[level-membership-for-orthopaedics-category]
Chapter 38 Anterior Cruciate Ligament Reconstruction Utilizing the Rigidfix for Femoral-Sided Fixation
Background
Graft selection for anterior cruciate ligament (ACL) reconstruction has been debated in the literature.1 Historically, the debate has been regarding the use of soft tissue grafts secondary to increased laxity as compared with patellar tendon autografts.2 The point of concern occurred at the site of graft fixation with soft tissue grafts, and the issues were “suspensory” fixation and creep with cyclical loading. Improved fixation techniques have largely eliminated the historical differences in laxity comparing quadrupled hamstring tendon with bone–patellar tendon–bone (BPTB) autografts.3 It has been well documented in recent literature that the two graft types have similar success rates.4–6 Some potential advantages of soft tissue grafts include decreased kneeling pain, decreased patellar tendonitis, lower risk of postoperative patella fracture, and improved cosmesis with a smaller incision for harvest.1
The patellar tendon graft, with bone plugs on each end, has classically been fixed with a metal interference screw in the tibia and femur with near-aperture fixation. This fixation was sufficiently rigid to prevent significant graft slippage or creep. The patellar tendon graft became the gold standard by which all other grafts and graft fixation systems were compared.1 Despite the increased laxity with hamstring tendon reconstructions, this technique gained popularity as patients complained of significant anterior knee and kneeling pain with patellar tendon autografts. The potential for patellar fracture also exists. Hamstring tendon autografts have less morbidity, although they do demonstrate some permanent hamstring weakness at high flexion angles.7 The clinical significance of this weakness remains unclear.
A quadrupled hamstring tendon graft has two significant biomechanical advantages. First, quadrupled hamstring grafts have a larger cross-sectional area when compared with patellar tendon grafts.7 The larger cross-sectional area results in more collagen and thus a stronger graft. The ultimate tensile strength of a quadrupled hamstring autograft is 4140N with a stiffness of 807 N/mm. This is compared to the patellar graft at 2977N and 455 N/mm, respectively. The native ACL has been tested at 2160N and 242 N/mm, respectively.1 Second, hamstring tendon grafts require smaller bone tunnels than do grafts with bone plugs. These grafts heal circumferentially to the tunnel wall if the interference screw is eliminated. These advantages fueled the search for better soft tissue graft fixation devices.
The historical poor performance of soft tissue grafts cannot be compared with today’s graft fixation. Initial studies compared doubled hamstring tendons to patellar tendons. A quadrupled soft tissue graft is the optimal choice when hamstring tendons are used. Studies of soft tissue graft fixation preceded the use of transfixion devices. Kousa et al8 tested the pullout strength of the soft tissue fixation devices that are currently most used for hamstring grafts. On the femoral side, the Bone Mulch Screw (Arthotek, Warsaw, IN) (1112N), Endobutton-CL (Smith & Nephew, Endoscopy Division, Andover, MA) (1086N), and Rigidfix (Depuy Mitek, Westwood, MA) (868N) systems had the best fixation for soft tissue grafts.8 These were significantly stronger than patellar tendons fixed with an endoscopic interference screw (588N). On the tibial side, the fixation is much more secure. The IntraFix (Depuy Mitek) (1332N) and WasherLoc (Arthrotek) (975N) both had higher pullout strengths than a patellar tendon bone plug fixed with a metal interference screw (758N, 9- × 30-mm screw). Interference screws for soft tissue grafts are weaker, with pullout strengths from 201N to 665N depending on the system.8
The improved fixation systems for hamstring tendons, combined with strength and stiffness superior to the native ACL, make this an attractive graft option. One must challenge any concept of a BPTB autograft as the gold standard. Patient factors and desires and the surgeon’s preference should dictate which graft is chosen. Surgeons completing ACL reconstructions should be well versed in both techniques. Allograft reconstruction offers an additional soft tissue option. For those surgeons or patients desiring an allograft source, the tibialis anterior tendon has an ultimate tensile strength of 4122N and is an attractive alternative.9 We also use the technique described here when an allograft tibialis is selected.
Surgical Technique
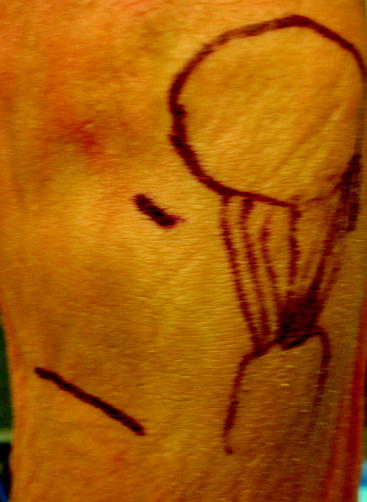
Surgical landmarks are identified and marked on the skin, including the superior border of the pes anserine tendons. This is palpable in most patients, but when not palpable, the middle of the tibial tubercle can be used to estimate its location. An oblique, skin-fold incision is used for graft harvest. This incision parallels the gracilis tendon. This incision is approximately 3 cm in length and is centered over the anterior border of the medial collateral ligament (Fig. 38-1). This is generally 4 to 5 cm medial to the tibial tubercle. Both arthroscopic portals and the harvest incision are injected with 5 to 10 mL of 1% lidocaine with epinephrine for the hemostatic effect.10
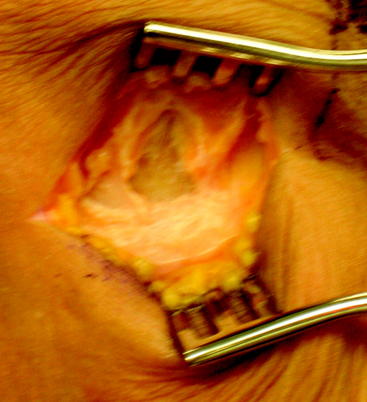
After the skin incision is made and subcutaneous soft tissues mobilized, the intersection of the anterior border of the medial collateral and the superior border of the sartorius fascia is marked with electrocautery (Fig. 38-2). The main advantage of this starting point is that it allows a relatively horizontal femoral tunnel in the coronal plane when the femoral tunnel is drilled through the tibial tunnel. Vertical grafts in the coronal plane have been associated with increased anterior laxity and functional instability. In order to locate this landmark later in the procedure, the electrocautery is used to make a cruciform periosteal incision that exposes enough of the tibia for the tibial tunnel drill site. The hamstring tendons are harvested after identifying the gracilis and semitendinosus tendons. It is our preference to used a closed loop tendon stripper to remove the tendons after freeing all palpable slips to the gastrocnemius and dissecting the tendon off the tibia, including Sharpey fibers.
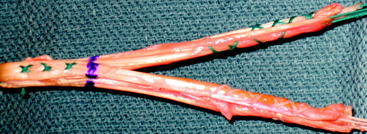
Once the tendons are harvested, they are passed to the back table for preparation. The gracilis and semitendinosus tendons are looped on a suture, creating a four-bundled graft (Fig. 38-3). The free ends of the tendons are sutured with #2 Orthocord (Depuy Mitek) in Krackow-type suture configuration. This is performed in the event that secondary fixation is desired in the tibia. Graft length is generally not an issue, but a minimum graft length of 10 cm, once quadrupled, ensures adequate soft tissue for fixation and ingrowth within the tibia and femur. The proximal end is sutured together with #2 Orthocord for a distance of 3 cm. Each individual graft strand is incorporated to ensure the creation of a single proximal mass. This is helpful to facilitate capture of the graft strands with the Rigidfix pins. Once suturing is complete, the graft is sized using a closed graft-sizing block, with 0.5-mm increments. The femoral side should fit snugly through the sizing block. The tibial side of the graft should freely pass through the sizing block. This, with the additional material of the Krackow sutures, often creates a 0.5 to 1.0 mm difference between the tibial and femoral tunnels. Finally, the graft is marked with a surgical pen 30 mm from the femoral tip of the graft. This allows intraarticular visualization of proper graft seating once it is passed. The graft should be kept under 12 to 15 pounds of tension on the back table until inserted.
At this point, the ACL tibial guide is inserted. The ideal position for the guide is on the lateral downslope of the medial tibial spine, approximately 7 mm anterior to the posterior cruciate ligament (PCL).5 Once the tip is firmly seated, correct anteroposterior positioning can be confirmed. The tunnel should be directly medial to the midpoint between the insertions of the anterior and posterior horns of the lateral meniscus. The tip of the “bullet” portion of the guide is then placed on the previously marked junction of the anterior border of the medial collateral ligament and the superior border of the pes tendons on the anteromedial flare of the tibia. The tunnel length is noted and should be at least 30 mm in length. The angle on the ACL tibial guide should be set at approximately 55 degrees. Care is taken not to allow the tip of the bullet to move in a superior direction. If this occurs, an excessively flat and short tibial tunnel will be created. This may compromise both graft fixation and positioning of the femoral tunnel using the endoscopic transtibial approach. For this reason, the bullet is positioned within a few millimeters of the superior border of the sartorius fascia.
Graft positioning in the femur plays a large role in successful reconstruction. The goal is to obtain as horizontal a graft as possible in the coronal plane. The femoral guide should be positioned as far from the 12-o’clock position as possible. The ideal positions to aim for are the 10:00 to 10:30 positions (on the clock face) for a right knee or 2:00 to 2:30 position for a left knee (Fig. 38-4). If this cannot be created through the tibial tunnel, the femoral guide can be placed through the medial portal and the tunnel drilled through this approach. If access through the medial portal is required, the knee should be flexed to 110 degrees to ensure adequate bone for the femoral socket. Care should be taken to not allow the guide to slip anteriorly and to ensure the post remains in the over-the-top position. If anterior slippage were to occur, the femoral tunnel would be placed too anterior, drastically increasing the risk of graft failure. The Beath pin is drilled through the femoral guide through both cortices, but not through the skin of the lateral thigh. It should be palpable below the skin, allowing for easy retrieval if necessary. An acorn drill is used to create the femoral socket to a depth of 35 mm. This depth will allow 30 mm of the graft to be seated in the socket. In smaller and female patients, the cortex may be encountered prior to 35 mm. As long as the drill has penetrated 25 mm, we accept that as the depth because two Rigidfix pins can still be placed to engage the graft. Bone and soft tissue debris are removed from the femoral socket and notch.
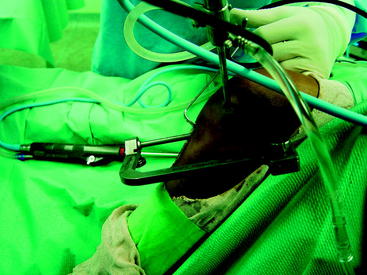
The appropriate-sized cannulated femoral rod is then attached to the cross-pin frame from the Rigidfix system and is inserted into the femoral tunnel over the Beath pin. Once it is fully seated, the Beath pin is removed (Fig. 38-5). If working through the tibial tunnel, the next step is to determine the exact position of joint flexion that provides the least resistance to rotation of the cross-pin guide frame. This step is crucial because knee flexion has often changed subtly since the femoral tunnel was drilled. Flexing and extending the knee a few degrees while rotating the guide frame permits the surgeon to determine which position of the knee allows the cross-pin guide frame to rotate freely and aligns the outrigger properly. This facilitates accurate position of the cross-pin sleeves and decreases the chance that one of the cross-pins will not penetrate the graft. If the guide is properly aligned, it should be nearly parallel to the floor.
A cross-pin sleeve is then placed over the interlocking trocar. The distal hole in the cross-pin frame is drilled first (Fig. 38-6). The interlocking trocar is drilled until the cross-pin sleeve is fully seated in its hole on the cross-pin guide frame. A small mallet is then used to gently tap the drill to disengage the interlocking trocar from the cross-pin sleeve. When it is disengaged, the user will see that the small interlocking pin on the trocar is no longer engaged with the sleeve. At this point, the trocar may be removed by spinning the drill. The observation of good fluid flow from the sleeve indicates central positioning of the pin in the tunnel. This process is repeated through the proximal slot on the outrigger.
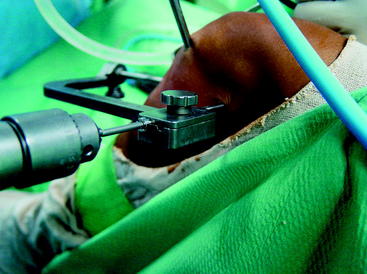
Fig. 38-6 Introduce the guide, and then drill the two cannulated sleeves.
(Reproduced with permission of Depuy Mitek.)
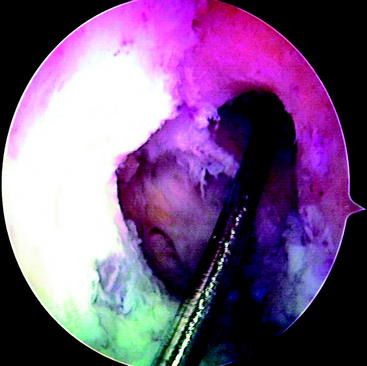
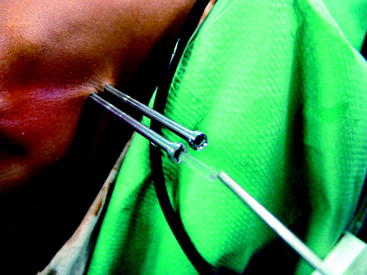
At this point, the cross-pin guide frame is disassembled and removed. The arthroscope is removed from the portal and is inserted through the tibial tunnel into the femoral socket to inspect the cross-pin holes. They should be centered in the tunnel. Passage of guide pins or nitinol wires through the sleeves should be preformed to identify their positions (Fig. 38-7). If only one is centered, we accept this as an acceptable fixation and insert both pins. If neither is correctly placed, graft fixation may not be adequate. At this point, an alternative type of femoral fixation should be employed. It is our preference to use a Milagro bioabsorbable screw, 1 mm over the diameter of the femoral socket. The Beath pin is now reinserted through the femoral tunnel and out through the skin on the lateral thigh. The suture on which the graft was looped is then retrieved and used to pass the graft. The cleft between the strands on the graft should be directed from the anterior to the posterior planes so that the Rigidfix pins will pierce all four arms of the quadrupled graft. The graft is then pulled so that the 30-mm pen mark just enters the femoral tunnel. The tunnel was ideally drilled to 35 mm because the tip of the drill is tapered 5 mm, resulting in 30 mm of cylindrical tunnel and complete fill with a 30-mm graft. As previously mentioned, a 25-mm tunnel (20 mm of graft) can be accepted. The Rigidfix outrigger is designed with 11 mm of bone distal to the more caudal pin, allowing excellent fixation through a shorter socket. The first cross-pin is then inserted using the stepped pin insertion rod and tapped with a small mallet until it is fully seated. Increased resistance occurs as the pin is tapped across the graft. The proximal pin is inserted first. Once it is placed, distal tension of approximately 25 pounds is applied across the graft. This ensures that both pins will share the load. The distal pin is then inserted (Fig. 38-8). The cross-pin sleeves are then removed. It is crucial to cycle the knee to take up any creep that might occur. We routinely use 25 cycles from 0 to 90 degrees with 25 pounds of force using a tensioner.
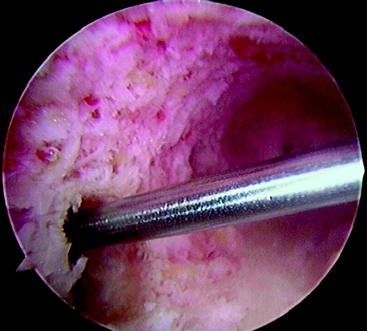
Fig. 38-7 Arthroscopic inspection of the location of the Rigidfix drill holes.
(Reproduced with permission of Depuy Mitek.)
The tibial side is then fixed using the IntraFix sheath and screw device. The technique for this implant is covered in Chapter 47. Once the graft is fixed on the tibial side, it is again examined arthroscopically. It is placed through a range of motion and checked in full extension to ensure a lack of impingement. The graft is probed to visually check proper tension.
TroubleShooting
Pitfalls may develop at any of several steps in the Rigidfix technique.
Two key points for optimal functioning of this system are a snug fit (using 0.5 mm tolerance) of the graft and sutures into the femoral socket and cycling the graft under tension multiple times before fixing the tibial side in order to reduce potential creep from this system. Because the graft is not looped over the pins but rather is skewered by them and compressed against the socket walls, there is the potential for excessive creep in the early postoperative course if these steps are not followed.11 In this study, which was done without cycling the graft prior to testing, 5 mm of creep was found in the first 100 cycles, a large contrast to the manufacturer’s data indicating less than 2 mm of creep over 1000 cycles (assuming adherence to these details).
1 Yunes M, Richmond JC, Engels EA, et al. Patellar tendon versus hamstring tendons in ACL reconstruction: a meta-analysis. Arthroscopy. 2001;17:248-257.
2 Brand J, Weiler A, Carborn DN, et al. Graft fixation in cruciate ligament reconstruction. Am J Sports Med. 2000;28:761-774.
3 Pinczewski LA, Deehan DJ, Salmon LJ, et al. A five-year comparison of patellar tendon versus four-strand hamstring tendon autograft for arthroscopic reconstruction of the anterior cruciate ligament. Am J Sports Med. 2002;30:523-536.
4 Goldblatt JP, Fitzsimmons SE, Richmond JC, et al. Reconstruction of the anterior cruciate ligament: meta-analysis of patellar tendon versus hamstring tendon autograft. Arthroscopy. 2005;21:791-803.
5 Fu FH, Bennett CH, Latterman C, et al. Current trends in anterior cruciate ligament reconstruction. Part I: biology and biomechanics of reconstruction. Am J Sports Med. 1999;27:821-830.
6 Fu FH, Bennett CH, Ma CB, et al. Current trends in anterior cruciate ligament reconstruction. Part II: operative procedures and clinical correlations. Am J Sports Med. 2000;28:124-130.
7 Spindler KP, Kuhn JE, Freedman KB, et al. Anterior cruciate ligament reconstruction autograft choice: bone-tendon-bone versus hamstring. Am J Sports Med. 2004;32:1986-1995.
8 Kousa P, Jarvinen TL, Vihavainen M, et al. The fixation strength of six hamstring tendon graft fixation devices in anterior cruciate ligament reconstruction. Part I: femoral site. Am J Sports Med. 2003;31:174-181.
9 Donahue TL, Howell SM, Hull ML, et al. A biomechanical evaluation of anterior and posterior tibialis tendons as suitable single-strand anterior cruciate ligament grafts. Arthroscopy. 2002;18:589-597.
10 Raffo CS, Richmond JC. Hamstring anterior cruciate ligament reconstruction with rigid, 360-degree, near-aperture fixation. Tech Orthop. 2005;20:1-5.
11 Ahmad CS, Gardner TR, Groh M, et al. Mechanical properties of soft tissue femoral fixation devices for anterior cruciate ligament reconstruction. Am J Sports Med. 2004;32:635-640.
[/level-membership-for-orthopaedics-category][not-level-membership-for-orthopaedics-category]
Chapter 38 Anterior Cruciate Ligament Reconstruction Utilizing the Rigidfix for Femoral-Sided Fixation
Background
Graft selection for anterior cruciate ligament (ACL) reconstruction has been debated in the literature.1 Historically, the debate has been regarding the use of soft tissue grafts secondary to increased laxity as compared with patellar tendon autografts.2 The point of concern occurred at the site of graft fixation with soft tissue grafts, and the issues were “suspensory” fixation and creep with cyclical loading. Improved fixation techniques have largely eliminated the historical differences in laxity comparing quadrupled hamstring tendon with bone–patellar tendon–bone (BPTB) autografts.3 It has been well documented in recent literature that the two graft types have similar success rates.4–6 Some potential advantages of soft tissue grafts include decreased kneeling pain, decreased patellar tendonitis, lower risk of postoperative patella fracture, and improved cosmesis with a smaller incision for harvest.1
The patellar tendon graft, with bone plugs on each end, has classically been fixed with a metal interference screw in the tibia and femur with near-aperture fixation. This fixation was sufficiently rigid to prevent significant graft slippage or creep. The patellar tendon graft became the gold standard by which all other grafts and graft fixation systems were compared.1 Despite the increased laxity with hamstring tendon reconstructions, this technique gained popularity as patients complained of significant anterior knee and kneeling pain with patellar tendon autografts. The potential for patellar fracture also exists. Hamstring tendon autografts have less morbidity, although they do demonstrate some permanent hamstring weakness at high flexion angles.7 The clinical significance of this weakness remains unclear.
A quadrupled hamstring tendon graft has two significant biomechanical advantages. First, quadrupled hamstring grafts have a larger cross-sectional area when compared with patellar tendon grafts.7 The larger cross-sectional area results in more collagen and thus a stronger graft. The ultimate tensile strength of a quadrupled hamstring autograft is 4140N with a stiffness of 807 N/mm. This is compared to the patellar graft at 2977N and 455 N/mm, respectively. The native ACL has been tested at 2160N and 242 N/mm, respectively.1 Second, hamstring tendon grafts require smaller bone tunnels than do grafts with bone plugs. These grafts heal circumferentially to the tunnel wall if the interference screw is eliminated. These advantages fueled the search for better soft tissue graft fixation devices.
The historical poor performance of soft tissue grafts cannot be compared with today’s graft fixation. Initial studies compared doubled hamstring tendons to patellar tendons. A quadrupled soft tissue graft is the optimal choice when hamstring tendons are used. Studies of soft tissue graft fixation preceded the use of transfixion devices. Kousa et al8 tested the pullout strength of the soft tissue fixation devices that are currently most used for hamstring grafts. On the femoral side, the Bone Mulch Screw (Arthotek, Warsaw, IN) (1112N), Endobutton-CL (Smith & Nephew, Endoscopy Division, Andover, MA) (1086N), and Rigidfix (Depuy Mitek, Westwood, MA) (868N) systems had the best fixation for soft tissue grafts.8 These were significantly stronger than patellar tendons fixed with an endoscopic interference screw (588N). On the tibial side, the fixation is much more secure. The IntraFix (Depuy Mitek) (1332N) and WasherLoc (Arthrotek) (975N) both had higher pullout strengths than a patellar tendon bone plug fixed with a metal interference screw (758N, 9- × 30-mm screw). Interference screws for soft tissue grafts are weaker, with pullout strengths from 201N to 665N depending on the system.8
The improved fixation systems for hamstring tendons, combined with strength and stiffness superior to the native ACL, make this an attractive graft option. One must challenge any concept of a BPTB autograft as the gold standard. Patient factors and desires and the surgeon’s preference should dictate which graft is chosen. Surgeons completing ACL reconstructions should be well versed in both techniques. Allograft reconstruction offers an additional soft tissue option. For those surgeons or patients desiring an allograft source, the tibialis anterior tendon has an ultimate tensile strength of 4122N and is an attractive alternative.9 We also use the technique described here when an allograft tibialis is selected.
Surgical Technique
Surgical landmarks are identified and marked on the skin, including the superior border of the pes anserine tendons. This is palpable in most patients, but when not palpable, the middle of the tibial tubercle can be used to estimate its location. An oblique, skin-fold incision is used for graft harvest. This incision parallels the gracilis tendon. This incision is approximately 3 cm in length and is centered over the anterior border of the medial collateral ligament (Fig. 38-1). This is generally 4 to 5 cm medial to the tibial tubercle. Both arthroscopic portals and the harvest incision are injected with 5 to 10 mL of 1% lidocaine with epinephrine for the hemostatic effect.10
After the skin incision is made and subcutaneous soft tissues mobilized, the intersection of the anterior border of the medial collateral and the superior border of the sartorius fascia is marked with electrocautery (Fig. 38-2). The main advantage of this starting point is that it allows a relatively horizontal femoral tunnel in the coronal plane when the femoral tunnel is drilled through the tibial tunnel. Vertical grafts in the coronal plane have been associated with increased anterior laxity and functional instability. In order to locate this landmark later in the procedure, the electrocautery is used to make a cruciform periosteal incision that exposes enough of the tibia for the tibial tunnel drill site. The hamstring tendons are harvested after identifying the gracilis and semitendinosus tendons. It is our preference to used a closed loop tendon stripper to remove the tendons after freeing all palpable slips to the gastrocnemius and dissecting the tendon off the tibia, including Sharpey fibers.
Once the tendons are harvested, they are passed to the back table for preparation. The gracilis and semitendinosus tendons are looped on a suture, creating a four-bundled graft (Fig. 38-3
[/not-level-membership-for-orthopaedics-category]
