Chapter 49 Anterior Cruciate Ligament Reconstruction Using a Mini-Arthrotomy Technique with Either an Ipsilateral or a Contralateral Autogenous Patellar Tendon Graft
Introduction
In the past 24 years, I have performed more than 5000 ACL reconstructions, and I have always used an autogenous patellar tendon graft for all the surgeries. I prefer to use the patellar tendon graft because it allows for quick and predictable bone-to-bone healing, is viable throughout the entire postoperative course,1 and can respond to stress during rehabilitation. Although any biological graft that is properly placed in the knee can achieve the same stability after surgery, the patellar tendon graft may allow for the fastest postoperative rehabilitation program because bone–bone healing is quicker than tendon–bone healing. Regardless of graft choice, proper rehabilitation must be done to give the best result.
Preoperative planning
Radiographs
Radiographs are obtained preoperatively to assist with surgery planning.
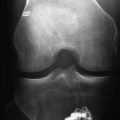
Plain radiographs, including standing posteroanterior 45 degrees flexed weight bearing,2 lateral, and Merchant3 views are obtained. The radiographs allow us to measure the width of the intercondylar notch, length of the patellar tendon, tibial slope angle, and width of the patella, which is usually twice the width of the patellar tendon. These measurements are helpful for planning the angle and length of the femoral tunnel and help determine the amount of notchplasty that may be needed to accommodate for the width of the new ACL graft. A magnetic resonance imaging (MRI) scan is not necessary for our preoperative evaluation but is reviewed if it has already been obtained elsewhere.
Rehabilitation
There is never a reason to do an isolated ACL reconstruction as an emergency surgery. Previous studies have shown that acute ACL reconstruction has a higher rate of postoperative arthrofibrosis than delayed ACL reconstruction when the patient has the opportunity to undergo rehabilitation to allow the knee to return to a quiescent state.4,5 All patients are evaluated by a physical therapist at the time of my initial evaluation. The physical therapist measures knee range of motion and strength before surgery and determines when the patient is ready to undergo surgery. The patient must have full knee range of motion equal to the contralateral normal knee, good leg control, and no knee swelling before he or she can undergo surgery. Furthermore, the patient must be mentally prepared for surgery. The surgery and rehabilitation program are fully explained to the patient and his or her caregiver so that they fully understand what is expected of them after surgery. The surgery date is planned for a time when the patient has at least 1 week off school or work and when a family member or friend can be at home with him or her during the first week postoperatively.
Technique
Exposure
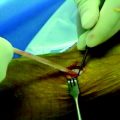
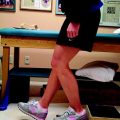
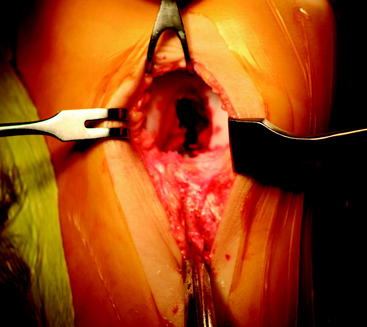
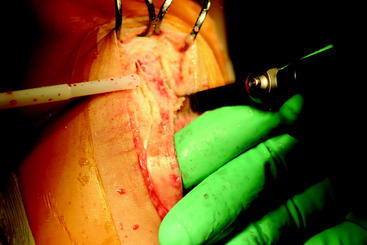
The tourniquet is left inflated to 300 mHg/psi (350 mHg/psi for larger thighs). The Ioban drape is taken off the skin just over the site where the skin incision is to be made. A 6-cm incision is made down to the deep fascia along the medial side of the patellar tendon, starting 1 cm above the inferior pole of the patella and extending 4 cm distal to the joint line (Fig. 49-1). The subcutaneous tissue is separated from the deep fascia medially where the tibial tunnel is to be drilled 4 cm distal to the joint and 1 cm medial to the tibia tubercle. The subcutaneous tissue is separated from the deep fascia with Metzenbaum scissors and finger dissection approximately 1 to 2 cm medial to the patellar tendon.
Tibial Exposure
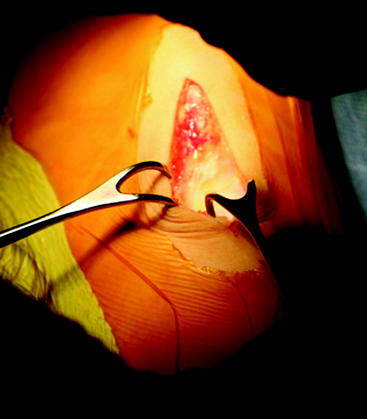
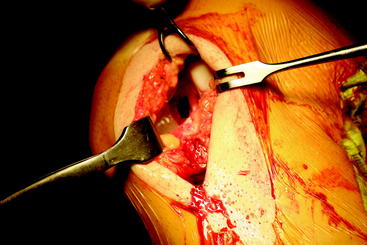
The deep fascia and periosteum of the proximal tibia are incised with electrocautery starting from the joint line and extending distally along the medial edge of the patellar tendon for 4 cm, then cutting at a right angle for another 2 cm to outline a flap to the level just proximal to the pes anserinus. The periosteum/fascial flap is lifted with a periosteal elevator to expose bare bone where the tibial tunnel will be created, made, and drilled (Fig. 49-2). Exposure at this level will ensure the tibial tunnel will be at least 40 mm long for the 25-mm bone plugs. The flap is kept as thick and continuous as possible to allow for closure of the soft tissue over the polyethylene button used for fixation, which has reduced the need for postoperative hardware removal.
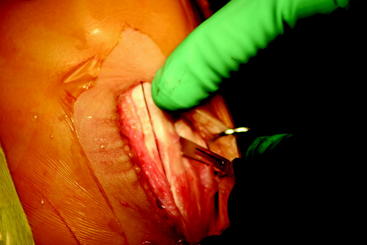
Femoral Exposure
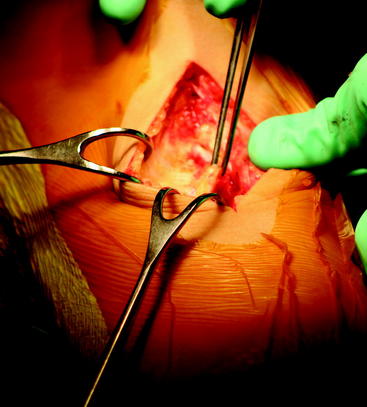
The table is elevated so that the femur is close to eye level. The foot of the bed is lowered so that the knee is flexed to 90 degrees. The bump under the thigh may need to be adjusted to allow for 90 degrees of flexion. The goal is to expose the flat surface of the lateral femoral cortex above the metaphyseal flare. The 3-cm lateral oblique incision is made about 4 to 5 cm above the superior pole of the patella along Langer’s lines (Fig. 49-3). Sharp dissection is made down to the iliotibial band. Metzenbaum scissors are used to split the iliotibial band along its fibers at a level one-third of its width from the anterior edge. With the knee extended to relax the quadriceps muscle, finger dissection is used to sweep the distal fibers of the vastus lateralis anteriorly from the femur. A Slocum retractor is inserted beneath the vastus lateralis, lifting it anteriorly to expose the femur, and a Cushing retractor is used to retract the posterior portion of the iliotibial band. A two-prong retractor pulls the skin distally so that the electrocautery can be used to incise the iliotibial band distally. Frequently the lateral superior geniculate artery, veins, or both are in the distal aspect of the wound running along the femoral surface. These vessels should be cauterized as soon as identified to avoid a postoperative hematoma. Electrocautery is then used to incise the periosteum, making a distally based T. An elevator is used to elevate the periosteal flaps to expose bone.

Notchplasty
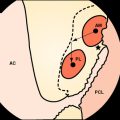
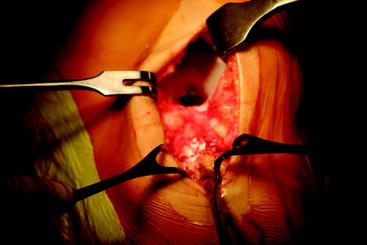
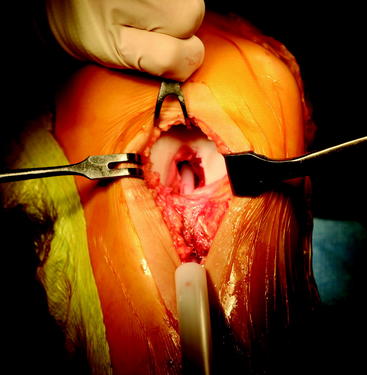
The lateral aspect of the notch is cleared of any ACL remnant and scar tissue, if present. The curette and sponge are used to push the capsule away from the back of the notch so that its posterior wall over-the-top position can easily be seen and palpated. The width of the notch and the space between the lateral femoral condyle and the posterior cruciate ligament (PCL) are measured with calipers (Fig. 49-4). The space between the lateral femoral condyle and the PCL is the space available for the ACL graft; it averages 8 mm in width for men and 6 mm in width for women. The notchplasty is then performed with a large curette to create at least an 11-mm space between the border of the lateral femoral condyle and the PCL so that the new 10-mm patellar tendon graft will fit in the notch in full extension without impingement.

Tunnel Placement
Tibial Tunnel
The tibial periosteal/fascial flap is retracted medially with a Cushing retractor.
A  -inch guide pin is placed on the anteromedial tibia about 4 cm below the joint line. The guide pin is directed 5 mm medial to the tibial spine and at least 5 mm anterior to where the tibial plateau “drops off” in the sagittal plane. This point can be found by palpation and represents an ideal placement for the tibial tunnel. We view the visible portion of the medial tibial plateau as a clock. The 9-o’clock position serves as the middle of the visible tibial plateau for the right knee (3-o’clock position for a left knee). The center of the ideal tibial tunnel corresponds to the position just posterior to the 9- or 3-o’clock position (Fig. 49-5). The tip of the guide pin is 5 mm medial to the tibial spine and 6 to 7 mm anterior to the posterior sloping of the tibial plateau where the PCL crosses. After an acceptable position is achieved, the guide pin is over-reamed with a 9-mm, end-cutting, cannulated reamer (Fig. 49-6). Reamings are saved for bone grafting of the graft harvest site later in the procedure. Curettes are used to position the medial and posterior wall of the tunnel in the desired place (Fig. 49-7).

Femoral Tunnel
Femoral tunnel placement is one of the more critical and technically difficult parts of the procedure. Graft placement that is too vertical (too anterior on radiograph) is probably the most common problem seen in nontraumatic failed ACL surgery. The mini-arthrotomy technique allows for anatomical placement of the femoral tunnel because it is drilled independently of the tibial tunnel. The tunnels can be placed where desired because of the ability to view the notch and the posterior wall. The extremity is placed in a figure-four position. The posterior wall must be well visualized just adjacent to the PCL. The guide pin is used to palpate the edge of the back wall and the lateral border of the PCL. From this point, the guide pin is moved forward 6 to 7 mm and laterally 3 to 4 mm. This allows for a 10-mm tunnel just adjacent to the PCL and just off the back wall. The guide pin is then drilled toward the cleared-off lateral femoral cortex in the lateral oblique incision. If the guide pin does not exit in the area of the cleared-off cortex, it must be redirected using the same starting point. Once the pin is in an acceptable position, it is over-reamed with a 10-mm end-cutting reamer to the lateral femoral cortex (Fig. 49-8). Bone reamings are once again saved for filling in the graft harvest site. The joint is irrigated thoroughly. The tunnel positions are checked using a suction tip. With the knee extended, the suction tip should pass colinearly through the tibial tunnel and femoral tunnel (Fig. 49-9).
Graft Harvest and Preparation
Ipsilateral Graft
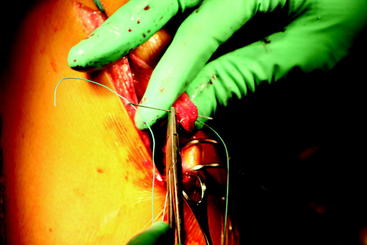
We prefer to harvest the graft after placement of the tunnels. This allows for harvesting of a graft to fit the tunnels, rather than vice versa. The knee is bent to 90 degrees, and the foot of the table is lowered. An incision is made just medial to the patellar tendon, from the inferior pole of the patella to the level of the tibial tubercle. The length of the incision depends on the length of the patellar tendon, which has been determined by measuring preoperative radiographs. The subcutaneous tissue is undermined sharply, exposing the patellar tendon. The paratenon is split longitudinally, and adequate flaps are maintained for later closure. The width of the tendon is measured. A 10-mm-wide graft is harvested using a #10 scalpel (Fig. 49-10). The bony blocks are scored with the scalpel so that the bone blocks will measure approximately 10 mm wide and 25 mm long. An oscillating saw is used to harvest the bone blocks in a wedge-shaped fashion (Fig. 49-11). The saw blade should be angled in 45 degrees toward the midline. The bone blocks are removed with a ¼-inch osteotome and contoured so that they will fit in their respective tunnels. Excess bone and soft tissue are removed with a rongeur. Three drill holes are drilled in each bone plug, and #2 Ethibond sutures are passed through the holes (Fig. 49-12). At this time, the graft is taken to the back table and excess fat pad is removed so that there will be no snagging when it passes through the tunnels. Measurements are taken of the patellar tendon length and the thickness and length of the graft. The patellar tendon graft is usually longer than the native ACL, but this extra length is easily accommodated by the femoral tunnel. The overall graft length should be 10 to 20 mm shorter than the overall tunnel length to allow for easy repositioning and tensioning while maintaining bone plugs inside the tunnels.
Passage of the Graft, Fixation, and Tensioning
A suture passer is passed into the tibial tunnel so that it exits the notch. The individual Ethibond sutures are passed through and brought out the tibial tunnel. The bone plug is guided into the tibial tunnel with the cancellous side anterior while keeping tension on the distal sutures. This places the graft so that the tendinous portion faces posteriorly, which helps to avoid impingement. Three suture ends are each passed through a hole of a ligament fixation button (Fig. 49-13). These are provisionally tied with two throws. The sutures in the femoral bone plug are looped into the suture passer and passed from the notch, exiting through the lateral incision. The end of the suture passer is guided through the femoral tunnel exit, the sutures are removed from the passer, and the device is withdrawn from the knee. The sutures are passed through a ligament fixation button and tied down tightly over the lateral femoral cortex. The sutures on the tibial side are pulled firmly to seat the femoral button. The sutures over the tibial button are loosened and the patellar plug is advanced in the tibial tunnel, removing any slack in the graft. The tibial sutures are then retied.

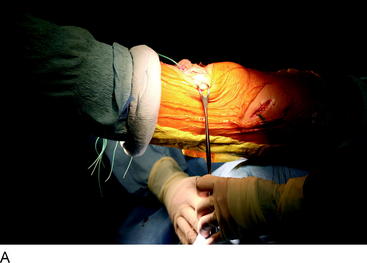
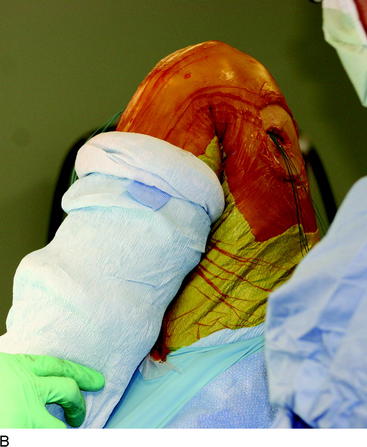
The knee is moved through a full range of motion from full hyperextension to full flexion (Fig. 49-14, A and B). If the graft was too tight before taking the knee through its full range of motion, the slip knots will accommodate by loosening just enough to allow for full motion. The tightness of the button on the tibia is checked again at 30 degrees of flexion. If it is too loose, the tibial sutures are retied, the knee is placed through full range of motion again, and the button is rechecked for proper tightness. If the sutures remain tight, three more throws are tied. This allows for fine-tuning of graft tension to avoid capturing the knee. The graft is then examined through the mini-arthrotomy to ensure that notch impingement does not occur.
Closure
Ipsilateral Graft
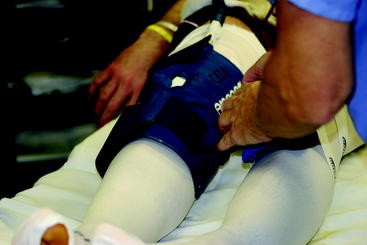
The incisions are covered with steri-strips. Plastizote squares (5 × 3 × ¼ inches) are applied over the steri-strips for local skin compression, making for a more cosmetic scar and prevention of a subcutaneous hematoma. An antiembolism stocking (Kendall, Mansfield, MA) and a cold/compression device (Fig. 49-15) (Cryo Cuff) are applied to assist
Postoperative Care
Upon admission to the hospital ward, the leg is kept elevated and moving in a continuous passive motion machine. Extension and flexion exercises begin as outlined in previous publications.6 The intravenous drip of ketorolac continues for approximately 23 hours until the dose is completed. The ketorolac, supplemented with 1 gm of acetaminophen every 6 hours, has provided excellent pain management for patients after the ACL reconstructive procedure.7 The overnight stay allows for patient and family education for the first week at home and ensures that the immediate postoperative goals are met, which prevents complications from developing.
Comments
The mini-arthrotomy technique using a patellar tendon autograft and suture-button fixation allows for reproducible excellent results and remains our method of choice for ACL reconstructions. Regardless of surgical technique, graft choice, or fixation device, the knee must be able to be moved through full range of motion after fixation to ensure that the graft placement has not captured the joint. The range of motion illustrated in Fig. 49-14 shows that the full knee extension includes hyperextension and the full flexion involves bringing the patient’s heel to the buttocks. If full range of motion cannot be obtained in the operating room after graft fixation, then it cannot be expected that the patient will be able to achieve full range of motion after surgery. Full normal range of motion is required for the patient to achieve the optimal result after surgery.
1 Rougraff B, Shelbourne KD, Gerth PK, et al. Arthroscopic and histologic analysis of human patellar tendon autografts used for anterior cruciate ligament reconstruction. Am J Sports Med. 1993;21:277-284.
2 Rosenberg TD, Paulos LE, Parker RD, et al. The forty-five-degree posteroanterior flexion weight-bearing radiograph of the knee. J Bone Joint Surg. 1988;70A:1479-1483.
3 Merchant AC. Patellofemoral malalignment and instabilities. In: Ewing JW, editor. Articular cartilage and knee joint function: basic science and arthroscopy. New York: Raven Press; 1990:79-91.
4 Mohtadi NG, Bogaert SW, Fowler PJ. Limitation of motion following anterior cruciate ligament reconstruction. A case control study. Am J Sports Med. 1991;19:620-625.
5 Shelbourne KD, Wilckens JH, Mollabashy A, et al. Arthrofibrosis in acute anterior cruciate ligament reconstruction. The effect of timing of reconstruction and rehabilitation. Am J Sports Med. 1991;19:332-336.
6 Shelbourne KD, Klootwyk TE, DeCarlo MS. Rehabilitation program for anterior cruciate ligament reconstruction. Sports Med Arthrosc Rev. 1997;5:77-82.
7 Shelbourne KD, Liotta FJ, Goodloe SL. Preemptive pain management program for anterior cruciate ligament reconstruction. Am J Knee Surg. 1998;11:116-119.