CHAPTER 17 AIRWAY MANAGEMENT: WHAT EVERY TRAUMA SURGEON SHOULD KNOW, FROM INTUBATION TO CRICOTHYROIDOTOMY
The concept of immediate and appropriate airway management spans all disciplines of medicine. Achieving, protecting, and maintaining the airway have been well recognized as the initial steps necessary in resuscitation of the critically ill and/or injured patient. The basic premise of the Advanced Trauma Life Support for Doctors Course (ATLS®) is that all resuscitations should follow the mnemonic “ABCDE.” This mnemonic “defines the specific, ordered evaluations and interventions that should be followed in all injured patients,”1 where the “A” stands for airway, and the “B” for breathing.
The optimal airway is the airway that the awake patient can maintain without assistance, while the worst-case scenario is an airway that can only be achieved with surgical intervention. The success or failure to achieve an adequate and protected airway is dependent on many factors. Techniques available to the clinician range from the simple to the complex. The concept of tracheal intubation is by no means a new one. In fact, the first documented report of tracheal intubation dates back to 1543, and actually refers to a tracheostomy. In his atlas On the Fabric of the Human Body, the Renaissance anatomist Anreas Vesalius observed, “Life may, in a manner of speaking, be restored. An opening must be attempted in the trunk of the trachea into which a reed or cane should be put; you will then blow into this so that the lung may rise again.”2
AIRWAY ANATOMY
Successful execution of any procedure demands a thorough understanding of the procedure: indications, technical requirements, and necessary equipment to complete the task. In addition, the operator must be cognizant of potential complications and their management. Obtaining an airway, whether by conventional or surgical means, is no different than any other procedure.3,4 The anatomy and normal functions of the structures that comprise the upper airway are complex. The surgeon must recognize the essential anatomic structures to effectively manage the airway.
Although separated anteriorly by the palate, the mouth and nasal cavities join posteriorly at the end of the soft palate to form the pharynx. The pharynx is separated into the nasopharynx and the oropharynx. The pharynx extends to the inferior border of the cricoid cartilage anteriorly and the inferior border of the body of C6 posteriorly. The wall of the pharynx is composed of two layers of pharyngeal muscles: the external circular layer consists of the constrictor muscles and the internal longitudinal layer consists of muscles that elevate the larynx and pharynx during swallowing and speaking. The nasopharynx follows directly from the nasal cavity at the level of the soft palate, and communicates with the nasal cavities through the nasal choanae and with the tympanic cavity through the Eustachian tube. It contains the pharyngeal tonsils in its posterior wall. The oropharynx begins at the soft palate and continues to the tip of the epiglottis. It contains the palatine tonsils, important landmarks in the Mallampati airway classification.5
The epiglottis is a spoon-shaped plate of elastic cartilage that lies behind the tongue. It prevents aspiration by covering the glottis—the opening of the larynx—during swallowing. The laryngopharynx/hypopharynx extends from the upper border of the epiglottis to the lower border of the cricoid cartilage. It is separated laterally from the larynx by the arytenoepiglottic folds, which contain the piriform recesses. The piriform sinuses are found at each side of the opening of the larynx, in which the inferior laryngeal nerve lies and swallowed foreign materials may be lodged.
Unlike the thyroid cartilage, which does not project posteriorly, the cricoid cartilage is a complete signet-shaped cartilaginous ring connected to both the thyroid cartilage and the first tracheal ring. This anatomic relationship was used by Sellick,6 who described the prevention of passive regurgitation of gastric contents by posterior pressure on the cricoid cartilage during the induction of general anesthesia, a technique that has since become the accepted standard of care.
The epiglottis is an elastic cartilaginous structure covered by a mucous membrane. The reflection of this mucous membrane forms a slight depression known as the vallecula. It is at this point that the tip of the laryngoscope blade is placed so as to elevate the epiglottis and visualize the vocal cords. The epiglottis is anteriorly attached, superiorly to the hyoid bone by the hypoepiglottic ligament, and inferiorly to the thyroid cartilage by the thyroepiglottic ligament. The quadrangular ligament extends between the lateral aspects of the arytenoid and epiglottic cartilages. Its free inferior edge is the vestibular ligament, and, covered with mucosa, it forms the vestibular fold, which lies above the vocal cord (fold) and extends from the thyroid to the arytenoid cartilage. The arytenoids articulate with the superolateral aspect of the cricoid, and each has an anterior vocal cord process that attaches to the vocal cords via the cord ligament. The free superior margin forms the aryepiglottic ligament, and its mucosal covering forms the aryepiglottic fold. It is within the posterior aspects of aryepiglottic folds that the cuneiform and corniculate cartilages can be seen. These cartilages rest on the apex of the arytenoids. Their elastic properties facilitate the return of the arytenoid cartilages to their anatomic position of rest after abduction, and can usually be seen during direct laryngoscopy. They can, therefore, be used as a landmark for the tracheal opening when it is difficult to visualize the vocal cords (Figure 1).
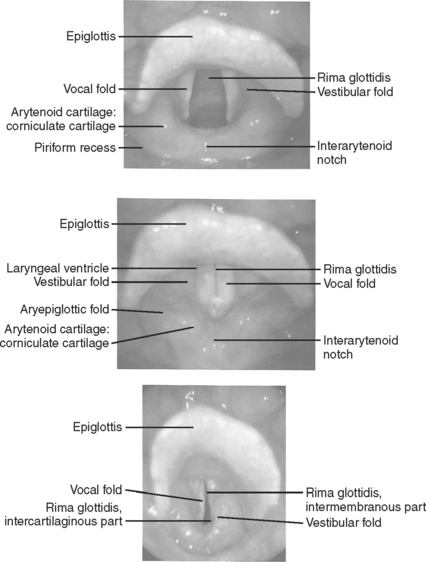
Figure 1 Landmarks of the tracheal opening.
(From Putz R, Pabst R, editors: Sobotta Atlas of Human Anatomy, 13 ed Baltimore, Williams & Wilkins, 2001, with permission.)
The glottis is contained within the larynx, and is the narrowest part of the adult airway. It is composed of the vocal cords (or folds) and the space between them is called the rima glottides. Because the true vocal cords are covered by stratified epithelium, they have the characteristic pearly white color when illuminated. The cords are innervated by the recurrent laryngeal nerves, and the musculature of the larynx receives its innervation from branches of the vagus nerve (cranial nerve X). The larynx is inclusive of the structures noted previously.
ASSESSING THE AIRWAY
Patient anatomy, both inherent and as altered by injury, is an important factor that requires careful assessment by the clinician prior to attempting intubation, whether nasal, orotracheal, or surgical. In the trauma patient, the clinician must always be cognizant of the potential for cervical spine injury. This is particularly important in the patient whose physical exam is compromised by an altered mental status, regardless of the cause. The presence of maxillofacial trauma or injuries of the soft tissues of the neck must also be considered when deciding the best way to secure and protect the airway. In the absence of injury or pathologic conditions, the ability to ventilate and control the supraglottic airway is a function of the size of the airway and the compliance of the supralaryngeal tissues. It should be remembered that under normal conditions air flow through the nasal cavity is not usually a concern in that this portion of the airway is usually supported by rigid elements in its walls. Conversely, the pharynx does not have a rigid support system, and therefore, it is predisposed to collapse. It can also be obstructed by the tongue in obtunded or comatose patients; in most cases this collapse and/or obstruction can initially be dealt with effectively with the use of the oral airway.7
A more ominous situation arises when the airway is compromised in the immediate vicinity of the laryngeal inlet because of the size of the base of the tongue or the epiglottis. Air flow in this region will be inversely proportional to the size of these structures, as well as the condition of the perilaryngeal tissues. Trauma to the neck causing anatomic disruption and/or tissue edema, prior irradiation to the neck, head and neck tumors, or redundant fatty tissue in the perilaryngeal area secondary to obesity will all restrict normal air flow. These conditions may lead to the “cannot-ventilate-and-cannot-intubate scenario,” a potentially lethal situation in even the most competent intubators.7
As with any other medical procedure, it is always prudent to perform a methodical evaluation of the situation, and determine the preferable approach and equipment needed to perform the task efficiently. In addition to factors previously discussed, one must also assess for scarring and fibrosis to the airway and surrounding tissues, injury to the trachea; congenital anomalies; acute inflammatory or neoplastic diseases of the airway; and finally gingival, mandibular, and dental anomalies/disease.8 Short, muscular individuals with very short necks and obese patients tend to be difficult to intubate. Morbidly obese patients can compromise the airway with excessive redundant tissue in the paratonsillar and paraglottic areas, masking visualization and accessibility of the glottis during laryngoscopy. Anatomic factors that should be assessed include mandibular mobility at the temporomandibular joints; mobility of the head at the atlanto-occipital joint (when cervical spine injury has been ruled out); the length, size, and muscularity of the neck; size and configuration of the palate; the proportionate size of the mandible in relation to the face; and the presence of an overbite of the maxillary teeth.
Difficulty in laryngoscopic visualization varies in accordance with the extent of anatomic variation or pathologic conditions. The Mallampati classification is routinely used by anesthesiologists to evaluate the airway in elective cases (see Figure 1 on page 59).
In order to classify a patient, the patient is asked to open the mouth as widely as possible and protrude the tongue out as far as possible while seated, with the head in the neutral position,8 something that is almost impossible to accomplish in the trauma setting. Evaluation of the atlanto-occipital extension is another tool that is used by anesthesiologists in the elective setting. Because this requires an awake patient who can sit upright and flex and extend the neck, it is not useful in the trauma setting. However, a clinician familiar with the Mallampati classification can perform a cursory evaluation of the oropharynx using a tongue blade or laryngoscope, which provides the clinician some idea as to the potential for difficulty in intubation. It will also demonstrate the existence of any evidence of injury to the oropharynx, the presence of foreign bodies, blood, or vomitus.
CONTROLLING THE AIRWAY
The best airway is the airway that the patient can safely maintain without any external intervention. The Eastern Association for the Surgery of Trauma has sited the need for emergency tracheal intubation in trauma patients with airway obstruction, hypoventilation, severe hypoxia in spite of supplemental oxygen administration, severe cognitive impairment (GCS score <8), cardiac arrest, and severe hemorrhagic shock.9 Once it has been decided that the airway is not adequate, or that the patient is unable to protect the airway, then intubation must be accomplished in an efficient and safe manner. It is important to remember that all trauma patients must be intubated with one person maintaining in-line cervical immobilization throughout the procedure to protect the possibly injured cervical spine.
As with all other procedures, a successful outcome depends on the operator’s experience and on having immediate access to all of the correct equipment. Most emergency departments have airway carts that contain all of the equipment that will routinely be needed for emergency intubations, as well as specialty carts designed for the “difficult airway.” While the contents of these carts will vary from institution to institution, they will usually be standardized within each hospital. Examples of stocking lists for the standard airway cart (Figure 2) and the difficult airway cart appear in Tables 1 and 2, respectively.

| Top of Airway Cart |
| Stat respiratory rx box |
| 2 − 2’s |
| Hurricane spray |
| Benzoin (1) |
| 2% xylocaine jelly (1) |
| Surgilube (1) |
| EID (1) |
| #7, 7.5, 8 ETT (1 @) |
| Stylette (1) |
| 12-cc syringe (1) |
| #18 NG tube (1) |
| 60-cc catheter tip syringe (1) |
| Magill forceps (1) |
| Green, yellow, red oral airway (1 @) |
| Laryngoscope handle |
| #2, 3, 4 Mac blades (1 @) |
| #2, 3 Wis/Miller blades (1 @) |
| Top Drawer |
| #6, 6.5, 7, 7.5, 8, 8.5, 9 ETT (2 @) |
| Stylette (2) |
| #2, 3 Miller blades (1 @) |
| #2, 3, 4 Miller blades (1 @) |
| Drawer 2 |
| PEEP valves (2) |
| Nasal cannulas (2) |
| ETCO2 sensors (2) |
| Adult O2 sensors (2) |
| Green, yellow, red oral airways (2 @) |
| #28, 30, 32 nasal airways (1 @) |
| Tube holders, IV tubing, tape, Dale holders |
| Drawer 3 |
| Luekens trap (2) |
| #18, 14 NG tube (2 @) |
| Surgilube |
| 2% xylocaine jelly |
| Yankauer (2) |
| Suction catheters (2) |
| Drawer 4 |
| Transtrach jet (1) |
| Bag-in aerosol setups with meds (2) |
| Rebreather masks (2) |
| Venti masks (2) |
| Drawer 5 |
| BVM (2) |
| Cross-vent circuits (2) |
| Extra vent sheets |
| Left Side Facing Front |
| Waste bin |
| BVM |
| Right Side Facing Front |
| Sterile gloves |
Table 2 Difficult Intubation Cart
| Outside of Cart |
| Jet ventilator present and connected to 50-psi regulator |
| Jet vent tank, regulator attached, >1500 psi (50 psi/1–15 lpm regulator) |
| Portable CO2 monitor with line attached and charger (in top drawer) or |
| CO2 clip colormetric detector |
| Drawer 1 |
| Intubation stylette 6 Fr., 10 Fr., 14 Fr. (1 @) |
| 2% lidocaine jelly (1 @) |
| Cetacaine spray (1 @) |
| 4% lidocaine solution (1 @) |
| Nasal spray (1 @) |
| 14 Fr. Jelco (5 @) |
| Magill forceps, pediatric (1 @) |
| Magill forceps, adult (1 @) |
| Bite block (1 @) |
| Fiberoptic bronchoscope adapter swivel (2 ea) |
| Ovasappian airway (2 ea) |
| Sampling elbow (1 @ch) |
| Sampling tee (1 @ch) |
| Sample tubing for CO2 monitor (2 @ch) |
| MAD (mucosal atomization device) (1 @) |
| Drawer 2 |
| Fiberoptic laryngoscope handle standard size ((1 @) |
| Fiberoptic laryngoscope handle penlight size (1 @) |
| Fiberoptic laryngoscope handle stubby size (1 @) |
| Fiberoptic laryngoscope blade Miller 1, 2, 3, 4 (1 @) |
| Fiberoptic laryngoscope blade Mac 2, 3 (1 @) |
| Fiberoptic CLM laryngoscope blade size 3, 4 (1 @) |
| Drawer 3 |
| Endotracheal tube cuffed 4.0, 5.0, 5.5, 6.0, 6.5, 7.0, 7.5, 8.0, (2 @) |
| Endotrol endo tube 6.0, 7.0 (2 @) |
| MLT endotracheal tube 6.0 (2 @) |
| Drawer 4 |
| Endotracheal tube uncuffed w/monitoring lumen 2.5, 3.0, 3.5, 4.0, 4.5, 5.0, 5.5 (1 @) |
| Drawer 5 |
| Sheridan Combitube© 41 Fr., 37 Fr. (1 @) |
| Mask size child (1 @) |
| Mask size small adult (1 @) |
| Mask size large adult (1 @) |
| Drawer 6 |
| LMA size 3 (1 @) |
| LMA size 4 (1 @) |
| Duoflex long guidewire (1 @) |
| Hyperinflation bag 3 liter (1 @) |
| Retrograde intubation kit (Cook) (1 @) |
| Cook airway exchange catheter 3 mm, 4 mm, 5 mm, 6 mm, 7 mm (1 @) |
| Cook “Frova Catheter” (1 @) |
| Cook “Melker” emergency cricothyrotomy catheter sets size 3.5, 4.0 (1 @) |
| Fastrach intubating LMA size 4 with endotracheal tubes and pusher (1 @) |
| Tissue spreader (1 @) |
| Bougie (1 @) |
| Olympus LF-GP |
| Cabinet for FOB |
| Cric Set |
| 2 Army Navy retractors |
| 2 thyroid retractors |
| 1 needle holder |
| 2 curved hemostats |
| 2 straight hemostats |
| 1 trach spreader |
| 2 Jackson tracheal hooks |
| 2 disposable scalpels |
| 2 sutures |
| Check |
| Satisfactory batteries in laryngoscope |
| Outdates on drugs and supplies |
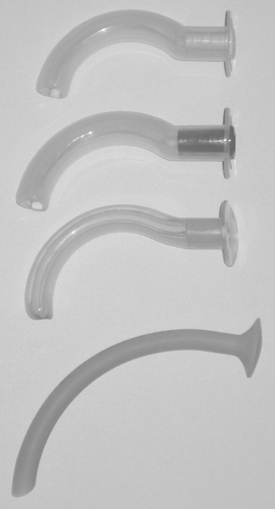
Oropharyngeal and nasopharyngeal airways (see Figure 2) are useful, but must be inserted with care. While neither one is well tolerated by the awake patient, the nasopharyngeal airway is better tolerated in the semiresponsive patient, and is less likely to stimulate gagging and vomiting.10 They can both be used to help maintain a patent upper airway in the obtunded patient. In the adult, the oral airway is inserted with the convexity facing down initially, and then rotated 180 degrees once in the oropharynx. It must be placed carefully, so that it does not push the tongue posteriorly, but rather, is seated posterior to the tongue displacing the tongue anteriorly. In children, the oral airway must always be placed with the convex surface facing cephalad initially to avoid injury to the soft tissues of the mouth and pharynx. It is important to remember that in patients with a persistent (intact) upper airway gag reflex, the insertion of the oral airway can precipitate laryngospasm and bronchospasm, as well as coughing, gagging, vomiting, and ultimately, aspiration.11
DOCUMENTATION OF PROPER ENDOTRACHEAL TUBE PLACEMENT
Auscultation of the chest is done both anteriorly and in the axillae, and is useful when breath sounds are heard bilaterally and are equal. This is not always the case, even with appropriate tube placement, because of the presence of pneumothoraces or hemothoraces seen in the trauma patient population. It is incumbent on the clinician to immediately treat the pneumothorax and/or hemothorax, and then confirm tube placement by both physical exam and chest radiograph. Auscultation over the left upper quadrant of the abdomen is important; with appropriate placement of the endotracheal tube, there will be no gurgling in the stomach during ventilation.
The cuffed portion of the endotracheal tube should be at least 1–2 cm below the cords, and in the average patient, the endotracheal tube will be taped in position at the 21–23-cm mark. Lastly, a chest radiograph should be performed to confirm proper placement of the endotracheal tube after every intubation.10 The tip of an appropriately placed endotracheal tube should be approximately 5 cm above the carina in the average adult.12
Cyanosis as an indicator of a fall in oxygen concentration is a late event, and is influenced by factors such as room lighting, anemia, and hemoglobin anomalies. Resolution of hypoxia is a reliable sign of proper tube placement, but minutes may elapse before a patient shows desaturation by pulse oximetry, especially in patients who have been properly preoxygenated.12 Identification of carbon dioxide (CO2) in exhaled gas has become the standard for verification of appropriate placement of an endotracheal tube in the elective or emergent setting. This can be accomplished with capnography (the instantaneous display of the CO2 waveform during ventilation) or capnometry, which is the measurement of CO2 in the expired gas. The latter has become the method of choice in the emergent setting because of the availability of colorimetric CO2 detectors.10,12 Colorimetric CO2 detectors are routinely inserted into the respiratory circuit between the end of the endotracheal tube and the ventilator tubing or Ambu-bag, and will detect the presence of CO2 as soon as ventilation begins after intubation. It must be remembered that although useful, the presence of CO2 is not, by itself, absolute assurance of proper tube placement. The endotracheal tube could be improperly positioned in a mainstem bronchus and one would still detect CO2. CO2 will not be detected in patients who are in cardiac arrest. In patients who have been actively ventilated prior to intubation, CO2 can be detected in gas from the stomach when the endotracheal tube is improperly placed in the esophagus. This will clear with several breaths, however, and indicate to the clinician that the tube is improperly placed.10
COMBITUBE©
The inability to intubate can be a lethal event due to the hypoxia resulting from the inability to ventilate and, therefore, oxygenate the critically ill or injured patient. There are certain “rescue” techniques available, and one such technique involves the use of the dual lumen esophagotracheal tube, known as the Combitube© (Tyco Healthcare Group LP, 2001). This redesigned tube, which comes in a regular and small adult size, has minimized the problems that had been seen with the use of the esophageal obturator airway as an airway rescue technique.13 The disposable Combitube© has a longer blue tube (No. 1) with a blind distal end and pharyngeal side holes, and a shorter clear tube (No. 2) with an open distal end (Figure 4). While Wissler13 recommends using the laryngoscope for placement of the tube under direct vision, the tube can be inserted blindly through the mouth.
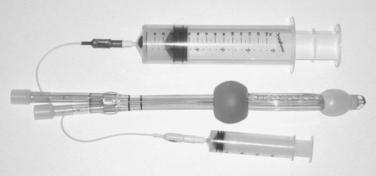
Figure 4 Combitube© with both balloons inflated. Larger syringe inflates the blue tube (No. 1) balloon.
While the tip of the tube can end up in the trachea (Figure 4), it will enter the esophagus 99% of the time.14 Once the tube is successfully placed, the balloons are inflated with air, 100 ml in the pharyngeal balloon to occlude the pharynx, and 15 ml in the distal balloon occluding either the esophagus or the trachea. Ventilation is now begun using tube no. 1. If the tip of the tube is positioned in the esophagus (the preferred position), one will hear breath sounds bilaterally, capnography will be positive for carbon dioxide, and auscultation over the left upper quadrant of the abdomen will be negative for gastric insufflation. At this point, a gastric tube can be placed through tube no. 2.
The Combitube© has been shown to be an effective alternative to prehospital cricothyroidotomy after failed rapid sequence intubation (RSI) attempts in patients with severe maxillofacial trauma. In fact, Blostein et al.15 studied 10 such patients who failed in-field intubation. The Combitube© was successfully replaced by an orotracheal tube in 7 of the 10 patients, and only 3 required a surgical airway. It must be remembered that the Combitube© must be replaced with a definitive airway as soon as the clinical situation permits. Furthermore, it should be remembered that contraindications to use of a Combitube© include patients who (1) are younger than 16 years, (2) are responsive with an intact gag reflex, (3) have known esophageal disease, and (4) have a known ingestion of a caustic substance.4
ENDOTRACHEAL INTUBATION
In the adult, the placement of a cuffed tube within the trachea is considered to be the definitive airway. This definitive airway can be achieved nasally, orally, or surgically (cricothyroidotomy or tracheostomy). The indications for each of these techniques will be determined by the level of clinical urgency for airway control, and the skill level of the clinician performing the intubation. Some of the indications for establishment of a definitive airway in the trauma patient include apnea, a GCS of less than 8 (and therefore the need to protect the airway), inability to oxygenate with face mask,10 massive facial trauma with hemorrhage, and trauma to the neck resulting in airway disruption and/or compression from hematoma.
Orotracheal Intubation
Trauma patients who require intubation often have a variety of anatomic and physiologic derangements that make intubation difficult. These patients frequently have varying degrees of hypoxia, acidosis, and hemodynamic instability. Compromised cardiac or pulmonary function, especially in the elderly patient, further increase the risk of myocardial or cerebral ischemia when attempts at intubation are prolonged. Associated conditions related to the traumatic event, such as intracranial hypertension, myocardial ischemia or dysfunction, upper airway bleeding, inhalation injury, and vomiting can actually be exacerbated by the physical manipulation required to intubate the patient.16 These factors necessitated the development of a standardized approach when emergency intubation is warranted. The advent of RSI has provided this standardized approach to those caring for the critically ill patient.
Rapid sequence intubation is the almost simultaneous administration of an induction agent (sedative, anxiolytic, amnesic) and a paralyzing dose of a neuromuscular blocking agent. The goal of RSI is to obtain a secure airway while avoiding complications such as vomiting and aspiration, cardiac arrhythmias, or the reflex sympathetic response caused by laryngoscopy. Relative contraindications include those situations where BVM ventilation will most likely be ineffective or impossible. When used appropriately, RSI has been shown to decrease complications associated with intubation while increasing the intubation success rate to 98%.16 The most commonly used RSI medications include lidocaine, the induction agents midazolam or etomidate, and the neuromuscular blocking agents (NMBAs) succinylcholine or rocuronium.
Induction agents will facilitate intubation by rapidly rendering the patient unconscious. Both midazolam and etomidate are rapidly effective and have a similar elimination half-life. Given parenterally, midazolam (1–2.5 mg/kg) has a greater propensity to precipitate hypotension, and etomidate (0.15–0.3 mg/kg) does not affect blood pressure, and has a cerebral protective effect in that it reduces cerebral blood flow and cerebral oxygen uptake. It is, therefore, favored for use in the trauma patient with hypotension.12,16
Succinylcholine, a depolarizing agent, is the most commonly used NMBA. It has a rapid onset (30–60 seconds) and relatively short duration of effect (5–15 minutes) that will allow for effective ventilation after 9–10 minutes. About 10–15 seconds after administration of succinylcholine, fasciculations occur that are associated with brief increase in intracranial, intraocular, and intragastric pressures. However, the potential increase in intracranial pressure is so small that its effects are outweighed and offset by the avoidance of hypoxia seen with an improved success rate of intubation.17 Succinylcholine cannot be used in patients with penetrating globe injuries, pseudocholinesterase deficiency, any history of myopathy or muscular dystrophy. In addition, patients who have, or are at risk for hyperkalemia, such as patients with thermal (burn) injuries more than 24 hours old, or crush syndromes with myonecrosis or rhabdomyolysis, should not receive succinylcholine.16 Rocuronium, a nondepolarizing NMBA, also has a short onset of action (30–60 seconds) after a dose of 1.0 mg/kg, but a longer recovery time (45–60 minutes) than succinylcholine.17 It does not have any of the deleterious side effects of succinylcholine, and according to Perry et al.,18 the success of intubation is similar with rocuronium and succinylcholine under all study conditions.
Rapid sequence intubation can be used in the pediatric patient, but dosing is different than that recommended in the patient over age 10 years. Pediatric patients have increased vagal tone and a decreased functional residual capacity. Bradycardia during intubation can result from both vagal stimulation and hypoxia. In addition, succinylcholine can cause bradycardia in the pediatric population. Table 3 shows the protocol used at our institution when dealing with the pediatric patient.
Table 3 Rapid-Sequence Intubation Medications in the Pediatric Population
| Patients Up to Age 2 Years | Patients Aged 2–10 Years |
|---|---|
| Atropine 0.02 mg/kg IV (Minimum dose 0.1 mg, maximum dose 0.5 mg) | Atropine 0.02 mg/kg IV (Minimum dose 0.1 mg, maximum dose 0.5 mg) |
| Lidocaine 1.5 mg/kg IV | Lidocaine 1.5 mg/kg IV |
| Midazolam 0.15 mg/kg IV | Etomidate 0.3 mg/kg IV |
| Rocuronium 1.0 mg/kg IV | Rocuronium 1.0 mg/kg |
| or | or |
| Succinylcholine 2.0 mg/kg (1.5 mg/kg if patient >12 kg) | Succinylcholine 1.5 mg/kg IV (2.0 mg/kg for patient <12 kg) |
From LIFE STAR Standards of Practice, Hartford, CT, Hartford Hospital, April 2007, with permission.
Intubation must be preceded by preoxygenation with 100% oxygen by mask until the oxygen saturation (SO2) by pulse oximetry is either at 100% or has reached a maximal level. BVM ventilation can be used to assist the breathing patient, and is used to control the airway in the apneic patient prior to intubation. The Sellick maneuver should be performed whenever possible to reduce the possibility of aspiration. The stomach may be insufflated during BVM ventilation, and an orogastric or nasogastric tube must be inserted after the patient is successfully intubated.
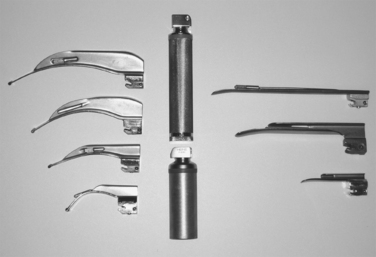
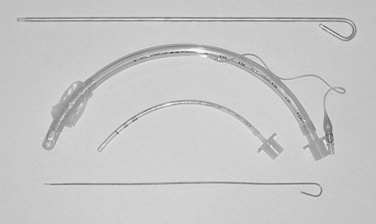
In the comatose and apneic patient, no medication is needed, and the patient can be intubated upon laryngoscopic visualization of the cords. There are several different laryngoscope blades for use (Figure 5). The appropriate shape and size should be selected for intubation. The laryngoscope is inserted into the mouth with care taken not to injury the lips or teeth. The blade of the laryngoscope is advanced posteriorly, sweeping the tongue upward and to the left. Once the tonsillar pillars are visualized, the tip of the blade is placed into the vallecula, exposing the larynx and the triangular glottic opening, which is formed and bordered by the vocal cords. If the epiglottis is seen to overhang the larynx, the blade is advanced farther into the vallecula, exposing the cords. Once the cords are visualized, the endotracheal tube is gently placed through the cords into the trachea. The use of an endotracheal tube stylette is common, but not mandatory. Endotracheal tubes vary in size, and those used for children are uncuffed. In the adult, the cuffed tube size will be determined by the size of the opening between the cords. Most adults will tolerate an endotracheal tube with an internal diameter of 7, 7.5, or 8 mm, placed to a depth of about 21–24 cm at the lip. In the child, the endotracheal tube should be uncuffed, and about the same size as the child’s nostril or little (fifth) digit of the hand. Placement should not be any further than 2 cm past the cords.1 The endotracheal tube should never be forced through the cords, but rather, should be gently guided through the glottis (Figure 6).
It is in these patients that securing a difficult airway can be fraught with difficulty. Complications related to hemodynamic alterations, as well as difficulties in oxygenation and ventilation have been shown to be significant issues in the patient population requiring emergent intubation outside the elective operating room (OR) setting.17–19 One study has shown that difficult intubations requiring more than three attempts account for almost 10% of all out-of-OR intubations, and that airway-related and hemodynamic-related complications were “relatively common.”18 This points to the fact that anyone dealing with the emergent airway must always have a secondary or backup plan. This backup plan should include what Mort referred to as “rescue operations.”17 These rescue plansshould include the Combitube© (discussed earlier), flexible bougies, laryngeal mask airways (LMAs), intubating LMAs, and finally, the emergency cricothyroidotomy. In addition, whenever possible, additional assistance by those proficient in intubation must be readily available if one hopes to avoid complications that include death when dealing with the difficult airway.
Bougies are semi-rigid, gum-elastic stylette-like devices with a bent tip. They should be a standard piece of equipment on any difficult airway cart, and should be immediately available whenever a difficult airway is anticipated. They are used most often when only the arytenoids or the epiglottis can be visualized. During laryngoscopy, the bougie is advanced into the larynx and through the cords, into the trachea. As the bougie moves down the trachea, the tip of the bougie rubs against the tracheal rings. This is transmitted up the bougie and one can experience what has been referred to as the “washboard effect.” Care must be exercised so as not to advance the bougie too far; this has the possibility of creating a bronchial injury. Once in position, the bougie position is maintained by one clinician as a second clinician advances a lubricated endotracheal tube over the bougie, through the cords, and into position in the trachea under laryngoscopic visualization (whenever possible). The bougie is then removed, and the steps to confirm ET tube placement are performed as mentioned earlier (Figure 7).
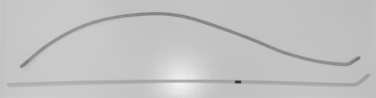
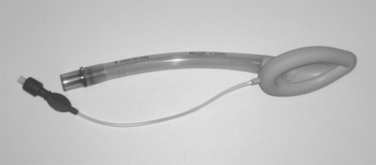
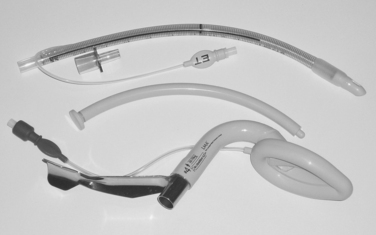
Originally introduced by Brain in 1983,20,21 the LMA is now routinely used for airway management in the elective anesthesia setting. The LMA (Laryngeal Mask Company Ltd) and the LMA Fastrach™ are also now becoming valuable additions to the armamentarium of emergency airway management (Figure 8).
The LMA is a large-bore tube that is attached to an ovoid or elliptical silicone cuff that, once well lubricated, is inserted blindly into the airway as far as it will go. Once properly positioned, and the cuff is inflated with 20–30 ml of air, the leading edge or tip of the cuff will obstruct the esophageal lumen while the cuff provides a low pressure seal around the entrance to the larynx, allowing for ventilation in an emergent setting. It is important to remember that the LMA will not be well tolerated in any patient with an existing gag reflex, and may precipitate vomiting and aspiration in these patients.18 The LMA comes in several sizes, and can be used in the pediatric and adult populations. As with endotracheal intubation, successful insertion will require the appropriate size selection. Indications for the emergent placement of the LMA in trauma patients include a GCS of 3 after rapid-sequence drug administration and attempted orotracheal intubation has failed.9
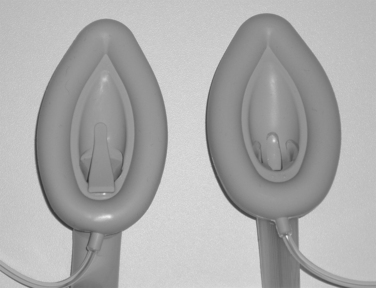
Although the LMA has been used to secure the airway in the trauma patient, it is, indeed, more suited for elective airway management situations. The LMA Fastrach (Figure 9), or intubating LMA, on the other hand, has been shown to be effective when used in the trauma center setting. The pharyngeal orifice of the LMA Fastrach is different that that of the regular LMA (Figures 10 and 11) and it allows the passage of a specifically designed and compatible endotracheal tube once the LMA Fastrach is appropriately placed. The maximal size endotracheal tube that the LMA Fastrach will allow is an 8-mm internal diameter. As with the LMA, the LMA Fastrach is placed in trauma patients when attempts to place an orotracheal tube with RSI have failed, the patient has a GCS of 3, and an airway must be controlled immediately.9 Placement of the intubating LMA is done in the same manner as with the LMA, but passage of the endotracheal tube is usually done as a two-person technique, with one person controlling the LMA and a second passing the very well-lubricated endotracheal tube. Once placement of the endotracheal tube is confirmed, the LMA can carefully be removed while maintaining the position of the endotracheal tube.
SURGICAL AIRWAY
The preferred method of management of the airway is by the patient with minimal assistance from the physician. The clinician can monitor the flow of air into the airway and observe any difficulty in ventilation. Unfortunately, this is not always possible.
1 American College of Surgeons. Advanced Trauma Life Support for Doctors Student Manual, 6 ed. Chicago: American College of Surgeons Committee on Trauma, 2002.
2 Vesalius A. de Humani Corporis Fabrica Libris Septum. Basel: Oporinus, 1543.
3 University of Virginia Health System: Airway Management: Assessing the Patient, April 2004. Available at http://www.healthsystem.virginia.edu/Internet/Anesthesiology-Elective/airway/Assessment.cfm
4 Shoemaker WC, et al. Textbook of Critical Care, 4 ed. Philadelphia: Saunders, 2000.
5 Mallarnpati SR, et al. A clinical sign to predict difficult tracheal intubation: a prospective study. Can J Anaesth. 1985;32:429.
6 Sellick B. Cricoid pressure to control regurgitation of stomach contents during induction of anesthesia. Lancet. 1961;2:404.
7 Mallarnpati SR. Recognition of the difficult airway. In: Benumof JL, editor. Airway Management: Principles and Practice. St. Louis, MO: Mosby-Yearbook, Inc., 1996.
8 Benumof JL. Management of the difficult airway: with specific emphasis on awake tracheal intubation. Anesthesiology. 1991;75:1087.
9 Dunham CM, Barraco RD, et al. Guidelines for emergency tracheal intubation immediately after traumatic injury. J Trauma. 2003;55:162.
10 Parks SN. Initial assessment. In Matox KL, Feliciano DV, Moore EE, editors: Trauma, 5 ed., New York: McGraw-Hill, 2004. Chapter 10
11 University of Virginia Health System How to Intubate, April 2004, Available at http://www.healthsystem.virginia.edu/internet/anesthesiology-elective/airway/intubation.cfm
12 Salem MR, Baraka A. Confirmation of tracheal intubation. In: Benumof JL, editor. Airway Management: Principles and Practice. St. Louis, MO: Mosby-Yearbook, Inc., 1996. Chapter 27
13 Wissler RN. The esophageal tracheal Combitube. Anesth Rev. 1993;20:147.
14 Smith CE, DeJoy SJ. New equipment and techniques for airway management in trauma. Curr Opin Anaesthiol. 2001;14(2):197.
15 Blostein PA, Koestner AJ, Hoak S. Failed rapid sequence intubation in trauma patients; esophageal tracheal Combitube is a useful adjunct. J Trauma. 1998;44:534.
16 Reynolds SF, Heffner J. Airway management of the critically ill patient: rapid sequence intubation. Chest. 2005;127:1397.
17 V Viersen: Rapid sequence induction for trauma, December 2005. Available at http://beta.trauma.org/traumawiki
18 Perry JJ, Lee J, Wells G. Are intubation conditions using rocuronium equivalent to those using succinylcholine? Acad Emerg Med. 2002;9:813.
19 Schwartz DE, Mattay MA, Cohen NH. Death and other complications of airway management in critically ill adults. Anesthesiology. 1995;82:367.
20 Brain AI. The laryngeal mask—a new concept in airway management. Br J Anaesth. 1983;55:801.
21 Danne PD, Hunter M, MacKillop ADF. Airway control. In Matox KL, Feliciano DV, Moore EE, editors: Trauma, 5 ed., New York: McGraw-Hill, 2004. Chapter 11