[level-membership-for-pulmolory-and-respiratory-category]
12 Airway Management
Note 1: This book is written to cover every item listed as testable on the Entry Level Examination (ELE), Written Registry Examination (WRE), and Clinical Simulation Examination (CSE).
The listed code for each item is taken from the National Board for Respiratory Care’s (NBRC) Summary Content Outline for CRT (Certified Respiratory Therapist) and Written RRT (Registered Respiratory Therapist) Examinations (http://evolve.elsevier.com/Sills/resptherapist/). For example, if an item is testable on both the ELE and the WRE, it will simply be shown as: (Code: …). If an item is only testable on the ELE, it will be shown as: (ELE code: …). If an item is only testable on the WRE, it will be shown as: (WRE code: …).
MODULE A
1. Assess the patient’s airway by inspection
a. Inspect the patient’s face to identify the presence of macroglossia (Code: IB1b) [Difficulty: ELE: R, Ap; WRE: An]
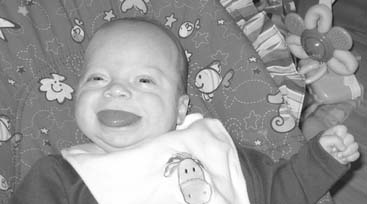
Macroglossia is an excessively large tongue that is often seen to protrude out of the mouth (Figure 12-1). It can partially obstruct the neonate’s upper airway and may be associated with inspiratory stridor. Macroglossia is associated with Down syndrome, Beckwith-Wiedemann syndrome, and several metabolic disorders. Immediate treatment may require (1) manually moving the mandible forward to pull the large tongue out of the airway, (2) inserting an oropharyngeal airway or nasopharyngeal airway, (3) placing the infant in the prone position. If the infant has life-threatening airway obstruction that is not corrected by these procedures, an endotracheal tube or tracheostomy tube must be inserted. Long-term management may require a tracheostomy or corrective facial surgery.
b. Assess for limits in neck range of motion (Code: IB1b) [Difficulty: ELE: R, Ap; WRE: An]
Other people with limited neck range of motion include a patient who has recently had cervical spine surgery and is being weaned from a neck brace or a patient with kyphoscoliosis who is wearing a supportive brace. If a patient wearing a neck brace has an upper airway obstruction, it may be possible to insert an oropharyngeal airway or nasopharyngeal airway to push the tongue forward to ease breathing. If these devices are not effective, and the neck cannot be hyperextended to open the airway, an emergency airway is needed. It is possible that a laryngeal mask airway (LMA) or Combitube could be inserted by an emergency medical technician, paramedic, or respiratory therapist. If these devices are not able to provide a secure airway, a physician will need to perform nasotracheal intubation or a tracheostomy (see Chapter 18).
2. Properly position the patient
b. Properly position the patient to maintain a patent airway (Code: IIIB1) [Difficulty: ELE: R, Ap; WRE: An]
Positioning of the head to open the airway is discussed in Chapter 11. Briefly, use the head tilt-chin lift maneuver to hyperextend the neck of an adult, and slightly extend the neck of a child to open the airway. You can place a small pad behind the neck and head to put the patient in the “sniff position.” Always keep the head in line with the body. If the patient has a known or suspected cervical spine injury, the neck cannot be hyperextended. Instead, open the airway with the jaw-thrust maneuver. Keep the head in line with the body.
3. Recommend the insertion of an artificial airway or a change in the type of artificial airway (Code: IIIG1f) [Difficulty: ELE: R, Ap; WRE: An]
4. Humidify an artificial airway
a. Maintain adequate humidification to the patient’s airway (ELE code: IIIB8) [Difficulty: ELE: R, Ap, An]
MODULE B
1. Recommend the insertion of an artificial airway or a change in the type of artificial airway (Code: IIIG1f) [Difficulty: ELE: R, Ap; WRE: An]
2. Manipulate oropharyngeal airways by order or protocol (ELE code: IIA7a) [Difficulty: ELE: R, Ap, An]
a. Get the necessary equipment
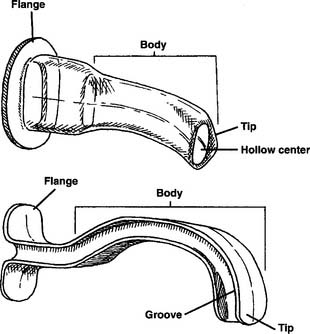
The oropharyngeal airway (or bite block) is made of plastic that is hard enough to withstand any patient’s biting force. A properly sized and placed oropharyngeal airway lifts the tongue forward from the posterior portion of the oropharynx to keep a patent airway and make suctioning oral secretions easier. An oropharyngeal airway is poorly tolerated in a conscious patient and can cause gagging and even vomiting. Oropharyngeal airways are available in a variety of sizes that fit infants or adults. The proper size is found by holding the airway against the patient’s face with the flange against the lips. The end of the airway should reach the angle of the jaw (Figure 12-2). Too large an airway can block the oropharynx by extending past the tongue. An airway that is too small can push the tongue back into the oropharynx rather than pulling the tongue forward, as intended. Figure 12-3 shows a properly placed and sized oropharyngeal airway.
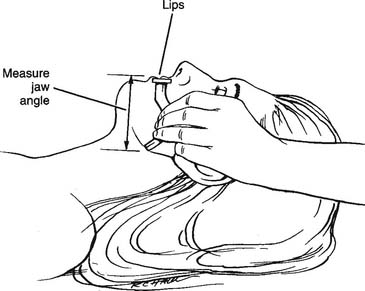
Figure 12-2 Procedure for measuring the proper size of the oropharyngeal airway.
(From Eubanks DH, Bone RC: Comprehensive respiratory care, ed 2, St Louis, 1990, Mosby.)
A number of manufacturers make oropharyngeal airways, which fall into two basic types: hollow center and I-beam (Figure 12-4).
d. Insert the correct oropharyngeal airway (ELE Code: IIIB2) [Difficulty: ELE: R, Ap, An]
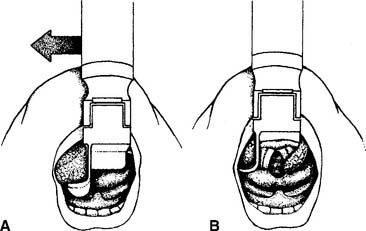
There are three widely used methods to insert an oropharyngeal airway.
1. First method
MODULE C
1. Recommend the insertion of an artificial airway or a change in the type of artificial airway (Code: IIIG1f) [Difficulty: ELE: R, Ap; WRE: An]
2. Manipulate nasopharyngeal airways by order or protocol (ELE code: IIA7a) [Difficulty: ELE: R, Ap, An]
a. Get the necessary equipment
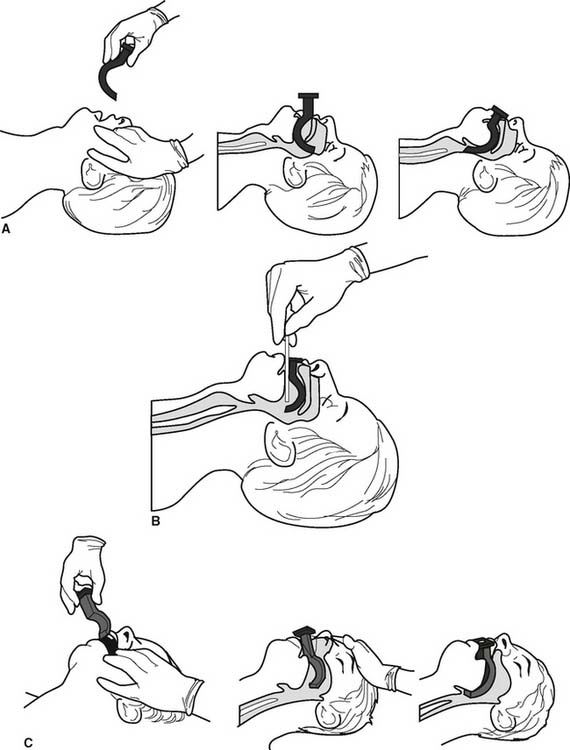
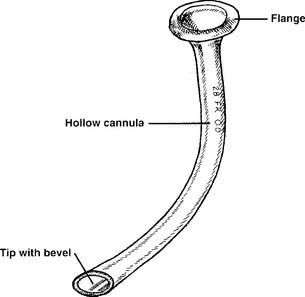
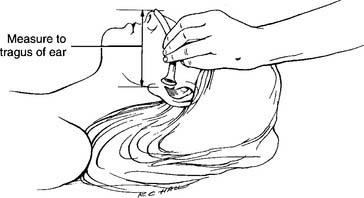
See Figure 12-5 for a close-up of a nasopharyngeal airway. All nasopharyngeal airways have a flange that fits close to the patient’s nostril. This prevents the entire tube from being pushed into the patient. All nasopharyngeal airways have a cannula with a channel for breathing or suctioning. Nasopharyngeal airways are available in a variety of sizes for adults. They can be properly sized by measuring from the tip of the nose to the tragus of the ear and adding 2 to 3 cm (Figure 12-6).
b. Put the equipment together and make sure that it works properly
All nasopharyngeal airways are made up of a single piece. There is nothing to assemble.
c. Troubleshoot any problems with the equipment
Make sure that the tube is not plugged by dried secretions, blood, or a foreign body. If plugged, the patient cannot breathe through it, and a suction catheter cannot be passed through it. Remove a plugged nasopharyngeal airway.
d. Insert the correct nasopharyngeal airway (ELE Code: IIIB2) [Difficulty: ELE: R, Ap, An]
The following steps are taken to insert a nasopharyngeal airway:

e. Assess the nasopharyngeal tube placement (ELE code: IIIB5) [Difficulty: ELE: R, Ap, An]
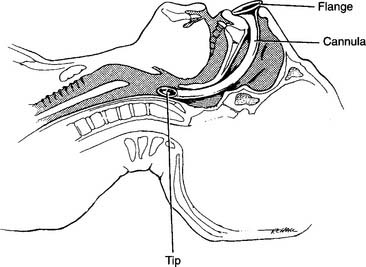
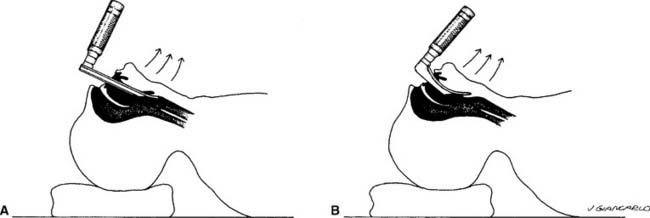
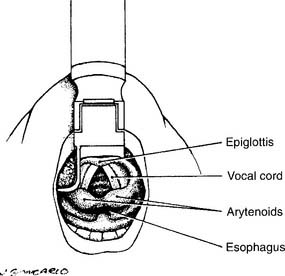
Check the placement by looking into the patient’s mouth with a flashlight and tongue depressor. A properly placed nasopharyngeal airway can be seen in the oropharynx and extends behind the tongue (Figures 12-7 and 12-8). The placement should be checked each time a tube is replaced or moved from one nostril to the other. If a nasopharyngeal tube is inserted too deeply, it can block the glottis opening into the trachea.
MODULE D
1. Recommend the insertion of an artificial airway or a change in the type of artificial airway (Code: IIIG1f) [Difficulty: ELE: R, Ap; WRE: An]
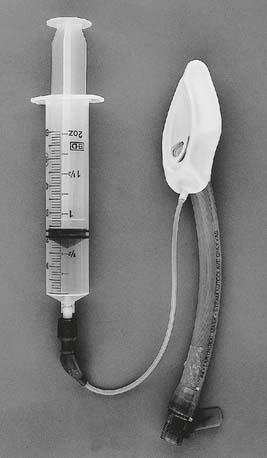
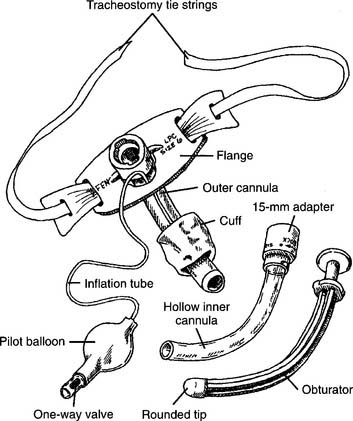
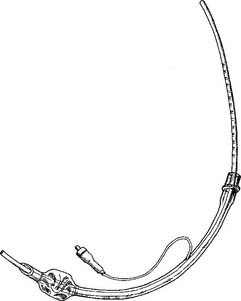
A laryngeal mask airway (LMA) is composed of a modified endotracheal tube with a standard 15-mm-outer diameter (OD) adapter (for attaching a resuscitation bag or ventilator circuit) at the proximal end and a silicone laryngeal mask at the distal end. The mask is inflated by attaching a syringe to the one-way valve and pilot balloon on an inflation tube, in the same manner as an endotracheal tube cuff (Figure 12-9). When the mask is inflated it surrounds and seals the larynx. LMAs were first used in the operating room by anesthesiologists. Their use has been expanded; today, emergency medical personnel and respiratory therapists use LMAs as an alternative to endotracheal tubes or Combitubes in patients with a difficult airway or during a CPR effort. Experience has shown that an LMA can be easily and quickly inserted without any additional equipment. Patients with asthma or irritable airways will have less coughing or bronchospasm than if an endotracheal tube were inserted. It has been shown that ventilating a patient with a resuscitation bag to an LMA is as effective or better than bag-mask ventilation. See Box 12-1 for indications, contraindications, and limits to an LMA.
BOX 12-1 Indications, Contraindications, and Limits of a Laryngeal Mask Airway
INDICATIONS
Remember that an LMA does not provide as secure an airway as an endotracheal tube. There are two limitations to using an LMA. First, the LMA does not absolutely protect against aspiration. Second, tidal volume gas can leak if mechanical ventilation pressures are greater than 20 cm H2O. This can lead to a smaller than desired tidal volume and/or gas being forced into the stomach. Excessive air in the stomach can cause vomiting. If either of these possibilities is of paramount clinical concern, the patient should have an endotracheal tube inserted rather than an LMA.
2. Manipulate laryngeal mask airways by order or protocol (Code: IIA7f) [Difficulty: ELE: R, Ap; WRE: An]
a. Get the necessary equipment
Several manufacturers make standard LMAs like that shown in Figure 12-9. In addition, there are two commonly seen modifications. The first is an LMA that facilitates tracheal intubation by easily allowing an endotracheal tube to slide through its lumen. The second is an LMA that includes a port for gastric suction to vent any air in the stomach. Adjunct supplies include a watersoluble lubricant for the laryngeal mask, syringe to inflate the mask, and protective gear for the practitioner, such as a face mask and gloves.
3. Assess the placement of the LMA (ELE code: IIIB5) [Difficulty: ELE: R, Ap, An]
While the NBRC does not list the insertion of an LMA as a testable item, proper placement is needed to ensure that it can be correctly maintained in the airway. Figure 12-10 shows the procedure for inserting an LMA and how the inflated mask covers the laryngeal inlet (glottis opening into the trachea). When the properly sized LMA is being placed, it is gently advanced until resistance is felt. (If the LMA is too small, no resistance will be felt since it will slide into the esophagus.) The distal tip of the mask will stop at the upper esophageal sphincter. The cuff is then inflated to cover the tracheal opening and seal off the esophagus. (Later, the cuff pressure can be measured; it should not exceed 60 cm H2O.) Manually ventilate the patient’s lungs with a resuscitation bag. The following steps should be taken to ensure that the LMA is properly placed to cover the opening to the trachea: (1) when the LMA mask is inflated, the tube will move out of the mouth about 1 to 2 cm; (2) auscultate for equal, bilateral breath sounds; (3) auscultate for the absence of sounds over the stomach; (4) an end-tidal carbon dioxide monitor should show exhaled CO2.
MODULE E
1. Recommend the insertion of an artificial airway or a change in the type of artificial airway (Code: IIIG1f) [Difficulty: ELE: R, Ap; WRE: An]
The Combitube (also known as the esophageal-tracheal Combitube or ETC) is a double-lumen tube that can be used to ventilate a patient whether the tube is placed into the esophagus (as intended) or trachea (Figure 12-11). The Combitube is one version of a series of tubes called esophageal obturator airways (EOAs) that are designed to be placed into the esophagus of an unconscious adult patient. Clinical experience has shown that a Combitube provides a reasonably secure airway in emergency situations, such as when performing CPR. It can be used as an alternative to an LMA. At the time this book was being published, there were five different types of EOA that provide the same two functions: ensure a stable airway for artificial ventilation and prevent vomiting and aspiration. Clinical experience with the various types of esophageal obturator airways is highly recommended because they do not appear or operate like standard endotracheal tubes. See Box 12-2 for a comparison of a Combitube with an endotracheal tube.
BOX 12-2 Indications, Contraindications, Advantages, and Disadvantages of the Combitube
2. Manipulate a Combitube by order or protocol (Code: IIA7g) [Difficulty: ELE: R, Ap; WRE: An]
3. Assess the placement of the Combitube (ELE code: IIIB5) [Difficulty: ELE: R, Ap, An]
While the NBRC does not list the insertion of the Combitube as a testable item, proper placement is needed to ensure that it can be correctly maintained in the airway. Figure 12-12 shows the procedure for inserting a Combitube. When the tube enters the esophagus as intended, both cuffs are inflated, and the patient is ventilated through the longer, colored tube, bilateral breath sounds will be heard (see Figure 12-12, C). Continue to ventilate the patient’s lungs and tape the tube in place. If breath sounds are not heard, the tube has accidentally entered the patient’s trachea. Now, ventilate through the shorter, clear tube and listen for bilateral breath sounds. If they are heard, continue to ventilate and tape the tube in place (see Figure 12-12, D).
MODULE F
1. Recommend the insertion of an artificial airway or a change in the type of artificial airway (Code: IIIG1f) [Difficulty: ELE: R, Ap; WRE: An]
2. Manipulate standard and fenestrated tracheostomy tubes by order or protocol (ELE code: IIA7c) [Difficulty: ELE: R. Ap, An]
a. Get the necessary equipment
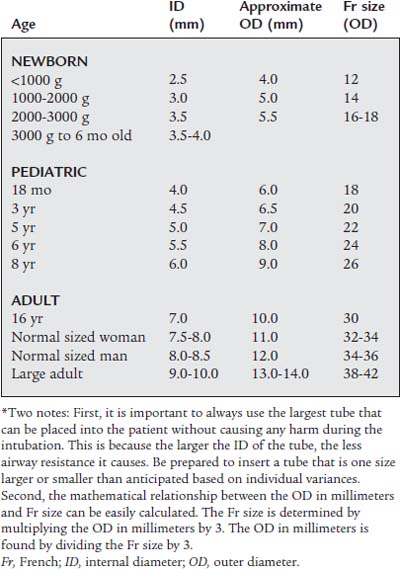
These tubes are available in a variety of sizes for patients of all ages from neonate to adult. See Table 12-1 for tracheostomy tube sizes (this also applies to tracheostomy buttons and endotracheal tubes) based on patient age. It is common practice to refer to the needed tube size by its inner diameter (ID). For example, a tracheostomy tube for an adult female would be 7.5- or 8.0-mm ID.
b. Put the equipment together and make sure that it works properly
The following are commonly seen examples of tracheostomy tube styles:
1. Standard tracheostomy tube
After the tracheostomy procedure is completed, the majority of patients have a standard tube placed into the stoma. Refer to Figure 12-13 for these features of a typical tracheostomy tube:
2. Fenestrated tracheostomy tube
Refer to Figure 12-14 when reviewing these features of the fenestrated tracheostomy tube:
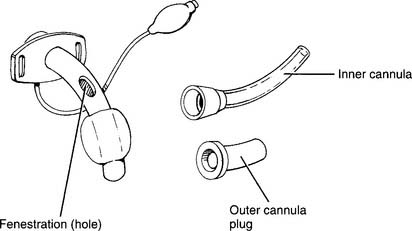
Figure 12-14 Fenestrated tracheostomy tube with its component parts and features.
(From Eubanks DH, Bone RC: Comprehensive respiratory care, ed 2, St Louis, 1990, Mosby.)
4. Maintain the proper position and appropriate cuff inflation of a tracheostomy tube (Code: IIIB4d) [Difficulty: ELE: R, Ap; WRE: An]
5. Change the tracheostomy tube (ELE code: IIIB7) [Difficulty: R, Ap, An]
b. Routine tube change
6. Independently perform tracheostomy care (Code: IIIF2g5) [Difficulty: ELE: R, Ap; WRE: An] (ELE code: IIIB6) [Difficulty: ELE: R, Ap, An]
7. Extubate the patient
a. Recommend extubation (Code: IIIG1h) [Difficulty: ELE: R, Ap; WRE: An]
Extubation should only be performed after correction of the causes that led to insertion of the tracheostomy tube. If the patient has required mechanical ventilation, review the discussion in Chapter 15 that relates to weaning the patient and extubation.
b. Perform extubation (Code: IIIB9) [Difficulty: ELE: R, Ap; WRE: An]
Extubation should be performed only by trained personnel and under the proper conditions to ensure the patient’s safety. See Box 12-3 for a list of complications that can occur after extubation. The generally recommended steps in extubation include the following:
Routine stoma care to ensure healing usually includes the following each shift:
MODULE G
1. Recommend the insertion of an artificial airway or a change in the type of artificial airway (Code: IIIG1f) [Difficulty: ELE: R, Ap; WRE: An]
A tracheostomy button is a hard plastic tube that is placed into the patient’s stoma to keep it open after the tracheostomy tube has been removed (Figure 12-15). A button is inserted because the physician has determined that the stoma must be kept open in case the tracheostomy tube must be reinserted. Advantages of the button include the patient being able to eat, talk, and cough normally. Yet, in case the patient has difficulty or needs a breathing treatment, a secure airway can be quickly reestablished.
2. Manipulate a tracheostomy button by order or protocol (ELE code: IIA7c) [Difficulty: ELE: R, Ap, An]
a. Get the necessary equipment
In general, the patient sizes for tracheostomy buttons match the sizes for tracheostomy tubes listed in Table 12-1.
b. Put the equipment together and make sure that it works properly
Refer to Figure 12-15 when reviewing these features of the tracheostomy button and accessories:
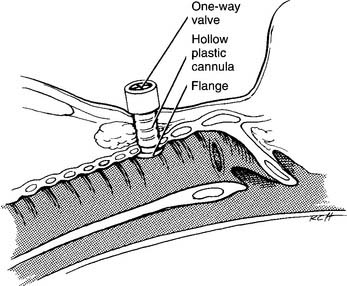
A one-way valve may be added to the button. This would be used for patients who must not inspire through their upper airway but may exhale through it. In patients with a very small tidal volume, inhaling through one of these valves reduces the patient’s upper airway anatomic dead space. Since expiration is through the upper airway, the patient can speak normally. Refer to Figure 12-16 when reviewing these features of the Kistner tracheostomy tube with an attached one-way valve:
c. Troubleshoot any problems with the equipment
Make sure that all component pieces of these tracheostomy buttons fit together properly and can be easily disconnected if necessary. The cannula must be kept clear of any secretions, blood, or foreign debris. A suction catheter should be passable through the hollow opening in the cannula. If the button is obstructed and the patient is having trouble breathing through the upper airway, the button should be removed and replaced with another button or a tracheostomy tube.
MODULE H
1. Recommend the insertion of an artificial airway or a change in the type of artificial airway (Code: IIIG1f) [Difficulty: ELE: R, Ap; WRE: An]
2. Manipulate a speaking tube or valve by order or protocol (ELE code: IIA7d) [Difficulty: ELE: R, Ap, An]
a. Get the necessary equipment
Table 12-1 lists the standard sizes of tracheostomy tubes. A speaking tracheostomy tube should match the same size as the current tracheostomy tube or button, if it is available.
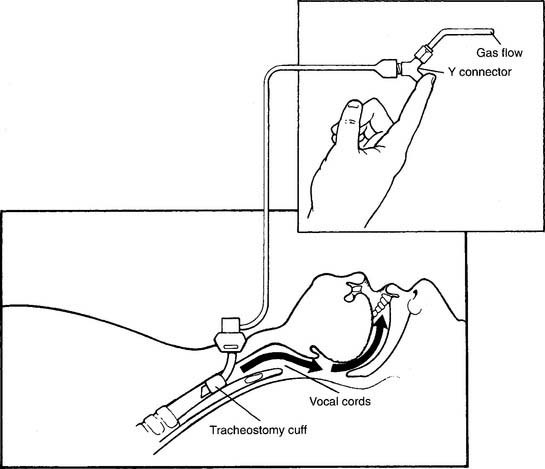
Speaking tracheostomy tubes are only available in adult sizes. See Figure 12-17 for the features of a speaking tracheostomy tube (Pitt and Vocalaid have versions). The cannula is the standard type except that an additional tube has been added to carry a compressed gas through a hole in the back of the cannula. This gas flows through the vocal cords and allows the patient to speak. The voice is not as strong as normal but should be understandable. Improved communication ability is a great help to the patient’s psychologic well-being. Patients can still be mechanically ventilated and have their secretions suctioned, and can eat and drink as usual.
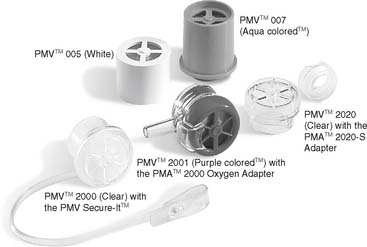
Passy-Muir (Figure 12-18) and Kistner (see Figure 12-16) are common types of speaking valves that can be attached to a tracheostomy tube or tracheostomy button. All feature a one-way valve that opens when the patient inspires to allow room air or supplemental oxygen to be inhaled. When the patient exhales, the valve closes. This causes all of the exhaled tidal volume to pass through the vocal cords for speech. Aerosol therapy may be provided either by a tracheostomy mask over the valve or by a T-piece attached to it. (See Chapter 6 for a discussion of these aerosol/oxygen delivery systems.) As an alternative, the Trach-Talk combines an elbow adapter to the tracheostomy tube and a T-piece with a one-way valve (Figure 12-19). This device provides the patient with aerosol and/or oxygen with humidity through the one-way valve during inspiration. On exhalation, the valve closes and the patient exhales through the vocal cords for speech.
b. Put the equipment together and make sure that it works properly
With a speaking tracheostomy tube, a Y-connector is added to the compressed gas tube. Usually about 4 to 6 L/min of compressed air or oxygen are set by a flowmeter to run to the Y. Closing off the other opening in the Y with a finger diverts the gas into the patient’s larynx for speaking. A little experimentation with flows helps the patient find the flow that works best for speaking (see Figure 12-17). If the patient cannot speak at all, check that the gas is turned on and that the tubing is properly connected.
All speaking valves are available in a standard size to fit onto a 15-mm-OD tracheostomy tube. Passy-Muir makes a variety of valves. Whether the patient is breathing spontaneously or is ventilator-dependent, the one-way valve directs the tidal volume into the patient. The valve closes on exhalation so that gas passes through the vocal cords for speaking. Be aware that for this system to work with a ventilator-dependent patient, the cuff must be deflated. This will result in some loss of delivered tidal volume. Make sure that the patient can tolerate this. Also adjust the ventilator’s alarm settings accordingly. If the patient is breathing spontaneously and needs low-flow supplemental oxygen, use the valve that includes a small-bore oxygen tubing nipple (see Figure 12-18).
c. Troubleshoot any problems with the equipment
For a speaking tracheostomy tube, see the preceding discussion on care of standard or fenestrated tracheostomy tubes. The same problems can occur with speaking tracheostomy tubes. Assess the patient’s ability to speak in an understandable way. Enough compressed gas must pass through the vocal cords for this to happen. Yet, too high a gas flow can cause some resistance to the patient’s tidal volume exhalation.
MODULE I
1. Recommend the insertion of an artificial airway or a change in the type of artificial airway (Code: IIIG1f) [Difficulty: ELE: R, Ap; WRE: An]
2. Manipulate oral and nasal endotracheal tubes by order or protocol (ELE code: IIA7b) [Difficulty: ELE: R, Ap, An]
a. Get the necessary equipment
An endotracheal tube is the best emergency device for maintaining a secure airway. It also provides a direct suctioning route to the lungs and prevents aspiration. Mechanical ventilation can easily be provided through it. See Table 12-1 for a list of endotracheal tube sizes (this also applies to tracheostomy tubes and buttons) based upon the patient’s age. It is common practice to refer to the needed tube size by its inner diameter (ID). For example, a tracheostomy tube for an adult male would be 8.0- or 8.5-mm ID.
The tubes are available in sizes from 4-mm OD through 14-mm OD so that patients of all ages and sizes can be intubated. The OD size increments are 0.5 mm. The thickness of the outer wall of the tube varies from 0.5 to 1 mm, which results in a reduction of the inner diameter (ID) of the tube by about 1 to 2 mm. Table 12-1 lists the approximate ID of an endotracheal tube to place into a patient based on age. It is common practice to refer to the size of endotracheal tube (or tracheostomy tube) needed by its ID. Once the tube is properly placed into the patient, the excess tube, beyond 3 to 4 cm past the teeth, should be removed. This reduces the airway resistance and mechanical dead space.
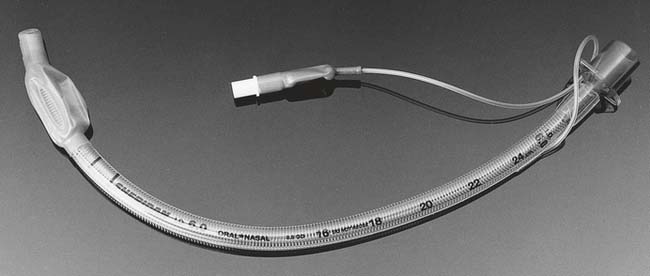
Most endotracheal tubes have the standard features shown in Figure 12-20. There are a number of specialty endotracheal tubes that can be found in limited use. They all share the same characteristics except for some special feature. These tubes are worth considering if available.

1. Pediatric endotracheal tubes
Pediatric endotracheal tubes are available in two basic types. One type has a constant diameter. During intubation, the tube should be inserted until the black mark about 2 cm from the tip is at the vocal cords. The second type has a body with a relatively wide proximal part that narrows at the distal end. The design is supposed to allow the smaller diameter tip to be passed through the vocal cords but prevent the wide “shoulder” from passing into the trachea. The distal ends of both types of tube have a single opening with a bevel cut (Figure 12-21). It is recommended that children less than 8 years of age have a tube without a cuff.

2. Wire-reinforced tubes
Wire-reinforced (also called armored) tubes have a steel spring coiled through them (Figure 12-22). An advantage of these tubes over regular tubes is that they are more resistant to collapse if the patient bites on them. Furthermore, the tube may be bent for shape and does not kink if the patient’s head is turned at an angle that might kink an ordinary tube.
3. Preformed tubes
Preformed tubes have been preshaped for surgical procedures on the head and neck. One style has a forward bend so that the tube can be taped to the chin (Figure 12-23). This shape keeps the tube and anesthesia circuit away from the patient’s nose, eyes, and top of the head. There are also tubes with a backward bend so that it can be taped to the forehead (Figure 12-24). This shape keeps the tube and anesthesia circuit away from the patient’s throat area.
4. Guidable (trigger) tubes
Guidable tubes have a string embedded within the wall of the tube (Figure 12-25). When the ring at the proximal end is pulled, the distal tip is flexed up to shorten the radius of the curve. This allows the tube to be directed into the anterior trachea. Guidable trigger tubes make it easier to intubate a patient with an anterior larynx or to perform a blind nasal intubation.
5. Double-lumen endotracheal tubes
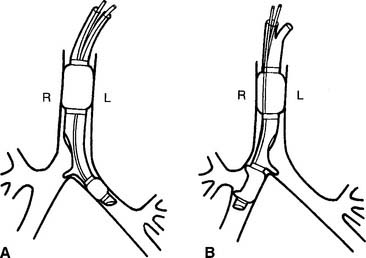
Double-lumen endotracheal tubes are used to allow independent lung ventilation. A double-lumen tube is also used during special procedures performed on one lung such as bronchoscopy, bronchoalveolar lavage, lobectomy, and pneumonectomy. The other lung may be mechanically ventilated to maintain the patient’s blood gas values (Figure 12-26). An adapter can be added to join the two proximal ends of the channels so that a single ventilator can be used to ventilate both lungs. The Carlens tube is used to preferentially intubate the left bronchus. The White tube is used to preferentially intubate the right bronchus (see Figure 12-27 for both). Robertshaw makes tubes for either right or left bronchial intubation.
6. Tubes for high-frequency jet ventilation
These special purpose tubes have a main lumen for a standard ventilator and an additional lumen to which a jet ventilator is attached. See Chapter 15 for more discussion and a photograph.
7. Oropharyngeal suctioning tubes
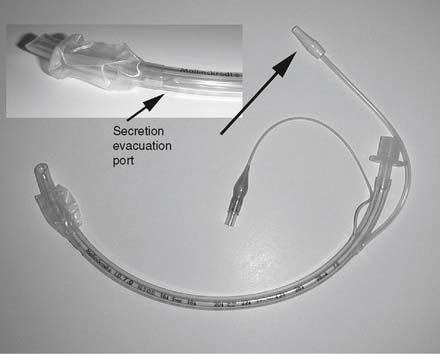
In response to the concern about oropharyngeal secretions leaking around the endotracheal tube cuff and causing ventilator-associated pneumonia, an endotracheal tube with a built-in suctioning catheter has been invented (Figure 12-28). The catheter runs down the outer curve of the tube to just above the cuff. When vacuum is applied to the catheter, any secretions that have accumulated above the cuff are suctioned out of the area. It functions like a standard, cuffed endotracheal tube in all other aspects.
b. Put the equipment together and make sure that it works properly
Refer to Figure 12-20 for these components of a standard endotracheal tube:
3. Manipulate intubation equipment: laryngoscope and blades, by order or protocol (WRE Code: IIA7d) [Difficulty: An]
a. Get the necessary equipment
The laryngoscope is made up of two basic parts: a handle and a blade. The most commonly seen handle is made of stainless steel; some newer units are made of plastic. The handle contains two C-cell batteries to power the light source in the blade. They all have a common base with a hooking bar so that the blades can be attached (Figures 12-29 and 12-30).
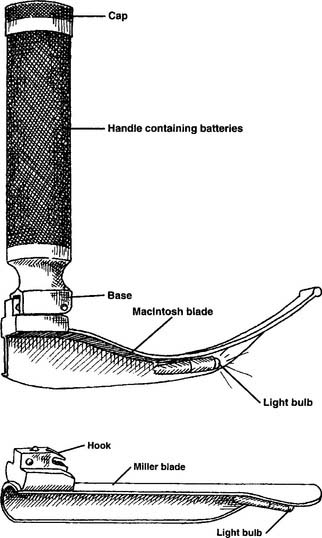
Blades are available in a variety of sizes from pediatric to adult. They all have a common hook so that they can be snapped and locked in place on the handle. The stainless-steel handles use stainless-steel blades. The newer plastic handles use plastic blades. The two different sets of handles and blades are not interchangeable. The blades are available in two different shapes. The Miller blades are straight and the MacIntosh blades are curved (see Figure 12-30). The person performing the intubation may specify a particular style of blade as well as blade size.
b. Put the equipment together and make sure that it works properly
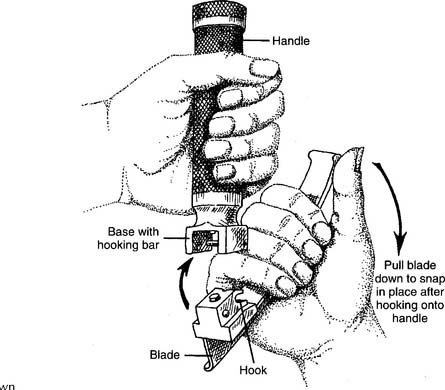
See Figure 12-29 for the steps in fastening the blade to the handle:
c. Troubleshoot any problems with the equipment
Besides the laryngoscope handle and blades, there are a number of additional items that are typically needed to ensure a smooth, safe intubation procedure. These are listed in Box 12-4.
4. Manipulate intubation equipment: fiberoptic devices, by order or protocol (ELE code: IIA7e) [Difficulty: ELE: R, Ap, An]
a. Get the necessary equipment
A physician may use a fiberoptic laryngoscope (Figure 12-31) or bronchoscope (see Figure 18-3) to visualize the larynx and trachea during a difficult intubation. Either can be used during a nasal or oral endotracheal intubation procedure.
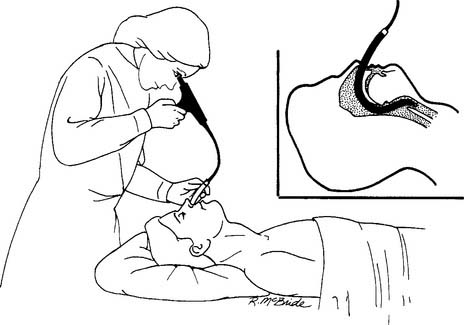
Figure 12-31 A fiberoptic laryngoscope that is being used to insert an endotracheal tube through the nasal passage.
(From Wilkins RL, Stoller JK, Kacmarek RM: Egan’s fundamentals of respiratory care, ed 9, St Louis, 2010, Mosby.)
A fiberoptic lighted stylet or lightwand (Figure 12-32) can be placed through the lumen of the endotracheal tube so that the lighted distal tip is at the end of the tube. When the room is darkened and the tube enters the trachea, a bright light will shine though the tissues over the throat.
c. Troubleshoot any problems with the equipment
Review the discussion on bronchoscopy in Chapter 18 for the details on the equipment. The fiberoptic tube should be lubricated so that it will easily slide through the lumen of the endotracheal tube (see Figure 12-31). After the physician has confirmed that the distal end of the fiberoptic tube has entered the trachea, the endotracheal tube is gently pushed into the trachea. The fiberoptic tube is then withdrawn, the cuff is inflated, and the endotracheal tube is secured. If the endotracheal tube will not slide into the patient’s trachea, it is either too large or there is not enough lubricant on the fiberoptic tube. It may be necessary to withdraw them, correct the problem, and start over again.
MODULE J
1. Perform endotracheal intubation (Code: IIIB3) [Difficulty: ELE: R, Ap; WRE: An]
Oral endotracheal intubation is the recommended procedure for securing the airway during an emergency such as a CPR attempt. In uncomplicated cases, the patient can be quickly intubated with an apneic period of no more than 20 seconds. This procedure is explained for a team of two respiratory therapists. It is difficult, if not impossible, for a single therapist to perform this important task without placing the patient at great risk. Usually the therapist who intubates is considered the leader and the other therapist acts as the assistant. Therapists must feel comfortable in both roles. See Box 12-5 for a list of indications and contraindications for oral intubation and Box 12-6 for a list of complications.
BOX 12-5 Indications and Contraindications for Oral Endotracheal Intubation
Steps in an emergency oral endotracheal intubation include the following:
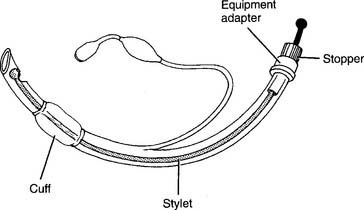
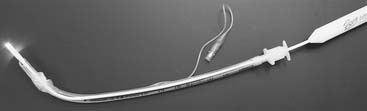
Figure 12-33 Stylet with stopper properly placed in standard endotracheal tube to maintain its curved shape.
(From Eubanks DH, Bone RC: Comprehensive respiratory care, ed 2, St Louis, 1990, Mosby.)
3. Palpate the patient to determine asymmetric chest movements, crepitus, and/or tracheal deviation (Code: IB2b) [Difficulty: ELE: R, Ap; WRE: An]
4. Auscultate the patient’s breath sounds and interpret any changes (Code: IB4a) [Difficulty: ELE: R, Ap; WRE: An]
After intubation, deliver a breath and listen over the epigastric area to rule out tube placement in the esophagus. After ruling out esophageal placement, check for bilateral breath sounds. Confirm equal bilateral breath sounds by first listening over the apical areas and then the lateral areas. If the tube has been inserted too far, it usually enters the right mainstem bronchus because it separates from the trachea at a less acute angle than the left mainstem bronchus. No breath sounds will be heard over the left lung field. If both lung fields cannot be auscultated, at least listen to the right apical area. This one site can be checked because the segmental bronchus to the right upper lobe separates from the right mainstem bronchus in such a way that if the right mainstem bronchus is intubated, the upper lobe segmental bronchus will be blocked.
a. Esophageal detection device
The esophageal detection device (EDD) is able to show that the endotracheal tube has been placed within an airway by pulling a small sample of gas from the patient’s lungs. If the endotracheal tube has been accidentally put into the esophagus, the deflated bulb will stay collapsed (Figure 12-38). A limitation of the EDD is that it inflates whether the endotracheal tube is placed into the trachea or either mainstem bronchus. Remember to auscultate for bilateral breath sounds.
5. Detect exhaled carbon dioxide
b. Manipulate intubation equipment: exhaled carbon dioxide detectors, by order or protocol (ELE code: IIA7e) [Difficulty: ELE: R, Ap, An]
1. Get the necessary equipment
Most exhaled carbon dioxide detectors are inexpensive, single-patient use, disposable devices. They are called colorimetric units because they change color when exhaled carbon dioxide passes through the sensitive material within the capsule (Figure 12-39). The units are placed onto an endotracheal tube’s 15-mm-OD adapter to monitor the proper placement of the endotracheal tube. This is often done if a patient is being transported and there is a possibility that the tube could be dislodged. Exhaled carbon dioxide detectors are also used during CPR attempts to help determine if resuscitation attempts are being performed on a viable patient. If the patient is not producing exhaled CO2, there is no metabolic activity. The physician may then decide to stop CPR efforts.
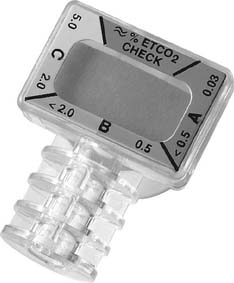
Currently available disposable units include the Easy Cap, the A.C.E. STAT-Check CO2 Indicator, and the unit produced by Resuscitation ACE Inc. The Easy Cap end-tidal CO2 detector (Figure 12-39) is the original unit and quite widely used. It is available in a neonatal/pediatric size for infants weighing less than 15 kg and in a standard size for larger children and adults. Its carbon dioxide indicator changes color from dark purple to yellow when CO2 is exhaled through it. The other two disposable units also indicate the presence of exhaled CO2 by an indicator turning purple.
One choice for an intubation capnograph is the MiniCAP III CO2 detector. It is a reusable item that has a mainstream type of infrared carbon dioxide detector. The unit is powered by a battery pack. Its light-emitting diode signals the presence of carbon dioxide with each exhalation. A capnograph should be selected if it is necessary to obtain a more accurate CO2 reading. Remember that capnography cannot confirm that the tube is properly placed in the trachea rather than a bronchus. Check for equal, bilateral breath sounds. See Chapter 5 for a full discussion on capnometry.
2. Put the equipment together and make sure that it works properly
The MiniCAP III has a disposable adapter that connects the mainstream CO2 detector to the patient’s endotracheal tube. The adapter has a 15-mm-ID end for attachment to the endotracheal tube and a 15-mm-OD end to which the manual resuscitator can be attached. The assembly and operation of a capnograph are discussed in Chapter 5. Review this material if necessary.
6. Recommend a chest radiograph to help determine the patient’s condition and review the chest radiograph (Code: IC2 and IIIE1) [Difficulty: ELE: R, Ap; WRE: An]
7. Review the upper airway or chest radiograph to see the position of the endotracheal or tracheostomy tube (Code: IB7b) [Difficulty: ELE: R, Ap; WRE: An]
All modern endotracheal and tracheostomy tubes contain a strip of radiopaque material near the distal tip of the tube. This is easily noticed as the white line s een on the chest radiograph and confirms the location of the tip of the tube in the airway (see Figure 12-20). The ideal location of the tip of the endotracheal tube is the middle third of the trachea. When the tube is positioned properly, it is less likely for the tip to be pushed into the carina when the patient bends his or her head forward or for the cuff to hit the vocal cords if the patient’s head is bent back. Both endotracheal and tracheostomy tubes should be positioned midline within the trachea. They should not be twisted laterally because the tip can cause damage to the tracheal wall.
8. Maintain the proper position of an endotracheal tube (Code: IIIB4c) [Difficulty: ELE: R, Ap; WRE: An]
A wide variety of handmade, as well as manufactured, devices are available to secure the endotracheal tube in the correct position. Figure 12-40 shows one way to make a tube holder from adhesive tape. This is flexible when the patient moves and is inexpensive. Tincture of benzoin can be applied to the patient’s cheeks to make the tape hold more securely without tearing the skin. An oropharyngeal airway may or may not be needed.
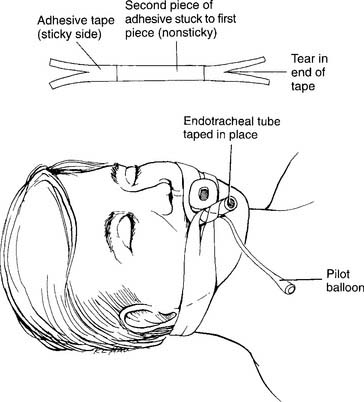
Figure 12-40 Taping the endotracheal tube to secure it in the airway.
(From Eubanks DH, Bone RC: Comprehensive respiratory care, ed 2, St Louis, 1990, Mosby.)
9. Maintain the appropriate cuff inflation of an endotracheal tube or tracheostomy tube (Code: IIIB4c, 4d) [Difficulty: ELE: R, Ap; WRE: An]
a. Determine tracheal tube cuff pressure and/or volume (Code: IB9r) [Difficulty: ELE: R, Ap; WRE: An]
1. Minimal leak
2. Minimal occluding volume
3. Select a cuff pressure and/or volume measuring system
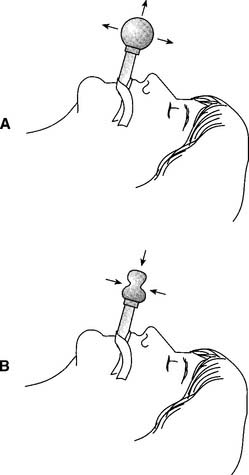
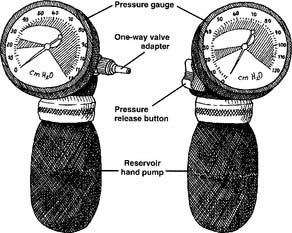
A cuff pressure manometer is needed to measure the air pressure within an endotracheal or tracheostomy tube cuff. When a tracheal tube is first inserted, the volume of air that is injected into the cuff should be measured and charted. The pressure within the cuff should also be noted. After that, if more air is inserted or any air is removed from the cuff it should be measured and recorded in the chart. The resulting final cuff pressure must also be recorded. A number of manufactured units are available for measuring cuff pressure. The Cufflator (Figure 12-41) is discussed here because it is widely used. This system consists of a pressure gauge calibrated in centimeters of water, a hand-pumped reservoir, an internal one-way valve, a pressure release valve, and an adapter to fit into the one-way valve on the cuff inflating tube. A three-way stopcock can be added to the one-way valve adapter. This can be used to prepressurize the system before attaching it to the patient’s one-way valve on the cuff inflating tube. The pressure in the cuff can be measured as air is added by squeezing the hand pump or as air is removed by the pressure release valve. The volume of air added or removed cannot be measured.
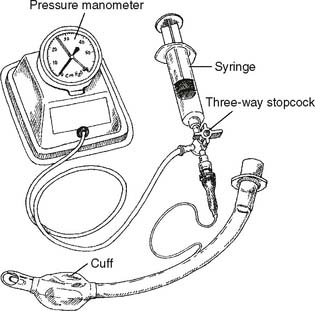
A second system can be “homemade,” although it is also commercially available. It consists of a 5- to 10-mL syringe, a three-way stopcock, and a pressure gauge (either millimeters of mercury or centimeters of water). The syringe and pressure gauge are attached to two of the ports on the stopcock. The third port on the stopcock is connected to the one-way valve on the cuff inflating tube. When the stopcock handle is opened to all three ports, the pressures throughout the system and the cuff are the same. Air can be added or removed with the syringe. The pressure gauge shows the system and cuff pressure as the air volume is adjusted (Figure 12-42). One advantage of this system over the Cufflator is that the volume of air that is added or subtracted can be measured. This system can also be prepressurized so that its pressure matches the pressure anticipated in the cuff. With any of these systems, it is necessary to keep airtight connections. If the pressure drops unexpectedly, an air leak will be noticed. Tighten the connections to create a seal so that the pressure is maintained.
b. Interpret the tracheal tube cuff volume and/or pressure (Code: IB10r) [Difficulty: ELE: R, Ap; WRE: An]
c. Inflate and/or deflate the cuff (ELE code: IIIF2g4) [Difficulty: ELE: R, Ap, An]
It is clear that a cuff pressure greater than the patient’s mucosa capillary pressure prevents the flow of blood through the area covered by the cuff. Tissue ischemia (hypoxemia) results. If the ischemia is severe enough, tissue necrosis follows. The higher the cuff pressure and the longer the high cuff pressure is maintained, the greater the likelihood of tissue necrosis. If the necrosis is circumferential (all the way around) to the trachea, tracheal stenosis may occur. Tracheal stenosis is found when the diameter of the trachea is narrowed because of scar tissue buildup after the normal mucosa and underlying tissues have died. The patient’s airway is permanently narrowed and, if serious, must be surgically corrected. Another severe complication of high cuff pressures and tracheal necrosis is the development of a tracheoesophageal fistula. This is an opening between the trachea and esophagus. This is more likely when the patient also has a nasogastric tube in place. The fistula permits food to pass into the airway and lungs, causing pneumonia. Mechanical ventilation is more difficult because of the air leak from the lungs to the esophagus. Surgical repair of the fistula is required.
MODULE K
1. Recommend the insertion of an artificial airway or a change in the type of artificial airway (Code: IIIG1f) [Difficulty: ELE: R, Ap; WRE: An]
Second, the tube should be replaced if the cuff is leaking or ruptured and the airway cannot be sealed. The patient may be reintubated by the procedure described earlier. Alternatively, a tube-changing stylet may be used (Figure 12-43). The stylet is a hollow, flexible plastic tube that can be bent and holds its shape. It has a center mark and 1-cm markings counting out to each end. These are to help keep the proper depth for inserting the replacement endotracheal tube. It can be used on an endotracheal tube that is at least 7.5-mm inner diameter. The procedure for changing the endotracheal tube with a tube-changing stylet includes the following:
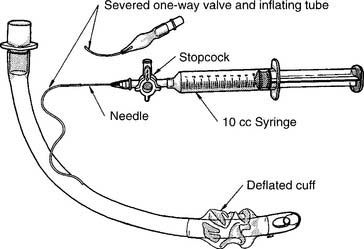
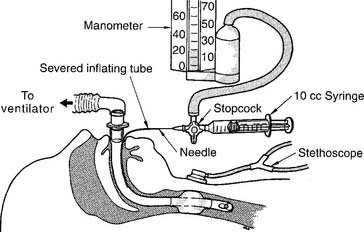
A defective one-way valve or severed cuff inflating tube may not necessarily lead to a reintubation; often it can be bypassed. This is done by slipping a small-diameter blunt needle (usually about 21 gauge) into the inflating tube, attaching a three-way stopcock to the hub of the needle, and screwing a 10-mL syringe into one of the stopcock ports (Figure 12-44). The cuff pressure can be measured by attaching a pressure manometer to the other port on the stopcock. Air can be added by the 10-mL syringe and the pressure measured simultaneously (Figure 12-45). There is now a commercially available system to bypass a severed cuff inflating tube.
2. Extubation
a. Recommend extubation (Code: IIIG1h) [Difficulty: ELE: R, Ap; WRE: An]
Extubation should only be considered after it has been determined that the original problem(s) that necessitated the endotracheal tube has (have) been corrected. It should be reasonably anticipated that once the endotracheal tube has been removed it will not have to be replaced. The patient should be able to sustain a patent airway, expectorate secretions effectively, and maintain acceptable arterial blood gas values. Supplemental oxygen may be needed. Also see the discussion in Chapter 15 that relates to weaning from mechanical ventilation and readiness for extubation. (The only exception to the preceding general guidelines would be when terminal extubation is performed. In this situation, it has been determined that further medical intervention is futile and the patient and/or family want extubation.)
b. Perform extubation (Code: IIIB9) [Difficulty: ELE: R, Ap; WRE: An]
Extubation should be performed only by trained personnel and under the proper conditions to ensure the patient’s safety. See Box 12-3 for a list of complications that can occur after extubation. The generally recommended steps in extubation include the following:
MODULE L
1. Analyze available information to determine the patient’s pathophysiologic state (Code: IIIH1) [Difficulty: ELE: R, Ap; WRE: An]
Be able to recognize an airway obstruction problem in a patient and recommend or place the proper airway device to correct the problem. A chest x-ray film should always be taken to confirm the location of a newly placed endotracheal or tracheostomy tube. All modern endotracheal and tracheostomy tubes contain a strip of radiopaque material near the distal tip of the tube. This is easily noticed as the white line seen on the chest x-ray film and confirms the location of the tip of the tube in the airway (see Figure 12-20). The chest x-ray examination should be repeated if a significant change has occurred in the patient’s condition, or if the tube has been pulled back or pushed more deeply into the trachea. The chest x-ray film would also show a pneumothorax related to the tracheostomy procedure or other pulmonary condition.
2. Independently initiate suctioning to manage an artificial airway (ELE code: IIIF2g3) [Difficulty: ELE: R, Ap, An]
Be prepared to suction the patient’s endotracheal tube or tracheostomy tube, as needed, to remove secretions. The procedure is described in Chapter 13.
3. Determine the appropriateness of the prescribed therapy and goals for the patient’s pathophysiologic state (Code: IIIH3) [Difficulty: ELE: R, Ap, An]
4. Recommend changes in the therapeutic plan when indicated (Code: IIIH4) [Difficulty: ELE: R, Ap; WRE: An]
It is not possible to predict how a patient may react to the placement of an artificial airway or its prolonged need. Some patients react with relief and relax when the WOB is reduced. Others may become angry at the limitations imposed on them. Still others may become depressed. Be prepared to deal with these reactions or changes in the patient’s emotional response to this very stressful situation.
5. Terminate the treatment or procedure based on the patient’s response (Code: IIIF1) [Difficulty: ELE: R, Ap; WRE: An]
6. Recommend discontinuing the treatment or procedure based on the patient’s response (Code: IIIG1i) [Difficulty: ELE: R, Ap; WRE: An]
American Association for Respiratory Care. Clinical practice guideline: management of airway emergencies. Respir Care. 1995;40(7):749.
American Association for Respiratory Care. Clinical practice guideline: removal of the endotracheal tube. Respir Care. 1999;44(1):85.
American Association for Respiratory Care. Clinical practice guideline: removal of the endotracheal tube—2007 revision & update. Respir Care. 2007;52(1):81.
American Heart Association, Emergency Cardiac Care Committee and Subcommittees. Guidelines for cardiopulmonary resuscitation and emergency cardiac care: adult advanced cardiac life support. JAMA. 1992;268(16):2199.
Practice guidelines for management of the difficult airway. Anesthesia. May 2003;98(5):1269-1277.
Cario J, Pilbeam S. Mosby’s Respiratory Therapy Equipment, 8e. St. Louis: Mosby, 2010.
Circulation 2005: Adjuncts for airway control and ventilation, 112; IV-51-IV-51; originally published online Nov 28, 2005.
Desai TR, Statter MB, Aresnman RM. Surgical management of the airway. In Goldsmith JP, Karotkin EH, editors: Assisted ventilation of the neonate, ed 3, Philadelphia: W. B. Saunders Company, 1996.
Eubanks DH, Bone RC. Comprehensive respiratory care, ed 2. St Louis: Mosby, 1990.
Frownfelter DL. Chest physical therapy and airway care. In Barnes TA, editor: Core textbook of respiratory care practice, ed 2, St Louis: Mosby, 1994.
Gorback MS. Airway management. In: Dantzker DR, MacIntyre NR, Bakow ED, editors. Comprehensive respiratory care. Philadelphia: W. B. Saunders Company, 1995.
Heffner JE. Managing difficult intubations in critically ill patients. Respir Management. 1989;19(3):53.
Hess DR, Branson RD. Airway and suction equipment. In Branson RD, Hess DR, Chatburn RL, editors: Respiratory care equipment, ed 2, Philadelphia: Lippincott Williams & Wilkins, 1999.
JEM 400 Endotracheal Tube Changer (Guide), product literature, Instrumentation Industries Inc, Bethel Park, Penn.
Kovac AL. Dilemmas and controversies in intubation. Respir Management. 1991;21(4):77.
Kurth CD, Goodwin SR. Obstructive airway diseases in infants and children. In Koff PB, Eitzman D, Neu J, editors: Neonatal and pediatric respiratory care, ed 2, St. Louis: Mosby-Year Book, Inc., 1993.
Levitzky MG, Cairo JM, Hall SM. Introduction to respiratory care. Philadelphia: WB Saunders, 1990.
Lewis RM. Airway care. In: Fink JB, Hunt GE, editors. Clinical practice in respiratory care. Philadelphia: LippincottRaven, 1999.
May RA, Bortner PL. Airway management. In: Hess DR, MacIntyre NR, Mishoe SC, et al, editors. Respiratory Care Principles & Practice. Philadelphia: W.B. Saunders Company, 2002.
McIntyre D. Airway management. In: Wyka KA, Mathews PJ, Clark WF, editors. Foundations of respiratory care. Albany: Delmar, 2002.
Part 4: Adult basic life support. Circulation. 2005;112:IV18-IV34.
Plevak DJ, Ward JJ. Airway management. In Burton GC, Hodgkin JE, Ward JJ, editors: Respiratory care: a guide to clinical practice, ed 4, Philadelphia: Lippincott-Raven, 1997.
PressureEasy Cuff Pressure Controller, ReviveEasy PtL Airway, and Endotracheal/Trach Tube Pilot Tube Repair Kit, product literature, Respironics, Monroeville, Penn.
Roth P. Airway care. In Aloan CA, Hill TV, editors: Respiratory care of the newborn and child, ed 2, Philadelphia: Lippincott-Raven, 1997.
Shapiro BA, Kacmarek RM, Cane RD, et al, editors. Clinical application of respiratory care, ed 4, St Louis: Mosby, 1991.
Shilling A, Durbin CG. Airway management devices. In Cairo JM, Pilbeam SP, editors: Mosby’s respiratory care equipment, ed 8, St Louis: Mosby, Inc, 2010.
Sills JR. An emergency cuff inflation technique. Respir Care. 1986;31(3):199.
Simmons KF, Scanlan CL. Airway management. In Wilkins RL, Stoller JK, Scanlan CL, editors: Egan’s fundamentals of respiratory care, ed 8, St Louis: Mosby, Inc, 2003.
Simmons KF, Scanlan CL. Airway management. In Wilkins RL, Stoller JK, Kacmarek RM, editors: Egan’s fundamentals of respiratory care, ed 9, St Louis: Mosby, Inc, 2009.
Whitaker K. Comprehensive perinatal & pediatric respiratory care, ed 2. Albany, NY: Delmar, 1997.
White GC. Equipment theory for respiratory care, ed 4. Albany, NY: Delmar, 2005.
Wilkins RL, Stoller JK, Scanlan CL, editors. Egan’s fundamentals of respiratory care, ed 8, St Louis: Mosby, Inc, 2003.
SELF-STUDY QUESTIONS FOR THE ENTRY LEVEL EXAM See page 594 for answers
SELF-STUDY QUESTIONS FOR THE WRITTEN REGISTRY EXAM See page 619 for answers
[/level-membership-for-pulmolory-and-respiratory-category][not-level-membership-for-pulmolory-and-respiratory-category]
12 Airway Management
Note 1: This book is written to cover every item listed as testable on the Entry Level Examination (ELE), Written Registry Examination (WRE), and Clinical Simulation Examination (CSE).
The listed code for each item is taken from the National Board for Respiratory Care’s (NBRC) Summary Content Outline for CRT (Certified Respiratory Therapist) and Written RRT (Registered Respiratory Therapist) Examinations (http://evolve.elsevier.com/Sills/resptherapist/). For example, if an item is testable on both the ELE and the WRE, it will simply be shown as: (Code: …). If an item is only testable on the ELE, it will be shown as: (ELE code: …). If an item is only testable on the WRE, it will be shown as: (WRE code: …).
MODULE A
1. Assess the patient’s airway by inspection
a. Inspect the patient’s face to identify the presence of macroglossia (Code: IB1b) [Difficulty: ELE: R, Ap; WRE: An]
Macroglossia is an excessively large tongue that is often seen to protrude out of the mouth (Figure 12-1). It can partially obstruct the neonate’s upper airway and may be associated with inspiratory stridor. Macroglossia is associated with Down syndrome, Beckwith-Wiedemann syndrome, and several metabolic disorders. Immediate treatment may require (1) manually moving the mandible forward to pull the large tongue out of the airway, (2) inserting an oropharyngeal airway or nasopharyngeal airway, (3) placing the infant in the prone position. If the infant has life-threatening airway obstruction that is not corrected by these procedures, an endotracheal tube or tracheostomy tube must be inserted. Long-term management may require a tracheostomy or corrective facial surgery.
b. Assess for limits in neck range of motion (Code: IB1b) [Difficulty: ELE: R, Ap; WRE: An]
Other people with limited neck range of motion include a patient who has recently had cervical spine surgery and is being weaned from a neck brace or a patient with kyphoscoliosis who is wearing a supportive brace. If a patient wearing a neck brace has an upper airway obstruction, it may be possible to insert an oropharyngeal airway or nasopharyngeal airway to push the tongue forward to ease breathing. If these devices are not effective, and the neck cannot be hyperextended to open the airway, an emergency airway is needed. It is possible that a laryngeal mask airway (LMA) or Combitube could be inserted by an emergency medical technician, paramedic, or respiratory therapist. If these devices are not able to provide a secure airway, a physician will need to perform nasotracheal intubation or a tracheostomy (see Chapter 18).
2. Properly position the patient
b. Properly position the patient to maintain a patent airway (Code: IIIB1) [Difficulty: ELE: R, Ap; WRE: An]
Positioning of the head to open the airway is discussed in Chapter 11. Briefly, use the head tilt-chin lift maneuver to hyperextend the neck of an adult, and slightly extend the neck of a child to open the airway. You can place a small pad behind the neck and head to put the patient in the “sniff position.” Always keep the head in line with the body. If the patient has a known or suspected cervical spine injury, the neck cannot be hyperextended. Instead, open the airway with the jaw-thrust maneuver. Keep the head in line with the body.
3. Recommend the insertion of an artificial airway or a change in the type of artificial airway (Code: IIIG1f) [Difficulty: ELE: R, Ap; WRE: An]
4. Humidify an artificial airway
a. Maintain adequate humidification to the patient’s airway (ELE code: IIIB8) [Difficulty: ELE: R, Ap, An]
MODULE B
1. Recommend the insertion of an artificial airway or a change in the type of artificial airway (Code: IIIG1f) [Difficulty: ELE: R, Ap; WRE: An]
2. Manipulate oropharyngeal airways by order or protocol (ELE code: IIA7a) [Difficulty: ELE: R, Ap, An]
a. Get the necessary equipment
The oropharyngeal airway (or bite block) is made of plastic that is hard enough to withstand any patient’s biting force. A properly sized and placed oropharyngeal airway lifts the tongue forward from the posterior portion of the oropharynx to keep a patent airway and make suctioning oral secretions easier. An oropharyngeal airway is poorly tolerated in a conscious patient and can cause gagging and even vomiting. Oropharyngeal airways are available in a variety of sizes that fit infants or adults. The proper size is found by holding the airway against the patient’s face with the flange against the lips. The end of the airway should reach the angle of the jaw (Figure 12-2). Too large an airway can block the oropharynx by extending past the tongue. An airway that is too small can push the tongue back into the oropharynx rather than pulling the tongue forward, as intended. Figure 12-3 shows a properly placed and sized oropharyngeal airway.
Figure 12-2 Procedure for measuring the proper size of the oropharyngeal airway.
(From Eubanks DH, Bone RC: Comprehensive respiratory care, ed 2, St Louis, 1990, Mosby.)
A number of manufacturers make oropharyngeal airways, which fall into two basic types: hollow center and I-beam (Figure 12-4).
d. Insert the correct oropharyngeal airway (ELE Code: IIIB2) [Difficulty: ELE: R, Ap, An]
There are three widely used methods to insert an oropharyngeal airway.
1. First method
MODULE C
1. Recommend the insertion of an artificial airway or a change in the type of artificial airway (Code: IIIG1f) [Difficulty: ELE: R, Ap; WRE: An]
2. Manipulate nasopharyngeal airways by order or protocol (ELE code: IIA7a) [Difficulty: ELE: R, Ap, An]
a. Get the necessary equipment
See Figure 12-5 for a close-up of a nasopharyngeal airway. All nasopharyngeal airways have a flange that fits close to the patient’s nostril. This prevents the entire tube from being pushed into the patient. All nasopharyngeal airways have a cannula with a channel for breathing or suctioning. Nasopharyngeal airways are available in a variety of sizes for adults. They can be properly sized by measuring from the tip of the nose to the tragus of the ear and adding 2 to 3 cm (Figure 12-6).
b. Put the equipment together and make sure that it works properly
All nasopharyngeal airways are made up of a single piece. There is nothing to assemble.
c. Troubleshoot any problems with the equipment
Make sure that the tube is not plugged by dried secretions, blood, or a foreign body. If plugged, the patient cannot breathe through it, and a suction catheter cannot be passed through it. Remove a plugged nasopharyngeal airway.
d. Insert the correct nasopharyngeal airway (ELE Code: IIIB2) [Difficulty: ELE: R, Ap, An]
The following steps are taken to insert a nasopharyngeal airway:
e. Assess the nasopharyngeal tube placement (ELE code: IIIB5) [Difficulty: ELE: R, Ap, An]
Check the placement by looking into the patient’s mouth with a flashlight and tongue depressor. A properly placed nasopharyngeal airway can be seen in the oropharynx and extends behind the tongue (Figures 12-7 and 12-8). The placement should be checked each time a tube is replaced or moved from one nostril to the other. If a nasopharyngeal tube is inserted too deeply, it can block the glottis opening into the trachea.
MODULE D
1. Recommend the insertion of an artificial airway or a change in the type of artificial airway (Code: IIIG1f) [Difficulty: ELE: R, Ap; WRE: An]
A laryngeal mask airway (LMA) is composed of a modified endotracheal tube with a standard 15-mm-outer diameter (OD) adapter (for attaching a resuscitation bag or ventilator circuit) at the proximal end and a silicone laryngeal mask at the distal end. The mask is inflated by attaching a syringe to the one-way valve and pilot balloon on an inflation tube, in the same manner as an endotracheal tube cuff (Figure 12-9). When the mask is inflated it surrounds and seals the larynx. LMAs were first used in the operating room by anesthesiologists. Their use has been expanded; today, emergency medical personnel and respiratory therapists use LMAs as an alternative to endotracheal tubes or Combitubes in patients with a difficult airway or during a CPR effort. Experience has shown that an LMA can be easily and quickly inserted without any additional equipment. Patients with asthma or irritable airways will have less coughing or bronchospasm than if an endotracheal tube were inserted. It has been shown that ventilating a patient with a resuscitation bag to an LMA is as effective or better than bag-mask ventilation. See Box 12-1 for indications, contraindications, and limits to an LMA.
BOX 12-1 Indications, Contraindications, and Limits of a Laryngeal Mask Airway
INDICATIONS
Remember that an LMA does not provide as secure an airway as an endotracheal tube. There are two limitations to using an LMA. First, the LMA does not absolutely protect against aspiration. Second, tidal volume gas can leak if mechanical ventilation pressures are greater than 20 cm H2O. This can lead to a smaller than desired tidal volume and/or gas being forced into the stomach. Excessive air in the stomach can cause vomiting. If either of these possibilities is of paramount clinical concern, the patient should have an endotracheal tube inserted rather than an LMA.
2. Manipulate laryngeal mask airways by order or protocol (Code: IIA7f) [Difficulty: ELE: R, Ap; WRE: An]
a. Get the necessary equipment
Several manufacturers make standard LMAs like that shown in Figure 12-9. In addition, there are two commonly seen modifications. The first is an LMA that facilitates tracheal intubation by easily allowing an endotracheal tube to slide through its lumen. The second is an LMA that includes a port for gastric suction to vent any air in the stomach. Adjunct supplies include a watersoluble lubricant for the laryngeal mask, syringe to inflate the mask, and protective gear for the practitioner, such as a face mask and gloves.
3. Assess the placement of the LMA (ELE code: IIIB5) [Difficulty: ELE: R, Ap, An]
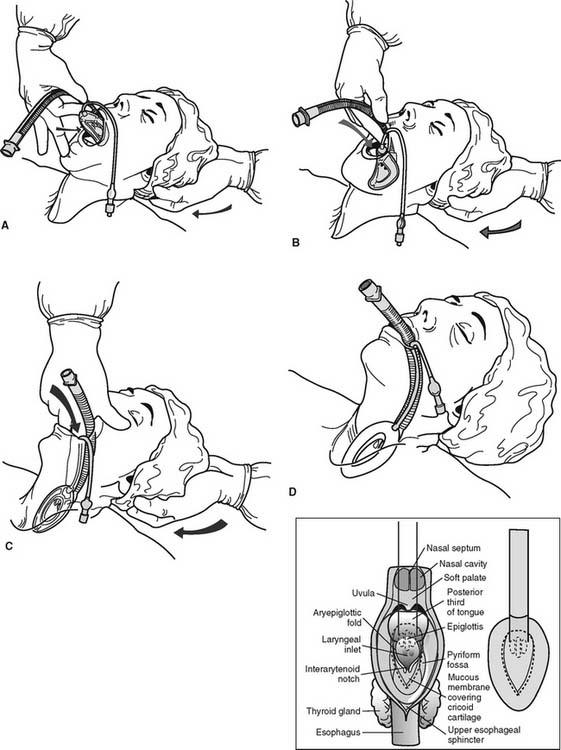
While the NBRC does not list the insertion of an LMA as a testable item, proper placement is needed to ensure that it can be correctly maintained in the airway. Figure 12-10 shows the procedure for inserting an LMA and how the inflated mask covers the laryngeal inlet (glottis opening into the trachea). When the properly sized LMA is being placed, it is gently advanced until resistance is felt. (If the LMA is too small, no resistance will be felt since it will slide into the esophagus.) The distal tip of the mask will stop at the upper esophageal sphincter. The cuff is then inflated to cover the tracheal opening and seal off the esophagus. (Later, the cuff pressure can be measured; it should not exceed 60 cm H2O.) Manually ventilate the patient’s lungs with a resuscitation bag. The following steps should be taken to ensure that the LMA is properly placed to cover the opening to the trachea: (1) when the LMA mask is inflated, the tube will move out of the mouth about 1 to 2 cm; (2) auscultate for equal, bilateral breath sounds; (3) auscultate for the absence of sounds over the stomach; (4) an end-tidal carbon dioxide monitor should show exhaled CO2.
MODULE E
1. Recommend the insertion of an artificial airway or a change in the type of artificial airway (Code: IIIG1f) [Difficulty: ELE: R, Ap; WRE: An]
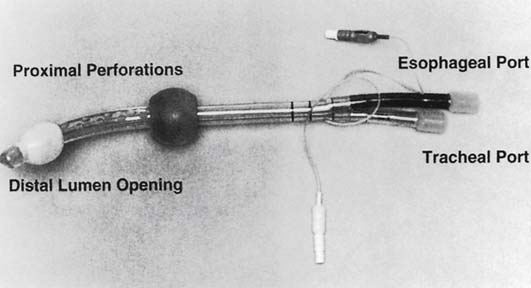
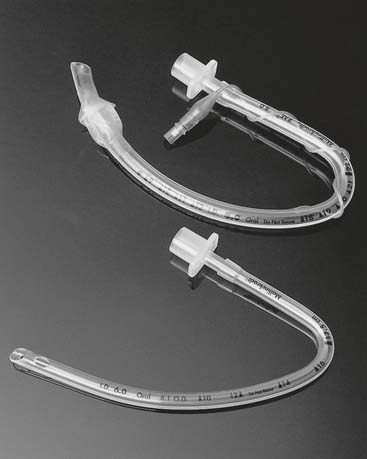
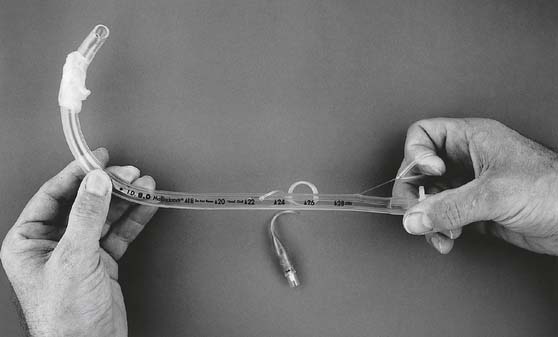
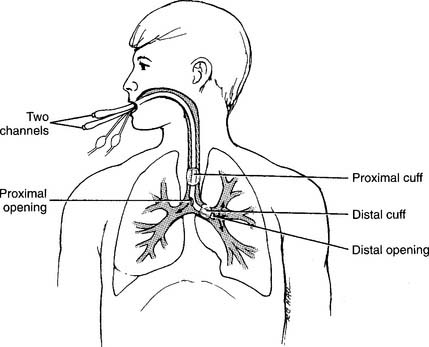
The Combitube (also known as the esophageal-tracheal Combitube or ETC) is a double-lumen tube that can be used to ventilate a patient whether the tube is placed into the esophagus (as intended) or trachea (Figure 12-11). The Combitube is one version of a series of tubes called esophageal obturator airways (EOAs) that are designed to be placed into the esophagus of an unconscious adult patient. Clinical experience has shown that a Combitube provides a reasonably secure airway in emergency situations, such as when performing CPR. It can be used as an alternative to an LMA. At the time this book was being published, there were five different types of EOA that provide the same two functions: ensure a stable airway for artificial ventilation and prevent vomiting and aspiration. Clinical experience with the various types of esophageal obturator airways is highly recommended because they do not appear or operate like standard endotracheal tubes. See Box 12-2 for a comparison of a Combitube with an endotracheal tube.
BOX 12-2 Indications, Contraindications, Advantages, and Disadvantages of the Combitube
2. Manipulate a Combitube by order or protocol (Code: IIA7g) [Difficulty: ELE: R, Ap; WRE: An]
3. Assess the placement of the Combitube (ELE code: IIIB5) [Difficulty: ELE: R, Ap, An]
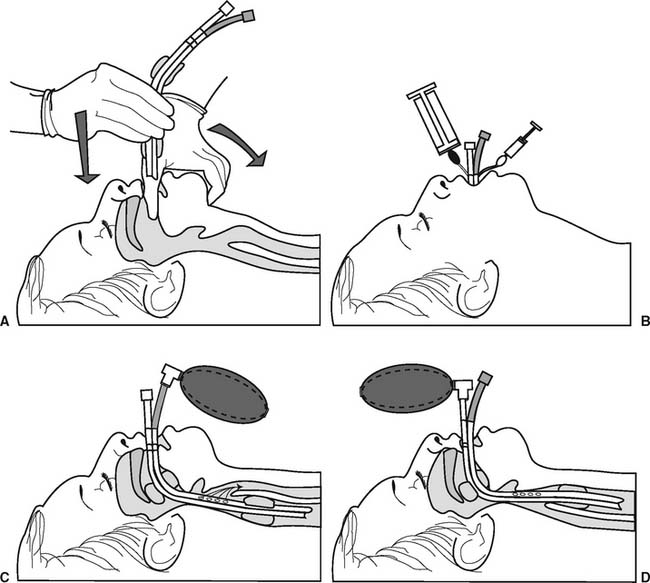
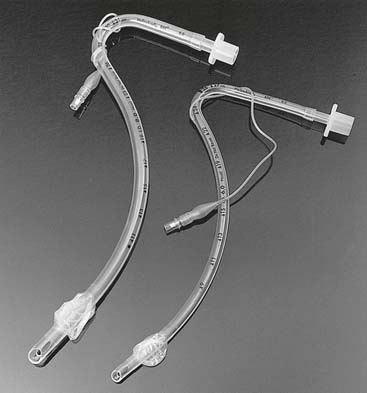
While the NBRC does not list the insertion of the Combitube as a testable item, proper placement is needed to ensure that it can be correctly maintained in the airway. Figure 12-12 shows the procedure for inserting a Combitube. When the tube enters the esophagus as intended, both cuffs are inflated, and the patient is ventilated through the longer, colored tube, bilateral breath sounds will be heard (see Figure 12-12, C). Continue to ventilate the patient’s lungs and tape the tube in place. If breath sounds are not heard, the tube has accidentally entered the patient’s trachea. Now, ventilate through the shorter, clear tube and listen for bilateral breath sounds. If they are heard, continue to ventilate and tape the tube in place (see Figure 12-12, D).
MODULE F
1. Recommend the insertion of an artificial airway or a change in the type of artificial airway (Code: IIIG1f) [Difficulty: ELE: R, Ap; WRE: An]
2. Manipulate standard and fenestrated tracheostomy tubes by order or protocol (ELE code: IIA7c) [Difficulty: ELE: R. Ap, An]
a. Get the necessary equipment
These tubes are available in a variety of sizes for patients of all ages from neonate to adult. See Table 12-1 for tracheostomy tube sizes (this also applies to tracheostomy buttons and endotracheal tubes) based on patient age. It is common practice to refer to the needed tube size by its inner diameter (ID). For example, a tracheostomy tube for an adult female would be 7.5- or 8.0-mm ID.
b. Put the equipment together and make sure that it works properly
The following are commonly seen examples of tracheostomy tube styles:
1. Standard tracheostomy tube
After the tracheostomy procedure is completed, the majority of patients have a standard tube placed into the stoma. Refer to Figure 12-13 for these features of a typical tracheostomy tube:
2. Fenestrated tracheostomy tube
Refer to Figure 12-14 when reviewing these features of the fenestrated tracheostomy tube:
Figure 12-14 Fenestrated tracheostomy tube with its component parts and features.
(From Eubanks DH, Bone RC: Comprehensive respiratory care, ed 2, St Louis, 1990, Mosby.)
4. Maintain the proper position and appropriate cuff inflation of a tracheostomy tube (Code: IIIB4d) [Difficulty: ELE: R, Ap; WRE: An]
5. Change the tracheostomy tube (ELE code: IIIB7) [Difficulty: R, Ap, An]
b. Routine tube change
6. Independently perform tracheostomy care (Code: IIIF2g5) [Difficulty: ELE: R, Ap; WRE: An] (ELE code: IIIB6) [Difficulty: ELE: R, Ap, An]
7. Extubate the patient
a. Recommend extubation (Code: IIIG1h) [Difficulty: ELE: R, Ap; WRE: An]
Extubation should only be performed after correction of the causes that led to insertion of the tracheostomy tube. If the patient has required mechanical ventilation, review the discussion in Chapter 15 that relates to weaning the patient and extubation.
b. Perform extubation (Code: IIIB9) [Difficulty: ELE: R, Ap; WRE: An]
Extubation should be performed only by trained personnel and under the proper conditions to ensure the patient’s safety. See Box 12-3 for a list of complications that can occur after extubation. The generally recommended steps in extubation include the following:
Routine stoma care to ensure healing usually includes the following each shift:
