Abdominal wall and hernias
GENERAL ISSUES IN HERNIA SURGERY
1. Definition: A hernia is an abnormal protrusion of a viscus (Latin: internal organ) through its containing wall. Abdominal wall hernias are very common, especially in the groin (inguinal hernias) and umbilical area.
 Consider whether there is another cause for the patient’s symptoms. Groin pain may be due to osteoarthrosis of the hip or a groin strain, rather than the obvious inguinal hernia. Epigastric pain may be biliary colic or a symptom of peptic ulcer and not a consequence of the epigastric hernia.
 The hernia may not be evident in the anaesthetized patient so mark the site (and side) preoperatively.
3. Indications to treat: Most hernias are operated on to ensure they do not enlarge, become uncomfortable, and to avoid the risk of strangulation. Reserve non-operative management for asymptomatic direct inguinal hernias, particularly in elderly, inactive or terminally ill patients and those who will not consent. The few who do not have an operation are best left without a truss, which is uncomfortable and difficult to manage.
4. Repair: There are three steps to a hernia repair:
 Herniotomy: remove the hernia sac
 Herniorraphy: close the hernia neck or wall defect
 Hernioplasty: support the defect, usually using a prosthetic mesh.
5. Select the approach (open or laparoscopic): This depends on the hernia site, your surgical expertise, operating facilities, the patient’s anatomy and wishes. Laparoscopic repair requires different surgical skills, may be more expensive for the hospital than an open repair and cannot be undertaken under local anaesthetic.
6. Consent: Ensure the patient has given full consent to the operation and understands the circumstances under which it will be performed. Provide full information on discharge arrangements.
7. Suture the repair with a non-absorbable monofilament suture on a curved, round-bodied needle, polyamide (nylon) and polypropylene being the most popular. Remember the following:
 Monofilament sutures require extra knots for security.
 Handle synthetic monofilament suture material with care. Do not hold it with instruments or jerk it when tying knots or it will be seriously weakened.
 Do not drag the fine suture through the tissues, since it will cut them, enlarging the holes.
 Do not tie the sutures too tightly. They will either cut out now or strangulate the tissues and weaken them later and may also increase the risk of troublesome neuralgia.
 Do not take even bites of the tissues. Although this looks neat, evenly inserted stitches tend to detach a strip of aponeurosis. Therefore, take successive bites at differing distances from the edge.
8. Prosthetic mesh in hernia repair: If you use prosthetic mesh for the repair, give a prophylactic dose of antibiotic at induction. Always administer this in operations for strangulated hernia as the wound may be contaminated.
Prosthetic mesh is an integral part of almost all hernia repairs as it often makes hernia surgery quicker and easier and reduces recurrence rates. There are many materials available, with several factors influencing choice:
 Strength/stiffness results not only from the intrinsic strength of the mesh, often related to the density of prosthetic material, but also from the resulting in-growth of fibrosis, which is greater with smaller pore sizes.
 Flexibility/elasticity: meshes should be flexible enough to conform to the abdominal wall movements on a long-term basis. It is increasingly apparent that current polypropylene meshes may be unnecessarily strong, resulting in pain and the sensation of stiffness when compared with lighter-weight open-weave or compound meshes (e.g. Vypro, Ethicon).
 Size and shape: all prostheses shrink as part of the process of scar maturation. Therefore allow a minimum overlap of the hernial defect by the mesh of 2–3 cm for initial fixation and long-term coverage. For laparoscopic ventral hernia repair, favour a 5-cm overlap. Various preformed meshes are now available for some hernia sites.
 Expense often limits the use of newer, composite meshes.
 Adhesion formation remains a problem, particularly with intraperitoneal implantation. Two-sided meshes, with one side engendering tissue ingrowth, the other inhibiting it (e.g. DualMesh, Gore, Proceed, Ethicon), reduce this risk.
 Infection: systemic prophylactic antibiotics have been shown to reduce the risk of wound infection.
9. Local anaesthesia is suitable for many groin hernia repairs and some other hernias. Young adults may not tolerate it alone and may require the addition of sedation. There are economic benefits, particularly for day-case surgery and in the elderly. Its use carries its own risks and the following general considerations apply:
 Monitor the blood pressure, pulse rate and oxygen saturation.
 Know the appropriate resuscitation procedures in case the patient develops an adverse reaction.
 For effective anaesthesia give a sufficient volume. Use either 0.5% lidocaine with adrenaline (epinephrine) 1 in 1000 000 or bupivacaine (0.25%). Select your choice of local anaesthetic for hernia operations and do not vary, to avoid confusion.
 Do not exceed the safe dose of local anaesthetic: for lidocaine with adrenaline (epinephrine) this is 70 mg lidocaine per kg, approximating for an average adult to 5000 mg, equivalent to 100 ml of a 0.5% solution.
 Clearly record in the notes the dose of local anaesthetic and other drugs.
10. Close the skin with sutures, clips, staples or adhesive strips. Continuous, absorbable subcuticular stitches provide a very neat result and avoid the discomfort and cost of suture removal.
11. Provide adequate postoperative analgesia. Inject local anaesthetic into the wound. Prescribe preoperative analgesics such as IV paracetamol and regular postoperative oral medication such as non-steroidal anti-inflammatories or co-codamol for 2 days.
 Reduce bruising and haematoma formation by achieving meticulous haemostasis and judiciously inserting suction drains.
 Wound infection rarely requires more than drainage of any collection. Sinus formation is rare with the use of monofilament sutures but occasionally requires removal of suture knots or mesh.
13. Hernia recurrence is related to technical failure, including a missed hernial sac and inadequate placement or sizing of the mesh.
INGUINAL HERNIA
Appraise
1. Most inguinal hernias are repaired.
2. Repair techniques: There are several open and laparoscopic techniques described to repair an inguinal hernia:
 The Lichtenstein mesh repair, developed by Irving Lichtenstein (1920–2000) of Los Angeles, in 1984; in 1989 he reported no recurrences in 1000 patients after 1–5 years. It is the most popular open technique, relatively easy to master and has a low recurrence rate Other open techniques repair the posterior wall of the inguinal canal by suturing the conjoint tendon to the inguinal ligament (Bassini repair) or by overlapping the transversalis fascia (Shouldice repair).
 Through a laparoscopic approach a synthetic mesh can be placed in the pre-peritoneal space from the midline medially to a point close to the level of the anterior superior iliac spine laterally, thus covering the whole extent of the inguinal canal including the internal ring and the area medial to the inferior epigastric vessels where direct hernias originate, as well as covering the internal opening of the femoral canal. The pre-peritoneal space can be reached either via a total extra-peritoneal (TEP) approach which should not involve entry into the peritoneal cavity, or via a transabdominal preperitoneal (TAPP) approach. For inguinal hernia repairs the TEP requires more surgical experience, but is considered safer as the peritoneum is not breached.
3. Selecting the correct approach to repair an inguinal hernia.
 Familiarize yourself with all techniques and adapt them according to the patient’s anatomy and wishes, rather than be compromised by lack of surgical expertise or equipment. The two approaches (open and laparoscopic) require very different surgical skills.
 The laparoscopic approach has slightly less postoperative pain, a faster return to work, a lower incidence of chronic groin pain and fewer wound complications. Long-term recurrence rates are similar for both methods. Laparoscopic repair costs more and carries a very small risk of serious injury to the intestine or major blood vessels, especially if the TAPP approach is adopted.
 The open operation has the advantage of being feasible under local anaesthesia. It is also cheaper and simpler to learn, and is currently recommended by NICE as the procedure of choice for primary, unilateral inguinal hernia in the UK. Consider especially women with primary unilateral inguinal hernias for open surgery.
 Repair a recurrent inguinal hernia through unscarred tissue: that is, if an open repair has recurred consider a laparoscopic approach, but if a laparoscopic repair has recurred consider an open approach.
 Bilateral inguinal hernia repairs are usually repaired laparoscopically as the operation is quicker. When repaired openly at the same time, the results are slightly inferior to separate repairs.
 For obese patients laparoscopic inguinal hernia repair is often easier.
 Undertake open repairs of large indirect inguinoscrotal hernias and urgent operations for hernias which may have strangulated.
 Avoid a laparoscopic approach if there has been previous lower abdominal surgery as a clear pre-peritoneal plane is difficult to find. Avoid it following previous open prostatectomy or procedures for urinary incontinence, but previous appendicectomy does not usually preclude it. A TAPP repair may be difficult or even hazardous if there are intraperitoneal adhesions following previous lower abdominal surgery.
 Select an open approach if there is an increased risk of bleeding such as anticoagulant therapy (even if was stopped preoperatively) or anti-platelet therapy such as clopidogrel, since bleeding can be more difficult to control than during the open operation.
Inspect
1. The diagnosis of groin swellings is notoriously difficult. Experienced as well as inexperienced surgeons make frequent mistakes. Do not accept the diagnosis of the referring doctor, but take a fresh history and carry out a complete examination. Is there another possible cause for the patient’s symptoms apart from the hernia? If a clear history of a reducible intermittent lump in the groin is accompanied by a negative examination, a hernia will be found on exploration; if in doubt, consider herniography.
2. Palpation is not the only or even the most important method of examination. Look with the patient standing and again with the patient supine. If you see a lump, ask yourself ‘Where is it?’ If it is reducible, where does it first reappear on coughing or straining? A cough impulse may be absent, especially over a femoral hernia in which a small sac is covered by much fatty extra-peritoneal tissue. Conversely, a cough impulse is present over Malgaigne’s (Parisian surgeon 1806–1856) bulging, or a saphena varix.
3. Always examine the scrotum and its contents in male patients. If there is a swelling, ask yourself the fundamental question ‘Can I get above it?’ Occasionally you discover undescended testes; deal with them at the same procedure.
Prepare
1. Obtain the patient’s signed consent, warning of the possible complications of haematoma (especially for large inguinoscrotal hernias), ischaemic orchitis, persistent groin pain, hernia recurrence, wound and mesh infection, and damage to local structures, which can be more significant with a laparoscopic approach. In laparoscopic surgery obtain consent for conversion to open repair if necessary. Discuss with the patient what action you should take, if, at operation for unilateral hernia, an unexpected, asymptomatic contralateral hernia is revealed. Record the agreed consent on the form.
OPEN MESH INGUINAL HERNIA REPAIR (Lichtenstein Repair)
Local anaesthesia for inguinal hernia repair
1. Follow the instructions for local anaesthesia.
2. Inject 20 ml along the line of the proposed incision using a fine needle to raise a continuous bleb within the epidermis.
3. Replace the needle with a larger one to inject deeply and along the same line superficial to the anterior wall of the canal.
4. Blunt the needle to improve the ‘feel’ of passage through the aponeurosis and inject 5 ml of fluid 2 cm above and medial to the anterior superior iliac spine deep to the external oblique to block the iliohypogastric and ilioinguinal nerves.
5. Reserve about half the volume of anaesthetic to inject under the external oblique aponeurosis, around the neck of the sac and into other sensitive areas during the operation.
Access
1. Start the incision a finger’s breadth above the palpable pubic tubercle within the skin crease which is often present (as opposed to parallel to the inguinal ligament) and extend this to two-thirds of the way to the anterior superior iliac spine. Incise the fascia to expose the external oblique aponeurosis, ligating and dividing two or three large veins that cross the line of the incision. Avoid cutting into the hernial sac and spermatic cord at the medial end of the incision.
2. Expose the glistening fibres of the external oblique aponeurosis and identify the external inguinal ring, which confirms the line of the inguinal canal.
3. With a scalpel split the external oblique aponeurosis in the line of the fibres. Enlarge the split medially and laterally by pushing the half-closed blades of the scissors in the line of the fibres. At the medial end of the split you open the external inguinal ring. Ensure that you do so. Do not allow curved blades of scissors to skirt around the crura of the ring. Preserve the ilioinguinal nerve, lying under the external oblique, to minimize the risk of postoperative numbness and pain.
4. Apply artery forceps to the edges of the aponeurosis and gently elevate each side. As you evert the upper leaf, look for the arching lower border of internal oblique muscle, with the cord below it. As you evert the lower leaf, sweep loose tissue from the deep surface of the inguinal ligament.
Assess (Fig. 6.1)
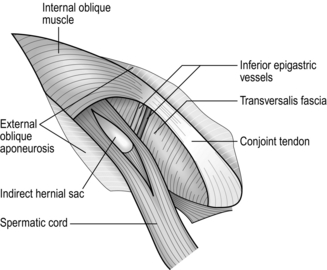
Fig. 6.1 Exposure of the right inguinal canal. The cremasteric fascia is split to show an indirect hernial sac.
KEY POINT
Confirm the diagnosis

1. Start to mobilize the cord by incising, just above and lateral to the public tubercle, the ‘mesentery’ of fascia and fibres of cremasteric muscle that extends downwards from the medial part of the conjoint tendon to envelop the cord. Deepen this small incision behind the cord, drawing the latter downwards while passing the index finger from below against the pubic tubercle, to develop a plane to encircle the cord and apply a hernia ring.
2. Now dislocate the cord laterally and downwards by incising the coverings along lines just above and below it. This exposes a direct hernia, which can be freed from the cord.
3. Carefully divide the fibres of cremaster just distal to the internal ring, ensuring haemostasis.
4. Even though a direct hernia is evident, examine the cord. Normally it is about the thickness of a pencil. It is markedly distended by an unreduced, sometimes adherent or sliding, hernia. A thickened sac results from a longstanding indirect hernia. Cord lipomata produce thickening, as does an encysted hydrocele of the cord (in females a hydrocele of the canal of Nuck). To exclude an indirect sac, open the spermatic fascia covering the cord and identify the edge of the peritoneum deep to the internal ring.
5. Identify the lower arching fibres of the internal oblique muscle, becoming tendinous at the conjoint tendon, and examine the posterior wall below this. A direct hernia may be a large bulge, a diffuse weakness of the whole posterior wall or, less often, a funicular hernia through a small localized defect (Ogilvie’s hernia).
6. If you have any concern that a femoral hernia may be present, incise the transversalis fascia to expose the upper aspect of the femoral canal. If a femoral sac is present, deal with it via a High approach repair (Lothiesen procedure, see later).
7. The cremasteric vessels pass medially from the inferior epigastric vessels adjacent to the cord. If the internal ring is enlarged it may be necessary to carefully identify, isolate, ligate and then divide the cremasteric vessels to facilitate a snug repair at the internal ring. If they are injured more medially, ligate them proximally and distally to the damage.
Hernia sac
Indirect sac
1. With the left thumb in front, gently stretch the previously mobilized cord over the left index finger, which is placed behind the cord. Make a short split with a knife, in the line of the cord, through the cremasteric and internal spermatic fascial layers. Continue the split proximally to the internal ring using scissors, first with their blades on the flat, separating fascia from deeper layers, then splitting the fascia.
2. Look for the sac. A white curved edge may be seen if the hernial sac is small (Fig. 6.1); if it is large it will be obvious as the fascial layers are separated. Using the point of the scalpel, gently incise the fibres crossing the fundus or the side edges of the sac. Unless it is very adherent it will then be possible to peel the sac out of the cord with the aid of a few further strokes of the blade. The sac is then dissected back to the level of the abdominal peritoneum, using a combination of wiping with a gauze swab and snipping firm attachments with scissors. Keep the dissection close to the sac and avoid damaging other structures in the cord.
3. Pick up the sac with two artery forceps and open it between the forceps with a scissors. Note any contents of the sac and return them to the peritoneal cavity. Adherent omentum may be freed, or ligated and excised. Be sure this is not part of a sliding hernia (see below).
4. While the empty sac is held vertically by means of the artery forceps, transfix its neck with a polyglactin (Vicryl) suture. Tie the ends of the suture-ligature into a half hitch, completely encircle the neck of the sac and tie a triple-throw knot to ligate the neck of the sac. If contents tend to bulge into the sac, gently hold them back using non-toothed dissecting forceps, sliding them out as the ligature is tightened.
5. Do not let your assistant cut the ends of the ligature. First excise the sac 1 cm distal to the ligature. Examine the cut end to ensure that only sac is seen, it does not bleed and the suture is secure, then cut the ligature yourself. The stump of the sac should retract through the internal ring.
6. Alternatively, fully mobilize and simply invert the sac. It need not be ligated for this.
7. If the margins of the internal ring have been stretched by the indirect hernia, narrow the gap in the posterior wall using a non-absorbable suture to approximate the attenuated margins of the transversalis fascia medial to the cord.
8. If there are large extra-peritoneal lipomata, carefully isolate, ligate and excise them but do not try to dissect out all the fatty tissue.
Large indirect sac
1. Complete hernias, or scrotal funicular hernias, have no distal edge to the sac as seen at the level of the pubic tubercle. Attempts to dissect out the whole sac cause the scrotal part of the sac and the testis to be drawn into the wound, increasing the risk of haematoma or ischaemic orchitis.
2. Purposefully divide the sac straight across within the inguinal canal. Isolate the proximal portion up to the internal ring, and leave the distal portion open. In this way the dissection is kept to a minimum.
3. If the sac is adherent, open it in front and place artery forceps at intervals round the inside as markers. Lift up two forceps, stretch the portion of sac between them, separate the sac from the cord and cut it distal to the forceps. Take the next two forceps and repeat the manoeuvre. Continue in this manner until the proximal circumference of the sac is completely sectioned, with the edges still held in the forceps.
4. After stripping the proximal part of the sac to the inguinal ring, transfix and ligate the neck.
Sliding indirect sac
1. In some hernias, retroperitoneal structures slide down to form part of the sac wall, chiefly the sigmoid colon, bladder or caecum. Always be on the look-out for sliding hernia.
2. You discover the sliding component when you attempt to empty and free the sac.
3. If the sac is intact, do not open it. If the sac has been opened, mark the fringe of peritoneum on the viscus with artery forceps and close the sac. Ensure that closure is complete.
4. Make sure that neither the organ nor its blood supply was damaged before the true situation was recognized. If the bladder was damaged, repair the wall and remember to insert an indwelling urethral catheter at the end of the operation.
5. Fully mobilize the entire hernia sac and sliding viscus from the cord and replace it in the abdomen. If the sac is inguinoscrotal, divide and close it below the sliding viscus and return it to the abdomen.
Direct sac
1. Always look for an indirect sac.
2. If the direct sac is funicular, resulting from a localized defect in the posterior wall, isolate it, empty it, then transfix, ligate and divide it at the neck. Define the margins of the posterior wall defect. If the hole is small and it can be closed without tension, suture it now, with non-absorbable material on a fine, curved, round-bodied needle.
3. More often the sac is diffuse and associated with a general weakness of the posterior wall. Do not open it. Push it inwards and maintain the invagination with a running suture of absorbable or non-absorbable suture, carried across the stretched transversalis fascia so as to flatten the bulge without tension. The sutures must not bite deeply or the bowel or bladder may be damaged.
Posterior inguinal canal wall repair
The Lichtenstein repair is the mainstay of all open inguinal hernia repairs and employs a sheet of polypropylene mesh covering the posterior wall of the inguinal canal and extending, for security, over adjacent structures, with a hole to transmit the cord. It is a ‘tension-free repair’. Additionally, or alternatively, a mesh ‘plug’ may be inserted into the defect.
Action
1. The mesh should have overall dimensions of 11 cm × 6 cm. To accommodate this, separate the external oblique aponeurosis from the deeper layers superiorly and medially and from the muscular part of internal oblique laterally to create an adequate pocket to receive the mesh.
2. Prepare the polypropylene mesh as indicated in Figure 6.2A. The lower medial corner is slightly rounded, the upper medial corner rather more so. The mesh is then incised from its lateral margin, placing the cut one-third of the distance from the lower edge. The cut extends for approximately half the length of the mesh, depending upon the size of the patient; it may need to be extended when the mesh is in place. In small patients the upper edge may need to be trimmed slightly.
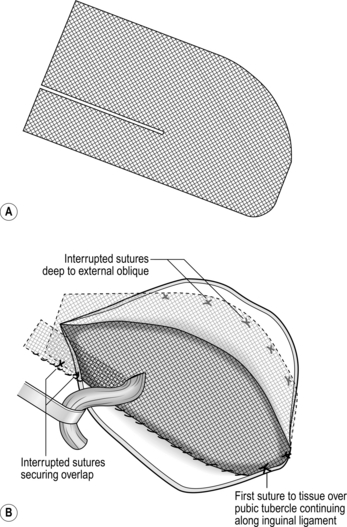
3. Place the mesh in its final position (Fig. 6.2B). Lift the cord and bring the narrow lower tail through under it, below the internal ring. Then tuck the lateral end under the external oblique; the lower edge of the mesh now lies along the inguinal ligament. Now insert the upper two-thirds of the mesh so that it lies under the external oblique aponeurosis superiorly and medially, ensuring that there is a good overlap on the rectus sheath medially. Tuck the wide upper tail under the external oblique laterally, with its lower edge over the lower tail. Insert your fingers under external oblique superiorly and laterally to ensure that the mesh lies quite flat in the peripheral part of the pocket, though there may be a slight bulge centrally.
4. The mesh does need to be secured in place across the posterior wall of the inguinal canal. Although most use polypropylene sutures, it is possible to use staples or glue. Start the fixation by passing a 2/0 polypropylene stitch through the mesh and the tissues overlying the pubic tubercle and tying this. Use this to form a continuous locking suture between the lower edge of the mesh and the inguinal ligament, working from medial to lateral, extending to at least 2 cm lateral to the internal ring. Take irregular bites of the inguinal ligament to avoid splitting it and do not allow the lower leaf of the external oblique to roll in and be included in the sutures; if this happens, there will be no external oblique left to close. For the medial part of this suture line it is best to retract the cord downwards. Then, as the suture approaches the internal ring, move the cord cephalad and pass the needle under it to continue laterally. When suturing immediately in front of the femoral vessels be careful to take only the ligament and not a bite of a major vessel!
5. If the slit in the mesh is too short extend it so that the cord passes directly from the internal ring to the opening in the mesh. A bulky cord may be accommodated by making a small cut in the mesh at right-angles to the slit. If you made too long a cut, all is not lost; simply shorten the slit with one or two sutures.
6. Overlap the tails of the mesh by bringing the lower edge of the upper portion in front of the lower tail and securing it to the inguinal ligament with two interrupted sutures (or by including it in the lateral part of the continuous suture). The resulting opening in the mesh should be a snug, but not a tight, fit around the cord (Fig. 6.2B).
7. Now secure the medial and upper margins of the mesh with about six interrupted sutures, avoiding the nerves (Fig. 6.2B). These are most conveniently placed 0.5 cm away from the edge, so that the mesh lies flat on the underlying aponeurosis or muscle. The medial sutures are particularly important as there is less overlapping of the mesh there, making it a potential site for recurrence.
8. The mesh repair is now completed. It appears slightly redundant centrally but that does not matter.
KEY POINT
Sound repair?

9. Replace the cord in the inguinal canal.
10. Wash the inguinal canal with any remaining local anaesthetic, making sure not to remove it too quickly.
11. Close the external oblique aponeurosis with a synthetic absorbable suture, starting laterally and ending medially to reform the external ring snugly but not tightly around the emerging cord. Once again, take care to take bites at unequal distances from the edges; otherwise you will pull from the cut edges a strip of aponeurosis.
12. Appose the subcutaneous fascia with fine absorbable stitches and close the skin wound (see above).
Postoperative management
1. Following repair of inguinal hernia under local anaesthesia, allow the patient to leave the operating theatre on foot. This is good for confidence.
2. Encourage patients to mobilize immediately after recovery from general anaesthesia.
3. Activities should be limited only by the patient’s comfort.
Complications of open inguinal hernia repair
In addition to the complications mentioned in the section on general issues, there are others specific to the groin:
1. Scrotal complications: Ischaemic orchitis is an uncommon complication presenting as pain and swelling in the first few days after hernia repair. In a proportion of cases it results in testicular atrophy. Damage to the vas should be recognized and repaired at the time of hernia repair. Hydrocele formation is more common after transection of the sac and resorbs spontaneously in most cases. Genital oedema, relatively common in the first 3 days, settles spontaneously, requiring reassurance only.
2. Haematoma: Bruising can be significant, often involving the scrotum, to the alarm of the patient, developing a couple of days after surgery. Even significant haematomas can be left to resolve, although this may take months and does increase the risk of orchitis, mesh infection and possibly recurrence and groin pain.
3. Wound infections: Reddening of the wounds is not uncommon, but frank purulent discharge is. If this persists, be concerned about a mesh infection and consider removing the mesh.
4. Nerve injury: Some degree of transient numbness below and medial to the incision is very common and may persist with little disability. Of much more significance is the incidence of chronic residual pain that occurs in at least 3% of conventional hernia repairs.
5. Urinary problems: Make sure you are aware of the possibility of bladder injury and recognize it at the time of surgery. Treat it by primary repair and insert an indwelling catheter until a cystogram demonstrates healing. Postoperative urinary retention becomes more common with age, after general anaesthesia and following bilateral hernia repair and usually resolves following a 24-hour period of catheterization.
6. Impotence: This is an occasional complaint for which there does not appear to be an organic basis.
OPEN RECURRENT INGUINAL HERNIA REPAIR
Appraise
1. Consider laparoscopic repair to avoid the adherent tissues.
2. For open operations, take considerable time to define the anatomy. This is difficult as there is distortion from the previous repair and all structures tend to be encased in fibrous tissue.
3. Once the anatomy is defined, secure the posterior wall and undertake a mesh repair as described.
4. Orchidectomy need not be considered, but warn the patient of the increased risk of ischaemic orchitis.
Access
1. Incise or excise the previous skin scar.
2. Deepen the incision at a higher or more lateral level than the previous approach, so that unscarred external oblique aponeurosis is encountered first.
3. Display the external oblique aponeurosis downwards to the inguinal ligament.
4. Re-open the inguinal canal through the scar in the external oblique aponeurosis. Avoid damaging the contents of the canal, which will be adherent.
5. Elevate the upper and lower leaves of the external oblique aponeurosis until you reach unscarred tissue.
6. Isolate the spermatic cord below the pubic tubercle and follow it up to the internal ring. It may lie in an unusual place or be adherent and the vas may have been separated from the vessels.
Assess
1. Look for an indirect recurrence. If you find a sac, isolate it, empty it, then transfix, ligate and divide it at the neck.
2. Look for a direct recurrence. If the recurrence is funicular, isolate it, empty it, then transfix, ligate and divide it at the neck. If it is a diffuse bulge, invert the sac with a running suture to maintain the invagination.
Repair
1. Almost always, the repair should be a mesh repair as outlined above.
2. Occasionally, for a small well defined direct defect, a ‘plug’ repair can be undertaken. Insert a bunched-up piece of polypropylene mesh through the small defect into the extra-peritoneal space and secure it with a few sutures across the open defect.
OPEN STRANGULATED INGUINAL HERNIA REPAIR
Appraise
1. Most operations listed as strangulated hernia are carried out for painful, irreducible or obstructed hernias.
2. An open approach to the strangulated inguinal hernia repair is easiest and most common,
3. Strangulation results from venous obstruction, a rise in capillary hydrostatic pressure, transudation of fluid, exudation of protein and cells, and eventual arterial obstruction. Alternatively, the pressure of a sharp constriction ring at the neck of the sac may cause local necrosis of the bowel wall.
4. Once diagnosed, try to reduce the hernia, making emergency surgery unnecessary and allowing for an early elective operation. The effect of reassuring the patient, who is laid supine in the head-down position, encourages spontaneous reduction. Try to gently reduce the hernia, making sure not to hurt the patient. There is a slight but real risk that you may reduce the hernia en masse: that is, the hernia remains within the peritoneal sac, the neck of which remains as a constriction, so the strangulation is not relieved. Some hernias reduce spontaneously when the patient is sedated prior to operation, or when anaesthesia is induced.
Prepare
1. Do not rush patients with strangulated hernias to the operating theatre. Make sure you know any reason (such as urinary outflow obstruction or a chest infection) why the patient has developed strangulation now. Identify coincidental disease that may make general anaesthesia and operation hazardous.
2. If strangulation has been present for some time, the patient requires fluid and electrolyte replacement. This takes priority over the operation. It is likely, in such cases, that bowel in the hernia will already be irreversibly ischaemic, so little is lost by the delay.
Assess
1. If the history was short, the sac will frequently be empty by the time you expose it. The relaxation produced by the anaesthetic often succeeds when other conservative methods have failed to reduce a hernia. There is then no merit in exploring the abdomen. Repair the hernia as though this were an elective operation.
2. If bowel is present in the sac, do not let it slip back into the abdomen but gently draw it down into view. The bowel is likely to have suffered the greatest damage where it was trapped at the neck of the sac.
3. Feel the margins of the neck of the sac with a fingertip.
4. In Richter’s hernia, a knuckle of the bowel wall is trapped. The bowel lumen is thus not obstructed but the knuckle may become gangrenous and perforate.
5. Maydl’s strangulation is very rare. Two loops lie in the sac but the blood supply to an intermediate loop within the abdomen may be prejudiced so that it is gangrenous.
KEY POINTS
Is the bowel viable?
 If there is a sheen to the bowel wall, if it is pink or becomes pink after release, if the arteries pulsate, if peristalsis is seen, replace the bowel with confidence.
 If the wall is black, green or purple, with no sheen, if there is no pulsation in the mesenteric vessels or it is malodorous, resect it.
 If the bowel is congested, bluish or plum-coloured and still has a sheen, but vascular pulsations cannot be felt, then its viability is doubtful. Remember, however, that blood extravasated subperitoneally cannot be reabsorbed immediately so the colour may not change. Cover the bowel with warm moist packs for 5 minutes and re-examine it. If it has improved in appearance and mesenteric arterial pulsations are palpable it is probably viable.
 The critical areas are the constriction rings at the point of entrapment. These are white when the bowel is first drawn down but may be greenish or black if they are obviously necrotic. Re-examine doubtful rings after an interval to see if the blood supply returns. If it does not, the bowel must be resected. Occasionally it is possible to invaginate and oversew a doubtful ring.
 Experienced surgeons probably resect bowel less frequently than those who are inexperienced. The mucosa is more vulnerable than the seromuscularis to the effects of ischaemia and, if the outer layers survive, the mucosa may slough to leave an annular ulcer. When this heals a constriction may develop – the intestinal stenosis of Garré. The patient presents after an interval of weeks or months with incipient small-bowel obstruction. Provided this is recognized, a simple elective resection can be carried out.
Action
1. If the neck of the hernia sac is constricted, first draw down healthy bowel, then place an index fingertip on each side of the contents, nails facing outwards. Gently dilate the neck of the sac (Fig. 6.3). Make sure the bowel does not slip back. Draw it out to ensure that there is no peritoneal constriction and to expose healthy bowel.
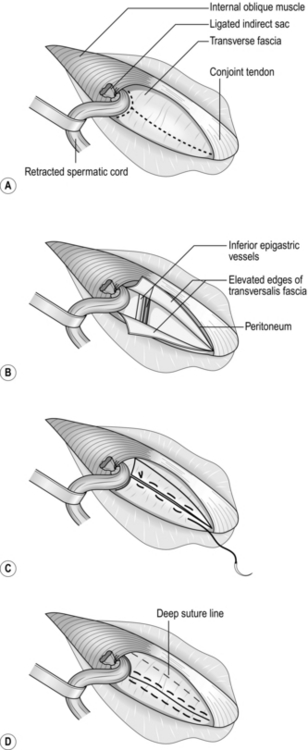
Fig. 6.3 Shouldice repair: (A) the broken line is the incision in transversalis fascia and around the internal ring; (B) the upper and lower flaps have been elevated; (C) the lower flap is sutured to the undersurface of the upper flap; (D) the upper flap is sutured over the lower flap. Finally, the conjoint tendon is sutured to the inguinal ligament.
2. If the bowel is viable, return it to the abdomen.
3. If necessary, resect a gangrenous segment of bowel, performing an end-to-end anastomosis.
OPEN INGUINAL HERNIA REPAIR IN WOMEN
1. In primary inguinal hernias, prefer an open approach. The technique is similar to that employed in men. The sac is almost invariably indirect.
2. The round ligament of the uterus lies in the position of the male spermatic cord. Ligate and excise it at the level of the internal ring to allow closure of the latter.
3. Recognize and isolate the sac, then transfix, ligate and divide it at its neck.
4. If the hernial sac is small, herniotomy is sufficient, combined with closure of the internal ring. For a larger hernia, repair the posterior wall with a mesh as in a male.
OPEN INGUINAL HERNIA REPAIR IN INFANTS
1. Open surgery remains the approach of choice.
2. Infants’ tissues are not suitable for handling by impatient or rough surgeons.
3. Make an incision in the skin crease just above the superficial inguinal ring. The well-developed deep fascia is easily mistaken for the external oblique aponeurosis.
4. The internal and external rings are almost superimposed in infants and it is therefore unnecessary to split the external oblique aponeurosis.
5. Isolate the cord just distal to the external ring, open the external fascial layers of the cord longitudinally and look for the sac. Pick up each layer with two pairs of fine artery forceps and open it between the forceps in the line of the cord. A short sac can be recognized by the white curved distal edge. The easy movement of the slippery internal surfaces of a large sac helps in identifying it. Make sure you are in the correct layer. When the sac is opened, the inner wall is shiny and the tips of the forceps can be passed into the peritoneal cavity.
6. Take great care in dissecting the fragile sac proximally; avoid tearing or splitting it or damaging the inconspicuous and adherent vas deferens. The sight of extra-peritoneal fat confirms that the neck has been reached. If the hernia is complete (i.e. it extends down to the testis), do not dissect it distally. Carefully free it circumferentially just distal to the external ring, either from the outside if it is unopened or from within if it is open. Transect the sac, leave the distal end open and dissect the proximal sac. At the external ring, transfix, ligate and divide the neck of the sac. Do not twist the sac, because the vas may be inadvertently twisted with it and damaged.
7. In an infant or child with a small indirect hernia, herniotomy is all that is required. If the external ring has been stretched by a large hernia, narrow it with one or two absorbable synthetic stitches. No other repair is necessary in an infant. Do not use a mesh.
8. Close the subcutaneous layers with fine absorbable sutures. Close the skin with a fine absorbable subcuticular suture.
LAPAROSCOPIC INGUINAL HERNIA REPAIR
Prepare
2. Ensure that the patient empties the bladder before the operation. Do not routinely pass a urinary catheter. If preliminary laparoscopic assessment reveals that the bladder is full, pass a catheter before proceeding further with the operation.
3. Place the anaesthetized patient supine on the operating table with arms by the side as they sometimes interfere with the operation if they are folded across the chest.
4. Clean the abdomen with povidone-iodine 10% alcoholic solution or other antiseptic.
5. Drape the whole abdomen to give adequate exposure for the placement of port sites.
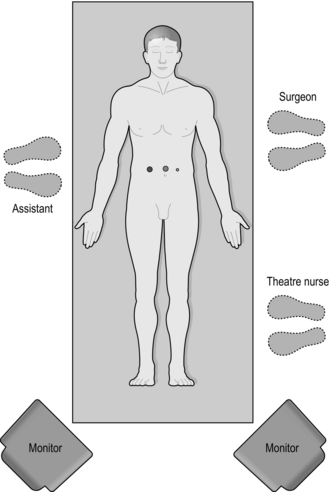
6. As the lead surgeon, stand on the side opposite the inguinal hernia, or the hernia which is largest (Fig. 6.4). An assistant and/or ‘scrub’ nurse stands on the other side (Fig. 6.5).
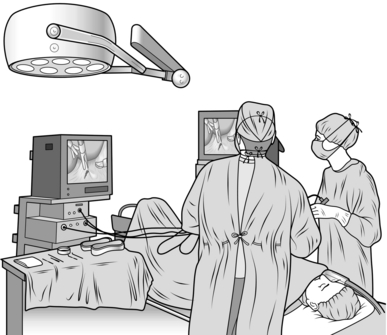
7. Position television monitors at the foot of the patient. Although one screen is sufficient, a second screen helps the assistant.
8. Ensure that you can observe the carbon dioxide insufflator to monitor gas flow and intra-abdominal pressure.
9. Do not have a screen between you and the anaesthetist as this interferes with your manipulation of instruments.
TOTALLY EXTRA-PERITONEAL HERNIA REPAIR
Access
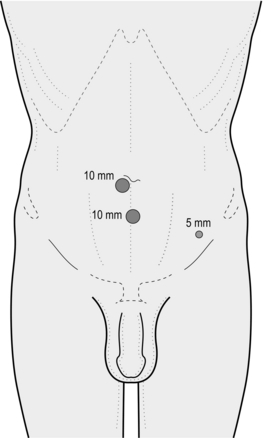
1. Make a transverse incision exactly 1.5 cm from the midline immediately below the umbilicus on the side of the hernia. Make the incision to the side of the larger of the hernias when bilateral hernias are to be repaired (Fig. 6.6).
2. Deepen the incision to the rectus sheath using small retractors to facilitate dissection.
3. Incise the rectus sheath for about 1 cm.
4. Identify the medial border of the rectus muscle and retract it laterally. Access has now been gained to the space within the rectus sheath.
5. In order to fashion a pre-peritoneal space, pass a 10-mm trocar and cannula with a balloon at its tip into the rectus sheath and guide it downwards until it reaches the pubic symphysis and then angle the tip to a position just behind the symphysis (Fig. 6.7).
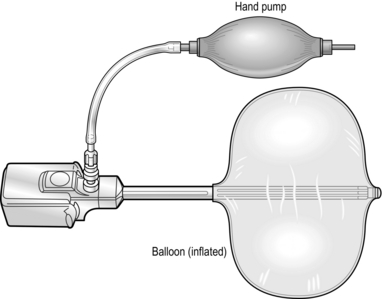
Fig. 6.7 An example of a disposable trocar. Prior to inflation, the balloon is placed through the subumbilical incision and used to initiate the dissection of the pre-peritoneal space.
KEY POINT
Caution

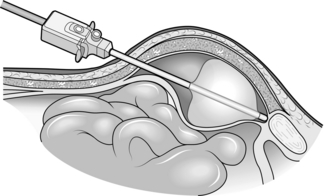
6. Insert a 30 degree laparoscope into the cannula and maintain the tip of the cannula at a point immediately deep to the pubic bone. Gently inflate the balloon around the end of the cannula until the pubic bone is visible, thereby creating a space between the peritoneum posteriorly and the rectus muscle anteriorly. The lower edge of the posterior rectus sheath can be seen (arcuate line). Inflate the balloon under direct vision and resist the urge to pump the balloon up quickly as this will reduce the likelihood of bleeding. Ensure that the balloon inflates completely. Approximately 30 pumps are required (Fig. 6.8).
7. Deflate the balloon and withdraw the cannula. Replace the 10-mm cannula with another that has a small retaining balloon at its tip and inflate this so that the balloon sits just inside the rectus sheath (Fig. 6.9). The cannula is designed so that there is very little extension beyond the balloon, ensuring that the cannula does not get in the way of the two further cannulas that will be needed. Pass the laparoscope back into position through the umbilical cannula.
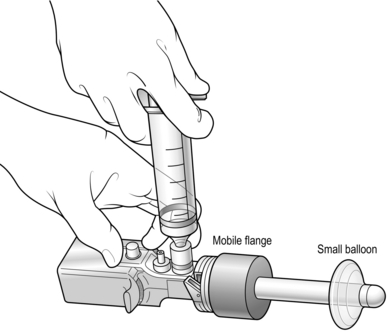
Fig. 6.9 A second disposable cannula used to replace that shown in Figure 6.7 after the initial pre-peritoneal dissection has been completed. The small balloon at the tip of the cannula can be inflated to retain the cannula within the pre-peritoneal space. The mobile flange is passed distally along the cannula so that the abdominal wall is gripped between the distal balloon and the flange. The laparoscope is then passed through the trocar.
8. Attach the gas lead to the cannula and inflate with carbon dioxide up to a pressure of 8–10 mmHg. Note the partially created pocket in the pre-peritoneal space. Further dissection is now required.
9. Place a second 5-mm trocar and cannula under laparoscopic vision in the pre-peritoneal space already created using a 1-cm midline incision approximately three fingerbreadths below the umbilical cannula at the level where the posterior rectus sheath becomes deficient. This ensures that the second cannula is placed as high as possible in order to facilitate further dissection of the pre-peritoneal space, but is not placed too close to the umbilical cannula, which would cause technical difficulties.
Assess
1. Place a blunt-ended 5-mm dissector in the second (subumbilical) cannula and enlarge the pre-peritoneal space by blunt dissection.
2. Clarify the anatomy. Note the pubic bone medially. Identify the inferior epigastric vessels, which are normally visible at this stage (Fig. 6.10).
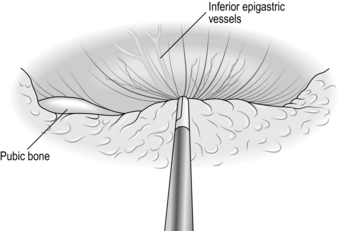
Fig. 6.10 The dissecting instrument is stripping the intact peritoneal sac away from the anterior abdominal wall and the inferior epigastric vessels are in view.
3. Strip the peritoneum downward away from the anterior abdominal wall. Do not start at the internal ring but dissect laterally and medially first.
4. Commence the dissection laterally in the region of the anterior superior iliac spine and ensure that the epigastric vessels do not come down with the dissected peritoneal sac but remain up on the anterior abdominal wall.
5. Coagulate small blood vessels and do not rush this phase of the operation.
6. Continue to strip the fat and areolar tissue and the peritoneal sac downwards and backwards in the lateral part of the dissection to reveal a portion of the psoas muscle.
7. Identify the pubic bone medially and gently strip the peritoneum down from this area. The bladder will be seen below the pubic bone near the midline and is gently stripped downwards and backwards. Look for the sac of a direct inguinal hernia, which will be seen attached to the white fold of transversalis fascia.
8. Note an indirect sac as it passes forwards into the internal ring close to the lower end of the inferior epigastric vessels.
Action
1. Create a space for an additional 5-mm cannula by enlarging the preperitoneal pocket by blunt stripping of the peritoneum away from the muscles of the anterior abdominal wall on the side of the hernia.
2. Identify the point of insertion by placing the scope near the abdominal wall and seeing the light shine through. Then insert a needle through the abdominal wall and confirm this by seeing it in the extra-peritoneal space. Inject some local at this time. Place the 5-mm trocar and cannula under laparoscopic vision at a point 2 cm medial to the anterior superior spine on the side opposite the hernia. Use this cannula to pass the 5-mm forceps.
3. Retract and free a direct hernia sac by stripping it away from the white fold of transversalis fascia using blunt and occasional scissors dissection. Make sure the sac is completely freed from its coverings and the pre-peritoneal space can be enlarged below it.
4. Turn your attention to the region of the internal ring.
5. Using a mixture of blunt and, if necessary sharp, dissection carefully dissect the tissues in the region of the internal ring and identify any hernia sac.
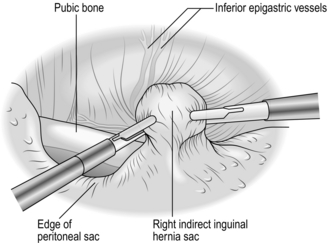
6. Grasp an indirect sac with the left-hand grasper and pull it backwards, stripping tissue away from it with the right-hand instrument. As you withdraw the sac place the right-hand forceps beyond the left-hand forceps and further retract the sac with the right hand using the left-hand instrument to strip tissue away from it. Large sacs can usually be withdrawn in this way (Fig. 6.11).
7. As the indirect sac is gradually withdrawn, look for the vas deferens or round ligament (passing medially) and the gonadal vessels (passing laterally). These structures are applied to the deep surface of the peritoneum at the internal ring.
8. Using blunt and sharp dissection separate the vas deferens and gonadal vessels from the peritoneum of the sac so that the latter can be fully withdrawn (Fig. 6.12).
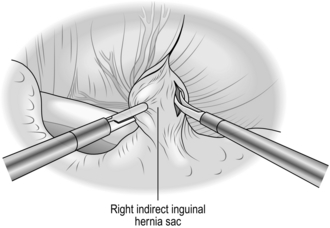
Fig. 6.12 Using a mixture of sharp and blunt dissection, the sac is separated from the vas deferens and the spermatic vessels.
9. When you have withdrawn the sac fully, strip the peritoneum back further from the internal ring to enlarge the pre-peritoneal pocket. The edge of the peritoneum should be at least 3–4 cm distant from the internal ring (Fig. 6.13).
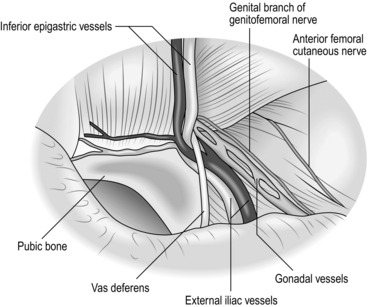
Fig. 6.13 The anatomy of the groin has been displayed and the intact visceral sac has been stripped away from the interior of the groin.
10. Avoid injury to the iliac vessels, which lie deep to the triangle between the vas deferens and the gonadal vessels. Do not tamper with the fatty tissue deep to these structures as they protect you from damaging the iliac vessels
11. Prepare a similar pocket in the pre-peritoneal space on the opposite side if you are repairing bilateral hernias.
12. For unilateral hernias prepare a 15-cm × 10-cm patch of polypropylene mesh. To orientate the mesh correctly mark the long axis of the mesh by drawing a line on it.
13. Grasp the mesh with forceps and insert it into the pre-peritoneal space using the midline subumbilical cannula.
14. Position the mesh so that it covers the inguinal region from the midline, passing laterally for 15 cm. Ensure that it covers the region of the internal ring, the region medial to the inferior epigastric vessels and the femoral canal and that it reaches the midline. Ensure that the mesh is lying flat against the anterior abdominal wall and on the psoas muscle (Fig. 6.14).
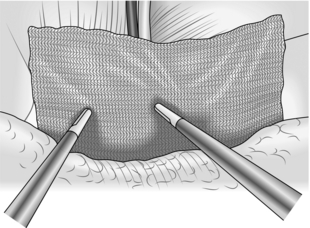
Fig. 6.14 The 15 cm × 10 cm mesh has been placed to cover the hernia defect and extends laterally from the midline. It is being held in place by two forceps as the extra peritoneal space is allowed to deflate. In this case, the mesh has not been stapled in place.
15. Staple or glue the mesh in position. Do not leave it unfixed. If you are using staples, secure the lower medial part of the mesh to Cooper’s ligament or the pubic bone first, then fix the upper border of the mesh to the abdominal wall. Do not place staples elsewhere.
16. Place a second mesh in a similar fashion if treating bilateral hernias. It is important that the right- and left-sided meshes overlap the midline.
Checklist
1. Check that there is no bleeding and control it with diathermy or clips.
2. Remove any staples that have fallen loose.
3. Place a large volume of low concentration local anaesthetic into the pre-peritoneal space.
Disconnect the insufflation and, as the pre-peritoneal space ‘collapses’, ensure that the mesh remains flat against the anterior abdominal wall. It is important that the lower edge of the mesh is not lifted up by the peritoneum as the pre-peritoneal space collapses.
4. Remove the cannulas and check that there is no bleeding.
5. Close the anterior rectus sheath as hernias can develop here. Close the skin incision with a single polypropylene 3/0 suture
TRANSABDOMINAL PRE-PERITONEAL INGUINAL HERNIA REPAIR
Access
1. Create a pneumoperitoneum using an open (Hasson) technique (see Chapter 5).
2. Make a vertical 1-cm incision from the centre of the umbilicus towards the symphysis pubis. Incise down to the rectus sheath. Open it to enter the peritoneal cavity under direct vision.
3. Insert a 10-mm blunt-tipped trocar and cannula into the peritoneal cavity under direct vision.
4. Attach the lead from the insufflator to the cannula and rapidly create a pneumoperitoneum up to a maximum pressure of 13–14 mmHg.
5. First ‘white-balance’ the video camera. Remove the trocar and pass a laparoscope into the cannula and into the abdomen. Prefer a 30-degree scope. Direct the laparoscope towards the groin.
6. Adjust the operating table so that the patient is positioned head-down and allow the intestines and omentum to fall away from the groin area to facilitate your view of the hernia orifice.
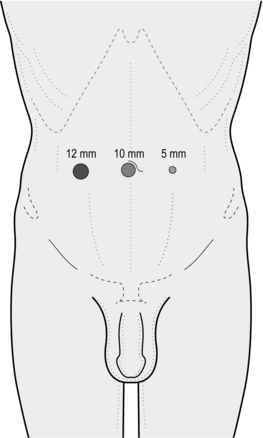
7. Under direct vision, create two new ports. Insert a 5-mm trocar and cannula at the level of the umbilicus lateral to the lateral border of the left and right rectus muscle (Fig. 6.15).
Assess
1. If adhesions obscure your view of the inguinal region, divide them carefully using scissors and diathermy. If they are very dense, consider conversion to open hernia repair.
2. Now establish the anatomy as it relates to the hernia (Fig. 6.16). Starting at the midline, identify the bladder and the median umbilical ligament (obliterated urachus) on the inner aspect of the lower abdominal wall. Check that the bladder is not full and catheterize the patient if it is.
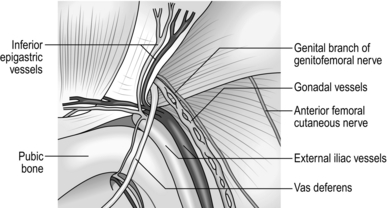
Fig. 6.16 The anatomy of the right groin in relation to TAPP repair. The shaded area has been called the ‘triangle of doom’ and is bounded by the vas deferens medially and the spermatic vessels laterally. In the floor of the triangle the external iliac vessels can be seen. The femoral nerve is not shown as it is on a deeper plane lateral to the vessels. The genitofemoral and anterior cutaneous nerve of the thigh are shown.
3. Moving away from the midline, identify the medial umbilical ligament (obliterated umbilical artery). Immediately lateral to this is the area through which a direct inguinal hernia may pass. Lateral to this, note another ridge, the inferior epigastric vessels that form the lateral umbilical ligament. Lateral to this again is the internal ring through which an indirect inguinal hernia may pass.
4. Moving yet further laterally, compress the abdominal wall at the anterior superior iliac spine and note the lateral extent of the dissection for the TAPP repair.
5. Locate the region of the internal ring by looking for two divergent structures which emerge from it. Passing medially, particularly in thin patients, identify the vas deferens (round ligament of the uterus in females) beneath the peritoneum. Passing laterally from the internal ring is a less distinct ridge caused by the gonadal vessels. Between the diverging vas and the gonadal vessels is the ‘triangle of doom’ containing the external iliac vessels.
6. Identify whether the hernia is direct (medial to the inferior epigastric vessels) or indirect (lateral to the inferior epigastric vessels).
7. The steps involved in the repair of direct and indirect hernias are essentially the same. However, whereas a direct hernia sac is normally easy to retract, a large indirect hernia sac may be difficult to retract from the scrotum and may need to be divided at or distal to the internal ring. Check that there is not an unexpected hernia on the other side. Now decide whether your repair will be unilateral or bilateral.
8. Do not be alarmed if you find a sliding hernia, as you should not separate the colon from the peritoneal sac. The colon will be retracted with the sac when you are dissecting a pre-peritoneal pocket in which to place the mesh.
Action
1. Ensure that any contents of the hernia sacs are reduced. Omentum adherent to the inside of the sac can be separated with scissors and diathermy. If the contents cannot be reduced laparoscopically, convert to an open repair.
2. Prepare a pre-peritoneal pocket between the peritoneum and the abdominal muscles in which to place the artificial mesh. The pocket should extend from the midline medially to approximately the level of the anterior superior iliac spine laterally. For bilateral hernias, pockets need to be fashioned on both sides and become continuous across the midline. A single large mesh or two individual meshes can be used for bilateral hernias.
3. Pick up the peritoneum 1–2 cm above the hernial orifice and make a short incision through the peritoneum using scissors with diathermy attached for haemostasis (Fig. 6.17). Gas may now enter the pre-peritoneal space and help to lift the peritoneum away from the underlying fascia and muscles.
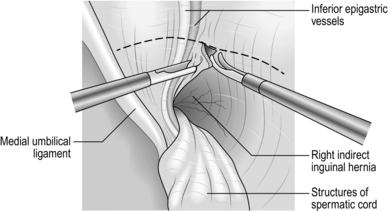
Fig. 6.17 The initial incision of the peritoneum above the internal opening of a right indirect inguinal hernia.
4. Extend the incision laterally to a level below the anterior superior iliac spine, carefully avoiding the inferior epigastric vessels, and medially into the peritoneal fold of the medial umbilical ligament. It is seldom necessary to fully divide this ligament, which sometimes bleeds.
5. By blunt and sharp scissors dissection (with diathermy), separate the peritoneum below the initial incision away from the underlying fascia and muscle.
6. Deepen the pre-peritoneal pocket medially and laterally before separating the peritoneum from the internal ring where the peritoneum will be at its most adherent and there will be a risk of injury to the gonadal vessels and the vas deferens.
7. Strip the peritoneum medially downwards and inwards. In the case of a direct hernial sac it usually retracts out of the hernia orifice with traction and with a little blunt and sharp dissection so that the whole sac is freed from the transversalis fascia. The latter appears as a white fold attached to the sac. Identify the shining white appearance of the superior ramus of the pubic bone and gently strip the tissues downwards away from the pubic ramus, extending the dissection 1–2 cm beyond the midline. The bladder is seen below and behind the area of dissection.
8. Fashion the lateral part of the peritoneal pocket by stripping the peritoneum downwards and away from the abdominal wall. Below the level of the inguinal ligament, branches of the genitofemoral nerve may be seen lying on the psoas muscle and should be carefully preserved.
9. Now separate the peritoneum, or an indirect sac if present, from the structures at the internal ring (Fig. 6.18). If there is no indirect sac, separate the peritoneum, using a mixture of blunt and sharp dissection, from the vas deferens or round ligament passing medially and from the gonadal vessels passing laterally from the internal ring. The round ligament is often very adherent to the peritoneum and may be divided.
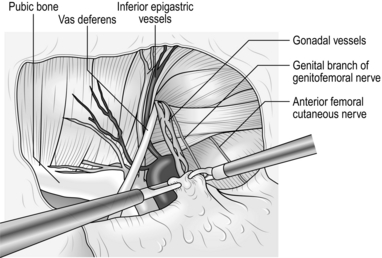
Fig. 6.18 The indirect sac has been withdrawn and the pre-peritoneal space prepared prior to insertion of the mesh in transabdominal pre-peritoneal (TAPP) repair.
10. Retract an indirect sac or transect it if it is large. The sac lies anterior to the vas deferens and the gonadal vessels. Retract it progressively from the inguinal canal using a grasper held in the left hand. Control scissors in the right hand for blunt and sharp dissection, to strip away the coverings of the sac. As the dissection proceeds, look for the gonadal vessels laterally and the vas deferens medially. Dissect the peritoneum away from these structures.
11. A large sac is difficult to reduce, so transect it. Withdraw the sac partially into the abdomen and divide around its circumference, taking care posteriorly where the vas deferens and the gonadal vessels are closely applied. The distal sac retracts back into the inguinal canal. Dissect the transected proximal sac away from the gonadal vessels and vas deferens. Control bleeding with diathermy.
12. Transection of the indirect sac results in a hole in the mobilized peritoneum that requires closure when the mesh has been placed.
13. Now check that the depth of the pre-peritoneal pocket is sufficient to accommodate a 10-cm deep mesh extending for 15 cm from the midline laterally towards the anterior superior iliac spine. Divide any strands of tissue that would get in the way and prevent the mesh from lying flat (Fig. 6.19).
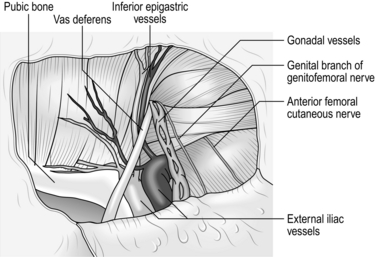
Fig. 6.19 The view during transabdominal pre-peritoneal (TAPP) repair immediately before positioning the mesh.
14. If you are repairing bilateral hernias, repeat the dissection of the pre-peritoneal pocket on the other side. The resultant pocket extends from one anterior superior iliac spine to the other. It is not usually necessary to divide the peritoneum above the bladder, nor is it necessary to divide either of the medial umbilical ligaments unless access is difficult.
15. Cut the synthetic mesh to the required dimension. For a unilateral hernia this is normally 15 cm × 10 cm. Bilateral hernias can be repaired using two separate 15-cm × 10-cm patches or by one large 28-cm × 10-cm mesh; this is stronger but more difficult to place. The latter is more difficult to orientate within the abdomen but is aided by cutting off the corners along one of the long sides of the mesh or by drawing a line on the mesh to indicate the long transverse axis.
16. Take hold of one corner of the mesh with a strong grasper and pass it through the 12-mm port under vision into the region of the pocket you have created.
17. Orientate the mesh so that it covers the groin from the midline to the anterior superior iliac spine within the pocket in front of the peritoneal flap, using graspers in each hand. Ensure that the mesh is lying flat and covers the hernial orifice.
18. If you are repairing bilateral hernias with a 28-cm × 10-cm mesh, pass it behind the midline peritoneum, which has been left undivided, and position it to lie flat and cover the relevant areas on both sides. Alternatively, place two 15-cm × 10-cm meshes meeting in the midline.
19. Most surgeons staple or glue the mesh in position. Take great care where you put staples. Place three to five staples spaced across the upper border of the mesh, attaching it to the abdominal muscles. Two or three staples may be used to fix the mesh to Cooper’s ligament on the superior aspect of the pubic bone medially. No other staples are required (Fig. 6.20).
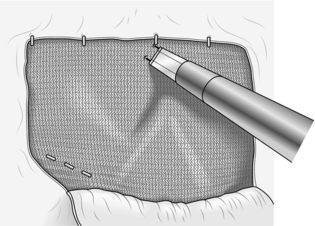
Fig. 6.20 The 15-cm × 10-cm mesh is being stapled into place. Note the three medial staples anchoring the mesh to Cooper’s ligament and the pubic bone. Staples are also placed along the superior border of the mesh but nowhere else.
KEY POINTS
Anatomy
 Never staple in the region of the lateral cutaneous nerve of thigh laterally.
 Avoid the area around the femoral vessels and adjacent nerves.
 Staples placed too low risk causing serious injury to the great vessels. Persistent genitofemoral neuralgia and even femoral nerve paralysis have been reported.
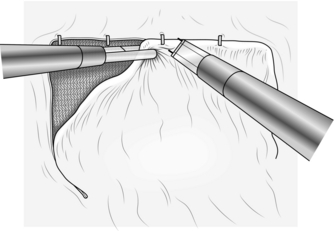
20. Cover the mesh with the peritoneum forming the pocket. Pick up the upper border of the peritoneum with a grasper in the left hand and staple the flap of peritoneum to the abdominal wall, covering the mesh completely. Alternatively, place a running suture between the peritoneum above the mesh and the free peritoneal flap. Ensure complete coverage of the mesh in order to avoid small-bowel adhesion and possible small-bowel obstruction (Fig. 6.21).
21. Repair any hole in the peritoneal covering of the mesh either with staples or by suturing. Such a hole might permit small bowel to pass into the pre-peritoneal space you have created and give rise to small-bowel obstruction.
Check
1. Check that there is no bleeding. Control bleeding from damaged inferior epigastric and gonadal vessels using haemostatic clips. Gonadal injury is unlikely unless previous surgery has been performed, compromising alternative blood supply.
2. Remove any staples that have fallen loose.
3. Check that there are no defects in the peritoneal covering of the mesh. If the peritoneum is thin and tending to tear, staple the margins of the defect in the peritoneum to the mesh, thereby reducing the likelihood of small-bowel herniation.
4. If you have repaired a sliding hernia, carefully check that the colon has not been injured in any way.
5. Disconnect the insufflation and allow the abdomen to deflate.
6. Remove the 5-mm cannulas under direct vision and check that there is no bleeding. Control any bleeding and, in the case of unexpected brisk bleeding from the deep part of the port site, pass a Foley catheter into the abdomen through the port site and blow up the balloon. Exert traction on the catheter, thus compressing the port site. The balloon can be left in position and removed later on the ward if necessary.
7. Do not remove the 10-mm cannula until the pneumoperitoneum has been evacuated lest a knuckle of small bowel be forced into the port site.
8. Close the rectus sheath in the 10-mm port sites using 2/0 multifilament synthetic absorbable sutures. Close the skin incisions with polypropylene 3/0 sutures.
FEMORAL HERNIA
Appraise
1. Repair all femoral hernias because of the high risk of strangulation.
2. One of the reasons for offering surgical repair freely is that an open operation can be accomplished easily using local anaesthesia.
3. Laparoscopic femoral hernia repair is not advocated as an alternative to open femoral hernia repair. A co-existing femoral hernia may be repaired at the same time as an inguinal hernia using the laparoscopic route.
4. Be aware of the prevascular femoral hernia; its neck extends laterally in front of the vessels.
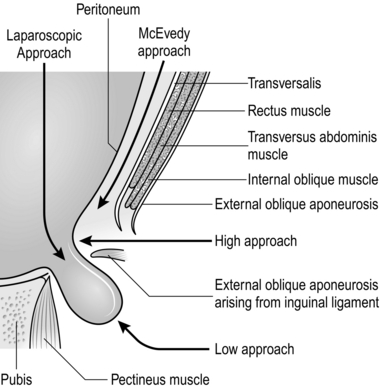
5. Be skilled in each of the three current open approaches for femoral hernia repair (Fig. 6.22). They all have merits and they are all safe, provided the operation is skilfully performed. In general, the low approach is used for elective operations and McEvedy’s for strangulated hernias.
LOW APPROACH (LOCKWOOD)
Action
Hernial sac
1. Expose the fat-covered hernial sac. Often, what appears to be a large swelling is mostly extra-peritoneal fat, in which lies a small sac. Clean the sac so that it may be traced proximally beneath the inguinal ligament.
2. Cautiously open the sac by incising it while it is held up between two artery forceps. Remember that the bladder may form the medial wall of the sac. Recognize the inside of the sac by seeing free fluid, a glistening surface and contents that may be reduced into the main peritoneal cavity.
3. Pick up the open edges of the sac with three equally spaced artery forceps, then sweep away the external fat to expose the neck, lying between the inguinal ligament anteriorly and the pectineal ligament posteriorly in the same horizontal plane. Note how deeply the neck of the sac lies.
4. Identify the femoral vein lying just laterally and preserve it from damage.
5. Empty the sac, transfix and ligate the neck with 2/0 absorbable suture; it should retract.
Repair
1. The inguinal and pectineal ligaments meet medially through the arched lacunar ligament. The object of the repair is to unite the ligaments for about 1 cm laterally, without producing constriction of the femoral vein (Fig. 6.23).
2. Use 2/0 monofilament nylon or polypropylene, on a small needle. Many use a J-shaped needle.
3. Place a small curved retractor over the femoral vein to protect it and draw it laterally. Insert a stitch deeply into the inguinal ligament and use this to draw the ligament upwards, while the needle is insinuated behind it, to take a good bite of the pectineal ligament. Avoid taking too deep a bite or the needle point will break as it strikes the pubic crest. One, two or three stitches may be used but, for ease of access, insert all the stitches before tying any. As the stitches are tightened, ensure that the femoral vein is not constricted.
4. Alternatively, the femoral canal may be occluded with a ‘plug’ of rolled mesh, secured with three sutures. This technique is simpler to perform, less likely to result in compression of the femoral vein and less prone to recurrence.
HIGH APPROACH (LOTHIESEN)
Action
Hernial sac
1. Identify the neck of the sac and the external iliac vein.
2. Isolate the neck of the sac and gently withdraw the fundus. If there is difficulty, have the lower skin flap retracted downwards, incise the cribriform fascia and isolate, open and empty the sac from below.
3. Ensure that the sac is empty and that the bladder is not adherent, then transfix, ligate and divide the neck of the sac.
Repair
1. With the index finger, feel the margins of the femoral canal. In front is the inguinal ligament, medially the lacunar ligament, posteriorly the pectineal ligament and laterally the femoral vein.
2. Narrow the triangular gap by inserting non-absorbable sutures of 2/0 monofilament nylon or polypropylene between the pectineal ligament and the inguinal ligament.
3. If the upper approach was selected because there is also an inguinal hernia, deal with an indirect sac now.
4. Either close the incision in the posterior wall transversalis fascia with a non-absorbable suture or carry out a mesh Lichtenstein repair.
McEVEDY’S APPROACH
Appraise
1. Use this approach for strangulated hernias as it provides excellent access for assessment of bowel and if necessary for resection.
2. The skin incision, as originally described, left an ugly scar, but this can be avoided by placing it more horizontally.
3. A urinary catheter inserted preoperatively, reduces the risk of damage to the bladder.
Access
1. Make an incision from 3 cm above the pubic tubercle running obliquely upwards and laterally for 7–8 cm, crossing the lateral border of the rectus muscle, which lies more vertically. Reflect the skin flaps so as to display the lateral part of the rectus sheath.
2. Incise the lower rectus sheath about 1–2 cm from, and parallel to, its lateral border. The lateral edge may tend to separate into its two anatomical layers.
3. Lift the lateral edge of the sheath and incise the thin transversalis fascia from about 2.5 cm above the pubic tubercle to mobilize the lower lateral edge of the rectus medially. Ligate and divide the inferior epigastric vessels which cross this line low down. The neck of the hernia is now in view as it enters the femoral canal.
Action
1. Retract the lower skin flap and isolate the sac.
2. Reduce the sac, manipulating it from above and below. Open and empty it, then transfix, ligate and divide the neck of the sac.
3. For a strangulated hernia (which is the reason for using this approach) the peritoneum may be opened above the neck to facilitate assessment of the bowel and any necessary resection.
4. Repair the canal from above.
5. Close the incision in the rectus sheath with 0 nylon or polypropylene.
UMBILICAL HERNIA
ADULT UMBILICAL HERNIA
Appraise
1. Most hernias in adults are para-umbilical, protruding adjacent to the cicatrix. The contents are most frequently omentum, which is often adherent to the interior of the sac.
2. Some adults, especially of African origin, have true umbilical hernias that have been present throughout life.
3. Repair umbilical hernia by early operation for fear of strangulation. In particular operate on strangulated, painful (reducible or not) hernias, especially those with small, hard margins. However:
 Small para-umbilical hernias (less than 1 cm) can be left untreated if asymptomatic.
 Many patients are grossly obese and elderly, with cardiovascular or respiratory disability and a longstanding hernia that has not been troublesome. Adjure such patients to lose weight and hesitate before offering operation.
 Ascites may provoke umbilical hernia. Find the cause and treat it. In some cases there is extensive malignant disease, when surgery is rarely indicated.
4. An open or laparoscopic approach can be used. With an open approach a mesh is placed either extra-peritoneally, deep to the abdominal wall, or as an onlay mesh anterior to it, often in association with a traditional double breasted ‘Mayo’s repair’. With a laparoscopic approach the mesh is secured intra-peritoneally against the defect with staples or sutures. For small primary umbilical hernias an open approach is recommended. For recurrent or periumbilical incisional hernias a laparoscopic approach may be considered.
5. In large hernias which distort the entire umbilicus, the possibility of excising and refashioning the umbilicus should be discussed preoperatively.
OPEN ADULT UMBILICAL HERNIA REPAIR
Access
1. Make a curved incision in the groove above or below the hernia. If necessary extend the cut transversely outwards on each side, for 2–4 cm.
2. Deepen the incision, identify the aponeurosis and expose it around the adjacent half of the circumference of the hernia.
3. If the hernia is small, preserve the umbilical skin by dissecting it off the hernia as a flap. If the hernia is large, make a spindle-shaped incision to include the umbilicus, excising the stretched skin.
4. Expose 2 cm of aponeurosis around the remainder of the margin of the hernia.
Action
1. Cut through the thinned-out edge of aponeurosis to expose the peritoneum and gradually work round to display the whole circumference of the neck of the sac.
2. Clear the sac of fatty tissue and cut it right round, at least 2 cm distal to the neck if possible. The contents of the sac are less likely to be adherent here than in the fundus, but free them if necessary. Mark the peritoneal edges with artery forceps.
3. If the contents of the sac are free, reduce them. If they are adherent to the fundus of the sac, free them and return them to the peritoneal cavity. If there is a mass of fibrous omentum, excise it with the fundus of the sac but take care to ligate all the bleeding omental vessels and avoid damaging the transverse colon.
4. Separate the peritoneum from the under-surface of the rectus sheath all round, without tearing it.
5. Close the peritoneal neck of the sac with a continuous 2/0 synthetic absorbable suture, producing a transverse linear suture line.
Repair
Extra-peritoneal mesh repair
1. For the underlay repair of a small, well-defined direct defect, take a piece of polypropylene mesh 2 cm larger in diameter than the defect. At each quadrant insert a 2/0 polypropylene suture through the intact tissue about 8 mm from the edge of the defect, pick up a small bite of the mesh and pass the needle back out through the intact tissue of the posterior wall, close to the point of entry. Hold the suture with an artery forceps and repeat the manoeuvre at each quadrant of the defect. Then parachute the mesh through the defect into the extra-peritoneal space and tie the four sutures. Additionally, suture the edge of the defect to the surface of the mesh with continuous polypropylene.
2. Throughout the procedure, ensure that the peritoneum is not breached, as placing ‘ordinary’ mesh in contact with abdominal wall contents increases the risk of adhesions and fistulation. If this occurs, consider converting to a Mayo’s repair with onlay mesh placement.
Mayo’s repair (Fig. 6.24)
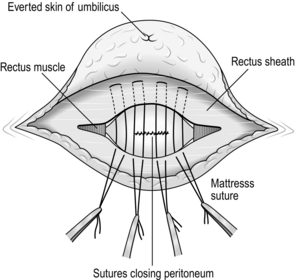
1. Consider this repair if the peritoneum has been breached, or the wound is possibly contaminated, as in urgent cases. If this is likely consider avoiding an adjunct onlay mesh.
2. Attempt the repair staying in the extra-peritoneal approach, but often the peritoneum is breached.
3. Place a series of horizontal mattress sutures using 0 or 1/0 polypropyline sutures, without tying them. Each stitch penetrates the upper leaf of the rectus sheath 3 cm from the edge, passes beneath it to catch the lower leaf 1 cm from the edge and passes back 3 cm from the edge. When the stitches are tied they draw the lower leaf underneath the upper leaf.
Onlay mesh repair
1. Place the mesh over the defect, the peritoneum having been closed as above. Secure the mesh into good tissue with 2/0 polypropylene sutures allowing a 2-cm margin.
2. Consider using a vacuum drain, as this procedure with its undermining of the skin and placement of a foreign body is at risk of seroma formation. Remove the drain early if there is no leakage.
Closure
1. If the skin over the fundus was preserved, pick up the under-surface of the navel with a synthetic absorbable stitch and sew it to the rectus sheath to produce a dimple. Suture the skin as a curved line above or below the newly fashioned umbilicus.
2. If the umbilicus was excised, close the subcutaneous fat and the skin as a transverse suture line.
LAPAROSCOPIC UMBILICAL HERNIA REPAIR USING INTRA-PERITONEAL ONLAY MESH
Appraise
Intra-peritoneal onlay polypropylene mesh in contact with the viscera of the abdominal cavity adheres to omentum and bowel because of its macroporous nature. The risk of enterocutaneous or intra-abdominal fistula from intra-peritoneal placement of polypropylene mesh is reduced by ensuring omental coverage. Use composite meshes in large defects, but they are more expensive. Addition of polyglactin to the polypropylene mesh does not reduce adhesions, although coating with titanium significantly reduces its inflammatory reaction. Polytetrafluoroethylene, as a composite with polypropylene with the polytetrafluoroethylene side in contact with the viscera, significantly lowers the incidence of adhesions.
Preparation
1. Place the anaesthetized patient supine on the operating table with their arms by their side.
2. Clean the abdomen with povidone-iodine 10% alcoholic solution or other antiseptic.
3. Drape the whole abdomen to give adequate exposure for the placement of port sites.
4. Stand on the same side as the assistant and/or ‘scrub’ nurse. Position television monitors on the opposite side of the patient. Sometimes with mesh placement it is easier to move around the patient and so it is therefore useful to have a monitor on both sides.
Access
1. Obtain access in an area away from any previous incision and away from the hernia, both of which are usually in the midline. Previous incisions may have adhesions or bowel adherent to them, presenting an inherent risk of damage, so gain access to the abdominal cavity as far back laterally as is safe on the insufflated abdomen. Use either an open (Hasson) technique or a closed technique using a Veress needle. The left subcostal area is often suitable for initial insufflation with a Veress needle.
2. Insert a 10-mm trocar and cannula through the initial incision as described, far back laterally on the abdomen. Use a ‘Visi’ port if possible, as entry can be watched.
3. Remove the trocar and introduce a laparoscope through the cannula into the abdomen.
4. Assess the abdomen and select a suitable position to insert a 5-mm trocar and cannula to the left of the laparoscope and another 5-mm trocar and cannula further left of the laparoscope, both under direct vision (Fig. 6.25).
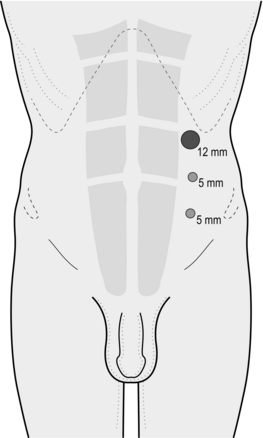
5. Place ports to access midline hernias either on the right and/or the left of the abdomen, depending on your preference. Add an extra-port if access is difficult.
Assess
If adhesions obscure your view of the hernia, divide them carefully using scissors and diathermy.
KEY POINTS
Respond to potential difficulties


Continue to divide any adhesions to allow visualization of the anterior abdominal wall for an area large enough to enable placement of a flat mesh of sufficient size. Adhesions around the neck of the hernia are often very adherent and may bleed.
Action
1. Define the margins of the hernia defect and ensure that any adhesions are cleared for at least 5 cm from the edge of the hernial defect.
2. Reduce the contents of the hernia sac using graspers and diathermy scissors. If this is not possible, convert to an open repair.
3. Leave the peritoneal sac in situ. It is very difficult to dissect a sufficiently large pre-peritoneal pocket into which a mesh can be placed in such a way that it is extra-peritoneal.
4. Assess the size of mesh required to give a minimum of a 4-cm overlap of the hernial defect on all sides. Cut the mesh in a circle shape to give an equal overlap on all sides. Mark the centre of the mesh with a marker pen to aid orientation inside the abdomen and ensure you position it centrally over the hernia defect.
5. Insert the mesh through the 12-mm cannula. Unfold it, using two graspers, and orientate it centrally over the hernial defect, ensuring equal coverage on all sides. This is sometimes helped by passing a suture from the centre of the mesh through the umbilicus. Remove this later.
6. Make sure that the mesh lies flat over the abdominal wall. Staple it into position along all sides. Try and use absorbable tacks. Although they are more expensive and more difficult to handle, they reduce the risk of adhesions. If you are inserting a large mesh, be willing to apply a second inner row of staples around the defect to fix it securely to the abdominal wall.
Checklist
1. Is the hernial defect well covered with mesh overlapping at least 4 cm all round?
2. Check any residual bleeding, using laparoscopic clips if necessary.
3. Remove any staples that have fallen loose.
4. Disconnect the insufflation equipment, allow the abdomen to deflate and remove the cannulas under direct vision.
5. Close the 12-mm port site using a 2/0 multifilament synthetic absorbable suture. Close the skin incisions with polypropylene 3/0 sutures.
INFANTILE UMBILICAL HERNIA
Appraise
1. Repair infantile umbilical hernia via an open approach.
2. Most infantile umbilical hernias protrude through the incompletely closed cicatrix. They occur more frequently in infants of African origin. Most of them close spontaneously without surgical repair, especially if the neck is less than 2 cm in diameter, so wait for 1–2 years. Repair them only if they increase in size.
3. Infants infrequently develop a supra-umbilical hernia. It will not close spontaneously, so repair it locally through a transverse incision sited directly over the defect.
OMPHALOCELE
Carry out closure with the minimum delay after birth; otherwise infection supervenes and the neonate will die (see Chapter 34).
UMBILICAL INFECTIONS, TUMOURS, FISTULAS AND SINUSES
Appraise
1. Neglected or imperfectly treated umbilical sepsis in infants can progress to septicaemia, distant pyogenic infections, pylephlebitis, liver suppuration and fatal jaundice.
2. An enteroteratoma is the remnant of the vitellointestinal duct forming a raspberry tumour. Cauterize it to destroy the mucosa.
3. Persistent discharge from the umbilicus in infants, children and young adults is likely to result from a congenital abnormality. An MRI (magnetic resonance imaging) scan may show the connecting track:
 Congenital faecal fistula results from persistence of the whole vitellointestinal duct. Faecal staining may be temporary if the fistula closes spontaneously. If there is distal obstruction, relieve this at the same time as closing the fistula.
 Patent urachus is persistence of the allantois (Greek: allos = sausage + eidos = form) usually associated with membranous obstruction of the urethra. Deal with the urinary obstruction at the time of closing the fistula.
4. In adults, infection is often the result of aggregated keratin forming an ‘omphalolith’ (Greek: lithos = stone), which can be lifted out of a deep umbilicus without anaesthesia. Persistent omphalitis stimulates granulation tissue, treated by cautery. Recurrent infections may require a minor plastic procedure to reduce the depth of the umbilicus.
5. The umbilicus is a rare site for pilonidal sinus, treated by excision.
6. Endometrioma at the umbilicus classically bleeds at the time of the menses.
7. Squamous epithelioma may develop at the umbilicus and subsequently can involve the inguinal lymph nodes. Excise the umbilicus and, if indicated, carry out bilateral block dissection of the inguinal nodes (vide infra).
8. Secondary carcinoma from the liver or porta hepatis may reach the umbilicus along the ligamentum teres. This presents as Sister Joseph’s nodule (first noticed by an observant nun and immortalized by the famous surgeon and author Hamilton Bailey 1894–1961).
9. A port-site metastasis may occur after laparoscopic surgery for malignancy.
EPIGASTRIC HERNIA AND PORT-SITE HERNIA
Appraise
1. In an epigastric hernia a small knuckle of extra-peritoneal fat insinuates itself through a vascular opening in the linea alba. It rarely has a peritoneal sac or contains bowel.
2. Port-site hernias occur after laparoscopic surgery. Repair is similar to that for epigastric hernia.
3. Laparoscopic repair is an alternative to the open operation, but for small hernias has no advantages.
Action
1. Make a transverse incision through the skin and deepen it down to the herniated fat.
2. Define the margins of the defect and reduce the hernia. If there is a peritoneal sac, simply invaginate it into the peritoneal cavity.
3. Suture a small (less than 1 cm) defect with a good rim using non-absorbable stitches, inverting the knots. Otherwise place a piece of polypropylene mesh 2 cm larger than the defect in each direction in the extra-peritoneal plane and secure it, as described for the underlay repair of a well-defined inguinal defect.
4. Close the skin, using a synthetic, absorbable subcuticular suture.
INCISIONAL HERNIA
Appraise
1. Incisional hernia is a deep disruption of the abdominal wound while the superficial layers remain intact (if the superficial layers also separate then a burst abdomen results).
2. Herniation may occur early, while the patient is still in hospital. More usually it develops during the following months or years.
3. Incisional hernias are associated with careless suturing, the use of rapidly absorbable instead of non-absorbable material, haematomas and infection, the insertion of drains through the main incision and damage to abdominal nerves. Jaundice, malnutrition, obesity, postoperative distension and re-exploration through the same incision after a short interval are other contributory factors, as are steroids and immunosuppression. Incisional hernia may follow delayed healing of a laparostomy.
4. Incisional hernias rarely strangulate; therefore do not rush to re-operate. Repairs have a high recurrence rate, reduced by the use of mesh, but this increases the risk of persistent infection or intestinal fistula.
5. If the patient is overweight, advise reduction before surgery. Ensure that infection has completely resolved before proceeding.
6. If mesh is to be used, give perioperative antibiotic cover.
OPEN INCISIONAL HERNIA REPAIR
Action
1. Deepen the incision until you reach aponeurosis or muscle, then work towards the margins of the defect.
2. Dissect the edges cleanly and separate the peritoneum from the deep surface all around unless you intend placing mesh intra-peritoneally.
3. If possible, invaginate the sac with a continuous suture. However, adherent contents and a narrow neck may require that the sac be opened to achieve reduction; if practicable close it.
4. Multiple defects in the abdominal wall (‘buttonhole tears’) are most conveniently managed by uniting them and repairing the resulting larger defect.
5. The cavity from which the sac has been stripped out often oozes, so meticulously apply haemostasis to minimize the risk of haematoma or seroma formation.
Repair
1. There is no advantage in attempting to define the layers of the abdominal wall.
2. Suture small defects, less than 4 cm, using non-absorbable material (0 or 1 G), but this does introduce tension adjacent to the repair so it is suitable only if the edge is strong.
3. Large defects, or poor tissue, are best repaired with a synthetic patch, to avoid a recurrence rate of 40–50%. The mesh may be applied at three levels in the abdominal wall, as described below (Fig. 6.26). Wherever it is placed it must extend at least 2 cm beyond the margin of the defect.
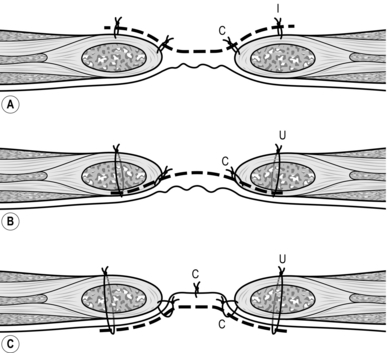
Fig. 6.26 Three alternative levels for placement of mesh in incisional hernia repair: (A) onlay; (B) extra-peritoneal; (C) intra-peritoneal. Transverse section through abdominal wall. i, interrupted sutures; c, continuous suture; u, ‘U’ sutures.
4. There are also methods that attach a piece of mesh to each side of the defect and then suture the two together or sandwich the abdominal wall between two layers of mesh.
Action
Onlay patch repair
1. This is the simplest method, placing a patch anterior to the aponeurosis and the defect, which may or may not have been sutured. Polypropylene mesh is most suitable as it is rapidly incorporated in scar tissue. It should extend 4 cm beyond the edge of the defect.
2. Secure the edge of the mesh with interrupted 2/0 polypropylene sutures at 2-cm intervals, reinforced with a continuous over-and-over stitch.
3. Place another continuous suture to fix the mesh where it lies over the edge of the defect. This is important to prevent herniation of bowel beneath the mesh.
Extra-peritoneal mesh repair
1. This is suitable for midline hernias.
2. The peritoneum, plus the posterior rectus sheath if above the arcuate line, is dissected off the posterior aspect of the rectus muscle laterally and from the aponeurosis in the midline, for about 3 cm.
3. Polypropylene mesh will incorporate more rapidly but polyester is easier to position as it can deform on the bias.
4. Cut a piece of mesh 2 cm larger than the defect at each margin.
5. The mesh is drawn into the space deep to the abdominal wall by interrupted ‘U’ sutures of 2/0 polypropylene at 2-cm intervals. Each passes in through the anterior rectus sheath and rectus, picks up the edge of the mesh and returns to be tied externally.
6. Then suture the margin of the defect to the surface of the mesh with a continuous over-and-over suture.
Intra-peritoneal mesh repair
1. Open the sac and free any adhesions for 4 cm around the rim.
2. Cut a piece of polyester mesh 2 cm larger than the defect in each direction (polypropylene is liable to cause dense intestinal adhesions).
3. Draw the margin of the mesh under the rim of the defect with a series of ‘U’ sutures of 2/0 polypropylene. These penetrate the peritoneum 2–3 cm from the rim. First place four cardinal sutures and hold them with forceps, adjusting the size of the mesh so that it fits the opening. Then insert more ‘U’ sutures at 1-cm intervals between one pair of cardinal sutures and tie these. Repeat this for the other three sections.
4. Pick up the mesh and the overlying rim with a continuous over-and-over suture, taking care to avoid the bowel.
SPIGELIAN HERNIA
Action
1. At open operation, make a skin crease incision over the lump and open the external oblique aponeurosis in the line of its fibres, extending the incision medially to open the anterior rectus sheath.
2. Once dissected, invert the sac and develop the pre-peritoneal space, allowing a check along the lateral edge of the rectus for other defects. Then place a mesh extra-peritoneally. The layers of the abdominal wall can usually be closed without tension using a 0 Prolene suture.
PARASTOMAL HERNIA
Appraise
1. Stomas leave weak areas in the abdominal wall. The whole area around the stoma may bulge diffusely or a segment of bowel may herniate. In addition, the stoma itself may prolapse.
2. Some parastomal hernias can be accepted, in particular diffuse hernias that are not troublesome, since they are unlikely to produce obstruction.
3. Re-siting the stoma, usually on the opposite side of the abdomen, is an effective treatment but involves a laparotomy and has a high rate of re-herniation.
4. The best method is to repair the hernia with polypropylene (or Vypro) mesh, either at laparotomy or by a local approach through a curved skin incision lateral to the stoma.
5. The mesh may be placed either extra-peritoneally or on the outside of the abdominal wall. Cut a hole in the mesh for the bowel, with a slit to enable it to be inserted without detaching the stoma from the skin. The slit is then sutured. The risk is wound infection, minimized by antibiotic prophylaxis and by sealing the stoma with plastic film.
NON-HIATAL DIAPHRAGMATIC HERNIA
Appraise
1. Neonatal diaphragmatic hernia must be repaired immediately because the lungs cannot expand since the chest cavity is filled with abdominal viscera. It is generally diagnosed on ultrasound scan before delivery so that specialist paediatric care can be arranged. There is no hernial sac because the defect is the persistent pleuroperitoneal canal – the hernia of Bochdalek (Vincent Bochdalek 1801–1883, Prague anatomist).
2. Adults occasionally present with acute obstruction within a persistent pleuroperitoneal canal, almost always on the left side. It may also follow thoracoabdominal surgery.
3. Reduction from below is easy, unless the abdominal viscera are adherent within the chest.
Action
Persistent pleuroperitoneal canal (hernia of Bochdalek) in adults:
1. By whatever approach is favoured, reduce the abdominal viscera.
2. Trace out the margins of the defect and close it using non-absorbable sutures. The margins usually come together more easily than anticipated.
Traumatic hernia
1. An abdominal approach is usually satisfactory and the viscera can be replaced within the abdomen, but a laparoscopic approach is beneficial for postoperative respiratory function in patients who may have lung injury from the trauma.
2. The margins of the defect are nearly always easy to define and repair using non-absorbable suture material.
3. Laparoscopic tensioning of the knots is facilitated by use of braided non-absorbable sutures. Buffers do not appear to be necessary.
LUMBAR HERNIA
Appraise
1. This may emerge spontaneously through the triangle of Petit (Jean Louis Petit 1674–1741, Parisian surgeon), bounded by the iliac crest, the posterior edge of the external oblique and the anterior edge of the latissimus dorsi muscles.
2. Lumbar hernia complicates renal incisions in the loin, drainage of lumbar abscess, trauma or paralysis of the muscles in the lumbar region.
OBTURATOR HERNIA
Appraise
1. This is rare. Most occur in females aged over 50 years, and on the right side.
2. Most are admitted with small-bowel obstruction, which, at operation, is discovered to be from an obturator hernia, sometimes of Richter’s type. A possible clinical clue is radiation of pain down the inner thigh to the knee. CT is diagnostic.
3. If diagnosed preoperatively it can be repaired laparoscopically by extending the pre-peritoneal TAPP (transabdominal pre-peritoneal hernia) or TEP (totally extra-peritoneal hernia) dissection inferiorly to include the obturator canal.
Action
1. Assuming the operation is being performed for intestinal obstruction and the small bowel is found to be tethered in the region of the obturator canal, improve the access by carrying the incision down to the pubis. A catheter should already be draining the bladder.
2. Identify the canal with the nerve entering it from the anteromedial aspect; the artery is posterolateral.
3. Gently free the bowel and inspect it to determine if it is viable.
4. Either make no attempt to repair the defect or suture peritoneum over a mesh patch.
GLUTEAL AND SCIATIC HERNIA
Appraise
1. Gluteal hernia emerges above or below the pyriformis muscle through the greater sciatic notch.
2. Sciatic hernia emerges through the lesser sciatic notch.
3. These hernias are usually discovered at exploratory laparotomy for intestinal obstruction and rarely produce a palpable swelling in the buttock.
PELVIC FLOOR HERNIA
This may occur spontaneously, accompanying a cystocele, rectocele or rectal prolapse. It most frequently follows surgery of the pelvic floor, including abdominoperineal resection and hysterectomy.
INTERNAL HERNIA
Appraise
1. Internal hernias present as intestinal obstruction. Most follow abdominal or abdominothoracic operations, the most common mechanism being a band adhesion. Intestine may herniate behind an anterior gastroenterostomy, through a transverse mesocolic defect following posterior gastroenterostomy or beside an abdominal stoma if the lateral space is not closed.
2. Internal hernias also occur at anatomical openings, such as the foramen of Winslow (Jacob Winslow 1669–1760, Danish anatomist) or the paraduodenal fossae, and through defects in the falciform ligament, the mesentery or the broad ligament. Think before dividing the ‘band’, as it may contain an important structure such as the portal triad! After dealing with the bowel the defect must be closed.
HAEMATOMA OF THE RECTUS SHEATH
Appraise
1. A sudden strain may rupture one of the inferior epigastric vessels entering the lower rectus abdominis muscle, producing pain. It is more common in patients who are anticoagulated.
2. On the right side, the localized pain and tenderness may be misdiagnosed as appendicitis. However, the patient does not have systemic or gastrointestinal symptoms, pyrexia or leucocytosis. Furthermore, the local tenderness in the right iliac fossa is greater when the patient puts the muscles under tension.
3. Ultrasound or CT (computed tomography) confirms the diagnosis and management is then conservative.
4. If you operate thinking the patient has appendicitis and discover a haematoma lying behind the lower rectus muscle, evacuate it. If there is a suspicion of continuing bleeding, isolate and ligate the inferior epigastric vessels in continuity.
ABDOMINAL WALL SEPSIS
WOUND INFECTION
Appraise
1. Wound contamination and haematoma are the major factors leading to wound infection. Following abdominal surgery a variety of organisms may be responsible. Multifilament stitches may perpetuate a wound infection, so prefer monofilament materials for non-absorbable sutures.
2. Prophylaxis for potentially contaminated wounds comprises perioperative antibiotics, scrupulous haemostasis in the abdominal wall and covering the wound edges with Betadine (povidone-iodine)-soaked swabs or plastic wound protectors.
3. The infection may be a localized wound abscess or an abscess occupying the whole wound, with or without surrounding cellulitis, or there may be cellulitis without an abscess (yet). The wound is hot, red and swollen and the patient is pyrexial and may be toxic.
ACTION
1. The mainstay of treatment is drainage. Often it is possible to achieve this on the ward by removing a suture from the softest part of the wound, followed by probing with forceps. If the wound has discharged spontaneously, consider enlarging the opening to provide adequate drainage. Where an absorbable subcuticular suture has been inserted, cut it. This risks inadvertently opening up the whole wound. It can be prevented by inserting a skin suture under local anaesthesia, on either side of the site of the opening. Be prepared to open the whole length of the wound for a severe infection. Always send a specimen for bacteriology.
2. Normally, do not administer antibiotics for wound infection unless there is cellulitis or the patient is already septic or at risk from immune deficiency, cardiac disease or prosthetic heart valves.
3. Sometimes when you open the wound you discover severe tissue necrosis. Do not then make the error of leaving a small hole and inserting a drain (see Necrotizing fasciitis, below).
4. Following drainage of a wound abscess, a chronic stitch sinus may persist. Explore the sinus with a pair of fine, sterile mosquito forceps, or a sterile crochet hook, to extract the stitch if possible. If the sinus persists, explore it under local or general anaesthesia to remove the suture material. Usually you find a knot of non-absorbable suture material. If you remove it now you may weaken the whole wound. Delay the removal for up to a year.
SYNERGISTIC SPREADING GANGRENE
Appraise
1. This is usually named after Meleney, the New York surgeon who described it in 1933. When it affects the scrotum it is called Fournier’s gangrene (Jean Fournier 1832–1914, Parisian dermatologist). It may result from the synergistic effects of a number of micro-organisms, or from a single organism.
2. The nature of an operation or injury, and the patient’s general condition, may predispose to the condition. Exclude diabetes, immunosuppression, uraemia and hepatic disease.
3. It develops as a slowly extending area affecting the whole thickness of the skin. The advancing edge is typically serpiginous and leaves dead, sloughing skin that separates to expose unhealthy granulation tissue.
Action
1. Start the patient immediately on broad-spectrum antibiotics, such as a cephalosporin and metronidazole, pending the result of bacteriology.
2. The essential action in controlling the infection is to excise all the necrotic tissue, exposing healthy, clean tissue. Leave the wound open and dress it frequently, repeating the excision of any developing necrotic tissue.
3. When the infection has been completely controlled, plan to resurface the denuded area with partial thickness skin grafts.
NECROTIZING FASCIITIS
Appraise
1. This spreading gangrene primarily affects the abdominal fascia. It may follow surgical operations or injury. It is predisposed to by general disease, particularly diabetes. Subsequently the overlying skin is also affected, but the skin involvement may not indicate the extent of the fascial infection. The mortality rate is 30%.
2. Management is with broad-spectrum antibiotics and immediate radical excision of all the necrotic tissue to leave healthy living tissue (in the limbs this may involve amputation).
GAS GANGRENE
Appraise
1. Clostridial infection of abdominal wounds is remarkably rare, considering that the organisms can be recovered from normal faeces.
2. The patient rapidly develops pyrexia, toxicity and hypotension.
3. The discoloured wound edges are crepitant and may discharge thin pus, described as smelling ‘mousy’.
Action
1. Administer 1 million units of benzylpenicillin and continue high doses thereafter.
2. As far as possible, and as rapidly as possible, correct the patient’s general condition.
3. Under general anaesthesia radically excise the whole area, back to clean, living tissue. Thoroughly wash the raw area with hydrogen peroxide (20 vols).
DESMOID AND OTHER ABDOMINAL WALL TUMOURS
Appraise
1. Desmoid tumours are non-encapsulated tumours that develop in the muscle intersections. They are classified as fibromatoses. Hyperplastic connective tissue infiltrates locally, but does not metastasize. Most occur in women, especially those who have borne children. Remove abdominal wall desmoids completely or they recur.
2. Patients with familial adenomatous polyposis may also develop desmoids within the abdomen. These generally surround the mesenteric vessels and so are irremovable.
3. Carcinoma of intra-abdominal structures may directly invade the abdominal wall. If the tumour is otherwise resectable do not hesitate to excise a portion of the abdominal wall en bloc with the primary neoplasm.
Action
1. Concentrate on excising the tumour with adequate clear margins and depth. In the case of a desmoid tumour do not fail to cut through healthy muscle and connective tissue all the way round.
2. If the abdominal wall is invaded from its deep surface, excise the peritoneum and the deep part of the muscle wall, but leave intact the superficial muscle layer. Do not attempt to repair the defect, which will peritonealize.
3. Close a small full-thickness defect layer by layer.
4. A large defect can often be closed by creating a flap of anterior rectus sheath based on its medial edge to swing to the opposite side, or a layer of lateral muscle may be swung over.
5. If you cannot close the defect with muscle or aponeurosis, the best alternative is to use a myocutaneous flap from the chest or thigh. Unless you are skilled in preparing such flaps, obtain the help of a plastic surgery colleague.
6. If you are completely unable to close the defect, consider inserting a polypropylene mesh or other plastic sheet until you can obtain help and advice.
7. When you cannot close the skin defect by any other means, create a large skin flap based laterally that you can slide over to cover the defect, applying split skin grafts to the donor site.
BLOCK DISSECTION OF GROIN LYMPH NODES
Appraise
1. Radical groin dissection is carried out for resection of proven or suspected malignant lymph nodes.
2. In general surgery, the operation is employed most frequently to excise metastatic melanoma deposits from primary sites in the leg, perineum and gluteal regions.
3. The inguinal nodes may be involved by epidermoid carcinoma of the external male or female genitalia, or of the anal skin. In these cases the nodal dissection is usually accomplished in continuity with excision of the primary lesion.
INGUINAL NODES
Action
1. Raise the upper skin flap so that the superficial and deep fascia can be incised 2–3 cm above and parallel to the inguinal ligament to display the lower fibres of the external oblique aponeurosis. Sweep the connective tissues downwards, leaving the lower portion of external oblique stripped clean.
2. Dissect the lower flap to reach the fascia lata over the lateral edge of the sartorius muscle and incise it here, preparing to sweep it medially with the superficial fascia. Look for, and preserve if possible, the lateral and intermediate cutaneous nerves of the thigh.
3. At the medial border of the sartorius muscle, the dissection extends into the femoral triangle as you display in turn the femoral nerve, femoral artery and femoral vein. In the groin, identify, doubly ligate and divide the superficial circumflex iliac, superficial epigastric and superficial external pudendal vessels, to avoid tearing their junctions with the main vessels.
4. Ligate and divide the saphenous vein at the lower extremity of the clearance and again as it joins the femoral vein, so that you remove the segment within the femoral triangle with the specimen.
5. Sweep the superficial tissues and lymph nodes medially as far as possible then incise the fascia lata vertically over the adductor magnus muscle.
6. The specimen is still attached by the fat and lymphatic tissue entering the femoral canal. Gently draw down the lymph node lying within the canal and remove it with the specimen.
ILIAC NODES
This dissection may be made in continuity with the inguinal node dissection, before or after the groin clearance.
Access
1. For a combined approach, make a vertical incision, starting superiorly at the midpoint of a line joining the umbilicus and anterior superior iliac spine and finishing inferiorly at the apex of the femoral triangle. The incision follows a gentle ‘S’, lest a future contracture restrict hip movements.
2. Alternatively, perform a laparoscopic iliac node dissection.
Action
1. Enter the iliac region through the inguinal ligament, by dividing the ligament over the femoral canal or detaching it from the pubic tubercle.
2. Incise the external oblique, internal oblique and transversus abdominis muscles 1–2 cm above and parallel to the inguinal ligament, so that the inguinal ligament can be swung laterally.
3. Doubly ligate and divide the inferior epigastric vessels.
4. Sweep up the intact peritoneum from the iliac vessels, making sure that the ureter remains attached to the peritoneum and is thus preserved from damage. Divide the obliterated umbilical artery.
5. Starting in the hollow of the sacrum, sweep out the connective tissue and lymph nodes from the iliac vessels and their branches, including the obturator vessels and nerve. Remove glands along the obturator vessels and nerve and at the obturator foramen.
6. Strip out the loose tissue and lymph nodes from the femoral canal.