 Peripherally Inserted Central Catheter
PREREQUISITE NURSING KNOWLEDGE
• Successful completion of specialized education in peripherally inserted central catheter (PICC) insertion and demonstrated competency are necessary.5,6 In addition, opportunities to demonstrate clinical competency on a regular basis (e.g., yearly) may be needed.
• Clinical and technical competence is needed in suturing PICC lines in place (if permitted by registered nurse [RN] in state of practice).
• Sterile technique should be understood.
• Knowledge is necessary of the anatomy and physiology of the vasculature and adjacent structures in the upper extremity, neck, and chest.
• Ideally, the patient receiving a PICC should have a peripheral vein that can accommodate a 14- or 16-gauge introducer needle. If necessary, a 22-G microintroducer can be used to dilate a vein to accommodate an introducer sheath. The smallest device in the largest vein allows for maximal hemodilution of the infusate and minimizes the risk of phlebitis and thrombosis.2
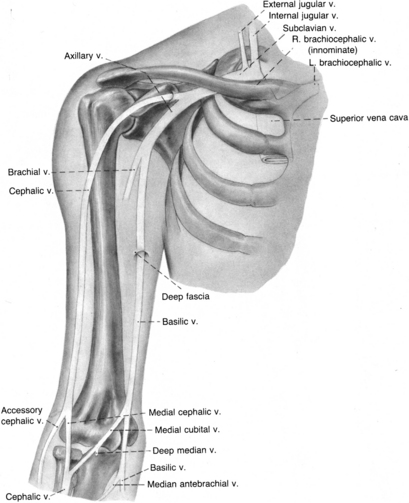
• The basilic and cephalic antecubital fossa veins are the preferred veins for cannulation with a PICC (Fig. 85-1). The basilic vein is the larger of the two veins and is the vein of choice for insertion of a PICC. The cephalic vein has been associated with an increased risk of thrombosis and is the vein of choice for patients who need crutches. Patient preference for arm selection (e.g., nondominant hand, lifestyle, activity restrictions, ability to care for the catheter) should be considered with selection of the insertion site.2 Once inserted, the PICC is advanced to the superior vena cava.5,6
• Patient indications for the insertion of a PICC are not limited to inpatient therapies. A PICC is used increasingly for patients receiving intravenous (IV) therapy in the home setting for chronic heart failure, cancer treatment, chronic pain management, nutritional support, and fluid replacement (e.g., hyperemesis gravidarum).
• PICCs may be preferred over percutaneously inserted central venous catheters for patients with trauma of the chest (e.g., burns) or certain pulmonary disorders (e.g., chronic obstructive pulmonary disease, cystic fibrosis).7 PICCs eliminate the risks associated with insertion of percutaneously inserted central venous catheters in the neck or chest (e.g., pneumothorax).2
• PICCs are contraindicated in patients with sclerotic veins and a history of renal disease and in extremities affected by mastectomy, arteriovenous graft, fistula, or radial artery surgery.
• IV therapy via the PICC poses fewer and less severe complications (including infections) compared with percutaneously inserted central venous catheters. The most common complications associated with the PICC are phlebitis and catheter occlusion.1,7
• A variety of PICCs are available for use. PICCs are flexible catheters that are made of silicone or polyurethane. Catheter diameters range from 23 gauge to 16 gauge, and catheter length ranges from 40 cm (16 inches) to 60 cm (24 inches). For adults, 18- or 20-gauge catheters that are 60 cm in length are the standard. PICCs are available as single-lumen, double-lumen, and triple-lumen catheters, with and without valves. Some PICCs are designed to handle power injections (e.g., contrast media for computed tomographic [CT] scans).
• A PICC can be inserted with or without the use of a guidewire. When a guidewire is used, venous access is achieved with a small gauge (20- or 22-gauge) peripheral IV catheter. Once the IV catheter is inserted, the stylet is removed and the guidewire is threaded through the IV catheter. The IV catheter is then removed, and the dilator/introducer is inserted over the guidewire. The dilator and guidewire are removed, leaving the introducer in the vein to allow for passage of the PICC into the vein. Once the PICC is in place, the introducer is removed. This approach is referred to as the modified Seldinger method.2 Care must be taken with the use of a guidewire. Although advancement of the introducer is enhanced by the firmness provided by the guidewire, the guidewire can inadvertently traumatize the vessel.7
• A PICC can also be inserted through a cannula. This insertion involves a venipuncture with a short peripheral IV catheter. The stylet is removed, and the PICC is threaded into the vein. The short peripheral IV catheter is removed by pulling it over the end of the PICC.2
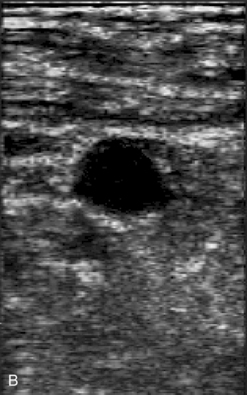
• Ultrasound scan technology is available to assist with vein assessment and PICC insertion (Fig. 85-2). Successful completion of specialized education is needed.

• A variety of safety-engineered introducers are available and should be used to reduce the risk for blood exposure and needle-stick injury.5,6,9
• Verification of the PICC tip placement requires a chest radiograph after insertion.2,5,6,11
• PICCs can be placed at the patient’s bedside, in interventional radiology, or in specialized rooms dedicated for PICC insertion.
EQUIPMENT
• Single-use tourniquet or blood pressure cuff
• Sterile and nonsterile measuring tape
• Waterproof underpad/linen saver
• Two pairs of nonpowdered sterile gloves
• Sterile drapes and towels, including one fenestrated drape
• Antiseptic solution (e.g., 2% chlorhexidine-based preparation)
• 10-mL vial of heparin (concentration and use per institution policy)
• 30-mL vial of normal saline (NS) solution
• Luer-Lok injection port (cap) with short extension tubing
• One to three 10-mL, 20-gauge, 1-inch needle syringes (blunt needles recommended), depending on the number of lumens
• Sterile 4 × 4 gauze pads or sponges
• 1% lidocaine without epinephrine, or 1 to 2 mL of eutectic mixture of local anesthetics (EMLA) cream (optional)
PATIENT AND FAMILY EDUCATION
• Explain the reason for the PICC, the benefits and risks associated with the catheter, and the alternatives to PICC placement.  Rationale: Clarification of information is an expressed patient need and helps to diminish anxiety, enhance acceptance, and encourage questions.
• Describe the major steps of the procedure, including the patient’s role in the procedure.  Rationale: Explanation decreases patient anxiety, enhances cooperation, provides an opportunity for the patient to voice concerns, and prevents accidental contamination of the sterile field and equipment.
• Instruct the patient and family to refuse injections, venipunctures, and blood pressure measurements on the arm with the PICC.  Rationale: The risk for catheter-related complications and catheter damage is minimized.
• Provide appropriate patient and family discharge education regarding the care and maintenance of the PICC.  Rationale: Education reduces the risk for catheter-related complications from lack of knowledge and skills needed to care for the PICC after discharge.
PATIENT ASSESSMENT AND PREPARATION
Patient Assessment
• Assess the patient’s medical history for mastectomy, fistula, shunt, or radial artery surgery.  Rationale: PICC insertion should be avoided in extremities affected by these conditions to preserve veins for future needs and because the risk for complications is increased.
• Obtain the patient’s baseline vital signs and cardiac rhythm.  Rationale: Cardiac dysrhythmias can occur if the catheter is advanced into the heart. Baseline data facilitate the identification of clinical problems and the efficacy of interventions.
• Assess the vasculature of the antecubital space of both arms, focusing on the basilic and cephalic veins (see Fig. 85-1). A tourniquet or blood pressure cuff should be applied on the mid–upper arm for vein assessment and then removed.  Rationale: Proper vein selection increases the success of insertion and decreases the incidence of postinsertion complications.
• Determine the patient’s allergy history (e.g., lidocaine, heparin, EMLA cream, antiseptic solutions, tape, latex).  Rationale: Assessment decreases the risk for allergic reactions with avoidance of known allergenic products.
Patient Preparation
• Verify correct patient with two identifiers.  Rationale: Prior to performing a procedure, the nurse should ensure the correct identification of the patient for the intended intervention.
• Ensure that the patient and family understand preprocedural teaching. Answer questions as they arise, and reinforce information as needed.  Rationale: Understanding of previously taught information is evaluated and reinforced.
• Ensure that informed consent has been obtained.  Rationale: Informed consent protects the rights of the patient and allows the patient to make a competent decision.
• Perform a pre-procedure verification and time out, if non-emergent. Rationale: Ensures patient safety.
• Assist the patient to a semi-Fowler or dorsal recumbent position, depending on the patient’s clinical condition and level of comfort.  Rationale: The upright position allows gravity to assist in directing the catheter downward when the catheter is advanced into the innominate vein and superior vena cava. It also may help avoid inadvertent placement of the catheter into the jugular vein.
• Position the selected arm at 45 degrees of extension from the body for anthropometric measurement. For catheter placement in the superior vena cava, use the nonsterile measuring tape to measure the distance from the selected insertion site to the shoulder (Fig. 85-3, A) and from the shoulder to the sternal notch (Fig. 85-3, B). Add 3 inches (7.5 cm; or the measured distance from the sternal notch to the third intercostal space) to this number for catheter placement in the superior vena cava.  Rationale: Extension of the extremity allows for displacement of the catheter with arm movement. Accurate measurement ensures proper tip position in the superior vena cava and determines the length of the catheter to be inserted.
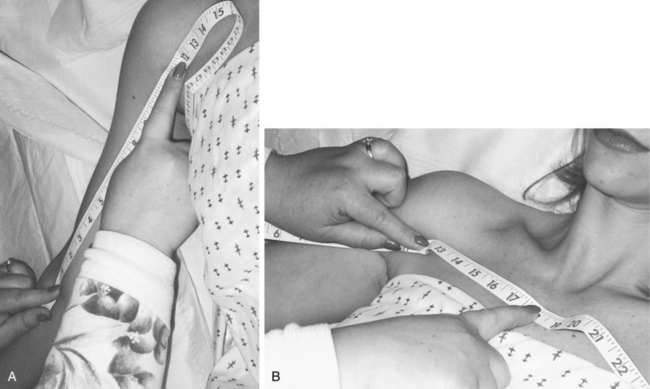
• Measure the mid–upper arm circumference of the selected extremity.  Rationale: Measurement provides a baseline for evaluation of suspected thrombosis. Increases of greater than 2 cm over baseline are supportive of venous occlusion.
• Stabilize the position of the arm with a towel or pillow.  Rationale: Stabilization increases patient comfort, secures the work area, and facilitates access to the selected vein.
• Instruct the patient on proper head positioning. The head is positioned to the contralateral side (away from the insertion site) throughout the procedure, except when the catheter is advanced from the axillary vein to the superior vena cava. At this point, the patient is instructed to position his or her head toward the ipsilateral side (toward the insertion site) with the chin dropped to the shoulder.  Rationale: Proper positioning limits the risk for the catheter being inadvertently directed into the jugular vein.
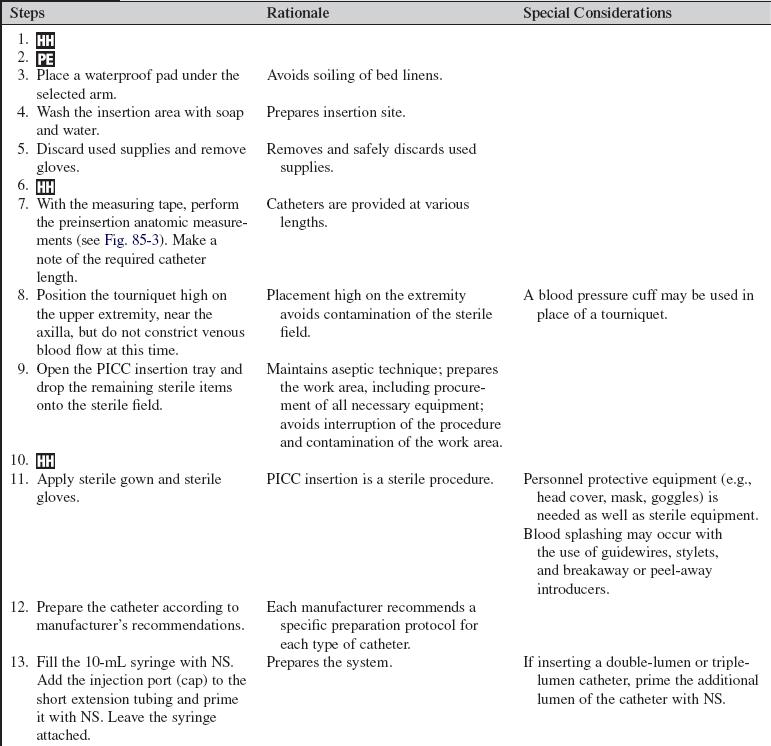

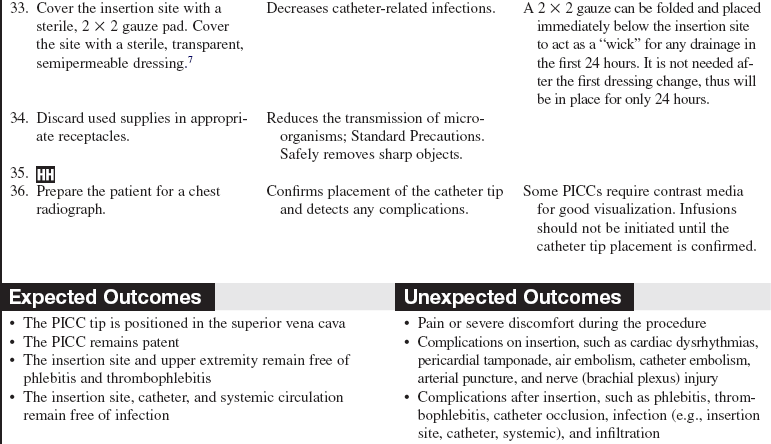
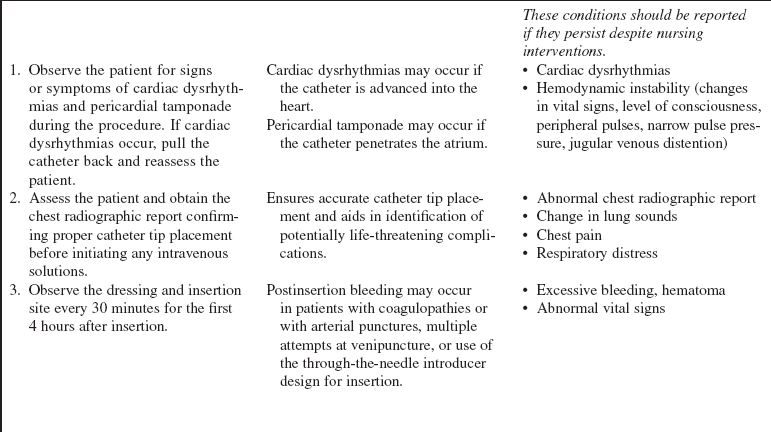
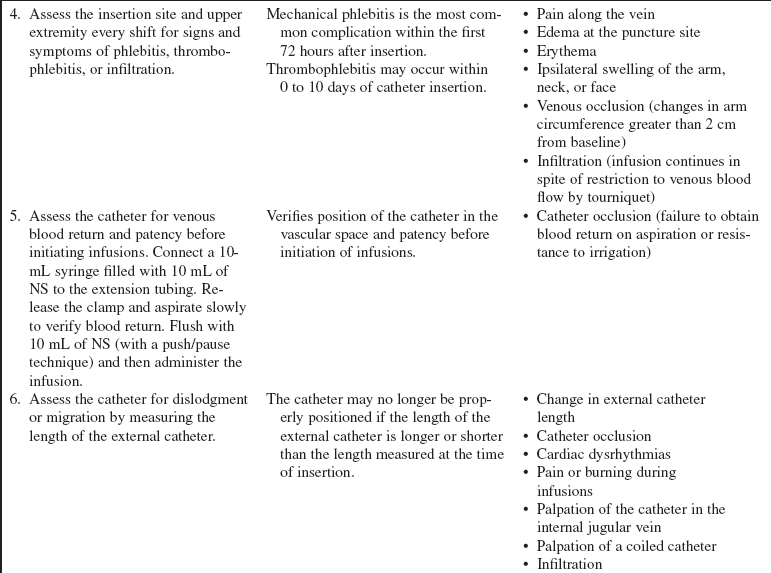
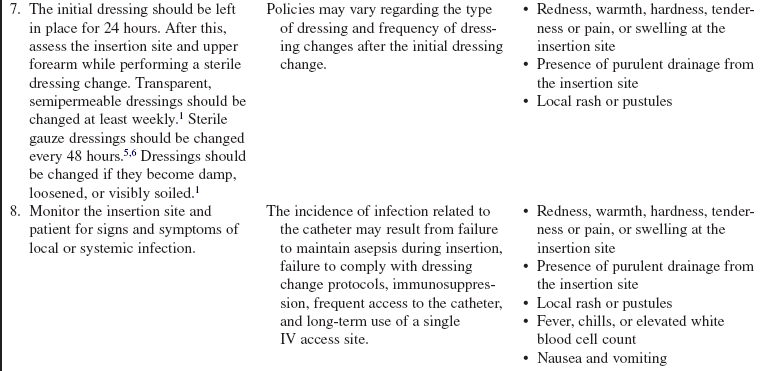

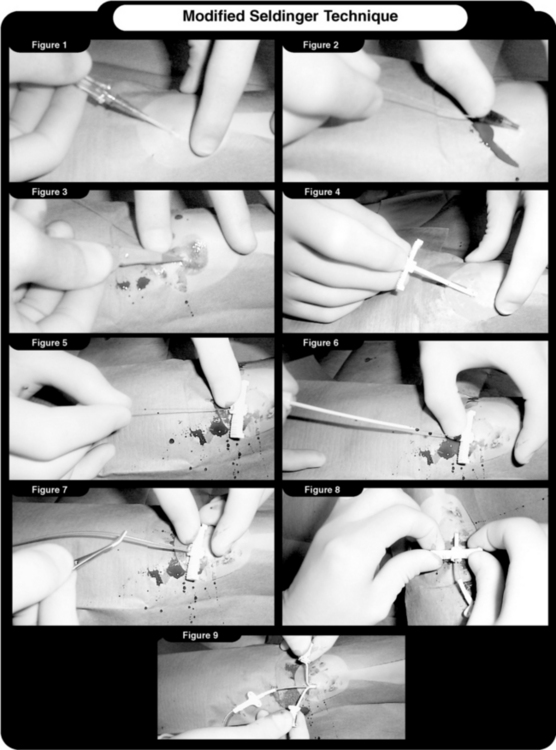
Figure 85-4 Modified Seldinger technique. 1, Insertion of the peripheral intravenous catheter. 2, Advancement of the guidewire through the catheter. 3, Small skin nick to facilitate the advancement of the dilator/introducer. 4, Insertion of the dilator/introducer over the guidewire. 5, Advancement of the dilator/introducer. 6, Removal of the dilator and guidewire. 7, Insertion of the catheter using sterile forceps. 8, Removal of the introducer. 9, Introducer peeled apart and removed. (Courtesy Bard Access Systems, Salt Lake City, UT.)
References
![]() 1. Centers for Disease Control and Prevention. Guidelines for the prevention of intravascular catheter-related infections. MMWR. 2002; 51(RR-10):2–29.
1. Centers for Disease Control and Prevention. Guidelines for the prevention of intravascular catheter-related infections. MMWR. 2002; 51(RR-10):2–29.
![]() 2. Eddins, J. Central venous access. In Phillips L, ed. : Manual of I. V. therapeutics, ed 4, Philadelphia: F. A. Davis, 2005.
2. Eddins, J. Central venous access. In Phillips L, ed. : Manual of I. V. therapeutics, ed 4, Philadelphia: F. A. Davis, 2005.
![]() 3. Fetzer, SJ, Reducing venipuncture and intravenous -insertion pain with eutectic mixture of local anesthetic. -a meta-analysis. Nurs Res 2002; 51:119–124.
3. Fetzer, SJ, Reducing venipuncture and intravenous -insertion pain with eutectic mixture of local anesthetic. -a meta-analysis. Nurs Res 2002; 51:119–124.
![]() 4. Hussey, VM, Poulin, MV, Fain, JA. Effectiveness of -lidocaine hydrochloride on venipuncture sites. AORN J. 1997; 66:472–475.
4. Hussey, VM, Poulin, MV, Fain, JA. Effectiveness of -lidocaine hydrochloride on venipuncture sites. AORN J. 1997; 66:472–475.
5. Infusion Nurses Society. Policies and procedures for -infusion nursing,, ed 3. Norwood, MA: INS; 2006.
6. Intravenous Nurses Society. Infusion nursing standards of practice. J Infus Nurs. 2006; 29(1S):S1–S90.
![]() 7. Josephson, DL. Intravenous infusion therapy for nurses,, ed 2. Clifton Park, NY: Thomson Delmar Learning; 2004.
7. Josephson, DL. Intravenous infusion therapy for nurses,, ed 2. Clifton Park, NY: Thomson Delmar Learning; 2004.
![]() 8. Lander, J, et al, Evaluation of a new topical anesthetic agent. a pilot study. Nurs Res 1996; 45:50–52.
8. Lander, J, et al, Evaluation of a new topical anesthetic agent. a pilot study. Nurs Res 1996; 45:50–52.
![]() 9. National Committee on Safer Needle Devices, Using safer needle devices. the time is now,. National Committee on Safer Needle Devices, Washington, DC, 1997.
9. National Committee on Safer Needle Devices, Using safer needle devices. the time is now,. National Committee on Safer Needle Devices, Washington, DC, 1997.
![]() 10. Nott, M, Peacock, J, Relief of injection pain in adults. EMLA cream for 5 minutes before venipuncture. Anaesthesia 1990; 45:772–774.
10. Nott, M, Peacock, J, Relief of injection pain in adults. EMLA cream for 5 minutes before venipuncture. Anaesthesia 1990; 45:772–774.
![]() 11. Oncology Nursing Society (ONS), Access device guidelines. recommendations for nursing practice and education,. ed 2. ONS, Pittsburgh, 2004.
11. Oncology Nursing Society (ONS), Access device guidelines. recommendations for nursing practice and education,. ed 2. ONS, Pittsburgh, 2004.
Alexander M, Corrigan A, Gorski L, Hankins J, Perucca R, eds. Infusion Nurses SocietyInfusion NursingAn evidence-based approach, ed 3, Saunders, 2010.
Potter PA, Perry AG, eds.. Basic nursing. a critical thinking approach. ed 5. Mosby, St Louis, 2003.
Weinstein, SM. Plumer’s principles and practice of intravenous therapy, ed 8. Philadelphia: Lippincott -Williams & Wilkins; 2006.
