CHAPTER 23. SUTURING
Indications185
Cautions186
Contraindications186
Equipment187
Practical procedure187
Post-procedure care193
Complications196
Prior to his post as physician to the Emperor Marcus Aurelius, the Greek physician Galen (129–circa 200–216) worked for several years gaining experience in the management of trauma as physician in a gladiator school. There he described using sutures for the purposes of haemostasis and tendon repair.
Lord Joseph Lister (1827–1912) introduced sutures treated with carbolic acid to promote antisepsis, as well as pioneering the process of chromatization to prolong the tensile strength of the suture. In these times suture material was most commonly derived from violin strings, the instrument itself being referred to as the ‘kit’ (from the word ‘kitara’, what we now refer to as the guitar). The intestines of the sheep, goat or ox were used to make these strings, termed ‘kitgut’. Suture material subsequently became referred to as ‘catgut’ despite not using the intestines of the cat in their production.
INTRODUCTION
Suturing is a skill commonly required outside the operating theatre, especially in A&E for minor trauma. Prior to suturing, a careful neurovascular and motor examination is always required as well as examining the wound for debris or foreign bodies.
INDICATIONS
 Tip Box
Always consider the alternatives to sutures when contemplating wound closure, including surgical staples, wound closure adhesive tape (e.g. Steri-Strips®) and dermal adhesives (cyanoacrylate skin glues, e.g. Dermabond®).
CAUTIONS
Superficial skin lacerations are commonly managed in the A&E setting. However, always seek senior or expert guidance prior to suturing if unsure.
• Injuries to extremities that occurred over 12 hours prior to presentation may, following appropriate cleaning, be left to heal by secondary intention.
• Seek a specialist referral if, on examination, there is any evidence of underlying bone fracture or neurovascular or motor deficit relating to the injury.
• Plastic surgery specialists will consider referrals or will readily give advice for any cases involving skin wounds if required.
• In general, proceed with caution in cases in which the cosmetic outcome is of greater significance to the patient:
— paediatric cases
— maxillofacial cases.
• Caution should also be used with bites, either human or animal. Closed-fist bites (e.g. sustained when the patient’s fist comes into contact with another person’s teeth) can lead to deep tendon infections, and are worth discussing with orthopaedic or hand specialists. Animal bites, if superficial, may also require a senior opinion with respect to antibiotic prophylaxis.
CONTRAINDICATIONS
• Lack of consent.
• Foreign body in the wound.
• Wound infection.

EQUIPMENT
• Sterile gloves and drapes.
• Chlorhexidine solution cleaning.
• 1 L bag of normal saline, giving set, sterile scissors and eye goggles.
• Lidocaine.
• 1 × 10 mL syringe.
• Orange needle.
• Green needle.
• Suture cutter.
• Suture pack (including toothed forceps, non-toothed forceps and needle holder).
• Gauze.
• Sterile dressing.
• Non-absorbable suture (e.g. ‘1’ silk).
— Non-absorbable sutures may be made from silk, nylon, polypropylene (Prolene) or polyester (Dacron).
— Sutures are sized by the United States Pharmacopoeia (USP) scale (Table 23.1). For example, an 11-0 suture would be appropriate for specialist ophthalmic surgery, a 4-0/5-0 suture for closing a limb wound, and a 2-0 suture for securing a central venous catheter.
| Gauge (USP scale) | Non-absorbable suture diameter (mm) |
|---|---|
| 11-0 | 0.01 |
| 10-0 | 0.02 |
| 9-0 | 0.03 |
| 8-0 | 0.04 |
| 7-0 | 0.05 |
| 6-0 | 0.07 |
| 5-0 | 0.10 |
| 4-0 | 0.15 |
| 3-0 | 0.20 |
| 2-0 | 0.30 |
| 0 | 0.35 |
| 1 | 0.40 |
| 2 | 0.50 |
| 3 | 0.60 |
| 4 | 0.60 |
| 5 | 0.70 |
| 6 | 0.80 |
— Several types of needle points are in common use (e.g. cutting, atraumatic and taper-cutting needles). However, whether the needle shape is straight or curved is particularly important in simple suturing. Curved needles are designed for use with needle-holders, whereas straight needles are designed to be hand-held (thus concomitantly increasing the associated risk of needlestick injury).
PRACTICAL PROCEDURE
THE SIMPLE INTERRUPTED SUTURE
• Obtain consent.
• Ask a nurse to accompany you in order to open non-sterile equipment and to comfort the patient.
• Wash your hands, wear the sterile gloves and lay out sterile environment and suture pack.
• Inspect and clean the area. Closely inspect the inside of the wound for debris or foreign bodies. Irrigate the wound with copious volumes of sterile normal saline until you are satisfied that the wound is clean.
 Tip Box
‘The solution to pollution is dilution’. Attach a giving set to a sterile 1 L bag of normal saline and cut off the lower two-thirds to half of the set using sterile scissors. Irrigate the wound liberally, squeezing the bag to direct a high-velocity jet of fluid directly into the wound. Always wear eye goggles when performing this technique and place a disposable absorbable pad and kidney bowl underneath the area being cleaned.
• Clean the surrounding skin outwards from the wound with chlorhexidine solution. Apply the sterile drape with only the wound exposed, giving a sterile field for suturing.
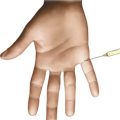
• Infiltrate local anaesthetic subcutaneously with an orange needle.
• Infiltrate local anaesthetic with a green needle into deeper tissues.
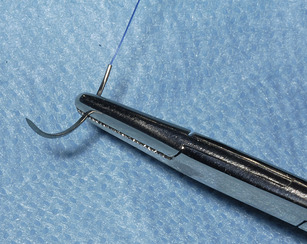
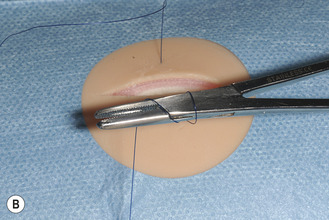
• Grasp the needle with the needle-holder approximately three-quarters to two-thirds of its length from the needle point (Fig. 23.1).
• Starting at the middle of the wound, lift the distal skin edge with toothed forceps in the non-dominant hand and hold the needle-holder with the dominant hand in a pronated position (Fig. 23.2).
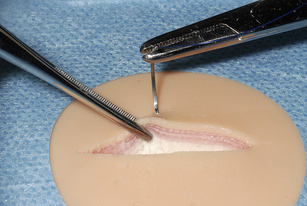
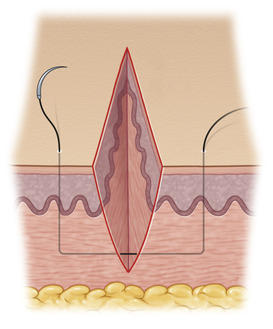
• Insert the needle at right angles to the skin approximately half to one centimetre from the wound edge and rotate the needle through the epidermis and dermis by supinating the dominant hand, thus rotating through the curvature of the needle. Ensure the needle passes through the bottom of the wound leaving no dead space deep to the suture. This secures a good ‘bite’ of healthy, undamaged skin and subcutaneous tissue (Fig. 23.3).
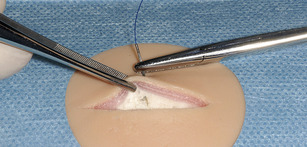
• Now release the needle from the needle-holder and re-grasp the needle within the word cavity whilst continuing to keep the wound edge held open with the toothed forceps.
• Lift the proximal edge of the skin with the toothed forceps in the non-dominant hand. Again, hold the needle-holder with the dominant hand in a pronated position.
• Return the needle to the bottom of the wound and insert it perpendicularly into the subcutaneous tissue (Fig. 23.4).
• Supinate the dominant wrist in order to keep the body of the needle perpendicular to the tissue it is passing through upwards to the skin surface. Aim to bring the needle through the skin at a point directly opposite and equidistant from the wound compared with the other side (Fig. 23.5).
• Pull the suture carefully through the wound by the needle. Leave approximately 5 cm of suture material free on the opposite side.
 Tip Box
Pull the suture in line with the needle to avoid breaking the suture from the needle.
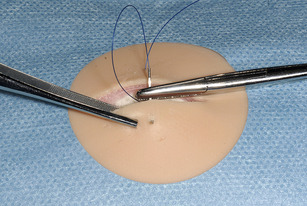
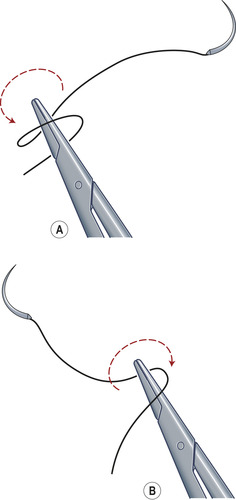
• Let go of the needle and close the needle holder whilst positioning it along the line of the wound.
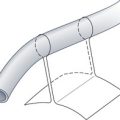
• Coil the suture material around the needle holder twice in a clockwise motion (Fig. 23.6 A and B).

• Open and turn the needle holder towards the free end of the suture. Grasp the free end.
 Tip Box
‘Lock’ the knot by pulling the knot in the direction of the wound (i.e. perpendicular to the suture).
 Tip Box
Do not place the stitches so tight that the wound is under tension. The purpose of the stitch is to appose the wound edges.
• Now let go of the suture and again close the needle holder positioning it along the line of the wound.
• Repeat the coiling procedure twice more using only one coil each time and in alternate directions (i.e. anticlockwise for the first single throw, then clockwise for the second single throw, Fig. 23.7).
• Cut the suture at approximately 1 cm in length from the skin (to aid suture removal).
• Place further sutures at half to one centimetre intervals working outwards from the centre of the wound.
• Clean the area and apply a dry dressing.
• Document the procedure clearly in the patient’s medical notes.
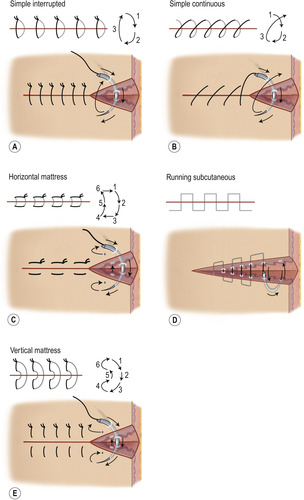
For further suture techniques see Fig. 23.8.
POST-PROCEDURE CARE
• Prescribe oral analgesia.
• Check patient’s tetanus status and give booster if required.
• If required (e.g. animal bites) consider prophylactic antibiotics. Discuss this with microbiology/consult local protocols.
• Advise the patient to attend their GP for removal of sutures (ROS) at the suggested date (Table 23.2).
| Suture location | ROS at day |
|---|---|
| Face and neck | 3–5 |
| Neck | 5–8 |
| Scalp | 7–10 |
| Trunk | 10–14 |
| Limbs | 10–14 |
| Foot | 14–21 |
• Reassure the patient that stitch removal is a painless procedure.
 Tip Box
Having inspected a wound prior to suture removal, only go on to remove the sutures from the healed area(s). Wound dehiscence may result from premature suture removal.
• Supply the patient with a wound care advice card. In general the patient should be advised to:
COMPLICATIONS
• Infection.
• Failure of wound healing.
• Hypertrophic or keloid scarring (more common in younger individuals and those with pigmented skin).