

[level-membership-for-surgery-category]
25 Important steps in common operations
Generic checklist for any surgical procedure (as formalised in the WHO surgical checklist, see Chapter 1)
• Correct and complete preoperative tests (e.g. FBC, U&E, ECG)
• Group and save/cross-match/clotting
• Hepatitis B, C, HIV status known? MRSA?
• Type of anaesthetic (general, regional block, local infiltration)
• DVT prophylaxis (stockings, LMWH)
• Site marked clearly by surgeon
• Skin preparation (NB allergies)
• Surgeon and staff protection
• Detailed postoperative instructions to medical and nursing staff.
• Incision (midline, transverse, laparoscopic)
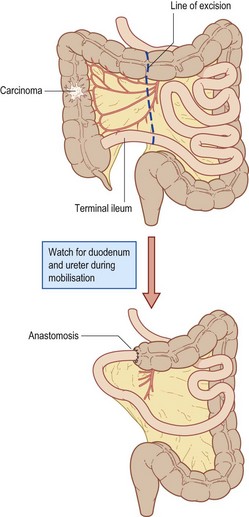
• Preliminary laparotomy, laparoscopy
• Determine operability, stage of disease
• Lateral to medial dissection (open procedure)
• Medial to lateral dissection (laparoscopic)
• Radical excision of lymphatic vessels
• Division of terminal ileum, transverse colon
• Ensuring of good blood supply to cut ends
• Anastomosis of ileum to colon (sutures or staples)
• Washout with cytocidals (water, Betadine)
• Return patient in satisfactory condition to recovery unit
• EUA, sigmoidoscopy, proctoscopy and biopsy
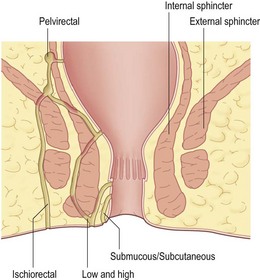
• Identify track(s) using probes, dye or H2O2
• Relation to internal/external sphincter
• Low – lay open from external to internal opening
• High – consider laying open lower track
• High – consider seton suture (tight/loose)
• Further options: Fibrin glue insertion, Fistula plug, Mucosal advancement flap
• AND SEEK SENIOR HELP IF IN DOUBT.
• Site incision according to operation
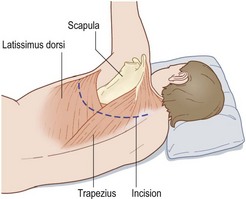
• Ribs are not counted until after muscle division
• Upper lobe fourth/fifth interspace, lower lobe sixth/seventh interspace
• Incision from midline skirting scapula to mid-axillary line
• Divide muscles (two layers) – preserve serratus anterior
• Count ribs, divide periosteum and strip with rougine
• Resect 2–3 cm of rib posteriorly
• Warn anaesthetist, open pleura along length
• Close over two drains (apical and basal)
• Close muscle layers and skin
• Attach underwater drains and re-expand lung
• Return patient in stable condition to recovery.
• Expose hip joint (anterior/posterolateral)
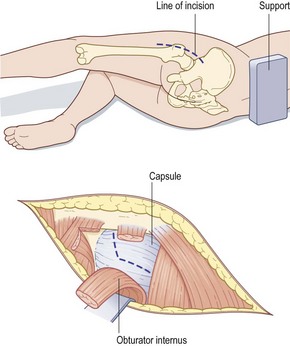
• Open capsule and dislocate joint
• Remove femoral head at angle corresponding to prosthetic shaft
• Ream the femur with broaches
• Prepare acetabulum by excising all soft tissue
• Enlarge acetabulum to fit cup
• Drill keying holes to provide grip for cement
• Insert femoral component into femur
• Close wound in layers with drainage.
Identify structures in order as indicated by arrows:
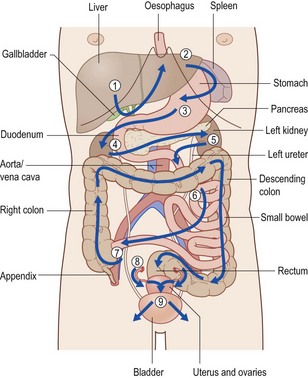
• liver, gallbladder, right kidney
• oesophagus, fundus of stomach, spleen
• body of stomach, duodenum, pancreas, left kidney
• lesser sac, transverse colon
• small bowel, appendix, aorta, ureters
• descending colon, sigmoid, upper rectum
• uterus, fallopian tubes, ovaries and bladder
• Mark site of pterion burr hole after shaving (3 cm above mid-zygomatic point)
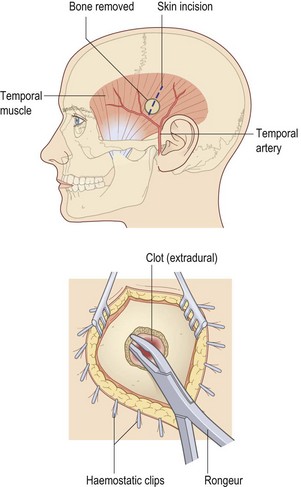
• Incise the scalp and use self-retaining retractor
• Use Hudson brace with perforator
• Move perforator gently to engage outer table and proceed to turn
• Apply firm pressure to the head to prevent lateral movement
• Exchange perforator for burr when inner table has been reached
• Ensure burr hole is vertical
• Stop bleeding from diploe with bone wax
• If extradural haematoma is found, proceed to further burr hole to the limit of the haematoma
• Remove blood clot carefully, wash with saline
• Secure bleeding point on middle meningeal artery
• Check for subdural haematoma
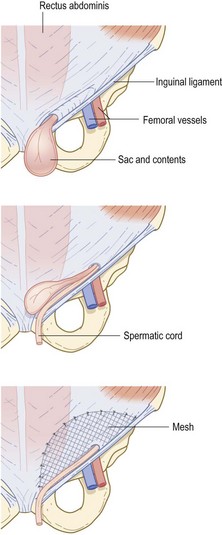
• Preserve ilioinguinal nerve if possible
• Identify sac and contents, spermatic cord in male
• Carefully separate cord from sac
• Avoid damage to vas and testicular artery
• Open sac; check viability of bowel/omentum
• Attach mesh to transversalis fascia
• Check all instruments, cameras, insufflators, screens etc.
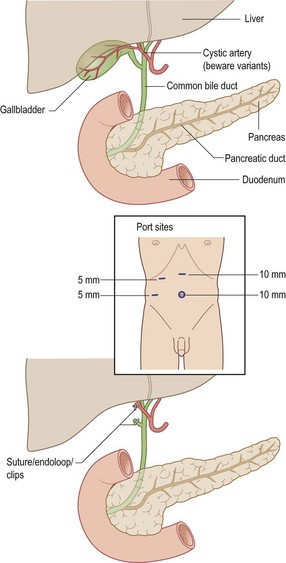
• Preset CO2 insufflator to 13–15 mm
• Insert first port (Hasson technique/Veress needle)
• Laparoscopy, identify gallbladder, cystic duct and artery
• Beware anatomical variations
• Dissect Calot’s triangle, cystic duct and artery
• Operative cholangiogram (if indicated)
• Securely clip artery and duct
• Dissect gallbladder from liver bed (meticulous haemostasis)
• Remove gallbladder via epigastric port using a retrieval bag
• Repeat laparoscopy for damage/bleeding from other sites
• Check port sites for bleeding
• Close all port site wounds carefully
• Return patient to recovery unit in a stable condition.
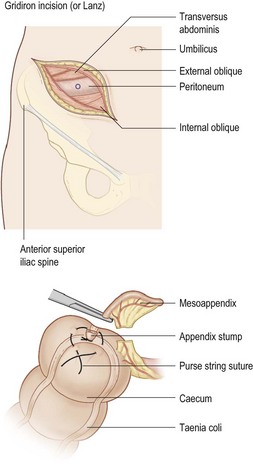
• If normal, examine small bowel for Meckel’s, Crohn’s disease
• If normal, inspect tubes/ovaries
• Divide appendicular artery and appendix mesentery
• Ligate base, remove appendix for histology
• Irrigate pelvis and aspirate if peritonitis
• Close wound in layers – no drain.
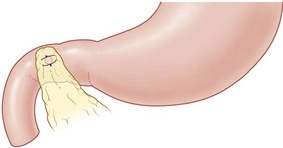
• Duodenal? Omental plug (mobilise omentum first)
• Gastric? Excise ulcer, send to pathology, close gastrotomy
• Meticulous lavage with saline
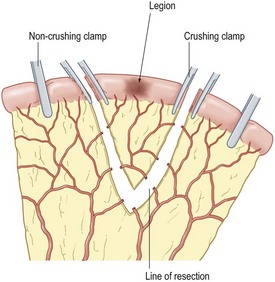
• Identify pathology (stricture, perforation, tumour, Crohn’s)
• Avoid bowel spillage (use soft bowel clamps) Ensure good vascularity of cut ends
• Anastomose ends (extramucosal interrupted using 2-O/3-O Vicryl)
• Close mesenteric defect (avoid damaging arcades)
• S-shaped incision behind the ear and down sternomastoid
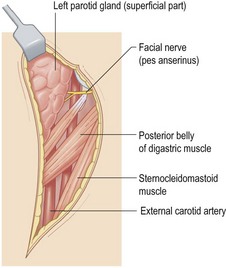
• Expose the main trunk of the facial nerve
• Reflect the parotid tissue superficial to the facial nerve
• Follow the nerve and branches until parotid border is reached
• Meticulous dissection (ideally with nerve stimulator) Tie the parotid duct
• Expose common, superficial and profunda arteries
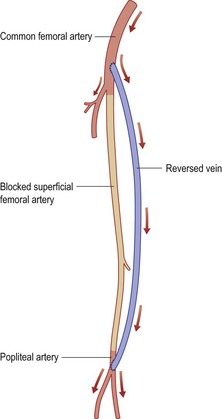
• Expose long saphenous vein (LSV) at termination
• Continue down the limb, isolating saphenous vein to knee
• Divide all LSV tributaries and free the vein
• Detach the vein at this level and reverse
• Ensure adequate length of vein
• Decide upper and lower levels for anastomosis
• Make subcutaneous tunnel for LSV
• Anastomose LSV to popliteal artery
• Anastomose LSV to common/superficial femoral artery
• Close wounds and check pulses.
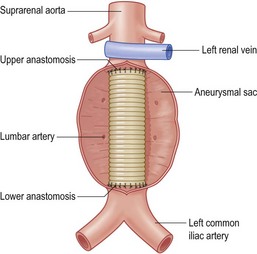
• Reflect root of mesentery to duodenojejunal flexure
• Identify neck of aneurysm and common iliac arteries (limited dissection)
• Give heparin and clamp aorta and common iliacs
• Incise aneurysm and oversew lumbar artery origins
• Oversew middle sacral artery and inferior mesenteric
• Inlay Dacron graft to upper end (beware renal artery origins)
• Suture lower end to iliacs or bifurcation
• Check back bleeding and debris is flushed out before releasing clamps
• Insert purse string around anus
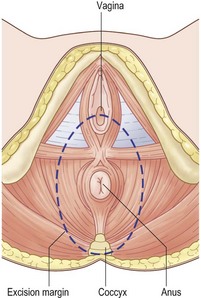
• Deepen incision to reach coccyx
• Develop posterior plane to meet abdominal operator
• Deepen lateral dissection to include levators
• Anteriorly in male develop plane between rectum and prostate
• In female posterior wall of vagina may be included in specimen
• Meet perineal operator for lateral ligaments
• Deliver specimen through the perineum
• Ensure meticulous haemostasis
• Close the wound over an abdominal drain
• Deliver the patient in a stable condition to recovery unit.
• Full laparotomy, determine nature of pathology
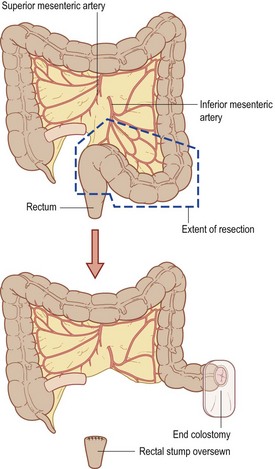
• Consider resection and anastomosis with covering ileostomy
• Mobilise left colon to sacral brim
• Identify ureters, preserve spleen
• Ligate inferior mesenteric, preserve left colic artery
• Ligate inferior mesenteric vein
• NB: Radical excision if carcinoma
• Resect specimen (may be very difficult)
• Mastectomy may be done at the same time
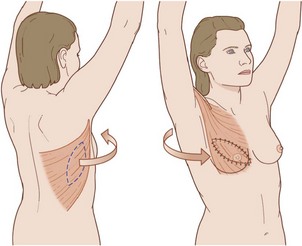
• Preoperative marking of skin paddle (different formats)
• Fashion skin paddle and define margin of latissimus dorsi muscle
• Inferior and medial border of muscle divided
• Dissect the latissimus dorsi from surrounding tissues
• Identify neurovascular bundle (deep surface) (separate axillary incision may be used)
• Transpose paddle to breast pocket.
• Transverse incision to include nipple
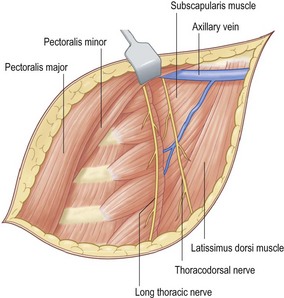
• Fashion skin flaps to incorporate the whole breast
• Avoid buttonhole injury to the skin
• Dissect breast from fascia over pectoralis major
• Irrigate with cytocidal solution
• Open the axilla through a separate incision
• Clean the axillary vessels taking all fat, lymph nodes and fascia
• Lateral thoracic vessels and intercostal brachial nerve are taken
• Avoid damage to brachial plexus and long thoracic nerve of Bell
• All nodes to the apex of the axilla are cleared
• Close both wounds over suction drains.
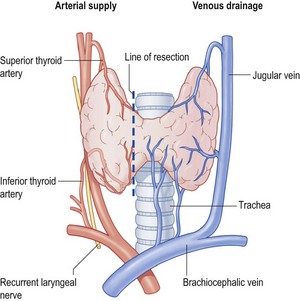
• Divide the strap muscles of the neck
• Divide and ligate the middle thyroid veins
• Draw down upper pole and identify superior thyroid vessels
• Ligate superior vessels and draw down upper pole
• Dissect lateral areolar tissue and identify inferior thyroid artery
• Identify recurrent laryngeal nerve (RLN)
• Tie inferior thyroid artery in continuity lateral to the RLN
• Divide inferior thyroid vein
• Mark line of section with haemostats
• Cut isthmus cleanly to trachea and dissect lobe free
• Remove lobe and oversew thyroid remnant to trachea
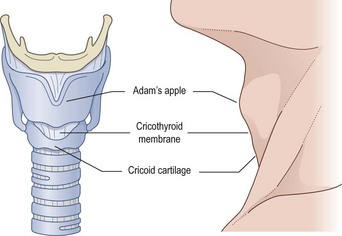
• Very brief sterilization/drape (e.g. chlorhexidine spray)
• Palpate the cricothyroid membrane (soft area just below the thyroid cartilage and just above the cricoid cartilage)
• Make a 2-cm transverse incision directly over the cricothyroid membrane (stabilising the trachea)
• Palpate the membrane directly and make a further 1-cm incision in the membrane itself
[/level-membership-for-surgery-category][not-level-membership-for-surgery-category]
25 Important steps in common operations
Generic checklist for any surgical procedure (as formalised in the WHO surgical checklist, see Chapter 1)
• Correct and complete preoperative tests (e.g. FBC, U&E, ECG)
• Group and save/cross-match/clotting
• Hepatitis B, C, HIV status known? MRSA?
• Type of anaesthetic (general, regional block, local infiltration)
• DVT prophylaxis (stockings, LMWH)
• Site marked clearly by surgeon
• Skin preparation (NB allergies)
• Surgeon and staff protection
• Detailed postoperative instructions to medical and nursing staff.
• Incision (midline, transverse, laparoscopic)
• Preliminary laparotomy, laparoscopy
• Determine operability, stage of disease
• Lateral to medial dissection (open procedure)
• Medial to lateral dissection (laparoscopic)
• Radical excision of lymphatic vessels
• Division of terminal ileum, transverse colon
• Ensuring of good blood supply to cut ends
• Anastomosis of ileum to colon (sutures or staples)
• Washout with cytocidals (water, Betadine)
• Return patient in satisfactory condition to recovery unit
• EUA, sigmoidoscopy, proctoscopy and biopsy
• Identify track(s) using probes, dye or H2O2
• Relation to internal/external sphincter
• Low – lay open from external to internal opening
• High – consider laying open lower track
• High – consider seton suture (tight/loose)
• Further options: Fibrin glue insertion, Fistula plug, Mucosal advancement flap
• AND SEEK SENIOR HELP IF IN DOUBT.
• Site incision according to operation
• Ribs are not counted until after muscle division
• Upper lobe fourth/fifth interspace, lower lobe sixth/seventh interspace
• Incision from midline skirting scapula to mid-axillary line
• Divide muscles (two layers) – preserve serratus anterior
• Count ribs, divide periosteum and strip with rougine
• Resect 2–3 cm of rib posteriorly
• Warn anaesthetist, open pleura along length
• Close over two drains (apical and basal)
• Close muscle layers and skin
• Attach underwater drains and re-expand lung
• Return patient in stable condition to recovery.
• Expose hip joint (anterior/posterolateral)
• Open capsule and dislocate joint
• Remove femoral head at angle corresponding to prosthetic shaft
• Ream the femur with broaches
• Prepare acetabulum by excising all soft tissue
• Enlarge acetabulum to fit cup
• Drill keying holes to provide grip for cement
• Insert femoral component into femur
• Close wound in layers with drainage.
Identify structures in order as indicated by arrows:
• liver, gallbladder, right kidney
• oesophagus, fundus of stomach, spleen
• body of stomach, duodenum, pancreas, left kidney
• lesser sac, transverse colon
• small bowel, appendix, aorta, ureters
• descending colon, sigmoid, upper rectum
• uterus, fallopian tubes, ovaries and bladder
• Mark site of pterion burr hole after shaving (3 cm above mid-zygomatic point)
• Incise the scalp and use self-retaining retractor
• Use Hudson brace with perforator
[/not-level-membership-for-surgery-category]