 Endotracheal Intubation (Perform)
PREREQUISITE NURSING KNOWLEDGE
• Anatomy and physiology of the pulmonary system should be understood.
• Indications for endotracheal intubation include the following5,12:
 Altered mental status (head injury, drug overdose)
 Anticipated airway obstruction (facial burns, epiglottitis, major facial or oral trauma)
 Upper airway obstruction (e.g., from swelling, trauma, tumor, bleeding)

 Ineffective clearance of secretions (i.e., inability to maintain or protect airway adequately)


• Pulse oximetry should be used during intubation so that oxygen desaturation can be detected quickly.
• Preoxygenation with 100% oxygen and a self-inflating manual resuscitation bag-valve-mask device with a tight-fitting face mask should be performed for 3 to 5 minutes before intubation.
• Intubation attempts should take no longer than 15 to 20 seconds. If more than one intubation is necessary, ventilation with 100% oxygen and a self-inflating manual resuscitation bag-valve-mask device with a tight-fitting face mask should be performed for 3 to 5 minutes before each attempt. If intubation is not successful after three attempts, consider use of other airway options, such as the Combitube or King Airway.
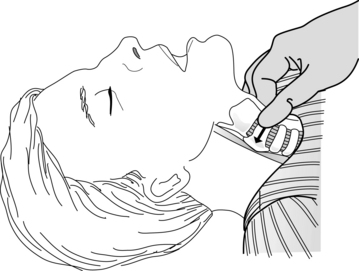
• Application of cricoid pressure (Sellick maneuver) may increase the success of the intubation. This procedure is accomplished with applying firm downward pressure on the cricoid ring, pushing the vocal cords downward so that they are visualized more easily. Once begun, cricoid pressure must be maintained until intubation is completed (Fig. 2-1).
• Two types of laryngoscope blades exist: straight and curved. The straight (Miller) blade is designed so that the tip extends below the epiglottis, to lift and expose the glottic opening. The straight blade is recommended for use in obese patients, pediatric patients, and patients with short necks because their tracheas may be located more anteriorly. When a curved (Macintosh) blade is used, the tip is advanced into the vallecula (the space between the epiglottis and the base of the tongue), to expose the glottic opening.
• Laryngoscope blades are available with fiberoptic light delivery systems. These systems provide a brighter light than bulbs, which can become scratched or covered with secretions.
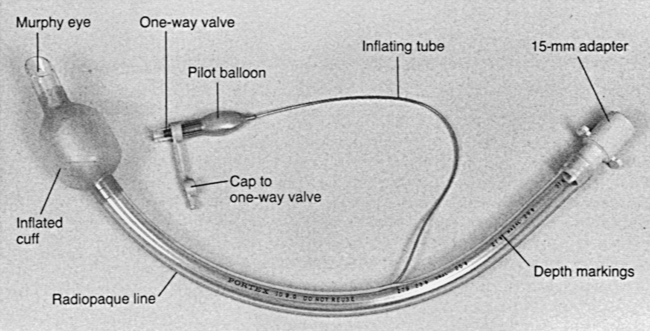
• Endotracheal tube size reflects the size of the internal diameter of the tube. Tubes range in size from 2.5 mm for neonates to 9 mm for large adults. Endotracheal tubes that range in size from 7 to 7.5 mm are used for average-sized adult women, whereas endotracheal tubes that range in size from 8 to 9 mm are used for average-sized adult men (Fig. 2-2).8,9,12 The tube with the largest clinically acceptable internal diameter should be used to minimize airway resistance and assist in suctioning.4
• Endotracheal intubation can be done via nasal or oral routes. The skill of the practitioner who performs the intubation and the patient’s clinical condition determine the route used.
• Nasal intubation is relatively contraindicated in trauma patients with facial fractures or suspected fractures at the base of the skull and after cranial surgeries, such as transnasal hypophysectomy.
• Improper intubation technique may result in trauma to the teeth, soft tissues of the mouth or nose, vocal cords, and posterior pharynx.
• In patients with suspected spinal cord injuries, in-line cervical immobilization of the head must be maintained during endotracheal intubation.
• Primary and secondary confirmation of endotracheal intubation should be performed.1,4
 Primary confirmation of proper endotracheal tube placement includes visualization of the tube passing through the vocal cords, absence of gurgling over the epigastric area, auscultation of bilateral breath sounds, bilateral chest rise and fall during ventilation, and mist in the tube.

• End-tidal CO2 (PetCO2) monitoring devices have been shown to be reliable indicators of expired CO2 in patients with perfusing rhythms.1,5,11,13,15 During cardiac arrest (nonperfusing rhythms), low pulmonary blood flow may cause insufficient expired CO2.14 CO2 detected with an end-tidal CO2 detector is a reliable indicator of proper tube placement.6 If CO2 is not detected, use of an esophageal detector device is recommended.1,3,11,15
• Disposable end-tidal CO2 detectors are chemically treated with a nontoxic indicator that changes color in the presence of CO2 and indicates that the endotracheal tube has been placed successfully into the trachea.
• Continuous end-tidal CO2 monitors may be used to confirm proper endotracheal tube placement after intubation attempts and allow for the detection of future tube dislodgment.
• Esophageal detector devices work by creating suction at the end of the endotracheal tube with compressing a flexible bulb or pulling back on a syringe plunger. When the tube is placed correctly in the trachea, air allows for reexpansion of the bulb or movement of the syringe plunger. If the tube is located in the esophagus, no movement of the syringe plunger or reexpansion of the bulb is seen. These devices may be misleading in patients who are morbidly obese, patients in status asthmaticus, patients late in pregnancy, or patients with large amounts of tracheal secretions.1
• Double-lumen endotracheal tubes are used for independent lung ventilation in situations with bleeding of one lung or a large air leak that would impair ventilation of the good lung.
• The endotracheal tube also provides a route for the administration of emergency medications (e.g., lidocaine, epinephrine, atropine, and naloxone) when no other routes of administration are available.4
EQUIPMENT
• Personal protective equipment, including eye protection
• Endotracheal tube with intact cuff and 15-mm connector (women, 7-mm to 7.5-mm tube; men, 8-mm to 9-mm tube)
• Laryngoscope handle with fresh batteries
• Laryngoscope blades (straight and curved)
• Spare bulb for laryngoscope blades
• Self-inflating manual resuscitation bag-valve-mask device with face mask connected to supplemental oxygen (≥15 L/min)
• Oxygen source and connecting tubes
• Swivel adapter (for attachment to resuscitation bag or ventilator)
• Luer-tip 10-mL syringe for cuff inflation
• Rigid pharyngeal suction-tip (Yankauer) catheter
• Suction apparatus (portable or wall)
• Bite-block or oropharyngeal airway
• Endotracheal tube–securing apparatus or appropriate tape


• Monitoring equipment: Continuous oxygen saturation and cardiac rhythm
• Secondary confirmation device: Disposable end-tidal CO2 detector, continuous end-tidal CO2 monitoring device, or esophageal detection device
• Drugs for intubation as indicated (sedation, paralyzing agents, lidocaine, atropine)
PATIENT AND FAMILY EDUCATION
• Assess patient’s and family’s level of understanding about the condition and rationale for endotracheal intubation.  Rationale: This assessment identifies the patient’s and family’s knowledge deficits concerning the patient’s condition, the procedure, the expected benefits, and the potential risks. It also allows time for questions to clarify information and voice concerns. Explanations decrease patient anxiety and enhance cooperation.
• Explain the procedure and the reason for intubation, if the clinical situation permits. If not, explain the procedure and reason for the intubation after it is completed.  Rationale: This explanation enhances patient and family understanding and decreases anxiety.
• If indicated and the clinical situation permits, explain the patient’s role in assisting with insertion of the endotracheal tube.  Rationale: This explanation elicits the patient’s cooperation, which assists with insertion.
• Explain that the patient will be unable to speak while the endotracheal tube is in place but that other means of communication will be provided.  Rationale: This information enhances patient and family understanding and decreases anxiety.
• Explain that the patient’s hands often are immobilized to prevent accidental dislodgment of the tube.  Rationale: This information enhances patient and family understanding and decreases anxiety.
PATIENT ASSESSMENT AND PREPARATION
Patient Assessment
• Verify correct patient with two identifiers.  Rationale: Prior to performing a procedure, the nurse should ensure the correct identification of the patient for the intended intervention.
• Assess immediate history of trauma with suspected spinal cord injury or cranial surgery.  Rationale: Knowledge of pertinent patient history allows for selection of the most appropriate method for intubation, which helps reduce the risk for secondary injury.
• Assess nothing-by-mouth (NPO) status, the use of a self-inflating manual resuscitation bag-valve device with mask before intubation, and signs of gastric distention.  Rationale: Increased risk of aspiration and vomiting occurs with accumulation of air (from the use of a self-inflating manual resuscitation bag-valve-mask device), food, or secretions. If a patient who has gastric distention or who has eaten recently needs to be intubated, anticipate the need to use cricoid pressure to decrease the risk of aspiration.
• Assess level of consciousness, level of anxiety, and respiratory difficulty.  Rationale: This assessment determines the need for sedation or the use of paralytic agents and the patient’s ability to lie flat and supine for intubation.
• Assess oral cavity for presence of dentures, loose teeth, or other possible obstructions and remove if appropriate.
• Assess vital signs and for the following:


•  Rationale: Any of these conditions may indicate a problem with oxygenation or ventilation or both.
• Assess patency of nares (for nasal intubation).  Rationale: Selection of the most appropriate naris facilitates insertion and may improve patient tolerance of tube.
• Assess need for premedication.  Rationale: Various medications provide sedation or paralysis of the patient as needed.
Patient Preparation
• Perform a pre-procedure verification and time out, if non-emergent.  Rational: Ensures patient safety.
• Ensure that the patient understands preprocedural teaching, if appropriate. Answer questions as they arise, and reinforce information as needed.  Rationale: Understanding of previously taught information is evaluated and reinforced.
• Before intubation, initiate intravenous or intraosseous access.  Rationale: Readily available intravenous or intraosseous access may be necessary if the patient needs to be sedated or paralyzed or needs other medications because of a negative response to the intubation procedure.
• Position the patient appropriately.
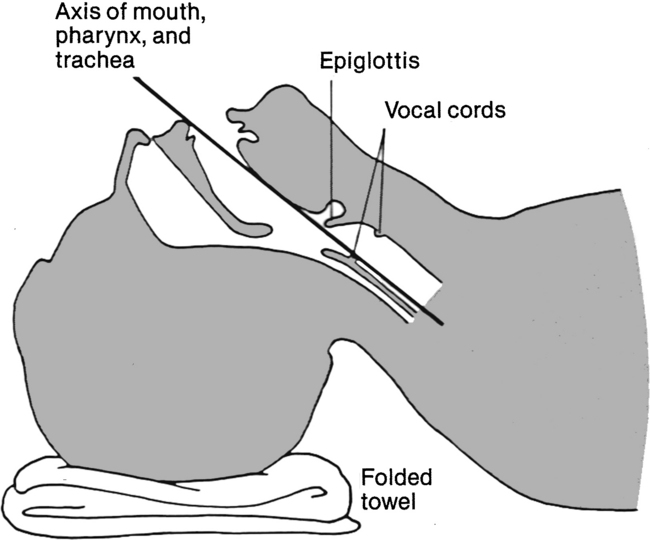
 Positioning of the nontrauma patient is as follows: Place the patient supine with the head in the sniffing position, in which the head is extended and the neck is flexed. Placement of a small towel under the occiput elevates it several inches, allowing for proper flexion of the neck (Fig. 2-3).
  Rationale: Placement of the head in the sniffing position allows for visualization of the larynx and vocal cords by aligning the axes of the mouth, pharynx, and trachea.

 Rationale: Because cervical spinal cord injury must be suspected in all trauma patients until proved otherwise, this position helps prevent secondary injury should a cervical spine injury be present.
• Premedicate as indicated.  Rationale: Appropriate premedication allows for more controlled intubation, reducing the incidence of insertion trauma, aspiration, laryngospasm, and improper tube placement.
• As appropriate, notify the respiratory therapy department of impending intubation so that a ventilator can be set up.  Rationale: The ventilator is set up before intubation.
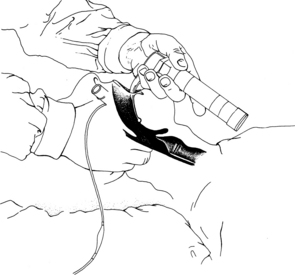
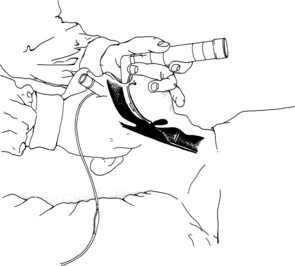
FIGURE 2-5 The blade is advanced into oropharynx, and the laryngoscope is lifted to expose the epiglottis.
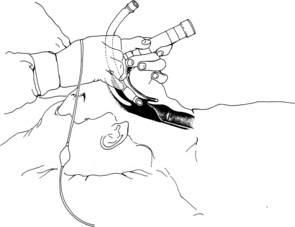

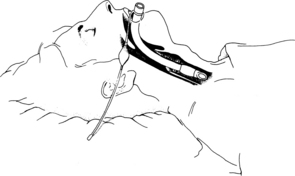
FIGURE 2-9 The tube is positioned so that the cuff is below the vocal cords, and the laryngoscope is removed.
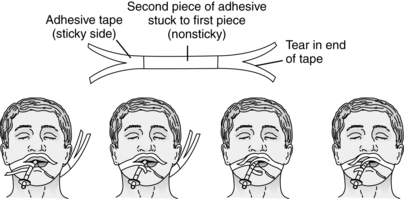
FIGURE 2-10 Methods of securing adhesive tape. Example protocol for securing the endotracheal tube with adhesive tape. 1, Clean the patient’s skin with mild soap and water. 2, Remove oil from the skin with alcohol and allow to dry. 3, Apply a skin adhesive product to enhance tape adherence. (When tape is removed, an adhesive remover is necessary.) 4, Place a hydrocolloid membrane over the cheeks to protect friable skin. 5, Secure with adhesive tape as shown. (From Henneman E, Ellstrom K, St John RE: AACN protocols for practice: care of the mechanically ventilated patient series, Aliso Viejo, CA, 1999, American Association of Critical-Care Nurses, 56.)
References
1. American Heart Association, Guidelines 2005 American Heart Association guidelines for cardiopulmonary resuscitation and emergency cardiovascular care. adjuncts for airway control and ventilation. Circulation. 2005; 112((Suppl) IV):51–57.
![]() 2. Barnason, S, et al. Comparison of two endotracheal tube securement techniques on unplanned extubation, oral mucosa, and facial skin integrity. Heart Lung. 1998; 27:409–417.
2. Barnason, S, et al. Comparison of two endotracheal tube securement techniques on unplanned extubation, oral mucosa, and facial skin integrity. Heart Lung. 1998; 27:409–417.
![]() 3. Bozeman, WP, et al. Esophageal detector device versus detection of end-tidal carbon dioxide level in emergency intubation. Ann Emerg Med. 1996; 27:595–599.
3. Bozeman, WP, et al. Esophageal detector device versus detection of end-tidal carbon dioxide level in emergency intubation. Ann Emerg Med. 1996; 27:595–599.
![]() 4. Cummins RO, ed.. Airway, airway adjuncts, oxygenation, and ventilation. ACLS: principles and practice. American Heart Association: Dallas, 2003:135–180.
4. Cummins RO, ed.. Airway, airway adjuncts, oxygenation, and ventilation. ACLS: principles and practice. American Heart Association: Dallas, 2003:135–180.
![]() 5. Goldberg, JS, et al. Colorimetric end-tidal carbon dioxide monitoring for tracheal intubation. Anesth Analg. 1990; 70:191–194.
5. Goldberg, JS, et al. Colorimetric end-tidal carbon dioxide monitoring for tracheal intubation. Anesth Analg. 1990; 70:191–194.
![]() 6. Hayden, SR, et al. Colorimetric end-tidal CO2 detector for verification of endotracheal tube placement in out-of-hospital cardiac arrest. Acad Emerg Med. 1995; 2:499–502.
6. Hayden, SR, et al. Colorimetric end-tidal CO2 detector for verification of endotracheal tube placement in out-of-hospital cardiac arrest. Acad Emerg Med. 1995; 2:499–502.
![]() 7. Hendey, GW, et al. The esophageal detector bulb in the aeromedical setting. J Emerg Med. 2002; 23:51–55.
7. Hendey, GW, et al. The esophageal detector bulb in the aeromedical setting. J Emerg Med. 2002; 23:51–55.
![]() 8. Henneman, E, Ellstrom, E, St John RE, Airway management. AACN protocols for practice: care of the mechanically ventilated patient series. American Association of Critical-Care Nurses, Aliso Viejo,CA, 1999.
8. Henneman, E, Ellstrom, E, St John RE, Airway management. AACN protocols for practice: care of the mechanically ventilated patient series. American Association of Critical-Care Nurses, Aliso Viejo,CA, 1999.
![]() 9. Holleran, RS, Air and surface patient transport. principles and practice. ed 3. Mosby, St Louis, 2003.
9. Holleran, RS, Air and surface patient transport. principles and practice. ed 3. Mosby, St Louis, 2003.
![]() 10. Kasper, CL, et al. The self-inflating bulb to detect esophageal intubation during emergency airway management. Anesthesiology. 1998; 88:898–902.
10. Kasper, CL, et al. The self-inflating bulb to detect esophageal intubation during emergency airway management. Anesthesiology. 1998; 88:898–902.
![]() 11. Schaller, RJ, et al, Comparison of a colorimetric end-tidal CO2 detector and an esophageal aspiration device for verifying endotracheal tube placement in the prehospital setting. a six-month experience. Prehosp Disaster Med 1997; 12:57–63.
11. Schaller, RJ, et al, Comparison of a colorimetric end-tidal CO2 detector and an esophageal aspiration device for verifying endotracheal tube placement in the prehospital setting. a six-month experience. Prehosp Disaster Med 1997; 12:57–63.
![]() 12. Stewart, C. Tracheal intubation. In: Stewart C, ed. Advanced airway management. New Jersey: Prentice Hall; 2002:76–113.
12. Stewart, C. Tracheal intubation. In: Stewart C, ed. Advanced airway management. New Jersey: Prentice Hall; 2002:76–113.
![]() 13. Takeda, T, et al. The assessment of three methods to verify tracheal tube placement in the emergency setting. Resuscitation. 2003; 56:153–157.
13. Takeda, T, et al. The assessment of three methods to verify tracheal tube placement in the emergency setting. Resuscitation. 2003; 56:153–157.
![]() 14. Varon, AJ, et al. Clinical utility of a colorimetricend-tidal CO2 detector in cardiopulmonary resuscitation and emergency intubation. J Clin Monit. 1991; 7:289–293.
14. Varon, AJ, et al. Clinical utility of a colorimetricend-tidal CO2 detector in cardiopulmonary resuscitation and emergency intubation. J Clin Monit. 1991; 7:289–293.
![]() 15. Zaleski, L, et al. The esophageal detector device. Does it work. Anesthesiology. 1993; 79:244–247.
15. Zaleski, L, et al. The esophageal detector device. Does it work. Anesthesiology. 1993; 79:244–247.
Committee on Trauma, American College of Surgeons. advanced trauma life support manual. American College of Surgeons, Chicago, 2004.
Ellis, DY, Harris, T, Zideman, D, Cricoid pressure in the -emergency department rapid sequence tracheal -intubation. a risk-benefit analysis. Ann Emerg Med 2007; 50:653–656.
Emergency Nurses Association, Trauma nursing core course. provider manual. ed 6. Emergency Nurses Association, Des Plaines, IL, 2007.
National Association of Emergency Technicians, PHTLS. basic and advanced prehospital trauma life support. ed 5. Mosby, St Louis, 2003.
Roberts JR, Hedges JR, eds. Clinical procedures in emergency medicine, ed 4, Philadelphia: Saunders, 2004.
