Assessment and management of the airway is the first step in the resuscitation of a critically ill patient in the emergency department (ED). Once the airway has been assessed and managed, evaluation of adequacy of ventilation follows. This chapter outlines the initial management of airway and ventilation in the ED.
Evaluation of the airway
Evaluation of the airway commences with a ‘look, listen, feel’ approach to detect partial or complete airway obstruction. If airway compromise is suspected, initial basic airway manoeuvres include the jaw thrust, chin lift and head tilt (providing with the latter that there is no suspicion of cervical spine injury); and placement of an oropharyngeal airway (OPA) (see Chapter 1.1 on Basic Life Support).
Gentle direct inspection of the upper airway using a laryngoscope may be necessary to detect a foreign body, which can be removed using a Yankauer suction catheter for liquids/secretions and/or Magill’s forceps for solid material. Once the airway is cleared, supplemental oxygen by face-mask is commenced as consideration is given to the breathing status.
Evaluation of breathing
Evaluation of breathing also uses a ‘look, listen, feel’ approach. Confirmation of adequate oxygenation initially uses a pulse oximeter. The adequacy of breathing may be confirmed with an arterial or venous blood gas analysis to confirm that the PCO2 is in the normal range.
Conscious patients with a patent airway but who have hypoxia and/or hypercapnoea should then be considered for non-invasive ventilation (NIV) or endotracheal intubation (ETI) and mechanical ventilation.
Non-invasive ventilation
Many patients in respiratory failure with hypoxaemia and/or hypercapnoea may benefit from a trial of NIV [1]. The use of NIV involves administration of a controlled mixture of oxygen and air delivered at a set positive pressure via a tightly sealed face-mask. The pressure is generally maintained between 5 and 10 cm H2O during both inspiration and expiration. This continuous positive airway pressure (CPAP) recruits lung alveoli that were previously closed, improving the ventilation/perfusion ratio and thus helping to correct hypoxaemia. There may also be a reduction in the work of breathing as a result of an increase in pulmonary compliance.
Inspiratory support (i.e. 5–20 cm H2O above the baseline pressure) during NIV is known as bi-level NIV. This additional inspiratory support is thought to further reduce the work of breathing when there is poor lung compliance or increased airway resistance.
Contraindications to NIV include comatose or combative patients, poor tolerance of a tight-fitting face-mask, poor seal of the face-mask due to facial hair, and/or the lack of trained medical or nursing staff to institute and monitor the NIV.
Clinical indications for non-invasive ventilation in the ED
Patients who present with severe acute pulmonary oedema (APO) should receive CPAP to improve cardiac and pulmonary function, while medical therapy with nitrates and diuretics is initiated [2]. On the other hand, patients who present with an exacerbation of chronic obstructive pulmonary disease (COPD) may benefit from bi-level NIV rather than CPAP alone [3].
There is also some evidence to support the use of NIV in patients with respiratory failure due to other common ED conditions, such as community-acquired pneumonia [1], although the role of NIV in the management of asthma remains uncertain [4]. Thus, it is common ED practice to administer a trial of NIV in most awake patients with respiratory distress or respiratory failure, prior to any consideration of a requirement for ETI and mechanical ventilation.
Endotracheal intubation
Endotracheal intubation (ETI) is performed for any one or more of the following four major reasons: to create an airway; to maintain an airway; to protect an airway; and/or to provide for mechanical ventilation.
Thus, a patient in respiratory arrest requires immediate bag/valve/mask (BVM) ventilation with supplemental oxygen while preparation is made for ETI and mechanical ventilation to protect and maintain the airway and provide mechanical ventilation. Alternatively, a patient with a reduced conscious state and/or depression of the cough reflex requires ETI for airway maintenance and protection. Also, ETI may be indicated as part of general anaesthesia in the combative patient who needs imaging and/or a practical procedure. Finally, ETI will be required for mechanical ventilation in a patient with respiratory failure in whom NIV has been unsuccessful or is contraindicated.
Challenges to ETI in the emergency department
There are additional challenges to ETI in the ED compared to ETI in the operating theatre. There is often inadequate time for consultation with the patient and/or family and details of current medications, previous anaesthetics and/or allergies may not be available. Also, the status of the cervical spine in a patient with an altered conscious state following trauma is unknown, even if initial plain imaging appears normal. Finally, patients who present to the ED are generally not fasted and thus at a higher risk of aspiration of stomach contents during ETI.
Accreditation in ETI
Given these risks, accreditation by the hospital for a medical practitioner to undertake ETI in the ED is essential. Such accreditation should be based on gaining appropriate qualifications as well as considerable experience in both the operating theatre or in the emergency department, under the supervision of an experienced anaesthetist or airway operator. In addition to initial accreditation, on-going skills maintenance in airway techniques using simulation training should be required [5].
A number of possible techniques for ETI in the ED are reviewed below. The selection of the appropriate technique depends upon physician preference and the clinical setting. A checklist approach is now becoming standard.
Rapid sequence intubation
Unless the patient is deeply comatose but not in cardiac arrest, upper airway reflexes will generally be present and ETI will require the use of sedative and neuromuscular blocking drugs to facilitate laryngoscopy and the placement of the endotracheal tube. Rapid sequence intubation (RSI) involves the simultaneous administration of sedative drugs and a rapid-onset muscle relaxant at a predetermined dose and is the technique of choice when intubation is required in the ED.
Precautions and relative contraindications to RSI
Precautions and relative contraindications to the performance of RSI aim to avoid the technique in those judged to be difficult or impossible to intubate, including a patient with upper airway obstruction, distorted facial anatomy, micrognathia or an ankylosed neck. An alternative elective intubation technique in such cases may be awake intubation under local anaesthesia or an awake surgical airway (see later) to avoid at all costs creating the situation of ‘can’t intubate, can’t ventilate’.
Preparation for RSI
Careful preparation is essential prior to RSI. If time and patient status allow, seek a history of current medications, allergies and time of the last meal. Make a careful examination of the upper airway looking for anatomical features that may predict difficult intubation. A ‘4×4’ checklist to ensure adequate preparation prior to RSI is shown in Box 2.1.1.
The conscious patient should receive explanation and reassurance during the preparatory phase. Pre-oxygenation with 100% oxygen is essential to prevent oxygen desaturation during the procedure. Ideally, NIV with 100% oxygen for a 3-minute period should be administered. If this is not possible, then spontaneous breathing through a tight-fitting bag/valve/mask using 15 L/min oxygen is an alternative way to pre-oxygenate the patient. In addition, the application of nasal prongs with continuous oxygen flowing at 15 L/min can decrease the incidence of hypoxia during the RSI process [6].
If the patient has suspected spinal column injury, the neck must be immobilized in the anatomically neutral position. Reliable intravenous access as well as equipment for suctioning the airway must be available as well as a tipping trolley.
Monitoring during RSI
Monitoring required during RSI must include a continuous ECG trace and pulse oximetry. The blood pressure should be measured either non-invasively using an automated monitoring device each minute or invasively using an intra-arterial catheter. Waveform capnography for end-tidal carbon dioxide (ETCO2) measurement following RSI must be calibrated and ready to use. In addition, a disposable calorimetric capnograph should be available in case the waveform capnograph fails.
Drugs used in RSI
The drugs required will depend on physician preference and the clinical situation. Common choices for induction include propofol at 1–2 mg/kg, a narcotic, such as fentanyl 1.0 μg/kg, a benzodiazepine, such as midazolam 0.05–0.1 mg/kg, followed by a rapid-onset depolarizing neuromuscular blocking drug, such as suxamethonium 1.5 mg/kg.
Contraindications to suxamethonium include known allergy, hyperkalaemia, burns, crush injury, spinal cord injury (not in the acute setting) or a history of malignant hyperthermia. Therefore, an alternative when suxamethonium is contraindicated is the rapid acting non- depolarizing drug rocuronium 1 mg/kg [7]. Details of the indications, dosages and side effects of all the commonly used drugs for RSI intubation are shown in Table 2.1.1.
Preparation of equipment and personnel prior to RSI
All drugs must be drawn up and checked in advance and the syringes clearly labelled. A spare laryngoscope must be available in case of failure of the first and the appropriate size of endotracheal tube (ETT) opened, lubricated and the cuff checked. Another ETT (one size smaller) should be immediately available. Finally, a bougie must be ready to hand. An ETT introducer (stylet) is preferred by some to provide a ‘hockey-stick’ J-shape to the end of the ETT.
At least two assistants will be required; one to assist the operator with the drugs and equipment and another to provide cricoid pressure following the administration of sedation and muscle relaxation drugs. If cricoid pressure is utilized, it must not allow distortion or impediment to the visualization of the vocal cords; if this occurs, it may be abandoned to improve and optimize the laryngoscopic view. A fourth person is required to provide in-line manual immobilization in the case of RSI for the trauma patient with possible spinal column injury. Additional equipment in case of difficult or failed intubation should be readily available, ideally kept together in the ‘Airway Trolley’ containing the items necessary for a failed intubation protocol as shown in Figure 2.1.1.
When all preparations are complete, including pre-oxygenation, the sedative drugs are administered as a bolus with gentle cricoid pressure applied via the cricoid ring cartilage. As consciousness is lost, the muscle relaxant is administered. Following fasciculations and the loss of muscle tone, firm cricoid pressure is applied and laryngoscopy performed. The patient is positioned in the ‘sniffing the morning air’ position with the neck flexed and the head extended, using a pillow under the head.
The laryngoscope is inserted and the vocal cords visualized. If the larynx is sighted, the endotracheal tube is placed directly through the vocal cords into the trachea, the cuff inflated and the ETT secured with tapes. Many brands of ETT now include a line marked proximal to the cuff which should be visible at the conclusion of laryngoscopy, thus avoiding placement of the ETT in the right main bronchus. Cricoid pressure should be maintained until the position of the tube is checked with the waveform capnograph and the ETT secured. The operator then indicates that the ETT is correctly placed and cricoid pressure may be released.
Ensuring optimal tracheal position
Clinical methods of ensuring optimal tracheal position include sighting the passage of the ETT through the vocal cords, misting of the ETT during exhalation and auscultation of breath sounds in both the lung fields. However, these clinical tests may be misleading and, in all cases, the ETT must be confirmed as placed in the trachea using waveform capnography, which is the gold standard for confirmation of tracheal placement in patients with a palpable pulse. However, during cardiac arrest there may be inadequate delivery of carbon dioxide to the lungs and hence a false-negative reading. In this setting, any doubt about correct airway placement should include removal of the ETT and ventilation using a supraglottic airway [8].
After placement of the ETI is confirmed, an orogastric or nasogastric tube should be inserted and a chest X-ray (CXR) performed to confirm correct positioning of the tip of the ETT in the trachea at least 1 cm proximal to the tracheal carina. The CXR also allows confirmation of correct placement of the orogastric or nasogastric tube in the stomach.
Maintenance of sedation and paralysis
As the drugs used for sedation and muscle relaxation wear off, further drugs for the maintenance of sedation and paralysis will be required. Appropriate monitoring of vital signs, pulse oximetry and waveform capnography with visual and audible alarms must be maintained at all times. Humidification of the inspired oxygen is desirable using a disposable heat and moisture exchange filter. When the patient is placed on mechanical ventilation, the PaCO2 should be checked to ensure adequate ventilation and to confirm correlation with the ETCO2. The unconscious patient also requires eye care, pressure area care, temperature control and catheterization of the urinary bladder.
Complications of RSI
Hypotension following endotracheal intubation is common and must be addressed promptly. The causes include the vasodilator and/or negative inotropic effects of the sedative drug(s) given and/or the reduction in preload from positive-pressure ventilation decreasing venous return and cardiac output. Treatment consists of administration of a 10–20 mL/kg fluid bolus of crystalloid fluid, such as saline or Hartmann’s and/or infusion of a vasopressor/inotrope, de- pending on the clinical setting.
Alternatively, in the setting of bronchospasm, hypotension may be due to gas trapping and dynamic hyperinflation from excessive ventilation, with the development of auto-PEEP (positive end-expiratory pressure), which is improved by immediate reduction in ventilation and allowing increased time for expiration. Importantly, hypotension can be due to the development of a tension pneumothorax occurring after the commencement of positive-pressure ventilation. On the other hand, hypertension usually indicates inadequate sedation and should be treated with supplemental sedation.
Intubation in a patient with severe head injury
The following additional measures need to be considered during intubation in patients with severe head injury. An assistant must hold the head in the neutral position due to the possibility of cervical spine instability, which increases the difficulty of visualizing the larynx. Laryngoscopy may raise intracranial pressure, although the benefit of pretreatment with lignocaine 1.5 mg/kg is uncertain in this setting [9]. In addition, thiopentone or propofol must be used cautiously in patients with severe head injury as profound hypotension due to unrecognized hypovolaemia may occur. In this setting, ketamine may be the preferred induction agent since this agent is more likely to maintain blood pressure compared with other sedating agents [10].
The technique of RSI is not recommended for a patient with a grossly abnormal upper airway and/or impending upper airway obstruction. In this setting, the larynx may then not be able to be visualized and ventilation of the now apnoeic patient may become impossible, leading to the ‘can’t intubate, can’t ventilate’ situation. An awake technique using local anaesthesia and/or a fibreoptic-assisted intubation should be performed in these patients (see later). Alternatively, an inhalational anaesthetic agent or a short-acting intravenous agent, such as propofol, can be used, as the sedative effects will rapidly reverse and spontaneous respirations resume if intubation and ventilation prove impossible.
Difficult intubation
Endotracheal intubation under direct vision may be easy or difficult, depending on the view of the larynx during laryngoscopy. This laryngeal view has been classified by Cormack and Lehane into grades 1–4 [11].
A Cormack and Lehane grade 1 laryngoscopy is a clear view of the entire laryngeal aperture. A grade 2 laryngoscopy is a view of only the posterior part of the larynx. In a grade 3 laryngoscopy, only the epiglottis is visualized and in grade 4 only the soft palate is seen. A difficult intubation is defined as a Cormack and Lehane grade 3 or 4 view at laryngoscopy.
Difficult intubation may be anticipated in the presence of pathological facial and upper airway disorders that may be congenital or acquired, such as maxillofacial and airway trauma, airway tumour or abscess or cervical spine immobility. There may also be anatomical reasons for a Cormack and Lehane grade 3–4 laryngoscopy, such as micrognathia or microstomia, poor mouth opening and/or a large tongue. A range of clinical tests have been proposed that help predict difficulty in visualization of the larynx, including relative size of the tongue to the pharynx, atlanto- occipital joint mobility and a thyromental distance<6 cm. However, these are not always clinically useful in the emergency setting. More recently, sonographic measurements of anterior neck soft tissue thickness at the level of hyoid bone and thyrohyoid membrane have been used to distinguish difficult and easy laryngoscopy [12].
Failed intubation drill
Attempts at blind placement of the ETT into the trachea when the larynx is not visualized are unlikely to be successful and may result in pharyngeal or laryngeal trauma making the situation even more difficult, with hypoxaemia. In this situation, a failed intubation drill must be immediately initiated [13]. A failed intubation algorithm suitable for use in the ED is shown in Figure 2.1.1.
The first step is to ensure that all medical and nursing staff present are made aware that the intubation is difficult and that a failed intubation drill is being initiated [14]. Second, depending on hospital resources, an urgent call for assistance from another physician with additional experience should be made.
Simple initial manoeuvres to improve visualization of the larynx include adding a second pillow to flex the neck further (unless cervical spine injury is suspected), the use of a straight Mackintosh laryngoscope blade and ‘backward/upward/rightward external pressure’ (BURP) on the thyroid cartilage with abandonment of cricoid pressure if needed.
If the larynx still cannot be visualized, blind placement of a bougie and subsequent railroading of a well lubricated size 7.0 mm ETT over the bougie should be attempted [15]. Correct bougie airway placement is suggested by feeling the tracheal rings ‘clicks’ and by hold-up at around 30–40 cm as the bougie reaches distally in a mainstem bronchus. Absence of hold-up indicates likely oesophageal placement. Rotating the ETT through 90° in an anticlockwise direction may be helpful to facilitate passage along the bougie through the larynx.
If this initial step at ETI is unsuccessful, adequate oxygenation must be re-established and or maintained using a bag/mask with an OPA or a laryngeal mask airway (LMA) between attempts at intubation. If oxygenation is able to be maintained using bag/valve/mask ventilation, alternative approaches suitable for use in the ED should be considered. A summary of these approaches for a failed intubation is given in Figure 2.1.1. However, if oxygenation cannot be maintained during the drill, immediate cricothyroidotomy is indicated.
Laryngeal mask airway
The LMA is commonly used for airway management during elective general anaesthesia. During a failed intubation drill, the LMA may be superior to a bag/mask and oral airway for oxygenation and ventilation, even though there is still the potential risk of aspiration of the contents of the stomach into the airway as this remains unprotected. This risk may be decreased with the use of an LMA with a distal drainage tube (LMA ProSeal™) or an LMA incorporating an oesophageal vent that allows placement of an orogastric tube to provide access for suctioning the upper oesophagus (LMA Supreme™) [16].
Modified laryngeal mask airways
In addition to the provision of oxygenation and ventilation, there are a number of modified LMAs that may be useful to facilitate intubation during a failed intubation drill in the ED. The intubating LMA is a modification of the standard LMA that incorporates a rigid curved outer airway tube with a metal handle and a special modified endotracheal tube specifically made to pass blindly through the LMA into the trachea (LMA Fastrach™). An LMA incorporating a video image of the larynx has been developed (LMA CTrach™), which may facilitate passage of a bougie through the LMA into the trachea. The LMA can then be removed and an ETT placed over the bougie. The latter has a higher success rate for first-time intubation compared with the LMA Fastrach [17].
Video-laryngoscope assisted intubation
There are an increasing number of laryngoscopes available that include a video image projected from the tip of the laryngoscope and displayed on a separate small screen or laryngoscopes with the screen fitted to the handle. These have the advantage of giving a superior view of the larynx and, although the first-pass success rate appears to be similar to traditional direct laryngoscopy [18]. Increasing familiarity may see this become the preferred method of laryngoscopy.
Fibreoptic bronchoscope-assisted intubation
A fibreoptic bronchoscope may assist in the intubation of the patient when RSI fails or is contraindicated. In particular, fibreoptic bronchoscope-assisted intubation (FBI) is the technique of choice in suspected traumatic injury to the larynx and in the obstructed airway, particularly with distorted anatomy, such as with an upper airway burn or tumour. The FBI may diagnose the severity of the laryngeal injury or pathology and the possible requirement for surgery. However, it requires considerable training and should only be performed by an experienced operator, usually in theatre. Equipment sterilization, maintenance and checking procedures must also be in place.
Technique of fibreoptic bronchoscope-assisted intubation
Topical anaesthetic is applied to the nasal passage using gauze soaked in 5 mL of lignocaine 2% with adrenaline 1:100 000 if the patient is aware. In addition, the upper airway is anaesthetized with lignocaine 10% spray. A well-lubricated 7.0 mm ETT is introduced nasally and passed to the posterior pharynx. Then the bronchoscope is inserted through the ETT to visualize the vocal cords. The suction port of the bronchoscope is used to clear any secretions and also to administer further local anaesthesia into the airway.
The bronchoscope is advanced through the larynx and the ETT then railroaded over the bronchoscope and down the trachea. Further sedation to decrease the cough reflex will be required at this time. The bronchoscope is removed and the patient is then ventilated with oxygen and given additional sedation as needed.
If an LMA has been used during a failed intubation drill and is in place to provide ventilation, this may be utilized to guide the bronchoscope into the larynx. A guidewire may be passed via the bronchoscope into the trachea. The LMA is then removed and an ETT is replaced over the guidewire [19].
Limitations of fibreoptic bronchoscope-assisted intubation
The use of a fibreoptic bronchoscope in the ED is limited by several factors. The bronchoscope and light source must be immediately available for a failed intubation drill. The technique requires considerable additional practice for skills maintenance, yet its use is rare in routine ED practice. The larynx may be difficult to visualize in the presence of blood, vomitus or secretions. Finally, the equipment is expensive to purchase and maintain.
Other airway management techniques
Retrograde intubation
If the patient is able to be adequately oxygenated with a supraglottic airway, the technique of retrograde intubation may be used in the ED [20]. The cricothyroid membrane is punctured by a needle and a guidewire is passed and directed cephalad. The wire is then brought out through the mouth using Magill’s forceps. The ETT may be passed over the wire and back into the larynx using the introducer of a cricothyroidotomy kit [21]. Alternatively, the wire may be passed inside the end of the ETT and then out through the ‘Murphy eye’. Resistance may be felt when the ETT reaches the larynx and some anticlockwise rotation may be required to facilitate passage into the larynx. When the level of the cricothyroid is reached, the guidewire is removed and the ETT passed further down the trachea. The technique of retrograde intubation takes time and experience to perform and is usually unsuitable in a critical airway emergency.
Blind nasotracheal intubation
Blind nasotracheal intubation (BNTI) is a traditional technique that may still occasionally be useful in the ED, either as the initial technique of choice or as part of a failed intubation drill once spontaneous respirations have resumed [22]. Contraindications include a fractured base of skull or maxillary fracture, a suspected laryngeal injury, coagulopathy and/or upper airway obstruction.
Technique of blind nasotracheal intubation
High-flow oxygen is administered by mask and the nasal passages are inspected to assess patency. The larger nasal passage is prepared as per the nasal fibreoptic intubation described above. Local anaesthetic may also be sprayed into the upper airway and intravenous sedation may be administered if required and clinically appropriate.
An ETT one size smaller than the predicted oral size is passed via the nose to the pharynx and advanced slowly towards the larynx with the operator listening for breath sounds. The head may need to be flexed, extended or rotated to facilitate entry into the larynx, the ETT rotated clockwise through 90° and/or a suction catheter used to guide the ETT. When the tube passes into the trachea, louder spontaneous respirations heard from the ETT or the onset of coughing down the tube, confirm successful placement. However, there are significant complications with BNTI including epistaxis, injuries to the turbinates, perforation of the posterior pharynx, laryngospasm and injury to the larynx.
Cricothyroidotomy
Cricothyroidotomy is an essential skill for all emergency physicians and must be considered immediately in the situation of ‘can’t intubate, can’t ventilate’. There are several possible techniques for emergency cricothyroidotomy described below.
Guidewire cricothyroidotomy
Proprietary kits allow a cricothyroidotomy tube to be placed using a Seldinger technique. In this approach, the cricothyroid membrane is punctured with a needle mounted on a syringe; free aspiration of air confirms placement in the airway. A guidewire is passed through the needle caudad down the trachea. The needle is then removed and a dilator passed along the wire, then a 4.5–6 mm cricothyroidotomy tube is mounted on a guide and passed along the wire and into the trachea. The position of the cricothyroidotomy tube must be carefully checked as it is possible to misplace it anterior to the trachea. Note, if the cricothyroidotomy tube is uncuffed, interpretation of a capnograph waveform can be misleading as much of the exhaled gas passes into the upper airway and not out through the cricothyroidotomy tube during exhalation, resulting in a potentially false-negative end-tidal CO2 trace.
Surgical cricothyroidotomy
Alternatively, a surgical cricothyroidotomy may be rapidly performed by making a small vertical incision over the cricothyroid membrane. Artery forceps are then used for blunt dissection to the cricothyroid membrane which is opened horizontally with the artery forceps. A bougie is passed through the opening into the trachea, then a size 6 mm cuffed ETT is ‘railroaded’ over the bougie. The ETT cuff is inflated, the bougie removed and bag/valve ventilation with oxygen commenced. This technique is faster to perform than a guide-wire technique, although physicians with limited surgical experience may prefer the guidewire approach [23].
Longer-term placement of a larger (>6 mm) ETT through the cricothyroid membrane is unsatisfactory because of the possibility of stricture occurring at the level of the cricoid ring. Therefore, the cricothyroidotomy is subsequently converted to either oral endotracheal intubation or a tracheostomy when it is safe and convenient to do so.
Tracheostomy
Compared with cricothyroidotomy, a surgical tracheostomy is time-consuming and difficult to perform in the ED [24], but may be indicated in suspected direct laryngeal injury. Pre-tracheal dissection requires adequate lighting, instruments and diathermy, with distorted anatomy and bleeding making the technique more complex. Percutaneous dilatational tracheostomy is commonly performed in the ICU and can be rapidly performed by an experienced operator in the ED [25].
Mechanical ventilation
Once intubation has been achieved, the patient is connected to a mechanical ventilator to provide continued ventilatory support. Because ventilated patients can initially be managed for some time in the ED, it is important that recommendations for optimal mechanical ventilation are implemented in the ED.
Optimal mechanical ventilation
A tidal volume of 8 mL/kg and a respiratory rate of 10–14 breaths per minute are considered safe for most patients. In general, 5 cm of positive end-expiratory pressure (PEEP) is provided.
However, patients with acute lung injury may have reduced pulmonary compliance and elevated peak inspiratory and plateau pressures. These patients should receive a ‘protective lung ventilation strategy’ [26]. This involves limiting the tidal volume to 6 mL/kg, with the respiratory rate setting increased to 16–20 breaths per minute to prevent excessive hypercapnoea. If hypoxia persists (PaO2<60 mmHg), then additional PEEP is indicated. This may be titrated in steps of 2.5 mmHg towards a maximum of 22 mmHg [27]. It is important to measure peak and plateau pressures in such a patient to avoid excessive intrinsic lung pressures. The latter is undertaken by pausing ventilation at end-inspiration for 10 seconds and observing the pressure trace on the screen of the ventilator.
Permissive hypercapnoea
Patients with severe airways obstruction, such as asthma or COPD, should receive a standard tidal volume of 8 mL/kg, but at a decreased respiratory rate of 4 to 8 breaths per minute to allow sufficient time for adequate passive exhalation [28]. This slow respiratory rate reduces the risk of dynamic pulmonary hyperinflation and development of auto-PEEP leading to hypotension. Using this strategy, the PaCO2 level will rise (‘permissive hypercapnoea’) as oxygenation is maintained.
Deliberate hyperventilation
In complete contrast, deliberate hyperventilation using a respiratory rate of 16–20 breaths per minute may be indicated to provide hypocapnoea in a patient who has been intubated and who has a severe metabolic acidosis, such as diabetic ketoacidosis. Also, hyperventilation in a patient with raised intracranial pressure to normocapnoea or slight hypocapnoea temporarily reduces the intracranial pressure while other treatments are being implemented.
Extubation in the emergency department
Increasingly, patients who are intubated pre-hospital by paramedics or by a physician in the ED may be considered for planned extubation in the ED, after investigation and treatment have excluded the requirement for mechanical ventilation in ICU. Examples include a patient with a drug overdose or those requiring brief general anaesthesia for a procedure.
In general, patients should be lightly sedated with a short-acting sedative, such as propofol, able to follow commands and able to cough adequately to tracheal suction. Ideally, a trial of spontaneous breathing with the ventilator set to a CPAP of 5 cm H2O, with minimal inspiratory pressure support (i.e. 5–10 cm H2O) with modest supplemental oxygen (i.e.<50% oxygen) is necessary. Also, the stomach should be emptied via an orogastric or nasogastric tube prior to extubation.
Oxygen was first discovered by Priestley in 1772 and was first used therapeutically by Beddoes in 1794. It now forms one of the cornerstones of medical therapy.
Oxygen (O2) constitutes 21% of dry air by volume. It is essential to life. Cellular hypoxia results from a deficiency of oxygen, regardless of aetiology. Hypoxaemia is a state of reduced oxygen carriage in the blood. Hypoxia leads to anaerobic metabolism that is inefficient and may lead to death if not corrected. A major priority in acute medical management is correction of hypoxia, hence oxygen is the most frequently administered and important drug in emergency medicine. There are sound physiological reasons for the use of supplemental oxygen in the management of acutely ill and injured patients.
The normal partial pressure of inspired air oxygen (PIO2) is approximately 20 kPa (150 mmHg) at sea level. If there is a reduction in the fraction of inspired oxygen (FIO2), as occurs at altitude, hypoxia results. This is relevant in the transport of patients at 2400 m in commercial ‘pressurized’ aircraft, where ambient cabin pressures of 74.8 kPa (562 mmHg) results in a PIO2 of 14.4 kPa (108 mmHg).
Hypoxia can result from inadequate delivery of inspired gas to the lung. The many causes include airway obstruction, respiratory muscle weakness, neurological disorders interfering with respiratory drive (seizures, head injury), disruption to chest mechanics (chest injury) or extrinsic disease interfering with ventilation (intra-abdominal pathology). These processes interfere with the maintenance of an adequate alveolar oxygen partial pressure (PAO2), which is approximately 13.7 kPa (103 mmHg) in a healthy individual.
Alveolar gas equation
An approximation of the alveolar gas equation permits rapid calculation of the alveolar oxygen partial pressures:
Oxygen diffuses across the alveoli and into pulmonary capillaries and carbon dioxide diffuses in the opposite direction. The process is passive, occurring down concentration gradients. Fick’s law summarizes the process of diffusion of gases through tissues:
V˙O2∝A/T×Sol/√MW×(PAO2–PpaO2)
where , ∝=proportional to, A=area of tissue, T=tissue thickness, Sol=solubility of the gas, MW=molecular weight, PA=alveolar partial pressure, and Ppa=pulmonary artery partial pressure.
In healthy persons, oxygen rapidly passes from the alveoli to the blood and, after 0.25 seconds, pulmonary capillary blood is almost fully saturated with oxygen, resulting in a systemic arterial oxygen partial pressure (PaO2) of approximately 13.3 kPa (100 mmHg). The difference between the PAO2 and the PaO2 is known as the alveolar to arterial oxygen gradient (A−a gradient). It is usually small and increases with age.
Expected A−a gradient
The expected A−a gradient when breathing air approximates to: Age (years)÷4+4.
An approximation of the actual value can be calculated as follows:
A–aO2gradient=140–(PO2+PCO2).
There is a defect in pulmonary gas exchange if the calculated value exceeds the expected value. The A−a O2 gradient is increased if there is a barrier to diffusion, such as pulmonary fibrosis or oedema or a deficit in perfusion, such as a pulmonary embolism. An increased A−a gradient also reflects widespread ventilation–perfusion mismatch.
In circumstances of impaired diffusion in the lung, raising the FIO2 assists oxygen transfer by creating a greater pressure gradient from the alveoli to the pulmonary capillary. The increase in FIO2 may not be as helpful when lung perfusion is impaired as a result of increased intrapulmonary shunting.
Oxygen carriage in the blood
Four steps are required to deliver oxygen to the periphery:
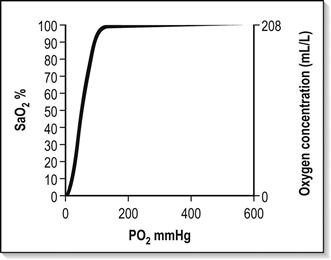
The haemoglobin–oxygen (Hb–O2) dissociation curve is depicted in Figure 2.2.1, which also summarizes the factors that influence the position of the curve. If the curve is shifted to the left, this favours the affinity of haemoglobin for oxygen. These conditions are encountered when deoxygenated blood returns to the lung. A shift of the curve to the right favours unloading of oxygen and subsequent delivery to the tissues.
A number of advantages are conferred by the shape of the Hb–O2 dissociation curve that favour uptake of oxygen in the lung and delivery to the tissues:
Oxygen is carried in the blood as dissolved gas and in combination with haemoglobin. At sea level (101.3 kPa), breathing air (FIO2=0.21), the amount of oxygen dissolved in plasma is small (0.03 mL oxygen per litre of blood for each 1 mmHg PaO2). Hence at PaO2=100 mmHg, 3 mL of oxygen are dissolved in each litre of plasma. Dissolved oxygen is important because it is the first available oxygen to diffuse into the tissues. The dissolved component assumes greater significance in the hyperbaric environment, where at 284 kPa and FIO2=1.0 up to 60 mL oxygen can be carried dissolved per litre of blood.
Haemoglobin carries 1.34–1.39 mL oxygen per gram when fully saturated. Blood with a haemoglobin concentration of 150 g/L carries approximately 200 mL oxygen per litre.
Oxygen flux
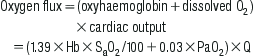
The total amount of oxygen delivered to the body per minute is known as oxygen flux.
where Hb=haemoglobin concentration g/L; SaO2=arterial oxygen saturation (percentage); PaO2=partial pressure of arterial oxygen (mmHg); Q=cardiac output (L/min).
A healthy individual breathing air transports approximately 1000 mL of oxygen per minute to the tissues, based on a cardiac output of 5 L/min; 30% or 300 mL/min of this oxygen is not available, because at least 2.7 kPa (20 mmHg) driving pressure is required to allow oxygen to enter the mitochondria. Therefore, approximately 700 mL/min are available for use by peripheral tissues. This provides a considerable reserve above the 250 mL/min consumed by a healthy resting adult.
In illness or injury, this reserve may be considerably eroded. Factors that reduce oxygen flux include a fall in cardiac output of any aetiology (including shock states), anaemia or a reduction in functional haemoglobin (carbon monoxide poisoning) and a drop in the SaO2. These situations are frequently encountered in the emergency department. Supplemental oxygen is required in addition to specific therapy, such as volume replacement, transfusion, and measures to improve cardiac output.
Local tissue perfusion and diffusion
Cellular hypoxia results if there is impairment of perfusion to local tissues. Oedema associated with medical illness or local injury increases the diffusion distance between blood and the cell, thus mandating a higher PaO2 to ensure adequate tissue oxygen delivery.
Elevation of cardiac output increases oxygen flux in these circumstances but, frequently, this too is significantly impaired by the disease state.
Tissue demands for oxygen increase by 7% for each degree Celsius elevation in body temperature and considerably greater increases in demand occur in seizures, sepsis, severe dyspnoea, restlessness and shivering.
Tissue extraction of oxygen is impaired in sepsis and by poisons, such as carbon monoxide or cyanide. In all cases, oxygen therapy must be combined with general measures, such as reduction of fever and specific treatment of the primary disease process.
Oxygen delivery systems
Oxygen delivery systems are classified into three groups (Box 2.2.1):
These systems deliver a variable FIO2 to the patient which is altered by the inspiratory flow rate, the minute volume of the patient and the physical characteristics of the delivery system.
Fixed-performance oxygen delivery systems
These systems deliver a specified FIO2 to the patient that is not altered by changes in ventilatory pattern, volume or inspiratory flow rate.
One hundred per cent (100%) oxygen systems
This is a subgroup of fixed-performance systems wherein 100% oxygen is delivered to the patient.
General principles
The oxygen source in most Australasian emergency departments consists of a wall-mounted flow meter capable of delivering oxygen up to 15 L/min, with most available oxygen delivery systems connecting to this apparatus. A 15 L/min flow rate limits the delivery of high FIO2 to adults for the following reasons:
Multiple-port oxygen supply outlets can overcome the above limitations of inspiratory flow rate and minute volume. The use of ‘Y’ connectors and ‘T’ pieces enable 30, 45 or 60 L per minute to be delivered to the patient to achieve an FIO2 of nearly 1.0, however, these systems can be untidy, using multiple hoses.
More efficient control of flow is achieved via higher output or dial-up flow meters. Extra source oxygen flow may cause variable-performance systems such as the Hudson mask to become fixed-performance systems. Hence the terms ‘variable performance’ and ‘fixed performance’ are loosely applied and are largely dependent on whether or not the gas flow delivered is sufficient to match the patient’s ventilatory requirements.
An example of this is in paediatric oxygen delivery. A high FIO2 can be delivered using a standard 15 L/min oxygen source because the child’s ventilatory requirements are smaller in proportion to the available oxygen supply.
The oxygen delivery systems available for use in emergency medicine, summarized in Box 2.2.1, can be further subdivided according to economy of oxygen use and whether or not the system can be used to ventilate the patient manually.
Variable-performance systems
The FIO2 delivered by these systems is summarized in Table 2.2.1. Options available for use in emergency medicine include:
The system must be used at flow rates of 4 L/min or less to avoid painful drying of the nasal mucosa, although a flow rate of 2 L/min or less is insufficient to create a nasopharyngeal reservoir during the expiration pause, ready for inspiration with the next breath.
The inspired oxygen concentration is a function of the patient’s inspiratory flow rate and is usually in the vicinity of 22–28%. At flow rates of 2–4 L/min, the nasopharynx acts as a partial reservoir during the expiratory pause, resulting in an increased FIO2. The delivered FIO2 is then influenced by the pattern of breathing (mouth or nose) and the positioning of the nasal cannula.
Nasal cannulae provide a higher FIO2 in paediatric patients and nose breathers. They are less effective in dyspnoeic patients because of the greater amounts of air inspired through the mouth. They are frequently used in patients with stable COPD because of the absence of dead space that prevents CO2 rebreathing. However, fluctuations in FIO2 make nasal cannulae less than ideal in the management of patients who rely on hypoxic respiratory drive and they are second choice after Venturi masks in the emergency management of these patients.
If nasal cannulae are used, there should be strict titration of flow rates to a target SaO2. Advantages for ward or home therapy include the ability to eat and drink, less noise than masks, and economy of oxygen use.
Face-masks (e.g. Hudson, Edinburgh, Medishield)
A small reservoir of oxygen is provided by these masks, but this has little effect on FIO2. The small increase in dead space created by the mask necessitates a flow rate greater than 6 L/min to prevent rebreathing of CO2. Two factors influence the FIO2 provided by this system:
At flow rates of 6–14 L/min, the delivered FIO2 varies from 0.35 to 0.6. This will be less in a dyspnoeic patient because of the higher inspiratory flow rate and greater in a child as the converse applies. If the PIFR increases, greater amounts of air will be entrained into the mask, diluting the oxygen. During expiration, the exhaled gas and excess oxygen are vented through the side perforations.
Attaching a reservoir bag to this mask improves the economy of oxygen use by storing these vented gases during the expiratory phase. This increases the delivered FIO2, but this may be at the expense of increased CO2 rebreathing. Commercially available reservoir bags have a volume of 750 mL to 1 L, which is inadequate for a dyspnoeic patient. The author recommends a minimum flow rate of 12 L/min to avoid CO2 retention.
Using a source oxygen supply of 15 L/min, the maximum FIO2 delivered via a Hudson mask to a quietly breathing adult is 0.6. By attaching another source of oxygen using a T piece or Y connector, the resultant flow rate of 30 L/min can deliver an FIO2 up to 0.8. With even greater flow rates, the mask may be converted into a fixed-performance system delivering an FIO2 of almost 1.0. Then the ability to deliver 100% oxygen is limited by the mask’s ‘fit’.
The Medishield mask is stated to be more efficient than the Hudson because dead space is reduced by bringing the oxygen supply closer to the mouth, allowing more effective entrainment during inspiration. An FIO2 of 0.75 may be obtained with a gas flow rate of 15 L/min.
T pieces and Y connectors
The term ‘T piece’ has been used to describe a number of different oxygen delivery systems, including the T piece for supplying humidified oxygen to patients with a tracheostomy and the ‘Ayre’s T piece’ which is a Mapleson E circuit. The use of T pieces or Y connectors in emergency medicine is to supplement an existing oxygen supply with:
The disadvantage of the system is that several oxygen ports are necessary, which is untidy and may restrict the patient’s mobility. There is loss of economy of oxygen use because of higher flow rates. T pieces allow a higher FIO2 to be delivered to severely dyspnoeic patients.
Fixed-performance systems
Two systems are available for use in emergency departments:
Oxygen flow through a Venturi system results in air entrainment with delivery of a fixed concentration of oxygen to the patient. The masks deliver FIO2 values from 0.24, 0.28, 0.35, 0.40 and 0.50 to 0.60, using different colour-coded adaptors or by varying the position of a dial on the mask connector. Many studies have assessed their accuracy. The patient receives the stated FIO2 provided the total flow rate exceeds 60 L/min or is 30% higher than the patient’s PIFR. As the patient’s PIFR increases, the system’s performance becomes variable.
In supplying an FIO2 of 0.24 using 6 L/min oxygen flow rate, the total flow rate delivered to the patient is 120 L/min. This falls to 30 L/min total flow for FIO2=0.6 using 15 L/min oxygen supply. This is just equal to the PIFR of a quietly breathing adult and unlikely to be sufficient to provide consistent performance in delivery of the stated FIO2. In severe dyspnoea, these masks may therefore not deliver the stated FIO2.
Increasing the oxygen flow rate above the manufacturer’s recommendations will increase the total gas flow to the mask, while maintaining the stipulated FIO2. At very high-flow rates, however, turbulence is likely to reduce the performance of the system.
Venturi masks provide the best means of managing a patient with chronic obstructive pulmonary disease in the ED because they provide a predictable FIO2 and the air entrained is more humid than fresh oxygen (see below). The entrained gas mixture can be further heated and humidified to assist with sputum clearance. High gas flows minimize rebreathing of CO2 and claustrophobia, but cause problems with sleeping due to noise.
Oxygen blenders
Air is blended with oxygen from a number of inlet ports to supply a fixed FIO2 to the patient. It is a high-flow system and fine-tuning of FIO2 from 0.21 to 1.0 is possible. The resultant mixture can then be channelled to the patient through systems such as continuous positive airways pressure or humidifiers. Lack of portability and high cost are disadvantages. Oxygen blenders are best suited to the resuscitation room and critical-care setting.
100% oxygen delivery systems
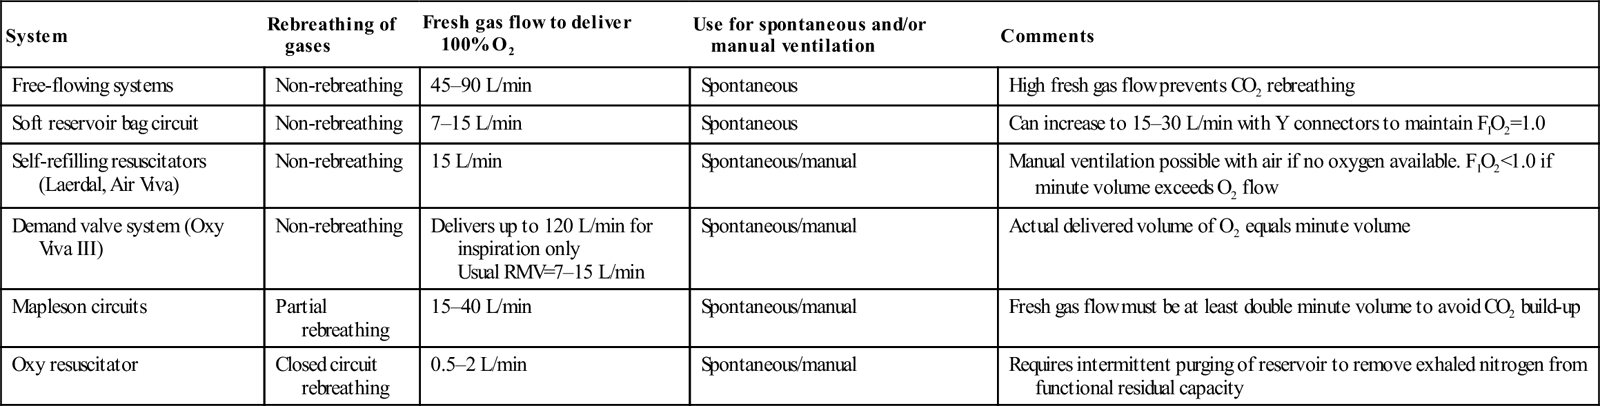
These systems vary in their economy of oxygen use and are summarized in Table 2.2.2. The least economical is the free-flowing system as it can only deliver 100% oxygen if the flow rate exceeds the patient’s PIFR. Incorporating a reservoir and unidirectional valves into the circuit enables greater economy of oxygen use by storing oxygen during expiration ready for the inspiratory phase.
Can increase to 15–30 L/min with Y connectors to maintain FIO2=1.0
Self-refilling resuscitators (Laerdal, Air Viva)
Non-rebreathing
15 L/min
Spontaneous/manual
Manual ventilation possible with air if no oxygen available. FIO2<1.0 if minute volume exceeds O2 flow
Demand valve system (Oxy Viva III)
Non-rebreathing
Delivers up to 120 L/min for inspiration only Usual RMV=7–15 L/min
Spontaneous/manual
Actual delivered volume of O2 equals minute volume
Mapleson circuits
Partial rebreathing
15–40 L/min
Spontaneous/manual
Fresh gas flow must be at least double minute volume to avoid CO2 build-up
Oxy resuscitator
Closed circuit rebreathing
0.5–2 L/min
Spontaneous/manual
Requires intermittent purging of reservoir to remove exhaled nitrogen from functional residual capacity
Devices incorporating a reservoir into the circuit are capable of delivering 100% oxygen only when the total oxygen flow equals or exceeds the patient’s respiratory minute volume (RMV), plus there are no leaks in the system. The reservoir volume must exceed the patient’s tidal volume, otherwise storage of oxygen is inefficient, fresh gas loss occurs when the reservoir is full, and there is the risk of asphyxia during inspiration.
A demand valve system delivers precisely the patient’s minute volume without the added bulk and problems of a reservoir. It is able to cope with changes in RMV provided fresh gas flow always exceeds the patient’s PIFR. Closed-circuit systems are the most economical in oxygen consumption. Carbon dioxide is absorbed by soda lime and low-flow fresh oxygen replaces that consumed during metabolism, which is approximately 250–1000 mL/min, which is considerably less than the patient’s RMV.
Classification
One hundred per cent oxygen-delivery systems available for use in emergency medicine are summarized in Table 2.2.2.
Free-flowing circuits
Flow rates in excess of the patient’s PIFR are required to provide 100% oxygen using a free-flowing system, which necessitates the use of multiple oxygen ports. The system may not deliver 100% oxygen, is wasteful of oxygen and may be untidy, restricting patient mobility for investigations. Sophisticated free-flowing systems using oxygen blenders and humidification are available, but restrict the ability to move the patient.
Soft reservoir circuits
These are non-rebreathing systems incorporating unidirectional valves to channel fresh oxygen to the patient and exhaled gas to the atmosphere. With one oxygen supply port the system delivers 100% oxygen, provided the patient’s minute volume is less than 15 L/min. Higher flow first stage regulators or two oxygen supply ports enable delivery of up to 30 L/min. Fresh gas flow is titrated to the patient’s minute volume by watching the reservoir bag, which should be fully distended at the start of inspiration and more than one-third full when inspiration is complete.
The reservoir bag has a minimum volume of 3 L and, for optimal performance, the patient’s tidal volume should not exceed 2 L. A soft silicone mask is strapped to the head to ensure a firm but comfortable fit without leaks. The system cannot be used to ventilate patients manually and may be hazardous if the patient has an impaired conscious state owing to the risk of aspiration if they vomit and asphyxiation if there is a fall in fresh gas flow or a sudden rise in minute volume. Complications are avoided with clinical vigilance and the use of safety valves to entrain air if the oxygen supply ceases.
Self-refilling, non-rebreathing resuscitators (Air Viva and Laerdal systems)
Most Australasian emergency departments possess at least one type of self-refilling system. They can be used to ventilate a patient manually as well as allowing spontaneous ventilation. The Laerdal system has three sizes for adults, children and infants, whereas the Air Viva system has one size for adults only (Table 2.2.3).
Examples of this type of system include the Oxy Viva, Laerdal and DAN demand valve systems. High-pressure oxygen is fed to a demand valve which delivers high-flow oxygen to the patient. The system can be used in a spontaneously breathing patient and, for manual ventilation, by depressing a manual override button. Spontaneously ventilating patients initiate an oxygen flow of up to 120 L/min by generating a negative pressure of 0.3 kPa (2.25 mmHg) at the start of inspiration. Fresh gas flow is delivered at a pressure of up to 5.3 kPa (40 mmHg).
Mapleson circuits are still used in some emergency departments. Partial rebreathing of gases occurs with all of the circuits but CO2 retention can be avoided if fresh gas flow exceeds minute volume by a ratio of 2–2.5:1.
The most commonly used versions are the Mapleson B and the Mapleson F, which are covered under paediatric considerations. Mapleson A, C, D and E circuits are not discussed further.
An example is the MD Oxyresuscitator. The circuit is the same as the Boyle’s anaesthetic circle system. A soda lime canister absorbs exhaled CO2 and a low-flow oxygen supply replaces oxygen consumed by metabolism at approximately 0.5–2 L/min. Considerable economy of oxygen use is thus achieved by rebreathing from the circuit.
Over the last decade, there has been interest in adding helium to oxygen (maximum 30% oxygen, also known as ‘Heliox’). Heliox has a lower density than air with the potential to reduce airway resistance and hence the work of breathing when treating disease processes such as COPD and asthma.
Helium (He, MW=4) is much lighter than nitrogen and therefore significantly lowers the density of the gas mix when combined with oxygen in the range of FIO2=0.2–0.4. This advantage is lost when FIO2>0.4. Despite lower density, the viscosity of Heliox is not significantly lower than that of air. Its main theoretical advantage is if there is turbulent gas flow that is density dependent. This may occur with COPD where there is a combination of small and medium airways disease. Early studies also suggested that Heliox may enhance nebulizer particles in the lung; however, greater flow rates may be required to drive the nebulizer. Despite the potential advantages, the clinical evidence for use in COPD is not strong.
Cochrane reviews of the topic concluded that there is insufficient evidence to support the routine use of Heliox to treat COPD exacerbations or exacerbations of asthma. However, the review of adults and children with asthma did conclude that Heliox may improve pulmonary function when there is more severe obstruction. Most of the studies of Heliox for asthma have assessed it as a driver of nebulizer therapy rather than for continuous administration.
Of the two studies of Heliox therapy for COPD assessed in the Cochrane review, only one study included acutely decompensated patients in the ED. This study failed to show a benefit from Heliox when it was used to drive nebulized β-agonist therapy. Further randomized studies using Heliox are needed in asthma and COPD, both continuously and as a driver for nebulizer therapy, with hard endpoints such as physiological parameters, response to nebulized β-agonists, need for non-invasive ventilation or intubation and admission rates.
Measurement of oxygenation
Clinical assessment of oxygenation is unreliable and the time-honoured sign of cyanosis varies with the level of haemoglobin, skin pigmentation, perfusion and external light. Arterial blood gases and pulse oximetry provide an objective measurement of oxygenation and enable precise titration of oxygen therapy to the clinical situation.
Pulse oximetry
Pulse oximetry is the most frequently used indicator of oxygenation in emergency medicine as it is non-invasive. It is regarded as the ‘fifth vital sign’ and provides continuous real-time assessment of a patient’s oxygenation and response to therapy. It has a proven role in emergency medicine and is an excellent clinical tool, provided the limitations are understood.
It is important to recognize that SaO2 is not an adequate marker of ventilatory function and will not detect rising PaCO2 in respiratory failure or a sedated patient until late, when conscious state becomes depressed or there is respiratory arrest. Hence all patients with potential respiratory compromise due to disease or sedative medication require careful monitoring of vital signs, conscious state and CO2 via end-tidal CO2 monitoring or arterial blood gases. Recent literature suggests a fall in SaO2 may precede CO2 accumulation during procedural sedation and analgesia in children.
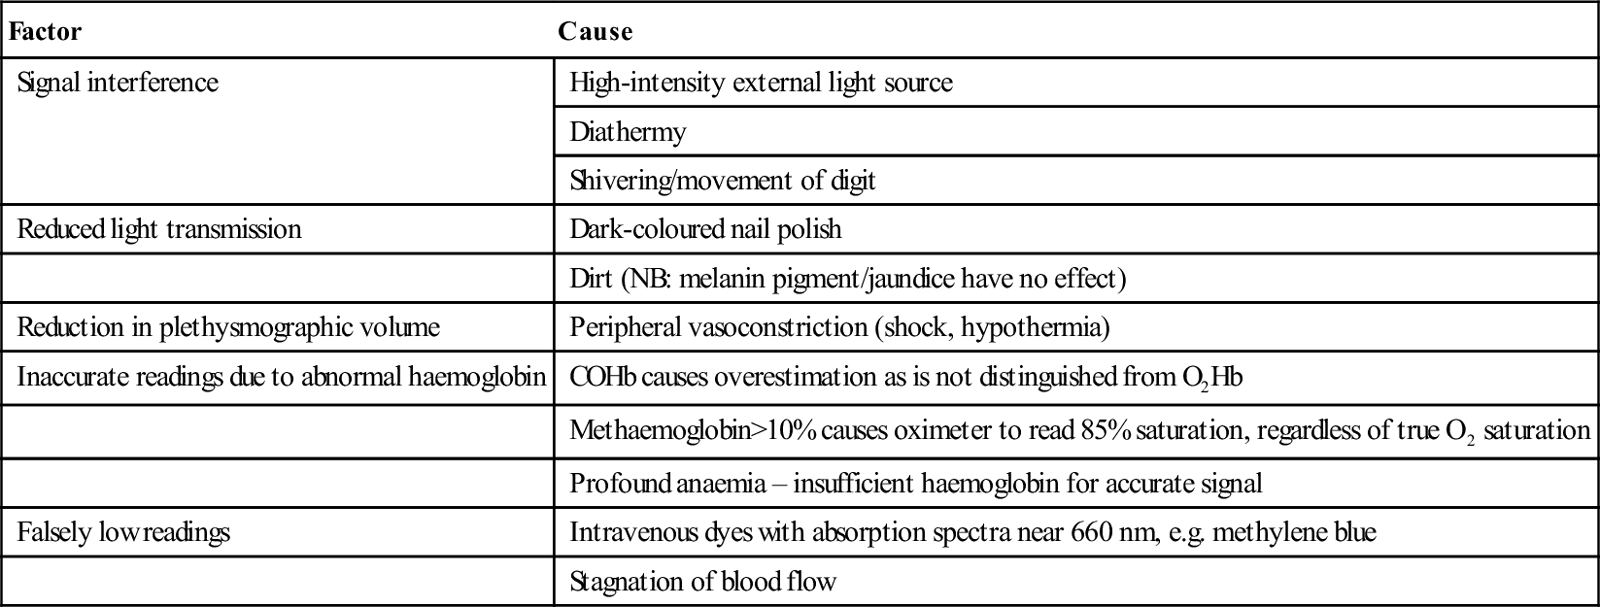
A detailed knowledge of the haemoglobin–oxygen dissociation curve is required to interpret pulse oximetry, as well as the factors that influence readings obtained by this equipment. These factors are summarized in Table 2.2.4.
Dirt (NB: melanin pigment/jaundice have no effect)
Reduction in plethysmographic volume
Peripheral vasoconstriction (shock, hypothermia)
Inaccurate readings due to abnormal haemoglobin
COHb causes overestimation as is not distinguished from O2Hb
Methaemoglobin>10% causes oximeter to read 85% saturation, regardless of true O2 saturation
Profound anaemia – insufficient haemoglobin for accurate signal
Falsely low readings
Intravenous dyes with absorption spectra near 660 nm, e.g. methylene blue
Stagnation of blood flow
Paediatric considerations in oxygen therapy
The general principles of oxygen therapy and its indications apply equally well for children as for adults, but there are a number of important differences in relation to body size, psychology and oxygen toxicity.
Body size
Children are smaller than adults both anatomically and physiologically, so that any increase in equipment dead space will significantly increase CO2 retention. Children are less able to tolerate increased resistance to ventilation, particularly if negative pressure must be generated to open valves in the apparatus.
Peak inspiratory flow rate and respiratory minute volume are lower; hence, a given oxygen supply flow rate will produce a higher FIO2 in a child than in an adult. A Hudson mask at 8 L/min may supply an FIO2 of 0.8 in a young child. Reservoir bags are not required to deliver FIO2 values near 1.0 to children weighing less than 15 kg as available supply flow rates (maximum 15 L/min) exceed the child’s PIFR.
Appropriately sized equipment is essential: a range of sizes of oxygen masks, oximeter probes, laryngoscopes and endotracheal tubes must be available to manage children of different ages as serious barotrauma may result from the use of excessive volume during manual ventilation. Resuscitator bags are available with paediatric-sized reservoirs. The Laerdal system has both paediatric and infant sizes. These units also have a pressure relief valve designed to prevent barotrauma. Pressure rapidly rises as the child’s lung reaches full inflation.
Jackson–Rees (Mapleson F) circuit
A smaller Mapleson circuit, the Jackson–Rees (Mapleson F) circuit, is available to ventilate children, which can be used for both spontaneous and manual ventilation. Rebreathing of carbon dioxide does not occur provided the fresh gas flow is 2–3 times minute volume and the bag is separated from the patient by a tube of internal volume greater than the patient’s tidal volume. The overall relationship between fresh gas flow, minute volume and PaCO2 is complex.
The principal advantages over the Laerdal system are that the operator can observe bag movement in spontaneous respiration and has a better ‘feel’ for airway obstruction in manual ventilation. However, considerable skill and experience are required to use the system safely.
Psychological considerations
Gaining the trust and confidence of an ill child is an art learnt with experience. They frequently respond with fear when oxygen therapy is administered, so it is helpful to ask a parent to nurse the child during treatment. A tight-fitting mask is less important in a child because source flow rate more closely approximates PIFR. Parents may assist by holding the oxygen mask close to the child’s face or by directing high-flow oxygen straight at the child’s mouth using a tube only. A cupped hand with the oxygen tube held between middle and ring fingers can serve as a surrogate oxygen ‘mask’.
Oxygen toxicity
Prolonged administration of oxygen at FIO2>0.6 for longer than 24 hours may be toxic to infants. This toxicity may not become apparent during their acute stay in the emergency department, but the oxygen dose received there contributes to the cumulative toxicity. Appropriate monitoring using pulse oximetry ensures administration of the correct dose and minimizes the risk of toxicity. However, supplemental oxygen should never be withheld because of fear of toxicity.
Transfer of patients on oxygen therapy
Supplemental oxygen therapy is a vital part of transporting the ill patient and is especially important for air travel where lower ambient PIO2 may exacerbate hypoxia already present as a result of the patient’s disease process. Patients with decompression illness or arterial gas embolism should not be transported at cabin pressures lower than 101.3 kPa (1 atmosphere absolute, ATA) because lower ambient pressure exacerbates their disease process by increasing bubble size. A number of factors must be considered for successful oxygen therapy during transport of a patient.
Knowledge of the oxygen delivery apparatus and its maximum rate of delivery are essential for estimating transport oxygen requirements. These estimates must take into account current oxygen consumption, duration of transport (including delays), oxygen required in the event of deterioration and a safety factor of at least 50%.
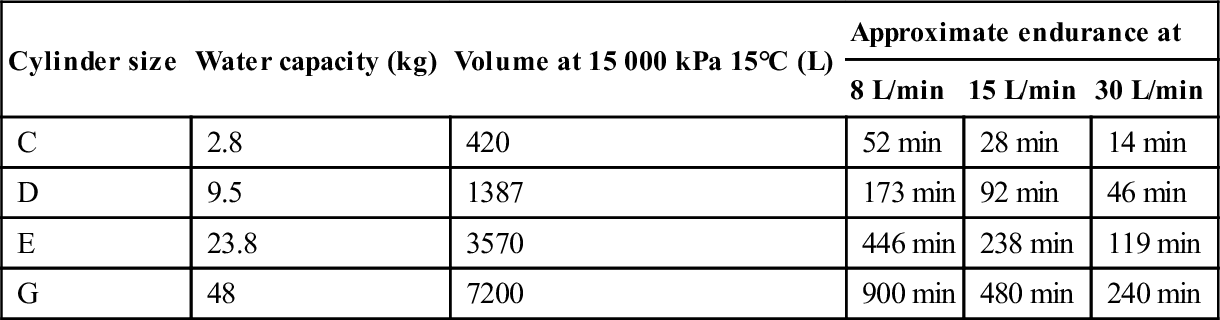
The sizes of oxygen cylinders available in Australasia, their filling pressures and approximate endurances are summarized in Table 2.2.5. The most economical circuit for prolonged transport with FIO2=1.0 is a closed circuit with a CO2 absorber and the least economical is a free-flowing circuit.
Monitoring during transport should be of the same standard as that initiated in the emergency department. Pulse oximetry is an essential tool to detect hypoxia during transport and should include audible and visual alarms. Oxygen therapy can be titrated against SaO2, which is particularly important in air travel where PIO2 varies with ascent and descent. All the usual clinical parameters must also be monitored.
Oxygen therapy in specific circumstances
Asthma
Hypoxia in asthma results from ventilation–perfusion mismatch created by bronchospasm, secretions and airway inflammation and oedema. Supplemental oxygen should be titrated to provide an SaO2>90% (preferably 94%) and must be continued during the interval between doses of inhaled bronchodilators.
Initial management should include a Hudson mask at 8 L/min flow rate, with SaO2 monitored continuously by pulse oximetry. The oxygen dose should be rapidly increased up to 100% if the patient remains hypoxic. Bronchodilator therapy is administered proportionate to the severity of the attack, using oxygen to drive the nebulizer. Oxygen should not be withheld or administered in low doses for fear of respiratory depression. Hypercapnia is an indication of extreme airway obstruction and its presence mandates aggressive therapy and/or mechanical ventilation.
Mechanical ventilation in asthma
Mechanical ventilation requires an FIO2=1.0, high inspiratory flow rate (100 L/min), low tidal volume (6–8 mL/kg), a prolonged I:E ratio of at least 1:3 and a low ventilation rate (6–10 breaths/min or less), to reduce the risks of progressive dynamic hyperinflation with the development of auto-PEEP (iPEEP) reducing venous return and hence preload, and of barotrauma with the development of a pneumothorax. Permissive hypercapnia is accepted with mechanical ventilation.
Occasionally, patients with asthma become hypoxic during nebulizer therapy because the oxygen flow rates driving the nebulizer (6–8 L/min) are lower than the flow rate required to maintain SaO2>90%. In these circumstances, extra oxygen is supplied to maintain SaO2 via a T piece or Y connector during nebulizer therapy.
Chronic obstructive pulmonary disease
Most ED patients with COPD have a degree of acute respiratory failure that caused their emergency presentation. This may be due to infection, bronchospasm, retention of secretions, coexistent left ventricular failure, worsening right heart failure, pulmonary embolism, pneumothorax, sedation or reduction of regular therapy, such as inhaled or oral steroids. Clues to the degree of severity and chronicity of the COPD are obtained from the patient’s history, past clinical records, emergency department blood gases and the response to initial oxygen therapy.
Clinical indicators of patients at risk of CO2 retention include a housebound patient, FEV1<1 L, polycythaemia, a warm vasodilated periphery and cor pulmonale. In the acutely unwell patient, treatment may be required before the history can be obtained.
COPD groups
Patients with COPD fall into two groups as regards management, although this classification is still debated.
There is overlap between the advanced stages of illness. The aims of oxygen therapy are targeted to produce SaO2 of 88–90% and to identify the second group of patients such that the oxygen dose can be titrated to achieve an acceptable clinical response without excessive elevation of PaCO2. Serial arterial blood gas analysis is essential in their management.
The majority will have a normal ventilatory response to CO2. Hypercapnia indicates that ventilatory failure is developing, with a danger of respiratory arrest if the patient’s disease is severe and progressive. This can also result from uncontrolled oxygen therapy with failure to monitor the patient’s clinical status and arterial blood gases. Any patient with impaired consciousness due to respiratory failure should be manually ventilated while being clinically assessed and treated.
Controlled titration of oxygen dose in COPD
Successful management of the cooperative patient with COPD necessitates controlled titration of oxygen dose. Variable-performance oxygen masks do not have a role in the emergency management of COPD, unless there is careful monitoring of SaO2 and ETCO2. A consistent initial approach to oxygen therapy for a conscious patient with advanced COPD is used as, at the time of presentation, their ventilatory response to CO2 is unknown.
In most patients, the administration of 24–28% oxygen by Venturi mask will improve oxygenation, with a target SaO2 of about 88–92%. It is also acceptable initially to titrate oxygen therapy to a target SaO2 range. A recent Australian pre-hospital randomized clinical trial (RCT) showed lower mortality for patients with COPD if they received oxygen by nasal prongs titrated to SaO2 range ≈88–92%. All nebulizer therapy was administered by air.
Below 90% saturation, the Hb–O2 dissociation curve falls steeply and, unless a pulmonary shunt is present, even small increments in oxygen will make a positive difference. The patient’s response to initial oxygen therapy (FIO2=0.24–0.28) will direct further oxygen dose changes and identify any patients not already known to be suffering chronic hypercapnia.
A repeat blood gas sample should be taken after 10 minutes of breathing FIO2=0.24–0.28. The PaCO2 may rise slightly because of the ‘Haldane effect’. If this rise is excessive (>1–1.3 kPa [8–10 mmHg]), it is consistent with an impaired ventilatory response to CO2. The FIO2 should then be adjusted downwards in steps to achieve a satisfactory pulse oximetry reading that is compatible with an acceptable CO2 level. In a patient with COPD, an acceptable range for SaO2 is 88–92%.
Blood gas sampling in COPD
Blood gas samples taken during the initial assessment of these patients (breathing air or controlled oxygen) assists management. Venous samples are acceptable, provided they are used consistently to monitor trends. If the bicarbonate level is>30 mmol/L or is elevated by more than 4 mmol/L for each 1.3 kPa (10 mmHg) rise in PaCO2 above normal (5.3 kPa, 40 mmHg), this provides strong evidence of chronic hypercapnia, provided there is no cause of a metabolic alkalosis.
Management in COPD
Patients with a normal ventilatory response to CO2 will not exhibit a significant elevation of PaCO2 in response to oxygen therapy. If hypoxaemia persists and the PaCO2 remains stable, then the oxygen dose may be increased incrementally until the desired oxygen saturation is achieved. A lower than normal SaO2 (≈88%) and PaO2 (≈56 mmHg) may be acceptable provided the patient remains conscious and cooperative.
Non-invasive positive-pressure ventilation (NIPPV) is indicated if the patient remains hypoxic or becomes progressively more hypoxic and the elevation of PaCO2 persists or worsens or their conscious state deteriorates. Intubation and ventilation may be required, which should be regarded as a last resort (and will not be covered). Supplemental oxygen should never be abruptly withdrawn from a patient with COPD as a catastrophic fall in PaO2 will occur. All reductions in controlled oxygen dose should be in a stepwise manner, similar to incremental increases.
In the majority of cases, an acceptable balance between PaO2 and PaCO2 can be achieved, where both hypoxia and hypercarbia are reversed by specific therapy. Treating the cause of the ventilatory failure is a priority.
A pilot study showed that short-term administration of bronchodilators using oxygen-driven nebulizers in the acute management of chronically hypercapnic patients may be safe. Caution is advised, as some authors suggest that COPD is still poorly managed in the emergency department with respect to oxygen dose. Interestingly, the authors of that paper offered only limited practical advice on the titrated use of oxygen in the acute management of COPD and did not differentiate between COPD patients with an acute elevation of CO2 and those with chronic elevation. The authors of the pre-hospital RCT were more specific, titrating to a target SaO2.
Goal-directed oxygen therapy
The oxygen dose in the initial management of many medical conditions including myocardial infarction, asthma and even pneumonia has been questioned. A recent Cochrane review of oxygen therapy for myocardial infarction claimed oxygen may be harmful. This conclusion was based on a non-significant analysis, dominated by a 1976 trial (86% of the weighting). That trial contained many clinical deficiencies not reflective of modern practice (e.g. diagnostic criteria, no intravenous glyceryl trinitrate (GTN) or reperfusion therapy, not monitoring oxygen saturations and no blood gases and use of gas flow rates known to cause CO2 accumulation). The authors correctly suggested that oxygen treatment for myocardial infarction should be further evaluated in a larger trial.
One recent trial suggested that high concentration oxygen therapy caused a greater rise in CO2 in adults presenting with community-acquired pneumonia, compared with titrated dose oxygen. The study did not examine clinical outcomes. Another area of interest is oxygen dose for asthma. Perrins et al. using transcutaneous (tc) CO2 monitoring demonstrated that high concentration oxygen therapy led to clinically significant increases in PtcCO2, compared to the titrated dose oxygen therapy. The high concentration group had 4.5 times greater gradient of increasing PtcCO2 and over twice the odds of requiring admission. Current trends in clinical evidence suggest that oxygen should be treated in the same way as any other drug, that is to provide the optimum dosage appropriately titrated to the clinical needs of the patient. Goal-directed oxygen therapy is no different in principle with available clinical monitoring systems to many other therapies for physiological disturbance.
Special delivery systems
Oxygen humidification
Humidification may be desirable when prolonged use (>6 h) of supplemental oxygen is required as oxygen is totally dry, possessing no water vapour. Humidification is particularly important in a patient ventilated with an endotracheal tube as the natural humidification that occurs in the nose, mouth and nasopharynx is bypassed. Patients with COPD and retained secretions benefit from humidification.
Additional heat is required to provide effective humidification by vaporization of water. Various systems are available to humidify inspired gas and, ideally, they should be able to deliver inspired gas to the trachea at 32–36°C with low resistance and at greater than 90% humidity. These devices should be simple to use and able to maintain temperature and humidity at varying gas flows and FIO2. There should also be safety alarms monitoring temperature and humidity.
Humidification of warmed inspired gas also enables heat transfer to hypothermic patients and is essential in treating the pulmonary complications of near drowning. Dry oxygen will exacerbate hypothermia. There are a number of commercial humidifiers available that provide humidification by heating coils with a large surface area for contact with inspired gas.
Continuous positive airways pressure
Continuous positive airways pressure (CPAP) has a role in the management of pulmonary oedema, pneumonia, bronchiolitis, respiratory tract burns and acute respiratory failure. Benefit to the patient is achieved as a result of increasing functional residual capacity and reduced pulmonary compliance. Hypoxaemia is reversed by reduction in intrapulmonary shunting and the work of breathing is reduced.
Circuit designs for CPAP
Circuit designs usually consist of a reservoir based on the Mapleson D circuit or a high-flow turbine system. Humidification can be added to the system and is considered essential for long-term use (>6 h). Use of an oxygen blender enables variable FIO2 to be administered. CPAP has a proven role in the emergency department in the acute management of cardiogenic pulmonary oedema. Reduced requirements for endotracheal intubation have been demonstrated when CPAP is used for severely ill patients. Complications of CPAP include aspiration and pulmonary barotrauma. It may elevate intracranial pressure and precipitate hypotension by reducing venous return to the thorax.
Hyperbaric oxygen treatment
Hyperbaric oxygen (HBO) treatment consists of administering oxygen at pressures greater than 1 ATA, usually in the range of 2.0–2.8 ATA. This requires a hyperbaric chamber which is pressurized with air while the patient breathes an FIO2=1.0 from various delivery systems for periods of 2–7 hours. The high PIO2 results in PaO2 of up to 267 kPa (2000 mmHg) if 2.8 ATA treatment pressure is used. This is beneficial, as there is increased dissolved oxygen in the plasma (up to 300 mL oxygen may be carried to the periphery each minute in the dissolved form), which maintains oxygen flux even if haemoglobin is non-functional, for instance in carbon monoxide poisoning. Increased PIO2 enables more rapid elimination of toxic gases from the body, for example carbon monoxide or hydrogen sulphide.
Uses of hyperbaric oxygen
HBO treatment has a number of benefits in treating gas embolism and decompression illness (DCI). It provides extra oxygen to tissues rendered ischaemic by nitrogen bubbles and the increased pressure reduces bubble size and enhances nitrogen removal from the body. The increased PO2 also creates a greater driving pressure of oxygen into ischaemic tissues in problem wounds and reduces swelling by vasoconstriction in crush injury. In addition, HBO treatment is used in anaerobic infections by virtue of being bacteriostatic to anaerobes, inhibiting clostridial α toxin and stimulating host defences via granulocyte function. Recognized indications for acute referral to a hyperbaric facility for HBO treatment are summarized in Table 2.2.6 (see Chapter 28.3).
These are entirely preventable with careful supervision and monitoring. Tight-fitting masks may cause asphyxia if there is insufficient oxygen reservoir or flow and aspiration of vomitus may occur if the patient has depressed airway reflexes. Use of appropriate oxygen flow rates with rebreathing circuits prevents CO2 accumulation.
Barotrauma can be prevented during mechanical ventilation by the use of appropriate volumes and pressures, although it can be difficult to avoid when there is reduced lung compliance, as in the moribund asthmatic. Knowledge of potential equipment complications enables prompt intervention should they arise. When investigating a sudden deterioration in the patient’s condition, a thorough check of the equipment in use is mandatory.
Carbon dioxide narcosis
This can be prevented by controlled oxygen therapy titrating the FIO2 against SaO2, arterial blood gases and conscious state (see above). An unconscious patient should be intubated and manually ventilated using high FIO2, preferably 100% oxygen. A patient with a deteriorating conscious state and respiration due to CO2 narcosis should be vigorously stimulated and encouraged to breathe while FIO2 is reduced in a stepwise manner. Oxygen should never be suddenly withdrawn as this precipitates severe hypoxia. Reversible causes of respiratory failure should be treated and non-invasive ventilation instituted.
Oxygen toxicity
Oxygen is toxic in high doses which is a function of PIO2 and duration of exposure. Toxicity is thought to occur by the formation of free radicals and toxic lipid peroxides, inhibition of enzyme systems and direct toxic effects on cerebral metabolism. Toxicity is mainly restricted to the respiratory system and central nervous system (CNS), although it can affect other regions such as the eye. Premature infants develop retrolental fibroplasia after prolonged exposure to high FIO2. CNS oxygen toxicity manifested by neuromuscular irritability and seizures (Paul Bert effect) is restricted to hyperbaric exposures.
Pulmonary oxygen toxicity (Lorrain Smith effect) is of relevance to emergency medicine, although exposures of 0.6–1 ATA for more than 24 hours are required to produce demonstrable evidence of lung injury. Acute changes such as pulmonary oedema, haemorrhage and proteinaceous exudates are reversible on withdrawal of oxygen. Longer durations of high PIO2 may lead to permanent pulmonary fibrosis and emphysema. Physicians should be alert to acute symptoms of cough, dyspnoea and retrosternal pain, although these are non-specific symptoms of oxygen toxicity. A progressive reduction in vital capacity may be demonstrated. As with all drugs, oxygen dose should be monitored and carefully titrated against SaO2 and clinical effect. However, oxygen therapy should never be withheld acutely because of fear of toxicity.
Haemodynamics is concerned with the physiology of blood flow and the forces involved within the circulation. Haemodynamic monitoring involves studying this complex physiology using various forms of technology to understand these forces and put them into a clinical context that can be used to direct therapy. The utility of basic monitoring is universally accepted. However, the maxim that ‘not everything that counts can be counted and not everything that can be counted counts’ (Albert Einstein, 1879–1955) should be borne in mind.
This is particularly salient in the emergency department (ED) where the pressure of work and the diversity of patients do not allow the unlimited use of complex and expensive monitoring systems.
This chapter provides an outline of current approaches to the various technologies available for haemodynamic monitoring and their applicability in the ED. Many methods are available which should be thought of in a stepwise progression from simple clinical assessment to invasive, highly technical methods using sophisticated devices.
Historical background
As recently as 100 years ago, only temperature, pulse and respirations were measured and used to manage patients. The technology for auscultatory blood pressure measurement was available, but did not come into regular use until the 1920s.
Intensive care as a medical/nursing specialty evolved in tandem with the electronic revolution of the 1960s. At the same time, increasingly sophisticated haemodynamic and laboratory techniques vastly improved diagnosis and provided a way further to evaluate therapy. Despite these major advances in the ability to monitor multiple physiological variables, there is little evidence to suggest that they have resulted in tangible improvements in patient outcome.
Practical use of monitoring
The practical use of any monitoring device must be appropriate to the individual clinical environment. Thus, it may be reasonable to insert a pulmonary artery Swan–Ganz catheter in the intensive care unit (ICU) where the necessary time can be taken, yet impractical and potentially unsafe in a busy ED. Another consideration is that haemodynamic monitoring should only be used when the clinical outcome may be influenced and potentially improved. Once irreversible cellular damage has occurred, no benefit occurs no matter how far therapy is maximized. Further, haemodynamic monitoring may not improve patient outcome unless linked to a clinical protocol or ‘goal-directed therapy’.
Clinicians should only introduce monitoring equipment that will have a direct influence on their choice of therapy, as the use of invasive monitoring carries potential risks of harm to the patient. The injudicious use of physiologically based treatment protocols may lead to worse outcomes. All monitored variables must be evaluated and applied in a manner proven to lead to benefit, in terms of both the diagnosis and the management.
Overview of cardiovascular physiology
One possible reason that haemodynamic monitoring has not been associated with improvements in outcome is the inability to understand and manipulate patients’ physiology effectively.
Circulatory model
Haemodynamic data are traditionally considered in the context of a circulatory model. This model varies, but usually consists of a non-pulsatile pump and a hydraulic circuit with discrete sites of flow resistance, alongside the Frank–Starling mechanism with its concepts of preload, contractility and afterload.
Cardiac output
Cardiac output (CO) is the volume of blood pumped by the heart per unit of time, usually expressed in litres per minute (L/min). The heart operates as a pump and ejects a bolus of blood known as the stroke volume (SV) with each cardiac cycle. CO is the product of SV and heart rate (HR).
A complex set of interrelated physiological variables determines the magnitude of CO, including the volume of blood in the heart (preload), the downstream resistance to the ejection of this blood (afterload) and the contractility of the heart muscle. However, it is the metabolic requirements of the body that are the most potent determinant of cardiac output.
Regulation of CO
The regulation of CO is therefore complex. A single measurement represents the summation of many interacting physiological processes. Basal CO is related to body size and varies from 4 to 7 L/min in adults. This value divided by the body surface area enables comparison between patients with different body sizes, giving the cardiac index (CI).
Bedside methods do not measure CO directly, meaning that the values obtained are only estimates. Assessment of CO is therefore not done routinely. Indeed, misuse of CO data may worsen outcomes. The International Consensus Conference on Haemodynamic Monitoring in Shock (2007) suggested that monitoring of CO is only of value if it guides therapies to improve outcome.
Cardiac index (CI)
CI measurement is valued over simple blood pressure recording as it describes the total volume of blood flow in the circulation per unit of time and hence serves as an indicator of oxygen delivery to the tissues. The CI is also useful for understanding and manipulating the pump activity of the heart.
Role of haemodynamic monitoring in the emergency department
The role of haemodynamic monitoring in the ED is even less well defined. Given the plethora of devices but the lack of a ‘gold standard’, there are insufficient data to recommend any one method over another.
Recent advances in the management of sepsis include haemodynamic optimization with early goal-directed therapy (EGDT) during the pre-intensive care period, especially in the ED. The latest Surviving Sepsis Campaign guidelines published in 2013 emphasized that resuscitation of a patient with severe sepsis should begin as soon as the diagnosis is made and not be delayed until ICU admission. The use of such an approach based on strict treatment protocols has been shown to reduce morbidity and mortality (see Chapter 2.5).
Early goal-directed therapy
Although widely accepted, the application of this strategy of early goal-directed therapy in clinical practice is far from common. Obstacles include a lack of skill to perform the initial procedures and difficulty in providing the required higher level of care due to ED staffing and patient flow constraints. However, with a potential patient stay in ED of up to 24 hours with finite critical care resources, approximately 15% of critical care is being provided in this setting already.
Clinical assessment
Current guidelines on haemodynamic monitoring recommend frequent measurement of blood pressure and physical examination variables, including signs of hypoperfusion, such as reduced urine output and abnormal mental status. Clinical examination is ‘low risk’ yet may yield much important information, but the sensitivity and specificity are low, even when individual elements are interpreted in isolation. Also, clinical assessment of the circulatory state may be misleading.
Nevertheless, clinical assessment still has an important role in the initial assessment of a critically ill patient. Paradoxically, the development of haemodynamic measuring devices was driven by the poor ability to assess the critically ill patient clinically, yet those patients managed simply by clinical assessment may do better than those managed with invasive, complex devices.
Key properties of an ‘ideal’ haemodynamic monitoring system include:
The underlying issue is not what a patient’s CO is, but rather whether this CO is effective for that particular patient. Trends are more important than specific, single-point values in guiding therapy. An effective CO should need no compensation and therefore a patient should have warm toes simultaneously with a normal BP and HR. One of the advantages of clinical endpoints is that they remain the same whatever the phase of the illness.
Clinical endpoints
Clinical endpoints that are important in the management of septic shock were set out by the American College of Critical Care Medicine (ACCM) in 1999, and again in 2007 and 2012 by an International Consensus Conference. These are essentially markers of perfusion and include skin temperature, urine output and cerebral function.
In patients with heart failure, simple clinical assessment of perfusion and congestion can define profiles (‘dry–warm’; ‘wet–warm’; ‘wet–cold’; ‘dry–cold’) that may be used to guide therapy and investigations. Further, in advanced heart failure, orthopnoea (≥2 pillows), jugular vein pulse (JVP) and a global assessment of perfusion (‘cold’ profile) help detect a reduced CI.
Physiological measurements and clinical endpoints should be viewed as complementary. Physiological measurements combined with clinical examination may provide a numeric target for a management strategy. Measurements also provide a universal language for information exchange.
Sound clinical evaluation in the ED in terms of markers of effective CO aid the early diagnosis and implementation of EGDT. Abnormal findings also suggest the need for more invasive haemodynamic monitoring and the need to involve the ICU team early in the patient’s management.
Blood pressure monitoring
The pressure under which blood flows is related to the force generated by the heart and the resistance to flow in arteries. Measurement of mean arterial pressure (MAP) is a more reliable measure of blood pressure than either the systolic or diastolic pressures. It is least dependent on the site or method of measurement, least affected by measurement damping and it determines the actual tissue blood flow.
Traditionally, low blood pressure was used to reflect shock and haemodynamic instability. This approach is being challenged as more reliance is placed on concepts of global tissue hypoxia and the estimation of CO and its adequacy. While Ohm’s law predicts a relationship between MAP and CO, MAP is a physiologically regulated variable and therefore can be a weak predictor of acute increases and decreases in CO.
Non-invasive blood pressure measurement
Non-invasive blood pressure (NIBP) measurements using a sphygmomanometer and palpation were first proposed in the late 1800s before Korotkoff introduced the auscultatory method in 1905. Originally, routine blood pressure measurements were not a regular part of clinical patient assessment. Today, non-invasive or indirect blood pressure measurement is the most common method used in the initial assessment of cardiovascular status.
Although there are significant differences between direct (i.e. invasive) and indirect measurements, non-invasive measurements should rightly form part of every patient’s assessment and management in the ED.
Non-invasive blood pressure devices
Non-invasive measurement techniques use blood flow within a limb to measure pressure. Automated oscillometric devices are now the standard, with manual methods (using either palpation or auscultation) becoming increasingly obsolete in clinical ED practice.
The cuff width should be about 40% of the mid-circumference of the limb. Failure to use the appropriate size of cuff leads to inaccurate and misleading measurements. The cuff is inflated until all oscillations in cuff pressure cease, then the occluding pressure is gradually reduced and proprietary algorithms compute mean, systolic and diastolic pressures.
The 95% confidence limits in the normotensive range are±15 mmHg but, in states of hypotension and hypertension, oscillometry tends to over- and underestimate, respectively, the pressures. Complications are unusual, although repeated measurements could cause skin bruising, oedema and even ulceration.
Other non-invasive monitoring methods for cardiac output
The ideal device has yet to be developed for the non-invasive measurement of CO and other related variables in the ED. Devices that are available do not compare reliably with invasive methods and are not suited to all patient cohorts and/or may be too elaborate or time-consuming for a busy ED.
Ultrasonic cardiac output monitor (USCOM)
This device was developed in Australia and introduced for clinical use in 2001. It provides non-invasive transcutaneous estimation of CO based on continuous-wave Doppler ultrasound. An ultrasound transducer is used to obtain a Doppler flow profile (velocity–time graph) from either the aortic (suprasternal notch) or the pulmonary (left of sternum, below the second intercostal space) window. The transducer is manipulated to get the best flow profile and audible feedback. CO is calculated from the product of the velocity–time integral (VTI) and the cross-sectional area of the target valve.
The device performs well in terms of the time taken to become competent and the reproducibility of its readings. It appears to be a rapid and safe estimate of CO and may assist in the prompt starting of EGDT by emergency physicians, including pre-hospital and retrievals.
The correlation of USCOM with standard estimates of CO, such as by thermodilution using a pulmonary artery catheter, has been reported as good, although studies are conflicting. Concerns have also been raised that reliability is affected by patient pathology and the severity of illness.
More is needed to define clearly the utility of USCOM in the ED. The device can be used as part of the overall clinical assessment, but should not be used in isolation. It may be best at looking at responses to treatment, such as changes in CO associated with a fluid bolus.
Oesophageal Doppler
Estimation of CO using various Doppler-based techniques has been extensively studied. The main difficulties are an inability to obtain acceptable flow signals with the transthoracic approach and problems in the measurement of the cross-sectional area using flow. The transoesophageal approach (TOE) is more reliable than the transthoracic.
The oesophageal Doppler device requires minimal training and volume challenge protocols can be developed such that nursing staff may use them at the bedside. However, this technique is not well tolerated in the awake patient and thus has limited application in the ED.
Transthoracic echocardiography
Transthoracic echocardiography (TTE) is used to determine left ventricular size, thickness and performance. It can also help identify a patient who requires fluids. The use of TTE has increased as the technology and familiarity have improved, with a move towards training in TTE for most intensive care specialists. This would also seem a natural progression for ED physicians, given the uptake of ultrasonography in ED for other indications.
Treatment decisions
Effective treatment decisions can be based on the TTE screen and on subsequent assessment of left ventricular function. One widely used parameter is respiratory variation of the vena cava diameter for assessment of intravascular volume and fluid responsiveness in shock. This is quantified by measuring the decrease in the inferior vena cava (IVC) diameter with inspiration compared with expiration, expressed as the IVC caval index or the IVC collapsibility index (IVC–CI). Higher IVC–CI values have been correlated with lower right atrial (RA) filling pressures and lower values have been correlated with higher RA filling pressures.
The utility of the IVC caval index in the ED for assessement of volume responsiveness and for fluid management is unclear. One issue is its applicability in the spontaneously breathing patient, as using the IVC caval index for fluid responsiveness in mechanically ventilated ICU patients appears to be of more value. Further, other factors can affect IVC diameter and collapsibility including left and right ventricular function, pulmonary hypertension and tricuspid valve dysfunction, which need to be considered when interpreting the findings.
Left ventricular systolic function
The most common initial technique in the ICU for TTE assessment of left ventricular systolic function is simply looking at the amount of endocardial border excursion toward the centre of the left ventricle and at increasing wall thickness during contraction. Using these, at a minimum the systolic function of the left ventricle may be described as being normal, hyperdynamic or having moderate or severe dysfunction.
Other useful TTE information with signicant haemodynamic and therapeutic value includes valvular function, right ventricular function and evidence of pericardial tamponade, regional left ventricular hypokinesis, transient apical ballooning and left ventricular outflow tract (LVOT) obstruction. One major criticism as regards TTE for haemodynamic monitoring is that it cannot be done continuously. Other problems include the skill base needed and having to reassess variables after changes in patient management. Knowledge and skills are rapidly increasing and, with the development of hand-held and compact portable devices, TTE is becoming more common despite its usefulness for general haemodynamic monitoring in the ED remaining unclear.
Invasive devices
Invasive blood pressure measurement
Arterial cannulation allows continuous blood pressure measurement, beat-to-beat waveform display and repeated blood sampling. A cannula inserted into an artery is connected via fluid-filled, non-compliant tubing<1 m in length to a linearly responsive pressure transducer. The system is then zeroed with reference to the phlebostatic axis (the midaxillary line in the fourth intercostal space). Modern transducers are pre-calibrated and therefore no further calibration is needed.
Sites and safety of arterial cannulation
The most common site for cannulation is the radial artery, as it is easy to access during placement and subsequent manipulations, the wrist has a dual arterial supply and there is a low complication rate. Temporary occlusion of the artery may occur and, in a small number of cases, this may be permanent. Other complications can include haematoma formation, bleeding, cellulitis and those associated with the catheter itself.
Alternative arterial cannulation sites are femoral, axillary and brachial, but all have similar complications. Arterial cannulation is a safe procedure if the optimal site for insertion is selected carefully for each patient. The preference in the ED is for the radial and femoral sites.
Use of invasive blood pressure monitoring
Invasive blood pressure monitoring should be used in all haemodynamically unstable patients and when vasopressor or vasodilator therapy is used. Relying on external NIBP monitoring to guide diagnosis and therapy does not provide sufficient diagnostic data, particularly in sepsis. Additional methods of haemodynamic monitoring may be considered in these patients, with early involvement of the intensive care department.
The remainder of this chapter discusses some of the supplementary methods available to assess important physiological measures that guide the management of the haemodynamically unstable patient.
Central venous pressure monitoring
Central venous access was first performed in Germany in the late 1920s, but the utility of the process was not really appreciated until the 1950s. This led to the development of cardiac angiography, central blood oxygenation determination and pressure recordings. The technique and clinical relevance of continuous central venous pressure (CVP) monitoring were first described in 1962, as it allowed direct determination of right heart function and assessment of intravascular volume status.
However, correlation with left heart function was found to be unpredictable and unreliable in the critically ill. Thus, the physiological meaning of the values obtained and their role in patient management are not clear. Problems result from errors in measurement and failure to understand the underlying pathophysiology involved.
Central venous access
Central venous access is obtained in the ED by inserting a catheter into a peripheral or central vein and is defined by the position of the catheter tip which should be positioned at the junction of the proximal superior vena cava and right atrium.
There is no ideal insertion site. Selection depends on the experience of the operator and patient factors, such as body habitus, disease or injury sustained and coagulation profile. The main routes used are the internal jugular, subclavian and femoral veins.
Indications for central venous access
Indications include fluid and electrolyte replacement; drug therapy where peripheral use is contraindicated, such as vasopressors; monitoring of the CVP to guide management; sampling of central venous blood to monitor central venous oxygen saturation (ScvO2); venous access for insertion of a pulmonary artery catheter or transvenous pacemaker; and a lack of an accessible peripheral vein.
Complications of central venous access
Complications related to insertion are divided into early and late. Relevant early complications in the ED include pneumothorax, haemothorax, dysrhythmias and injury to surrounding structures, including arterial puncture, nerve and tracheal injury. Late complications include catheter-related sepsis, superior vena cava erosion with cardiac tamponade and venous thrombosis.
The CVP is often used as a marker of preload and is considered an estimate of right atrial pressure (RAP). The normal CVP in the spontaneously breathing supine patient is 0–5 mmHg, with 10 mmHg considered an upper limit of normal in those being mechanically ventilated. The CVP also correlates with left ventricular end-diastolic pressure (LVEDP) in a patient with normal heart and lungs. However, in disease states this relationship is frequently abnormal. Thus, the CVP can only be a rough guide to right ventricular preload, with emphasis on dynamic changes rather than absolute values.
Central venous oxygen saturation
Rivers et al. reported in 2001 that, in septic shock, early aggressive resuscitation guided by CVP, MAP and continuous ScvO2 monitoring reduced 28-day mortality rates from 46.5% to 30.5%. ScvO2 is measured in blood taken via the central venous catheter and reflects the balance between oxygen delivery and oxygen consumption. Oxygen extraction in health is normally about 25–30% and an ScvO2>65% reflects an optimal balance. ScvO2 correlates well with mixed venous saturations (SvO2) obtained via a pulmonary artery catheter.
Current guidelines recommend instituting goal-directed therapy in septic shock, especially when the ScvO2 is below 70%. The ScvO2 is also significant in postoperative surgical patients in the ICU, with levels<70% independently associated with a higher rate of complications and increased length of hospital stay.
Australasian Resuscitation in Sepsis Evaluation (ARISE)
Continuous measurement of ScvO2 is possible in the ED where central venous catheterization is commonly performed and when the alternative of pulmonary artery insertion is impractical. The role of ScvO2 and EGDT is being studied further in the current Australasian Resuscitation in Sepsis Evaluation (ARISE), a multicentre, unblinded, randomized, controlled trial of EGDT versus standard care in patients with severe sepsis presenting to the EDs of hospitals in Australia, New Zealand, Finland and Hong Kong. It will test the hypothesis that EGDT, compared to standard Australasian resuscitation practice, reduces 90-day all-cause mortality in patients presenting to the ED with severe sepsis.
Pulse contour techniques for cardiac output
The use of pulse contour techniques to obtain a continuous estimation of CO by analysis of the arterial waveform dates back over 100 years. Erlanger and Hooker first proposed a correlation between stroke volume and changes in arterial pressure and suggested there was a correlation between CO and the arterial pulse contour. Advances in computer technology have since led to the development of complex algorithms relating the arterial pulse contour and CO.
The appeal of arterial waveform monitoring is that it can now be performed using a minimally invasive technique, with several companies producing devices that take measurements from an arterial line. The PiCCO (Pulsion Medical Systems, Munich, Germany) is discussed as it is one of the most established of the commercially available systems.
PiCCO system of arterial waveform monitoring
The PiCCO system uses pulse contour analysis to provide a continuous display of CO according to a modified version of Wesseling’s algorithm. The patient requires a central line, preferably sited in either the internal jugular or the subclavian vein so that the venous injectate port is placed in the central cardiopulmonary cicrculation. If the femoral vein is accessed the intrathoracic volumetric measurements may be overestimated, although the transpulmonary thermodilution CO measurement may still be reliable. An arterial catheter with a thermistor is also required, which needs to be placed in one of the larger arteries, such as the femoral or brachial-axillary access.
The PiCCO system combines the pulse contour method for continuous CO measurement and a transpulmonary thermodilution technique to offer complete haemodynamic monitoring. Transpulmonary thermodilution works on the principle that a known volume of thermal indicator (cold 0.9% NaCl) is injected into a central vein. The injectate rapidly disperses both volumetrically and thermally within the pulmonary and cardiac volumes. This volume of distribution is termed the intrathoracic volume. When the temperature signal reaches the arterial thermistor, a temperature difference is detected and a dissipation curve is generated. The Stewart–Hamilton equation is applied to this curve and the CO is calculated.
Transpulmonary thermodilution
This transpulmonary thermodilution also gives measures of preload and volume responsiveness in terms of global end-diastolic blood volume (GEDV) as well as intrathoracic blood volume (ITBV). The extravascular lung water (EVLW) provides a measure of water content outside the pulmonary vasculature, including the interstitium and any alveolar fluid and may be useful as an indicator of pulmonary oedema. The technique of transpulmonary thermodilution appears to be comparable in accuracy to pulmonary artery thermodilution. Following calibration by thermodilution, the PiCCO then continually quantifies parameters such as:
Decision trees to guide the use of the last three parameters in the clinical setting have been devised. ITBV is used as an indicator of cardiac preload and may be helpful in guiding fluid therapy. It is derived from the GEDV and its clinical utility is likely to be equivalent. GEDV and ITBV may be of greatest clinical value when dynamic measures of volume responsiveness, such as stroke volume variation (SVV) and systolic pressure variation (SPV), cannot be used.
EVLW correlates with extravascular thermal volume in the lungs. The EVLW may also be used to guide fluid management, especially in those already known to have pulmonary oedema.
The cardiac function index is the ratio of CO to GEDV. It aids in evaluation of the contractile state of the heart and hence overall cardiac performance. It is a preload-independent variable and reflects the inotropic state of the heart. The CFI has the potential to become a routine parameter of cardiac performance, but it is a derived variable and its benefit over the individual components that comprise it (CO and GEDV) is not clear.
Advantages of the PiCCO system
The main advantage of the PiCCO system is that it is less invasive than a pulmonary artery catheter, requiring only a central line and an arterial line which most critically ill patients already have. This, in turn, leads to fewer complications. The data collected are extensive and allow manipulation of haemodynamics using reliable parameters.
Contraindications to using the PiCCO include when access to the femoral artery is restricted, such as in burns. The PiCCO may also give inaccurate thermodilution measurements in the presence of intracardiac shunts, an aortic aneurysm, aortic stenosis, pneumonectomy, rapid changes in body temperature and during extracorporeal circulation. There can also be drift in measured values when there is a major change in vascular compliance.
The use of the PiCCO system in the ED is plausible. The technique is relatively non-invasive and uses access lines that are already used in the management of the critically ill. The device can aid both diagnosis and provide a monitoring tool for clinical decision making regarding fluid replacement. Further validation studies and technological advances will consolidate its potential.
Pulmonary artery Swan–Ganz catheter
The pulmonary artery catheter (PAC) or Swan–Ganz catheter was long considered the ‘gold standard’ method of monitoring unstable circulation, for example in patients with advanced heart failure. Since its introduction in the 1970s, it was assumed that the information provided improved patient outcome. However, various observational studies have now shown that its use does not improve outcomes and may even be associated with a worse outcome. Hence, the use of the PAC without targeting specific endpoints confers no benefit to the patient.
Disadvantages of pulmonary artery catheters
The insertion of a PAC is time-consuming and requires skill and experience. The technique also has significant complications (e.g. haematoma, arterial puncture, infection, pulmonary infarction, pulmonary artery perforation, arrhythmias, catheter knotting) and the data generated can be difficult to interpret. Current guidelines recommend that the PAC is not used routinely in the management of shock and, therefore, its use in the ED should not be considered.
Conclusion
The challenge in emergency medicine is to select those haemodynamic monitoring methods and technologies that are best suited to the clinical environment and which are able to influence positively both the diagnosis and the subsequent management to improve patient outcome. Currently, the best approach is to begin with sound clinical assessment and then to increase the invasiveness of monitoring in tandem with the patient’s suspected diagnosis and response.
Shock is a clinical syndrome where tissue perfusion, and hence oxygenation, is inadequate to maintain normal metabolic function of the cells and organ. Although the effects of inadequate perfusion are initially reversible, prolonged oxygen deprivation leads to generalized cellular hypoxia with disruption of critical biochemical processes, eventually resulting in cell membrane ion pump dysfunction, inadequate regulation of intracellular pH, intracellular oedema and cell death.
Shock is traditionally classified and managed according to the presumed aetiology, but a common approach in practice is to attend urgently to the cardiorespiratory physiological abnormalities, assess the response to adjust the working diagnosis with later attention to the underlying diagnosis.
Recognizing shock may be difficult, particularly at the extremes of age. Pre-existing disease and the use of medications modify the compensatory mechanisms that safeguard perfusion of vital organs. Consider the possibility of inadequate tissue perfusion (‘shock’) in any emergency presentation with symptoms, signs or laboratory findings of abnormal end-organ function. Early, aggressive and targeted treatment of shock is associated with an improved outcome.
Aetiology and epidemiology
Shock is due to malfunction of components of the cardiovascular system, not uncommonly with more than one contributing mechanism. If the aetiology is apparent, classification based on the mechanism, such as hypovolaemic, cardiogenic, septic, neurogenic or anaphylactic shock, will guide therapy.
When the aetiology is unclear or the shock fails to respond to therapy, the following physiologically based classification assists in decision making (see Boxes 2.4.1–2.4.4).
No classification is exhaustive, and contributory causes may feature in more than one category.
Pathophysiology
Most organs and tissues are able to autoregulate or adjust their flow according to metabolic demand, as long as flow is adequate. This flow is dependent on a gradient between an area of higher pressure (mean arterial pressure, MAP) and the lower-pressure side of the venous system (represented by a central venous pressure, CVP).
The mean arterial pressure may fall if the cardiac output (CO) is reduced or if the total peripheral resistance (TPR) in the arterial tree falls:
MAP=CO×TPR
Cardiac output is determined by the stroke volume (SV) and heart rate (HR). The heart is a relatively simple pump and hence preload (the volume of blood in the left ventricle at the end of filling or the amount of stretch of the left ventricle) determines SV until disease states intervene:
CO=SV×HR
Relaxation of the arterial and venous tone by vasoactive mediators or lack of vasotonic mediators results in reduced resistance and increased capacitance and lower pressures in both the arterial and venous systems. Any injury to the endothelium will result in loss of volume, as well as failure of vascular autoregulation. Additionally, if there is a defective valve causing regurgitation of blood and repumping or a fixed narrow orifice, there is a failure in forward flow.
Compensatory mechanisms
Compensatory mechanisms are provoked by the combination of lowered pressure and inadequate perfusion of tissues and contribute to the symptoms and signs of shock. Neurohumeral stimulation produces increased circulating catecholamines, angiotensin, aldosterone and vasopressin manifesting clinically with anxiety, thirst, restlessness, tachycardia, diversion of blood from the skin bed and a reduction in urinary output and urinary sodium. Blood flow to the brain and heart is maintained at the expense of renal, splanchnic, skin and muscle blood flow [1]. Significant fluid shifts occur from the interstitium to the intravascular compartment, which may falsely maintain haematocrit.
Decompensated shock
The ultimate consequence of shock, if tissue perfusion is not returned by compensatory measures or resuscitation, is inadequate regeneration of adenosine triphosphate (ATP) causing failure of membrane ion pumps to maintain the function and structural integrity of the cell.
This cellular dysfunction manifests in the myocardium as systolic contractile dysfunction (also due in part to reduction in sensitivity to catecholamines and circulating myocardial depressant factors) and impaired ventricular relaxation (lusiotropy). This myocardial failure, along with failure of vascular beds despite the increased circulating catecholamines, contributes to what is described as ‘decompensated shock’.
Clinical features
The clinical features in the initial diagnosis of shock are due to inadequate perfusion of tissues and resulting multiorgan dysfunction of the body’s compensatory mechanisms. Clinicians should not wait for physical observations to trigger a preconceived BP limit before considering shock, but should actively look for signs of inadequate perfusion in any patient presenting with abnormal organ function:
A structured framework, such as that advocated by early management of severe trauma (EMST) (advanced trauma life support (ATLS)) or advanced cardiac life support (ACLS), promotes both a systematic survey and effective therapy to occur simultaneously. Treatments based on an initial working diagnosis are modified by the observed responses to therapy and/or the results of investigations. Frequent reassessment of status and adequacy of response is vital. Once shock is recognized as present this implies a high chance of death, thus urgent escalation to management by a multidisciplinary team in a monitored resuscitation area is indicated, with a designated team leader and communication being vital [4,5].
A key goal in the treatment of shock during and after the initial resuscitation is correction of the underlying problem. Methods used to guide resuscitation are discussed below.
Emergency department (ED) observations
The presence and progress of shock is detected in the ED by careful recording of vital signs and frequent and repeated clinical assessment.
The concept of acheiving specific levels of cardiac output by manipulating haemoglobin concentration, inotropes, vasopressors, vasodilators and fluid volumes is promoted. Early hypotheses suffered from mathematical linkage error and balanced studies showed that ‘supranormal’ cardiac outputs or oxygen delivery was not beneficial in undefined groups or trauma [13,14]. A seminal single centre study by Rivers in 2001 proposed that, in severe sepsis in the ED, a resuscitation algorithm guided by CVP, MAP and central venous saturation ‘goals’ led to an improvement in survival. The commonest intervention change was an increase in fluid resuscitation volume [15].
Having clear clinical goals communicated during resuscitation does allow the team to focus together. These targets can be physiological, time or intervention based.
Interventions in shock
1. Fluid therapy
Choice of fluid
A sensible maxim is: ‘Replace that which is lost, at the rate at which it is lost’.
Aliquots of between 10 and 40 mL/kg (averaging 20 mL/kg) at free flow or ‘stat’ over minutes are recommended. If the heart is suspected of having abnormal compliance or being too ‘full’, a smaller bolus is given equally rapidly and the clinical response closely observed.
Cannulae sized 16 and 20 gauge may achieve flow rates of 1 L over 5 and 10 minutes, respectively [23]. In the emergency situation, hand-pump infusion lines or gravity or pressure bag-driven infusion will deliver volumes effectively. Volumetric infusion pumps or lines should not be used in resuscitation, as the maximum rate of infusion is inadequate and alarm features may delay infusion. Pressure infusion pumps can achieve high rates but at a significant risk of complications [24].
Route of fluid therapy
Large volumes can be delivered by any route, but central lines, smaller peripheral inserted catheters and intraosseous needles may require a driving pressure. The latter may fail unless carefully supervised. The antecubital, saphenous and femoral veins are reliably accessed with few complications. Consider ultrasound-guided access in difficult situations.
Titration targets
Defining a target for ‘how much is enough’ is problematic, as each shock scenario has a different aetiology, clinical features and monitoring requirements. Traditionally, the return of physiological variables towards normal and set perfusion targets are used (Table 2.4.1). Decisions are made using multiple inputs preferably using the technique of fluid challenge and review of response to each challenge.
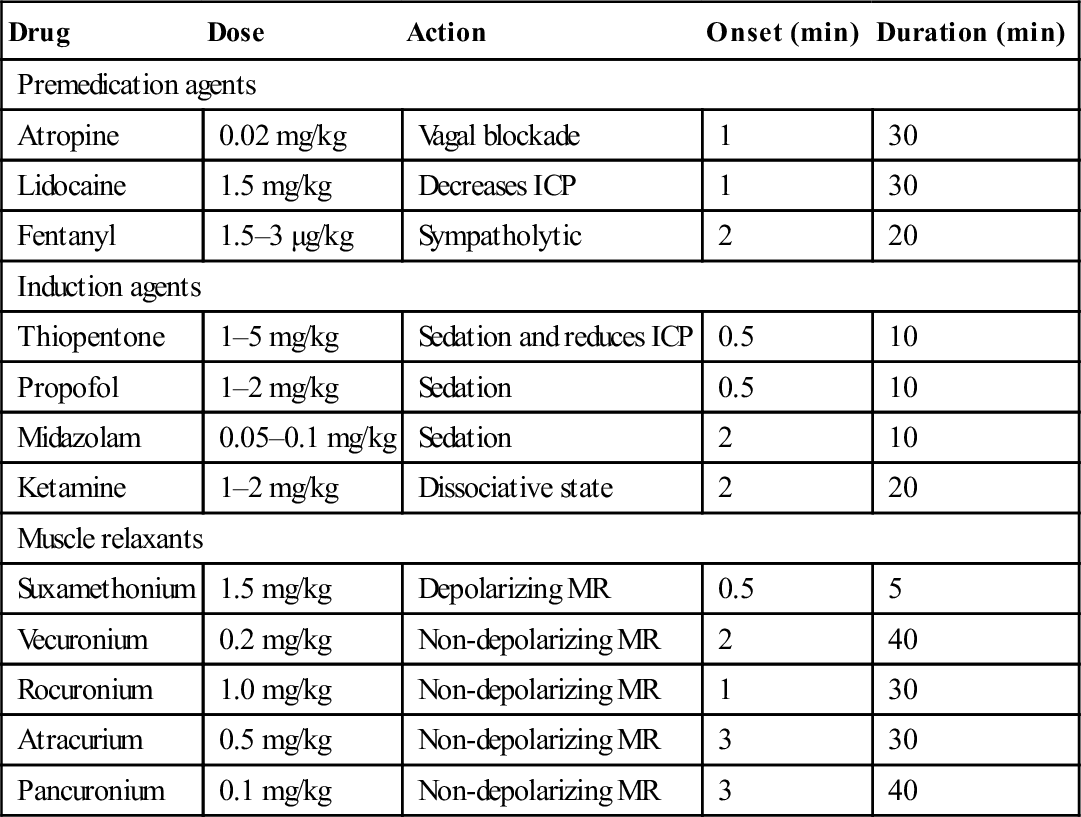
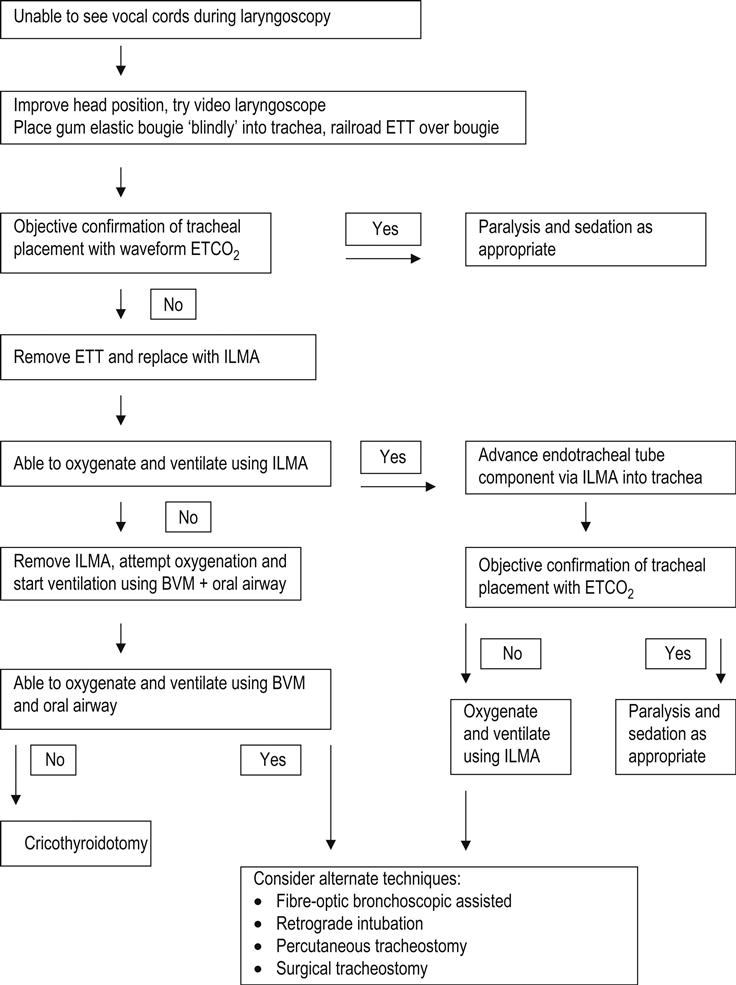


 To correct defects in the delivery of inspired gas to the lungs. A clear airway is essential.
 Where there is inadequate oxygenation of blood due to defects in pulmonary gas exchange.

 To provide 100% oxygen where clinically indicated.
 To titrate oxygen dose in patients with impaired ventilatory response to carbon dioxide.


 , ∝=proportional to, A=area of tissue, T=tissue thickness, Sol=solubility of the gas, MW=molecular weight, PA=alveolar partial pressure, and Ppa=pulmonary artery partial pressure.