CHAPTER 16. ABDOMINAL PARACENTESIS AND ASCITIC DRAIN INSERTION
Ascitic drain insertion134
Post-procedure care and investigations139
Complications140
Suggested reading140
Hippocrates (460–377 BC) was known to have utilized abdominal paracentesis for the treatment of ascites. Accumulated abdominal fluid was frequently the endpoint of congestive cardiac failure. One of the earliest treatments for fluid accumulation (hydropsy or dropsy) involved use of fine percutaneous tubes to cause seepage of interstitial fluid. These famous Herbert Southey’s (1783–1865) silver tubes were used for any oedematous part of the body. A natural extension of such therapy was abdominal paracentesis. Ludwig van Beethoven (1770–1827) underwent repeated paracentesis for ascites related to cirrhosis (undiagnosed at the time). Historians have recently blamed Beethoven’s doctor for contributing to his death by lead poisoning due to the poultices applied to the paracentesis sites!
ABDOMINAL PARACENTESIS
INTRODUCTION
Abdominal paracentesis is performed as a supplementary diagnostic procedure to determine the cause of ascites or new abdominal pain in patients with ascites. In cirrhotic patients it is commonly performed when there is a suspicion that new symptomatology is due to spontaneous bacterial peritonitis or malignancy. Coagulopathies are not contraindications to the procedure given a large number of patients with ascites of hepatic origin will have abnormal clotting. Ascitic paracentesis has been outlined below in accordance with the British Society of Gastroenterology guidelines.
INDICATIONS
• Diagnostic investigations of abdominal ascites.
CONTRAINDICATIONS
• Local infection overlying the puncture site.
• Highly deranged coagulopathy.
• Lack of consent.
EQUIPMENT
• Dressing pack.
• Sterile gloves.
• Orange needle.
• Green needle × 2.
• 20 mL syringe.
• 10 mL syringe.
• Lidocaine.
• Gauze.
• Chlorhexidine cleaning solution.
• Sterile drapes.
• Plaster.
• Skin pen.
• Blood culture bottles.
• Blood glucose tube–fluoride oxalate tube.
• EDTA tube.
• Sterile bottles × 2.
PRACTICAL PROCEDURE
• Explain the procedure to the patient and gain consent.
• If ascites is not distending the abdomen it is prudent to undertake ultrasound examination to locate the fluid.
 Tip Box
Ensure the patient has an empty bladder prior to the procedure.
• Raise the level of the bed until their abdomen is at a comfortable height for you to perform the procedure.
• Palpate and percuss the edge of the liver to ensure you know its position.
• Percuss the ascites by assessing for shifting dullness: percuss the abdomen in the supine position listening for the transition point between resonance and dullness. The central abdomen should be resonant and the flanks dulled by the presence of dependent ascites. Ask the patient to then roll into the lateral position and wait approximately 5 seconds. Percuss over the area that was previously dull: if this now sounds resonant, this is indicative of shifting dullness.
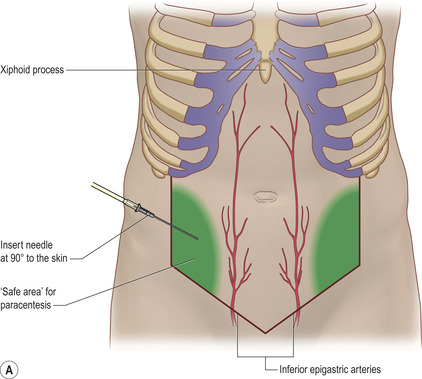
• A spot lateral to this in the right or left lower quadrant can be marked but should be in the safe area (Fig. 16.1 A and B). The commonest site for an ascitic tap is about 15 cm lateral to the umbilicus in the left or right lower quadrant. The aim is to avoid solid structures such as liver and spleen in the upper abdomen and the lower epigastric arteries and bowel in the lower abdomen.

 Tip Box
Avoid areas with superficial dilated veins, especially in the presence of portal hypertension.
• Wash your hands and wear sterile gloves.
• Clean the area and place the sterile drapes.
• Draw up the lidocaine in a 10 mL syringe and attach the orange needle.
• Warn the patient of a sharp scratch and infiltrate 2 mL of the local anaesthetic subcutaneously over the marked area using an orange needle.
• Check the area is adequately anaesthetized with gentle poking of the skin with the needle.
• Infiltrate local anaesthetic into deeper tissues advancing the green needle obliquely until ascitic fluid is aspirated.
 Tip Box
This oblique direction is termed the ‘Z track’, ensuring the sites of needle entry at the skin and at the peritoneum do not overlie one another. This reduces the risk of continuing leak from the puncture site following the procedure.
• Assemble the 20 mL syringe and green needle.
• Once the required volume of the sample has been obtained, withdraw the needle and place firm pressure on the area with some gauze.
• Apply a sterile dressing.
• Inoculate ascitic fluid into blood culture bottles, specimen bottles, a fluoride-oxalate tube and an EDTA tube.
• Document the procedure clearly in the patient’s medical notes. Note the macroscopic appearance of the fluid (e.g. straw-coloured, turbid, haemorrhagic).
• Advise the patient to lie on the opposite side to paracentesis for approximately 2 hours should any ascites leak from the site of aspiration.
POST-PROCEDURE INVESTIGATIONS
• Cell count – particularly looking at the neutrophil count (> 250 white cells/mm3 is diagnostic of spontaneous bacterial peritonitis).
• Microscopy, culture and sensitivity including acid-fast bacilli.
• Cytology.
• Glucose.
• Lactate dehydrogenase (LDH).
• Amylase (increased in pancreatitis).
• Protein.
• Albumin (with concurrent serum albumin to determine the serum–ascites albumin gradient).
• Alpha-fetoprotein (AFP).
• pH.
• Gamma-glutamyl transpeptidase (increased in hepatoma).
COMPLICATIONS
Complications are uncommon. Approximately 1% of taps result in superficial abdominal haematomas, with intraperitoneal complications such as haemoperitoneum or bowel perforations occurring in less than 1 in 1000 taps. In the presence of bleeding diatheses (e.g. significant thrombocytopaenia or coagulopathy) it would be reasonable to perform the procedure under platelet or fresh frozen plasma (FFP) cover, respectively. However, there is little evidence that this reduces the risk of bleeding for this procedure.
• Pain.
• Infection around puncture site.
• Bacterial peritonitis.
• Bleeding around puncture site.
• Leaking of ascitic fluid around puncture site.
• Dry tap.
• Perforation of bowel wall or bladder.
 Tip Box
In the case of a dry tap ask the patient to gently roll towards you so that the ascites accumulates at the site of aspiration. However, an abdominal ultrasound scan to mark the best site for paracentesis would be the investigation of choice in this setting.
ASCITIC DRAIN INSERTION
INTRODUCTION
Ascitic drain insertion is indicated for the relief of raised intra-abdominal pressure secondary to large-volume ascites. This may compromise urine output through reduced renal perfusion (intra-abdominal hypertension >30 cm water) or ventilatory function with increasing carbon dioxide tension.
Large-volume ascites commonly develops in portal hypertension due to primary liver disease, severe right heart failure or malignancy. The removal of large volume ascites secondary to liver cirrhosis necessitates simultaneous intravenous replacement with albumin as per British Society of Gastroenterology guidelines to maintain the intravascular volume in the face of large fluid shifts. The administration of albumin per se in liver disease, however, does not reduce the rate at which ascites reaccumulates; this is controlled by measures that reduce portal hypertension.
INDICATIONS
Relief of symptoms due to tense ascites:
• pain
• progressive oliguria secondary to intra-abdominal hypertension
• progressive ventilatory difficulty.
 Tip Box
Whilst the release of purulent fl uid from a collection to reduce bacterial load is common practice with abscesses (an empyema, for example), the British Society of Gastroenterology states that there is no available evidence to support this line of management in the case of spontaneous bacterial peritonitis (SBP). Therefore the role of total paracentesis in the management of SBP remains a matter of debate and varied practice, and local gastroenterology or hepatology advice and policy should be consulted prior to considering this measure.
CONTRAINDICATIONS
• Local infection overlying the puncture site.
• Highly deranged coagulopathy.
• Bowel obstruction.
• Lack of consent.
EQUIPMENT
• Dressing pack.
• Sterile gloves.
• Orange needle (25 G).
• Green needle (21 G).
• 1 × 10 mL syringe.
• 1 × 20 mL syringe.
• Lidocaine.
• Gauze.
• Chlorhexidine cleaning solution.
• Sterile drapes.
• Transparent sterile dressing.
• Suture.
• Suture cutter.
• Bonanno® Catheter ascitic drain.
• Drainage bag.
• Skin pen.
PRACTICAL PROCEDURE
• Gain consent.
 Tip Box
Ensure the patient has an empty bladder prior to the procedure.
• Position the patient in a supine position on a bed. Ask them to move towards your side of the bed and place a pillow under their head for comfort.
• Raise the level of the bed until their abdomen is at your height or just below.
• Palpate and percuss the edge of the liver to ensure you know its position.
• Percuss the ascites by assessing for shifting dullness: percuss the abdomen in the supine position listening for the transition point between resonance and dullness. Ideally the ascites should be assessed by ultrasound and the site of maximum ascitic depth marked by the radiologist. Mark the site for puncture in the safe area (see Fig. 16.1 B).
 Tip Box
Avoid areas with superficial dilated veins, especially in the presence of portal hypertension.
• Wash your hands and wear sterile gloves.
• Clean the area and place the sterile drapes.
• Draw up the local anaesthetic in a 10ml syringe and attach the orange needle.
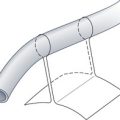
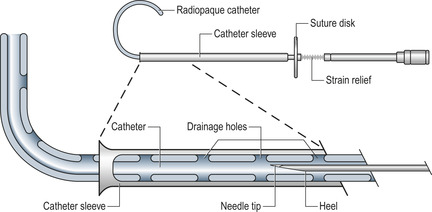
• Assemble the ascitic drain as instructed (Fig. 16.2).
• Warn the patient of a sharp scratch and infiltrate 1 mL of the local anaesthetic subcutaneously over the marked area.
• Check the area is adequately anaesthetized with gentle poking of the skin with the needle.
• Infiltrate local anaesthetic into deeper tissues with a green needle until ascitic fluid is aspirated (Fig. 16.3). While withdrawing the needle, line the track with local anaesthetic.

 Tip Box
When siting an ascitic drain in patients with peritoneal metastases use up to 10 mL lidocaine. If you hit peritoneal deposits, gently withdraw the needle slightly and proceed in a different direction.
 Tip Box
Never attempt drain insertion if you have been unable to obtain ascitic aspirate at the time of local anaesthetic infi ltration.
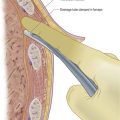
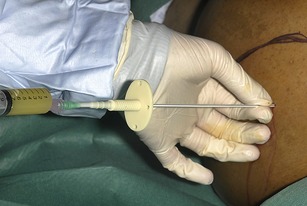
• Attach a 20 ml syringe to the assembled drain apparatus. Introduce the ascitic drain trocar at a 90 degree angle to the abdominal wall. Hold the apparatus with two hands using the hand closest to the abdominal wall to regulate the length of drain inserted, ensuring that only a small length of the drain apparatus is inserted at a time. This minimizes the potential trauma were the whole or most of the trocar to inadvertently enter the abdominal cavity. Advance the trocar slowly whilst aspirating the syringe until ascitic fluid is obtained (Fig. 16.4).
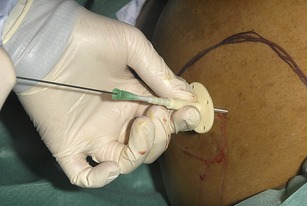
• Unscrew the locking mechanism between the trocar and the drain.
• Using your non-dominant hand gently slide the drain into the abdominal cavity over the trocar, and with your dominant hand subsequently withdraw the trocar out of the drain as you would a cannula (Fig. 16.5).
 Tip Box
Ensure when withdrawing the trocar you do not withdraw it too quickly otherwise the drain will kink.
• Attach the drainage bag (Fig. 16.6).
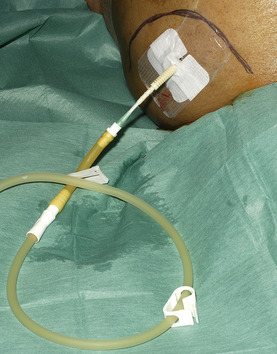
• Place a clear sterile dressing over the drain entry site.
• Document the procedure clearly in the patient’s medical notes.

POST-PROCEDURE CARE AND INVESTIGATIONS
• Send ascitic fluid for the same range of investigations as you would when performing a diagnostic tap (see under Abdominal paracentesis investigations section).
• Request post-procedure observations at regular intervals of approximately 15 minutes for the first hour, then hourly thereafter, in particular relating to the patient’s volume status. Keep a strict fluid balance chart, noting the volume of ascites drained, the volume of intravenous fluid replacement (if required) and the urine output.
• In the event of haemodynamic compromise consider intravenous volume expansion with a synthetic colloid plasma expander and hold off further drainage until haemodynamic stability is achieved.
 Tip Box
• The British Society of Gastroenterology guidelines for the management of ascites secondary to cirrhosis recommend:
— An albumin infusion as a plasma expander when large volumes (i.e. greater than 5 L) are removed. For each litre of ascites removed infuse 8 g of albumin (i.e. 100 mL 20% albumin administered for every 3 L ascites drained).
— A synthetic plasma expander may be used when less than 5 L of ascites has been removed.
• Aim to drain the ascites to dryness in a single session of not more than 1–4 hours. The ascitic drain should preferably be removed as soon as the original symptoms for placement of the drain have been controlled. Sterile ascitic fluid is at risk of becoming infected if drains are left in for more than 24 hours.
COMPLICATIONS
In the presence of bleeding diatheses (e.g. significant thrombocytopaenia or coagulopathy) it would be reasonable to perform the procedure under platelet or FFP cover, respectively. However, there is little evidence that this reduces the risk of bleeding for this procedure.
• Pain.
• Infection around puncture site.
• Bacterial peritonitis.
• Bleeding around drain site.
• Leaking of ascitic fluid around drain site – a suture (ideally a purse-string) may be used to close the drain track.
• Dry tap – obtain an ultrasound to look for loculated ascites.
• Hypotension.
• Perforation of bowel wall or bladder.
SUGGESTED READING
Moore, K.P.; Aithal, G.P., Guidelines on the management of ascites in cirrhosis, Gut 55 (suppl 6) (2006) vi1–vi12; http://www.bsg.org.uk/pdf_word_docs/ascites_cirrhosis.pdf.