[level-membership-for-cardiovascular-category]
CHAPTER 11. CENTRAL VENOUS CATHETER INSERTION
NICE guidelines on ultrasound guidance90
Indications91
Contraindications91
Equipment91
Practical procedure91
Placement of femoral lines100
Complications101
Post-procedure investigations and care101
Measuring central venous pressure using a manometer101
Equipment101
Practical procedure102
Post-procedure investigations103
Suggested reading104
Stephen Hales (1677–1761) performed the first recorded central venous catheterization in 1733 when he inserted a glass tube into the jugular vein of a horse to measure central venous pressure. In 1953 Seldinger described a percutaneous method for central venous access, and subsequently central venous cannulation became a widespread medical technique.
INTRODUCTION
Modern central venous catheters have several lumen, which allow for:
Central venous catheters can be placed in the internal jugular, subclavian or femoral veins using the Seldinger technique. This chapter will discuss internal jugular and femoral approaches.
NICE GUIDELINES ON ULTRASOUND GUIDANCE
• 2D imaging ultrasound guidance should be the preferred method when inserting a central venous catheter in adults and children in elective situations.
• 2D imaging ultrasound guidance should be considered in most clinical situations where central venous catheter insertion is necessary, either elective or emergency.
• When using the ultrasound, ensure that the orientation of the probe correlates with the anatomical position. The probe head should have a marker on one side that corresponds to a marker on the screen, enabling the user to identify correct orientation of the probe (and hence correct orientation of the vessels you are visualizing!).
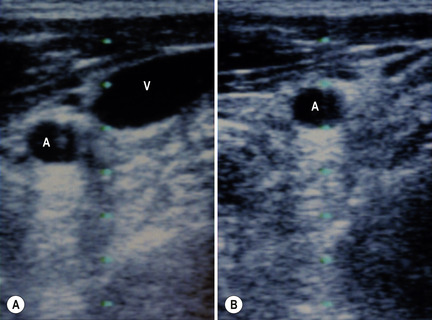
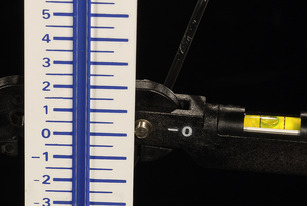
• Having found the internal jugular or femoral vessels, check for the vein by compressing the region with the probe. The vein collapses with the application of pressure whereas the thicker-walled artery remains patent and pulsates (Fig. 11.1 A and B).
INDICATIONS
• Measurement of central venous pressure.
• Secure intravenous access in patients requiring several lumens for i.v. infusions.
• Pre-operatively for major operations, e.g. aortic aneurysm repair, coronary artery bypass grafts; these are usually inserted by anaesthetists.
CONTRAINDICATIONS
• Coagulopathy (relative contraindication).
• Local sepsis over puncture site.
• Lack of consent.
EQUIPMENT
• Dressing pack.
• Sterile gown, gloves and drapes.
• Chlorhexidine cleaning solution.
• Lidocaine.
• 2 × 10 mL syringes.
• 1 × 5 mL syringe.
• Orange needle.
• 2 × green needles.
• Sterile gauze.
• 100 mL sterile bag normal saline.
• Central line pack (includes central line, introducer needle, guidewire and dilator).
• 3-way taps (the quantity corresponding to the number of lumens on the central line).
• Scalpel.
• Suture.
• Clear sterile dressing.
• If available – portable ultrasound probe, sterile cover and probe jelly.
PRACTICAL PROCEDURE
POSITIONING FOR INTERNAL JUGULAR LINE PLACEMENT
• Lay the patient flat on the bed and elevate the bed to your level for your own comfort.
• Tilt the bed with the head down (the Trendelenburg position). This reduces the risk of air embolism whilst also helping to distend the neck veins.
 Tip Box
If the patient is more dyspnoeic in the head-down position, minimize the time spent in this position by performing the skin preparation and infiltration of local anaesthesia with the patient sitting up.
• Turn the patient’s head approximately 30 degrees from the midline away from the side of line insertion.
 Tip Box
If the patient is inadvertently flexing their neck, place a 0.5- or 1-L bag of normal saline between the shoulder blades; this allows for more neck extension.
 Tip Box
Place the patient on telemetry in order to observe for potential arrhythmias during insertion. These occur if the guidewire or line is inserted too far and makes contact with the tricuspid valve, in which case pull back the guidewire.
PREPARATION
• Wash hands, wear the sterile gown and gloves and lay out sterile environment and dressing pack.
• Check and assemble the equipment – attach three-way taps to all lumens of the central line other than the port through which the guidewire will pass. Flush the ports with normal saline to ensure patency (simply pierce the sterile bag of normal saline with a green needle attached to a 10 mL syringe and withdraw saline as required). Once flushed, turn the 3-way taps off to the patient.
 Tip Box
After flushing the lines, keep the saline flush syringe on top of the normal saline so as not to confuse it with the lidocaine syringe.
• Clean the area – clean outwards in a spiral motion from the centre to the periphery.
• Place a sterile drape over the patient with a central window over the area of line insertion.
• Palpate the carotid artery and ultrasound the area in order to obtain a guide of the anatomy and landmarks for insertion (Fig. 11.2).
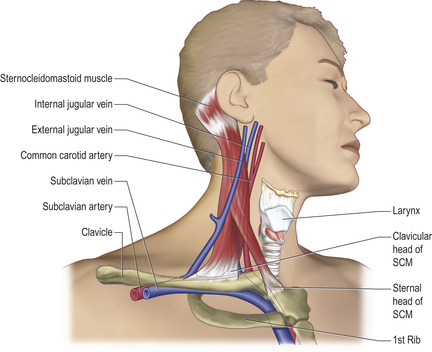
• The surface point at which the line enters the neck is midway between the sternal notch and the mastoid process, lateral to the carotid pulsation. The line subsequently advances under the sternocleidomastoid muscle towards the internal jugular vein.
STERILE TECHNIQUE FOR SETTING UP THE ULTRASOUND PROBE
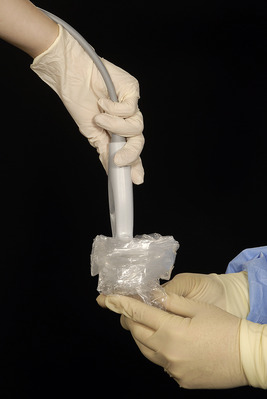
• The operator rolls up the sterile plastic sheath into a ‘sock’ whilst an assistant applies gel onto the ultrasound probe head.
• Offer the sterile sheath to the assistant who can then place the probe into the sheath (Fig. 11.3). In this way the sterile operator does not touch the non-sterile probe, and likewise the non-sterile assistant does not contaminate the sterile sheath.
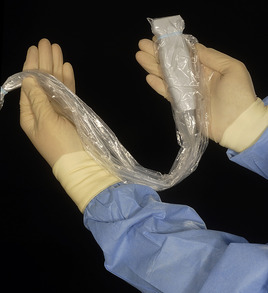
• Roll the sheath down to its full length and secure with the sterile elastic bands around the probe head (Fig. 11.4). The probe is now sterile and can be placed on the sterile trolley or on your sterile field.
• Chlorhexidine cleaning solution applied to the sterile probe head is an excellent transducer, and avoids the need for gel in your sterile field. Once the sterile plastic sheath is secured, simply dip the sterile probe head into a gallipot of alcoholic chlorhexidine solution and subsequently apply the sterile probe head to the patient’s skin to obtain an image.
• When using the ultrasound, identify the internal jugular vein and align the probe with the vein in the centre of your picture. When inserting the needle below the probe head aim directly for the internal jugular vein on the screen.
PROCEDURE
 Tip Box
Some operators advocate the use of a ‘guide needle’. The internal jugular vein is deliberately located when infiltrating local anaesthetic. Upon puncture of the vein, the syringe is removed from the needle, which is left in situ as a marker of the vein’s location.
 Tip Box
Loosen the guidewire ensuring it runs smoothly in and out of its sheath and place it next to you on the sterile drape so that it is readily accessible. The shorter the time between venepuncture and introducing the guidewire, the greater the chance of success.
• Connect the 5 mL syringe to the introducer needle.
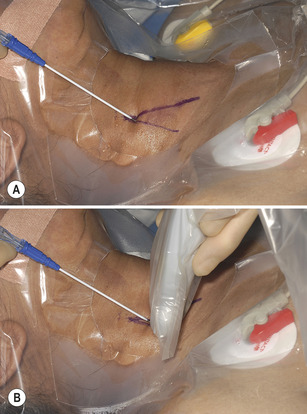
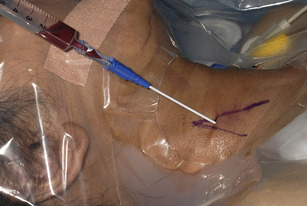
• At the same time as palpating the carotid pulse (or preferably whilst using ultrasound guidance), insert the syringe at the point midway between the sternal notch and the mastoid process, lateral to the carotid pulsation (Fig. 11.5). Aim towards the ipsilateral nipple advancing under the sternocleidomastoid whilst continuously aspirating for blood.
 Tip Box
Distinguishing features between venous and arterial puncture may include (for arterial puncture) pulsatile flow and a brighter colour of blood. However, these features are not to be relied upon, and if you are in any doubt as to the nature of the vessel punctured remove the needle immediately and apply firm compression. Re-try preferably under ultrasound guidance.
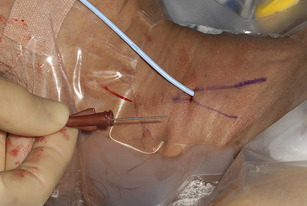
• Having located and confirmed the vein by blood aspiration into the syringe (Fig. 11.6) hold the needle still with the non-dominant hand and remove the syringe with the other.
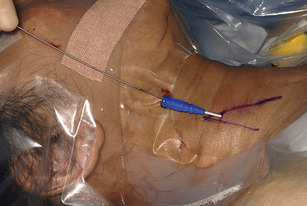
• Pass the guidewire down the introducer needle with the dominant hand ensuring that some 10 cm of wire have passed into the vein (Fig. 11.7). Keep a close eye on the telemetry and watch for arrhythmias. Should these occur pull the guidewire back until the arrhythmia terminates.
 Tip Box
NEVER force the guidewire through the needle if significant resistance is felt. Remove the guidewire and recheck that the tip of the introducer needle still lies in the lumen of the vein.
• Ensuring that you do not lose sight of the guidewire at any time, remove the needle over the guidewire.
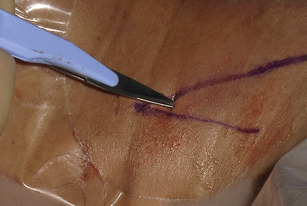
• While moving the tail of the guidewire to one side, make a small (approximately 0.5 cm) incision with the scalpel in the skin to enlarge the guidewire’s percutaneous passage. Ensure that the incision is immediately adjacent to the guidewire to avoid a ‘skin bridge’ between the guidewire and the incision (Fig. 11.8).
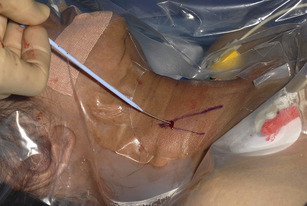
• Pass the dilator over the guidewire (Fig. 11.9), and advance under the skin once the guidewire has reappeared at the other end of the dilator.
 |
| Fig. 11.9 |
 Tip Box
The ease of passage of the dilator not only depends upon skin elasticity and the size of the nick in the skin, but sometimes if difficult might indicate inadvertent passage through the internal carotid arterial wall. Be suspicious of this complication if it is difficult to pass the dilator, especially if the guidewire seems to be well in situ and moves freely without kinks. If any concern exists regarding arterial placement of the guidewire and/or dilator, remove the apparatus and apply firm pressure with gauze over the area for 5 to 10 minutes.
• Once a path has been dilated remove the dilator over the guidewire, taking care to not remove the guidewire at the same time. Now cover the enlarged puncture site with gauze to guard against air embolism.
• Pass the central line over the guidewire, ensuring that the guidewire appears from the other end before the central line touches the skin (Fig. 11.10). In most multi-lumen catheters the guidewire appears through the brown capped channel.
• Whilst holding the guidewire at its tip, advance the central line through the skin along the dilated passage. There should be no sense of resistance.
• Insert the line to 15 cm.
• Place the suture cover on the line at the point of entry to the skin (15 cm).
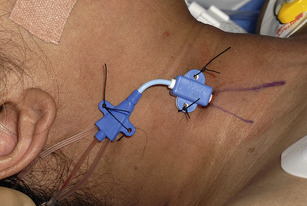
• Suture the line in place both at the suture cover and at the neck of the line to reduce movement of the venous catheter (Fig. 11.11).
• Check all lumens aspirate and flush freely. Turn the 3-way tap ‘off’ to the patient.
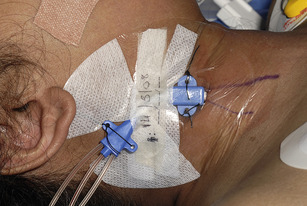
• Apply a clear sterile dressing over the line (Fig. 11.12).
PLACEMENT OF FEMORAL LINES
This differs from the internal jugular in a number of ways.
• The patient does not need to be lying head down or need to be monitored.
• Location (see Fig. 6.5) is easier by palpation of the femoral artery (located at the midpoint between the anterior superior iliac spine and the pubic symphysis) with the vein located medially (whereas the internal jugular vein is lateral to the artery in the neck). Use of ultrasound simplifies vein location.
• Once the femoral vein is located the venous catheter can be inserted to its full length using the same technique described above and sutured in place.
COMPLICATIONS
• Infection.
• Bleeding and haematoma formation (in neck or retroperitoneum depending upon site of insertion).
• Pneumothorax (internal jugular).
• Arterial puncture: should this occur, remove the needle and apply firm compression for at least 5 minutes.
• Venous thrombosis.
POST-PROCEDURE INVESTIGATIONS AND CARE
• For internal jugular lines use a chest X-ray to check line position and rule out pneumothorax. Internal jugular lines should be sited with the tip at the junction of the superior vena cava/right atrium.
• Central venous blood gas analysis central venous oxygen saturations are commonly used in the critical care environment.
• Sepsis in the presence of an indwelling central venous catheter warrants insertion of a line elsewhere and removal of the current line. Send blood cultures both from the central line and peripherally. Send the tip of the venous catheter in a sterile container to microbiology upon removal.
• Central venous pressure monitoring if in the internal jugular position. This may be performed using either:
— a direct electronic transducer system with the central venous pressure (CVP) reading and waveform displayed on a monitor or
— a manometer containing crystalloid attached to the internal jugular line.
MEASURING CENTRAL VENOUS PRESSURE USING A MANOMETER
Once the internal jugular catheter is in situ, arranging the apparatus to measure CVP would be a task expected of the nursing staff on the ward. As this procedure is performed infrequently in the ward setting, however, this may not always be the case. It is therefore important to have some knowledge about how to set up the manometer to obtain accurate CVP readings.
EQUIPMENT
PRACTICAL PROCEDURE
• Wash your hands and wear sterile gloves.
• Ensure that the central venous catheter aspirates and flushes freely. Use the distal port for CVP measurement.
• Connect a 3-way tap to:
— a 1-L bag of normal saline via a giving set
— the central venous catheter via extension tubing pre-flushed with the normal saline (to prevent air embolism)
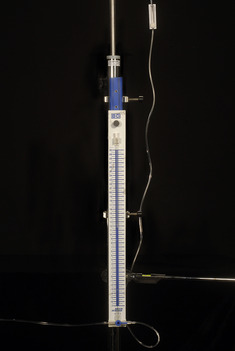
— a manometer clamped to a drip stand (Fig. 11.13).
• The patient should ideally be positioned in the supine recumbent position. If not possible, position the patient in a semi-recumbent position to a maximum angle of 45degrees.
• The baseline point of reference of the manometer is 0. This must correspond with the level of the right atrium, which is taken as the fourth intercostal space in the mid-axillary line (preferably with the patient supine). Mark this point on the patient with a skin pen (to obtain accurate serial CVP measurements).
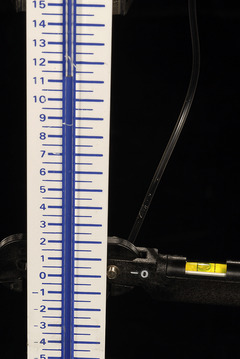
• Loosen the clamp on the manometer and slide the manometer until the ‘0’ reading is level with the mark at the fourth intercostal space in the mid-axillary line. Tighten the clamp on the manometer in place on the drip stand at this point. Use the spirit level to ensure that the ‘0’ reading on the manometer is directly in line with this mark on the patient (Fig. 11.14).
• Turn the 3-way tap off to the patient, allowing the manometer to fill with fluid.
• Once nearly full, turn the 3-way tap off to the intravenous fluid. The fluid level in the manometer will now fall until it levels off at the point of the patient’s CVP (measured in cmH2O, Fig. 11.15). The fluid level will oscillate at this point with the patient’s ventilatory efforts, and the average reading between inspiration and expiration is taken as the CVP.
• Record serial CVP readings on a chart.
• Turn the 3-way tap off to the manometer and adjust the intravenous fluid infusion rate on the giving set.
POST-PROCEDURE INVESTIGATIONS
• Always zero the CVP manometer to the point marked on the patient prior to taking a reading.
• It is the trend of serial CVP measurements that is useful in guiding volume status rather than the discrete CVP reading obtained.
• It should be remembered that CVP measurements are limited by the patient’s co-morbidities, especially those giving rise to raised pulmonary arterial pressures.
• CVP measurements represent a diagnostic tool to be used in addition to clinical examination in the assessment of volume status.
SUGGESTED READING
NICE guidance. Central venous catheters – ultrasound locating devices. Available online at: http://www.nice.org.uk/Guidance/TA49
[/level-membership-for-cardiovascular-category][not-level-membership-for-cardiovascular-category]
CHAPTER 11. CENTRAL VENOUS CATHETER INSERTION
NICE guidelines on ultrasound guidance90
Indications91
Contraindications91
Equipment91
Practical procedure91
Placement of femoral lines100
Complications101
Post-procedure investigations and care101
Measuring central venous pressure using a manometer101
Equipment101
Practical procedure102
Post-procedure investigations103
Suggested reading104
Stephen Hales (1677–1761) performed the first recorded central venous catheterization in 1733 when he inserted a glass tube into the jugular vein of a horse to measure central venous pressure. In 1953 Seldinger described a percutaneous method for central venous access, and subsequently central venous cannulation became a widespread medical technique.
INTRODUCTION
Modern central venous catheters have several lumen, which allow for:
Central venous catheters can be placed in the internal jugular, subclavian or femoral veins using the Seldinger technique. This chapter will discuss internal jugular and femoral approaches.
NICE GUIDELINES ON ULTRASOUND GUIDANCE
• 2D imaging ultrasound guidance should be the preferred method when inserting a central venous catheter in adults and children in elective situations.
• 2D imaging ultrasound guidance should be considered in most clinical situations where central venous catheter insertion is necessary, either elective or emergency.
• When using the ultrasound, ensure that the orientation of the probe correlates with the anatomical position. The probe head should have a marker on one side that corresponds to a marker on the screen, enabling the user to identify correct orientation of the probe (and hence correct orientation of the vessels you are visualizing!).
• Having found the internal jugular or femoral vessels, check for the vein by compressing the region with the probe. The vein collapses with the application of pressure whereas the thicker-walled artery remains patent and pulsates (Fig. 11.1 A and B).
INDICATIONS
• Measurement of central venous pressure.
• Secure intravenous access in patients requiring several lumens for i.v. infusions.
• Pre-operatively for major operations, e.g. aortic aneurysm repair, coronary artery bypass grafts; these are usually inserted by anaesthetists.
CONTRAINDICATIONS
• Coagulopathy (relative contraindication).
• Local sepsis over puncture site.
• Lack of consent.
EQUIPMENT
• Dressing pack.
• Sterile gown, gloves and drapes.
• Chlorhexidine cleaning solution.
• Lidocaine.
• 2 × 10 mL syringes.
• 1 × 5 mL syringe.
• Orange needle.
• 2 × green needles.
• Sterile gauze.
• 100 mL sterile bag normal saline.
• Central line pack (includes central line, introducer needle, guidewire and dilator).
• 3-way taps (the quantity corresponding to the number of lumens on the central line).
• Scalpel.
• Suture.
• Clear sterile dressing.
• If available – portable ultrasound probe, sterile cover and probe jelly.
PRACTICAL PROCEDURE
POSITIONING FOR INTERNAL JUGULAR LINE PLACEMENT
• Lay the patient flat on the bed and elevate the bed to your level for your own comfort.
• Tilt the bed with the head down (the Trendelenburg position). This reduces the risk of air embolism whilst also helping to distend the neck veins.
Tip Box
If the patient is more dyspnoeic in the head-down position, minimize the time spent in this position by performing the skin preparation and infiltration of local anaesthesia with the patient sitting up.
• Turn the patient’s head approximately 30 degrees from the midline away from the side of line insertion.
Tip Box
If the patient is inadvertently flexing their neck, place a 0.5- or 1-L bag of normal saline between the shoulder blades; this allows for more neck extension.
Tip Box
Place the patient on telemetry in order to observe for potential arrhythmias during insertion. These occur if the guidewire or line is inserted too far and makes contact with the tricuspid valve, in which case pull back the guidewire.
PREPARATION
• Wash hands, wear the sterile gown and gloves and lay out sterile environment and dressing pack.
• Check and assemble the equipment – attach three-way taps to all lumens of the central line other than the port through which the guidewire will pass. Flush the ports with normal saline to ensure patency (simply pierce the sterile bag of normal saline with a green needle attached to a 10 mL syringe and withdraw saline as required). Once flushed, turn the 3-way taps off to the patient.
Tip Box
After flushing the lines, keep the saline flush syringe on top of the normal saline so as not to confuse it with the lidocaine syringe.
• Clean the area – clean outwards in a spiral motion from the centre to the periphery.
• Place a sterile drape over the patient with a central window over the area of line insertion.
• Palpate the carotid artery and ultrasound the area in order to obtain a guide of the anatomy and landmarks for insertion (Fig. 11.2).
 |
