Wound care
Wounds


History


Physical examination
 Inspect the Wound for Injury to Neurovascular or Tendinous Structures
 Inspect the Wound for Hemostasis, Exposed Bone, or Hardware if Postsurgical
Acute wounds


Principles of wound care: Treatment
Irrigation and débridement
1) Irrigate the wound with sterile normal saline with a device producing 7 to 15 pounds per square inch (psi) of pressure. Examples include commercially available pulse lavage devices and a 30-mL syringe attached to an 18-gauge angiocatheter.
2) Débride the wound of any contaminants such as grass and gravel. Minimize actual excision of tissue in the acute setting, and only débride obviously nonviable tissues.
Closure
 To minimize scarring, close acute wounds on extremities (excluding the hand and fingers) in layers.
• Use monofilament suture for contaminated wounds to minimize bacterial seeding of braided suture (see later section on Sutures).
• Avoid tension-creating techniques (vertical and horizontal mattress suture repair) because these are more likely to cause necrosis of the skin edges.
• Approximate muscle with strong absorbable monofilament suture that will last around 90 days (e.g., PDS suture).
• Approximate dermis with absorbable monofilament suture that will last around 40 days (e.g., Monocryl).
• Approximate skin with permanent monofilament suture that will be removed in 1 to 2 weeks (e.g., Prolene, Nylon).
• Wounds on the hand, fingers, and plantar foot should be closed in one layer only, with permanent monofilament suture taking bites through the epidermis and dermis.
Chronic wounds
 Treatment is based on the etiology of the chronicity of the wound. Identify (on the basis of the history) the main etiology for the delayed wound healing.
• Treat contaminated wounds with mechanical débridement in the office or enzymatic débridement or dressings that will débride the wound (normal saline wet-to-dry dressing changes twice daily). Chemicals such as Dakin solution should not be used for more than 48 hours because they can be toxic to healthy tissues.
• Treat pressure ulcers with appropriate orthotics for pressure offloading or total contact casts if the patient is a candidate.
• Treat arterial ulcers with referrals to vascular surgery for evaluation of inflow.
• Treat diabetic ulcers with education (inspecting footwear and regular extremity examinations) and adequate glucose control.
• Treat venous ulcers with graduated compression and edema control with an Unna boot, compression stockings, and elevation.
• Infected wounds need operative débridement and appropriate antibiotic therapy.

• The ideal wound healing environment is slightly moist to encourage epithelialization. Topical antimicrobials (e.g., polysporin, bacitracin) or hydrogels are helpful when applied with a gauze dressing changed once a day.
• More frequent dressing changes are helpful when trying to débride the wound with dressing changes (as in normal saline wet-to-dry dressing changes).
• Refer your patient to a dedicated wound care specialist if you are not seeing improvement in the wound.
Negative pressure therapy for wounds


Sutures


Suture technique

1) Always enter the skin with the needle perpendicular to the skin.
2) The distance from the entry of the needle to the wound on one side of the wound should equal the distance of the needle entry to exit on the other side of the wound.
3) The depth of the needle penetration should be equivalent on both sides of the wound to prevent the creation of a shelf, or mismatched wound margins.
4) Maximize eversion of the wound margins to facilitate optimal appearance of the ultimate scar.


Simple interrupted: Figure 12-1
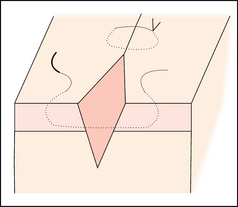
Figure 12-1. Simple interrupted suture.
 Technique: With wrist pronated, enter the skin with the needle perpendicular to the skin and wound. Then supinate and travel across the wound, taking equal bites on either side of the wound edge, and grasp the needle. When viewed in cross section the bite should look like a pear, wider in the dermis and narrower in the epidermis to optimize the final appearance of the scar. The knot is secured after the needle passes through both sides of the wound.

Simple running: Figure 12-2
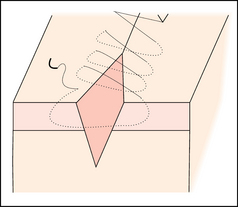
Figure 12-2. Simple running suture.
 Technique: See earlier description for a simple interrupted suture. The difference is that after the first bite, the needle is left attached to the suture end and continuously used from one wound margin to the other with a knot secured at the beginning and one secured at the end of the area to be approximated.

Vertical mattress: Figure 12-3
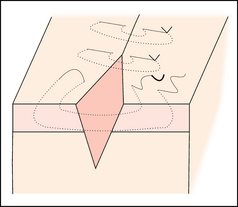
Figure 12-3. Vertical mattress suture.
 Technique: Also called “far-far-near-near stitch.” See earlier description for a simple interrupted suture. After taking the first bite in the deeper layer, the needle is reversed and the “near-near” bite is taken. This is a smaller bite (both in depth and distance to the wound), taken in the opposite direction as the first bite. The knot is secured on the side of the wound. The knot should be secured away from any potentially compromised tissue (e.g., the knot is not secured on the same side as a flap of skin).

Horizontal mattress: Figure 12-4
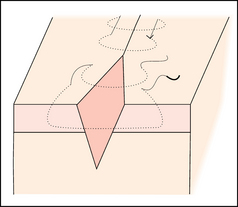
Figure 12-4. Horizontal mattress suture.
 Technique: See earlier technique for a simple interrupted suture. Before tying the knot, the needle is brought back in the reverse direction across the wound. The second entry point is made after traveling parallel to the wound the same distance as the previous exit point was from the wound edge. The needle is then passed as a simple interrupted suture in the reverse direction and secured on the side of the wound. The knot should be secured away from any potentially compromised tissue (e.g., the knot is not secured on the same side as a flap of skin).

Buried deep dermal: Figure 12-5

Figure 12-5. Deep dermal buried suture.
 Technique: Enter the wound from a deep aspect, not the epidermis. With the needle perpendicular to the dermis, the dermis is entered and the wrist is supinated. The needle should exit just deep to the dermal-epidermal junction and travel across the wound. Enter the other side of the wound at the same level as the exit on the opposite side (just below the dermal-epidermal junction). Supinate and then exit in the deep dermis across from the entry point on the other side. The knot is secured deep in the wound, and the tails of the knot are cut flush with the knot.

Subcuticular: Figure 12-6
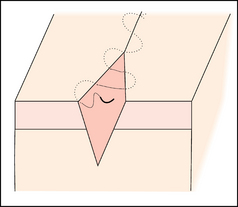
Figure 12-6. Subcuticular suture.
 Technique: A buried deep dermal stitch is secured deep in the wound at the apex. Then the needle is passed from deep to superficial at the wound apex, and horizontal bites are taken (in contrast to all the previous bites described in this chapter). The bite is taken at the dermal-epidermal junction. The needle enters perpendicular to the dermis with the needle held parallel to the epidermal surface. The needle then enters the contralateral edge of the wound at the same vertical depth and longitudinal wound distance or mirror image of where it exited on the previous wound margin. This is repeated until closure of the wound, and a buried knot is secured at the end with the tails of the knot cut flush with the knot.

Ethicon. Knot tying manual. Somerville: Ethicon; 2005.
Ethicon. Wound closure manual. Somerville: Ethicon; 2005.
Vasconez HC, Habash A, Plastic and reconstructive surgery, Doherty GM, ed. CURRENT diagnosis & treatment, surgery, ed 13. New York, McGraw-Hill, 2010.
Weitzul S, Taylor RS. Suturing technique and other closure materials. In Robinson JK, ed.: Surgery of the skin, ed 2, Saint Louis: Elsevier, 2010.