Wilderness Eye Emergencies
Ocular Procedures
Examination of Pupils
Examine the pupils for size, equality, shape, and reaction to light.
1. Approximately 10% of the population has pupils of unequal size (anisocoria).
2. If light is shined in either eye, both pupils should constrict equally (consensual response). If one pupil is seen to be dilated compared with the other when a penlight is rapidly alternated from one eye to the other, this may indicate retinal or optic nerve dysfunction.
3. An irregularly shaped, tapered “teardrop pupil” suggests ocular penetration.
4. When evaluating a red or painful eye, a significant difference in size between pupils may provide a clue to diagnose iritis (constricted) or glaucoma (dilated).
5. Although somewhat rare, mid-dilation is noted in pupillary block/angle-closure glaucoma. Look for a mid-dilated pupil (5 to 7 mm), with pain and severe decreased vision in one eye. These patients tend to be farsighted and older than 50 years.
6. A widely dilated, nonreactive pupil is suggestive of contact with medicine (e.g., scopolamine patch) or a cerebral aneurysm. If increased intracranial pressure is causing anisocoria, the patient will be obtunded or comatose.
Estimation of Anterior Chamber Depth (i.e., Rule Out Narrow Angle, a Contributing Factor to Glaucoma)
Shine a small flashlight obliquely from the temporal side of the eye (Fig. 32-1, A).
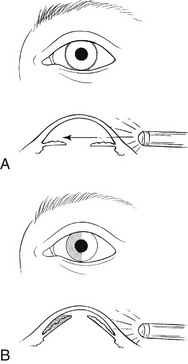
FIGURE 32-1 Estimating depth of anterior chamber.
1. If the nasal iris is well illuminated, it suggests a normal anterior chamber.
2. If the nasal iris lies in shadow, it suggests a shallow anterior chamber (narrow angle) (Fig. 32-1, B).
3. This may be a difficult test to interpret. It is helpful to compare one eye with the other, or the patient’s eye with that of another person.
4. A history of being farsighted should raise suspicion; narrow angles accompany hyperopia and small anterior chambers (usually these individuals wear thick glasses that magnify their eyes on direct inspection).
Extraocular Muscle Testing
1. Have the patient follow a flashlight or finger through the extremes of gaze in six directions. Ask if the patient sees one image or two images.
2. Double vision in any field of gaze may represent extraocular muscle palsy.
3. Fourth cranial nerve palsies tend to occur after head trauma and are generally benign. The patient will have vertical diplopia.
4. Patients with sixth cranial nerve palsy will have horizontal diplopia.
5. When both eyes have lateral gaze limitation, this is a sign of increased intracranial pressure.
6. With a third cranial nerve palsy, the eye will be turned down and out. The patient may not complain of diplopia because of ptosis. If the same pupil is dilated, this is assumed to be from a posterior communicating aneurysm until proven otherwise. Evacuate the patient immediately.
7. Grossly limited extraocular motion (EOM) with proptosis suggests acute orbital inflammation or retrobulbar hemorrhage. Retrobulbar hemorrhage is usually accompanied by periorbital ecchymosis and subconjunctival hemorrhage following trauma.
8. If the eye appears sunken within the orbit and the patient exhibits limited upward gaze, suspect a blow-out fracture of the orbital floor. Fracture of the orbital floor with entrapment of the inferior rectus muscle causes vertical diplopia with limited gaze both up and down. Fracture of the medial orbital wall with entrapment of the medial rectus muscle causes horizontal diplopia and limited gaze both medially and laterally.
Visual Field Testing
1. Ask the patient to cover one eye completely and look directly at your opposing eye from a distance of about 1 m (3.3 ft).
2. Place your fingers outside the patient’s field of peripheral vision and slowly move them centrally.
3. Ask the patient to inform you when he or she can see your fingers. The patient’s fields are generally normal when they correspond with those of the examiner.
Upper Eyelid Eversion
1. Place the end of a cotton-tipped applicator horizontally above the tarsal plate while you pull the eyelashes and the lid margin down and out (Fig. 32-2, A).
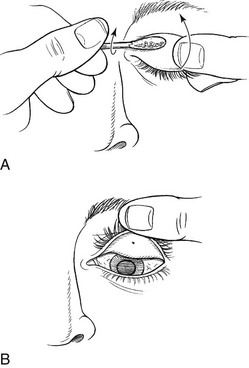
FIGURE 32-2 Upper eyelid eversion.
2. Flip the lid up to evert it. Hold the everted lid in position by pressing the lashes against the superior orbital rim (Fig. 32-2, B).
Fluorescein Examination
1. Use fluorescein staining to evaluate any red or painful eye.
2. Wet the fluorescein strip with a drop of saline (artificial tears) or a drop of topical anesthetic.
3. When examining an eye with a possible infection, always use a separate fluorescein strip for each eye to avoid cross contamination.
4. Next, apply the wetted strip to the inside of the patient’s lower lid.
5. Ask the patient to blink, which will spread the fluorescein over the surface of the eye. Areas of corneal disruption stain brilliant green.
6. Use a small, blue filter placed over a penlight, which works well in the dark.
7. Outside during the day, simple sunlight often causes any significant corneal lesion to fluoresce.
8. Fluorescein permanently stains soft contact lenses, so instruct patients to remove these lenses before the fluorescein examination and leave them out for several hours after the examination.
9. If there is concern regarding a penetrating injury, fluorescein can be used to paint the area of concern. Observe if fluorescein dilutes by pinpoint leak of aqueous fluid (a positive Seidel test indicates an open globe).
Eye Patching
1. Use a pressure patch to hold the eyelid closed and thereby facilitate healing of a corneal defect. Protect the injured eye from bright light. Using a patch for healing is not always necessary, but may be a personal preference.
2. A (light) pressure patch is indicated in many common eye emergencies and whenever the surface of the cornea has been injured, especially with a large corneal defect. The patient will be more comfortable; however, pressure patching probably does not speed up corneal healing.
3. Small corneal defects may heal rapidly without patching.
4. After patching, the patient often experiences less pain and tearing.
5. Do not use patching when the corneal epithelial defect is secondary to an infection (e.g., conjunctivitis, corneal ulcer) or if injury was caused by or contaminated with organic matter.
6. Use caution if the patient is a contact lens wearer, especially extended-wear lenses, which contribute to increased risk for infection.
7. Never apply a pressure patch to an eye after a penetrating injury. After eye penetration or trauma, tape a protective cup (e.g., padded drinking cup) over the eye or fashion a cloth “donut” from a cravat or other cloth to avoid placing pressure on the eye or inflicting any further trauma during evacuation.
8. “Plano” (noncorrective) soft contact lenses are often used by ophthalmologists for patching corneal lesions. These might be considered if available.
Procedure
1. Before patching a corneal abrasion, apply both a drop or two of a mydriatic-cycloplegic solution and a thin ribbon of antibiotic-antiseptic ointment.
a. The cycloplegic relaxes ciliary muscle spasm that accompanies corneal abrasion.
b. Check the patient for a narrow anterior chamber before instilling the drops (see Estimation of Anterior Chamber Depth, earlier), although this is usually not realistic in the field.
2. Use antibiotic ointment for prophylaxis, although corneal abrasions rarely become infected.
3. For the patch to be effective, you must put it on just tightly enough to keep the eyelid shut. Do not put undue pressure on the eye.
a. Double the first patch by folding vertically, and place it over the closed lid. If a second patch is not available, this patch can be held in place with a single piece of tape.
b. Put the unfolded second patch over the first folded patch.
5. Prepare the skin near the eye with tincture of benzoin (if available) to help the tape adhere. Be careful to keep benzoin out of the eye.
6. Place the tape diagonally from the center of the forehead to the cheekbone. Make sure the tape completely covers the patch to minimize slippage but does not extend onto the angle of the mandible.
7. Remove the patch every 24 hours so that the eye can be reexamined and the patch changed. Using a clean patch every 24 hours helps to prevent infection.
8. Instruct the patient with an eye patch to rest the uninjured eye. Discourage reading because rapid involuntary movement of the patched eye occurs.
Locating a Displaced Contact Lens
1. The conjunctival fornix of the lower lid is easily examined by distracting the lens from the globe with gentle downward finger pressure applied to the lower lid.
2. If the contact lens has been displaced into the superior conjunctival fornix (usually the case), it may be more difficult to locate.
3. If visual inspection with a penlight and a handheld magnifying lens is not successful in finding the lens, gentle digital massage over the closed upper lid directed toward the medial canthus often results in the contact lens emerging at that location. Several minutes of massage may be required. A few drops of artificial tears, and topical anesthetic if available, often facilitate the process.
4. If this maneuver is unproductive, the eye may be anesthetized with a drop of topical anesthetic, the upper lid distracted from the globe with upward finger pressure, and the fornix swept with a moistened cotton-tipped applicator.
5. Alternatively, using a paper clip opened to a right angle to create a simple retractor, evert the eyelid after proparacaine (or other topical anesthetic) instillation, and then lift the edge of the tarsus with the rounded edge of the paper clip.
6. If the lens is not the last and can be discarded, it can often be easily located with fluorescein. Commonly, the missing contact lens will not be there, even in the presence of a persistent foreign body sensation.
Disorders
Sudden Loss of Vision in White, “Quiet” Eye
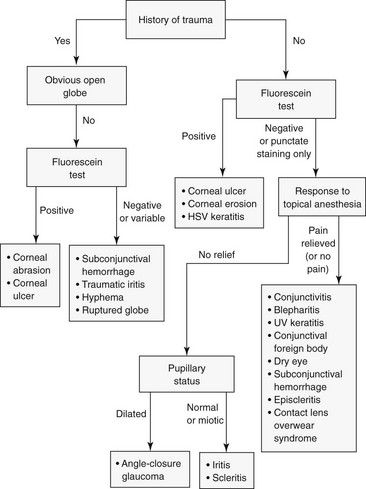
Acute and significant visual loss is an emergency. The common causes of acute visual loss are listed in Box 32-1.
Giant Cell (Temporal) Arteritis
Signs and Symptoms
Treatment
1. Because this disease can cause significant visual loss in the absence of effective treatment, initiate care immediately with a high-dose corticosteroid (e.g., prednisone, 80 to 100 mg/day PO).
2. Evacuate the patient so that a high-dose steroid can be administered intravenously.
3. When treated, symptoms often improve within 1 to 3 days. However, steroids are typically continued for many weeks.
Red Eye (Fig. 32-3 and Box 32-2)
Signs and Symptoms
1. Acute onset of severe pain and blurred vision
2. A red eye, often with the pupil slightly dilated and a “steamy” (edematous) cornea
3. The affected eye often feels appreciably harder than the unaffected eye (palpate through the lid gently and with extreme caution).
4. Symptoms beginning in low light
5. Possible nausea, vomiting, and generalized head pain
Treatment
1. Instill timolol 0.5% (Timoptic), 1 drop bid (caution if patient has asthma, chronic obstructive pulmonary disease, or history of heart block).
2. Instill pilocarpine 2% (Pilocar), 1 drop q15min × 4, then qid.
3. Administer acetazolamide 250 mg PO qid.
4. Arrange for immediate evacuation for emergency ocular surgery (laser iridotomy).
5. The other eye is also at risk; it is prudent to treat this eye with pilocarpine bid, prophylactically.
Corneal Abrasion
Signs and Symptoms
Treatment
1. Apply a topical antibiotic solution. A solution is preferable to an ointment when the patient is expected to remain active. If the patient is sleeping or if the eye is patched, an ointment has slightly greater duration of effect.
2. If the abrasion is extensive (>30% of the corneal surface) or painful, add a mydriatic-cycloplegic agent to the regimen.
3. Instruct the patient to avoid activity requiring frequent active eye movement.
4. Determine whether to patch (see Ocular Procedures, earlier).
5. Be aware that many small (<3 mm) abrasions resolve as quickly with or without corneal (eye) patching.
6. Base the decision to patch the eye on abrasion size and comfort (many patients with severe corneal defects feel more comfortable after patching).
7. NOTE: Do not patch if patient is a contact lens wearer or the corneal epithelial defect was caused by or contaminated with organic matter.
8. If the eye is not patched, apply cool compresses over the eye after the topical antibiotic to soothe the area.
9. Alternatively, a soft contact patch lens (e.g., plano or plus 0.5 to plus one correction) instilled with topical ketorolac (Acular) 0.5% ophthalmic solution is very comfortable, and antibiotic drops can be delivered through the lens.
10. Administer an oral analgesic or antiinflammatory drug to provide symptomatic relief
11. A corneal abrasion typically resolves within 24 to 48 hours, although a large abrasion may take longer. Evacuate promptly any patient with a corneal lesion that does not resolve within 4 days or that is progressing (enlarging or becoming more painful).
Corneal Erosion
Treatment
1. Apply antibiotic ointment to the eye (above lower eyelid) before patching.
2. Apply the cycloplegic drug one time only.
3. Patch the affected eye for 12 hours, then remove the patch to inspect the eye. If total resolution has not occurred, replace the patch for another 12 hours.
4. Use a lubricating ointment at night (e.g. Lacrilube, Refresh PM, or similar).
5. If hypertonic ophthalmic saline solution is not available, instill artificial tears four to eight times per day.
6. If the patient with corneal erosion does not respond to treatment, encourage evacuation.
Contact Lens–Related Corneal Abrasion
A lens-related corneal abrasion is at high risk for transformation into a corneal ulcer.
Corneal Ulcer
Treatment
1. Instill gatifloxacin ophthalmic solution 1 drop q15min for 6 hours, then 1 drop q30min, continued during the evacuation. If gatifloxacin or another quinolone is not available, use another ocular antibiotic. These may have reduced efficacy.
2. Pseudomonas infection is not uncommon as a serious complication of overnight soft contact lens wear. Consider adding tobramycin drop for drop to the quinolone with a 5-minute interval between drops.
5. Do not wear contact lenses.
6. Administer an analgesic as needed.
7. Be aware that immediate ophthalmologic consultation is required for appropriate cultures and antimicrobial treatment. Do not withhold antibiotics pending evacuation.
Corneal Foreign Body
Treatment
1. A foreign body can often be removed by simple irrigation with a copious amount of the cleanest water available (disinfected drinking water).
2. If simple irrigation is unsuccessful and the foreign body can be visualized, use a moistened cotton swab to gently brush away the foreign body. The corneal epithelium can be easily damaged by forceful or repetitive use of this technique. Do not blindly sweep in hopes of success.
3. After removal of the foreign body, instill topical antibiotic drops. You may apply an eye patch if there is an epithelial defect.
4. Apply a cool compress to ease discomfort.
5. Inform the patient that the foreign body sensation will return after the anesthetic wears off.
6. If the foreign body is metallic, a rust ring may develop. This is not dangerous and can be removed later by an ophthalmologist.
7. If the foreign body cannot be easily removed or if signs and symptoms (pain, irritation, redness) persist for more than a day after removal, initiate evacuation.
Conjunctivitis (“Pink Eye”)
Acute Bacterial Conjunctivitis
Treatment
1. Apply topical antibiotic solution 1 to 2 drops q2-6h for at least 5 to 7 days.
2. If the infection progresses (increasing symptoms) despite antibiotic therapy, arrange for evacuation.
3. If corneal opacification is noted (e.g., corneal ulcer, more common in a soft contact lens wearer), arrange for evacuation.
Viral Conjunctivitis (Acute Follicular Conjunctivitis)
Signs and Symptoms
Treatment
1. Consider instilling a topical antibiotic (because specific diagnosis is difficult in the field), 1 to 2 drops q2-6h for at least 5 to 7 days.
2. Administer artificial tears for relief, with or without vasoconstrictive drops qid for 1 to 2 days.
3. Apply cool compresses for symptomatic relief. Be careful not to cross contaminate the uninvolved eye.
4. Be diligent about hand washing; avoid sharing towels to prevent spread to others.
5. Be aware that viral conjunctivitis may last 2 weeks.
6. Evacuate the patient if the condition is not resolving or if any corneal opacification is noted.
8. Do not apply steroids in the field, because of the risk for herpes simplex virus infection exacerbation.
Chemical Conjunctivitis and Chemical Injury to the Cornea
Treatment
1. Instill a topical anesthetic.
2. Irrigate the eye with a copious amount of the cleanest water available immediately. In most cases, 1 to 2 L (1 to 2 qt) of irrigant is sufficient. However, for an alkali burn, use at least 3 L (3 qt) or 30 minutes of continuous irrigation.
3. If the injury was from an acid or alkali, transport the patient rapidly to definitive care. If possible, continue irrigation during transport.
4. Instill a cycloplegic to reduce ciliary spasm.
5. Instill antibiotic ophthalmic ointment.
6. Cool compresses may provide relief. Be careful not to cross contaminate the uninvolved eye.
7. Evacuate any patient with a corneal burn associated with corneal opacification or significant defect on fluorescein staining.
Allergic Conjunctivitis
Treatment
1. Instill vasoconstrictive drops (e.g., 0.3% pheniramine maleate plus 0.025% naphazoline ophthalmic solution [Naphcon-A]) up to qid for 1 to 2 days.
2. Consider topical ketorolac (Acular) 0.5% ophthalmic solution, 1 drop q6-12h, for 1 to 2 days.
3. A topical antihistamine (e.g., ketotifen or pheniramine maleate) can also be very helpful.
Herpes Simplex Viral Keratitis
Signs and Symptoms
1. Symptoms mimicking those of corneal abrasion
2. History of previous episode
3. In early herpetic infection, only small punctate lesions or a single vesicle on the cornea may be seen
4. Over time, typical dendritic (branching) pattern of corneal involvement becoming apparent on fluorescein staining
Treatment
1. If available, instill a topical antiviral agent (trifluridine [Viroptic] 1% ophthalmic solution) q2h while the patient is awake until the corneal epithelium has healed. Instill this agent qid for 1 week.
2. Apply a fluoroquinolone antibiotic solution (e.g., gatifloxacin [Zymar] or moxifloxacin (Vigamox) ophthalmic solution, 1 to 2 drops qid) until patient is evaluated. This is in case of misdiagnosis or secondary bacterial infection.
Infection of the Eyelid
Treatment
1. Gently scrub the eyelid margins with baby shampoo bid using a washcloth or cotton-tipped applicator.
2. Apply warm compresses for 15 to 20 minutes tid to qid.
3. Instill artificial tears for associated mild ocular irritation or dry eyes four to eight times a day.
4. Apply antibiotic ointment qid to the eyelid margin for 1 week, then qhs for 1 more week.
Hordeolum
Treatment
1. Apply warm compresses for 15 to 20 minutes several times per day.
2. Gently scrub the eyelid with soap and water several times per day.
3. Apply a topical antibiotic such as erythromycin ophthalmic solution q4-6h for 7 to 10 days.
4. If cellulitis is present, administer a systemic antibiotic for 7 to 10 days.
5. If the upper and lower lids are involved and there is orbital extension (i.e., extraocular movement limitation), it is an emergency and requires immediate evacuation.
6. Perform incision and drainage only if there is an identifiable pointing lesion and no response to conservative treatment.
Periocular Inflammation (Box 32-3)
Signs and Symptoms
1. Tenderness and redness of the eyelid, often associated with fever
2. Consider using pen to outline the area of erythema for gauging clinical progression.
3. Unlike orbital cellulitis, no pain with eye movement or restriction of extraocular movement
4. Inability to open the eye because of marked eyelid edema
5. Appearance resembling and easily confused with an allergic eyelid reaction or insect bite
6. With an allergic or inflammatory process, usually itching without tenderness
Treatment
1. Administer levofloxacin 500 mg PO bid for 7 to 10 days.
2. Alternatively, administer ciprofloxacin 750 PO bid for 7 to 10 days. Gatifloxacin or moxifloxacin may be used.
3. Alternatively, administer cephalexin 500 mg PO tid to qid for 7 to 10 days.
4. Apply warm compresses to the inflamed region qid.
6. Consider evacuation for any patient with the following conditions:
Orbital Cellulitis
Signs and Symptoms
1. Red eye, blurred vision, diplopia, headache, fever, eyelid edema
2. Erythema, warmth, and tenderness over the affected area
3. Conjunctival chemosis and injection
4. Restricted ocular motility and pain developing on attempted ocular motion
5. Possible coexisting meningitis
Iritis
Signs and Symptoms
1. Moderate to severe pain that does not respond to topical anesthesia
4. Pupil of the involved eye constricted and less reactive
5. Redness surrounding the cornea; ciliary vessels running through the sclera beneath the conjunctivae becoming injected, causing a purplish area of injection around the cornea (“ciliary injection”)
Treatment
1. Address any specific cause.
2. Instill a mydriatic-cycloplegic agent to reduce pain and ciliary spasm and prevent synechiae.
3. Avoid topical steroids in the field, (risk for herpes simplex virus infection exacerbation).
4. Ibuprofen 400 mg PO tid may be beneficial.
5. Evacuate the patient if the condition persists or progresses. Iritis associated with UV photokeratitis or corneal abrasion is usually self-limited.
Ultraviolet Photokeratitis (Snowblindness)
Signs and Symptoms
1. Pain, although there is typically a 6- to 12-hour symptom-free interval just after exposure
2. Severe gritty sensation in the eyes
5. Marked conjunctival erythema and chemosis
7. Ciliary injection with iritis
9. On fluorescein staining, a horizontal band-like uptake that corresponds with the shielding effect of the squinting eyelids
Treatment
1. Spontaneous healing generally occurs in 24 hours. However, take steps to minimize pain and disability.
3. Instill a single dose of a topical anesthetic to help control pain during the examination. Do not use the anesthetic more than once because prolonged use can impair corneal reepithelialization.
4. Consider administering a topical NSAID solution (ketorolac [Acular] 0.5% ophthalmic solution) 1 drop q6-12h.
5. Apply an antibiotic solution. If a pressure patch is used, apply topical antibiotic ointment before patching.
6. Administer an NSAID such as ibuprofen to control symptoms.
7. Administer a systemic narcotic analgesic, if necessary.
8. Apply cold compresses to provide some relief.
9. If needed, instill a mydriatic-cycloplegic agent to reduce pain associated with ciliary spasm.
10. Note that topical steroids are not recommended because of the potential for delayed epithelial healing.
11. Patch the affected eye for 12 hours, and then remove the patch to inspect the eye. If total resolution has not occurred, replace the patch for another 12 hours.
Prevention
1. Wear sunglasses that block more than 99% of UV type B light.
2. Add side shields to sunglasses to prevent reflected UV light from striking the cornea.
3. Always carry spare sunglasses.
4. Create a makeshift shield by cutting narrow horizontal slits in a piece of cardboard, foam padding, or duct tape and securing this over the eyes.
Subconjunctival Hemorrhage
This condition is usually caused by local trauma, coughing, or straining.
Hyphema
Treatment
1. Allow the patient to rest in an upright (e.g., sitting) position.
3. No near work (i.e., avoid the accommodative pupillary response).
4. Place shield over eye; do not patch.
5. Instill an intermediate- to long-acting mydriatic-cycloplegic agent.
6. Consider acetazolamide 250 PO qid if available.
7. Do not give aspirin or NSAIDs.
8. If the hyphema is large, arrange for immediate evacuation. A small hyphema may be better treated with rest, avoiding high physical exertion and jostling associated with evacuation.
9. History of sickle cell trait or disease worsens the prognosis and so evacuation of the patient is recommended.
Retrobulbar Hemorrhage
1. Grossly limited EOM with proptosis suggests acute orbital inflammation or retrobulbar hemorrhage.
2. Retrobulbar hemorrhage is usually accompanied by periorbital ecchymosis and subconjunctival hemorrhage following trauma.
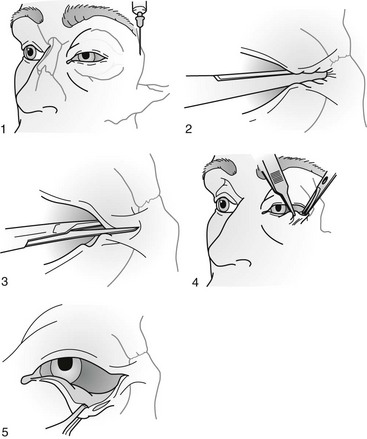
3. This is an emergency, so the patient should be evacuated immediately. If evacuation is impossible and evolving orbital compartment syndrome is suspected, consider lateral canthotomy (Fig. 32-4).
Ruptured Globe
Signs and Symptoms
1. History of significant trauma or projectile injury
2. Reduced vision, pain (see Examination of Vision, earlier)
3. Pupil appears distorted and teardrop shaped, pointing toward the rupture.
4. An abnormal anterior chamber (either shallow or deep compared with the contralateral eye)
5. Significant conjunctival hemorrhage or with dark specks of uveal tissue underneath
Treatment
3. Elevate the patient’s head to decrease IOP.
4. Cover the eye with a cup or improvised shield to avoid any pressure on the globe.
5. Avoid any activities (including further ocular examination) that may cause the patient to blink excessively or to strain.
6. Administer a systemic antibiotic such as levofloxacin 500 mg PO bid or ciprofloxacin 750 mg PO bid, or a third-generation injectable cephalosporin, such as ceftriaxone 1 g IV q12h.
7. If an extended evacuation is necessary and a small puncture wound can be identified, consider applying a drop or two of superglue to the wound. Although this is a radical maneuver, uninterrupted loss of aqueous or vitreous would otherwise result in permanent blindness.
Refractive Changes at Altitude after Refractive Surgery
1. Acute hyperopic shift has been reported in persons who have had radial keratotomy (RK) and then experienced altitude exposure.
2. The effect of altitude exposure on post-RK eyes is most likely caused by hypoxia rather than by decreased pressure.
3. Breathing a normoxic inspired gas mix does not protect against the development of hypoxic corneal changes.
4. The effect of the post-RK hyperopic shift seen at altitude depends on the postoperative refractive state (undercorrected patients may actually have their vision improve) and the accommodative abilities of the individual.
5. Individuals who have undergone RK and plan to undertake an altitude exposure of 2743 m (9000 ft) or higher while mountaineering should bring multiple eyeglasses with increasing plus lens power.
6. Reports have noted mild myopic shifts at altitude in some individuals after LASIK.