CHAPTER 18 Vertical infraclavicular block
Clinical anatomy
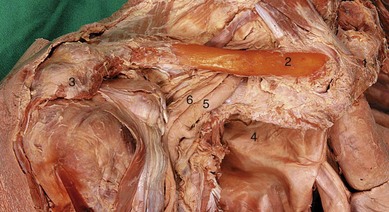
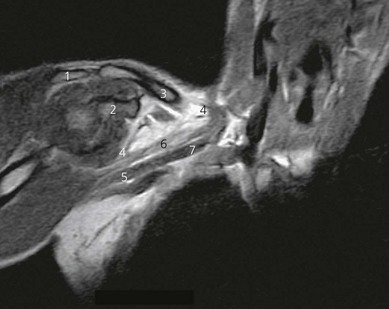
The brachial plexus passes behind the clavicle to enter the axilla. Here it lies laterally to the subclavian vessels and dome of the lung (Fig. 18.1). Above the clavicle, the trunks have formed divisions that continue to form the cords of the plexus in the axilla.
Surface anatomy
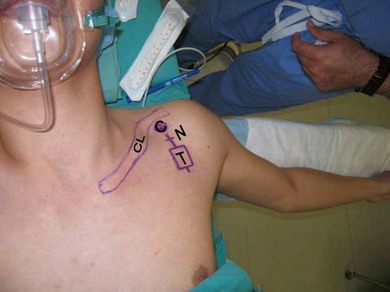
Important bony landmarks are the clavicle, anterior aspect of the acromion, the suprasternal notch, and the spine of the scapula. The distance between the suprasternal notch and anterior aspect of the acromion is measured and divided equally to find the needle insertion point, inferior to the clavicle (Fig. 18.2). Recent studies have shown that the optimal site in females may be 0.8 cm lateral to the midpoint. In adults, this distance is usually greater than 17 cm. A healed fractured clavicle will change the relations of this insertion point and is thus a relative contraindication for performing this block without ultrasound.
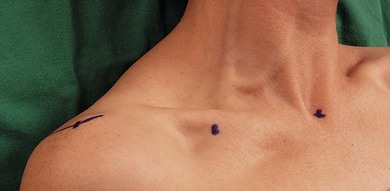
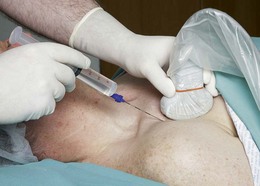
The needle insertion point is lateral to the apex of the lung (Fig. 18.3). This can be confirmed by palpating the subclavian artery both above the clavicle and medial to the needle insertion point.
Sonoanatomy
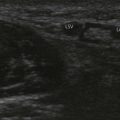
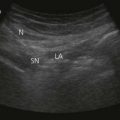
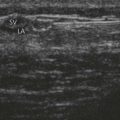
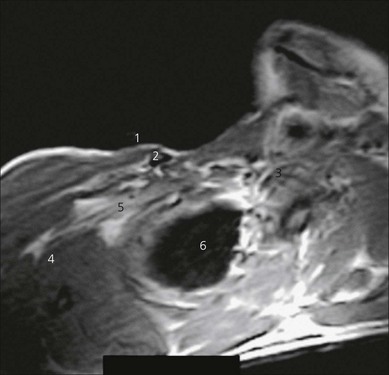
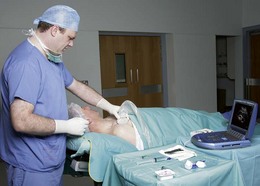
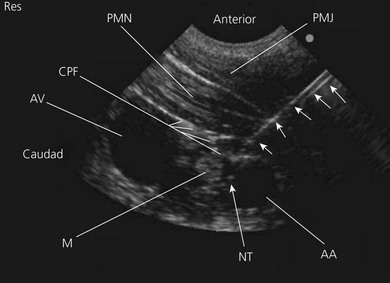
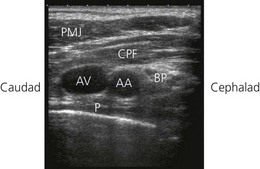
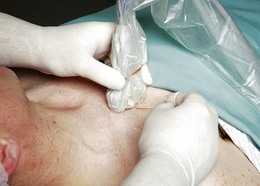
The ultrasound-guided infraclavicular technique is performed over the pectoral region. In view of the increased depth at which the brachial plexus is found at this level with respect to other techniques, the ultrasound transducer should be of lower frequency (4–7 MHz). Scanning is performed laterally in proximity to the coracoid process (Fig 18.4). The ultrasound transducer (curvilinear, held in a sagittal orientation) is placed near the lower edge of the clavicle, and a transverse view (parasagittal plane) of the axillary artery and vein is obtained (Fig 18.5). A good alternative is to use a small curved transducer for infraclavicular scanning since it provides a wider field of view and more space for needle insertion. However, phased array or linear transducers can also be used. Care should be used not to apply too much downward pressure on the transducer, which may occlude the axillary vein. The Doppler options facilitate identification of the vascular structures.
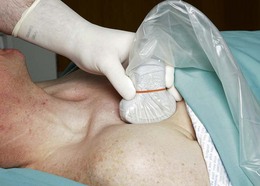
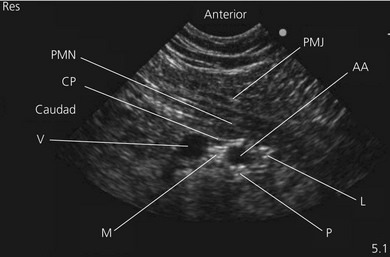
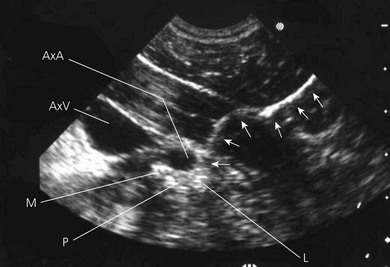
Perform a systematic anatomical survey from superficial to deep. The pectoralis major and minor muscles are most superficial and easily identified. Identify the axillary artery and vein deep to the pectoralis minor muscle. The vein is almost always caudad to the artery. Look for hyperechoic nerve structures around the axillary artery. Hyperechoic density posterior to the axillary artery can be due to ‘acoustic enhancement’, an artifact generated when the ultrasound beam crosses a vessel with little acoustic impedance. Angle (tilt) the transducer slightly in the parasagittal plane to check if this hyperechoic structure stays in the same location. If it does not, this is not likely to be a nerve structure. The pleura or chest wall is identified as a hyperechoic fine line outlining the anechoic lung tissue if the transducer is moved medially. It can be seen to move with respiration. The plexus is usually found at a depth of 2–6 cm. The cords of the plexus are located adjacent to the artery in medial, lateral and posterior positions (Fig 18.5). Upper limb position does influence these relationships. Arm abduction to 90° will bring the three cords closer together and will enhance nerve visualization. The pectoralis major, pectoralis minor muscles and clavipectoral fascia are visualized and further identified by appropriate resisted movements.
Technique
Landmark-based approach
The patient is placed supine, with the upper arm at the side of the body and the hand resting on the abdomen; the head is rotated slightly to the opposite side. The needle insertion site is anesthetized. A 50-mm 21-G insulated needle is used. The stimulating current is set at 1 mA, 2 Hz, and 0.1 ms. The needle is advanced vertically, perpendicular to the patient trolley rather than to the chest wall (Fig. 18.6), until the appropriate muscle response is obtained. The needle position is adjusted while reducing the current to 0.35 mA with maintenance of the muscle response.
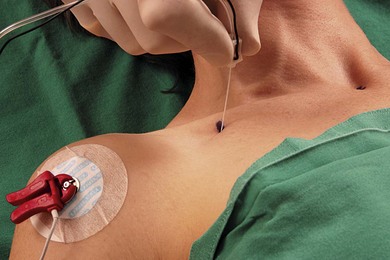
The plexus is usually found at a depth of 2–4 cm. Incremental injection of local anesthetic is made with repeated aspiration. For this block, 40 mL of local anesthetic is sufficient (Fig. 18.7).
Ultrasound-guided approach
Intravenous access, ECG, pulse oximetry and blood pressure monitoring are established. The patient lies supine, with the upper limb abducted at 90° to the body. This moves the plexus away from the chest wall and the needle advanced in the sagittal plane is unlikely to encounter the rib cage. It also makes the plexus more compact. The head is rotated slightly to the opposite side. The operator stands on the side to be blocked, at the head of the patient (Fig 18.8). The ultrasound screen should be placed on the side of the block below the shoulder.
The deltopectoral region is scanned with a 4–7 MHz ultrasound transducer. Developing and maintaining a predetermined basic scanning routine is of enormous help in improving operator confidence and success. Start scanning on a line drawn from the mid-clavicular point to the axillary pulse to obtain an image of the axillary artery and vein. Adjustable ultrasound variables such as scanning mode, depth of field, and gain are optimized. Move the transducer cephalad or caudad to bring the axillary artery to the centre of the image. Then start sliding the transducer laterally while maintaining the axillary artery in the centre of the image to a point when the three cords wrap around the artery on three sides. If you go further laterally, two branches from the medial and lateral cords are seen lying anterior to the axillary artery, and further laterally, they join to form the median nerve. The outline of the ultrasound transducer is marked on the skin (Fig 18.9).
The skin is disinfected with antiseptic solution and draped. A sterile sheath (CIVCO Medical Instruments, Kalona, IA, USA) is applied over the ultrasound transducer with sterile ultrasound gel (Aquasonic, Parker Laboratories, Fairfield, NJ, USA). Another layer of sterile gel is placed between the sterile sheath and the skin. A skin wheal of local anesthetic is raised at a distance from the transducer to facilitate sterility and allow a shallow angle of approach to improve needle visualization. The needle entry site is 1–2 cm cephalad to the final curvilinear transducer position (Fig 18.10). A 25-gauge needle is advanced under real-time ultrasound guidance and local anesthetic is deposited along the needle entry path. A 17-G Tuohy needle is used in a free-hand technique. This needle is chosen as it gives good tissue feel and has advantages for ultrasound visualization. The needle without stylet is connected to sterile extension tubing attached to a stopcock and two 20-mL syringes, and flushed with local anesthetic to remove all air from the system.
The Tuohy needle is introduced and not advanced until visualized. This may require needle or transducer adjustment. Advance the needle at a 45–60° angle from the cephalad end of the ultrasound transducer along its long axis in the caudad direction. The goal is to deposit local anesthetic around all three cords of the brachial plexus. Local anesthetic injected posterior to the axillary artery resulting in a U shape spread around the artery is associated with complete blockade of the arm, forearm and hand (Fig. 18.11). Consistent success is associated with local anesthetic spread posterior to the axillary artery and a radial nerve type stimulation, while inconsistent block is associated with spread anterior to the axillary artery and a median nerve type stimulation. In practice, it is best to inject the first 10–15 mL of local anesthetic posterior to the artery in the 6 o’clock position (posterior cord). Then inject further as the needle is withdrawn to the 9 o’clock position (lateral cord). If spread to the 3 o’clock position it is deemed inadequate; it may be necessary to separately place the block needle between the axillary artery and vein to access the medial cord.
A more medial approach to the one described above can also be used. In this approach, the plexus is arranged above the subclavian artery as it passes beneath the clavicle (Fig 18.12). The pleura will be in the scanning field and the pectoralis minor muscle will not be seen. A short axis approach can be used here (Fig 18.13). Aiming in a medial to lateral orientation is probably safer in trying to avoid the pleura.
Continuous technique
The position of the catheter tip is confirmed by injecting 1–2 mL of air and observing its echodense spread around the posterior cord (Fig 18.14). A multi-orifice catheter should not be used, as the local anesthetic will flow preferentially from an orifice located in low resistance tissue.
Adverse effects
Clinical pearls
Landmark- based approach
Arcand G, Williams SR, Chouinard P, et al. Ultrasound-guided infraclavicular versus supraclavicular block. Anesth Analg. 2005;101(3):886-890.
Bigeleisen P, Wilson M. A comparison of two techniques for ultrasound-guided infraclavicular block. BJA. 2006;96(4):502-507.
Greher M, Retzel G, Niel P, et al. Ultrasonographic assessment of topographic anatomy in volunteers suggests a modification of infraclavicular vertical brachial plexus block. BJA. 2002;88(5):632-636.
Kilka HG, Geiger P, Mehrkens HH. Die vertikale infraklavikulare Blockade des Plexus brachialis. Anaesthesist. 1995;44:339-344.
Klaastad O, Lilleas FG, Rotnes JS, et al. A magnetic resonance imaging study of modifications to the infraclavicular brachial plexus block. Anesth Analg. 2000;91:929-933.
Sandhu NS, Manne JS, Medabalmi PK, et al. Sonographically guided infraclavicular brachial plexus block in adults: a retrospective analysis of 1146 cases. J Ultrasound Med. 2006;25(12):1555-1561.