[level-membership-for-surgery-category]
CHAPTER 16 Ventral incisional hernia
Step 1. Surgical anatomy
♦ Ventral hernia repair is a common operation in the United States. With the realization that mesh is more durable than primary closure alone, fascial defects greater than 3 cm are often repaired with mesh reinforcement. More and more, the laparoscopic approach has gained popularity.
♦ The laparoscopic approach may lessen the morbidity by avoiding a laparotomy and lowering the incidence of hernia recurrence by providing wide mesh coverage of the defect. Additionally, direct laparoscopic visualization of the abdominal cavity can help the surgeon to identify “Swiss cheese” multiple fascial defects.
Step 2. Preoperative considerations
Patient preparation
♦ Because the risk of recurrence is relatively high for these procedures, not all hernias need to be repaired when discovered. Elective repair should be considered for patients who have pain or in whom the hernia has enlarged over time.
♦ Patients who have severe pain may need urgent or even emergent surgery to prevent strangulation of bowel. Sharp pain or peritoneal signs suggest the possibility of bowel strangulation or necrosis.
♦ Laparoscopic ventral hernia repair requires the use of general anesthesia. Patients need to undergo appropriate preoperative evaluation to determine their ability to tolerate the procedure.
♦ A computed tomography (CT) scan may be useful to confirm the diagnosis of hernia or to delineate the size of the hernia when physical exam is difficult, such as in obese patients.
Equipment and instrumentation
♦ Standard laparoscopic instrumentation is required, including scissors and atraumatic graspers.
♦ For access, we prefer using a Veress needle and an optical trocar with a 0-degree endoscope.
♦ Once the procedure is underway, it is helpful to use a 5-mm, 30-degree endoscope to allow viewing through any of the 5-mm ports. At least one larger port will be required to introduce the mesh into the abdominal cavity.
♦ Equipment for hemostasis is necessary even though it is used sparingly. It can be helpful to have electrocautery and clip appliers, and in some cases, ultrasonic coagulation can be used for vessel ligation and hemostasis.
Anesthesia
♦ Sequential compression devices should be placed and subcutaneous heparin should be given for thromboembolic prophylaxis preoperatively.
♦ Intravenous antibiotics, usually a first-generation cephalosporin, should be administered prophylactically to cover skin flora. Broader coverage for gram-negative organisms may be added in case of an enterotomy.
♦ Although formal bowel prep is usually not necessary, a bowel prep may be elected at the surgeon’s discretion when a difficult lysis of adhesions is anticipated.
♦ After induction of anesthesia, the stomach and bladder are decompressed with an orogastric and urinary catheter, respectively.
♦ The abdomen is scrubbed and painted with Betadine. The patient’s abdomen may then be covered with Ioban barrier to limit the mesh contact with skin.
Room setup and patient positioning
♦ The patient is placed in the supine position with arms tucked to facilitate a greater range of movement for the surgeon and assistant around the operative table.
♦ The surgeon usually stands on the patient’s right side with an assistant on the opposite side.


Step 3. Operative steps
Access and port placement
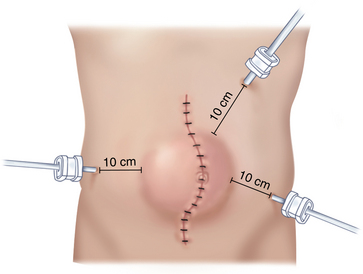
♦ Pneumoperitoneum can be achieved with either an open or closed technique, but the initial incision should be at least 10 cm away from the closest margin of the defect.
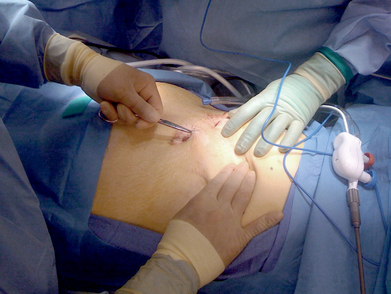
♦ For a midline abdominal incisional hernia, we will often start with a Veress needle in the left subcostal location. After drop test and insufflation with carbon dioxide to create a pneumoperitoneum, we use a 12-mm optical trocar Visiport (Covidien, Mansfield, Massachusetts) for initial access. This is placed far from the midline incision and the hernia (Figure 16-1).
♦ After assuring there is no iatrogenic injury with a straight scope, we will switch to an angled scope (30 or 45 degrees) to achieve better visualization. Two subsequent 5-mm ports should be placed under direct visualization in the right and left flanks. While a 5-mm scope can allow viewing from all ports, at least one larger port will be required to introduce the mesh into the abdominal cavity.
♦ Ports positioned too close to the hernia may affect visualization and access to the hernia.
Reduce hernia contents
♦ Sometimes the hernia will reduce completely with only gentle external pressure on the anterior abdominal wall. More commonly, external pressure aids the dissection. For difficult cases, additional 5-mm ports may be required to achieve adequate countertraction during dissection.
♦ We limit use of electrocautery and the Harmonic scalpel in an effort to reduce the chance of inadvertent intestinal burn injury. We will reduce enough of the abdominal wall adhesions to allow the wide mesh overlap of the hernia defect.
♦ In general, we do not excise or invert the hernia sac at operation, but we do discuss with patients preoperatively the likelihood of a postoperative seroma.
Placing the mesh
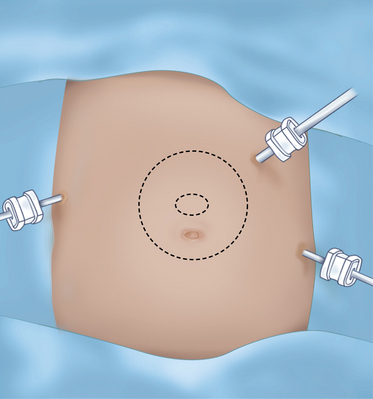
Once the size of defect is carefully estimated, we generally choose a mesh that allows a 4-cm mesh overlap of the fascial defect (Figure 16-2).
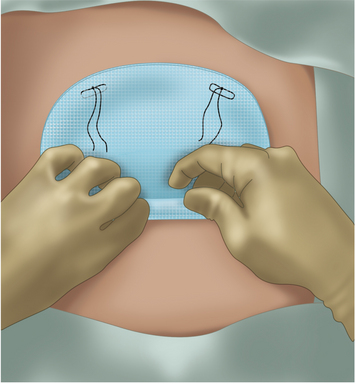
♦ We prefer the dual-sided mesh, which promotes healing against the abdominal wall but retards adhesions to its inner surface toward the bowel.
♦ The mesh is prepared with sutures placed at each corner with 0-Prolene suture. Larger meshes will require additional sutures, and we will use a white Gore suture to help distinguish its tails from the blue Prolene corner sutures.
♦ The lateral edges of the mesh are then rolled inward like a scrolled letter. The mesh is then inserted through the 12-mm port site. Alternatively, the mesh can also be delivered by using a grasper from a separate port site to pull it into the abdomen (Figure 16-3).
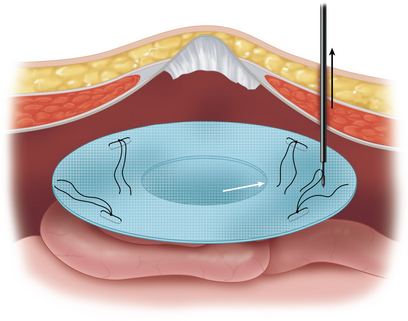
♦ For larger meshes, the 12-mm port can be removed, and the rolled mesh is directly passed through the abdominal wall port site.
Fixing the mesh to the wall
♦ The mesh is unrolled ensuring that the porous side is facing the abdominal wall and the smooth side of mesh faces the bowel beneath (Figure 16-4).
♦ A 2-mm incision is made on the skin at one of the corner points marked on the patient’s abdomen.
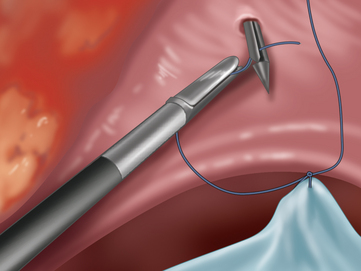
 The tails of the corresponding suture are then pulled up through the abdominal wall using a fascial closure device. The sutures are not tied until is it certain that the defect is well covered and that the mesh will lay flat (Figure 16-5).
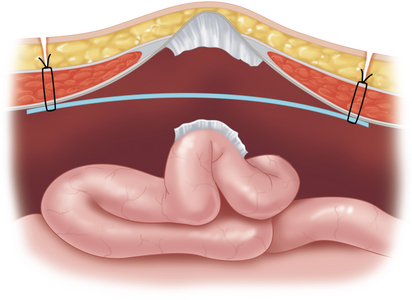
 Once the mesh can be pulled taut and adequate coverage is ensured, the sutures are tied in the subcutaneous tissue to provide four-point transabdominal fixation (Figure 16-6).
♦ After suture fixation is achieved, the mesh is stapled to the abdominal wall using a 5-mm spiral tacking device. The insufflation pressure is decreased to 12 mmHg and external manual counter pressure is applied to the abdominal wall so the stapler fires straight into the abdominal wall.
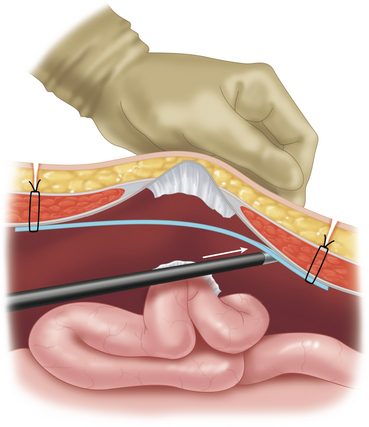
 The tacks are placed at 1- to 2-cm intervals at the edge of the mesh to prevent small bowel from slipping between the mesh and the abdominal wall. Until recently, spiral tacks have been made of titanium. New tacks are made of synthetic materials and will absorb over time. The absorbable tacks are currently reserved for mesh less than 1 mm in thickness (Figure 16-7).

Step 4. Postoperative steps
♦ The orogastric tube and bladder catheter are removed in the operating room.
♦ Patients can be started on a regular diet after the operation, but if extensive bowel manipulation and adhesiolysis were done during the operation, the surgeon may prefer to keep the patient NPO with a nasogastric tube until bowel function returns.
♦ Antibiotics are continued for 24 hours, and heparin is continued until the patient is ambulatory unless the patient’s comorbidities demand more prolonged therapy.
♦ For pain control, we favor narcotic patient controlled analgesia (PCA).
♦ We routinely place an abdominal binder for 1 month to help reduce seroma formation.
♦ Patients usually return to light duty within 1 week and resume full activity in 3 to 4 weeks.
Step 5. Pearls and pitfalls
Patients with defects near the costal margin
♦ Tacking to the diaphragm should be avoided because of the pain it will cause and the fact that it will likely only result in injury to the diaphragm without much enhancement of the mesh’s fixation.
♦ Transfascial sutures will not be possible here and attempts to suture between the ribs should also be avoided as they may lead to pleural effusions.
♦ To help achieve adequate coverage, the falciform ligament is divided up to the bare area of the liver.
♦ The mesh is then placed between the liver and abdominal wall. It is fixated by tacking to the costal margin bony structures in as few areas as possible, with the goal of orienting the mesh to lie flat against the abdominal wall.
♦ Care should be taken to avoid injury to the infracostal neurovascular bundle.
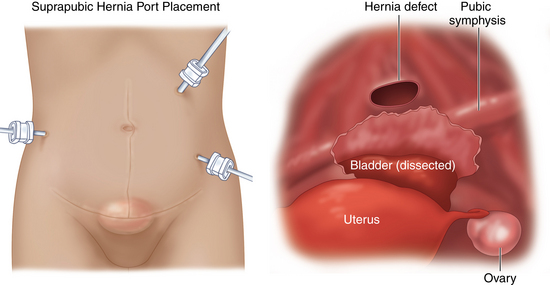
Patients with defects in the pelvic region
To achieve adequate caudal coverage of the hernia, we recommend several additional steps:
♦ First, we dissect the urinary bladder away from the anterior abdominal wall. To do this we place a three-way stopcock on the catheter to inflate and deflate the bladder. This will define the bladder and help avoid injury to the bladder (Figure 16-10).
♦ Once the bladder is dissected, it is retracted posteriorly and the pubic symphysis and Cooper’s ligaments are identified. The inferior edge of the mesh is then placed in this retropubic space and can be secured to Cooper’s ligaments laterally with nonabsorbable spiral tacks.
♦ In the midline, the mesh is sutured to the anterior abdominal wall using a transfascial technique or an intracorporeal technique if the surgeon doesn’t feel a transfascial stitch is possible.
Turner PL, Park AE. Laparoscopic repair of ventral incisional hernias: pros and cons. Surg Clin of No Amer. 2008;88;1:85-100.
Varghese TK, Wu A, Murayama K. Ventral hernia repair. Jones DB, Wu J, Soper NJ, editors. Laparoscopic Surgery: Principles and Procedures, ed 2. New York: Marcel Dekker. 2004:159-170.
Saber AA, Rao AJ, Itawi EA, et al. Occult ventral hernia defects: a common finding during laparoscopic ventral hernia repair. Am J Surg. 2008;195;4:471-473.
Scott D, Jones DB. Hernias and abdominal wall defects. In: Norton JA, Bollinger RR, Chang AE, et al, editors. Surgery Scientific Basis and Current Practice. New York: Springer-Verlag; 2008:1133-1178.
[/level-membership-for-surgery-category][not-level-membership-for-surgery-category]
CHAPTER 16 Ventral incisional hernia
Step 1. Surgical anatomy
♦ Ventral hernia repair is a common operation in the United States. With the realization that mesh is more durable than primary closure alone, fascial defects greater than 3 cm are often repaired with mesh reinforcement. More and more, the laparoscopic approach has gained popularity.
♦ The laparoscopic approach may lessen the morbidity by avoiding a laparotomy and lowering the incidence of hernia recurrence by providing wide mesh coverage of the defect. Additionally, direct laparoscopic visualization of the abdominal cavity can help the surgeon to identify “Swiss cheese” multiple fascial defects.
Step 2. Preoperative considerations
Patient preparation
♦ Because the risk of recurrence is relatively high for these procedures, not all hernias need to be repaired when discovered. Elective repair should be considered for patients who have pain or in whom the hernia has enlarged over time.
♦ Patients who have severe pain may need urgent or even emergent surgery to prevent strangulation of bowel. Sharp pain or peritoneal signs suggest the possibility of bowel strangulation or necrosis.
♦ Laparoscopic ventral hernia repair requires the use of general anesthesia. Patients need to undergo appropriate preoperative evaluation to determine their ability to tolerate the procedure.
♦ A computed tomography (CT) scan may be useful to confirm the diagnosis of hernia or to delineate the size of the hernia when physical exam is difficult, such as in obese patients.
Equipment and instrumentation
♦ Standard laparoscopic instrumentation is required, including scissors and atraumatic graspers.
♦ For access, we prefer using a Veress needle and an optical trocar with a 0-degree endoscope.
♦ Once the procedure is underway, it is helpful to use a 5-mm, 30-degree endoscope to allow viewing through any of the 5-mm ports. At least one larger port will be required to introduce the mesh into the abdominal cavity.
♦ Equipment for hemostasis is necessary even though it is used sparingly. It can be helpful to have electrocautery and clip appliers, and in some cases, ultrasonic coagulation can be used for vessel ligation and hemostasis.
Anesthesia
♦ Sequential compression devices should be placed and subcutaneous heparin should be given for thromboembolic prophylaxis preoperatively.
♦ Intravenous antibiotics, usually a first-generation cephalosporin, should be administered prophylactically to cover skin flora. Broader coverage for gram-negative organisms may be added in case of an enterotomy.
♦ Although formal bowel prep is usually not necessary, a bowel prep may be elected at the surgeon’s discretion when a difficult lysis of adhesions is anticipated.
♦ After induction of anesthesia, the stomach and bladder are decompressed with an orogastric and urinary catheter, respectively.
♦ The abdomen is scrubbed and painted with Betadine. The patient’s abdomen may then be covered with Ioban barrier to limit the mesh contact with skin.
Room setup and patient positioning
♦ The patient is placed in the supine position with arms tucked to facilitate a greater range of movement for the surgeon and assistant around the operative table.
♦ The surgeon usually stands on the patient’s right side with an assistant on the opposite side.
Step 3. Operative steps
Access and port placement
♦ Pneumoperitoneum can be achieved with either an open or closed technique, but the initial incision should be at least 10 cm away from the closest margin of the defect.
♦ For a midline abdominal incisional hernia, we will often start with a Veress needle in the left subcostal location. After drop test and insufflation with carbon dioxide to create a pneumoperitoneum, we use a 12-mm optical trocar Visiport (Covidien, Mansfield, Massachusetts) for initial access. This is placed far from the midline incision and the hernia (Figure 16-1).
♦ After assuring there is no iatrogenic injury with a straight scope, we will switch to an angled scope (30 or 45 degrees) to achieve better visualization. Two subsequent 5-mm ports should be placed under direct visualization in the right and left flanks. While a 5-mm scope can allow viewing from all ports, at least one larger port will be required to introduce the mesh into the abdominal cavity.
[/not-level-membership-for-surgery-category]
