Vaginal Hysterectomy
Simple Vaginal Hysterectomy
When hysterectomy is indicated, the most appropriate route of removal of the uterus must be chosen. Hysterectomy can be performed transvaginally, abdominally, laparoscopically, or with laparoscopic assistance. The decision to proceed with a vaginal hysterectomy depends on numerous factors. These include the surgeon’s training and comfort level with the procedure, the size and mobility of the uterus, the presence of pelvic relaxation, and the benign or malignant nature of the condition. In general, vaginal hysterectomy is less morbid and results in a quicker recovery time than an abdominal or laparoscopy-assisted approach. In contrast to abdominal hysterectomy, vaginal hysterectomy is limited by the size and particularly the mobility of the uterus and by the capacity and elasticity of the vagina. Both are relative criteria because a large uterus can be morcellated, and a narrow vagina can be enlarged with an episiotomy.
Vaginal hysterectomy begins with appropriate positioning of the patient. Vaginal hysterectomy is performed with the patient in the dorsal lithotomy position with her feet in “candy-cane” stirrups. The patient’s buttocks should extend slightly over the edge of the table so that a posterior retractor can be placed easily. The thighs are somewhat abducted and the hips flexed (Fig. 53–1). Excessive flexion and abduction of the thighs should be avoided, as this can lead to position-induced nerve injuries. The lateral aspects of the legs should be clear of the stirrups to avoid pressure on the peroneal nerve. The urinary bladder is then emptied with a catheter, and the vaginal area is prepped in a normal fashion. Examination under anesthesia is performed to confirm the degree of uterine descensus, the width of the vaginal outlet, and the presence or absence of pelvic pathology.
Surgical Technique
1. With a speculum depressing the posterior vaginal wall, the anterior vaginal wall is lifted with a Dever or Haney retractor. The cervix is grasped with two single-toothed tenacula, and downward traction is placed on the cervix.
Vasoconstrictors such as vasopressin (Pitressin), phenylephrine (Neo-Synephrine), or epinephrine may be injected into the paracervical tissue if no medical condition, such as hypertension or heart disease, contraindicates their use. We prefer to use a prepared solution of 1% or 2% lidocaine or 0.5% bupivacaine with 1 : 200,000 epinephrine. Use of these ready-made solutions negates the need for mixing in the operating suite and provides some preemptive analgesic at the surgical site. The surgeon should remember that the maximum amount of lidocaine with epinephrine used should not exceed 7 mg/kg or 500 mg total in the healthy adult, whereas the amount of bupivacaine with epinephrine generally should not exceed 225 mg. The total dosage for vaginal hysterectomy is usually 5 to 10 mL of injection. Should a medical contraindication to the use of vasopressors be present, injectable saline provides the benefits of hydrodistention without the cardiovascular risks.
A knife or electrosurgical instrument is used to make the initial incision through the vaginal mucosa (Fig. 53–2). The position and depth of this incision are very important because they determine access to appropriate planes that will lead to the anterior and posterior cul-de-sacs. The appropriate location of the incision is at the site of the bladder reflection, which is indicated by a crease formed in the vaginal mucosa when the cervix is pushed slightly inward. If this location cannot be identified, one should make the incision low rather than high to avoid potential bladder injury. A circumferential cervical incision is accomplished (Fig. 53–3). Downward traction of the tenaculum and countertraction by the retractors help to determine the appropriate depth of the incision (Fig. 53–4). The incision should be continued down to the cervical stroma. Once the appropriate depth of the incision is reached, the vaginal tissue will fall away from the underlying cervical tissue because there is a distinct plane between these two tissues (Figs. 53–5 and 53–6).
2. The vagina is mobilized both anteriorly and posteriorly. Once the appropriate plane has been reached, blunt dissection of the posterior vaginal wall will lead to the posterior cul-de-sac, which can be entered sharply (Figs. 53–7 and 53–8). Once the peritoneum has been entered, the posterior cul-de-sac is explored for adhesive disease or any other potential abnormalities that may lead to difficulty in performing the hysterectomy. A Haney or weighted retractor is then placed in the posterior cul-de-sac.
3. The uterus is pulled outward and somewhat to the opposite side. Half of an open Haney or similar clamp is introduced into the posterior cul-de-sac, and the uterosacral ligament is clamped (Fig. 53–9). The tip of the clamp is advanced as far caudally to the cervix as possible so that the parametrium included in the clamp follows the line between the anterior and posterior incisions of the vagina (Fig. 53–10). The pedicle then is cut with heavy scissors or a scalpel. The author prefers to ligate the pedicle with an absorbable suture, usually 0 Dexon or Vicryl, with a strong needle attached to it (Fig. 53–11). At times, bleeding from the posterior vaginal cuff may be encountered. This usually can be controlled with cauterization or a running interlocking suture. The cut pedicle is suture-ligated with a transfixing-type suture in which the needle enters the upper part of the ligament pedicle just slightly beyond the end of the Haney clamp. It is withdrawn and then reintroduced into the pedicle at its midpoint. These sutures are usually tagged for later identification of the uterosacral ligaments. The author prefers to alternate clamping of pedicles on opposite sides instead of clamping up one side of the uterus and then the other. This will gradually improve uterine mobility and exposure. Sharp dissection is used to mobilize the bladder more anteriorly off the cervix (Figs. 53–12 and 53–13). There is never a benefit in rushing to enter the anterior cul-de-sac. This will only lead to inadvertent cystotomies. No attempt should be made to enter the anterior cul-de-sac until the vesicouterine space has been developed. Once the bladder has been mobilized (Fig. 53–14), the cardinal ligament is clamped on each side (Fig. 53–15). This pedicle, which should include peritoneal tissue posteriorly, is sutured in a similar fashion to the uterosacral ligaments. However, the second pass through the ligament is actually made through the previous pedicle, thus obliterating any dead space between the two pedicles to decrease the potential for bleeding or tearing of tissue.
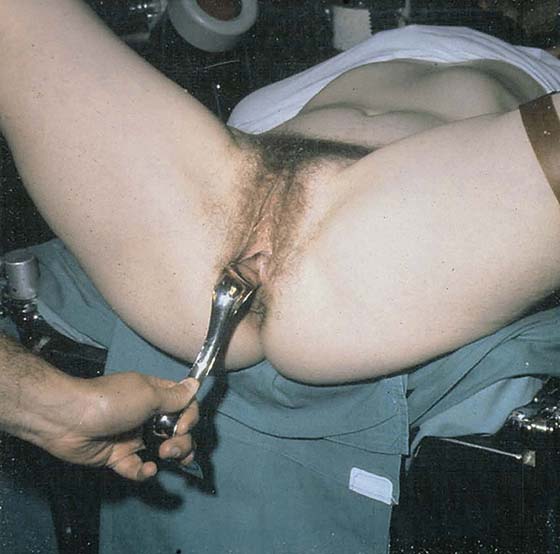
FIGURE 53–1 Proper positioning of the patient in high “candy-cane” stirrups in preparation for vaginal hysterectomy.
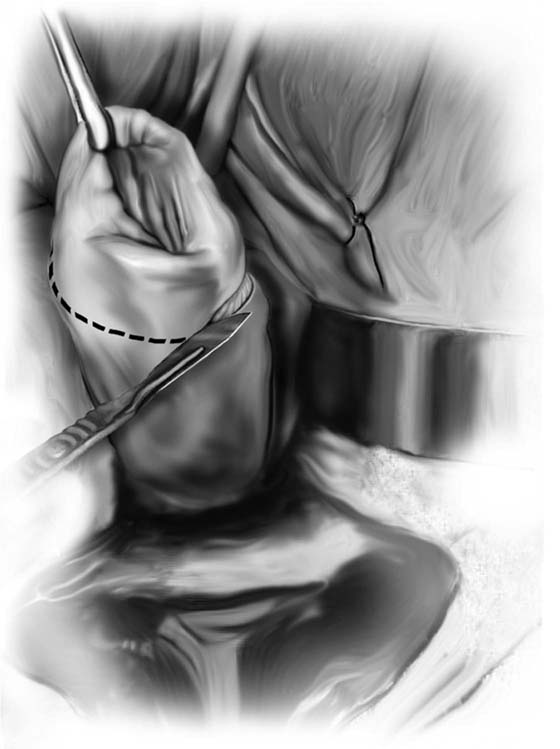
FIGURE 53–2 The initial incision begins circumferentially at the reflection of the vaginal mucosa onto the cervix. A scalpel or electrosurgical instrument can be utilized.
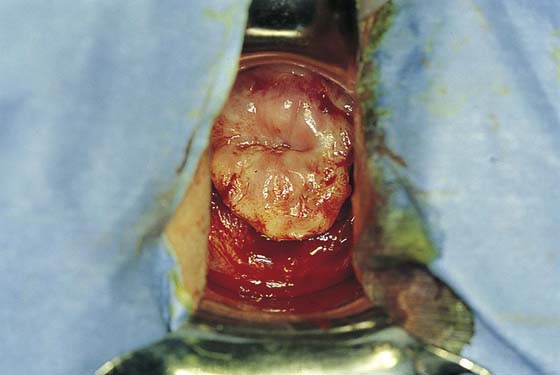
FIGURE 53–3 The circumferential incision has been made around the cervix.
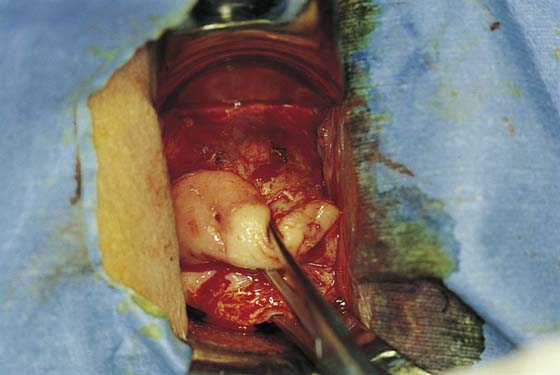
FIGURE 53–4 The appropriate depth of the initial incision is demonstrated on the anterior cervix.
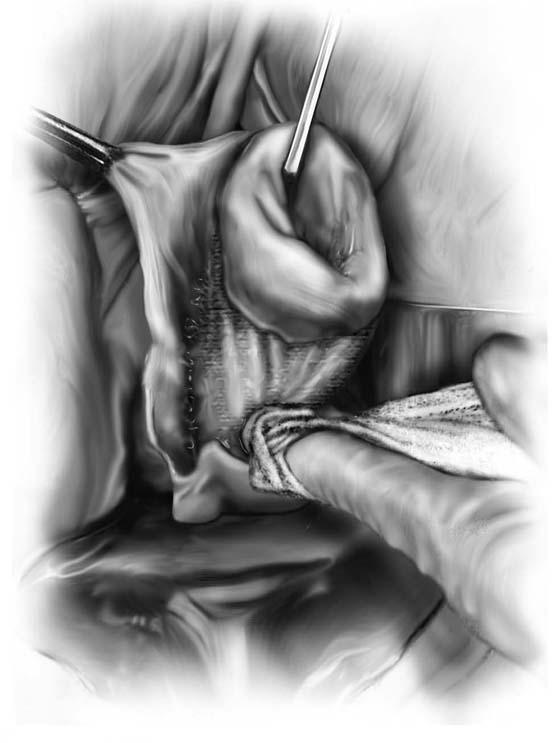
FIGURE 53–5 Once the appropriate plane is reached, blunt dissection will usually lead to the posterior peritoneal reflection.
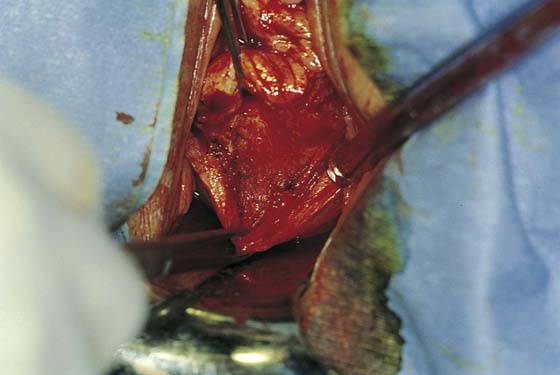
FIGURE 53–6 Dissection of the posterior vaginal wall off the back of the cervix.
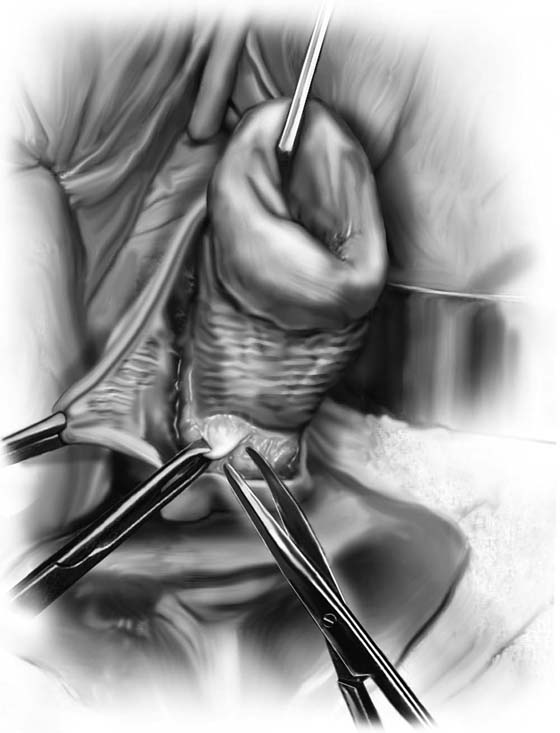
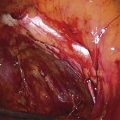
FIGURE 53–7 Sharp entrance into the posterior cul-de-sac.
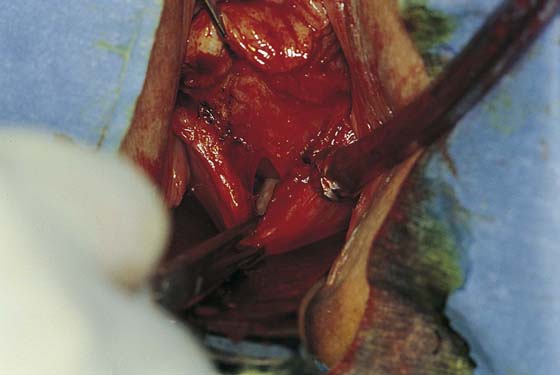
FIGURE 53–8 The posterior cul-de-sac has been entered.
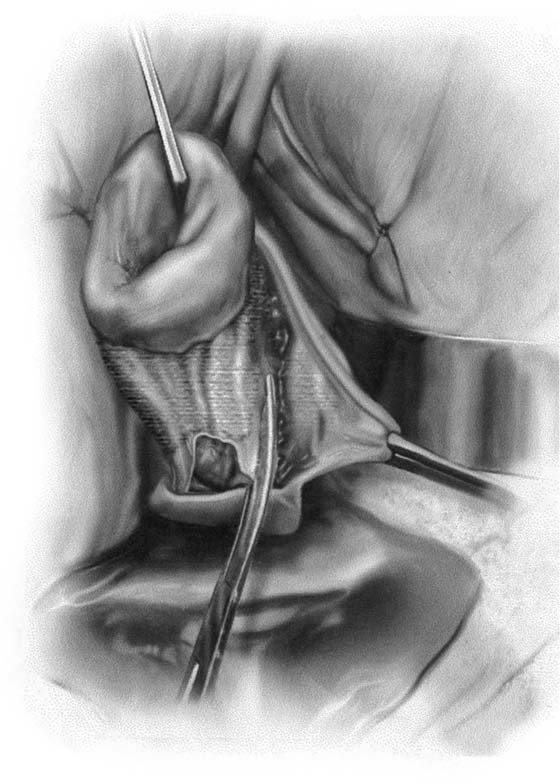
FIGURE 53–9 Clamping of the right uterosacral ligament.
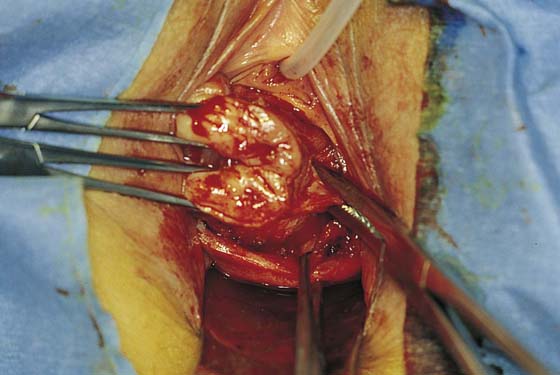
FIGURE 53–10 A Haney clamp is used to clamp the right uterosacral ligament.
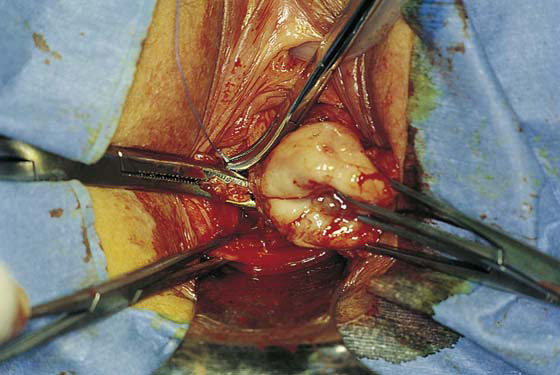
FIGURE 53–11 Passage of a 0 Vicryl suture through the tip of the Haney clamp after the left uterosacral ligament has been cut. Note that the clamp should be placed as perpendicular as possible to the cervix.
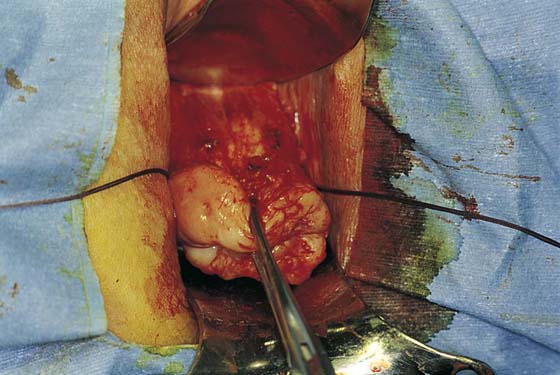
FIGURE 53–12 The vagina has been mobilized off the anterior cervix.
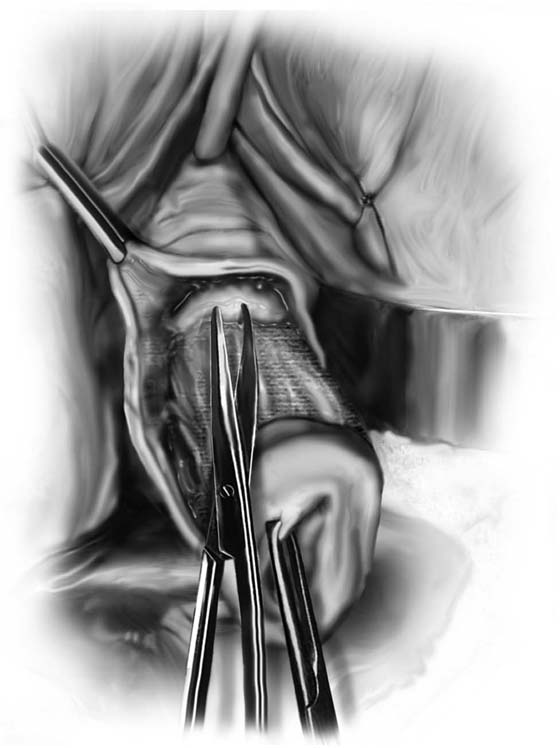
FIGURE 53–13 Sharp dissection is then needed to incise the pubocervical fascia to enter the vesicouterine space before the anterior cul-de-sac is entered.
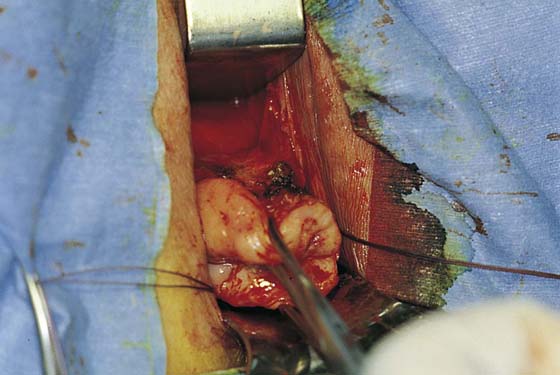
FIGURE 53–14 The vesicouterine space has been entered. This allows placement of a retractor anteriorly, which mobilizes the bladder off the anterior cervix and exposes the peritoneal reflection of the anterior cul-de-sac.
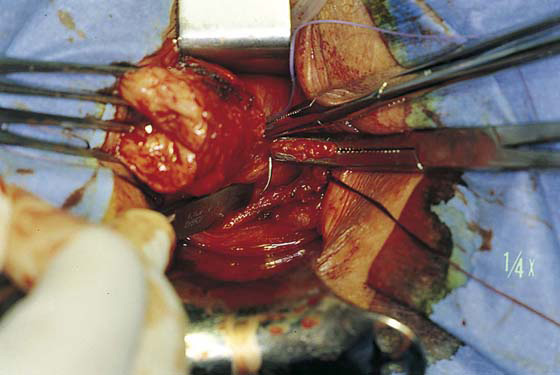
FIGURE 53–15 The cardinal ligament has been clamped and cut and is being sutured. This suture will incorporate the pedicle into the previous uterosacral ligament pedicle.
4. After the cardinal ligaments have been incised, a retractor is placed in the vesicouterine space to elevate the bladder off the uterus (see Fig. 53–14). If the anterior cul-de-sac is easily accessible, it can be entered at this time (Figs. 53–16 through 53–18). The next clamp, which probably will include the uterine vessels, should incorporate the anterior and posterior peritoneal reflections if the anterior cul-de-sac has been entered (Fig. 53–19). These clamps should be placed perpendicular to the longitudinal access of the cervix, and the tips of the clamps should completely slide off the cervix to ensure no inadvertent lateral migration and to avoid excessive bleeding or ureteral injury (see Fig. 53–19). As was previously mentioned, suturing of all pedicles involves passage of the needle through the tissue at the tip of the clamp and then a second pass through the previous pedicle. This will obliterate any dead space and eliminate potential bleeding between pedicles (Fig. 53–20). Extra care should be taken to avoid passage of the needle through a vessel because this may lead to the development of a retroperitoneal hematoma.
5. The uterus is then delivered anteriorly or posteriorly into the vagina (Fig. 53–21). The fundus is grasped with the tenaculum and pulled into the vagina. The utero-ovarian ligament is supported by the index finger on the opposite side, and a clamp is placed close to the uterus. The last pedicle usually includes the fallopian tube and the round and ovarian ligaments. At times, these may be taken with one clamp, but usually a clamp placed from below is required, as well as a clamp placed from above (Fig. 53–22). A finger should be maintained behind this pedicle to ensure that the clamps overlap posteriorly, and that no other tissue has been included in the clamp (Figs. 53–22 through 53–24). Once the final pedicles have been cut, the uterus is handed off to be sent to pathology. These pedicles are then doubly ligated. If one clamp has been used, a free tie is initially placed, followed by a suture-ligature. If two clamps have been used, each pedicle is individually ligated, and then a figure-of-8 suture is placed through both pedicles. These sutures are tagged, and at this time all pedicles are inspected to ensure hemostasis (Fig. 53–25). Because all pedicles have been sutured into the previous pedicle, no tearing or dead space between the pedicles should be noted (see Fig. 53–25).
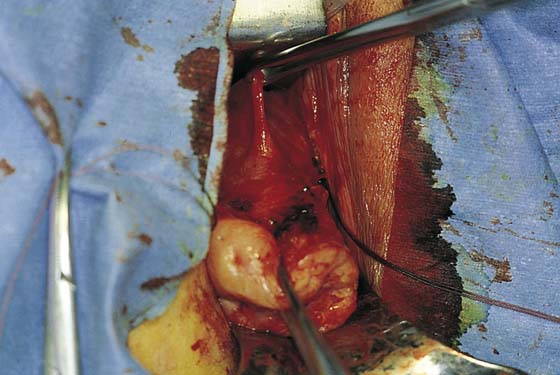
FIGURE 53–16 After the vesicouterine space has been entered, the anterior peritoneal reflection is usually easily accessible.
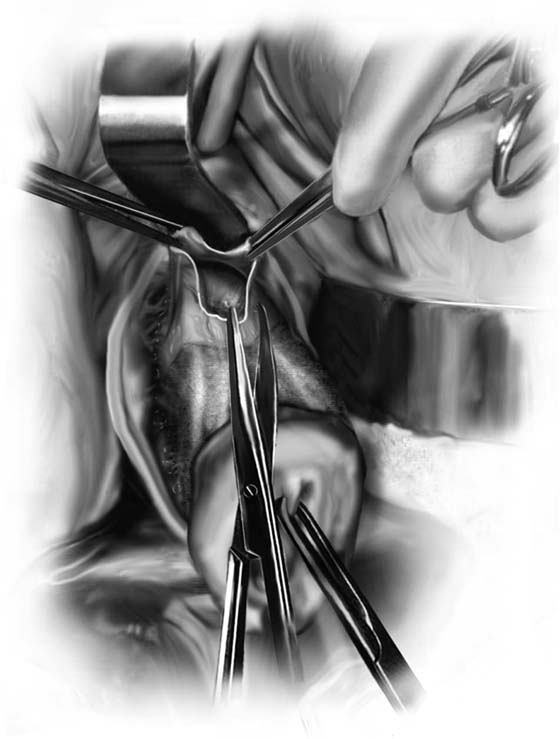
FIGURE 53–17 Sharp dissection into the anterior cul-de-sac.
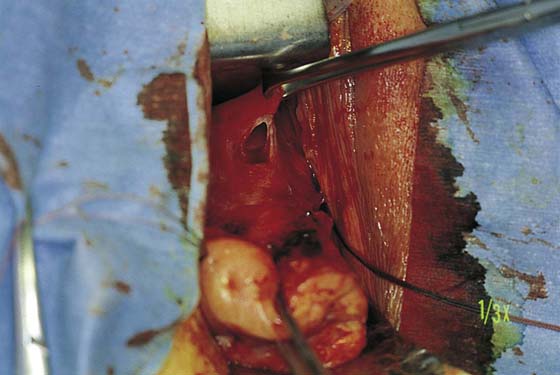
FIGURE 53–18 The anterior cul-de-sac has been entered.

FIGURE 53–19 Clamping of the uterine vessels. The clamp incorporates the peritoneal reflections of the anterior and posterior cul-de-sac. Note the placement of the clamp at a right angle to the cervix.
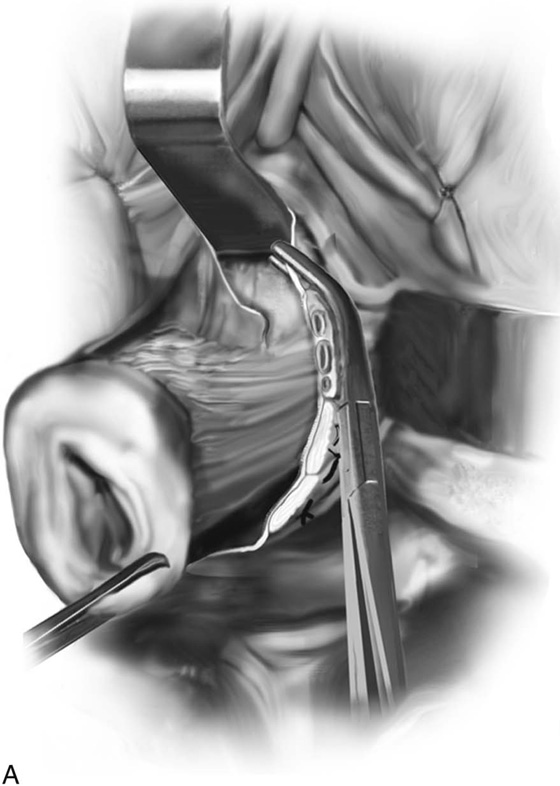
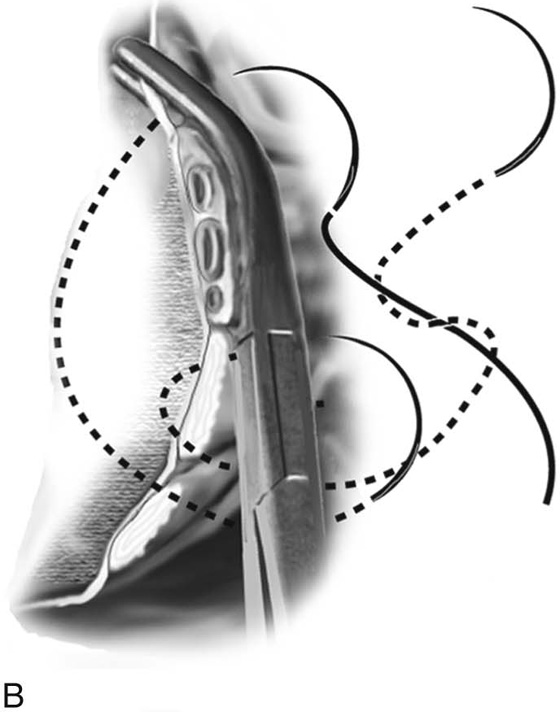
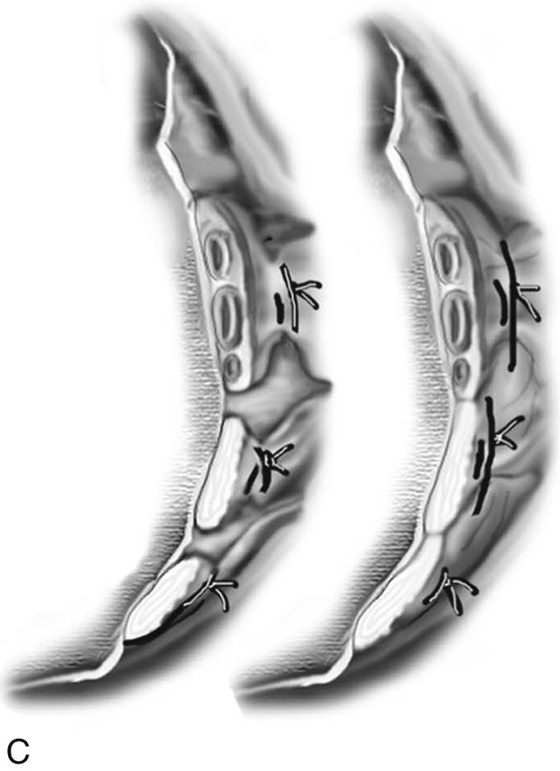
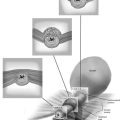
FIGURE 53–20 A. The proper technique for clamping of the uterine vessels. B. The pedicle is sutured to ligate the vessels, as well as to incorporate the pedicle into the previously ligated pedicle. A suture is initially passed through the tissue at the tip of the clamp, and then a second pass of the needle is made through the distal end of the previous pedicle. C. This technique of ligating pedicles completely obliterates the dead space between pedicles. This technique is contrasted with the technique of ligating each pedicle individually, which results in gaps between pedicles that may lead to tearing of tissue with bleeding between pedicles.
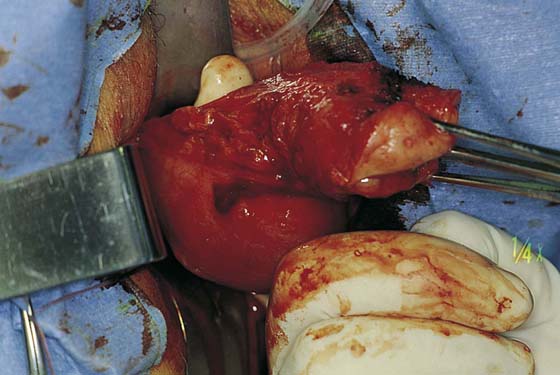
FIGURE 53–21 The uterus is delivered through the posterior cul-de-sac.
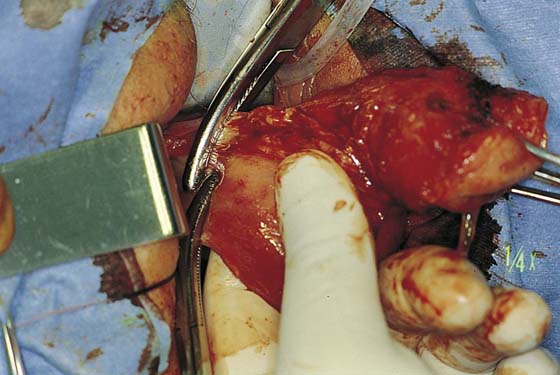
FIGURE 53–22 Clamps have been placed close to the uterus. The pedicle includes the fallopian tube and the round and ovarian ligaments. Note that the tips of the clamps cross in the midline.
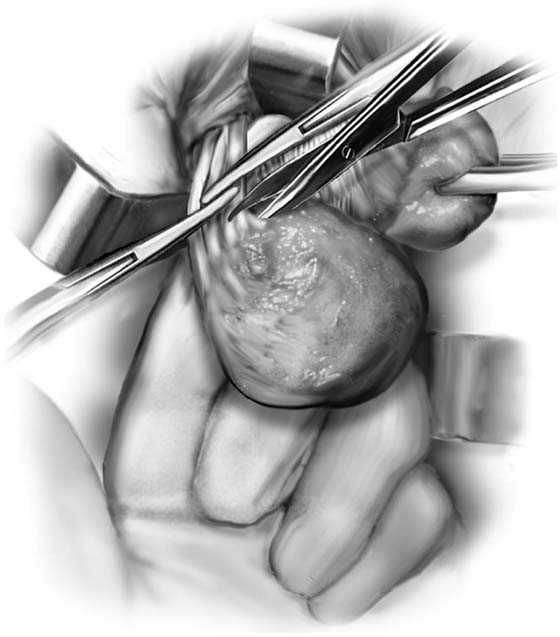
FIGURE 53–23 The pedicle is cut with scissors or a knife. Note: A finger behind the pedicle prevents inadvertent cutting of other structures.
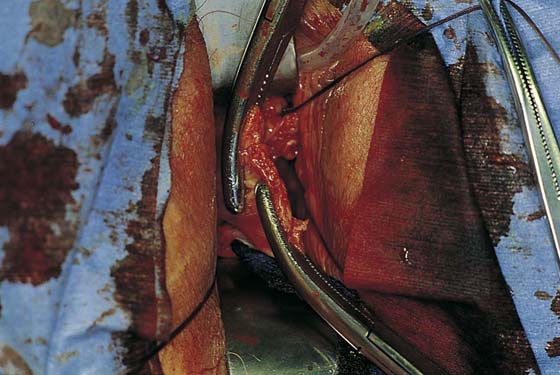
FIGURE 53–24 The uterus has been removed and the adnexal pedicle is doubly ligated. Each clamp is individually ligated, and then a figure-of-8 suture is placed through both pedicles. This suture is usually tagged.
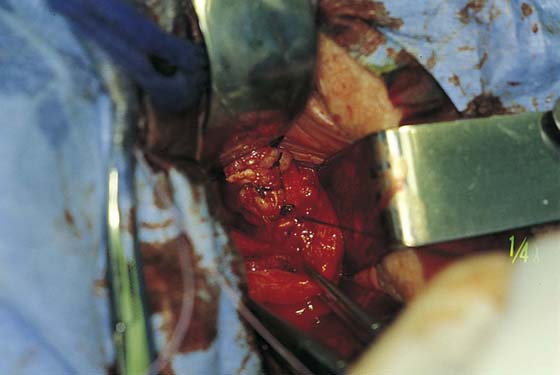
FIGURE 53–25 The pedicles on the left side of the cuff are inspected, and hemostasis is ensured.
Vaginal Salpingo-oophorectomy
Removal of the adnexa can be accomplished at the time of vaginal hysterectomy in at least 50% of patients and, according to some reports, in up to 90% of cases. The success of performing adnexectomy totally depends on the ability to expose the tube and ovary and to gain access to their pedicles. Utilization of suture tags to provide gentle traction on the round ligaments will aid in visualization of the tube and ovary. Most commonly it is best to grasp the adnexa with a Babcock clamp and pull them down as far as possible (Fig. 53–26). The round ligament, ovarian ligament, fallopian tube, and mesosalpinx are then clamped with a curved Haney clamp or, more ideally, a Statinsky vascular clamp. It is very important to place this clamp accurately and to ensure that the ovarian artery does not retract outside of the clamp. To avoid injuring the ureter, it is important to place the clamp as close to the ovary as possible. The tissue is then cut (Fig. 53–27) and the pedicle suture-ligated with a 2-0 delayed absorbable suture. An initial free tie is placed around the pedicle; this is followed by a transfixion suture-ligature distal to the first tie. If the ovary is inaccessible, this may be the result of a short, strong round ligament, which prevents the ligament from being pulled down and clamped. In this situation, the round ligament is separately clamped, and the adnexa is then mobilized, allowing direct clamping of the infundibulopelvic ligament.
Evaluating the Posterior Cul-de-sac
The posterior cul-de-sac should be routinely assessed at the time of vaginal hysterectomy (Figs. 53–28 and 53–29). Many times, a potential or true enterocele is present. Also, in cases of uterovaginal prolapse, one has to decide whether a formal vaginal vault suspension needs to be performed, or whether simple obliteration of the cul-de-sac via a culdoplasty will result in adequate vaginal support and length.
The goal of a McCall-type culdoplasty is to obliterate the cul-de-sac by pulling the uterosacral ligaments across the midline. It also anchors and pulls the vagina inward, thus creating increased posterior vaginal wall length. The technique of a McCall culdoplasty usually involves the placement of one to three internal McCall sutures, which are permanent sutures that are placed to approximate the uterosacral ligaments and incorporate intervening peritoneum (Figs. 53–30 and 53–31). To place these stitches, the surgeon depresses the sigmoid colon down and to the right with the left index and middle fingers. A monofilament 0 suture is then placed deeply into the left uterosacral ligament. The suture is then continued across the top of the sigmoid colon and parietal peritoneum to reach the patient’s right side, where it is placed deep into the right uterosacral ligament. This suture is then tagged, and a second (and even a third) suture is placed (see Figs. 53–30 and 53–31). The external McCall sutures are placed, beginning with passage of a delayed absorbable suture through the posterior vaginal wall and peritoneum. This suture is then incorporated into the left uterosacral ligament and is continued across the peritoneum over the sigmoid colon to the right uterosacral ligament; it then is brought back out through the vagina, where it is tagged (see Fig. 53–31). When the cul-de-sac is very shallow and redundancy in the posterior vaginal wall is minimal, a single external McCall suture may be sufficient (see Fig. 53–31). However, at times a second (and even a third) external McCall suture is placed, depending on the redundancy of the upper part of the posterior vaginal walls (Fig. 53–32). When the redundancy of the posterior vaginal wall and cul-de-sac is excessive, it is desirable to wedge out some vagina and actually excise the peritoneum up to the level of placement of the internal McCall sutures (Figs. 53–29 and 53–33).
The internal McCall sutures are tied, and the external McCall sutures are tagged but not tied until after closure of the vaginal cuff (Fig. 53–34). If an anterior colporrhaphy is to be performed, it is done at this time. If not, or after the anterior colporrhaphy is performed, the vaginal vault is closed with interrupted 2-0 delayed absorbable sutures approximating the anterior and posterior vaginal epithelia with their underlying fascia. The external McCall sutures are then tied (Figs. 53–35 through 53–38). These sutures anchor the posterior vaginal wall to the uterosacral ligaments, as well as obliterate the cul-de-sac and support the vaginal cuff. Cystoscopy to ensure ureteral patency should be considered routinely after McCall culdoplasty.
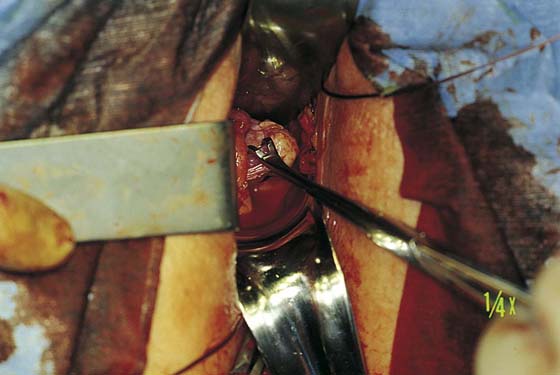
FIGURE 53–26 A Babcock clamp is used to grasp the ovary and pull it down into the vaginal field.

FIGURE 53–27 A curved Haney or Statinsky vascular clamp is used to clamp across the adnexal pedicle. The adnexa is cut away with scissors, and the pedicle is doubly ligated (inset).
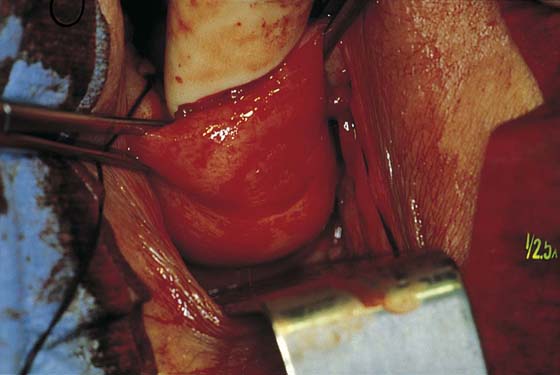
FIGURE 53–28 Palpation of the posterior cul-de-sac after removal of the uterus. The index finger is placed in the cul-de-sac, and the peritoneum and upper posterior vaginal wall are mobilized distally.
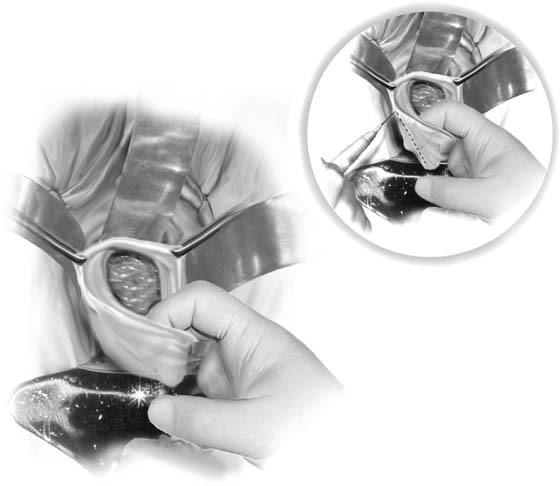
FIGURE 53–29 Digital palpation of the posterior cul-de-sac and enterocele. Inset. The technique of removal of the redundant wedge of posterior vaginal wall and peritoneum.
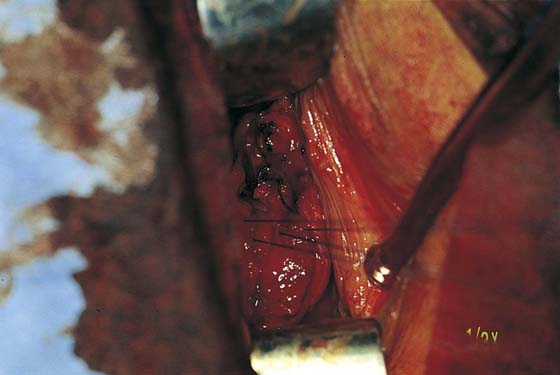
FIGURE 53–30 Two internal McCall sutures have been placed; permanent sutures are passed through the uterosacral ligaments and intervening peritoneum of the cul-de-sac. Sutures are tagged to be tied after placement of the external McCall sutures.
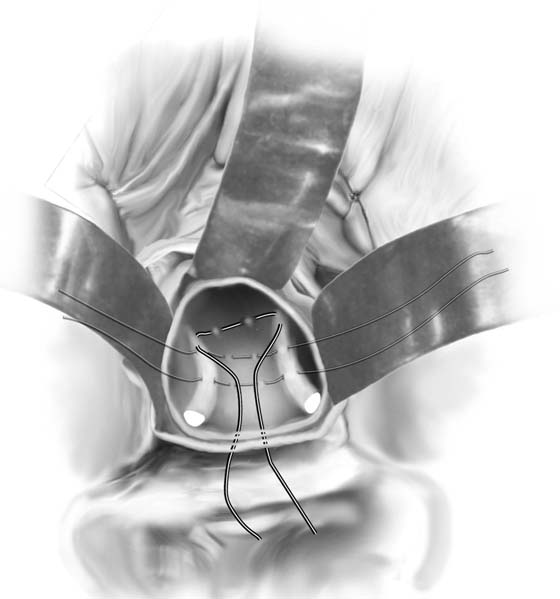
FIGURE 53–31 McCall culdoplasty. Two internal sutures (permanent) and one external suture (delayed absorbable) have been placed.
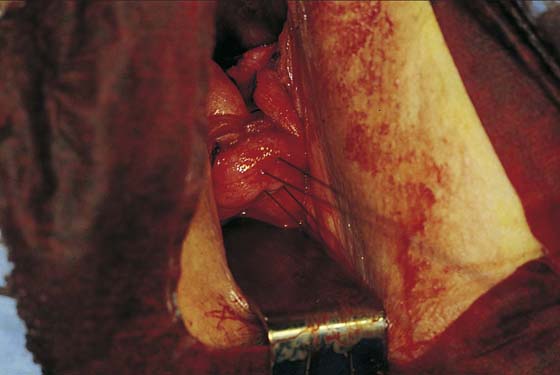
FIGURE 53–32 Two external McCall sutures have been placed. These sutures will be tied after closure of the vaginal cuff.
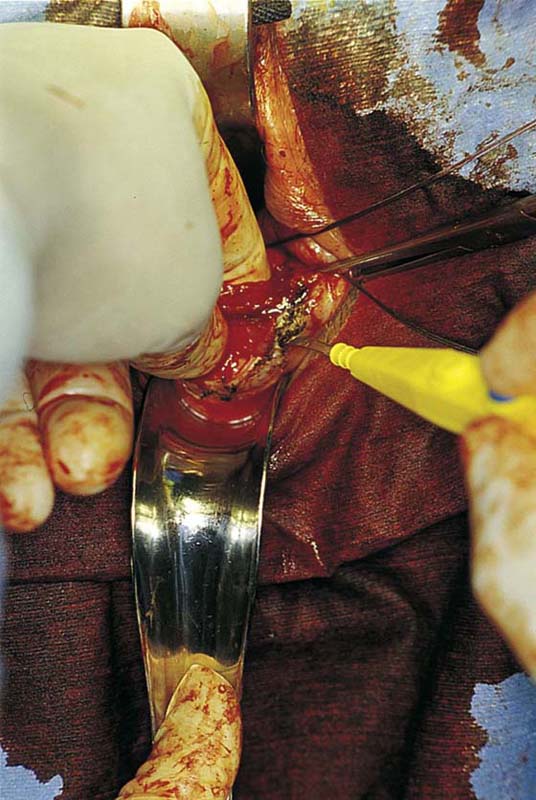
FIGURE 53–33 A wedge of redundant posterior vaginal wall and peritoneum is being excised with Bovie cautery.
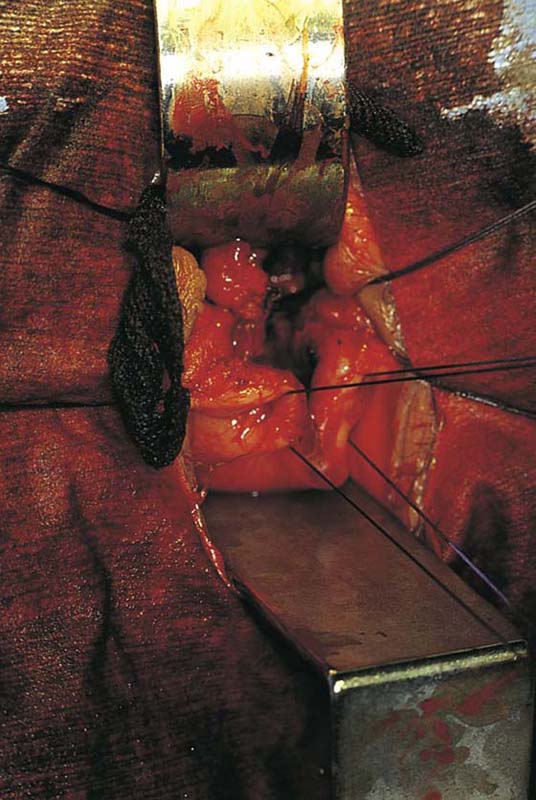
FIGURE 53–34 Two tagged external McCall stitches, which have been placed after a wedge of posterior vaginal wall has been removed.
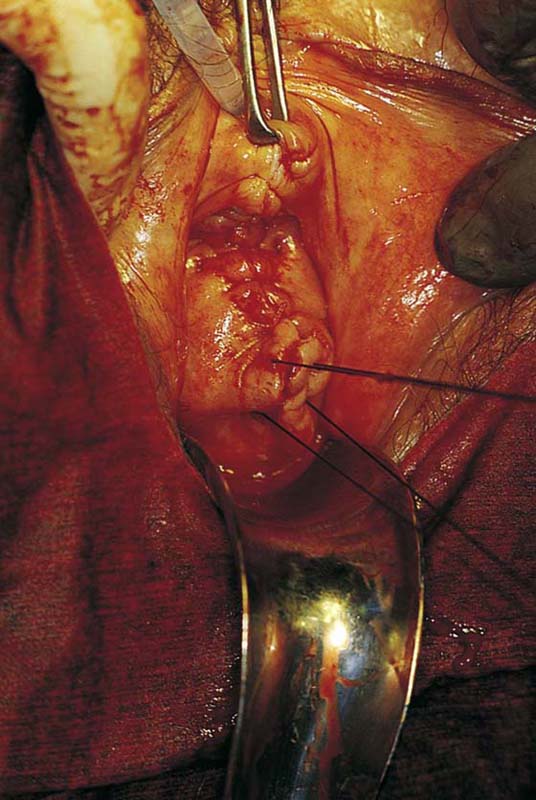
FIGURE 53–35 Untied external McCall sutures after anterior colporrhaphy and closure of the vaginal cuff.
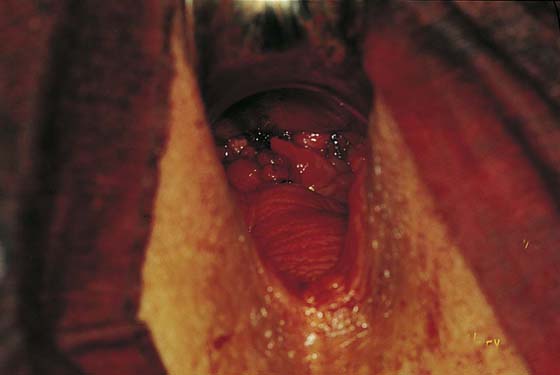
FIGURE 53–36 The upper posterior vaginal wall after tying down of external McCall sutures.

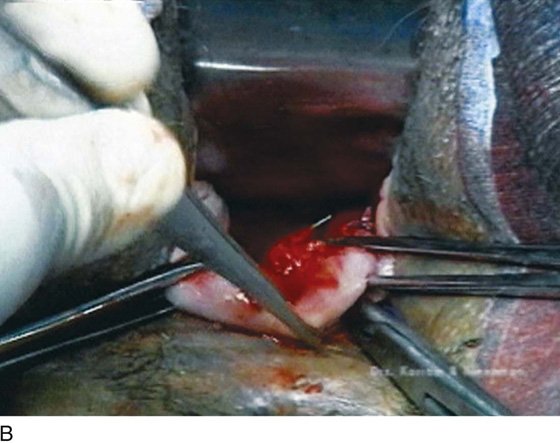
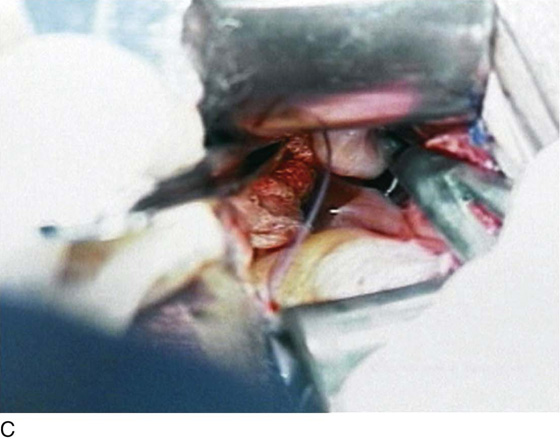
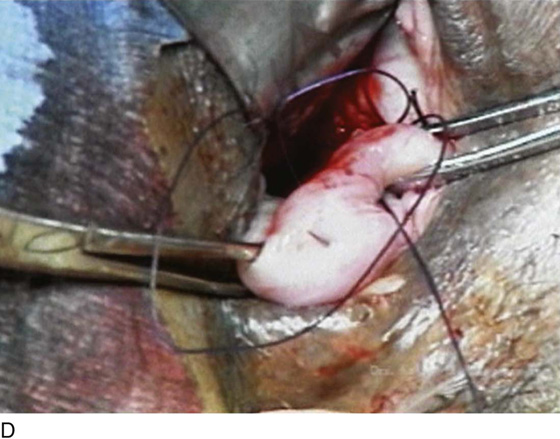
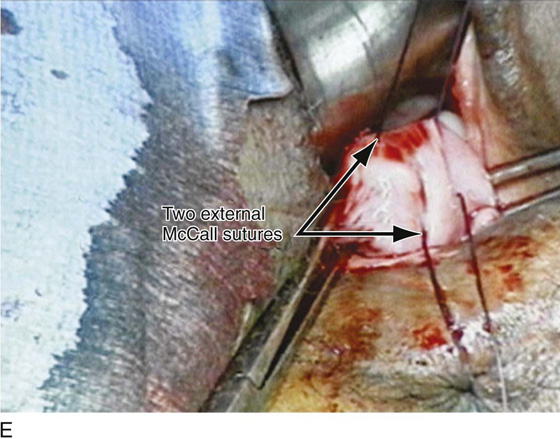
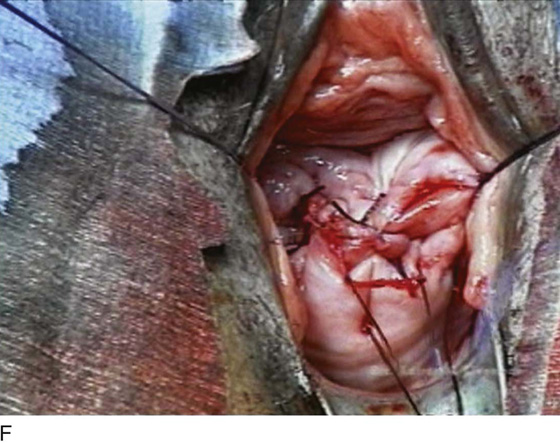

FIGURE 53–37 Technique of McCall culdoplasty. A. The cul-de-sac has been exposed, and the left uterosacral ligament is visualized. B. The first external McCall suture is being passed from the inside of the vaginal lumen into the peritoneum of the cul-de-sac. C. The suture is then passed through the left uterosacral ligament. D. The suture has been passed across the intervening peritoneum through the right uterosacral ligament and is now being passed back out into the vaginal lumen through the posterior vaginal cuff. E. A second McCall suture has been passed in an identical fashion more distal to the first. Demonstrated here are the two external McCall sutures before closure of the vaginal cuff and tying of the sutures. F. The vaginal cuff is closed with interrupted, delayed absorbable sutures. G. The McCall sutures are tied. Note the excellent elevation of the vagina into the hollow of the sacrum.
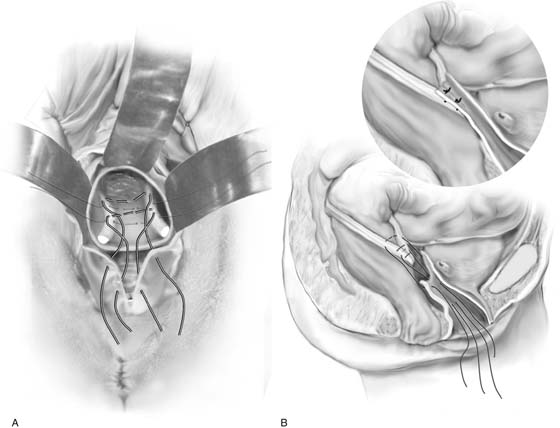
FIGURE 53–38 A. Placement of internal and external McCall sutures after a wedge of posterior vaginal wall has been removed. B. Cross-section of the upper vagina and vaginal vault before and after tying of sutures.
Difficult Vaginal Hysterectomy
The technical aspects of vaginal hysterectomy at times can be more challenging if abnormal pathology of the pelvis exists, resulting in adhesive disease or an enlarged uterus. Certain cases of significant uterovaginal prolapse may also be challenging.
Complete Uterine Procidentia
In the preoperative assessment of complete uterine prolapse, it is important to determine whether this is true uterine procidentia, or whether it demonstrates a severely elongated cervix, and to assess in a site-specific fashion all other pelvic floor support defects. This should initially include palpation of the cervix (Fig. 53–39) to determine the extent of cervical elongation. The lateral fornices of the anterior and posterior vaginal walls should be evaluated (Fig. 53–40), and the extent of anterior (Fig. 53–41) and posterior vaginal wall eversion should be noted (Fig. 53–42). All of this information is very important in selection of the appropriate surgical procedure. The basic steps for vaginal hysterectomy in the patient with complete prolapse are identical to those for vaginal hysterectomy (Figs. 53–43 through 53–54). If the cervix is markedly elongated (Figs. 53–50 through 53–64), one must take numerous extraperitoneal bites in the paracervical tissue until the peritoneal reflection of the anterior and posterior cul-de-sac is reached (see Figs. 53–58 through 53–60). Severe descent of the uterus distorts the anatomy of the entire pelvis. It is important to keep in mind that the normal position of the ureter may be distorted as a result of long-standing traction commonly associated with advanced uterine prolapse and a large cystocele (Fig. 53–65).
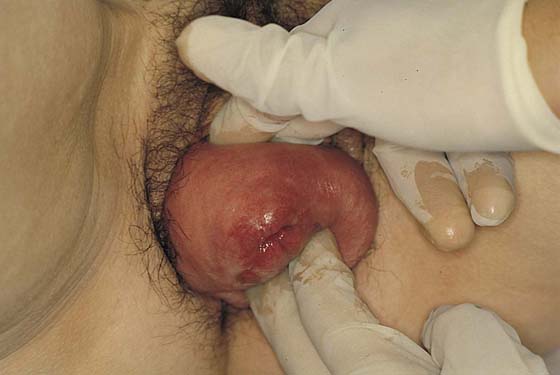
FIGURE 53–39 Palpation of the cervix in a patient with complete prolapse to determine preoperatively whether the cervix is elongated.
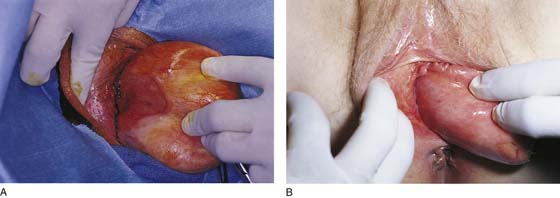
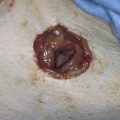
FIGURE 53–40 A. Lateral vaginal fornix. Note the large ulcer from long-standing prolapse. B. Complete eversion of the lateral aspect of the anterior vaginal wall.
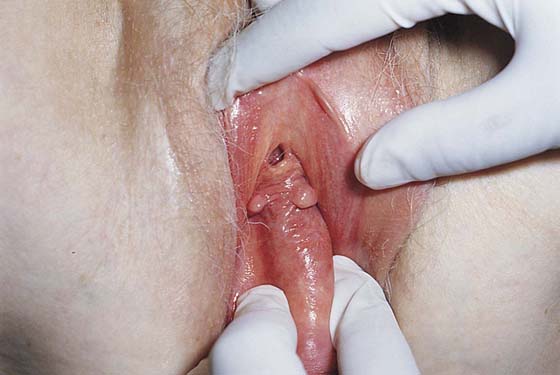
FIGURE 53–41 Complete eversion of the anterior vaginal wall.
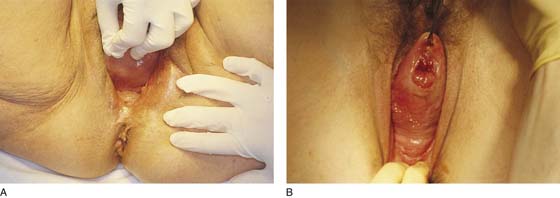
FIGURE 53–42 A. Approximately 75% of the posterior vaginal wall has been everted in this patient with uterine prolapse. B. Complete eversion of the posterior vaginal wall in a patient with an elongated cervix.
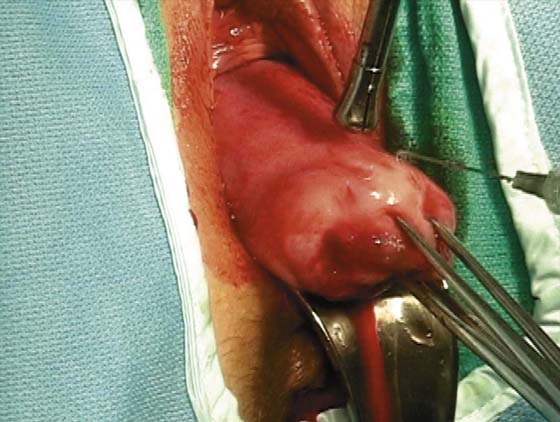
FIGURE 53–43 The level of the initial incision depends on the extent of cervical elongation. The so-called bladder sulcus often is not apparent. This incision is made in a relatively distal position because the cervix is not elongated.
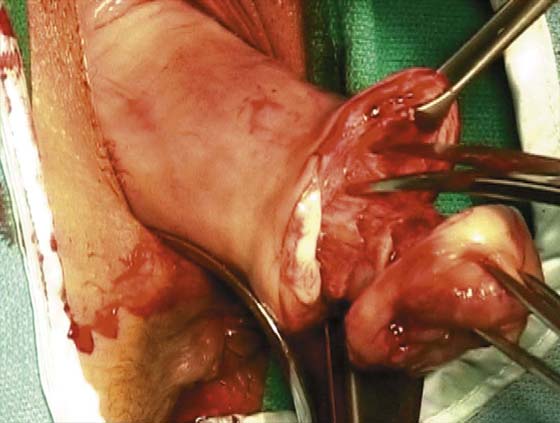
FIGURE 53–44 Sharp entrance into the posterior cul-de-sac.
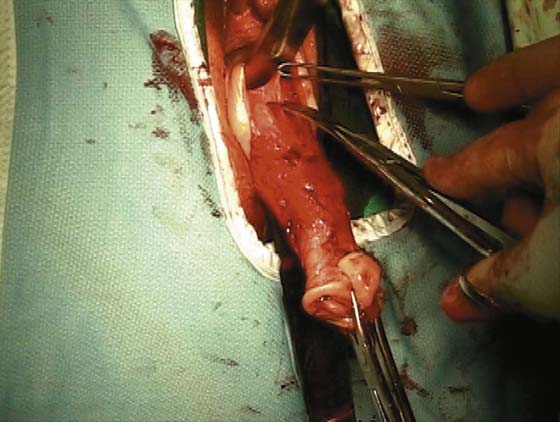
FIGURE 53–45 A retractor has been placed in the posterior cul-de-sac. Note that the cervix is of normal length.
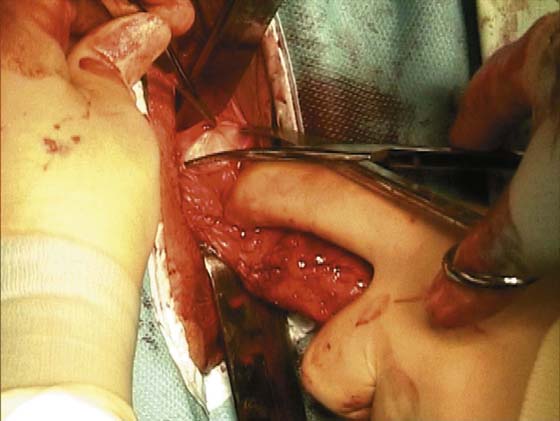
FIGURE 53–46 Sharp dissection down to the pubocervical fascia, which is usually white and glistening.
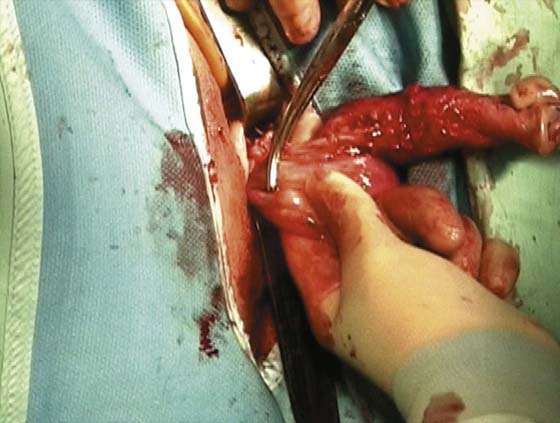
FIGURE 53–47 A finger has been passed from posterior cul-de-sac up and around the uterus and is tenting up the peritoneum of the anterior cul-de-sac.
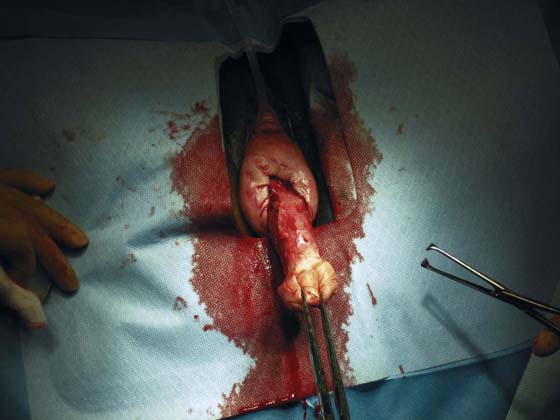
FIGURE 53–48 The uterus has been delivered; posterior and adnexal structures have been clamped. Note: The clamps cross over each other in the midline.
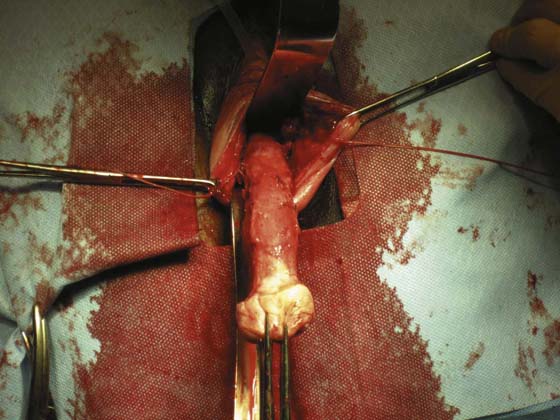
FIGURE 53–49 Dissection and excision of the enterocele sac from the posterior vaginal wall.
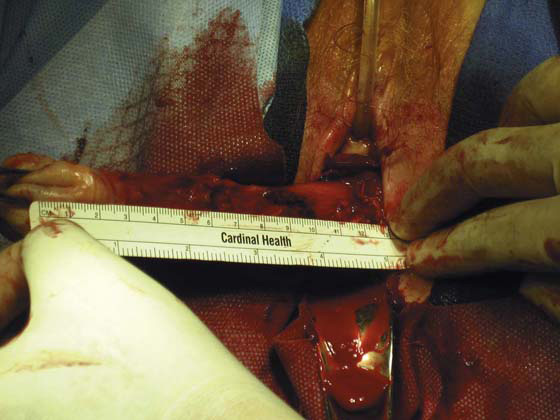
FIGURE 53–50 Complete uterine procidentia with eversion of the anterior vaginal wall.
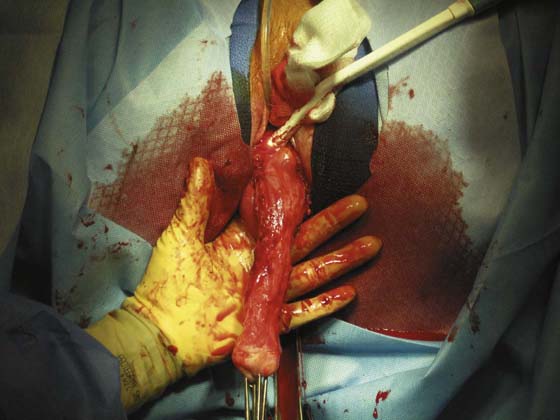
FIGURE 53–51 Note a markedly elongated cervix. Sharp dissection of the bladder off the anterior cervical wall is demonstrated to the level of the vesicouterine space.

FIGURE 53–52 The vesicouterine space has been identified.
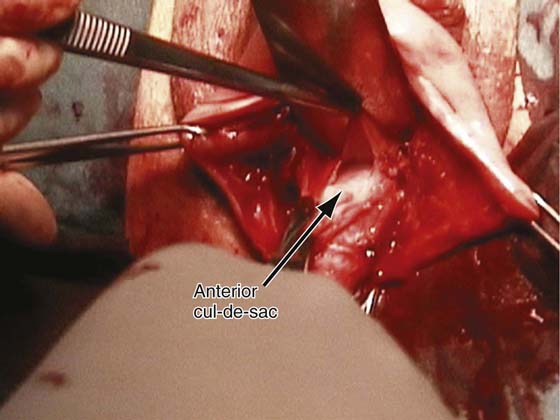
FIGURE 53–53 Sharp dissection is used to enter the anterior cul-de-sac.
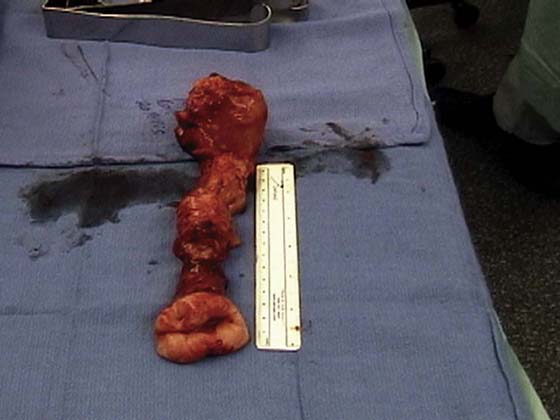
FIGURE 53–54 A markedly elongated cervix in a patient with uterine procidentia.
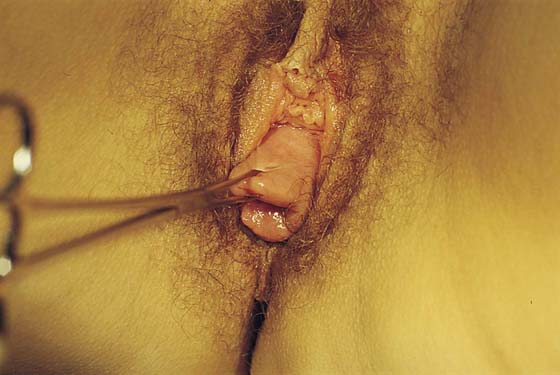
FIGURE 53–55 Uterine prolapse with a markedly elongated cervix.
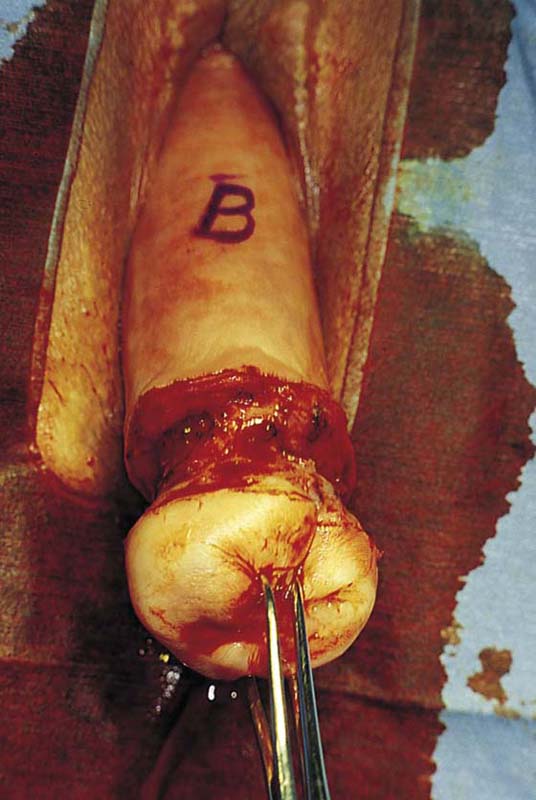
FIGURE 53–56 The initial incision of the cervix. B indicates the approximate location of the bladder and anterior peritoneum.
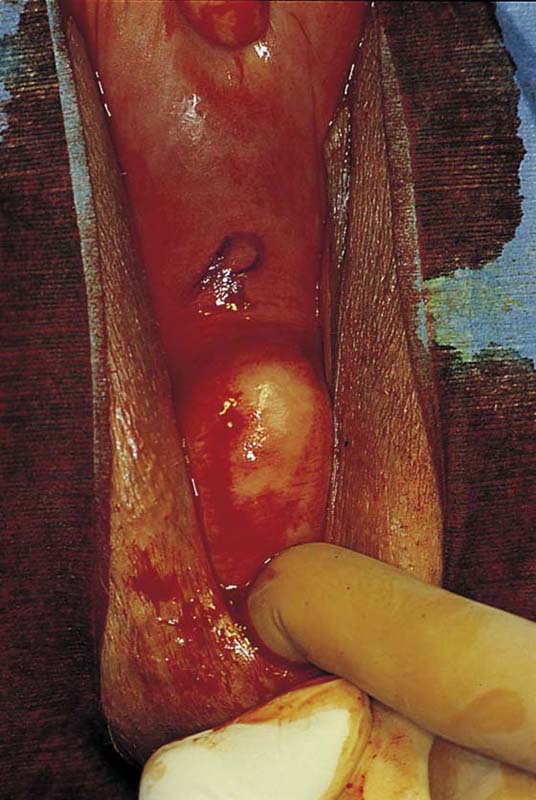
FIGURE 53–57 The cervix has been elevated anteriorly to reveal the posterior vaginal wall. The finger in the rectum demonstrates the location of the anterior rectal wall. R indicates the approximate location of the posterior reflection of the peritoneum.
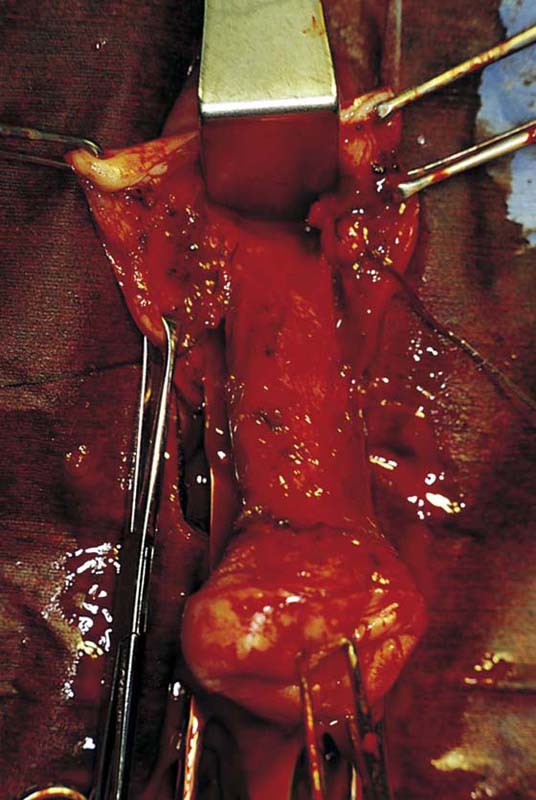
FIGURE 53–58 Numerous extraperitoneal bites have been taken. High up on the anterior vaginal wall, the vesicouterine space has been reached.
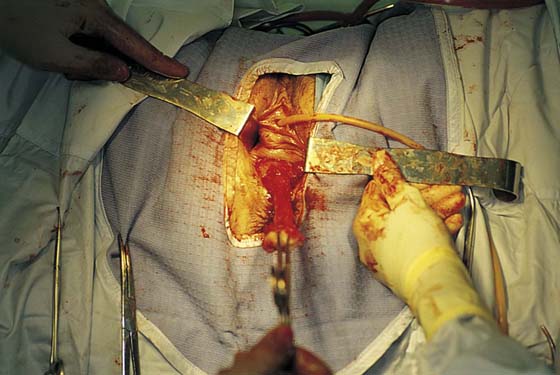
FIGURE 53–59 Another photograph of an elongated cervix in which numerous extraperitoneal bites of tissue have been taken.
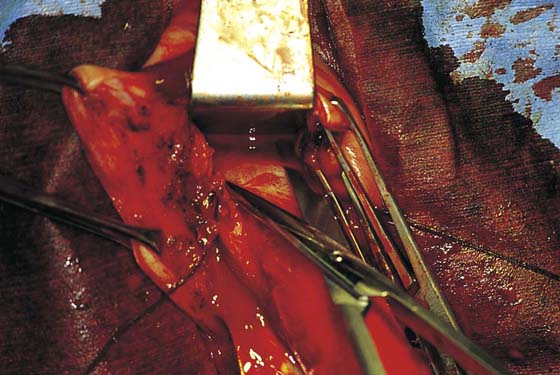
FIGURE 53–60 The anterior cul-de-sac is sharply entered high up at the top of an elongated cervix.
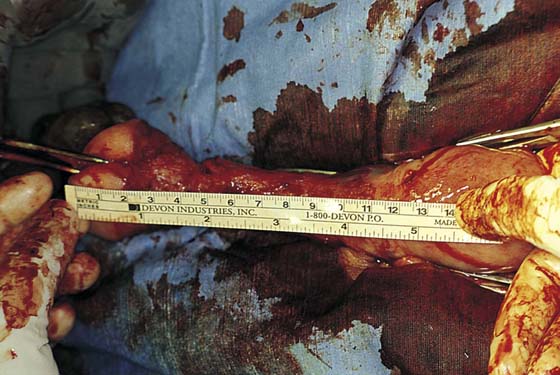
FIGURE 53–61 The tape measure documents a 12-cm cervix in this patient.
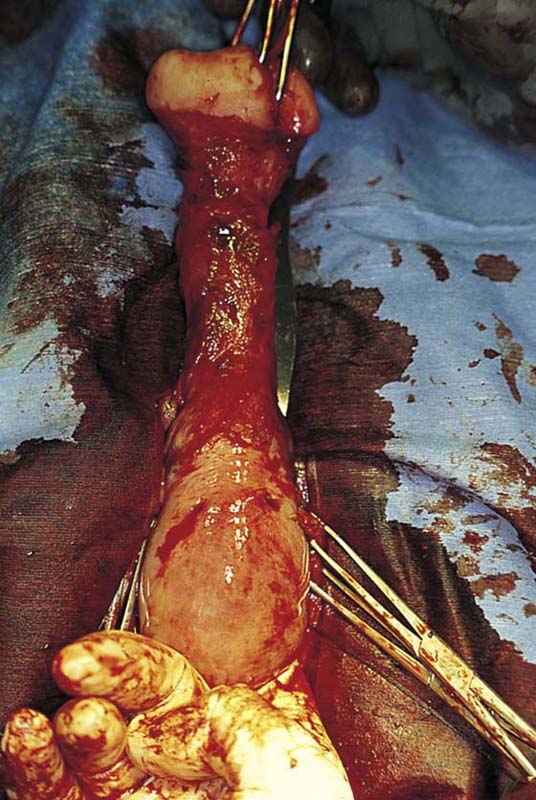
FIGURE 53–62 Once the posterior cul-de-sac has been entered, the uterus can usually be delivered.
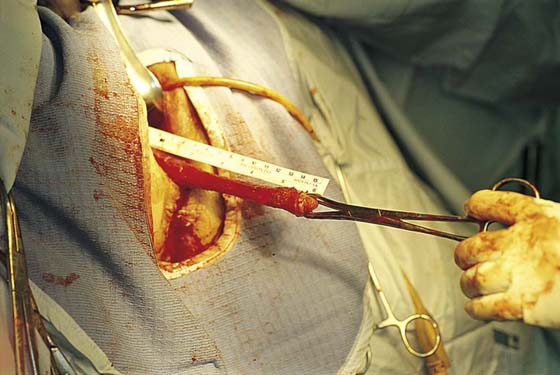
FIGURE 53–63 The tape measure documents a 15-cm cervix in this patient.
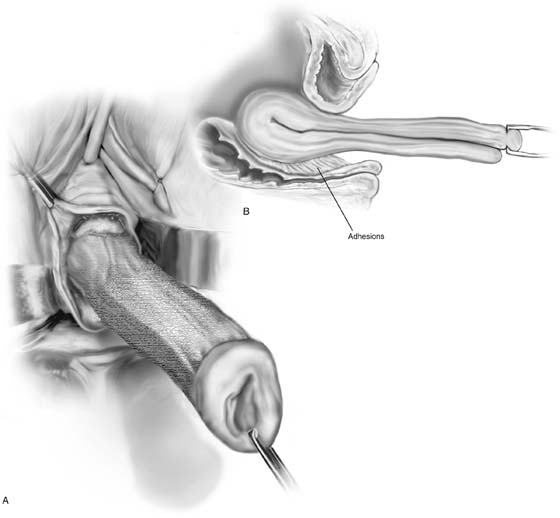
FIGURE 53–64 A. A markedly elongated cervix with a very high anterior cul-de-sac. Usually there is no obvious reason why a cervix is elongated. B. However, as is demonstrated here, at times elongation may be a result of adhesive disease in the posterior or anterior cul-de-sac.
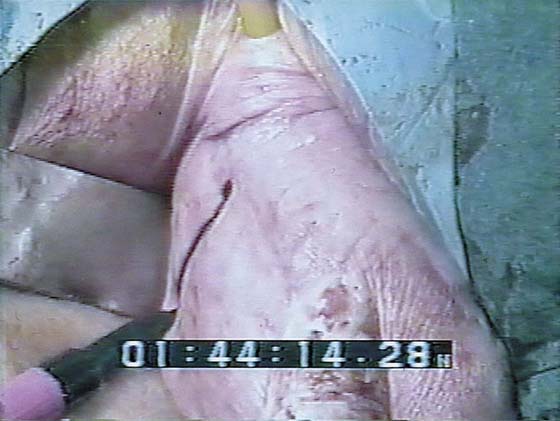
FIGURE 53–65 Marking on the anterior vaginal wall the approximate location of the right ureter in a patient with long-standing uterine procidentia and complete vaginal eversion.
Obliteration of the Vesicouterine Fold
At times the peritoneal reflection of the anterior cul-de-sac cannot be found during vaginal hysterectomy because of previous inflammation or previous pelvic surgery, most commonly cesarean section. As was previously mentioned, the author routinely postpones entrance into the anterior cul-de-sac until the vesicouterine space is easily entered; this usually occurs after numerous clamps have been applied to the parametrium. It is very important in situations like this to use sharp dissection into this space because if aggressive blunt dissection is utilized, the chance of cystotomy is much greater (Figs. 53–66 and 53–67). Blunt dissection will ultimately result in passage of the finger into the plane of least resistance—many times this is directly into the bladder—if severe adhesive disease exists. If a cystotomy does occur at the time of vaginal hysterectomy, the cystotomy should be utilized to determine the appropriate plane through which the anterior cul-de-sac should be entered. The hysterectomy should then be completed and the cystotomy closed. Repair of a vaginal cystotomy should follow the guidelines for repair of any fistula. Cystoscopy initially should be performed to ensure that the ureteral orifices and trigone are not involved. The bladder wall is then mobilized to allow closure of the cystotomy under minimal tension. The cystotomy is usually closed in two layers with a 3-0 absorbable suture. After vaginal cystotomy, the bladder should be drained postoperatively for 7 to 10 days.
Adhesions of the Posterior Cul-de-sac
Adhesions of the posterior cul-de-sac, although relatively rare, can occur, especially in cases of endometriosis. This should be highly suspected when some nodularity of the cul-de-sac is evident on examination, and certainly if the uterus is immobile. After the initial incision has been made and entry into the posterior cul-de-sac has been found to be impossible, it is probably best to proceed with anterior dissection and entry into the anterior cul-de-sac. If this cannot be accomplished, one should identify the anterior rectal wall by placing a finger in the rectum. Sharp dissection between the anterior rectal wall and the posterior cervix can be performed in the hope of safely reaching the posterior peritoneal reflection. If, however, the uterus is immobile and neither the anterior nor the posterior cul-de-sac can be comfortably entered, it is probably prudent to proceed with an abdominal or a laparoscopic approach to hysterectomy.
Removal of the Large Uterus
At times the uterus will be enlarged and somewhat immobile, most commonly because of the presence of multiple leiomyomata.
Uterine morcellation, or removal of the uterus piecemeal, is a procedure most often used for the large myomatous uterus. The author prefers to do this by delivering as much of the uterus as possible into the posterior cul-de-sac and by morcellating the uterus via elliptical incisions. Elliptical incisions are taken through the posterior uterine wall. With each removal of tissue, the edges of the incision are brought together, thus decreasing the bulk of the uterus to the point where it ultimately can be completely delivered through the cul-de-sac (Figs. 53–68 through 53–70).
At times, amputating the cervix with a scalpel permits easier access to the uterus. From this point, the anterior uterine wall can be resected or bivalved (Figs. 53–71 and 53–72), assuming the anterior cul-de-sac has been entered, or submucosal myomata can be removed and a vaginal myomectomy performed to decrease the bulk of the uterus and assist in its delivery (Fig. 53–73).
Another technique for removal of a large uterus secondary to a uterine leiomyoma is intramyometrial coring. With strong downward traction, the cervix is circumscribed as high as possible, and a cylinder is developed parallel to the axis of the uterus with the scalpel (Fig. 53–74). The cylinder should be wide enough to include the endometrial cavity in the core specimen, but not so wide that the knife perforates the fundus. Downward traction delivers the cored specimen, eventually turning the uterus inside out.
Figure 53–75 demonstrates vaginal removal of a 17-week–size uterus in which a combination of morcellation and coring is utilized.
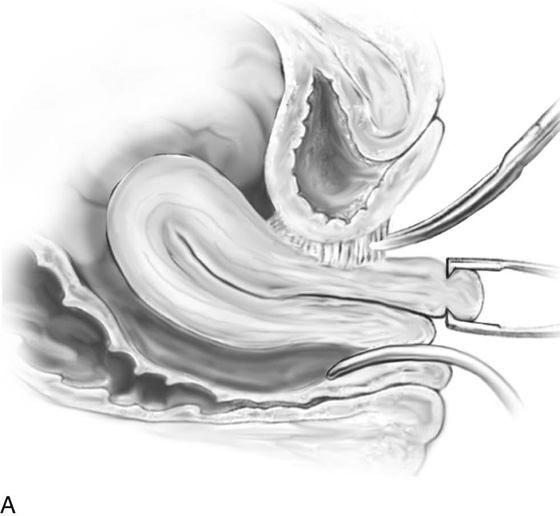
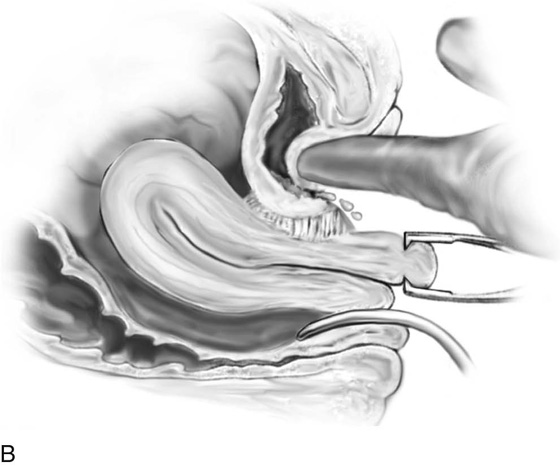
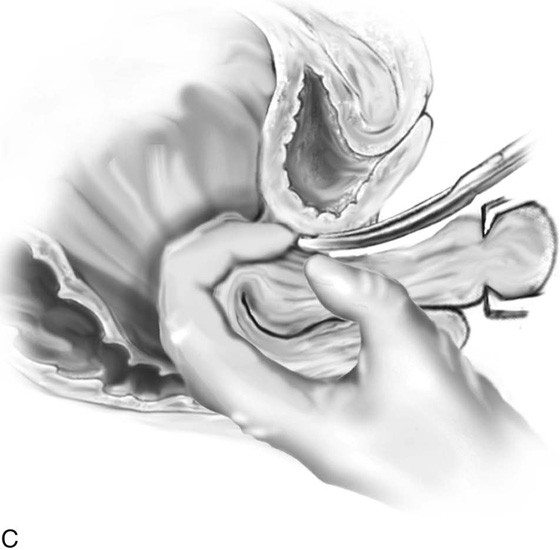
FIGURE 53–66 A. Dense adhesions noted between the base of the bladder and the anterior cervix. These are best taken down using sharp dissection. B. Blunt dissection in this situation may lead to inadvertent cystotomy, as the finger will pass into the area of least resistance. C. Passing a finger around the uterus, when possible, may help facilitate dissection in the appropriate plane.
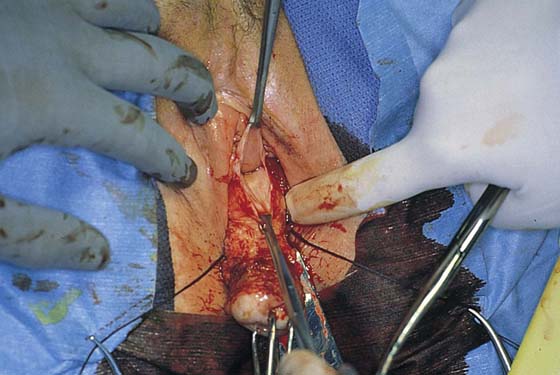
FIGURE 53–67 Sharp entrance into the anterior cul-de-sac has been performed in a patient who has anterior cul-de-sac adhesions secondary to a previous caesarean section.
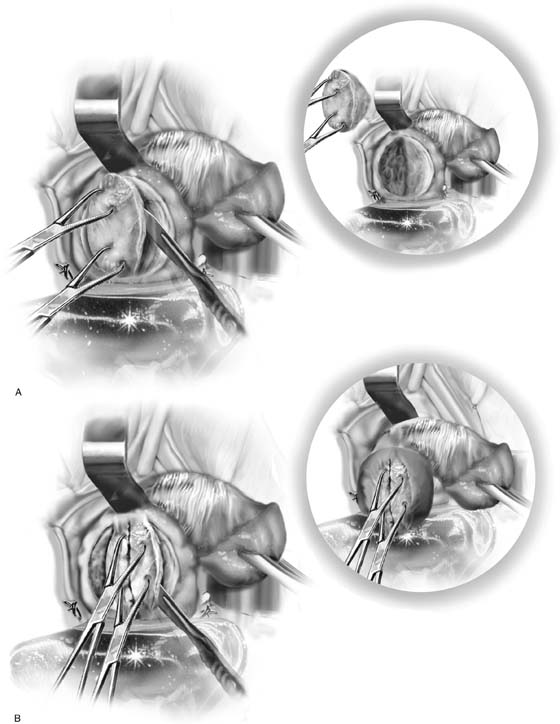
FIGURE 53–68 Technique of uterine morcellation for vaginal removal of a large uterus. A. Elliptical wedge of tissue removed from the posterior uterus. B. Edges of the initial incision are brought together with two single-toothed tenacula, and another wedge of tissue is removed. This procedure is continued until the uterus can be completely delivered (inset).

FIGURE 53–69 Delivery of a large uterus after morcellation.
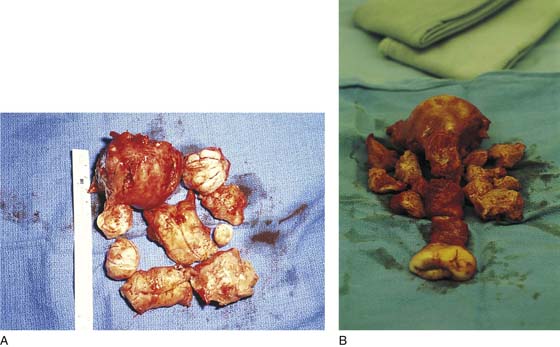
FIGURE 53–70 A and B. Two examples of morcellated uteri that have been removed transvaginally.
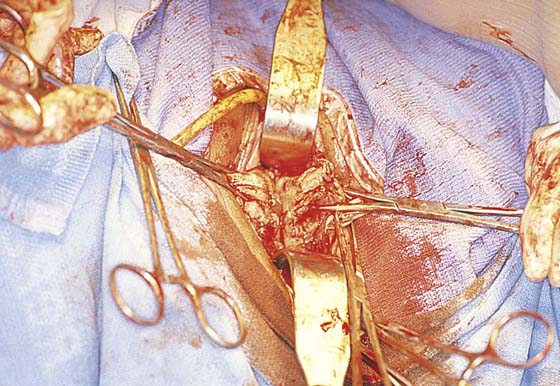
FIGURE 53–71 The cervix has been amputated, and the uterus is being bivalved.
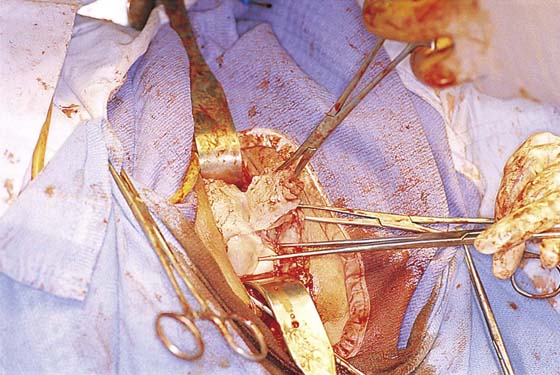
FIGURE 53–72 Hemisection of the uterus after the cervix has been amputated. Note the multiple uterine leiomyomata.
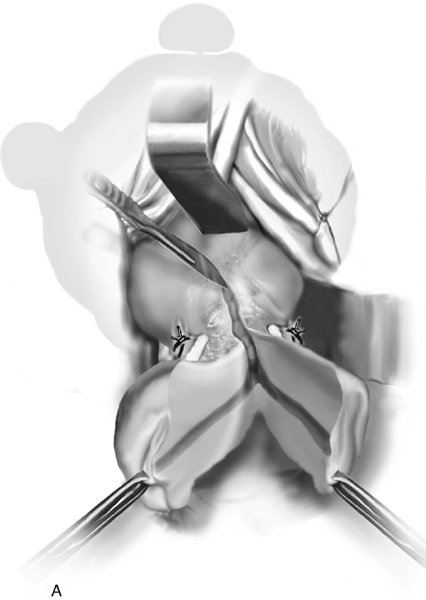
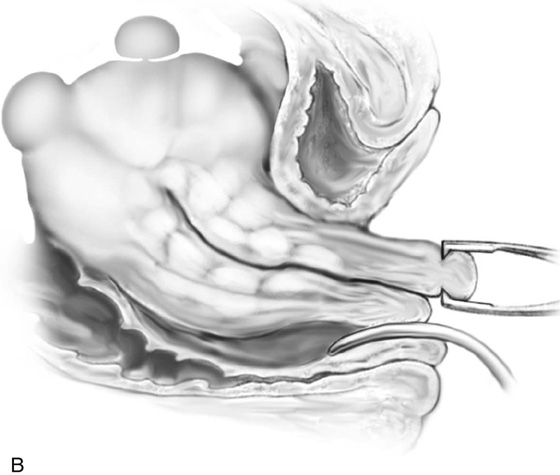
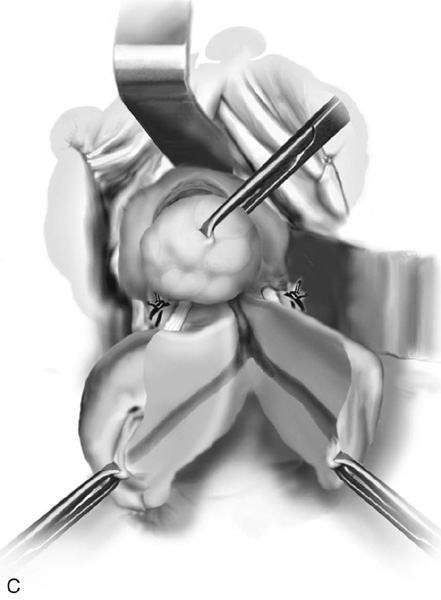
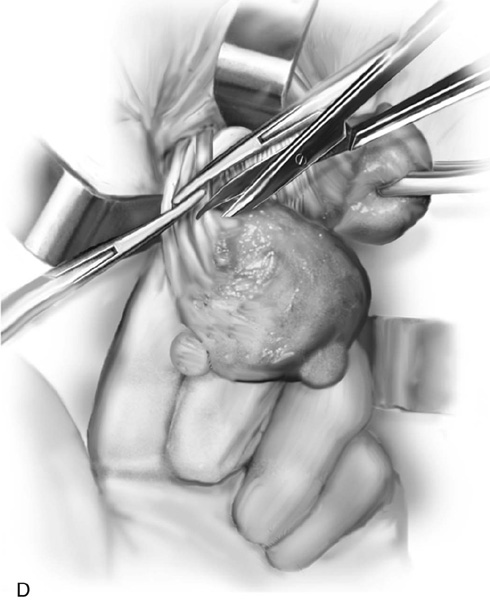
FIGURE 53–73 Technique of hemisection of the uterus. A. The scalpel incises up the midportion of the uterus. B. The side view demonstrates multiple uterine leiomyomata. C. Vaginal myomectomy. D. Delivery of the uterus after its size has been reduced with clamping of adnexal pedicles.
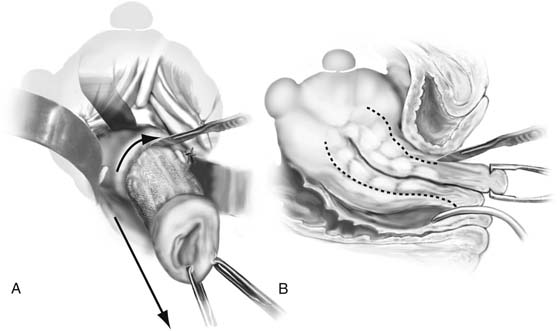
FIGURE 53–74 Technique of intramyometrial coring. A. The scalpel creates a cylinder of tissue, facilitated by strong downward traction on the cervix. B. Side view of the technique of intramyometrial coring. Downward traction delivers the cored specimen, eventually turning the uterus inside out.
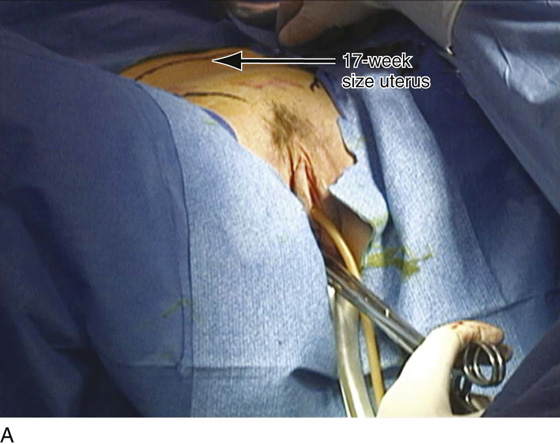
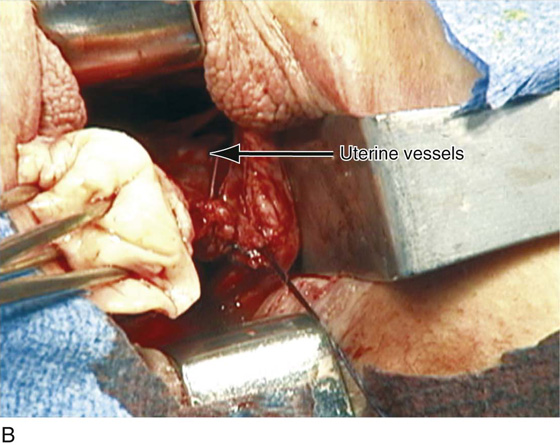
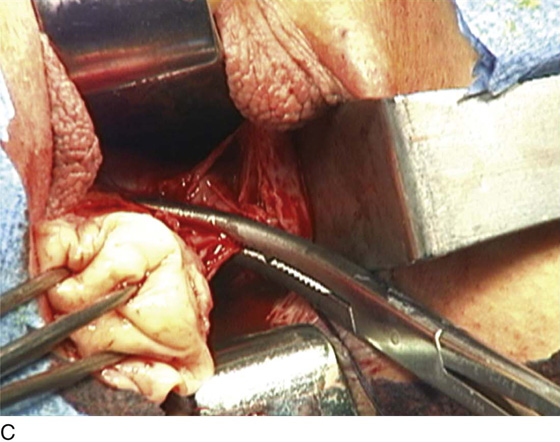
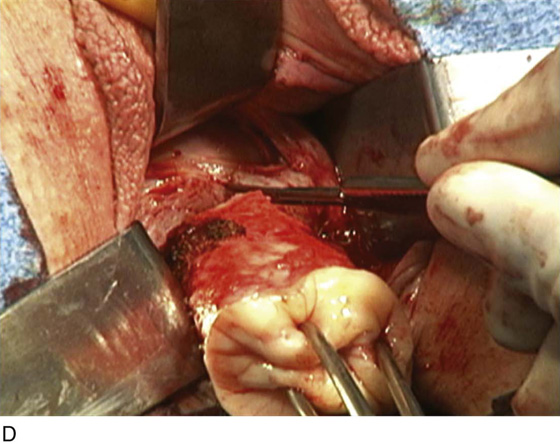
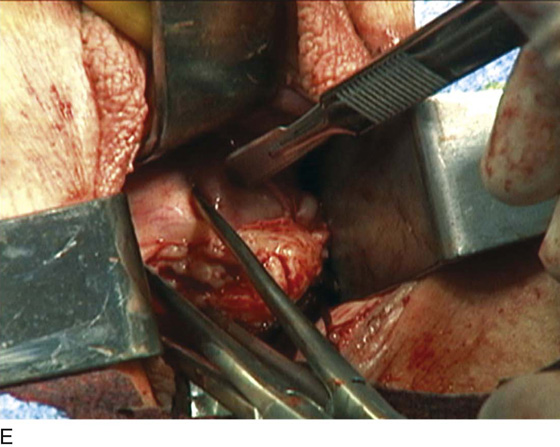
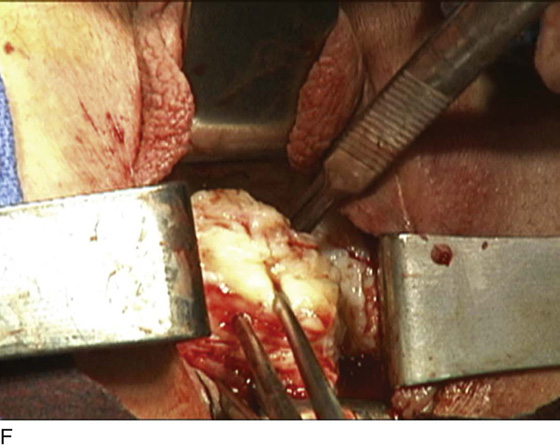
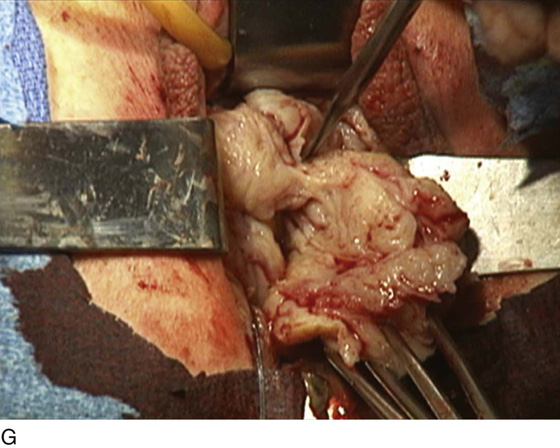
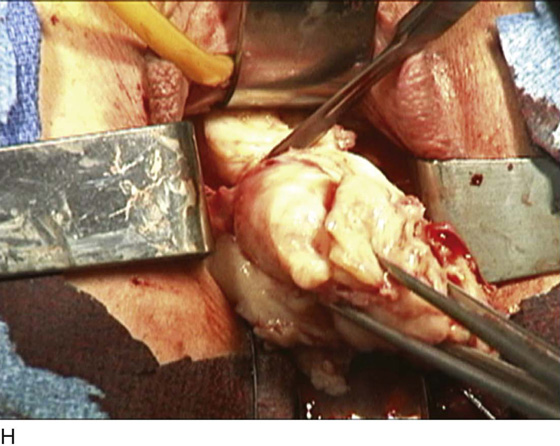
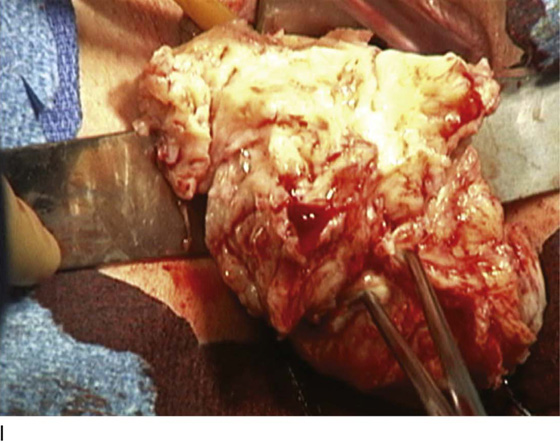
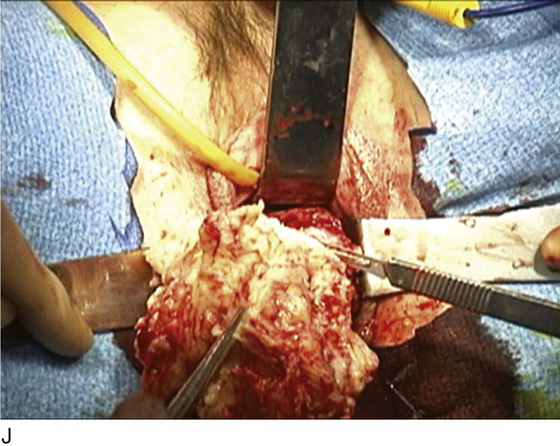
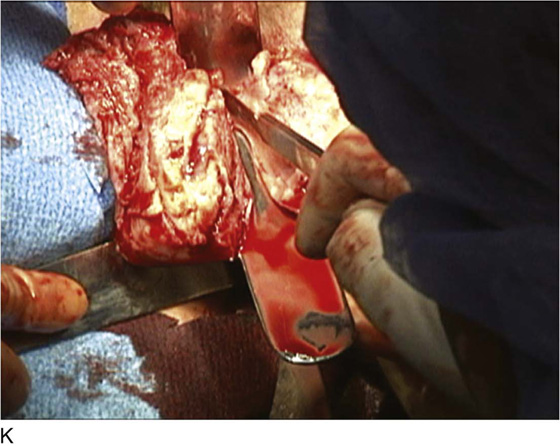

FIGURE 53–75 Demonstrates vaginal removal of a 17-week–size uterus utilizing a combination of morcellation and intramyometrial coring. A. The uterus has been marked and is noted to be 17-week size. B. The vaginal hysterectomy has begun. It is important that before any morcellation or coring is done, the uterine vessels are clamped to ensure the blood supply of the uterus. C. The uterine vessels are clamped with a Haney clamp placed at right angles to the cervix. D. The cervix is being amputated to allow access to the enlarged body of the uterus. E. The technique of intramyometrial coring is begun with a scalpel that is used to cut on the undersurface of the serosa of the anterior portion of the uterus. F. Downward traction with a single-toothed tenaculum allows removal of the uterus in pieces. G. The enlarged uterus is now morcellated and removed in pieces. H. Morcellation of the uterus is continued. I. The large fibroid has been delivered posteriorly. J. The large fibroid is being cut away from the remainder of the uterus. K. The upper part of the uterus is being bivalved to allow facilitation of clamping of the adnexal pedicles. L. The 17-week–size morcellated uterus that has been removed vaginally is shown.