CHAPTER 11 Unicompartmental Knee Arthroplasty
Mobile-Bearing Techniques


Introduction
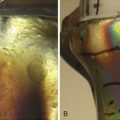
Anteromedial arthritis of the knee with an intact anterior cruciate ligament, as described by White et al., is a distinct pattern of osteoarthritis that is appropriately treated with unicompartmental arthroplasty when conservative measures fail.1 Unicompartmental knee arthroplasty for anteromedial osteoarthritis with a functional anterior cruciate ligament utilizing a mobile meniscal polyethylene bearing (Oxford Unicompartmental Knee Arthroplasty, Oxford, UK) has demonstrated 92.3% survivorship at 20 years.2 Clinical results have been good or excellent in 91% of patients at minimum 10-year follow-up utilizing Hospital for Special Surgery Knee Scores.3 Wear rates of the polyethylene have been reported as 0.01 mm/year when the device is functionally normally without intra-articular or extra-articular impingement.4 Rapid recovery protocol utilization has resulted in faster functional return than with total knee arthroplasty.5 There remains concern regarding the increased difficulty in performing this operation, and early failures are often due to technical errors. New instrumentation has been developed (Oxford Microplasty Instrumentation; Biomet, Warsaw, IN) that allows more predictable execution of the procedure while minimizing technical errors. The enhanced performance of the operation should further improve the previously reported excellent clinical and survivorship successes of this mobile-bearing unicompartmental knee arthroplasty.
Setup and Equipment
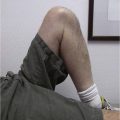
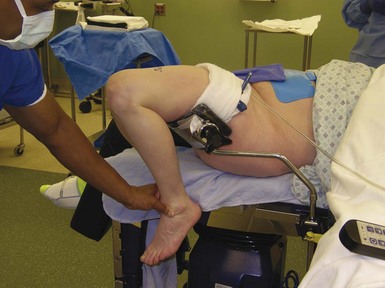
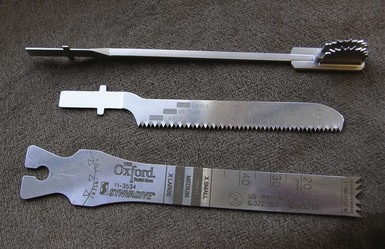
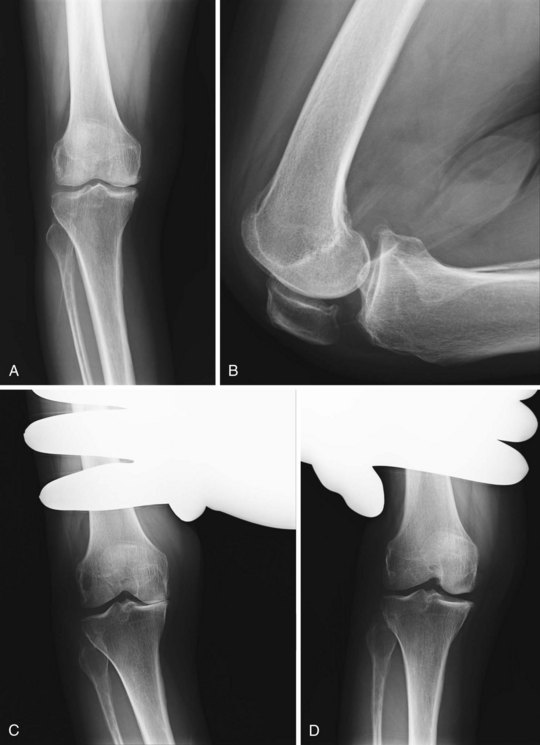
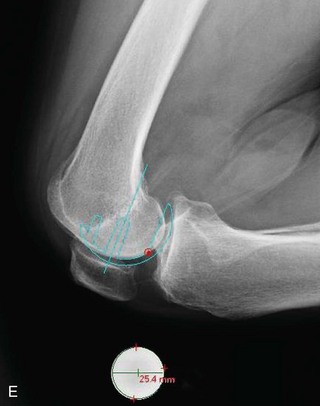
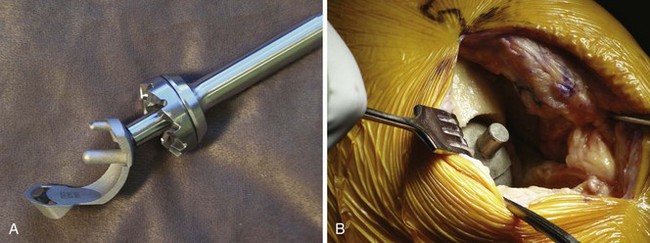
A tourniquet should be placed on the proximal thigh of the operative limb. A hanging leg holder is utilized to have the operative extremity flexed 30° at the hip with enough abduction to allow at least 135° of knee flexion without impingement on the operative table (Fig. 11–1). The contralateral leg is placed in a well-padded foam leg holder. The foot of the bed is dropped perpendicular to the floor. A stiff, narrow reciprocating saw, a 12-mm-wide oscillating saw, and a double-armed vertical toothbrush saw are utilized during the operation (Fig. 11–2) (Oxford Knee Resection Procedure Three Pack; Synvasive Technologies Inc., El Dorado Hills, CA). A Woodson-style curette is an excellent cement removal tool. Standard knee retractors and instruments are used. Radiographs are reviewed for anteromedial arthritis and appropriate restoration of the knee with valgus stress radiograph (Fig. 11–3A-D). Preoperative templating of the femoral component size is performed using the lateral radiograph (Fig. 11–3E).
Approach
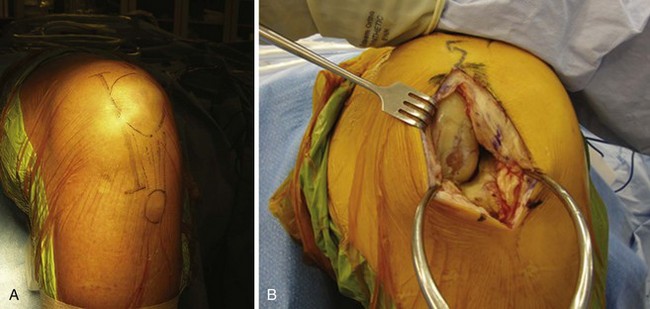
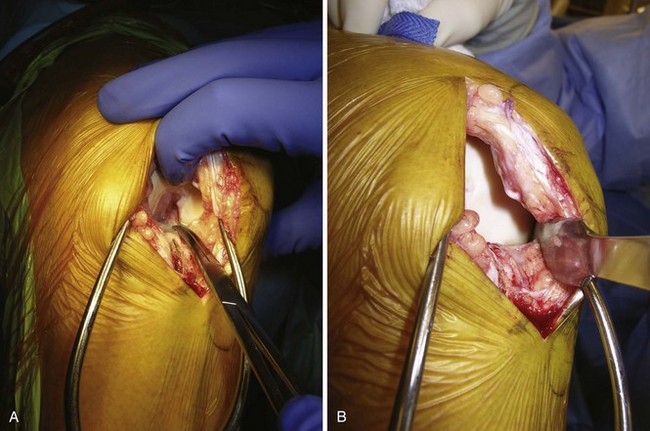
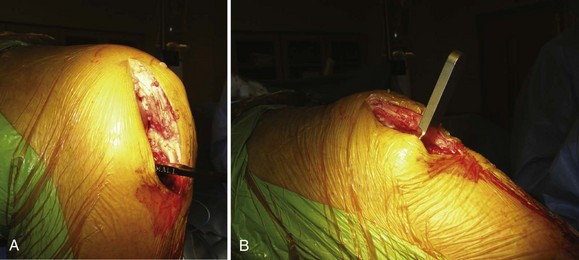
The operative extremity is exsanguinated and the tourniquet is insufflated to 350 mm Hg. The knee is allowed to flex 90° with gravity in the hanging leg holder. A slightly oblique skin incision is made from the superomedial edge of the patella to a point 3 cm inferior to the joint line, medial to the tibial tubercle (Fig. 11–4A). An arthrotomy is performed with proximal extension of 1–2 cm into the vastus medialis at the level of the superomedial pole of the patella (Fig. 11–4B). Electrocautery is used to expose the anteromedial aspect of the tibia to allow for later positioning and visualization of the tibial resection guide. None of the medial collateral ligament is released. The anterior horn of the medial meniscus is excised. A small portion of the retropatellar fat pad is excised to allow visualization of the anterior cruciate ligament and the lateral compartment of the knee (Fig. 11–5). If the anterior cruciate ligament is nonfunctional or there is full-thickness lateral compartment osteoarthritis upon inspection, conversion to a total knee arthroplasty is undertaken.
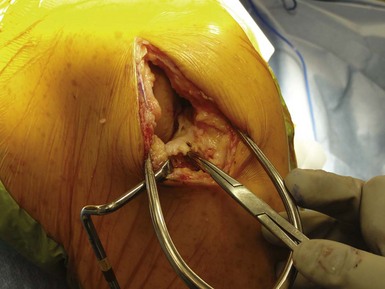
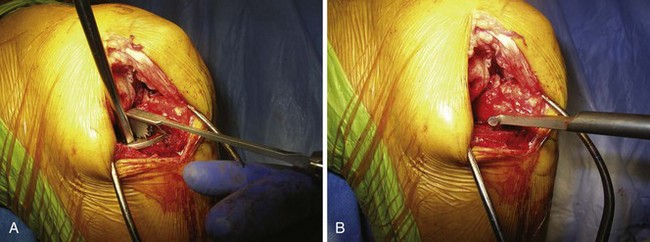
Assuming the anterior cruciate ligament and the lateral compartment are normal, the unicompartmental arthroplasty continues. Osteophytes are removed with an osteotome from the medial and lateral aspects of the intercondylar notch as well as from the medial margin of the medial femoral condyle. A small rongeur is used to remove the anvil osteophyte anterior to the anterior cruciate ligament insertion on the tibia. The anteromedial osteophyte on the tibia is removed and the blush of bleeding bone from its removal serves as a guide for depth of resection for the tibial osteotomy (Fig. 11–6).
Technical Description
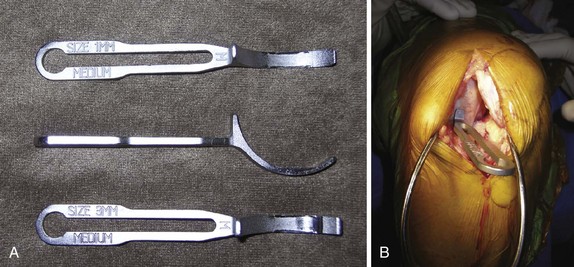
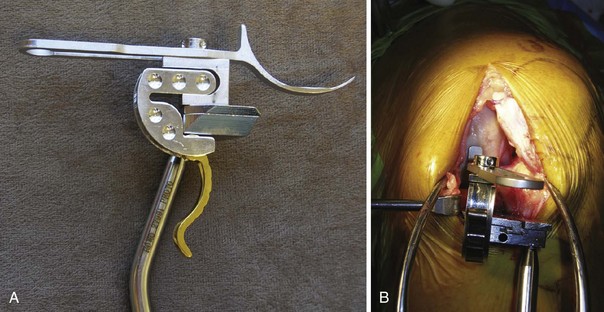
The Oxford Microplasty femoral spoon of preselected size based on the preoperative templating is inserted into the medial compartment, capturing the medial femoral condyle in the sagittal plane. Appropriate tension and restoration of the joint space are achieved with the aid of sequential 1-mm spoons (range 1–3 mm) (Fig. 11–7). The proximal tibial resection guide is then placed and coupled to the spoon with the G clamp (Fig. 11–8). The G clamp comes in 3-mm and 4-mm options corresponding to the expected thickness of the polyethylene bearing at the completion of the procedure. Tension is removed from the Gelpi retractor prior to coupling to prevent inaccurate elevation of the planned resection level. A double check is performed confirming that the shaft of the tibial saw guide is parallel to the long axis of the tibia in the coronal and sagittal planes. This will provide 7° of posterior slope utilizing the horizontal tibial resection guide. The tibial guide is secured in place utilizing one pin in the most lateral hole or two pins with one each medial and lateral. A curved Z retractor is placed medially to protect the medial collateral ligament.
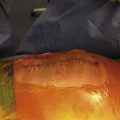
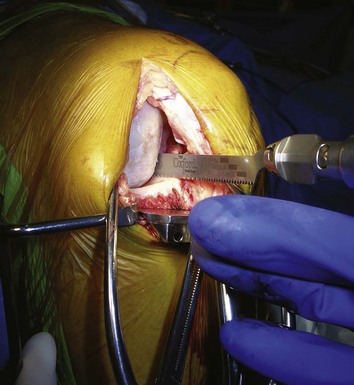
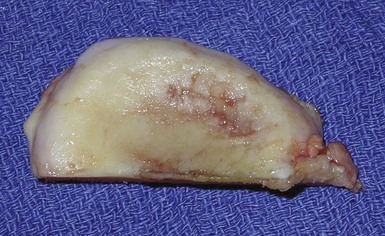
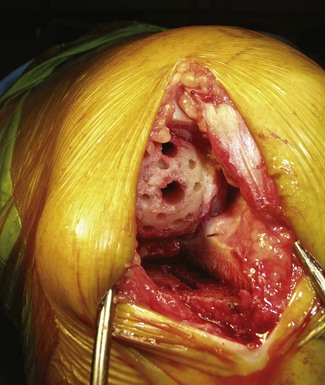
The vertical cut is performed first with the stiff narrow reciprocating saw at the lateral edge of the medial femoral condyle and medial edge of the anterior cruciate ligament insertion on the tibia (Fig. 11–9). The blade should be directed at the head of the femur and along the flexion-extension plane. Care must be taken to avoid raising the blade during resection and damaging the posterior tibial cortex below the desired resection depth. The narrow saw blade is used to perform the horizontal osteotomy on the tibia. The blade must pass through the posterior cortex. The osteotomized bone is levered up with an osteotome and removed. The excised bone should demonstrate the classic findings of anteromedial arthritis with preservation of the posterior cartilage (Fig. 11–10). The remaining meniscus can now be removed.
The intramedullary rod with the distal coupling feature is placed retrograde up the femoral canal from a starting point 1 cm anterior to the anteromedial corner of the intercondylar notch, after drilling and opening the hole with an awl while the knee is in 45° of flexion. The Oxford Microplasty femoral alignment guide, which is set at the corresponding thickness of the flexion space measured by the plastic feeler gauges without the tension of retractors on the medial collateral ligament, is placed into the medial compartment. The linkage bar is used to couple the intramedullary rod to the Oxford Microplasty femoral alignment guide (Fig. 11–11). The 4-mm and 6-mm pilot holes are then drilled sequentially in the distal femoral condyle. The posterior femoral resection guide (Fig. 11–12A) is placed and then the posterior condyle is cut with the narrow saw while protecting the medial collateral ligament with the Z retractor (Fig. 11–12B). Milling is then performed on the distal femoral condyle starting with the zero spigot (Fig. 11–13). The tibial and femoral trials are placed and the feeler gauges are used to balance the flexion space (Fig. 11–14A). All retractors should be removed during trialing to prevent tension on the medial collateral ligament. The feeler gauge is removed and the knee is brought to 10–20° flexion. Metal feeler gauges are then inserted to determine the balanced gap (Fig. 11–14B). The size of the flexion feeler gauge minus the size of the extension feeler gauge equals the spigot number that will be utilized to mill the remaining distal femur to balance the flexion-extension gaps. Trials are then replaced and gaps assessed. Further milling can be performed if necessary to balance the gaps. The Oxford Microplasty 2-in-1 anterior mill and the posterior osteophyte resection tool are placed (Fig. 11–15). The mill is used to remove the anterior femoral condylar bone, which could be a source of impingement in extension. The angled osteotome is used through the capture mechanism to remove the posterior osteophytes that can cause impingement in high flexion.
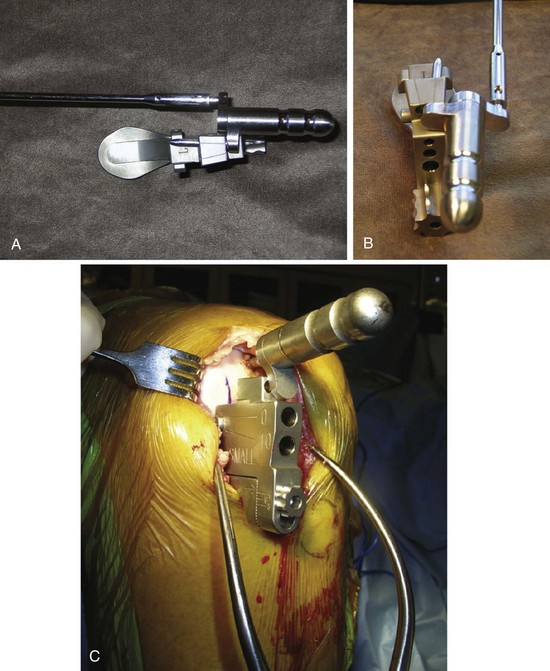
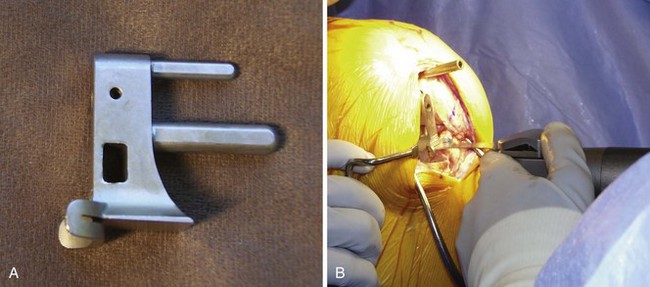
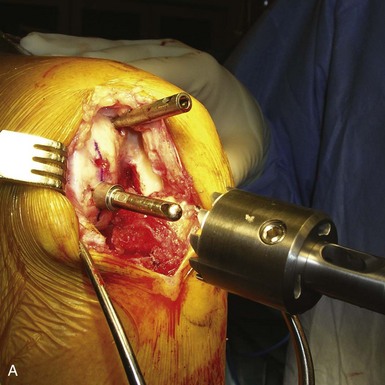
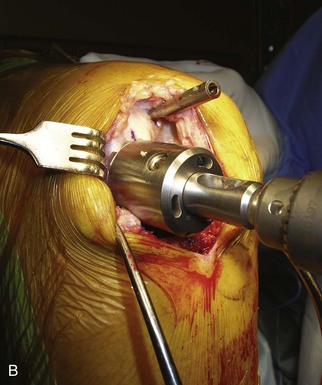
Figure 11–13 (A) Zero spigot inserted into the 6-mm pilot hole. (B) Spherical cutter used to mill the distal femur.
Attention is given to the completion of the tibial preparation. The tibial base plate should cover the plateau adequately, and up to 2 mm of medial overhang is acceptable. It is critical to have the posterior margin of the component flush with the posterior cortex. This is accomplished by placing the universal removal hook into the posterior recess of the knee, pulling it forward to engage the posterior cortex, and then sliding the tibial component posteriorly until contacting the hook. It is common to have 1–2 mm of uncoverage anteriorly on the plateau. The tibial template nail is impacted through the tibial component. The toothbrush saw is utilized to prepare the keel and the bone is removed with the tibial groove gauge (Fig. 11–16). The trial tibial component is impacted gently into position and then trialing is performed with the anatomic trial bearing. The bearing should restore the ligaments to normal tension, and range of motion should be smooth without impingement or instability.
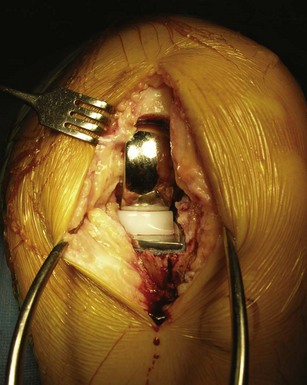
The femoral and tibial bone is prepared to enhance cement interdigitation by drilling multiple small holes with the cement key drill (Fig. 11–17). The soft tissues of the knee are injected with a combination of ketorolac, ropivacaine, and epinephrine as part of our multimodal pain management protocol. The surfaces are copiously irrigated with pulse lavage and then dried. The tibial component is cemented first and impacted from posterior to anterior to force excess cement forward to allow ease of removal. The Woodson-style curette, with both the 45° and 90° arms, is an excellent tool to remove the excess cement. The suction is placed on the 4-mm anterior drill hole in the femur while finger impaction of the cement is performed on the femur. This negative-pressure effect allows for excellent cement interdigitation. The femoral component is then impacted into position and excess cement is removed. The spacer bearing of appropriate thickness is inserted and then the leg is placed in 45° of flexion while the cement cures (Fig. 11–18). The bearing should be re-trialed after the cement cures. The appropriate size of polyethylene bearing is then inserted into the knee. A final check of range of motion ensures a smooth arc of motion with no impingement or instability of the bearing. Routine closure then ensues. Insertion of a drain is left to the discretion of the surgeon.
Postsurgical Follow-Up
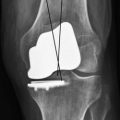
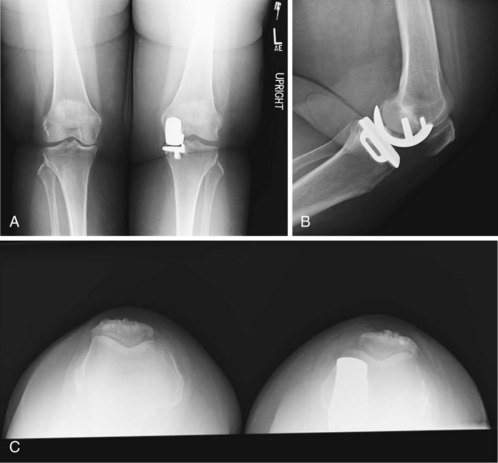
The majority of patients spend 1 night in the hospital. The drain, if utilized, is removed on postoperative day 1. Lombardi et al. reported an average length of stay of 1.4 days (range 0–9) in the first 1000 unicompartmental knee arthroplasties performed in a two-surgeon series.5 The patient returns at 6 weeks postoperatively for a clinical examination and radiographic evaluation (Fig. 11–19). The manipulation rate is 0.7% as reported by Berend in a series of 1000 consecutive unicompartmental knee arthroplasties (Berend KR, personal communication). Barring postoperative variances related to the arthroplasty, follow-up thereafter is annually with anteroposterior, lateral, and Merchant’s view radiographs of the knee. No restrictions are placed on the patients, but high-impact repetitive exercise is discouraged.
Tips and Pearls
1 White SH, Ludkowski PF, Goodfellow JW. Anteromedial osteoarthritis of the knee. J Bone Joint Surg [Br]. 1991;73:582-586.
2 Price AJ, Murray DW, Goodfellow JW, et al. 20-year survival and 10-year clinical results of the Oxford uni knee arthroplasty [paper 046]. Presented at the 73rd Annual Meeting of the American Academy of Orthopaedic Surgeons, Chicago, IL, March 2006.
3 Price AJ, Waite JC, Svard U. Long-term clinical results of the medial Oxford unicompartmental knee arthroplasty. Clin Orthop Relat Res. 2005;435:171-180.
4 Kendrick BJL, Longino D, Pandit H, et al. Polyethylene wear in Oxford unicompartmental knee replacement: a retrieval study of 47 bearings. J Bone Joint Surg [Br]. 2009;92:367-373.
5 Lombardi AVJr, Berend KR, Walter CA, et al. Is recovery faster for mobile-bearing unicompartmental than total knee arthroplasty? Clin Orthop Relat Res. 2009;467:1450-1457.