[level-membership-for-anesthesiology-category]
Chapter 23 Ultrasound-Guided and Fluoroscopically Guided Joint Injections


 Ultrasound or fluoroscopic guidance is indicated for certain joint injections when there is increased needle depth required (e.g., hip joint) or when important surrounding neurovascular structures are present.


Introduction
Peripheral intraarticular injections have been successfully used for several decades in several locations.1 Injections may be performed into joints for diagnostic or therapeutic purposes (or both). Diagnostically, local anesthetic injection into a target area can facilitate identification of pain-generating structures and facilitate proper treatment.2–7 Therapeutically, appropriately placed corticosteroid injections can reduce pain and inflammation and promote functional gains. For both diagnostic and therapeutic intents, precise placement of injectate may be necessary to optimize outcome.8,9 Although peripheral joint injections have been traditionally performed primarily using palpatory landmarks (i.e., “blind”), the possibility of incorrect needle and injectate placement has led many clinicians to consider the use of image guidance for peripheral joint injections. Whereas an inappropriately placed injection will compromise the diagnostic utility of the procedure, incorrect placement of a therapeutic injectate such as corticosteroid or visco-supplementation may compromise outcome.
More recently, ultrasonography has been used to ensure accurate and safe needle placement for a variety of interventional procedures, including joint injections.10–24 Advantages of ultrasonography include no additional exposure to ionizing radiation, no use of contrast (thus lower cost and less risk of allergic reaction), and the ability to directly visualize surrounding soft tissue and neurovascular structures.
Hip Joint Injections
Establishing a Diagnosis
Pain coming from the hip joint can be caused by a variety of pathologic conditions, including degenerative and inflammatory arthritis, labral tears, avascular necrosis, and femoroacetabular impingement.25 The pain is often felt in the groin, although pain in the buttocks, lateral hip, and thigh can also be referred from the hip joint. Even after performing a careful history, physical examination, and imaging studies, it can, at times, be challenging trying to differentiate between pain emanating from an intraarticular hip source versus pain referred from surrounding soft tissue structures or being referred pain from the spine. In this clinical situation, an intraarticular hip joint injection with anesthetic may provide useful information to ensure an accurate diagnosis.2,7 Therapeutically, corticosteroid injections into the hip joint can reduce pain and inflammation.
Imaging
Because of the deep location of the hip joint along with the femoral neurovascular bundle in close proximity to the target injection site, image guidance is recommended for this injection. Although previous studies have described hip joint injections using palpatory landmarks, the results were suboptimal and may have increased complications.26,27 Using fluoroscopy, a straight anteroposterior (AP) view of the hip allows accurate visualization of the target area. Alternatively, ultrasonography may be used to visualize the femoral head and neck along with the overlying hip joint capsule in a sagittal oblique plane.28–30 The proper ultrasound probe needs to be selected for the hip joint, depending on the patient’s body habitus. Higher frequency linear ultrasound probes provide better spatial resolution but have less penetration to see deeper structures. Lower frequency curvilinear probes allow better depth penetration and a wider field of view but less spatial resolution.
Indications
Anesthetic injections into the hip joint may be helpful diagnostically to confirm the source of the patient’s symptoms.2,7 Lack of improvement suggests other causes for the patient’s pain, such as surrounding soft tissue structures or referred pain from spine pathology. Therapeutically, corticosteroid injections may help with intraarticular pain and inflammation in the appropriate clinical situation.


Technique
Fluoroscopically Guided Hip Joint Injection
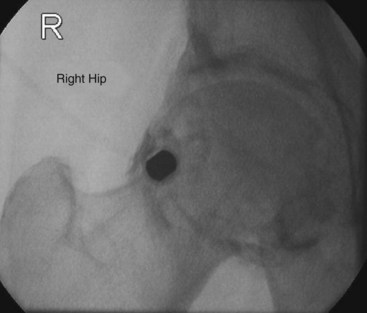
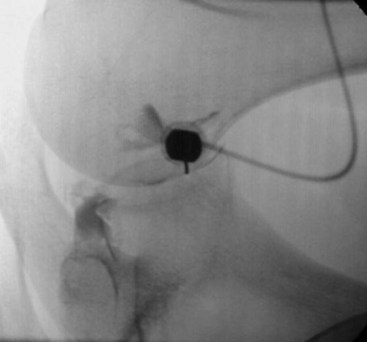
Fluoroscopically guided hip joint injections can be performed by a variety of approaches, including a direct vertical approach parallel to the fluoroscopic beam and an oblique approach from inferior/lateral to superior/medial. The vertical approach is described here. The patient is placed supine on the fluoroscopy table. A direct AP image over the hip joint to be injected is obtained (Fig. 23-1). After clear visualization of the femoral head and neck, a radiopaque object is then used to identify the proper location of needle insertion on the skin. The target site will be the lateral aspect of the femoral head–neck junction to avoid the neurovascular bundle that is usually located medially. Using a surgical marker, this location is then marked on the skin. The femoral artery should be palpated to identify the location of the neurovascular bundle. This location can also be marked on the skin with a surgical marker. The procedure field over the anterior hip should then be sterilely prepped and draped. Using a 25- or 27-gauge needle, the skin and subcutaneous tissue is then anesthetized using 1% lidocaine. Next, a 22-gauge needle is advanced through the overlying soft tissues using intermittent fluoroscopy to ensure proper needle trajectory. Os should be contacted at the femoral head–neck junction. The needle is then slightly withdrawn 1 to 2 mm. After removal of the stylet from the spinal needle, sterile tubing with a syringe containing contrast is attached. A small amount of contrast is slowly injected under fluoroscopy to ensure intraarticular placement. The contrast should flow smoothly into the hip joint without significant resistance. If resistance is encountered, the needle should be adjusted slightly followed by repeat injection of contrast. Contrast should flow freely and away from the needle tip. A hip arthrogram should be obtained, confirming intraarticular needle placement. The syringe is then changed, and the injectate (anesthetic, corticosteroid, or both) is then slowly injected. After placement of the injectate into the hip joint, the needle is then removed, and the overlying area is cleaned.
Ultrasound-Guided Hip Joint Injection
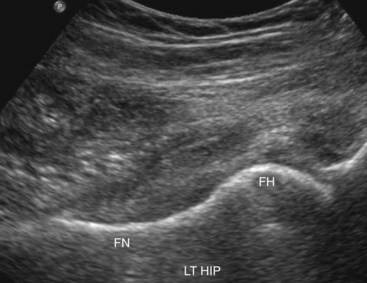
Numerous previous reports have described intraarticular hip joint injections under ultrasound guidance.10,14,19–21,23,24 We follow the method previously described by one of the authors, which is described here.21 The patient is placed in the supine position with the hip in a neutral position. The anterior-superior iliac spine is palpated, and the transducer is oriented in a sagittal plane with the superior end of the transducer located just medial to this structure. The transducer is then kept in the sagittal orientation and moved medially until the hyperechoic (i.e., bright), round femoral head is visualized. The transducer is then rotated into the transverse plane and moved medially to identify the femoral neurovascular bundle. This is easily visualized using color or power Doppler, which is usually now standard on most ultrasound machines. The transducer is then slid back laterally to the femoral head. The transducer is slowly rotated in the orientation of the femoral neck. During this rotation, the superior aspect of the ultrasound probe should keep the femoral head visualized while the inferior aspect of the probe will then bring the femoral neck into view (Fig. 23-2). In this long-axis femoral head–neck view, the ultrasound settings (e.g., depth, gain) can then be further adjusted to provide the optimal image of the femoral head–neck junction and overlying hip joint capsule. While this sagittal oblique orientation is maintained, the examiner slowly slides the transducer medially and laterally to judge the width of the femur neck. The transducer should be positioned at the most lateral aspect possible while all structures are kept clearly in view, thus keeping the neurovascular bundle a greater distance away from the target needle trajectory. With the ultrasound transducer held steady, a surgical marker can then be used to outline the position of the inferior aspect of the ultrasound probe.
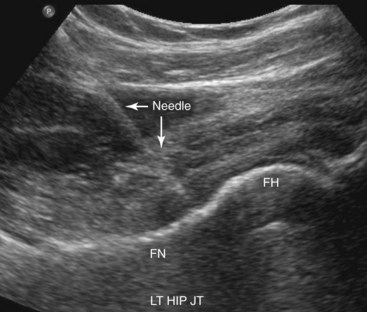
The procedure field over the anterior hip should then be sterilely prepped and draped. With a sterile ultrasound transducer cover and sterile ultrasound gel, the transducer is placed back onto the skin as previously marked, and an optimal image is obtained again. Local anesthesia is provided at the puncture site with 1% lidocaine under live ultrasound guidance. A 25-gauge needle is often used for this part of the procedure to anesthetize the skin and deeper subcutaneous layers. Next, a free-hand technique is used with the injectate syringe attached to a 22-gauge 9-cm (or longer based on the clinical situation) spinal needle. The needle is slowly advanced through the overlying soft tissues while the target femoral head–neck junction and needle tip are visualized at all times. The hip joint capsule can be visualized, and a “pop” is often felt as the needle advances through the capsule and into the hip joint. With the needle tip clearly in view, the injectate is then slowly injected while the hip capsule is visualized rising away from the femoral head and neck (Fig. 23-3). If corticosteroid is injected, it appears as hyperechoic (bright) under ultrasonography. If only local anesthetic is injected, it appears anechoic (dark) under ultrasonography. After the injection is completed, the needle is removed, and the area is cleaned.
Glenohumeral Joint Injections
Imaging
Glenohumeral joint injections are often performed using only palpatory landmarks without image guidance. Previous studies, however, have shown poor accuracy with non-guided glenohumeral joint injections.8,31 In the authors’ experience, the glenohumeral joint is often located deeper than one would expect. This, in combination with the relatively small target size of the joint space, likely accounts for the reported poor accuracy of this injection performed without imaging guidance. To ensure accurate needle and injectate placement, either fluoroscopy or ultrasound guidance can be used successfully. Using fluoroscopy, a straight AP view of the glenohumeral joint allows accurate visualization of the target area. This injection is most commonly performed from an anterior approach. Alternatively, ultrasonography may be used to accurately perform a glenohumeral joint injection, usually with a posterior approach.17,32


Technique
Fluoroscopically Guided Glenohumeral Joint Injection
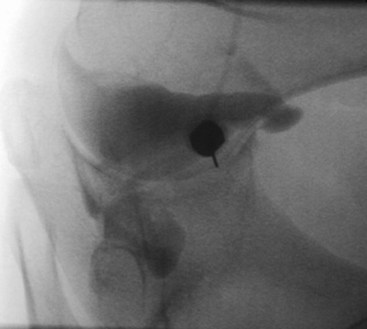
Fluoroscopically guided glenohumeral joint injections can be performed with an anterior or a posterior approach. The anterior approach is described here. The patient is placed supine on the fluoroscopy table with the hand supinated. A direct AP image over the glenohumeral joint is obtained. After clear visualization of the joint space between the humerus and glenoid, a radiopaque object is then used to identify the proper location of needle insertion on the skin. The target for the injection is approximately one third of the way up from the inferior aspect of the joint, aiming closer to the humeral head than the glenoid.33 Using a surgical marker, this location is then marked on the skin. The procedure field over the anterior glenohumeral joint should then be sterilely prepped and draped. Using a 25- or 27-gauge needle, the skin and subcutaneous tissue is then anesthetized using 1% lidocaine. Next, a 22-gauge, 6.5-cm or 9-cm needle is advanced through the overlying soft tissues using intermittent fluoroscopy to ensure proper needle trajectory. Bone is contacted on the medial side of the anterior humeral head. The needle is then slightly withdrawn and redirected medially into the glenohumeral joint (Fig. 23-4). After removal of the stylet from the spinal needle, sterile tubing with a syringe containing contrast is attached. A small amount of contrast is slowly injected under fluoroscopy to ensure intraarticular placement. The contrast should flow smoothly into the glenohumeral joint without significant resistance. If resistance is encountered, the needle should be slightly adjusted or the bevel turned followed by repeat injection of contrast. A glenohumeral joint arthrogram should then be obtained, confirming intraarticular needle placement (Fig. 23-5). The syringe is then changed, and the injectate (anesthetic, corticosteroid, or both) is then slowly injected. After placement of the injectate into the glenohumeral joint, the needle is then removed, and the overlying area is cleaned.
Ultrasound-Guided Glenohumeral Joint Injection
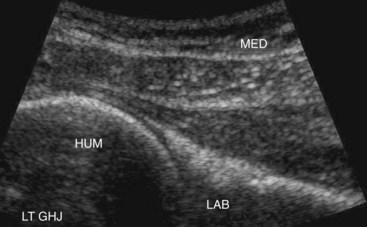
Similar to fluoroscopy, there are varying ways to access the glenohumeral joint using ultrasound guidance. The authors prefer a posterior approach that has been previously described.17,32 The patient is placed in the lateral decubitus position with the target shoulder facing upward. The shoulder can be adducted across the body. The spine of the scapula is palpated, and then the transducer is placed just inferior to this in the posterior/lateral aspect of the shoulder. The hyperechoic (i.e., bright) humeral head is then identified. This can be confirmed with passive shoulder internal or external rotation. The transducer is slid either medial or lateral to identify the posterior labrum, spinoglenoid notch, and posterior humeral head. The target for the injection is between the medial aspect of the humeral head and the triangular-shaped posterior labrum (Fig. 23-6). The target area should be located close to the side of the transducer where the needle will enter the skin. With the ultrasound transducer held steady, a surgical marker can then be used to outline the position of the lateral aspect of the ultrasound probe.
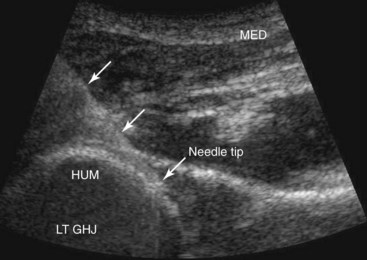
The skin over the posterior shoulder should then be sterilely prepped and draped. With a sterile ultrasound transducer cover and sterile ultrasound gel, the transducer is placed back onto the skin as previously marked, and an optimal image of the glenohumeral joint is again obtained. Local anesthesia is then provided at the insertion site with 1% lidocaine under live ultrasound guidance. A 25-gauge, 5-cm needle is often used for this part of the procedure to anesthetize the skin and deeper subcutaneous layers. Next, a free-hand technique is used with the injectate syringe attached to a 22-gauge, 6.5-cm or 9-cm spinal needle. The needle is slowly advanced through the overlying soft tissues while the targeted posterior glenohumeral joint and needle tip are visualized at all times. The needle tip is advanced into the joint capsule until it is visualized between the humeral head and the posterior labrum (Fig. 23-7). The medication is then slowly injected. If corticosteroid is injected, it appears as hyperechoic (bright) under ultrasonography. If only local anesthetic is injected, it appears anechoic (dark) under ultrasonography. After the injection is completed, the needle is removed, and the area is cleaned.
Knee Joint Injections
Establishing a Diagnosis
Knee pain can be caused by multiple conditions, including bursitis, ligamentous trauma, patellofemoral pain syndrome, inflammatory arthritis, and osteoarthritis. Pain is typically felt directly within the knee, although pain can be referred into both the thigh and lower leg. A detailed history, physical examination, and imaging studies can help localize the pain generator. However, at times, diagnostic intraarticular knee injections can assist in making the correct diagnosis.34 Therapeutically, corticosteroid and viscosupplementation injections have been shown to reduce pain associated with knee osteoarthritis.35,36
Imaging
The superficial structures of the knee joint are readily visualized via ultrasonography. Using ultrasonography, the knee joint capsule (suprapatellar recess) can be visualized deep to the quadriceps tendon between the quadriceps fat pad and the prefemoral fat pad just proximal to the patella. Effusions can often be appreciated at this location. Effusions may also be visualized medially or laterally to the patella under the patellar retinacula. When visualized, these hypoechoic or anechoic (i.e., dark) effusions are usually accessible to aspiration and injection. When no effusion is visible, the medial patellar portal may be used with visualization of the distal patella, Hoffa’s fat pad, and the medial femur. In patients with a lower body mass index, a linear probe can be used to visualize the capsule lateral to the patella. In patients with larger knees, a curvilinear probe may be needed to visualize the joint capsule proximal to the patella and deep to the quadriceps tendon. Patients with posterior knee pain may have a Baker’s cyst, which is commonly visualized between the gastrocnemius and semimembranosus tendon.37


Technique
Fluoroscopically Guided Knee Joint Injection
There are a variety of approaches to fluoroscopically guided knee injections. These include the lateral or medial patellofemoral joint approach as well as the anterior approach.38 The lateral patellofemoral joint approach is described here. The patient is placed on the fluoroscopy table in the supine position. The knee to be injected is flexed 20 to 30 degrees with a pillow or towel placed under the joint for comfort. The patella is palpated, and the groove between the patella and femur is marked with a surgical marker. The anterior knee is then sterilely prepped and draped. A 25- or 27-gauge needle is used to anesthetize the skin and subcutaneous tissue. With one hand manually displacing the patella medially, a 19- or 22-gauge needle is advanced under the patella into the patellofemoral joint. After the stylet is removed, sterile tubing and a syringe containing 1 to 2 cc of local anesthetic is attached. There should be minimal resistance when this small volume is injected as a test dose. Next, 1 to 2 cc of contrast agent (either Omnipaque or gadolinium) is injected. If the contrast does not spread easily in the typical capsular pattern or if significant resistance is encountered, the needle should be repositioned. The beginning of a knee arthrogram should be obtained. The injectate is then slowly injected. After the injection is completed, the needle is removed, and the area is cleaned.
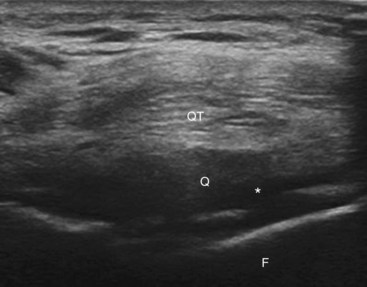
Ultrasound-Guided Knee Joint Injection
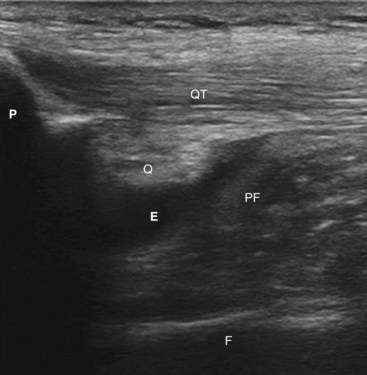
Two reports have described techniques for ultrasound-guided intraarticular knee injections.14,39 The authors typically use the methods described by Qvistgaard and colleagues14 with some modifications. The patient is placed in the supine position. The symptomatic knee is flexed to 30 to 70 degrees, depending on where the fluid is best visualized in the suprapatellar recess. After the patella is palpated, a linear probe is placed over the quadriceps tendon in the longitudinal axis with the proximal aspect of the patella visible distally. The quadriceps tendon, quadriceps fat pad, and pre-femoral fat pad and femur can usually be well visualized. The hypoechoic suprapatellar synovial bursa or collapsed joint recess lies between the quadriceps fat pad and prefemoral fat pad (Fig. 23-8). The probe is then rotated 90 degrees to a short-axis view of the quadriceps tendon (Fig. 23-9). The skin lateral to the transducer is then palpated to estimate the needle trajectory with the goal of avoiding the quadriceps tendon. The skin is then marked with a surgical marker and prepped in the usual sterile fashion. Using a 25- or 27-gauge needle, 1% lidocaine is injected to anesthetize the superficial tissue and skin. This can be done under direct ultrasound guidance to help visualize the correct path for the larger needle. Next, using a free-hand technique, a 22- or 25-gauge needle is slowly advanced through soft tissue until the needle tip is positioned between the quadriceps fat pad and prefemoral fat pad (Fig. 23-10). If no obvious effusion is visible for aspiration, local anesthetic can be injected to ensure proper needle tip placement. The injectate should flow with minimal resistance. A small effusion should become apparent in the proper tissue plane between the quadriceps tendon and prefemoral fat pad. After proper needle placement is confirmed, either corticosteroid or viscosupplementation can be injected. Corticosteroid particles are usually visible under ultrasonography. After the injection, the needle is then removed, and the site is cleaned.

Other Peripheral Joint Injections
Practitioners have used ultrasonography to guide multiple other peripheral joint procedures, including the elbow, wrist, ankle, and small joints of the hands (carpometacarpal, metatarsophalangeal, proximal interphalangeal joints). Rheumatologists have found ultrasound guidance helpful when fluid aspiration is needed for diagnostic purposes.40 In a study to evaluate clinical outcomes, Sibbitt and colleagues41 found that ultrasound-guided injections of both large and small peripheral joints provided increased pain relief 2 weeks after the procedure. Compared with palpation-guided injections, the response rate increased by 62%.
In conclusion, peripheral joint injections have been completed for both diagnostic and therapeutic purposes for at least 6 decades. Initially, these procedures were completed using only palpatory landmarks for guidance. More recently, fluoroscopy and ultrasonography have been used with increased accuracy.10–12,20,22,38 To date, limited studies have directly correlated peripheral injection accuracy with efficacy.41 More studies are needed to firmly establish this relationship. The authors of this chapter believe that when clinically indicated, fluoroscopy and ultrasonography allow physicians to perform safe, accurate peripheral joint injections, which may reduce the risk of complications and improve clinical outcomes.
1 Hollander JL, Brown EMJr, Jessar RA, Brown CY. Hydrocortisone and cortisone injected into arthritic joints; comparative effects of and use of hydrocortisone as a local antiarthritic agent. J Am Med Assoc. 1951;147(17):1629-1635.
2 Braunstein EM, Cardinal E, Buckwalter KA, Capello W. Bupivacaine arthrography of the post-arthroplasty hip. Skeletal Radiol. 1995;24(7):519-521.
3 Mitchell MJ, Bielecki D, Bergman AG, et al. Localization of specific joint causing hindfoot pain: value of injecting local anesthetics into individual joints during arthrography. AJR Am J Roentgenol. 1995;164(6):1473-1476.
4 Khoury NJ, el-Khoury GY, Saltzman CL, Brandser EA. Intraarticular foot and ankle injections to identify source of pain before arthrodesis. AJR Am J Roentgenol. 1996;167(3):669-673.
5 Crawford RW, Ellis AM, Gie GA, Ling RS. Intra-articular local anaesthesia for pain after hip arthroplasty. J Bone Joint Surg Br. 1997;79(5):796-800.
6 Lucas PE, Hurwitz SR, Kaplan PA, et al. Fluoroscopically guided injections into the foot and ankle: localization of the source of pain as a guide to treatment—prospective study. Radiology. 1997;204(2):411-415.
7 Crawford RW, Gie GA, Ling RS, Murray DW. Diagnostic value of intra-articular anaesthetic in primary osteoarthritis of the hip. J Bone Joint Surg Br. 1998;80(2):279-281.
8 Jones A, Regan M, Ledingham J, et al. Importance of placement of intra-articular steroid injections. BMJ. 1993;307(6915):1329-1330.
9 Partington PF, Broome GH. Diagnostic injection around the shoulder: hit and miss? A cadaveric study of injection accuracy. J Shoulder Elbow Surg. 1998;7(2):147-150.
10 Carson BW, Wong A. Ultrasonographic guidance for injections of local steroids in the native hip. J Ultrasound Med. 1999;18(2):159-160.
11 Koski JM. Ultrasound guided injections in rheumatology. J Rheumatol. 2000;27(9):2131-2138.
12 Grassi W, Farina A, Filippucci E, Cervini C. Sonographically guided procedures in rheumatology. Semin Arthritis Rheum. 2001;30(5):347-353.
13 Koski JM, Hermunen H. Intra-articular glucocorticoid treatment of the rheumatoid wrist. An ultrasonographic study. Scand J Rheumatol. 2001;30(5):268-270.
14 Qvistgaard E, Kristoffersen H, Terslev L, et al. Guidance by ultrasound of intra-articular injections in the knee and hip joints. Osteoarthritis Cartilage. 2001;9(6):512-517.
15 Sofka CM, Collins AJ, Adler RS. Use of ultrasonographic guidance in interventional musculoskeletal procedures: a review from a single institution. J Ultrasound Med. 2001;20(1):21-26.
16 Sofka CM, Adler RS. Ultrasound-guided interventions in the foot and ankle. Semin Musculoskelet Radiol. 2002;6(2):163-168.
17 Adler RS, Sofka CM. Percutaneous ultrasound-guided injections in the musculoskeletal system. Ultrasound Q. 2003;19(1):3-12.
18 Migliore A, Martin LS, Alimonti A, et al. Efficacy and safety of viscosupplementation by ultrasound-guided intra-articular injection in osteoarthritis of the hip. Osteoarthritis Cartilage. 2003;11(4):305-306.
19 Migliore A, Tormenta S, Martin LS, et al. Open pilot study of ultrasound-guided intra-articular injection of hylan G-F 20 (Synvisc) in the treatment of symptomatic hip osteoarthritis. Clin Rheumatol. 2005;24(3):285-289.
20 Sofka CM, Saboeiro G, Adler RS, et al. Ultrasound-guided adult hip injections. J Vasc Interv Radiol. 2005;16(8):1121-1123.
21 Smith J, Hurdle MF. Office-based ultrasound-guided intra-articular hip injection: technique for physiatric practice. Arch Phys Med Rehabil. 2006;87(2):296-298.
22 Smith J, Hurdle MF, Locketz AJ, Wisniewski SJ. Ultrasound-guided piriformis injection: technique description and verification. Arch Phys Med Rehabil. 2006;87(12):1664-1667.
23 Sofka CM, Adler RS, Danon MA. Sonography of the acetabular labrum: visualization of labral injuries during intra-articular injections. J Ultrasound Med. 2006;25(10):1321-1326.
24 Smith J, Hurdle MF, Weingarten TN. Accuracy of sonographically guided intra-articular injections in the native adult hip. J Ultrasound Med. 2009;28(3):329-335.
25 DeAngelis NA, Busconi BD. Assessment and differential diagnosis of the painful hip. Clin Orthop Relat Res. 2003;406:11-18.
26 Leopold SS, Battista V, Oliverio JA. Safety and efficacy of intraarticular hip injection using anatomic landmarks. Clin Orthop Relat Res. 2001;391:192-197.
27 Ziv YB, Kardosh R, Debi R, et al. An in expensive and accurate method for hip injections without the use of imaging. J Clin Rheumatol. 2009;15(3):103-105.
28 Koski JM, Anttila PJ, Isomäki HA. Ultrasonography of the adult hip joint. Scand J Rheumatol. 1989;18(2):113-117.
29 Moss SG, Schweitzer ME, Jacobson JA, et al. Hip joint fluid: detection and distribution at MR imaging and US with cadaveric correlation. Radiology. 1998;208(1):43-48.
30 Iagnocco A, Filippucci E, Meenagh G, et al. Ultrasound imaging for the rheumatologist III. Ultrasonography of the hip. Clin Exp Rheumatol. 2006;24(3):229-232.
31 Sethi PM, Kingston S, Elattrache N. Accuracy of anterior intra-articular injection of the glenohumeral joint. Arthroscopy. 2005;21(1):77-80.
32 Cicak N, Matasović T, Bajraktarević T. Ultrasonographic guidance of needle placement for shoulder arthrography. J Ultrasound Med. 1992;11(4):135-137.
33 Peterson JJ, Fenton DS, Czervionke LF. Image-guided musculoskeletal intervention. Philadelphia: Saunders Elsevier; 2008.
34 Malfair D. Therapeutic and diagnostic joint injections. Radiol Clin North Am. 2008;46(3):439-453. v
35 Adams ME, Atkinson MH, Lussier AJ, et al. The role of viscosupplementation with hylan G-F 20 (Synvisc) in the treatment of osteoarthritis of the knee: a Canadian multicenter trial comparing hylan G-F 20 alone, hylan G-F 20 with non-steroidal anti-inflammatory drugs (NSAIDs) and NSAIDs alone. Osteoarthritis Cartilage. 1995;3(4):213-225.
36 Ravaud P, Moulinier L, Giraudeau B, et al. Effects of joint lavage and steroid injection in patients with osteoarthritis of the knee: results of a multicenter, randomized, controlled trial. Arthritis Rheum. 1999;42(3):475-482.
37 Ward EE, Jacobson JA, Fessell DP, et al. Sonographic detection of Baker’s cysts: comparison with MR imaging. AJR Am J Roentgenol. 2001;176(2):373-380.
38 Freiberger RH, Pavlov H. Knee arthrography. Radiology. 1988;166(2):489-492.
39 Im SH, Lee SC, Park YB, et al. Feasibility of sonography for intra-articular injections in the knee through a medial patellar portal. J Ultrasound Med. 2009;28(11):1465-1470.
40 Balint PV, Kane D, Hunter J, et al. Ultrasound guided versus conventional joint and soft tissue fluid aspiration in rheumatology practice: a pilot study. J Rheumatol. 2002;29(10):2209-2213.
41 Sibbitt WL, Peisajovich A, Michael AA, et al. Does sonographic needle guidance affect the clinical outcome of intraarticular injections? J Rheumatol. 2009;36(9):1892-1902.
[/level-membership-for-anesthesiology-category][not-level-membership-for-anesthesiology-category]
Chapter 23 Ultrasound-Guided and Fluoroscopically Guided Joint Injections
Ultrasound or fluoroscopic guidance is indicated for certain joint injections when there is increased needle depth required (e.g., hip joint) or when important surrounding neurovascular structures are present.Introduction
Peripheral intraarticular injections have been successfully used for several decades in several locations.1 Injections may be performed into joints for diagnostic or therapeutic purposes (or both). Diagnostically, local anesthetic injection into a target area can facilitate identification of pain-generating structures and facilitate proper treatment.2–7 Therapeutically, appropriately placed corticosteroid injections can reduce pain and inflammation and promote functional gains. For both diagnostic and therapeutic intents, precise placement of injectate may be necessary to optimize outcome.8,9 Although peripheral joint injections have been traditionally performed primarily using palpatory landmarks (i.e., “blind”), the possibility of incorrect needle and injectate placement has led many clinicians to consider the use of image guidance for peripheral joint injections. Whereas an inappropriately placed injection will compromise the diagnostic utility of the procedure, incorrect placement of a therapeutic injectate such as corticosteroid or visco-supplementation may compromise outcome.
More recently, ultrasonography has been used to ensure accurate and safe needle placement for a variety of interventional procedures, including joint injections.10–24 Advantages of ultrasonography include no additional exposure to ionizing radiation, no use of contrast (thus lower cost and less risk of allergic reaction), and the ability to directly visualize surrounding soft tissue and neurovascular structures.
Hip Joint Injections
Establishing a Diagnosis
Pain coming from the hip joint can be caused by a variety of pathologic conditions, including degenerative and inflammatory arthritis, labral tears, avascular necrosis, and femoroacetabular impingement.25 The pain is often felt in the groin, although pain in the buttocks, lateral hip, and thigh can also be referred from the hip joint. Even after performing a careful history, physical examination, and imaging studies, it can, at times, be challenging trying to differentiate between pain emanating from an intraarticular hip source versus pain referred from surrounding soft tissue structures or being referred pain from the spine. In this clinical situation, an intraarticular hip joint injection with anesthetic may provide useful information to ensure an accurate diagnosis.2,7 Therapeutically, corticosteroid injections into the hip joint can reduce pain and inflammation.
Imaging
Because of the deep location of the hip joint along with the femoral neurovascular bundle in close proximity to the target injection site, image guidance is recommended for this injection. Although previous studies have described hip joint injections using palpatory landmarks, the results were suboptimal and may have increased complications.26,27 Using fluoroscopy, a straight anteroposterior (AP) view of the hip allows accurate visualization of the target area. Alternatively, ultrasonography may be used to visualize the femoral head and neck along with the overlying hip joint capsule in a sagittal oblique plane.28–30 The proper ultrasound probe needs to be selected for the hip joint, depending on the patient’s body habitus. Higher frequency linear ultrasound probes provide better spatial resolution but have less penetration to see deeper structures. Lower frequency curvilinear probes allow better depth penetration and a wider field of view but less spatial resolution.
Indications
Anesthetic injections into the hip joint may be helpful diagnostically to confirm the source of the patient’s symptoms.2,7 Lack of improvement suggests other causes for the patient’s pain, such as surrounding soft tissue structures or referred pain from spine pathology. Therapeutically, corticosteroid injections may help with intraarticular pain and inflammation in the appropriate clinical situation.
Technique
Fluoroscopically Guided Hip Joint Injection
Fluoroscopically guided hip joint injections can be performed by a variety of approaches, including a direct vertical approach parallel to the fluoroscopic beam and an oblique approach from inferior/lateral to superior/medial. The vertical approach is described here. The patient is placed supine on the fluoroscopy table. A direct AP image over the hip joint to be injected is obtained (Fig. 23-1). After clear visualization of the femoral head and neck, a radiopaque object is then used to identify the proper location of needle insertion on the skin. The target site will be the lateral aspect of the femoral head–neck junction to avoid the neurovascular bundle that is usually located medially. Using a surgical marker, this location is then marked on the skin. The femoral artery should be palpated to identify the location of the neurovascular bundle. This location can also be marked on the skin with a surgical marker. The procedure field over the anterior hip should then be sterilely prepped and draped. Using a 25- or 27-gauge needle, the skin and subcutaneous tissue is then anesthetized using 1% lidocaine. Next, a 22-gauge needle is advanced through the overlying soft tissues using intermittent fluoroscopy to ensure proper needle trajectory. Os should be contacted at the femoral head–neck junction. The needle is then slightly withdrawn 1 to 2 mm. After removal of the stylet from the spinal needle, sterile tubing with a syringe containing contrast is attached. A small amount of contrast is slowly injected under fluoroscopy to ensure intraarticular placement. The contrast should flow smoothly into the hip joint without significant resistance. If resistance is encountered, the needle should be adjusted slightly followed by repeat injection of contrast. Contrast should flow freely and away from the needle tip. A hip arthrogram should be obtained, confirming intraarticular needle placement. The syringe is then changed, and the injectate (anesthetic, corticosteroid, or both) is then slowly injected. After placement of the injectate into the hip joint, the needle is then removed, and the overlying area is cleaned.
Ultrasound-Guided Hip Joint Injection
Numerous previous reports have described intraarticular hip joint injections under ultrasound guidance.10,14,19–21,23,24 We follow the method previously described by one of the authors, which is described here.21 The patient is placed in the supine position with the hip in a neutral position. The anterior-superior iliac spine is palpated, and the transducer is oriented in a sagittal plane with the superior end of the transducer located just medial to this structure. The transducer is then kept in the sagittal orientation and moved medially until the hyperechoic (i.e., bright), round femoral head is visualized. The transducer is then rotated into the transverse plane and moved medially to identify the femoral neurovascular bundle. This is easily visualized using color or power Doppler, which is usually now standard on most ultrasound machines. The transducer is then slid back laterally to the femoral head. The transducer is slowly rotated in the orientation of the femoral neck. During this rotation, the superior aspect of the ultrasound probe should keep the femoral head visualized while the inferior aspect of the probe will then bring the femoral neck into view (Fig. 23-2). In this long-axis femoral head–neck view, the ultrasound settings (e.g., depth, gain) can then be further adjusted to provide the optimal image of the femoral head–neck junction and overlying hip joint capsule. While this sagittal oblique orientation is maintained, the examiner slowly slides the transducer medially and laterally to judge the width of the femur neck. The transducer should be positioned at the most lateral aspect possible while all structures are kept clearly in view, thus keeping the neurovascular bundle a greater distance away from the target needle trajectory. With the ultrasound transducer held steady, a surgical marker can then be used to outline the position of the inferior aspect of the ultrasound probe.
[/not-level-membership-for-anesthesiology-category]
