Chapter 11 Tympanoplasty—Undersurface Graft Technique
Transcanal Approach
 Videos corresponding to this chapter are available online at www.expertconsult.com.
RATIONALE AND REQUIREMENTS
Several basic requirements for successful use of this approach are as follows:
GRAFT SELECTION
In transcanal tympanoplasty using the underlay technique, the grafting material may be any type of autogenous connective tissue, such as vein, fascia, or perichondrium. In 1957, Shea,1 using vein, was the first to use the underlay grafting technique. Tabb,2 Austin and Shea,3 and others soon recognized the superiority of this method over onlay skin grafting and followed Shea’s lead. The use of fascia as an underlay graft was first reported by Storrs.4 Tragal perichondrium was first used in tympanoplasty as an onlay graft by Goodhill and associates,5 and it is the material we prefer. It is in the immediate surgical field, is extremely durable, and is very easy to handle when pressed. Vein also is easy to position and, if large enough (as from the antecubital fossa), can be used to repair perforations of any size. Our primary objection to the use of vein grafts is that in the event of a serious future illness, the large vein could be an important means of administering parenteral medications.
SURGICAL TECHNIQUE
Preparation
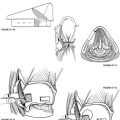
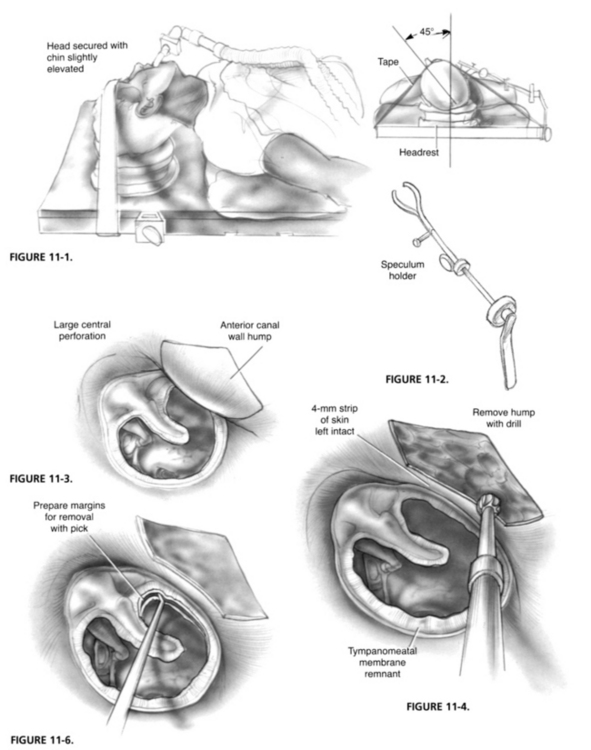
Perioperative antibiotics are rarely used. The hair and skin surrounding the ear are cleansed with 70% alcohol. The hair is not shaved unless fascia is to be taken, but it is combed away from the ear and sprayed with liquid spray bandage. The head is secured with tape in a standard foam headrest in the position most conducive to good visibility for the surgeon; this usually involves tilting the head back and the chin up slightly (Fig. 11-1). For this reason, the surgeon, rather than a nursing assistant, should prepare and position the patient. The ear canal, auricle, and surrounding skin are cleansed with povidone-iodine scrub and painted with povidone-iodine solution. The field is draped in a sterile manner.
Visibility: Canal Enlargement and Speculum Placement
The sine qua non for successful transcanal surgery is adequate exposure. Inadequate visibility is probably the primary objection to this technique, but there are several moves that can significantly improve it. The external auditory meatus can be enlarged by making a small slit in the superior aspect of its lateral end with a No. 15 scalpel blade and stretching it with a nasal speculum. The largest sized ear speculum that can be atraumatically inserted is used and secured with a speculum holder (Fig. 11-2). The speculum holder is essential because it allows the use of both hands and serves as a support for the surgeon’s fingers. The holder is quite mobile, and allows the speculum to be placed and secured in the optimal position. It should be repositioned as needed throughout the procedure. The microscope head should also be moved about frequently to provide an unobstructed view of the operative field. Generally, the less complex the microscope, the more mobile it is, and the easier it is to use.
In the case of anterior and large central perforations, the anterior margin frequently cannot be seen because of a bulging anterior canal wall (Fig. 11-3). This problem can be remedied easily in 99% of cases by removing the hump. Sometimes the removal of a “dog-house” segment of anterior canal wall skin is all that is necessary. Frequently, the bony hump must also be removed, and this can be done quickly with a curette or small cutting burr (Fig. 11-4). In the removal of this bony hump, one must be aware of the proximity of the temporomandibular joint and avoid penetration into it. It is important to leave a 2 to 3 mm strip of skin intact between the annulus and the medial end of the resected skin. The excised skin is preserved in physiologic solution until the end of the procedure, at which time it is replaced.
If the anterior perforation is marginal, the Austin “reverse elevator” (Fig. 11-5) is used to elevate the annulus and the adjacent 1 to 2 mm of the canal wall skin to provide a larger raw surface area for graft attachment. This elevated area gradually retracts into its normal position as the ear heals. It is a crucial maneuver in the successful repair of the anterior marginal perforation.

Perforation Preparation
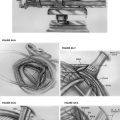
When the margin of the perforation can be adequately visualized, it is prepared by incising the edge with a sharp, slightly angled pick (Fig. 11-6), removing the rim and about 1 or 2 mm of the mucosa with a cup forceps (Fig. 11-7).
Canal Incisions and Middle Ear Exposure
A posterior tympanomeatal incision is made with the superior limb beginning 2 to 3 mm anterior to the malleus neck (Fig. 11-8). This makes it possible to elevate the drumhead remnant completely off of the malleus handle (Fig. 11-9). Removal of the drumhead remnant from the malleus handle is performed in most situations except those in which the perforation is in an inferior or extremely posterior position. Two possible major advantages result from this. First, removal of any squamous epithelial ingrowth along the medial aspect of the malleus handle is facilitated. And second, ossicular chain reconstruction may be benefited since placement of the graft lateral to the handle of the malleus allows a malleus to stapes prosthesis to be palced directly against the bare malleus, without an intervening graft. This second advantage becomes moot however if a PORP or TORP is used.
Perichondrial Graft
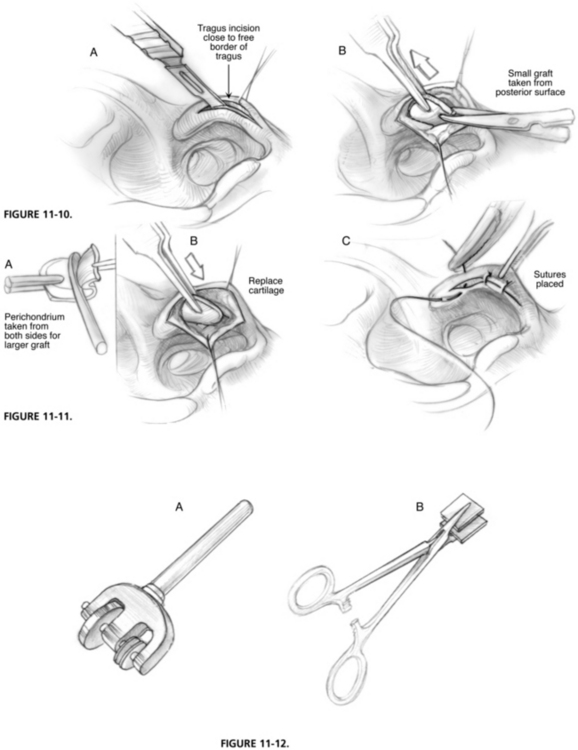
The tragal perichondrial graft is taken. If the perforation involves 60% of the surface of the drumhead or less, the graft usually may be obtained from the posterior aspect of the tragus through an incision immediately posterior to the free border without removal of the cartilage itself (Fig. 11-10). If the perforation involves more than 60% of the drumhead, the entire tragus with its perichondrium is removed through an incision along the free border. The excess soft tissue is removed from the perichondrium overlying the anterior surface of the tragus, and the entire perichondrium is removed from both sides of the cartilage and over the free border with a duckbill or Freer elevator and thumb forceps (Fig. 11-11). The cartilage is reinserted into the wound in its normal position to preserve the tragal contour, and the incision is closed with fine absorbable suture. The perichondrium is pressed with a vein or fascia press (Fig. 11-12). This process thins the graft for easier handling and enlarges it so that any size perforation can be closed.
Middle Ear Preparation
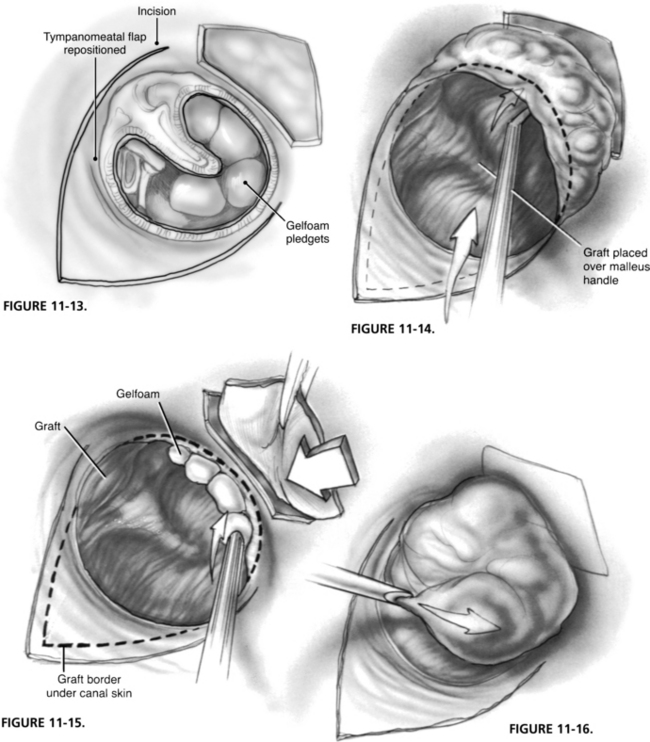
The middle ear is filled with absorbable gelatin sponge (Gelfoam) soaked in a physiologic solution, such as lactated Ringer solution or Tis-U-Sol irrigating solution (Fig. 11-13). It is imperative that the tympanic cavity be filled with the Gelfoam, especially in the anterior part at the eustachian tube orifice, to prevent medial displacement of the graft. The central part of the middle ear should not be filled lateral to the umbo, however. If it is overfilled at this point, lateralization and loss of the conical contour of the drumhead may result.
Graft Placement and Stabilization
For medium-sized or large perforations, the tympanomeatal flap is lifted, and the graft is placed over the posterior middle ear space, and then advanced over the malleus handle to the anteriormost extent of the perforation. The tympanomeatal flap is laid back down over the graft, and the graft edges are tucked under the margins of the flap (Fig. 11-14). With smaller posterior and inferior perforations, the graft may simply be inserted through the perforation and smoothed out posteriorly by elevating the tympanomeatal flap.
Some surgeons prefer to place the graft medial to the malleus handle.6 As we pointed out earlier, we prefer graft placement onto the surface of the malleus since this allows a malleus to stapes prosthesis to be approximated directly to the bony surface of the malleus without an intervening graft. Adhesions between the umbo and promontory are also less likely to occur if the drum is placed lateral to the malleus handle.
External Canal Packing
If the anterior canal wall skin has been removed, it should now be replaced. Small pledgets of moist Gelfoam are used to overlap the junction of rim and graft circumferentially and over the canal incision for further stabilization (Figs. 11-15 and 11-16). Finally, the external canal is filled with an antibiotic ointment, such as polymyxin. In the event of antibiotic sensitivity, povidone-iodine ointment may be substituted see video.
1. Shea J.J.Jr. Vein graft closure of eardrum perforations. J Laryngol Otol. 1960;74:358.
2. Tabb H.G. Closure of perforations for the tympanic membrane by vein grafts: A preliminary report of twenty cases. Laryngoscope. 1960;70:271.
3. Austin D.F., Shea J.J.Jr. A new system of tympanoplasty using vein graft. Laryngoscope. 1961;71:596.
4. Storrs L.A. Myringoplasty with the use of fascia grafts. Arch Otolaryngol. 1961;74:45.
5. Goodhill V., Harris I., Brockman S.F. Tympanoplasty with perichondrial graft. Arch Otolaryngol. 1964;79:131.
6. Hough J.V.D. Tympanoplasty with the interior fascial graft technique and ossicular reconstruction. Laryngoscope. 1970;80:1385.