Tubal Sterilization
Tubal interruption, or bilateral partial salpingectomy, is a relatively easy and direct method of accomplishing surgical sterilization. Typically, this operation is performed at the time of cesarean section, or immediately postpartum in the case of vaginal delivery. Two operations are especially well suited for these particular circumstances. Modified Irving and Pomeroy techniques are enhanced as further tubal separation may be anticipated as the result of rapid regression of the uterine mass to a nonpregnant size and shape. Most interval sterilizations are performed via laparoscopy (Fig. 30–1A–H). The Uchida operation can be performed as a postpartum or an interval operation. Simple fimbriectomy or ampullary-isthmus excision is well suited as an interim operation.
Whatever method is selected for tubal sterilization, certain precepts must be followed. First, an executed sterilization permit must be obtained for each and every patient, and each patient must be informed that the operation is a permanent sterilization procedure, and that there is no possibility of pregnancy in the future. Paradoxically, patients also must be told that a failure rate is associated with each operation. Second, the tube must be carefully distinguished from the two other structures located at the top of the broad ligament: most anteriorly, the round ligament, and most posteriorly, the utero-ovarian ligament (Fig. 30–2). Next the tube should be traced from the uterus to the fimbriated end and then secured with a Babcock clamp or stay suture-ligature. Finally, the location of the ipsilateral ovary should be viewed relative to the tube. The proximal and distal ends of the tube are grasped with Babcock clamps, and the stretched tube is held straight and elevated upward so as to clearly expose the mesosalpinx.
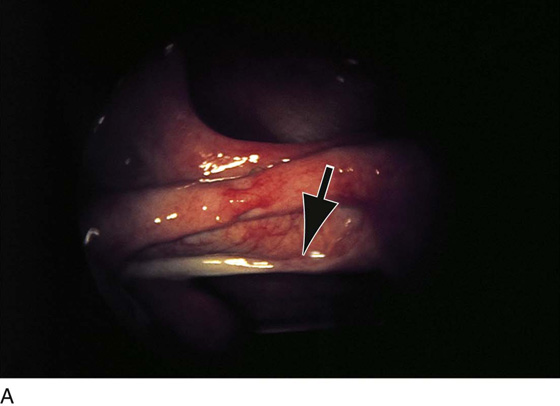
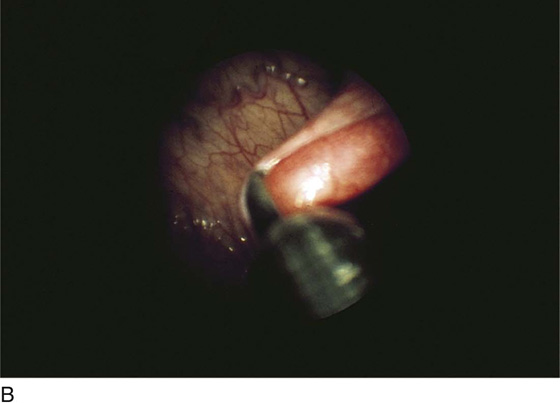
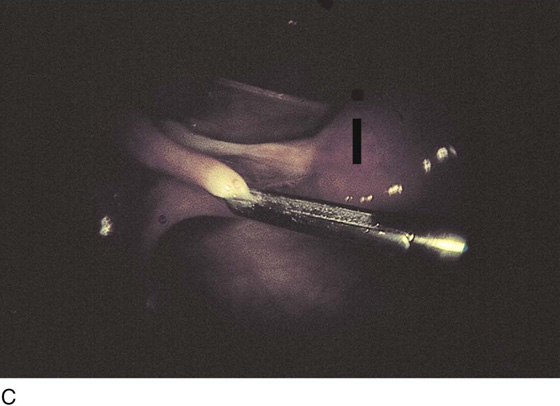
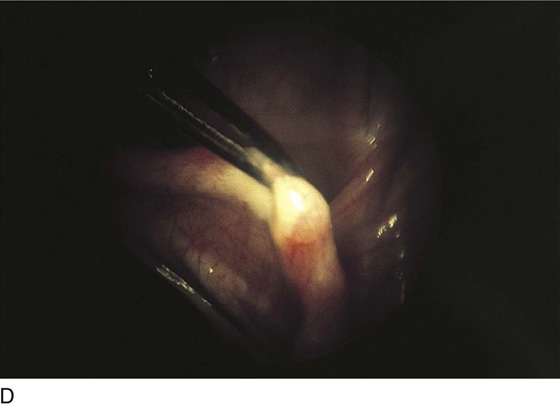
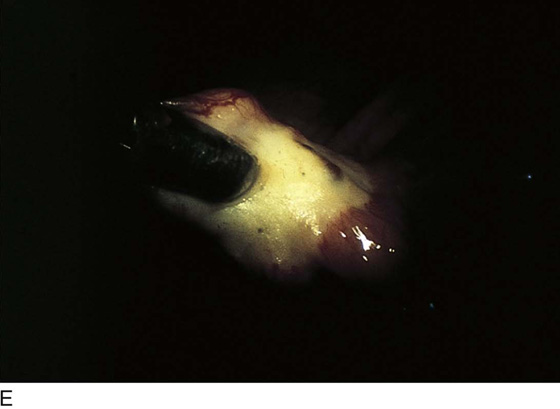
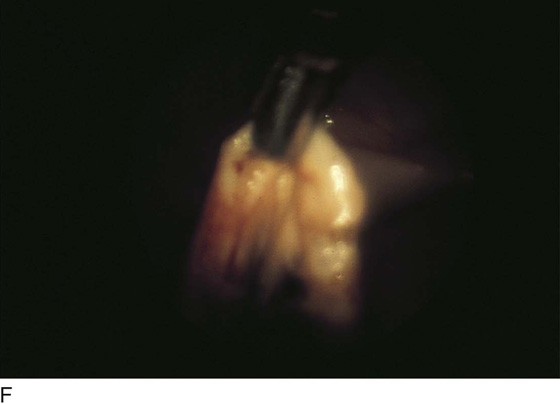
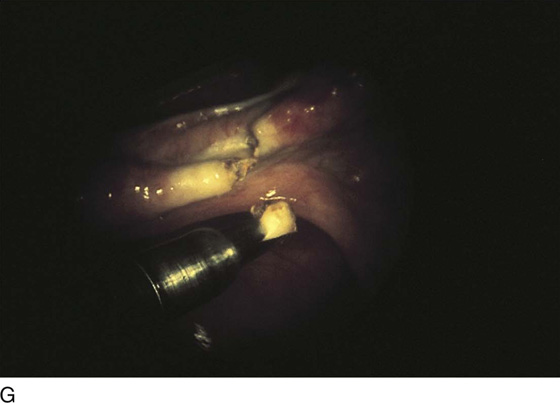
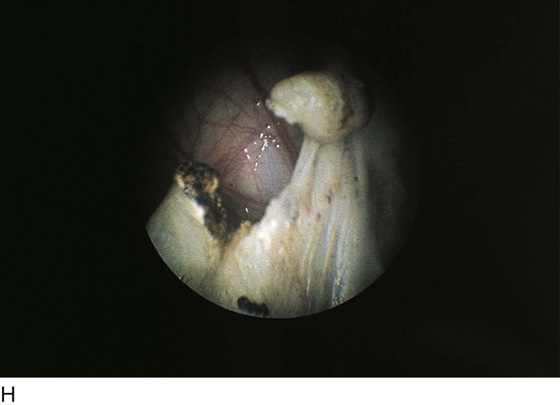
FIGURE 30–1 A. Endoscopic view of the oviduct. Note anteriorly the curving round ligament and below (arrow) the whitish utero-ovarian ligament. B. The close-up of the tube grasped by the forceps. C. Panoramic view from the front (anterior) detailing the three tubular structures emanating from the top of the uterus (dark line). Grasped within the forceps is the tube. Anteriorly is the round ligament and posteriorly the utero-ovarian ligament. D. Electric current is applied via the grasping forceps. White blanching (coagulation) occurs above and below the point where the tube is held by the forceps. E. Close-up view of the extensive coagulation. F. To achieve satisfactory hemostasis, coagulation continues until the mesosalpinx is coagulated. G. A coagulated segment of the oviduct is removed and sent to pathology. H. Completed laparoscopic bilateral partial salpingectomy performed by electrosurgical coagulation.
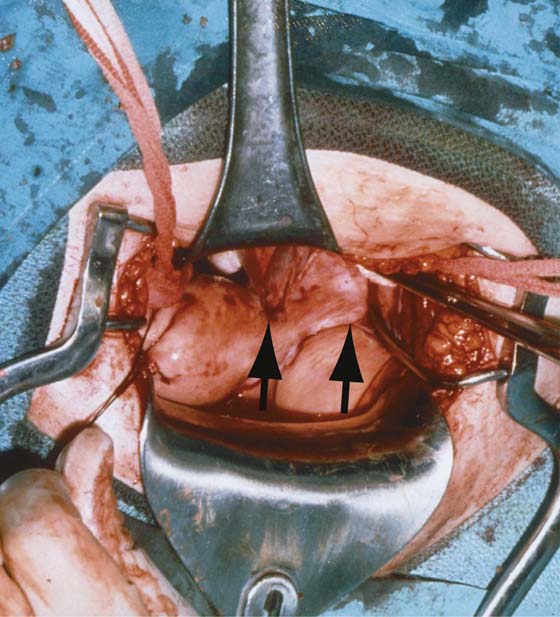
FIGURE 30–2 Laparotomy performed on a woman who had a failed bilateral partial salpingectomy. The failure was caused by bilateral ligation of the round ligaments rather than ligation of the oviducts (arrows).
Modified Irving Procedure
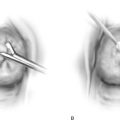
A window is made under a 3-cm segment of tube with the use of fine, straight mosquito clamps, thus securing fat and vessels within the mesosalpinx (Fig. 30–3A). Next, Kelly clamps are applied to the uterine end and to the fimbriated end of the isolated tubal segment (Fig. 30–3B). The tube is ligated and then is suture-ligated on each end with 3-0 Vicryl or polydioxanone (PDS) double-armed sutures. The segment of tube is cut out and sent to pathology for diagnosis. The sutures are cut close to the knot on the distal (fimbriated) end. The two sutures are held with needles on the uterine end (Fig. 30–3C). A needle guide or mosquito clamp is pushed into the posterior aspect of the uterus after the distance that the tied proximal tubal segment will stretch without tension is measured. Each needle is sutured via the guide through the hole created in the posterior wall of the uterus. As the needle guide is removed, the ends of the suture (after the needles have been cut free) are tightened, securing the proximal tubal stump into the myometrium of the posterior uterine wall. The ends of the suture are tied, and not only are the proximal and distal ends of the tubes widely separated, but the uterine end is also sealed off inside the wall of the uterus (Fig. 30–3D).
Pomeroy Operation
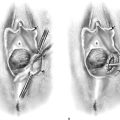
In the Pomeroy operation, a knuckle of the ampullary portion of the tube is pulled up with a mosquito hemostat or Allis clamp (Fig. 30–4A). A Kelly clamp is placed across the base of the pulled-up knuckle of tube (Fig. 30–4B). Scissors are used to excise the knuckle of tube by cutting along the superior marginal surface above the Kelly clamp application. Next, a 0 chromic catgut suture ligature is placed below the center of the Kelly clamp and is secured fore and aft (Fig. 30–4C). The clamp is removed as three knots are tied into place. Hemostasis is checked and the suture ligature is cut just above the knot (Fig. 30–4D).
Fimbriectomy
This operation may be performed by minilaparotomy (abdominally) or by posterior colpotomy (vaginally) or by laparoscopy. The oviduct is located and secured close to the uterus with a Babcock or Allis clamp. The fimbriated portion of the tube is clamped with a Kelly clamp; a second Kelly clamp is placed across the tube at the ampullary-fimbrial junction. The tube is cut between the first and second Kelly clamps, and the fimbriated end sent to pathology. The tube is ligated and suture-ligated with 2-0 silk or 3-0 nylon (Fig. 30–5).
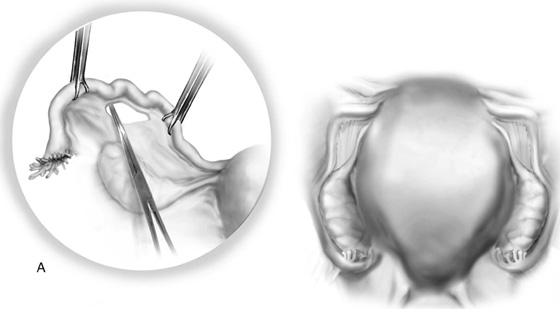
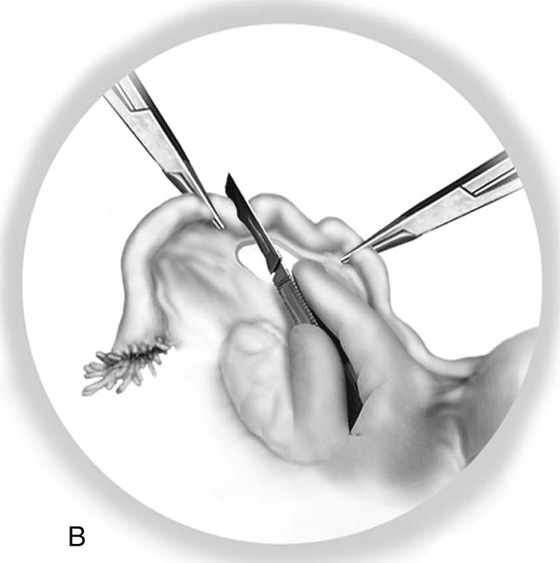
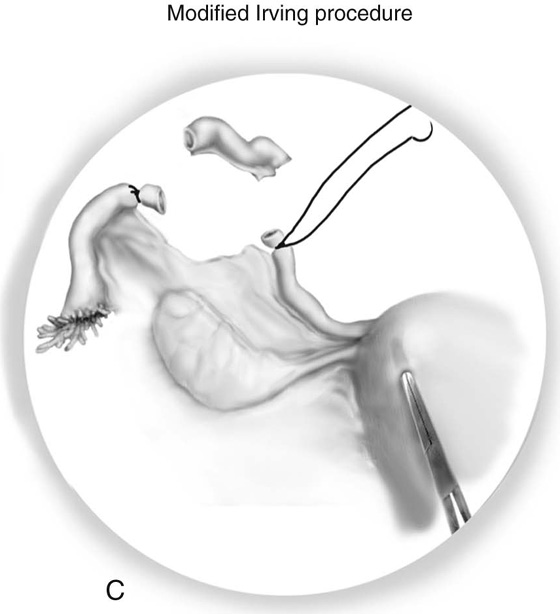
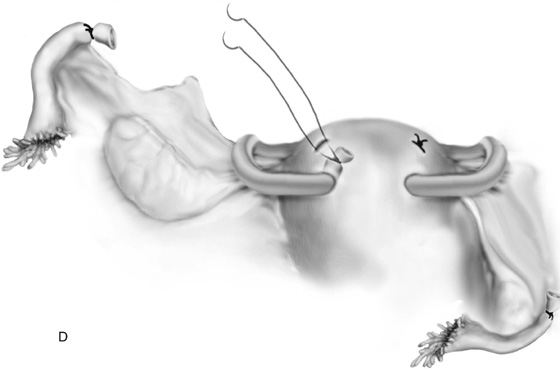
FIGURE 30–3 The modified Irving procedure. A. A mosquito clamp is used to create a window in the mesosalpinx beneath the tube segment that is to be removed. B. Two mosquito or Kelly clamps are placed at each extreme of the isolated segment, and the segment is cut out. C. Suture-ligatures are placed through each end of the remaining oviduct and tied under the clamps, which are then removed; however, the double-armed suture attached to the uterine oviductal remnant is held. A grooved director or mosquito clamp is used to burrow a hole into the posterior aspect of the uterus. D. The sutures are fed through the tract and into the uterine wall. The uterine oviductal segment is buried in the uterine wall as the suture ends are pulled snugly and tied into place.
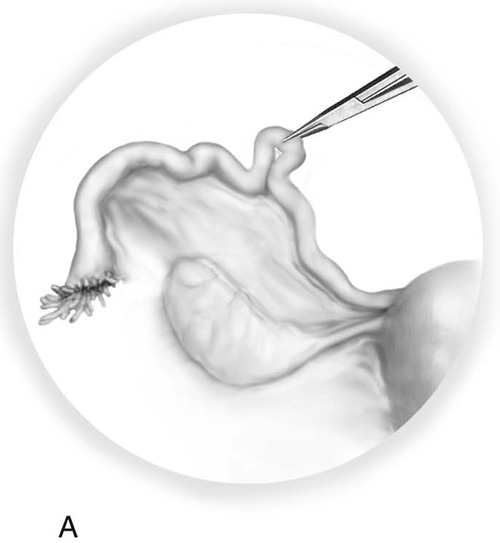
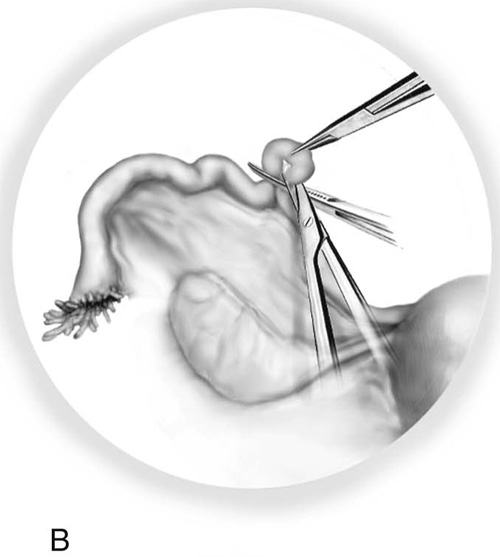
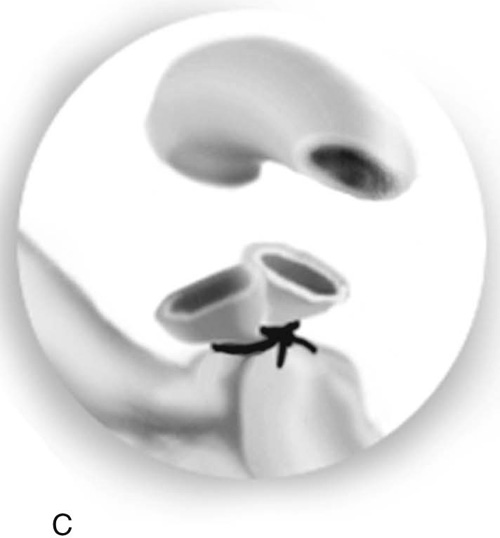
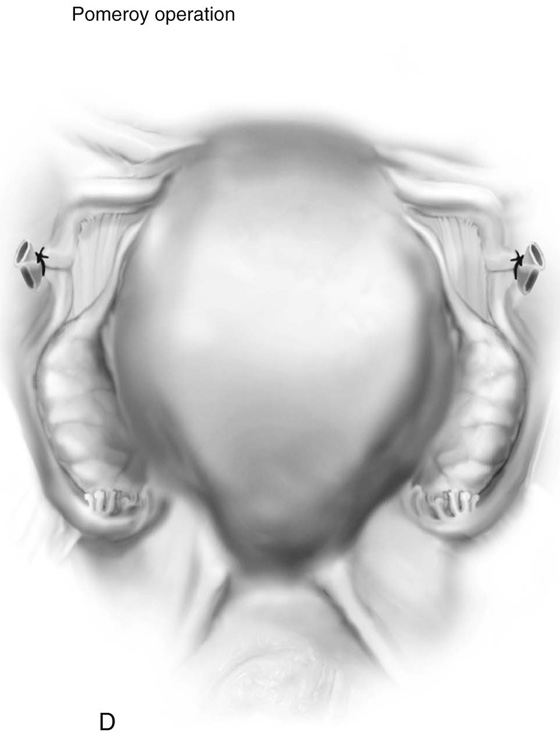
FIGURE 30–4 The Pomeroy operation. A. A clamp is used to grasp a knuckle of ampulla and pull it upward. B. A second Kelly clamp is placed across the base of the knuckle, and the tube above the Kelly clamp is cut off and sent to pathology. C. Next, a 0 chromic catgut ligature is placed around the Kelly clamp and is tied snugly into place. D. As the pregnant uterus involutes and the tensile strength of the chromic catgut weakens, the cut tube segments are pulled apart.
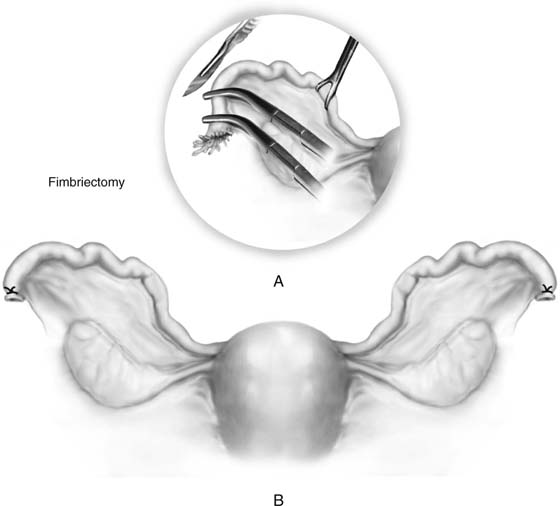
FIGURE 30–5 Fimbriectomy is a simple operation. A. The fimbriated ends of the tube are clamped with Kelly clamps, and the fimbriae are amputated. B. The ends are suture-ligated with 2-0 silk or 3-0 nylon.
Simple Bilateral Partial Salpingectomy
This is an interval operation and may be performed by minilaparotomy or by laparoscopy. The tube is grasped with an Allis clamp at midpoint in its length. A hole is made with a mosquito clamp in the mesosalpinx directly below the elevated portion of the oviduct. The hole measures approximately 1.5 to 2 cm. The tube is clamped at either pole above the mesosalpingeal opening. Scissors are used to cut out the segment of tube, and either end is suture-ligated with 2-0 or 3-0 silk or nylon (Fig. 30–6). Alternatively, the ends of the tube may be coagulated with bipolar forceps rather than clamped and ligated with suture.
Uchida Operation
The Uchida operation may be performed postpartum or as an interval procedure. The principles of the operation are similar to those of the Irving operation (i.e., not only is the oviduct divided, but one end is also physically isolated from the other by a barrier).
The tube is grasped at the ampullary-isthmic junction. The serosa of the 2-cm segment of tube is infiltrated with 5 to 10 mL of a 1 : 200 vasopressin/saline solution (Fig. 30–7A, B). With a sharp scalpel, the dorsum (antimesenteric side) of the tube is shallowly incised in a parallel fashion to the axis of the oviduct. An Allis clamp is used to grasp the tube beneath the serosa and strip it from the surrounding serosa by moving the clamp forward and backward along the length of the incision (Fig. 30–7C). Either pole of the tubal segment is clamped with mosquito clamps, and the segment (1.5 cm) of tube is cut out. Each end is suture-ligated with 2-0 silk or nylon (Fig. 30–7D). The uterine end of the tube is buried in the mesosalpinx as it is closed with 3-0 Vicryl. The other ligated end remains outside of the reconstituted mesosalpinx (Fig. 30–7E).
Silastic Band Operation
This technique typically is performed by laparoscopy; however, it may be utilized at laparotomy as well. The procedure requires a special tool: the band applicator. This is a tong forceps with two cylindrical tubes in which the outer cylinder moves over the inner cylinder as the tongs grasper pulls a knuckle of tube into the inner cylinder. Essentially, the tube is grasped at the thinnest portion of the ampulla. Before the start of the procedure, a Silastic band is loaded onto the terminal inner cylinder (Fig. 30–8A). The tube segment is held in the tongs and is slowly drawn up into the hollow inner cylinder (Fig. 30–8B). The trigger mechanism at the same time causes the outer cylinder to push the Silastic band onto the intercepted knuckle of tube and the proximal mesosalpinx in a fashion analogous to the Pomeroy technique, except that no portion of tube is cut (Figs. 30–8C and 30–9). The tube simply necroses slowly because its blood supply is compromised by the tight Silastic band.
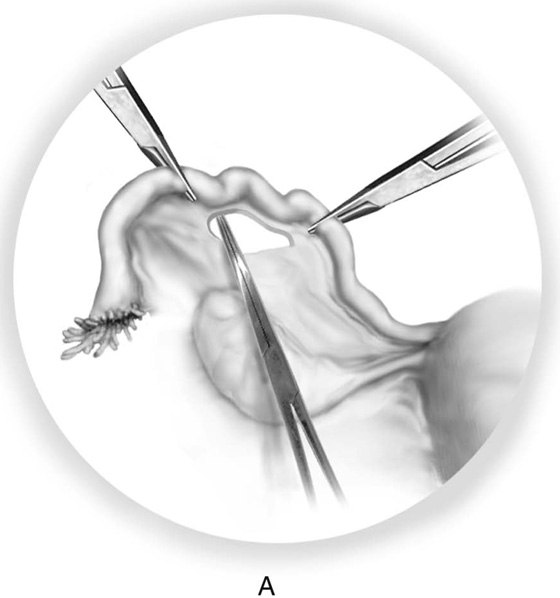
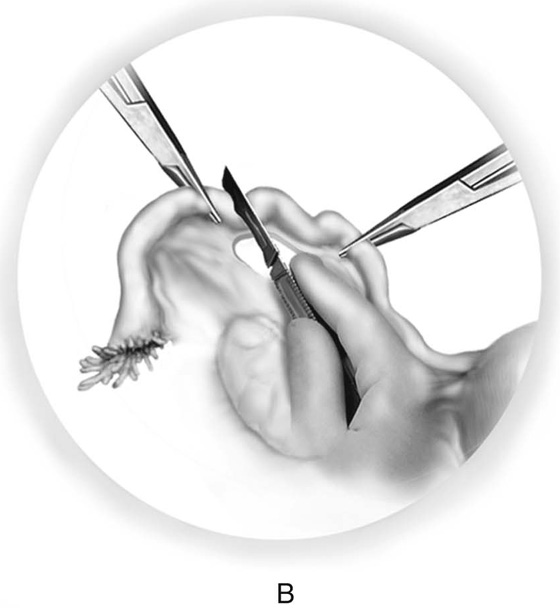
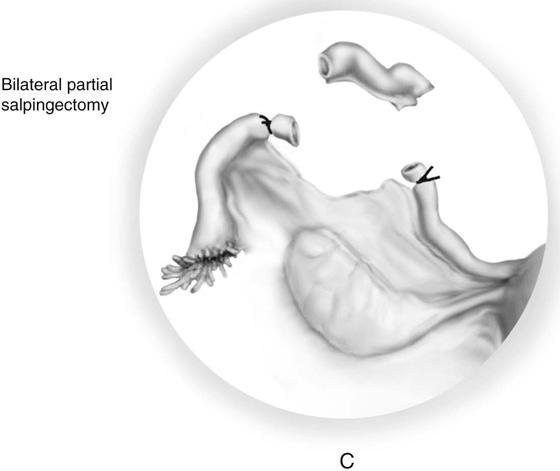
FIGURE 30–6 A-C. Bilateral partial salpingectomy is performed in exactly the same manner as the Irving operation; however, neither tubal segment is isolated from the other. The ends are simply ligated with permanent suture material.
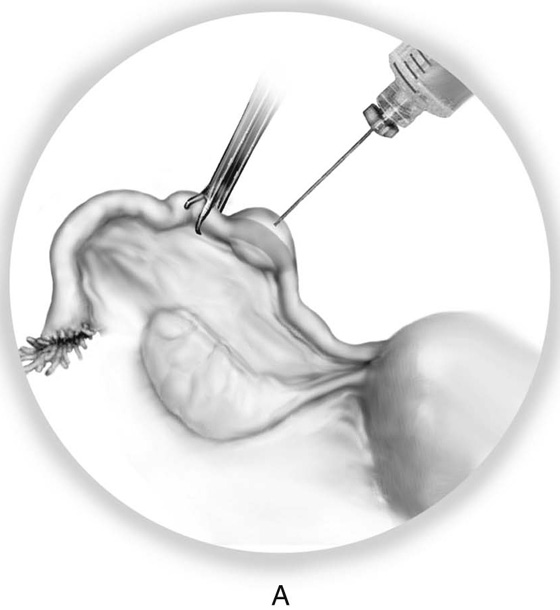
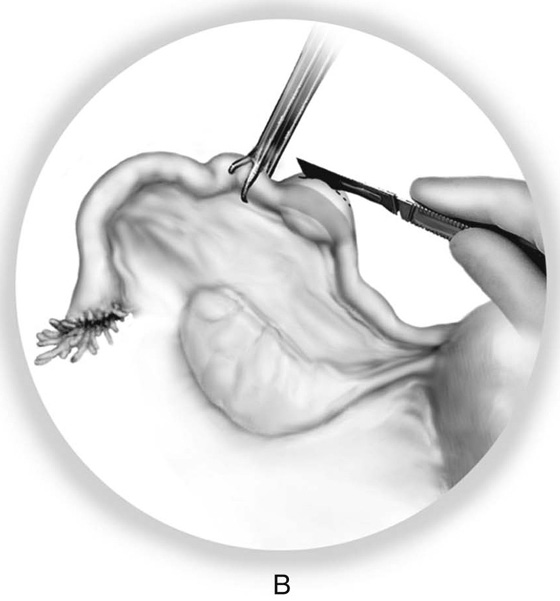
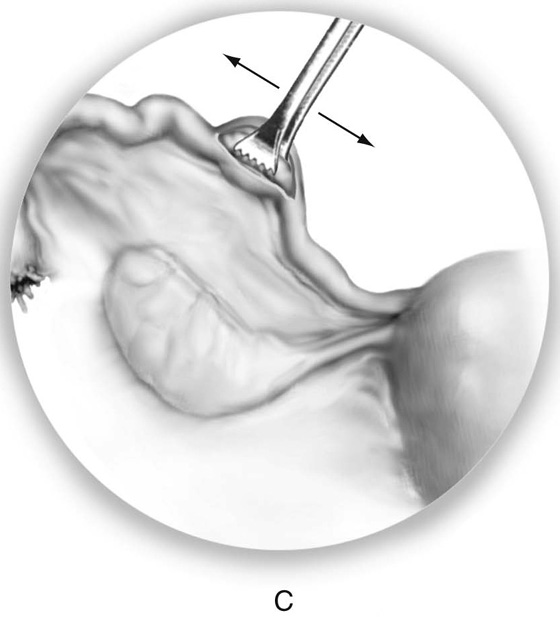

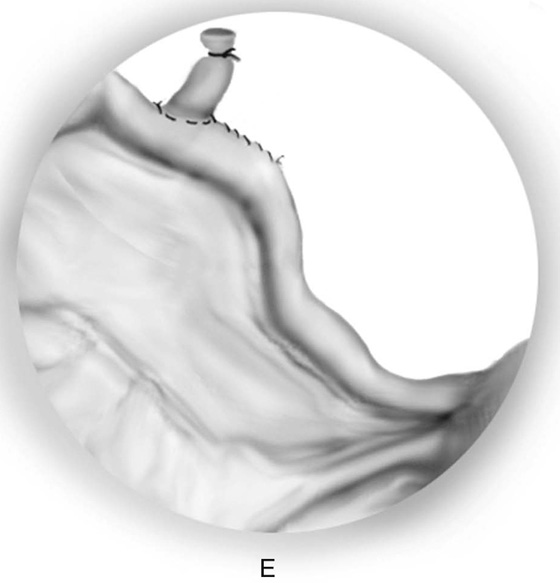
FIGURE 30–7 A. The Uchida operation utilizes an injection of 1 : 200 vasopressin into the mesosalpinx for the dual purpose of hemostasis and creation of a dissection plane. B. A linear incision is made above the oviduct in the ballooned-out segment that has followed vasopressin injection. C. With a Uchida clamp or a loosely applied Allis clamp, the oviduct is freed from the mesentery by moving the clamp back and forth within the mesosalpinx. The freed segment is ligated at either end with 2-0 silk or nylon, and the segment is cut out. D and E. The fimbriated end of the tube remains out of the mesosalpinx during closure of the mesentery, whereas the uterine end of the tube is buried in the mesosalpinx.
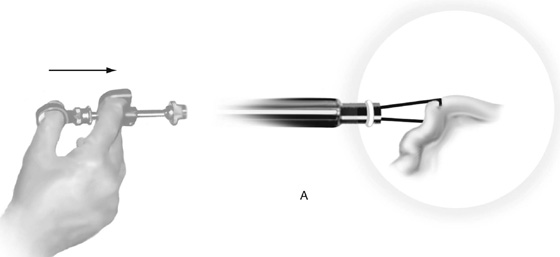
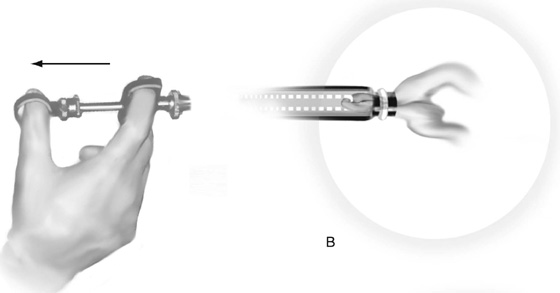
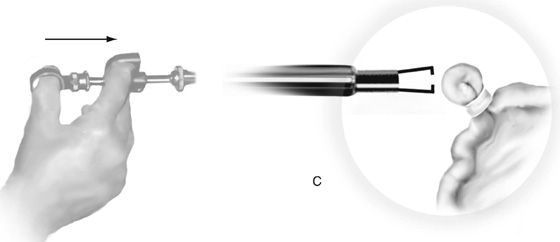
FIGURE 30–8 The Silastic banding of the oviducts requires a special tongs forceps. A. An isthmic segment of the tube is grasped with the tongs. Note that a Silastic band has been loaded onto the inner cylinder of the forceps at its terminal portion. B. Next, the tongs containing a knuckle of tube are drawn into the inner cylinder of the tongs forceps. At the same time, the spring-loaded inner cylinder is pulled back against the fixed outer cylinder, causing the band to be pushed onto the base of the knuckle of oviduct. C. The tongs are released (i.e., extended outward), freeing the banded tube.
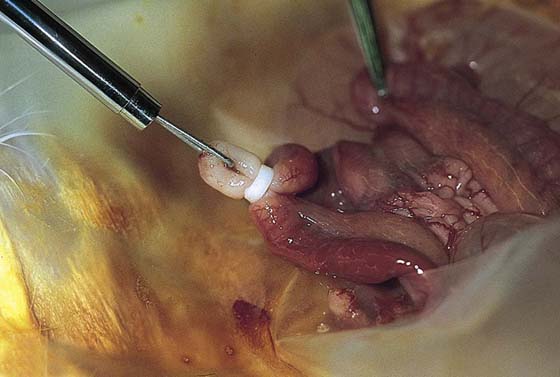
FIGURE 30–9 The Silastic banding technique performed upon a rabbit uterine horn. Note the white color of the banded knuckle of oviduct, which is the result of its blood supply being cut off.