[level-membership-for-obstetrics-gynecology-category]CHAPTER 57
Trocar-Based Synthetic Mesh Kits Used to Correct Pelvic Organ Prolapse
Vincent Lucente  Patrick Culligan
Some surgeons believe that for many patients, native connective tissues are inadequate for successful long-term results in reconstructive pelvic surgery. Recently, meshes have been developed with the hope of meeting the unique requirements for use in the vagina. Innovative tension-free approaches to the placement of these meshes have been described in the hope of facilitating successful surgical outcomes while maintaining a minimally invasive surgical approach.
The most commonly utilized mesh kits for prolapse are the Prolift system marketed by Ethicon Women’s Health and Urology (Fig. 57–1), the Apogee and Perigee Systems marketed by American Medical Systems (Fig. 57–2), and the Avaulta System marketed by Bard. These kits make use of an optimal mesh material (polypropylene) and an innovative trocar-based delivery system designed to facilitate tension-free placement. This chapter describes techniques used by the authors for placement of these systems.
Patients undergoing pelvic reconstructive surgery via a transvaginal mesh system require appropriate and standard preoperative medical clearance, especially those patients at increased risk for operative adverse events, such as those resulting from fluid shifts, blood loss, susceptibility to infection, or impaired wound healing. Additional unique considerations must be carefully reviewed before a transvaginal mesh procedure is performed.
Perhaps most important, as for many surgeries, is the provision of a very clear and understandable informed consent process. As with all evolving newer technologies and surgical procedures, one must have even a higher level of commitment to reviewing with the patient where in the development of evidence-based medicine (as well as your own surgical expertise) the surgical technology currently exists. At our centers, we have developed dedicated consent forms specifically designed to clearly communicate to patients the nuances of undergoing these relatively new approaches to pelvic reconstructive surgery. We go to great lengths to explain definitions of the term experimental versus standard of care. We discuss that the surgery has indeed gone through the review process of the FDA and has stood the test of earlier observational and comparative trials and has developed a growing body of literature supporting the benefits, as well as defining the associated risks. We candidly discuss our own success rates, as well as complication rates, especially those related to exposure or erosion and de novo dyspareunia. We also stress with our patients that we have found relative risks such as younger age, a history of undergoing a prior reconstructive procedure utilizing any permanent material or suture, and the presence of chronic pain disorder (especially pelvic pain) to be associated with the possibility of developing new-onset pelvic pain or, more specifically, dyspareunia. Last, each patient is given the option of a more traditional suture repair of endogenous tissue, as well as the alternative of an open or laparoscopic abdominal sacral colpopexy.
All of our patients receive appropriate thromboembolic precautions, a rectal prep, including an enema the night before and the morning of surgery, preoperative antibiotic prophylaxis utilizing a second-generation cephalosporin, and careful operative prep of the vaginal canal and surgical site. We recommend that patients receive preoperative topical transvaginal estrogen and encourage patients to continue to use transvaginal topical estrogen for an extensive period of time postoperatively. It is important that patients realize that to optimize sexual function and comfort, the vaginal lining itself should be kept as healthy as possible with the support of topical estrogen.
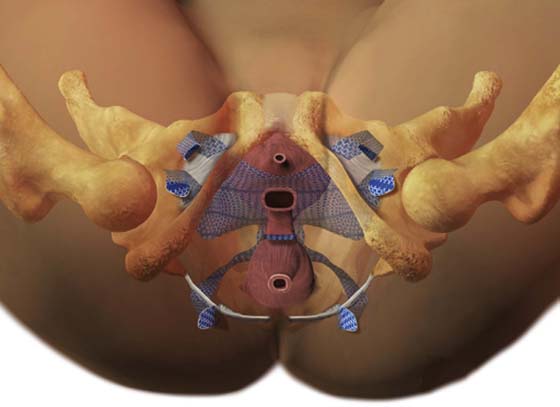
FIGURE 57–1 The Prolift system (Ethicon Women’s Health & Urology).
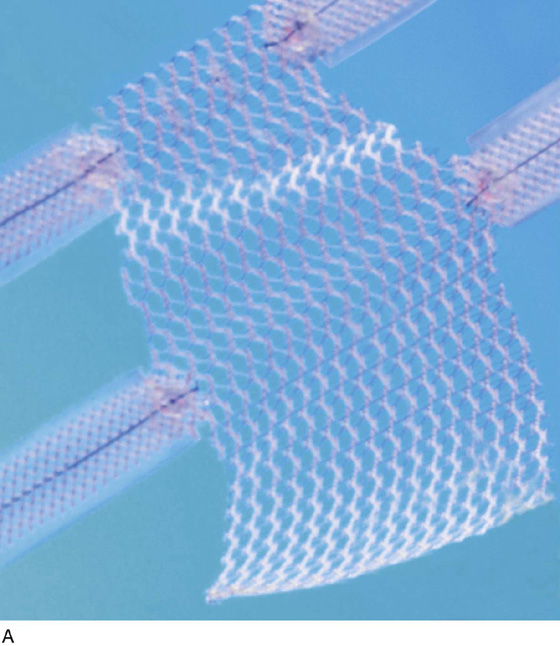
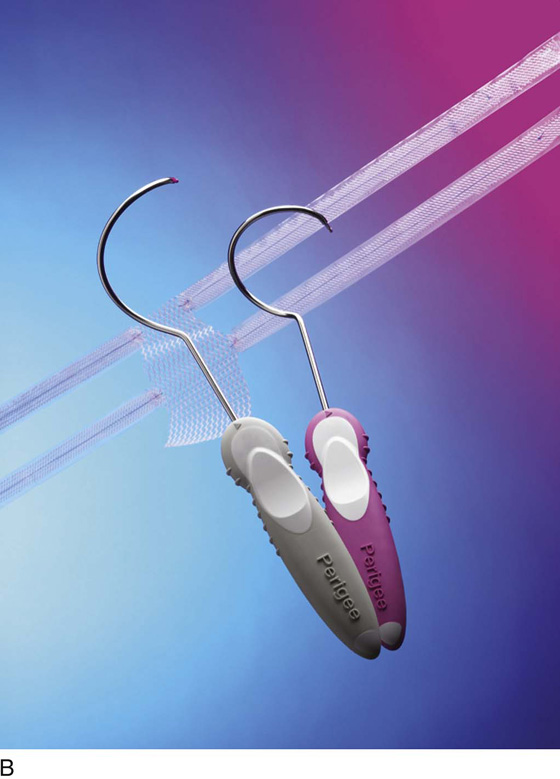
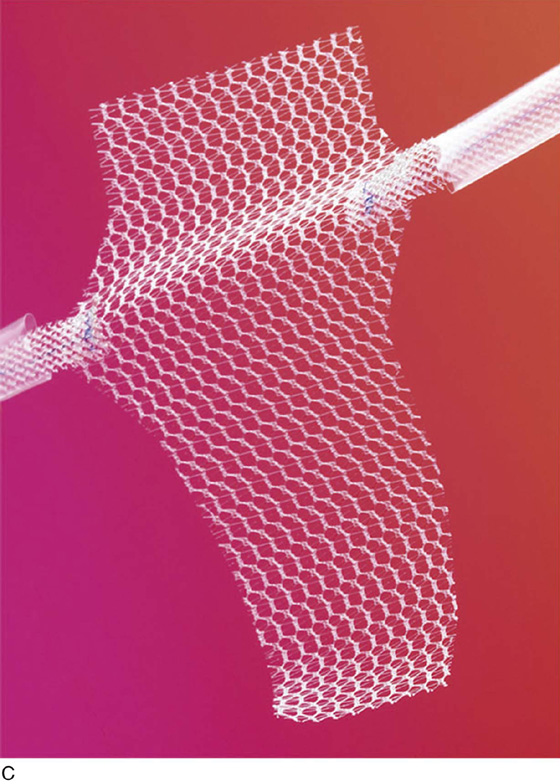
FIGURE 57–2 The Apogee and Perigee Systems. (Courtesy American Medical System, Inc., Minnetonka, Minnesota. www.AmericanMedicalSystems.com.)
We believe it is our responsibility to position the lower extremities carefully in adjustable Allen-type stirrups. From the lateral perspective, hip flexion should be no greater than 90°, and the leg should be abducted such that the knee is not in line with the foot and the contralateral shoulder (Fig. 57–3). Even with careful positioning, some patients will experience muscle strain and discomfort caused by hip flexion. Therefore, we often recommend that our patients perform specific stretching exercises for several weeks before undergoing surgery. Patients are instructed to perform these exercises while lying in bed in the morning or evening. Patients are instructed to grasp their knee or behind the knee, then while flexing toward their chest as much as they physically can, they can gently rotate the leg laterally and hold that position for a count of 10 seconds. Since embracing this exercise as part of our routine preoperative care, we have anecdotally seen a significant decrease in patient complaints of hip, back, and leg pain associated with the exaggerated dorsal lithotomy position required for transvaginal mesh surgery.
In the authors’ opinion, the most technically challenging aspect of placement of any of the transvaginal trocar-based mesh kits is performing the proper dissection. Traditional dissection involved with suture plication of endogenous tissue of the anterior or posterior vaginal wall involves “splitting” of the vaginal epithelium from the underlying muscularis, followed by various forms of plication of the muscularis layer, trimming of the redundant epithelium, and closure. This splitting dissection, if utilized with transvaginal mesh placement, will inevitably result in a significantly high mesh exposure rate. To emulate and achieve the same low exposure rate experienced with transabdominal placement of the pelvic mesh, the transvaginal approach must enter the same pelvic spaces, placing the mesh deep to all of the histologic layers and compromising the vaginal wall. The surgeon must be skilled at entering the true vesicovaginal space anteriorly, as well as the rectovaginal space posteriorly, and placing the mesh into these spaces, as opposed to within the vaginal wall (Figs. 57–4 through 57–6). This specific full-thickness dissection is accomplished by utilizing first a very precise hydrodissection, then careful sharp dissection, and is finally completed with blunt dissection into the paravesical and pararectal spaces. Anteriorly, surgical entrance into the vesicovaginal space can be difficult because the lumen of the space is extremely small. Given the minimal amount of fat that exists in this potential space, it is best viewed as a balloon with little to no air within the lumen, which must be carefully entered. Recently, we adopted the use of an 18-gauge Tuohy needle, which provides increased tactile and visual feedback for precise bevel placement, allowing proper fluid dissection and distention of the vesicovaginal space (Fig. 57–7).
Our approach to entering this space involves the placement of two Allis clamps on the anterior vaginal wall approximately 3 to 4 cm apart, in the area corresponding with the most pronounced portion of the anterior prolapse. Very commonly, the inferior margin of the bladder can be easily palpated through the vaginal wall. With a gentle pinch, the bladder can be pushed cephalad, potentiating the space between the bladder and the full-thickness vaginal wall. A Tuohy needle is then utilized to enter the vesicovaginal space, while a point closer to the inferior Allis clamp is chosen and the needle is held perpendicular to the plane of the vaginal wall edge. The needle offers 5-mm colored segments to provide the surgeon with a measured visual reference, which aids in accurate placement. The needle is carefully advanced through the full thickness of the vaginal wall, which most often is approximately 5 to 7 mm. Commonly, a popping sensation is distinctly palpable as the rounded tip of the needle enters the true vesicovaginal space. With the needle bevel-faced ventral in a 12-o’clock position, fluid can be infused easily into the space, creating hydrodissection. We prefer a dilute solution of 0.25% marcaine with epinephrine diluted 1 : 1 with injectable saline. A 20-mL aliquot of the fluid is placed along the midline. Next, a standard needle is used to reenter the 20-mL fluid pocket and then is directed off midline laterally, while the needle is kept parallel with the lateral aspects of the anterior vaginal wall. A vigorous push of the syringe will help force fluid laterally, physically separating the underlying detrusor muscle from the overlying full-thickness vaginal wall.
Next, the anterior vaginal wall is incised with a scalpel or with the use of electrocautery to enhance hemostasis. Extreme care must be utilized to ensure that the surgeon has penetrated through all of the histologic layers of the vagina and has surgically entered the previously established fluid pocket. Often, this fluid pocket appears as a silver-gray jelly-like space that often contains yellow wisps of adipose tissue, which are easily visible without magnification. The incision is extended for a total length of approximately 4 cm (Fig. 57–8).
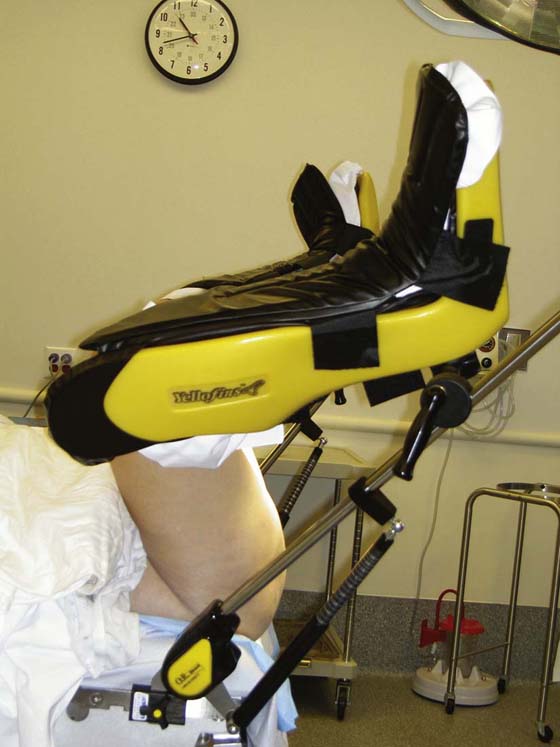
FIGURE 57–3 Patient positioning on the operating room table with hip flexion not greater than 90°.
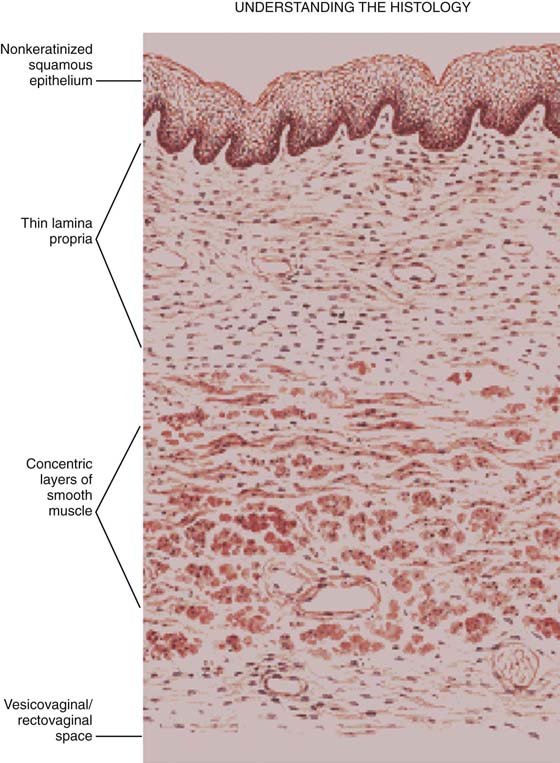
FIGURE 57–4 Histologic layers making up the vaginal wall.
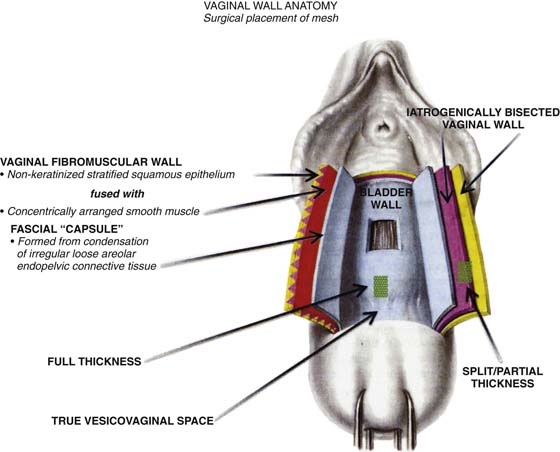
FIGURE 57–5 Diagrammatic representation of different layers of the vaginal wall for optimal placement of mesh.
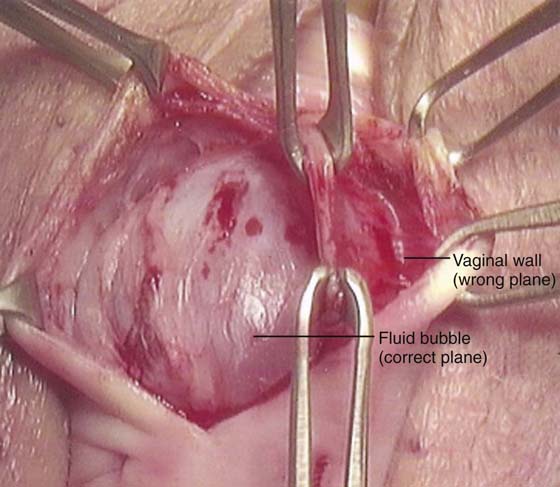
FIGURE 57–6 Tissue layer grasped between middle Allis clamps represents the inner aspects of the vaginal wall, inadvertently split or separated (wrong plane) from the full thickness of the wall.
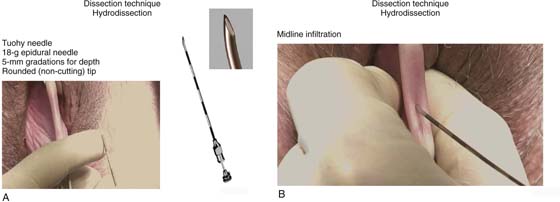
FIGURE 57–7 A. Dissection technique with a Tuohy needle for precise distention of the vesicovaginal space. B. Midline infiltration with a Tuohy needle.
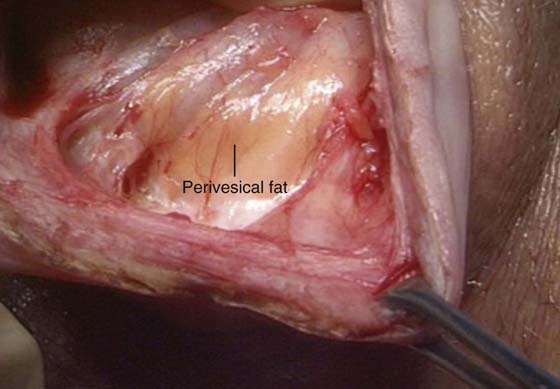
FIGURE 57–8 True vesicovaginal space identified by gross visualization of perivesical fat.
Blunt dissection completes development of the surgical spaces. It is preferable to switch from sharp to blunt dissection once safe visualization of scissor placement is no longer feasible because of lateral advancement and deviation of the dissection. The tip of the surgeon’s index finger is used to sweep the loose areolar tissue, with pressure directed laterally toward the medial aspect of the obturator internus muscle. This allows the development of a surgical space, enabling direct palpation of pelvic sidewall structures, including the ischial spine, the iliococcygeus fascia, and the arcus tendineus fascia pelvis. Patients who have had prior dissection in this area, such as those who have undergone a prior paravaginal defect repair with suture attachment, can pose great technical difficulty for developing this space. We have found it helpful to utilize cystoscopic guidance to avoid inadvertent blunt dissection or injury into the bladder wall for patients who may have adhesive disease in the paravesical space.
Trocar or needle placement for the anterior Prolift utilizes the obturator foramen, with the needle traversing the obturator membrane at the superior medial edge of the inferior ramus and superior ramus, as well as at the inferior medial aspect of the foramen along the inferior ramus (for the posterior [or kindly referred to as] “deep pass”). A marking pen is utilized to demarcate the incisions, beginning with the superior medial notch, which is often palpable, and a pinch technique is used to internally feel the notch with the surgeon’s index finger and with the thumb externally pinching to identify the exact location of the notch, given the various pelvic shapes and bone thicknesses that are seen in diverse populations. Once the superior medial notch has been palpated and marked on the skin, measurement 1 cm lateral and 2 cm inferior from the first mark is used to establish the location of the incision for the deep anterior pass. Both skin sites are then infiltrated with approximately 10 mL of dilute 0.25% marcaine epinephrine to promote hemostasis and provide perioperative anesthetic. A vertical 4-mm skin incision is made. We have preferred to place the deep anterior trocar first. The key to optimal needle placement is to appreciate the three-dimensional aspects of the pelvis (Fig. 57–9) to encourage alignment of the needle and proper trajectory of the needle to reach the level of the ischial spine and slightly ventral to it. This can be accomplished only with rotation of the needle such that the curve of the needle becomes concentric with the curve of the pelvis as downward pressure is maintained on the needle handle, encouraging the tip of the needle to maintain intermittent contact with the medial aspect of the ischium until the tip of the needle reaches the ischial spine (Fig. 57–10). Because of the inward or medial curvature of the ischium, which actually creates the ischial spine itself, the needle must take an “arced” approach rather than a “straight” approach to the ischial spine to drop the needle down onto the anterior aspect of the ischial spine, providing optimal vaginal lengthening or apical support (Fig. 57–11). Unfortunately, a common error that occurs when an anterior Prolift is performed is that the surgeon fails to properly utilize the design and curvature of the needle, often placing the needle and cannula only within 2 cm of the ischial spine, resulting in suboptimal apical support or vaginal foreshortening.
Once the tip of the deep anterior trocar has truly reached the level of the ischial spine, the handle is elevated slightly, allowing the tip to point; additional advancement of the needle creates a small hole through the condensation of the arcus tendineus and iliococcygeal fascia, allowing the needle to enter the dissected space, and the needle is advanced for a distance of approximately 1 to 2 cm. It is critical to carefully remove any surrounding areolar tissue so that the deployed cannula can be controlled and the forthcoming retrieval suture easily passed down the cannula and advanced outwardly through the dissected space.
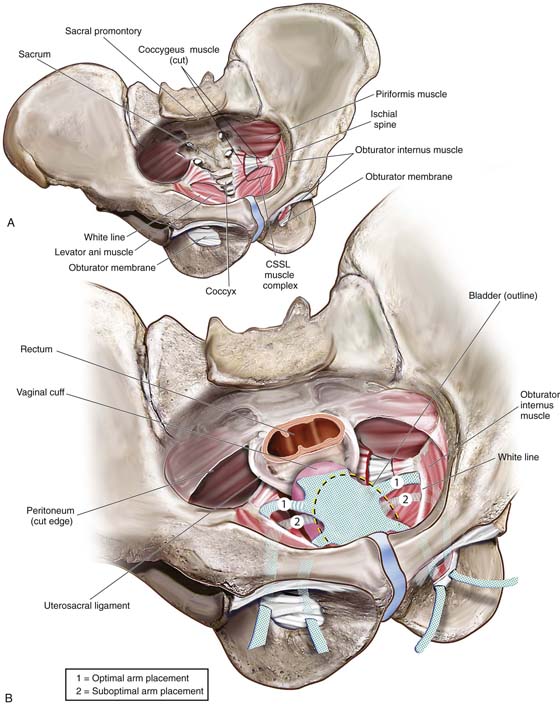
FIGURE 57–9 Three-dimensional view of the pelvis. A. Bony anatomy and ligaments; insertions of muscles. B. Placement of anterior mesh kits.
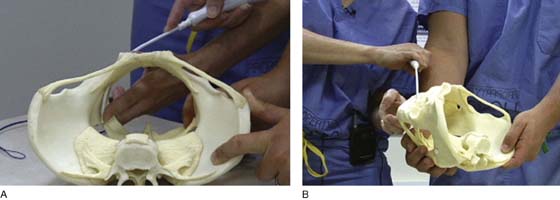
FIGURE 57–10 Concentric alignment of the needle curve and pelvic curve achieved with trocar rotation. A. View from above, aligning the needle curve with the pelvic curve. B. Lateral view of the alignment of the needle with the pelvic curve.
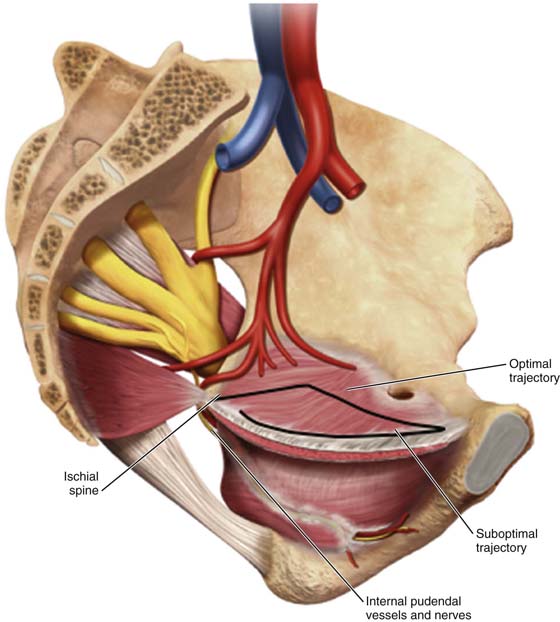
FIGURE 57–11 Trajectory of the needle with respect to pelvic anatomy, aiming to provide optimal support. (Trocar Placement With Respect To Pelvic Anatomy © Ethicon, Inc, Women’s Health and Urology Division, Somerville, NJ. Reproduced with Permission.)
Once all four cannulas of the anterior Prolift have been placed with the corresponding retrieval suture, proper mesh sizing and securement of the mesh must be achieved. The surgeon should appropriately size the mesh based on the distance between the urethrovesical junction and the vaginal cuff or apex or the anterior aspect of the cervix for patients who have not had a prior hysterectomy. Suture securement of the mesh, which primarily serves to prevent the mesh from folding, shifting, or bunching, is simple tacking of the mesh along the midline, both distal and proximal. At the level of the urethrovesical junction, a 2-0 delayed absorbable polydioxanone (PDS) suture is utilized. Proximally, suture selection is dependent on the presence or absence of the cervix. For those patients who have a cervix, we prefer to use a permanent 2-0 polypropylene suture by placing at least two or three sutures through the cervical stroma and then securing the sutures to the mesh itself. For those patients who have had a prior hysterectomy, we favor a 2-0 PDS suture.
The dissection techniques and incisions used for the Prolift and Avaulta procedures are identical. Because the area of the Avaulta mesh body is quite a bit smaller than that of the Prolift system, we believe that an anterior colporrhaphy is a helpful first step for this operation. However, because of the deep dissection required to get into the true vesicovaginal space, little to no connective tissue is left for plication. Therefore, extreme care must be taken to avoid intravesical suture placement or ureteral compromise when an anterior colporrhaphy is performed as the first step in this procedure.
As is the case with the anterior Prolift, the anterior Avaulta arms are delivered through two distinct aspects of the obturator foramen, and the same trocar is used for both deep and superficial passes. With any needle pass through the obturator foramen (deep or superficial), the surgeon should always be aware of the exact location of the needle tip immediately after placement and through the level of resistance. If the needle is inadvertently placed too far as it goes through a level of resistance (i.e., overshoot), the surgeon might not be able to feel the needle tip easily. In these instances, the best course of action is to remove the needle and start over, rather than “finding” the needle by moving it about within the patient because this may result in vascular or visceral damage.
Vigorous irrigation of the surgical site is then performed. This facilitates debridement of the area and provides obvious dilution of any possible bacterial inoculants. Once vigorous irrigation is completed, the incision is closed with a running lock delayed absorbable suture (2-0 Vicryl or Monocryl). After the incision has been closed, one of the most critical steps of the procedure is deployment of the mesh. Setting of the mesh is accomplished with the vagina completely closed then displaced inwardly, replicating or reproducing inward vaginal displacement such that occurs with coital function. Because transvaginal meshes are not in line with the axis of the vagina, they can create resistance to inward displacement during sexual intercourse. The arrangement of mesh used for an abdominal sacral colpopexy has the advantage of not providing such resistance; therefore, mesh is placed very loosely to avoid excessive tightness, which may cause a pulling sensation when the patient stands erect. For transvaginal meshes, if the mesh is set too loose, symptoms of relaxation may result; alternatively, if the mesh is set too tight, deep penetrating dyspareunia can occur.
After the cannulas have been removed, thereby deploying or setting the mesh, the vagina is immediately packed with gauze in the upper vaginal and midvaginal areas before any additional surgery, such as a sling procedure, or even posterior colporrhaphy, is performed. Patients then undergo final packing of the vagina upon completion of any concomitant surgeries. An indwelling Foley is placed until the following day. Most patients have both the packing and the Foley removed and next-day discharge with minimal analgesic use. For those patients who may pose a risk for avulsion of the vagina off the mesh before adequate fibrin adherence or tissue ingrowth (morbid obesity, chronic coughing, etc), packing remains in place until postoperative day number 3.
Placement of Posterior Mesh System
Dissection for a posterior Prolift again must require a full-thickness incision and dissection of the posterior vaginal wall. Unlike the true vesicovaginal space, the rectovaginal space is easier to enter because the space is distended with pararectal fat. Most surgeons are more comfortable and have a higher degree of accuracy when correctly entering and dissecting within the true rectovaginal space. This dissection continues cephalad toward the apex of the vagina, again with care taken to make the length of the incision as minimal as possible to still execute the surgery. Therefore, tunneling below the posterior vaginal wall to the posterior cervix or cuff as much as possible is preferred. Once the rectovaginal space has been properly developed, the pararectal spaces are entered with sharp and blunt dissection through the right and left rectal pillars. Once the pararectal space has been entered, surgical landmarks are identified with palpation of the ischial spine, iliococcygeus muscle, and coccygeus muscle and the sacrospinous ligament (running within the lower third of the coccygeus). Less dissection is needed than for a traditional sacrospinous ligament fixation because a posterior mesh placement does not require direct visualization, as is often required when other instrumentation is used to secure the sacrospinous ligament for vaginal vault suspension.
Once dissection is completed, attention is directed toward needle placement. With the mid anal skin verge used as an anatomic reference point, two skin marks are made 3 cm lateral and 3 cm posterior to the mid anal verge. Once again, dilute local anesthetic solution is infiltrated, with the needle directed approximately 15° to 20° degrees off the midline to allow safe and ample spacing away from the rectum residing in the midline. Two small 4-mm skin incisions are then made. For the Prolift device, a trocar needle and overriding cannula are guided via palpation through the gluteal muscle, with a curved approach to the sacrospinous ligament at a point two fingerbreadths medial to the ischial spine. Gentle upward movement of the needle can often identify the tip as it ascends under the iliococcygeus muscle toward the coccygeus and accompanying sacrospinous ligament. Care must be taken to avoid the rectum at all times. This is best accomplished again by using a slight 15° to 20° angle away from the midline during the beginning journey or trajectory of the needle, and then drifting the needle back toward the midline as it approaches the sacrospinous ligament preidentified spot. This again allows safe passage without jeopardizing or encroaching the pudendal neurovascular bundle residing within Alcock’s canal. Many surgeons have the tendency to repeatedly check the location of the ischial spine as a reference point during passage of the trocar. This, unfortunately, will result in inadvertent directing of the needle toward the ischial spine itself, rather than at the desired location of two fingerbreadths medial to the ischial spine along the lower one third of the coccygeus muscle. It is much better to repeatedly rub or push down on the coccygeus to facilitate spatial reference as opposed to retouching or reaching toward the ischial spine. Once the trocar tip has approximated the appropriate location under the muscle ligament complex, it is directed upward through the sacrospinous ligament complex. The areolar tissue is then easily swept away with an index finger, allowing the cannula to be deployed and the introducing trocar removed. As with the anterior Prolift, the retrieval suture is placed down the cannula and delivered through the dissected field, exiting the vaginal introitus.
Although it is possible to place the posterior Avaulta needle directly through the sacrospinous ligament, it is not specifically designed for this. Instead, the posterior Avaulta needle is initially placed in exactly the same way as the posterior Prolift needle, but the endpoint of deep posterior needle placement is the iliococcygeus muscle, about 1 cm medial and inferior to the ischial spine. Once the needle has pierced this aspect of the muscle, the surgeon should deploy the snare, as is done for the anterior mesh arm placement previously described. The two deep passes of the posterior Avaulta should be performed first. If tacking sutures are desired near the apex along the body of the mesh, they should be placed at this point. A rectal exam should be performed after each step of posterior mesh placement. We are less inclined to perform a posterior colporrhaphy when placing posterior Avaulta than we are to perform an anterior colporrhaphy at the time of anterior Avaulta placement. Our decision regarding the posterior colporrhaphy step is based on the caliber of the distal rectum. If the rectum has become significantly wider than the body of the mesh, we will perform a traditional plication colporrhaphy before setting the tension of the mesh.
Another major difference between the posterior Prolift and the posterior Avaulta is the presence of distal arms on the Avaulta mesh. These arms are deployed with the same needle used for the deep pass of the device. The same buttock incisions are used as well. The needle is placed through the buttock incision, with care taken to avoid snagging of the proximal arm. The needle is placed through the subcutaneous tissue lateral to the anal sphincter. The endpoint for distal needle placement is the junction of the bulbocavernosus and transverse perineal muscles. Particular care must be taken to avoid vessels and nerves in the region such as the inferior rectal artery and nerve.
As with the anterior Prolift, the mesh itself must be properly sized to the patient’s vaginal and pelvic dimensions. It is advised that the mesh should be cut approximately to correspond with the upper two-thirds length of the posterior vaginal wall. We have found that bringing the mesh distally all the way to the perineum across the perineal body will result in a higher exposure rate at the level of the perineal body. We, therefore, do not bring mesh beyond a point 3 cm above the posterior fourchette. We have also found that it is beneficial to narrow the distal aspect of the posterior mesh to avoid rolling or folding of the mesh in the lower region. Once again, as with the anterior Prolift, if a cervix is indeed in place, two to three permanent 2-0 Prolene sutures are used to permanently fixate the cervix to the mesh itself. A cervical notch is cut in the apical aspect of the Prolift mesh, approximating the size of the cervix. In the absence of a cervix, 2-0 PDS is utilized, and the tail of the Prolift is removed if indeed there is no enterocele. For those patients who have an enterocele, depending on size, the sac itself may be opened, removed, then closed or inverted with an extraperitoneal purse string suture, or it may simply be inverted with the mesh placed over the enterocele. It is important to realize that keeping the tail of the mesh intact to cover the apex to prevent or treat the enterocele requires double tacking of the mesh. The proximal edge of the mesh bridge or tail must be secured with sutures to the apical aspect of the anterior pubocervical fascia. A second tacking suture must be placed at the cephalad aspect of the posterior vaginal wall. Once the mesh has been sized and secured, the arms or straps of the mesh are retrieved by using the retrieval sutures previously placed.
Once the mesh has been retrieved through the cannula, vigorous irrigation is carried out for the purposes previously described. The posterior vaginal wall is again closed with a running lock 2-0 Vicryl suture. For those patients who have a significant rectocele and a dilated ampule with defecatory dysfunction more often requiring digital splinting to facilitate bowel movements, rectal plication of the outer layer of the rectal muscularis is carried out with a delayed absorbable suture under digital guidance of an index finger placed within the rectal cavity itself. Before complete closure, the distal aspect of the mesh is secured to the cephalad aspect of the perineal body with the use of interrupted 2-0 Monocryl sutures. It is best to place these sutures after the mesh has been deployed, as it is nearly impossible to predict how far the mesh will pull up once the arms of the mesh have been retrieved. Final adjustment is again achieved by creating a certain amount of slack into the mesh setting by placing the exam finger into the rectum and then displacing the anterior rectal wall ventrally to simulate a large bolus of stool, so that the mesh will not restrict rectal distention necessary for the passage of large-caliber stool. It is also imperative that the surgeon ensure that the rectal wall has not been involved with the mesh system, and that it is clearly separated from any mesh material. A bimanual exam with an index finger within the rectum and a second index finger in the pararectal space following the mesh material downward easily ensures that the rectum has not been involved during mesh placement. We follow the same steps postoperatively as for the anterior Prolift. Figures 57–12 and 57–13 illustrate placement of a total mesh kit.
Our utilization of trocar-based transvaginal mesh systems has evolved over the past 5 years. We began with selective cases on older patients who were not sexually active and had undergone prior surgery, which had failed. Recently, with our expertise in proper dissection and confidence in optimizing needle placement and mesh deployment, and with the latest developments in lower-weight hybrid mesh construction, we routinely began to offer mesh kit placement to most women with advanced pelvic organ prolapse. Although recent interest has been expressed in nontrocar delivery systems, at the present time experience and published data are insufficient to allow objective commentary on these procedures.
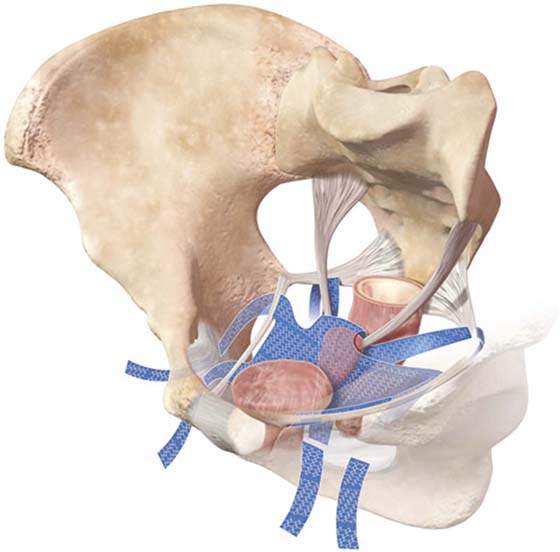
FIGURE 57–12 Total mesh placement as it is related to the bony pelvis. (Placement of GYNECARE PROLIFT Pelvic Floor Repair System © Ethicon, Inc, Women’s Health and Urology Division, Somerville, NJ. Reproduced with Permission.)
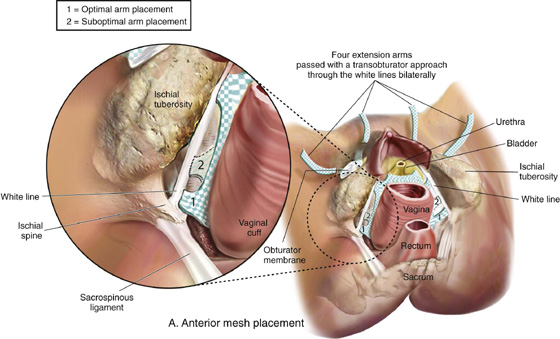
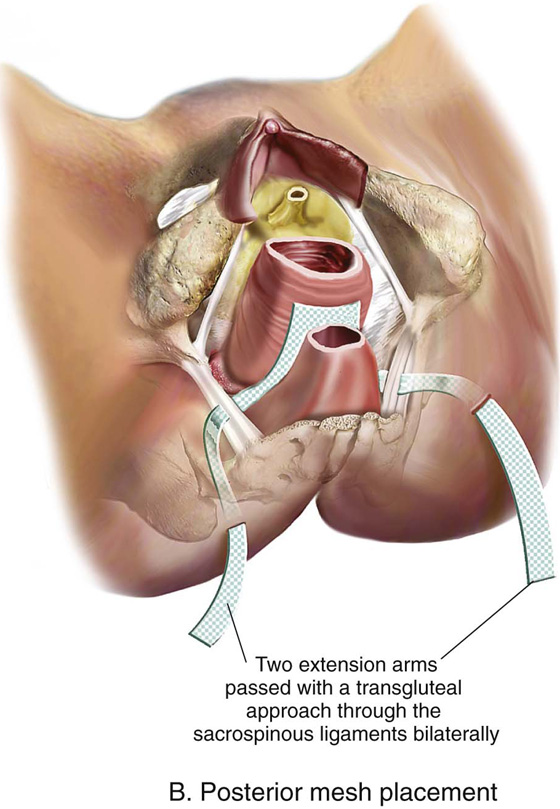
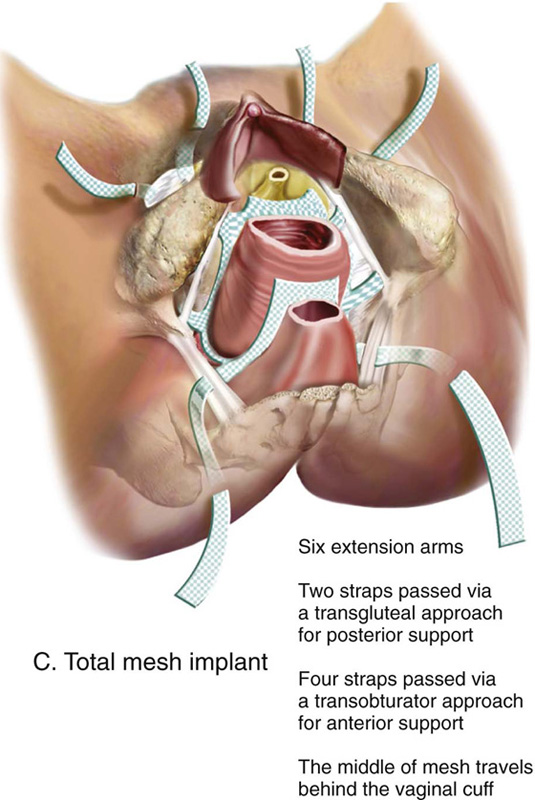
FIGURE 57–13 A. Completed anterior mesh placement. B. Completed posterior mesh placement. C. Total mesh implant.
[/level-membership-for-obstetrics-gynecology-category][not-level-membership-for-obstetrics-gynecology-category]CHAPTER 57
Trocar-Based Synthetic Mesh Kits Used to Correct Pelvic Organ Prolapse
Vincent Lucente Patrick Culligan
Some surgeons believe that for many patients, native connective tissues are inadequate for successful long-term results in reconstructive pelvic surgery. Recently, meshes have been developed with the hope of meeting the unique requirements for use in the vagina. Innovative tension-free approaches to the placement of these meshes have been described in the hope of facilitating successful surgical outcomes while maintaining a minimally invasive surgical approach.
The most commonly utilized mesh kits for prolapse are the Prolift system marketed by Ethicon Women’s Health and Urology (Fig. 57–1), the Apogee and Perigee Systems marketed by American Medical Systems (Fig. 57–2), and the Avaulta System marketed by Bard. These kits make use of an optimal mesh material (polypropylene) and an innovative trocar-based delivery system designed to facilitate tension-free placement. This chapter describes techniques used by the authors for placement of these systems.
Patients undergoing pelvic reconstructive surgery via a transvaginal mesh system require appropriate and standard preoperative medical clearance, especially those patients at increased risk for operative adverse events, such as those resulting from fluid shifts, blood loss, susceptibility to infection, or impaired wound healing. Additional unique considerations must be carefully reviewed before a transvaginal mesh procedure is performed.
Perhaps most important, as for many surgeries, is the provision of a very clear and understandable informed consent process. As with all evolving newer technologies and surgical procedures, one must have even a higher level of commitment to reviewing with the patient where in the development of evidence-based medicine (as well as your own surgical expertise) the surgical technology currently exists. At our centers, we have developed dedicated consent forms specifically designed to clearly communicate to patients the nuances of undergoing these relatively new approaches to pelvic reconstructive surgery. We go to great lengths to explain definitions of the term experimental versus standard of care. We discuss that the surgery has indeed gone through the review process of the FDA and has stood the test of earlier observational and comparative trials and has developed a growing body of literature supporting the benefits, as well as defining the associated risks. We candidly discuss our own success rates, as well as complication rates, especially those related to exposure or erosion and de novo dyspareunia. We also stress with our patients that we have found relative risks such as younger age, a history of undergoing a prior reconstructive procedure utilizing any permanent material or suture, and the presence of chronic pain disorder (especially pelvic pain) to be associated with the possibility of developing new-onset pelvic pain or, more specifically, dyspareunia. Last, each patient is given the option of a more traditional suture repair of endogenous tissue, as well as the alternative of an open or laparoscopic abdominal sacral colpopexy.
All of our patients receive appropriate thromboembolic precautions, a rectal prep, including an enema the night before and the morning of surgery, preoperative antibiotic prophylaxis utilizing a second-generation cephalosporin, and careful operative prep of the vaginal canal and surgical site. We recommend that patients receive preoperative topical transvaginal estrogen and encourage patients to continue to use transvaginal topical estrogen for an extensive period of time postoperatively. It is important that patients realize that to optimize sexual function and comfort, the vaginal lining itself should be kept as healthy as possible with the support of topical estrogen.
FIGURE 57–1 The Prolift system (Ethicon Women’s Health & Urology).
FIGURE 57–2 The Apogee and Perigee Systems. (Courtesy American Medical System, Inc., Minnetonka, Minnesota. www.AmericanMedicalSystems.com.)
We believe it is our responsibility to position the lower extremities carefully in adjustable Allen-type stirrups. From the lateral perspective, hip flexion should be no greater than 90°, and the leg should be abducted such that the knee is not in line with the foot and the contralateral shoulder (Fig. 57–3). Even with careful positioning, some patients will experience muscle strain and discomfort caused by hip flexion. Therefore, we often recommend that our patients perform specific stretching exercises for several weeks before undergoing surgery. Patients are instructed to perform these exercises while lying in bed in the morning or evening. Patients are instructed to grasp their knee or behind the knee, then while flexing toward their chest as much as they physically can, they can gently rotate the leg laterally and hold that position for a count of 10 seconds. Since embracing this exercise as part of our routine preoperative care, we have anecdotally seen a significant decrease in patient complaints of hip, back, and leg pain associated with the exaggerated dorsal lithotomy position required for transvaginal mesh surgery.
In the authors’ opinion, the most technically challenging aspect of placement of any of the transvaginal trocar-based mesh kits is performing the proper dissection. Traditional dissection involved with suture plication of endogenous tissue of the anterior or posterior vaginal wall involves “splitting” of the vaginal epithelium from the underlying muscularis, followed by various forms of plication of the muscularis layer, trimming of the redundant epithelium, and closure. This splitting dissection, if utilized with transvaginal mesh placement, will inevitably result in a significantly high mesh exposure rate. To emulate and achieve the same low exposure rate experienced with transabdominal placement of the pelvic mesh, the transvaginal approach must enter the same pelvic spaces, placing the mesh deep to all of the histologic layers and compromising the vaginal wall. The surgeon must be skilled at entering the true vesicovaginal space anteriorly, as well as the rectovaginal space posteriorly, and placing the mesh into these spaces, as opposed to within the vaginal wall (Figs. 57–4 through 57–6). This specific full-thickness dissection is accomplished by utilizing first a very precise hydrodissection, then careful sharp dissection, and is finally completed with blunt dissection into the paravesical and pararectal spaces. Anteriorly, surgical entrance into the vesicovaginal space can be difficult because the lumen of the space is extremely small. Given the minimal amount of fat that exists in this potential space, it is best viewed as a balloon with little to no air within the lumen, which must be carefully entered. Recently, we adopted the use of an 18-gauge Tuohy needle, which provides increased tactile and visual feedback for precise bevel placement, allowing proper fluid dissection and distention of the vesicovaginal space (Fig. 57–7).
Our approach to entering this space involves the placement of two Allis clamps on the anterior vaginal wall approximately 3 to 4 cm apart, in the area corresponding with the most pronounced portion of the anterior prolapse. Very commonly, the inferior margin of the bladder can be easily palpated through the vaginal wall. With a gentle pinch, the bladder can be pushed cephalad, potentiating the space between the bladder and the full-thickness vaginal wall. A Tuohy needle is then utilized to enter the vesicovaginal space, while a point closer to the inferior Allis clamp is chosen and the needle is held perpendicular to the plane of the vaginal wall edge. The needle offers 5-mm colored segments to provide the surgeon with a measured visual reference, which aids in accurate placement. The needle is carefully advanced through the full thickness of the vaginal wall, which most often is approximately 5 to 7 mm. Commonly, a popping sensation is distinctly palpable as the rounded tip of the needle enters the true vesicovaginal space. With the needle bevel-faced ventral in a 12-o’clock position, fluid can be infused easily into the space, creating hydrodissection. We prefer a dilute solution of 0.25% marcaine with epinephrine diluted 1 : 1 with injectable saline. A 20-mL aliquot of the fluid is placed along the midline. Next, a standard needle is used to reenter the 20-mL fluid pocket and then is directed off midline laterally, while the needle is kept parallel with the lateral aspects of the anterior vaginal wall. A vigorous push of the syringe will help force fluid laterally, physically separating the underlying detrusor muscle from the overlying full-thickness vaginal wall.
Next, the anterior vaginal wall is incised with a scalpel or with the use of electrocautery to enhance hemostasis. Extreme care must be utilized to ensure that the surgeon has penetrated through all of the histologic layers of the vagina and has surgically entered the previously established fluid pocket. Often, this fluid pocket appears as a silver-gray jelly-like space that often contains yellow wisps of adipose tissue, which are easily visible without magnification. The incision is extended for a total length of approximately 4 cm (Fig. 57–8).
FIGURE 57–3 Patient positioning on the operating room table with hip flexion not greater than 90°.
FIGURE 57–4 Histologic layers making up the vaginal wall.
FIGURE 57–5 Diagrammatic representation of different layers of the vaginal wall for optimal placement of mesh.
FIGURE 57–6
[/not-level-membership-for-obstetrics-gynecology-category]
