Trauma Emergencies
Assessment and Stabilization
Establishing Priorities
There are three immediate priorities in managing wilderness trauma:
1. Self control: It is normal to feel anxious when confronted with an injured patient. However, anxiety and fear can be transmitted to other members of the team and distract from team and patient safety goals.
2. Control the situation: The first priority is ensuring the safety of your team and patient(s). Injury to additional persons can exponentially complicate the scenario and require more resources. Expeditious evacuation of the patient requires that all expedition members function at maximal efficiency; even minor injuries to other members of the group can jeopardize an evacuation. Although a medical professional among the team may be the best qualified to perform patient assessment and care, the overall group leader needs to take into consideration team resources, safety, weather, travel plans, and the overall coordination of evacuation.
3. Obtain an overview of the situation: The team leader needs to assess if the group has enough food, water, and shelter to support itself during the evacuation. If the patient requires treatment in the field and/or if weather does not permit evacuation, then shelter needs to be arranged to protect against the elements until everything is ready for patient evacuation. Efforts should be made to contact necessary rescuers and agencies, if possible, or consideration made for sending part of the team to request assistance.
Basic Principles of Wilderness Trauma Management
1. Primary survey: Rapidly identify immediate life threats to the patient by assessing “ABCDE”—airway; breathing; circulation; disability and neurologic status, including possible cervical spine injury; and environmental exposure.
2. Resuscitation: Stabilize any conditions discovered during the primary survey.
3. Secondary survey: Complete a basic medical history and head-to-toe examination of the patient to discover all injuries.
4. Definitive plan: Create a treatment and evacuation plan for the patient.
5. Packaging and transfer preparation: Protect the patient from environmental exposure, and evacuate the patient or prepare for rescue assistance.
Primary Survey
Assess the Scene
1. Ensure the safety of noninjured members of the party.
2. Assess the scene for further hazards such as falling rocks, avalanche, and dangerous animals before rendering first-aid care.
3. Avoid approaching the patient from directly above if falling rock or a snowslide is possible.
4. Do not allow your sense of urgency to transform an accident into a risky and foolish rescue attempt.
Airway
1. If the patient is unresponsive, immediately determine if he or she is breathing.
a. If the patient’s position prevents adequate assessment of the airway, roll the patient onto the back as a single unit, supporting the head and neck (Fig. 12-1).
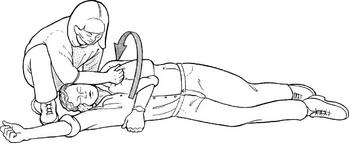
FIGURE 12-1 One-person roll.
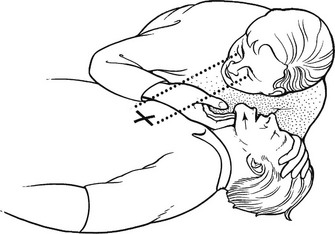
b. Place your ear and cheek close to the patient’s mouth and nose to detect air movement while looking for movement of the chest and abdomen (Fig. 12-2). In cold weather, look for a vapor cloud and feel for warm air movement.
2. If no movement of air is detected, clean out the mouth with your fingers and use the chin lift (Fig. 12-3) or jaw thrust technique to open the airway.
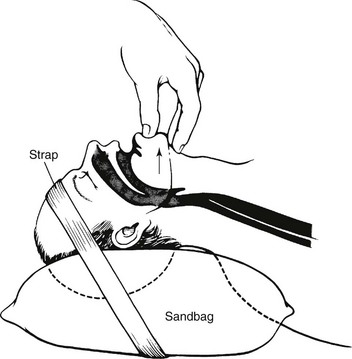
a. Perform the jaw thrust by kneeling down with your knees on either side of the patient’s head, placing your hands on either side of the patient’s mandible and pushing the base of the jaw up and forward (Fig. 12-4).
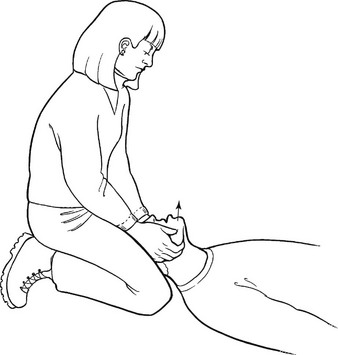
FIGURE 12-4 Jaw thrust.
b. Note that the jaw thrust and chin lift techniques are labor intensive and occupy your hands. If you are alone and the situation is critical, you can establish a temporary airway by pinning the anterior aspect of the patient’s tongue to the lower lip with a safety pin (see Fig. 10-5), noting that this can result in significant bleeding and is perceived by some observers as a maneuver of last resort. An alternative to puncturing the lower lip is to pass a string or shoelace through the safety pin and hold traction on the tongue by securing the other end to the patient’s shirt button or jacket zipper (see Fig. 10-6).
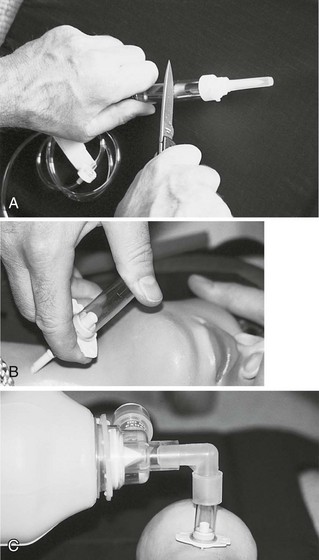
3. Cricothyroidotomy (cricothyrotomy)—the establishment of an opening in the cricothyroid membrane—is indicated to relieve life-threatening upper airway obstruction when a patient cannot be ventilated effectively through the mouth or nose and endotracheal intubation is not feasible (also see Chapter 10).
a. Locate the cricothyroid membrane by palpating the patient’s neck, starting at the top. The first and largest prominence felt will be the thyroid cartilage (“Adam’s apple”); the second felt is the cricoid cartilage (below the thyroid cartilage). The small space between these two, noted by a small depression, is the cricothyroid membrane (Fig. 12-5, A).
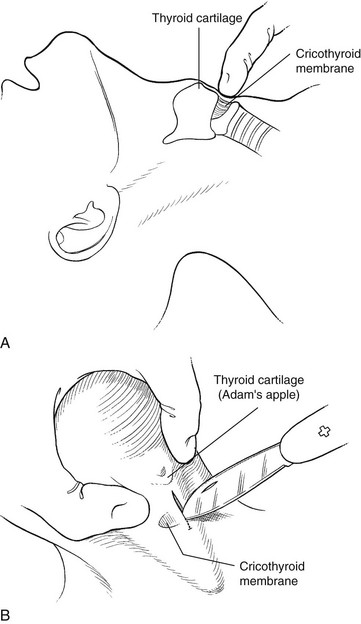

b. With the patient lying on his or her back, cleanse the neck around the cricothyroid membrane with an antiseptic.
c. Put on protective gloves. Make a vertical 2.5-cm (1-inch) incision through the skin with a knife over the membrane (go a little bit above and below the membrane) while using the fingers of your other hand to pry the skin edges apart. Anticipate bleeding from the wound (Fig. 12-5, B and C).
d. After the skin is incised, puncture the membrane by stabbing it with your knife or other pointed object.
e. Stabilize the larynx between the fingers of one hand, and insert an improvised cricothyrotomy tube (Box 12-1) through the membrane with your other hand while aiming caudally (toward the buttocks). Secure the object in place with tape. You can also insert the improvised tube through the tape before placing it through the cricothyroid membrane.
Box 12-1 Improvised Cricothyrotomy Tubes
1. Syringe barrel: Cut the barrel of a 1- or 3-mL syringe with the plunger removed at a 45-degree angle at its midpoint. The proximal flange of the syringe barrel helps secure the device to the neck and prevents it from being aspirated (Fig. 12-6).
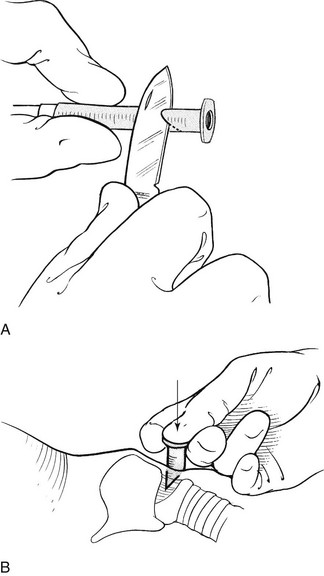
FIGURE 12-6 A and B, Cut the barrel of a syringe at a 45-degree angle, and insert the pointed end through the membrane.
2. IV administration set drip chamber: Cut the plastic drip chamber of a macrodrip (15 drops/mL) IV administration set at its halfway point with a knife or scissors. Remove the end protector from the piercing spike and insert the spike into the cricothyroid membrane. The plastic drip chamber is nearly the same size as a 15-mm (0.6-inch) endotracheal tube adapter and fits snugly in the valve fitting of a bag-valve device (Fig. 12-7).
3. Any small hollow object: Examples include a small flashlight or penlight casing, pen casing, small pill bottle, and large-bore needle or IV catheter. Several commercial devices are available that are small and sufficiently lightweight to be included in the first-aid kit.
Breathing
Expose the patient’s chest, and assess for chest wall movement, breath sounds, and signs of breathing, such as condensation of water vapor emanating from the nose and mouth. If the patient is not adequately breathing, you may need to provide rescue breaths (see Chapters 10 and 11). If the patient demonstrates tachypnea, dyspnea, resonant hemithorax, absence of breath sounds, asymmetric chest movement, hypotension, or hypoxia, the patient may have a tension pneumothorax. Treatment of a hemodynamically unstable patient with a tension pneumothorax is needle decompression (Box 12-2).
Box 12-2 Needle Decompression of a Tension Pneumothorax
2. Insert a large (16 to 14 gauge) IV catheter or long needle (>5 cm [2 inches]) directly above the third rib into the second intercostal space until the pneumothorax is decompressed. This is often accompanied by a release (“rush”) of air.
3. Alternatively, you can place the IV catheter or needle directly above the sixth rib in the fifth intercostal space in the axillary line at the traditional site for a thoracostomy tube (Fig. 12-8).
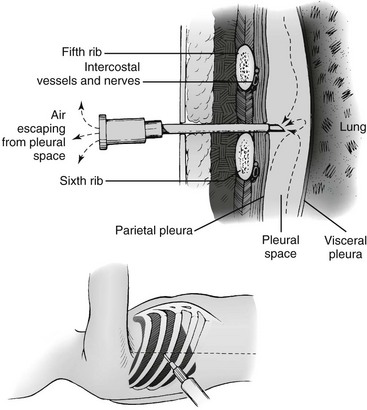
FIGURE 12-8 Needle decompression of a tension pneumothorax.
4. If an IV catheter is used, advance the catheter over the needle and leave it in place as you withdraw the needle.
Circulation
External Bleeding
1. Carefully check the patient for signs of profuse bleeding. Be sure to feel inside any bulky clothing and check underneath the patient for signs of bleeding.
2. Control bleeding with direct pressure.
3. Apply a tourniquet only as a last resort when bleeding cannot be stopped by direct pressure (Box 12-3).
Box 12-3 How to Apply a Tourniquet
1. Tourniquet material should be wide and flat to prevent crushing tissue. Use a firm bandage, belt, or strap 7.5 to 10 cm (3 to 4 inches) wide that will not stretch. Never use wire, rope, or any material that will cut the skin.
2. Wrap the bandage snugly around the extremity several times as close above the wound as possible, and tie an overhand knot.
3. Place a stick or similar object on the knot, and tie another overhand knot over the stick (Fig. 12-9, A).
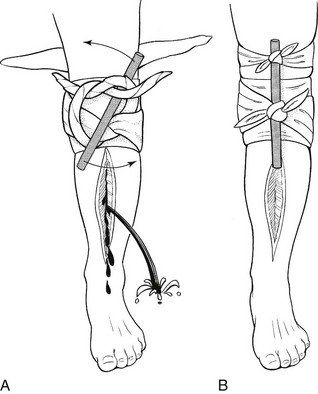
FIGURE 12-9 Applying a tourniquet.
4. Twist the stick until the bandage becomes tight enough to stop the bleeding. Tie or tape the stick in place to prevent it from unraveling (Fig. 12-9, B).
5. Mark the patient with a “TK” where it cannot be missed, and note the time the tourniquet was applied.
6. If you are more than an hour from medical care, loosen the tourniquet very slowly at the end of 60 minutes, while maintaining direct pressure on the wound. If bleeding is again heavy, retighten the tourniquet. If bleeding is now manageable with direct pressure alone, leave the tourniquet in place but do not tighten it again unless severe bleeding starts.
a. A tourniquet is a band applied around an extremity so tightly that all blood flow distal to the site is stopped. Several lightweight, manufactured tourniquets are available, such as the Combat Application Tourniquet (C-A-T). Tourniquets can be improvised from clothing, towels, or tent material.
b. If the tourniquet is left on for more than 3 to 6 hours, tissue distal to the tourniquet may die and the extremity may require amputation.
c. If you can control the situation, the tourniquet may be loosened every 60 minutes to see if pressure alone will staunch the bleeding. However, this should be done with extreme caution, because there is always the risk that when a tourniquet is released, there will be significant blood loss.
Internal Bleeding
1. Avoid unnecessary movement of the patient.
2. Splint all fractured extremities.
3. Apply traction to a femur fracture (see Chapter 18).
4. Apply a circumferential compression pelvic sling to a pelvic fracture (Box 12-4).
Box 12-4 Applying an Improvised Pelvic Sling
1. Ensure that objects have been removed from the patient’s pockets and that any belt has been removed so that pressure of the sheet or object does not cause discomfort by pressing items against the pelvis.
2. Gently slide the improvised material under the patient’s buttocks, and center it under the bony prominences of the hips (greater trochanters) (Fig. 12-10, A).
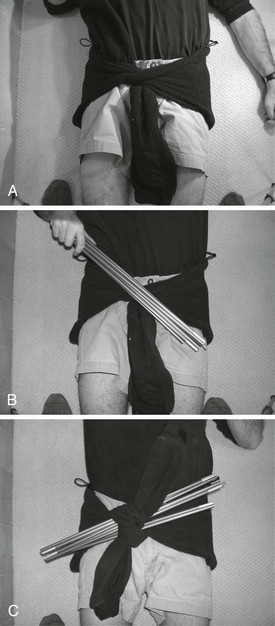
FIGURE 12-10 Improvised pelvic sling.
3. Cross the object over the front of the pelvis, and tighten the sling by pulling both ends and securing with a knot, clamp, or duct tape (Fig. 12-10, B and C).
4. Another tightening technique is to wrap the sling snugly around the pelvis and tie an overhand knot. Place tent posts, a stick, or similar object on the knot, and tie another overhand knot. Twist the poles or stick until the sling becomes tight.
5. If a Therm-a-Rest pad or other inflatable sleeping pad is available, fold it in half so that it approximates the size of the pelvis. Gently slide the pad under the patient’s buttocks, and center it under the greater trochanters and symphysis pubis. Secure the pad with duct tape, then inflate the pad as you would normally until it produces a snug fit.
a. Unstable pelvic fractures are associated with significant blood loss.
b. Pelvic reduction and stabilization in the early post-traumatic phase will mitigate venous hemorrhage.
c. Clothes, sheets, a sleeping bag, pads, air mattress, tent, or tent fly can be used to improvise an effective pelvic sling in the backcountry. The object should be wide enough so that it does not cut into the patient when tightened.
Cardiopulmonary Resuscitation and Circulation (see also Chapter 25)
1. If a trauma patient is pulseless and apneic, cardiopulmonary resuscitation (CPR) is not likely to be successful unless the patient has a tension pneumothorax that can be relieved. A short period of CPR (10 to 15 minutes, unless the patient is hypothermic) is recommended.
2. If a pulse is present, vital information can be extrapolated from determining where it can be felt.
Disability and Neurologic Assessment
1. Neurologic assessment during the primary survey should be rapid and efficient.
2. Establish the level of consciousness (alert, responds to verbal stimuli, responds to painful stimuli only, or unresponsive).
3. Assess bilateral pupil size and reactivity.
4. Assess the Glasgow Coma Scale (GCS; see Appendix B) or other repeatable scale for neurologic function.
5. Deterioration in mental status is a poor prognostic sign.
Cervical Spine
1. Initiate and maintain spine immobilization after trauma if some mechanism is responsible for spinal injury and the following:
• The patient complains of midline neck or back pain.
• The cervical spine is tender to palpation.
• Paresthesias or altered sensation exists in the extremities.
• Paralysis or weakness occurs in an extremity not caused by direct trauma.
• The patient has an altered level of consciousness or is under the influence of drugs or alcohol.
• The patient has another painful injury, such as a femoral or pelvic fracture dislocated shoulder, or broken ribs that may distract the person from appreciating pain in the spine.
2. If a cervical spine injury is suspected, immobilize the patient’s head and neck and prevent any movement of the torso. (See Box 12-5 for immobilization aids.)
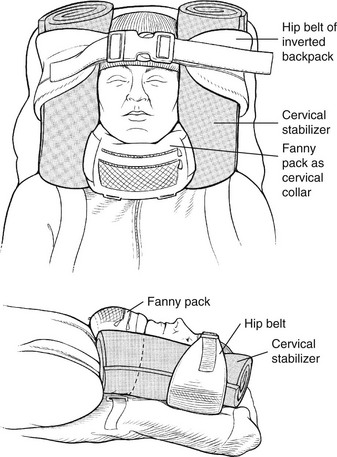
Box 12-5 Immobilization Aids
The cervical collar is always viewed as an adjunct to full spinal immobilization and is preferentially not used alone.
SAM Splint Cervical Collar (Fig. 12-11)
Create a bend in the SAM splint approximately 15 cm (6 inches) from the end of the splint. This bend will form the anterior post. Next, create flares for the mandible. Apply the anterior post underneath the chin, and bring the remainder of the splint around the neck. Take up circumferential slack by creating lateral posts. Finally, squeeze the back to create a posterior post and secure with tape.
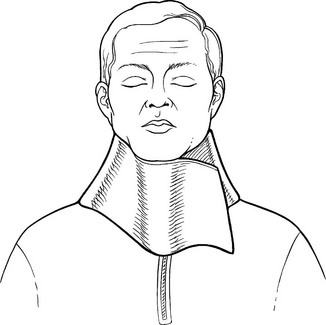
FIGURE 12-11 SAM splint cervical collar.
Fold the pad longitudinally into thirds, and center it over the back of the patient’s neck. Wrap the pad around the neck and under the chin. If the pad is not long enough, tape or tie on extensions (Fig. 12-12).
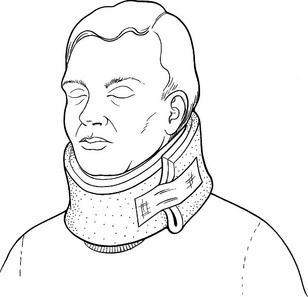
FIGURE 12-12 Ensolite pad used as a cervical collar.
Internal-Frame Pack/Snow Shovel System
Modify an internal-frame backpack by inserting a snow shovel through the center-line attachment points (the shovel’s handgrip may need to be removed first).
Tape the patient’s head to the lightly padded shovel, which serves as a head bed.
3. Avoid moving the patient with a suspected spinal injury if he or she is in a safe location. The patient will need professional evacuation.
Cover and Protect the Patient From the Environment
1. If it is cold, place insulating garments or blankets underneath and on top of the patient. Remove and replace any wet clothing.
2. If it is hot, loosen the patient’s clothing and create shade.
3. If the patient is in a dangerous area, move to a safer location while maintaining spine immobilization if indicated.
Secondary Survey
History
The patient’s brief medical history should be assessed during the secondary survey. Consider the SAMPLE history mnemonic (Box 12-6) for this purpose. Knowledge of the mechanism of injury and any comorbidities or allergies may enhance understanding of the patient’s physiologic state.
Neurologic, Head, and Face Evaluation
1. Estimate the GCS or another neurologic status scoring system (if not done in the primary survey), and repeat at a minimum hourly if initially abnormal and circumstances permit.
2. Perform a more detailed examination, searching for focal neurologic deficits.
a. Sensory defects follow the general dermatome patterns shown in Figure 12-14.


b. Changes in reflexes not accompanied by altered mental status do not mandate evacuation unless the patient also has a spinal cord injury.
3. Palpate the scalp thoroughly, seeking tenderness, depressions, and lacerations.
a. Immediately evacuate any patient with suspected depressed skull fracture or basilar skull fracture accompanied by penetrating scalp trauma.
b. Administer a broad-spectrum antibiotic (e.g., cefuroxime, adult dose 1.5 g IM).
c. Do not remove any impaling foreign bodies piercing the head or neck. Pad and secure these to prevent motion that would cause further injury.
Evaluation of the Body
1. Undress the patient sufficiently to perform a proper head-to-toe examination. Keep in mind the weather conditions and appropriate concern for patient modesty. Check around the patient’s neck or wrist for a medical information bracelet or tag and in the patient’s wallet or pack for a medical identification card.
2. Remember to ask the patient to move any injured body part before you move it. If the patient resists because of pain or weakness, you should suspect a fracture or spinal cord injury. Never force the patient to move.
3. Examine the patient’s skin for sweating, color, and locating injuries such as bruises, rashes, burns, bites, or lacerations. Check inside the patient’s lower eyelids for pale color, which can indicate anemia or internal hemorrhage. Note abnormal skin temperature.
4. Examine the chest, watching the patient breathe to see if the chest expands completely and equally on both sides. Examine the chest wall for tenderness and deformities or foreign objects. Auscultate for breath sounds.
5. Gently press all areas of the back and abdomen to find areas of tenderness. Examine the buttocks and genitals.
6. Examine the patient’s bony structure. Gently press on the chest, pelvis, arms, and legs to reveal areas of tenderness. Run your fingers down the length of the clavicles and press where they join the sternum. Evaluate the integrity of each rib, and observe for areas of deformation or discoloration.