[level-membership-for-orthopaedics-category]
CHAPTER 24 Transtibial Single-Bundle Posterior Cruciate Ligament Reconstruction
Injuries to the posterior cruciate ligament (PCL) are increasingly being recognized in athletes and trauma patients. The past decade has seen an increase in the diagnosis, treatment, and study of these injuries. Depending on the patient population being evaluated, there is a wide range reported for the incidence of PCL injuries. The incidence of PCL injury varies between 3% in an athletic population to 37% in the emergency room trauma setting.1–3 Many of these patients have multiple ligament involvement including anterior cruciate ligament (ACL), posterolateral corner (PLC), and medial-sided injuries. Clinical and cadaveric studies have established that grade 3 PCL injuries usually involve concurrent injury to the posterolateral corner.4
In this chapter, we will describe the anatomy of the posterior cruciate ligament, pertinent aspects of the history and physical examination in evaluating patients with a potential PCL injury, diagnostic imaging, treatment options, and our single-bundle transtibial reconstruction technique. There is much debate surrounding PCL reconstruction, including timing and the optimal technique. This chapter describes our preferred transtibial technique in detail, but we are aware that several successful reconstructive techniques may yield equivalent outcomes.5–12
ANATOMY
Structure
The posterior cruciate ligament is an extra-articular ligament. Although it is clearly visualized arthroscopically, there is a thin layer of synovium that reflects from the posterior capsule and surrounds the PCL. The PCL is between 32 and 38 mm in length and its cross-sectional area at its midsubstance is 32.2 mm2 (approximately 1.5 times larger than the ACL).13 The insertion sites of the PCL are approximately three times larger than the midsubstance cross-sectional area, giving the PCL an hourglass appearance. The fibers of the PCL attach on the tibia approximately 1.0 to 1.5 cm below the joint line in a lateral to medial direction (Fig. 24-1). On the femoral side, the PCL fibers attach to the medial femoral condyle in an anterior to posterior direction, adjacent to the anterior margin of the articular cartilage.
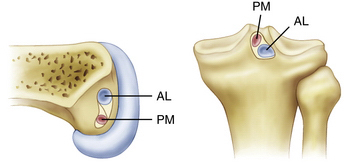
There are three main components of the PCL—the anterolateral bundle (AL), the posteromedial bundle (PM), and the meniscofemoral ligaments.14–17 These components each have unique bony insertions as well as anatomic and biomechanical properties. The anterolateral bundle has a maximum load of 1120 N and a stiffness of 120 N/mm, the posteromedial bundle has a maximum load of 419 N and a stiffness of 57 N/mm, and the meniscofemoral ligaments have a maximum load of 297 N and a stiffness of 49 N/mm.16 The anterior meniscofemoral ligament (ligament of Humphrey) and the posterior meniscofemoral ligament (ligament of Wrisberg) arise from the posterior horn of the lateral meniscus and sandwich the PCL bundles. Because the meniscofemoral ligaments are attached to the mobile lateral meniscus, it is possible for the PCL to be ruptured while the meniscofemoral ligaments remain intact. Their anatomic location and relative strength allow them to provide a scaffold for an injured PCL ligament while it attempts to heal. The AL bundle has twice the cross-sectional area of the PM bundle and 150% of the stiffness and strength, so it is considered the most important component of the PCL and the focus of single-bundle reconstructions.18
The vascular supply to the posterior cruciate ligament is from the popliteal artery via the middle geniculate artery. The synovial sleeve covering the PCL is well vascularized and is a major contributor to the blood supply of the ligament.19,20 The synovial sleeve that provides a rich vascular supply to the PCL, as well as the meniscofemoral ligaments, gives some PCL injuries the potential to heal. Both the PCL and its synovial sleeve are innervated by nerve fibers from the popliteal plexus. The plexus receives contribution from the posterior articular nerve, a prominent branch of the posterior tibial nerve, and from the terminal portions of the obturator nerve.21 Golgi organ–like structures have been observed near ligament origins beneath the synovial sheath and are thought to have a proprioceptive function in the knee.22 Ruffini’s corpuscles (pressure receptors), Vater-Pacini corpuscles (velocity receptors), and free nerve endings (pain receptors) have also been found in the PCL on histologic study.23 Therefore, disruption of the PCL not only alters knee kinematics, but also alters the sensation and, probably, proprioception.24
Injuries to the posterolateral corner are commonly associated with PCL injuries. It is highly unlikely that a patient has a grade 3 PCL injury without a significant injury to the posterolateral corner.4 The structures of the PLC have been studied at length and there remains some debate as to which structures are included. Traditionally, the structures of the posterolateral corner are the popliteus tendon, popliteofibular ligament, and lateral collateral ligament.25–27 However, other structures that have been described as part of the posterolateral corner include the joint capsule, arcuate ligament, and fabellofibular ligaments.
Function
The kinematics of the posterior cruciate ligament reflects the two-bundle anatomy. The larger anterolateral bundle is tight in flexion and slackens with knee extension.14,17 The posteromedial bundle is tight in extension and slackens with knee flexion. With deep knee flexion, the PM bundle moves anterior and away from the tibial plateau so that it becomes taut again in deep knee flexion.28 Midranges of flexion recruit fibers from both bundles so that neither bundle is completely slack. When studied independently, however, neither bundle is completely isometric.
Biomechanical studies have shown that the PCL is the primary restraint to posterior drawer forces and is a secondary restraint to external rotation.25–27 Isolated section of the PCL, without damage to the posterior capsule, results in a small degree of increased posterior laxity in full extension, with more pronounced increases in posterior laxity with flexion to 90 degrees.29,30 In these studies, there were only minimal changes in rotation or varus-valgus laxity from isolated PCL sectioning.
The structures of the posterolateral corner each have an independent kinematic profile that comes together in a complex pattern to provide resistance to tibial external rotation and posterior tibial translation.4,25–27 Individually, the lateral collateral ligament (LCL) is the primary restraint to varus stress and does not significantly contribute to anterior/posterior translational control. The popliteofibular ligament complex, which comprises the popliteus and popliteofibular ligament, is relatively isometric and controls external tibial rotation at all angles of knee flexion.31 It tightens in full extension to provide restraint to posterior tibial translation at full extension. Combined sectioning of the PCL and posterolateral corner results in significantly increased posterior laxity when compared with isolated sectioning of the PCL or the posterolateral corner alone.32 Therefore, injuries to either structure when both are damaged will result in increase stress on the remaining structure or reconstruction.33
PATIENT EVALUATION
History
Physical Examination
Careful evaluation of the ligamentous structures of the knee is crucial. Because isolated PCL injuries are rare, and isolated grade 3 tears perhaps nonexistent, a multiligamentous injury should be suspected whenever a PCL injury is identified. The usual clinical testing of the ACL, medial collateral ligament (MCL), and LCL should be carried out. In an unstable knee, it is critical to perform these tests with the knee starting in a reduced position. If the test is performed from a subluxed position, the examiner may mistake the cause of laxity—for example, reporting a positive anterior drawer in the setting of a PCL tear because the anterior drawer test was initiated from a posteriorly subluxed position.
A posterior drawer test is the most accurate clinical test for PCL injuries.34,35 The patient is placed supine with the knee flexed to 90 degrees and the tibia neutrally rotated. A posteriorly directed force is placed on the proximal tibia. This can also be performed with the tibia in external rotation (posterolateral drawer) and internal rotation (posteromedial drawer) to assist in evaluation of the posterolateral and posteromedial corners, respectively. The extent of posterior translation of the tibia with respect to the femur is measured by evaluating the relationship and change in position of the proximal tibia and medial femoral condyle. Normally, the medial proximal tibia is positioned approximately 1 cm anterior to the medial femoral condyle, but comparison with the contralateral side, if uninjured, can provide an accurate reference point. In addition to degree of translation, the quality of the end point is important in the evaluation of the PCL injury.
Grade I injuries are partial thickness tears that have a palpable but diminished step-off of the tibia with respect to the femur. This corresponds to 0 to 5 mm of posterior tibial translation. Grade II injuries are partial-thickness tears in which patients have lost the normal tibial step-off, but the proximal tibia does not translate posteriorly to the medial femoral condyle. This corresponds to 5 to 10 mm of posterior tibial translation. More than 10 mm of posterior tibial translation corresponds to a grade III injury, which is consistent with a complete PCL rupture.33 The proximal tibia will translate posterior to the medial femoral condyle without a good end point in this setting. Grade III injuries are associated with PLC injury in most, if not all cases.4
The posterior sag test (Godfrey test) is performed with the hip and knee flexed to 90 degrees. The examiner supports the lower extremity by holding the foot and observes the proximal tibia with respect to the femur. In the setting of a complete PCL tear, gravity will pull the proximal tibia posteriorly. By comparing the anterior profile of the injured knee and proximal tibia with the normal side, very subtle posterior translations can be seen. The quadriceps active test is performed with the patient supine and the knee flexed to 60 degrees. While the examiner stabilizes the foot, the patient contracts the quadriceps muscle. With PCL insufficiency, the tibia will initially lie posteriorly subluxed when the knee is relaxed, but with isometric quadriceps contraction, the tibia will translate anteriorly and attempt to reduce relative to the femur. The reverse pivot shift test is performed by passively extending the knee from a flexed position with the foot externally rotated and a valgus force applied to the tibia. The tibia will initially be subluxed posterolaterally if the PCL-PLC is not functional, but will abruptly reduce with respect to the femur at 20 to 30 degrees of knee flexion as the knee comes into extension.36 Additional tests for injury to the PCL and posterolateral corner have been described. See the chapter on the posterolateral corner for an in-depth review of this topic (Chapter ••).
A careful neurovascular examination is critical for evaluating patients with PCL injuries. The structures of the popliteal fossa include the popliteal artery, popliteal vein, tibial nerve, and peroneal nerve. The popliteal artery is tethered proximally at the adductor hiatus and distally at the soleus arch, and therefore vulnerable to injury from dislocation of the knee. The peroneal nerve is at risk for injury because of the course it takes around the fibular head, especially in the setting of associated varus injury. The incidence of neurovascular injury ranges from 14% to 49%.26,29,30 Because many knee dislocations “autoreduce” before they are examined or imaged, the physician must be careful to monitor for injury and to get appropriate studies if injury is suspected.
Diagnostic Imaging
Radiography
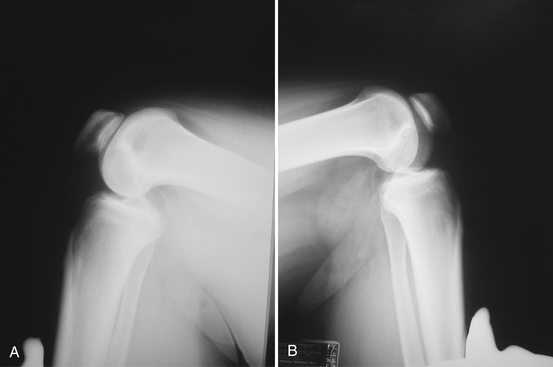
A standard knee series, including bilateral standing anteroposterior (AP), AP flexion 45-degree weight-bearing, lateral, and Merchant patellar radiographs, should be evaluated for evidence of posterior tibial subluxation, avulsion fractures, and associated knee injury. Subtle posterior tibial subluxation may be the only finding on these films. The unopposed pull of the hamstrings causes posterior tibial subluxation, which can become fixed within a short time. Stress lateral radiography performed in neutral rotation and the knee flexed to 90 degrees with and without a posterior drawer force may show increased tibial translation with respect to the femur when compared with the contralateral knee (Fig. 24-2).
Magnetic Resonance Imaging
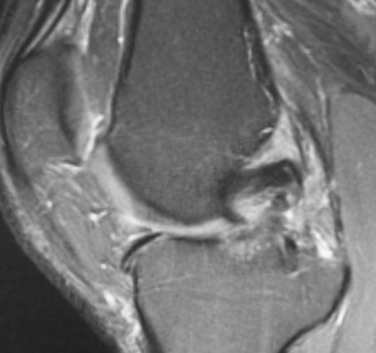
Magnetic resonance imaging (MRI) has become the diagnostic study of choice for evaluation of the knee with clinical suspicion of a PCL injury (Fig. 24-3). MRI and stress radiography have been shown to corroborate the severity of the PCL injury as identified on physical examination.37 Normally, the PCL appears curvilinear and dark on both T1- and T2-weighted sequences, representing the relatively lax anterolateral component. The sensitivity of an MRI scan for determining acute PCL tears has been reported to be between 96% and 100%.38–40 The sensitivity of MRI, however, is not nearly as good for the evaluation of a chronic PCL injury. It is not uncommon for the PCL to look attenuated but intact, even in the setting of chronic grade III instability. MRI is also helpful for evaluating and determining the appropriate treatment course for associated injuries to the knee.
TREATMENT
Indications and Contraindications
Indications
Patient with low-grade PCL injuries that can be treated successfully with conservative treatment are not indicated for PCL reconstruction.41,42 Most isolated grades I and II PCL injuries do well with conservative management, including a rehabilitation program that focuses on quadriceps strengthening while eliminating any hamstring strengthening through a flexed knee.26,43,44 Insertion site avulsions from the femur or tibia may be treated successfully if acute anatomic repair is possible and typically yield results superior to reconstruction. Acute grade III PCL tears combined with a PLC injury and/or other multiligamentous injuries is generally considered an indication for surgery. Associated ligament injuries, especially to the posterolateral corner, also need to be evaluated and treated appropriately. Posterolateral corner injuries and insertion site avulsions are best treated with acute direct repair (within 3 weeks of injury). Patients with chronic grade III PCL injuries that fail conservative treatment and cause symptomatic functional instability are candidates for PCL reconstruction.
Conservative Management
Nonoperative treatment for grades I and II PCL injuries has been shown to have a high rate of success.33,43,44 We use a four-phase rehabilitation protocol for nonoperative treatment of grades I and II PCL injuries. Phase I involves a brace locked in extension for 6 to 8 weeks after the initial injury. The patient is weight bearing as tolerated while in the brace and uses crutches as needed for assistance. The patient may remove the brace for physical therapy and a home exercise program. The key to this phase is to avoid posterior tibial translation and active knee flexion while the PCL heals. Phase II begins with discontinuation of the brace and crutches when gait has normalized. Physical therapy focuses on restoring range of motion and quadriceps strength through a progressive step up program. Open-chain hamstring exercises are discouraged. Phase III begins active knee flexion without resistance, a progressive step-down program, and proprioception activities. The goals of phase III include full range of motion and functional progression with adequate strength. Phase IV is sport-specific training with aggressive functional strengthening, gradual return to running, agility exercises, and plyometric training.
Arthroscopic Technique
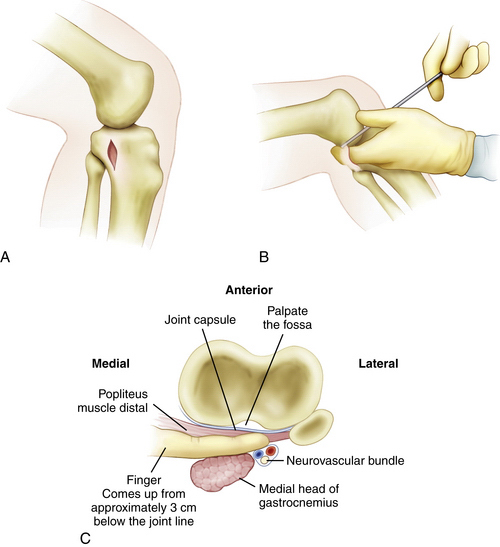
A posteromedial safety incision, as described by Fanelli,45 can be valuable not only for avoiding injury, but also for expediting proper tibial tunnel placement (Fig. 24-4). A 2.0- to 2.5-cm incision is made approximately 3 cm distal to the joint line. The crural fascia is incised in a longitudinal fashion anterior to the medial head of the gastrocnemius muscle. This is the same interval commonly used for the tibial inlay approach. A gloved finger can be used to dissect the interval bluntly under the medial head of the gastrocnemius, over the popliteus muscle belly, and proximally along the tibia up to the PCL insertion site. In this location, the gloved finger will be extracapsular, with the neurovascular structures lying just posterior. This enables the surgeon to check the proper placement of the PCL tibial guide and guide pin while protecting the neurovascular structures behind the finger during the reaming. A malleable ribbon retractor can also be used in this interval to help protect the neurovascular bundle.
It is critical to perform a diagnostic arthroscopy to evaluate and treat coexisting pathology, which needs to be addressed in the setting of a grade III PCL injury. The remnant of the torn PCL is débrided using standard synovial shavers but maintaining a small footprint on the femoral side. This will serve as a guide for appropriate femoral tunnel placement. With the arthroscope in the anterior lateral portal, the anterior and posterior medial portals can be used to débride the remnant of the PCL tibial stump. This needs to be done carefully, with the blade of the shaver always facing away from the thin posterior capsule. Curved PCL instruments are used through the anteromedial portal to elevate the posterior capsule off of the tibia (Fig. 24-5). The posteromedial safety incision can be used to ensure that the curettes are properly positioned on the bone.
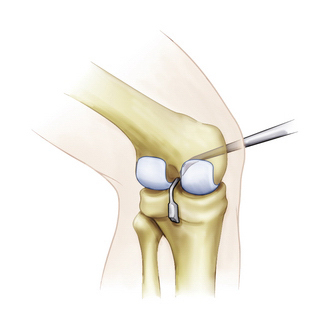
FIGURE 24-5 Posterior capsular elevation with curved PCL instruments through the medial portal.
(Adapted from Biomet Sports Medicine, Warsaw, Ind.)
The curved PCL guide is placed through the anterior medial portal and over the back of the tibia into the PCL fossa (Fig. 24-6) with the assistance of the surgeon’s finger through the posteromedial safety incision. The guide pin is placed in the tibial insertion site of the PCL with a vertical orientation when compared with a standard ACL reconstruction tunnel. A 3-cm incision is made on the anteromedial aspect of the tibia for placement of the tibial tunnel. The guide is initially placed to determine the proper location of the anteromedial incision. The tibial guide pin is placed using extreme caution under fluoroscopy to ensure proper pin placement and avoid injury to the neurovascular structures. Placing the arthroscope in the posteromedial portal may offer improved visualization of the guide pin.
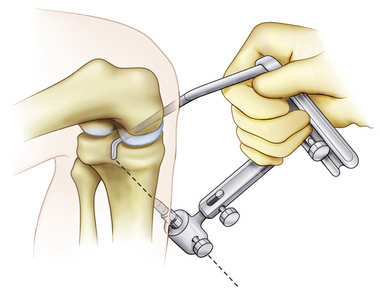
FIGURE 24-6 PCL guide positioned for proper placement of the transtibial guide pin.
(Adapted from Biomet Sports Medicine, Warsaw, Ind.)
The tip of the guide pin is covered with a curved curette to prevent its advancement and the tibial tunnel is reamed with a standard constant diameter cigar reamer (Fig. 24-7). Fluoroscopy and a finger in the posterior medial safety incision can be used to make sure that the guide pin is not advancing. Fanelli has recommended that surgeons stop reaming once at the inner portion of the posterior cortex, leave the cigar reamer in place, remove the guide wire, and replace it with the blunt end going up into the reamer to the posterior cortex.45 This technique will help avoid injury to the neurovascular structures if the guide pin is inadvertently advanced (Fig. 24-8). When reaming through the posterior cortex, the reamer may be used without power to provide additional safety. The reamer will initially penetrate the distal posterior cortex, which is typically out of the arthroscopic visualization field. Once again, the neurovascular bundle can be protected with a malleable retractor or with a finger through the safety incision. When reaming is completed, a rasp is used to smooth the sharp edges along the edge of the tunnel (Fig. 24-9).
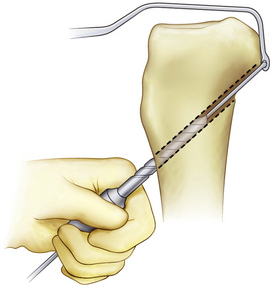
FIGURE 24-7 The tibial guide pin is capped during reaming of the tibial tunnel.
(Adapted from Biomet Sports Medicine, Warsaw, Ind.)
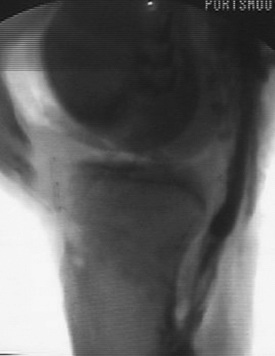
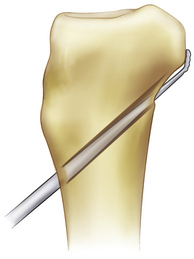
FIGURE 24-9 The tunnel edges are chamfered after reaming.
(Adapted from Biomet Sports Medicine, Warsaw, Ind.)
Although the femoral tunnel can be established via an inside-out or outside-in method, we currently prefer the inside-out technique. An accessory low anterolateral portal is made with the aid of a spinal needle. Inside-out femoral guides are commercially available (Biomet Sports Medicine; Warsaw, Ind) and placed through the low anterolateral portal. The aiming guide allows direct visualization of the ultimate position of the femoral tunnel. For the single-bundle PCL reconstruction, the guide (and subsequent tunnel) is centered over the femoral anterolateral bundle footprint (Fig. 24-10). If the footprint is difficult to visualize, the single-bundle tunnel will be at approximately the 10:30 position on a left knee and 1:30 on a right knee, with the knee in 90 degrees of flexion. Make sure that the tunnel does not violate the articular cartilage of the medial femoral condyle; however, the edge of the tunnel will typically be within 3 to 5 mm of the articular surface. As an example, for a 12-mm tunnel, the guide pin will be placed approximately 10 mm from the articular surface (6-mm tunnel radius plus 4 mm). Drill the femoral guide pin through the aiming guide, through the femur, and out of the lateral skin. An acorn reamer is then used to drill from inside-out through the accessory anterolateral portal (Fig. 24-11 ) while being careful not to injure the cartilage on the lateral femoral condyle during this step. A rasp is again used to smooth the edges of the tunnel.
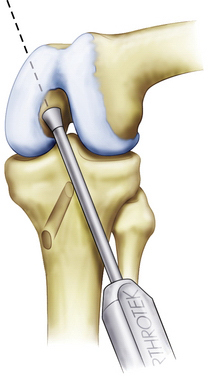
FIGURE 24-10 Femoral guide wire placement using an inside-out guide.
(Adapted from Biomet Sports Medicine, Warsaw, Ind.)
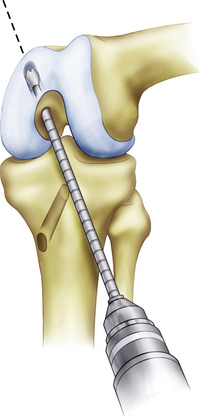
FIGURE 24-11 Inside-out drilling of the femoral tunnel through an accessory low anterolateral portal.
(Adapted from Biomet Sports Medicine, Warsaw, Ind.)
Alternatively, an outside-in PCL femoral guide may be used. The guide is placed through the inferomedial portal so that the guide pin exits through the center of the anterolateral footprint (Fig. 24-12). The guide should be angled so the guide pin will enter through the medial aspect of the metaphysis, proximal to the epicondyle and medial to the trochlea (Fig. 24-13). Confirm that the femoral tunnel will not violate the articular surface of the trochlear groove and drill from outside-in with the appropriately sized cannulated cigar reamer (Fig. 24-14). Cap the guide pin with a curette and use care not to injure the ACL or other intra-articular structures when entering the joint with the reamer. Remove bony debris and smooth the edges of the tunnel with a rasp.
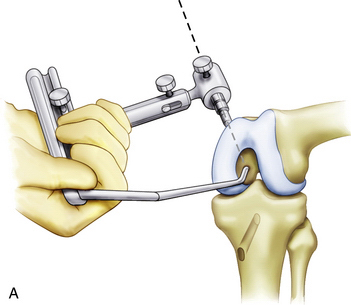
FIGURE 24-12 The PCL guide is positioned from outside-in through the anteromedial portal.
(Adapted from Biomet Sports Medicine, Warsaw, Ind.)
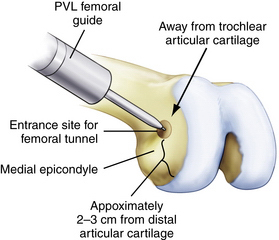
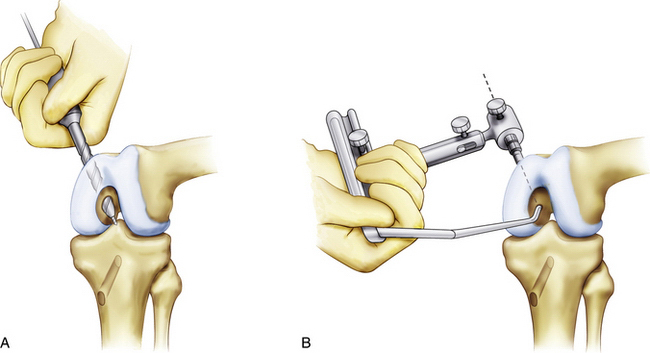
FIGURE 24-14 Drilling the femoral tunnel outside-in.
(Adapted from Biomet Sports Medicine, Warsaw, Ind.)
The optimal graft delivery technique depends on the surgeon’s preferred femoral fixation method. When using graft fixation to the outer cortex of the femoral metaphysis for primary or backup fixation, the graft can be delivered outside-in through the femur, across the joint, and into the tibial tunnel. A looped 18-gauge wire is advanced through the tibial tunnel and pulled into the joint with a grasper placed through an anterior arthroscopy portal. Passage of the wire into the joint can be made easier by placing a finger through the posteromedial safety incision and reducing the tibia with an anterior drawer force. The grasper is then placed into the joint through the femoral tunnel and used to pull the wire loop up through the femoral tunnel. The wire loop can now be used to pass the graft proximally to distally (Fig. 24-15). Alternatively, a commercially available suture-passing device (Magellan suture passer; Biomet) can be used in a similar manner.
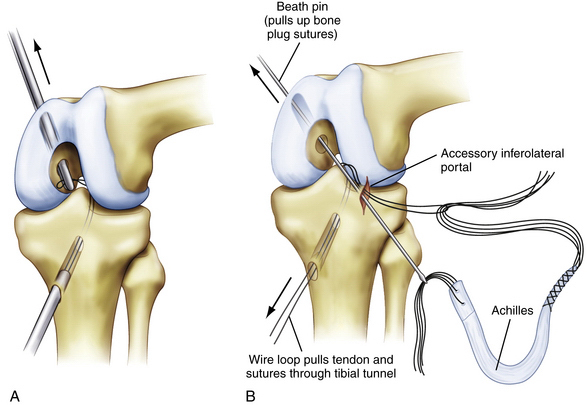
We alternatively use a graft delivery technique that uses the accessory inferolateral portal (see Fig. 24-15B). The looped 18-gauge wire is delivered through the tibia similarly to the previously described technique, except that the wire is delivered out the accessory inferolateral portal. A Beath pin is placed through the same portal, through the femoral tunnel, and exits through the skin. Because we typically use a large Achilles allograft with a bone plug, the bone plug sutures are placed through the Beath pin eyelet (femoral side) and the sutures holding the soft tissue end of the graft are passed through the 18-gauge wire loop (tibial side). The Beath pin and 18-gauge wire are both advanced to deliver the bone plug into the femoral tunnel and the soft tissue side of the graft into the tibial tunnel, respectively. It is important to make sure that the sutures are delivered through the tibial tunnel before attempting to pass the large soft tissue graft itself. Occasionally, soft tissue from the fat pad can get caught between the Beath pin and wire loop. This soft tissue must be débrided prior to graft passage to prevent the graft from getting caught. One way to avoid this problem is to place an arthroscopy cannula into the accessory inferolateral portal before the wire loop and Beath pin are passed through the portal. Once the suture shuttles are delivered, the cannula is removed before the sutures and graft are passed. This alternative graft passage technique uses a femoral interference screw at the intra-articular aperture for fixation and obviates the need to drill the femoral tunnel all the way through the femoral metaphysis and the need to make an additional incision. However, this technique does not provide for backup femoral fixation.
Once the graft is passed, the femoral side is fixed first with a metal or bioabsorbable interference screw. This can be accomplished inside-out, to obtain aperture fixation (our preferred method), or outside-in. If fixation is thought to be suboptimal, backup fixation is used on the outer cortex. Once the femoral side is fixed, a commercially available graft-tensioning device (Biomet) is used to assist the surgeon in maintaining proper graft tension and joint reduction during tibial fixation (Fig. 24-16). The ends of the sutures from the tibial side of the graft are attached to the tensioning device and traction is applied through a ratcheting mechanism. The tibial step-off is reduced to normal and the knee is cycled 20 to 25 times throughout a full range of motion. The tibial side of the graft is secured primarily with a bioabsorbable interference screw placed over a guide wire up to the posterior cortex of the tibia, with the knee between 70 and 90 degrees of flexion. Backup fixation is provided by a screw with a washer on the tibial cortex (Fig. 24-17).
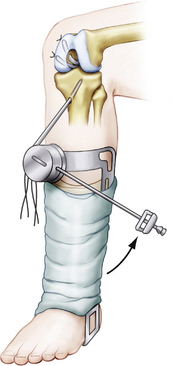
FIGURE 24-16 Knee ligament graft-tensioning boot assists the surgeon during graft tensioning and fixation.
(Adapted from Biomet Sports Medicine, Warsaw, Ind.)
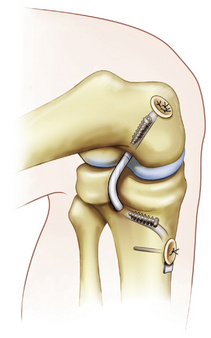
FIGURE 24-17 Final fixation of the graft. Alternatively, backup fixation may be also be used on the outer cortex of the femur.
PEARLS& PITFALLS
PEARLS
Postoperative Rehabilitation
Postoperatively, patients are placed in a brace locked in extension. Initially, care is taken during the rehabilitation protocol to avoid posterior tibial translation and active knee flexion. Patients are partial weight bearing for the first 2 weeks and gradually progress to full weight-bearing by week 5. This, however, may be modified based on concomitant reconstructive procedures. Braces and crutches are used until the quadriceps are adequately strengthened and gait has normalized, approximately week 6. Goals for the first 5 weeks include range of motion from 0 to 90 degrees using active assisted range of motion extension from 70 to 0 degrees and passive range of motion for flexion. Range of motion is gradually increased from weeks 6 to 12 and a progressive step-up/step-down program is implemented. Open-chain hamstring exercises are not initiated until week 12 and resistive knee flexion exercises are not initiated until week 20. As long as progression with rehabilitation falls within the expected guidelines, patients may start running in a straight line 6 months postoperatively with expected return to sport at from 8 to 12 months.
1. Miyasaka D, Daniel D, Stone M. The incidence of knee ligament injuries in the general population. Am J Knee Surg. 1991;4:85-96.
2. Fanelli GC. Posterior cruciate ligament injuries in trauma patients. Arthroscopy. 1993;9:291-294.
3. Fanelli GC, Edson CJ. Posterior cruciate ligament injuries in trauma patients: part II. Arthroscopy. 1995;11:526-529.
4. Sekiya JK, Whiddon DR, Zehms CT, Miller MD. A clinically relevant assessment of posterior cruciate ligament and posterolateral corner injuries. Evaluation of isolated and combined deficiency. J Bone Joint Surg Am. 2008;90:1621-1627.
5. Sekiya JK, West RV, Ong BC, et al. Clinical outcomes after isolated arthroscopic single-bundle posterior cruciate ligament reconstruction. Arthroscopy. 2005;21:1042-1050.
6. MacGillivray JD, Stein BE, Park M, et al. Comparison of tibial inlay vs. transtibial techniques for isolated posterior cruciate ligament reconstruction: minimum 2-year follow-up. Arthroscopy. 2006;22:320-328.
7. Seon JK, Song EK. Reconstruction of isolated posterior cruciate ligament injuries: a clinical comparison of the transtibial and tibial inlay techniques. Arthroscopy. 2006;22:27-32.
8. Chen CH, Chen WJ, Shih CH, Chou SW. Arthroscopic posterior cruciate ligament reconstruction with quadriceps tendon autograft: minimal 3 years follow-up. Am J Sports Med. 2004;32:361-368.
9. Wang CJ, Weng LH, Hsu CC, Chan YS. Arthroscopic single vs. double bundle posterior cruciate ligament reconstructions using hamstring autograft. Injury. 2004;35:1293-1299.
10. Ahn JH, Yoo JC, Wang JH. Posterior cruciate ligament reconstruction: double-loop hamstring tendon autograft vs Achilles tendon allograft. Clinical results of a minimum 2-year follow-up. Arthroscopy. 2005;21:965-969.
11. Wu CH, Chen AC, Yuan LJ, et al. Arthroscopic reconstruction of the posterior cruciate ligament by using a quadriceps tendon autograft: a minimum 5-year follow-up. Arthroscopy. 2007;23:420-427.
12. Hatayama K, Higuchi H, Kimura M, et al. A comparison of arthroscopic single and double bundle posterior cruciate ligament reconstruction: review of 20 cases. Am J Orthop. 2006;35:568-571.
13. Girgis FG, Marshall JL, Monajem A. The cruciate ligaments of the knee joint. Anatomical, functional, and experimental analysis. Clin Orthop Relat Res. 1975;(106):216-231.
14. Harner CD, Xerogeanes JW, Livesay GA, et al. The human posterior cruciate ligament complex: an interdisciplinary study. Ligament morphologhy and biomechanical evaluation. Am J Sports Med. 1995;23:736-745.
15. Harner CD, Livesay GA, Kashiwaguchi S, et al. Comparative study of the size and shape of the human anterior and posterior cruciate ligaments. J Orthop Res. 1995;13:429-434.
16. Race A, Amis AA. Loading of the two bundles of the posterior cruciate ligament: an analysis of bundle function in AP drawer. J Biomech. 1996;29:873-879.
17. Amis AA, Gupte CM, Bull AM, Edwards A. Anatomy of the posterior cruciate ligament and the meniscofemoral ligaments. Knee Surg Sports Traumatol Arthrosc. 2006;14:257-263.
18. Inderster A, Benedetto KP, Klestil T, et al. Fiber orientation of posterior cruciate ligament: an experimental morphological and functional study. Part 2. Clin Anat. 1995;8:315-322.
19. Arnoczky SP, Rubin RM, Marshall JL. Microvasculature of the cruciate ligaments and its response to injury. An experimental study in dogs. J Bone Joint Surg Am. 1979;61:1221-1229.
20. Scapinelli R. Studies on the vasculature of the human knee joint. Acta Anat (Basel). 1968;70:305-331.
21. Kennedy JC, Alexander IJ, Hayes KC. Nerve supply of the human knee and its functional importance. Am J Sports Med. 1982;10:329-335.
22. Schultz RA, Miller DC, Kerr CS, Micheli L. Mechanoreceptors in human cruciate ligaments. A histological study. J Bone Joint Surg Am. 1984;66:1072-1076.
23. Katonis PG, Assimakopoulos AP, Agapitos MV, Exarchou EI. Mechanoreceptors in the posterior cruciate ligament. Histologic study on cadaver knees. Acta Orthop Scand. 1991;62:276-278.
24. Safran MR, Allen AA, Lephart SM, et al. Proprioception in the posterior cruciate ligament deficient knee. Knee Surg Sports Traumatol Arthrosc. 1999;7:310-317.
25. Grood ES, Stowers SF, Noyes FR. Limits of movement in the human knee. Effect of sectioning the posterior cruciate ligament and the posterolateral structures. J Bone Joint Surg Am. 1988;70:88-97.
26. Veltri DM, Deng XH, Torzilli PA, et al. The role of the popliteofibular ligament in stability of the human knee. A biomechanical study. Am J Sports Med. 1996;24:19-27.
27. Gollehon DL, Torzilli PA, Warren RF. The role of the posterolateral and cruciate ligaments in the stability of the human knee. A biomechanical study. J Bone Joint Surg Am. 1987;69:233-242.
28. Van Dommelen BA, Fowler PJ. Anatomy of the posterior cruciate ligament. A review. Am J Sports Med. 1989;17:24-29.
29. Fox RJ, Harner CD, Sakane M, et al. Determination of the in situ forces in the human posterior cruciate ligament using robotic technology. A cadaveric study. Am J Sports Med. 1998;26:395-401.
30. Markolf KL, Feeley BT, Tejwani SG, et al. Changes in knee laxity and ligament force after sectioning the posteromedial bundle of the posterior cruciate ligament. Arthroscopy. 2006;22:1100-1106.
31. Sugita T, Amis AA. Anatomic and biomechanical study of the lateral collateral and popliteofibular ligaments. Am J Sports Med. 2001;29:466-472.
32. Harner CD, Baek GH, Vogrin TM, et al. Quantative analysis of human cruciate ligament insertions. Arthroscopy. 1999;15:741-749.
33. Harner CD, Hoher J. Evaluation and treatment of posterior cruciate ligament injuries. Am J Sports Med. 1998;26:471-482.
34. Clancy WGJr, Shelbourne KD, Zoeliner GB, et al. Treatment of knee joint instability secondary to rupture of the posterior cruciate ligament: Report of a new procedure. J Bone Joint Surg Am. 1983;65:310-322.
35. Covey DC, Sapega AA. Injuries to the posterior cruciate ligament. J Bone Joint Surg Am. 1993;75:1376-1386.
36. Jakob R, Hassler H, Staeubli H. Observations on rotatory instability of the lateral compartment of the knee: Experimental studies on the functional anatomy and the pathomechanism of the true and reversed pivot shift sign. Acta Orthop Scand Suppl. 1982;91:1-32.
37. Schulz MS, Steenlage ES, Russe K, Strobel MJ. Distribution of posterior tibial displacement in knees with posterior cruciate ligament tears. J Bone Joint Surg Am. 2007;89:332-338.
38. Esmaili J, et al. Accuracy of MRI in comparison with clinical and arthroscopic findings in ligamentous and meniscal injuries of the knee. Acta Orthop Belg. 2005;71:189-196.
39. Grover JS, Bassett LW, Gross ML, et al. Posterior cruciate ligament: MR imaging. Radiology. 1990;174:527-530.
40. Polly DWJr, Callaghan JJ, Sikes RA, et al. The accuracy of selective magnetic resonance imaging compared with the findings of arthroscopy of the knee. J Bone Joint Surg Am. 1988;70:192-198.
41. Torg JS, Barton TM, Pavlov H, Stine R. Natural history of the posterior cruciate ligament-deficient knee. Clin Orthop Relat Res. 1989;(246):208-216.
42. Boynton MD, Tietjens BR. Long-term follow-up of the untreated isolated posterior cruciate ligament-deficient knee. Am J Sports Med. 1996;24:306-310.
43. Shelbourne KD, Davis TJ, Patel DV. The natural history of acute, isolated, nonoperatively treated posterior cruciate ligament injuries: A prospective study. Am J Sports Med. 1999;27:276-283.
44. Shelbourne KD, Muthukaruppan Y. Subjective results of nonoperatively treated, acute, isolated posterior cruciate ligament injuries. Arthroscopy. 2005;21:457-461.
45. Fanelli GC. Posterior Cruciate Ligament Injuries: A Practical Guide To Management. Springer-Verlag, New York, 2004.
[/level-membership-for-orthopaedics-category][not-level-membership-for-orthopaedics-category]
CHAPTER 24 Transtibial Single-Bundle Posterior Cruciate Ligament Reconstruction
Injuries to the posterior cruciate ligament (PCL) are increasingly being recognized in athletes and trauma patients. The past decade has seen an increase in the diagnosis, treatment, and study of these injuries. Depending on the patient population being evaluated, there is a wide range reported for the incidence of PCL injuries. The incidence of PCL injury varies between 3% in an athletic population to 37% in the emergency room trauma setting.1–3 Many of these patients have multiple ligament involvement including anterior cruciate ligament (ACL), posterolateral corner (PLC), and medial-sided injuries. Clinical and cadaveric studies have established that grade 3 PCL injuries usually involve concurrent injury to the posterolateral corner.4
In this chapter, we will describe the anatomy of the posterior cruciate ligament, pertinent aspects of the history and physical examination in evaluating patients with a potential PCL injury, diagnostic imaging, treatment options, and our single-bundle transtibial reconstruction technique. There is much debate surrounding PCL reconstruction, including timing and the optimal technique. This chapter describes our preferred transtibial technique in detail, but we are aware that several successful reconstructive techniques may yield equivalent outcomes.5–12
ANATOMY
Structure
The posterior cruciate ligament is an extra-articular ligament. Although it is clearly visualized arthroscopically, there is a thin layer of synovium that reflects from the posterior capsule and surrounds the PCL. The PCL is between 32 and 38 mm in length and its cross-sectional area at its midsubstance is 32.2 mm2 (approximately 1.5 times larger than the ACL).13 The insertion sites of the PCL are approximately three times larger than the midsubstance cross-sectional area, giving the PCL an hourglass appearance. The fibers of the PCL attach on the tibia approximately 1.0 to 1.5 cm below the joint line in a lateral to medial direction (Fig. 24-1). On the femoral side, the PCL fibers attach to the medial femoral condyle in an anterior to posterior direction, adjacent to the anterior margin of the articular cartilage.
There are three main components of the PCL—the anterolateral bundle (AL), the posteromedial bundle (PM), and the meniscofemoral ligaments.14–17 These components each have unique bony insertions as well as anatomic and biomechanical properties. The anterolateral bundle has a maximum load of 1120 N and a stiffness of 120 N/mm, the posteromedial bundle has a maximum load of 419 N and a stiffness of 57 N/mm, and the meniscofemoral ligaments have a maximum load of 297 N and a stiffness of 49 N/mm.16 The anterior meniscofemoral ligament (ligament of Humphrey) and the posterior meniscofemoral ligament (ligament of Wrisberg) arise from the posterior horn of the lateral meniscus and sandwich the PCL bundles. Because the meniscofemoral ligaments are attached to the mobile lateral meniscus, it is possible for the PCL to be ruptured while the meniscofemoral ligaments remain intact. Their anatomic location and relative strength allow them to provide a scaffold for an injured PCL ligament while it attempts to heal. The AL bundle has twice the cross-sectional area of the PM bundle and 150% of the stiffness and strength, so it is considered the most important component of the PCL and the focus of single-bundle reconstructions.18
The vascular supply to the posterior cruciate ligament is from the popliteal artery via the middle geniculate artery. The synovial sleeve covering the PCL is well vascularized and is a major contributor to the blood supply of the ligament.19,20 The synovial sleeve that provides a rich vascular supply to the PCL, as well as the meniscofemoral ligaments, gives some PCL injuries the potential to heal. Both the PCL and its synovial sleeve are innervated by nerve fibers from the popliteal plexus. The plexus receives contribution from the posterior articular nerve, a prominent branch of the posterior tibial nerve, and from the terminal portions of the obturator nerve.21 Golgi organ–like structures have been observed near ligament origins beneath the synovial sheath and are thought to have a proprioceptive function in the knee.22 Ruffini’s corpuscles (pressure receptors), Vater-Pacini corpuscles (velocity receptors), and free nerve endings (pain receptors) have also been found in the PCL on histologic study.23 Therefore, disruption of the PCL not only alters knee kinematics, but also alters the sensation and, probably, proprioception.24
Injuries to the posterolateral corner are commonly associated with PCL injuries. It is highly unlikely that a patient has a grade 3 PCL injury without a significant injury to the posterolateral corner.4 The structures of the PLC have been studied at length and there remains some debate as to which structures are included. Traditionally, the structures of the posterolateral corner are the popliteus tendon, popliteofibular ligament, and lateral collateral ligament.25–27 However, other structures that have been described as part of the posterolateral corner include the joint capsule, arcuate ligament, and fabellofibular ligaments.
Function
The kinematics of the posterior cruciate ligament reflects the two-bundle anatomy. The larger anterolateral bundle is tight in flexion and slackens with knee extension.14,17 The posteromedial bundle is tight in extension and slackens with knee flexion. With deep knee flexion, the PM bundle moves anterior and away from the tibial plateau so that it becomes taut again in deep knee flexion.28 Midranges of flexion recruit fibers from both bundles so that neither bundle is completely slack. When studied independently, however, neither bundle is completely isometric.
Biomechanical studies have shown that the PCL is the primary restraint to posterior drawer forces and is a secondary restraint to external rotation.25–27 Isolated section of the PCL, without damage to the posterior capsule, results in a small degree of increased posterior laxity in full extension, with more pronounced increases in posterior laxity with flexion to 90 degrees.29,30 In these studies, there were only minimal changes in rotation or varus-valgus laxity from isolated PCL sectioning.
The structures of the posterolateral corner each have an independent kinematic profile that comes together in a complex pattern to provide resistance to tibial external rotation and posterior tibial translation.4,25–27 Individually, the lateral collateral ligament (LCL) is the primary restraint to varus stress and does not significantly contribute to anterior/posterior translational control. The popliteofibular ligament complex, which comprises the popliteus and popliteofibular ligament, is relatively isometric and controls external tibial rotation at all angles of knee flexion.31 It tightens in full extension to provide restraint to posterior tibial translation at full extension. Combined sectioning of the PCL and posterolateral corner results in significantly increased posterior laxity when compared with isolated sectioning of the PCL or the posterolateral corner alone.32 Therefore, injuries to either structure when both are damaged will result in increase stress on the remaining structure or reconstruction.33
PATIENT EVALUATION
History
Physical Examination
Careful evaluation of the ligamentous structures of the knee is crucial. Because isolated PCL injuries are rare, and isolated grade 3 tears perhaps nonexistent, a multiligamentous injury should be suspected whenever a PCL injury is identified. The usual clinical testing of the ACL, medial collateral ligament (MCL), and LCL should be carried out. In an unstable knee, it is critical to perform these tests with the knee starting in a reduced position. If the test is performed from a subluxed position, the examiner may mistake the cause of laxity—for example, reporting a positive anterior drawer in the setting of a PCL tear because the anterior drawer test was initiated from a posteriorly subluxed position.
A posterior drawer test is the most accurate clinical test for PCL injuries.34,35 The patient is placed supine with the knee flexed to 90 degrees and the tibia neutrally rotated. A posteriorly directed force is placed on the proximal tibia. This can also be performed with the tibia in external rotation (posterolateral drawer) and internal rotation (posteromedial drawer) to assist in evaluation of the posterolateral and posteromedial corners, respectively. The extent of posterior translation of the tibia with respect to the femur is measured by evaluating the relationship and change in position of the proximal tibia and medial femoral condyle. Normally, the medial proximal tibia is positioned approximately 1 cm anterior to the medial femoral condyle, but comparison with the contralateral side, if uninjured, can provide an accurate reference point. In addition to degree of translation, the quality of the end point is important in the evaluation of the PCL injury.
Grade I injuries are partial thickness tears that have a palpable but diminished step-off of the tibia with respect to the femur. This corresponds to 0 to 5 mm of posterior tibial translation. Grade II injuries are partial-thickness tears in which patients have lost the normal tibial step-off, but the proximal tibia does not translate posteriorly to the medial femoral condyle. This corresponds to 5 to 10 mm of posterior tibial translation. More than 10 mm of posterior tibial translation corresponds to a grade III injury, which is consistent with a complete PCL rupture.33 The proximal tibia will translate posterior to the medial femoral condyle without a good end point in this setting. Grade III injuries are associated with PLC injury in most, if not all cases.4
The posterior sag test (Godfrey test) is performed with the hip and knee flexed to 90 degrees. The examiner supports the lower extremity by holding the foot and observes the proximal tibia with respect to the femur. In the setting of a complete PCL tear, gravity will pull the proximal tibia posteriorly. By comparing the anterior profile of the injured knee and proximal tibia with the normal side, very subtle posterior translations can be seen. The quadriceps active test is performed with the patient supine and the knee flexed to 60 degrees. While the examiner stabilizes the foot, the patient contracts the quadriceps muscle. With PCL insufficiency, the tibia will initially lie posteriorly subluxed when the knee is relaxed, but with isometric quadriceps contraction, the tibia will translate anteriorly and attempt to reduce relative to the femur. The reverse pivot shift test is performed by passively extending the knee from a flexed position with the foot externally rotated and a valgus force applied to the tibia. The tibia will initially be subluxed posterolaterally if the PCL-PLC is not functional, but will abruptly reduce with respect to the femur at 20 to 30 degrees of knee flexion as the knee comes into extension.36 Additional tests for injury to the PCL and posterolateral corner have been described. See the chapter on the posterolateral corner for an in-depth review of this topic (Chapter ••).
A careful neurovascular examination is critical for evaluating patients with PCL injuries. The structures of the popliteal fossa include the popliteal artery, popliteal vein, tibial nerve, and peroneal nerve. The popliteal artery is tethered proximally at the adductor hiatus and distally at the soleus arch, and therefore vulnerable to injury from dislocation of the knee. The peroneal nerve is at risk for injury because of the course it takes around the fibular head, especially in the setting of associated varus injury. The incidence of neurovascular injury ranges from 14% to 49%.26,29,30 Because many knee dislocations “autoreduce” before they are examined or imaged, the physician must be careful to monitor for injury and to get appropriate studies if injury is suspected.
Diagnostic Imaging
Radiography
A standard knee series, including bilateral standing anteroposterior (AP), AP flexion 45-degree weight-bearing, lateral, and Merchant patellar radiographs, should be evaluated for evidence of posterior tibial subluxation, avulsion fractures, and associated knee injury. Subtle posterior tibial subluxation may be the only finding on these films. The unopposed pull of the hamstrings causes posterior tibial subluxation, which can become fixed within a short time. Stress lateral radiography performed in neutral rotation and the knee flexed to 90 degrees with and without a posterior drawer force may show increased tibial translation with respect to the femur when compared with the contralateral knee (Fig. 24-2).
Magnetic Resonance Imaging
Magnetic resonance imaging (MRI) has become the diagnostic study of choice for evaluation of the knee with clinical suspicion of a PCL injury (Fig. 24-3). MRI and stress radiography have been shown to corroborate the severity of the PCL injury as identified on physical examination.37
[/not-level-membership-for-orthopaedics-category]
