TRANSPORT OF THE INJURED VICTIM
1. Never move a victim unless you know where you are going. If you are lost and caring for an injured victim (or yourself), prepare a shelter. Try to position yourself so that visual distress signals can be fashioned in an open field, in the snow, or near a visible riverbank. Keep the victim covered and warm. Assume that the victim is frightened and needs frequent reassurance. If he cannot walk, you must attend to his bodily functions. A urinal can be constructed from a wide-mouthed water bottle. Defecation is more complicated, but may be assisted by cutting a hole in a blanket or sleeping pad placed over a small pit dug in the ground.
2. Unless you are in danger, never leave a victim who is unconscious or confused.
3. If possible, send someone for help and wait with the victim, rather than perform an exhausting and time-consuming solo or duo extrication. If someone is to be sent for help, choose a strong traveler and provide him with a written request that details your situation (number of victims, injuries, need for supplies, specific evacuation method required). While you certainly don’t want to underestimate the seriousness of the situation, don’t request a helicopter evacuation for someone with a sprained ankle who can easily be carried out in a litter. Anyone sent to obtain assistance should contact the closest law enforcement agency, which will seek the appropriate rescue agency.
4. Conserve your strength. Don’t create additional victims with heroic attempts at communication or feats of strength and exertion.
5. Attempt to transport a victim only if waiting for a rescue party will be of greater risk than immediate movement, if there are sufficient helpers to carry the victim (as a general rule, it takes six to eight adults to carry one injured victim), and if the distance is reasonable (under 5 miles, or 8 km). A victim who is carried on an improvised stretcher over difficult terrain usually gets a rough ride. Always test your carrying system on a noninjured person before you use it on the victim.
LIFTING AND MOVING TECHNIQUES
Straight Lift
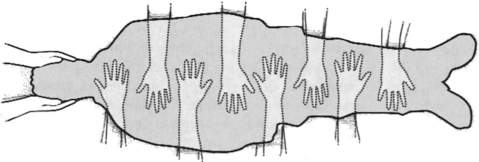
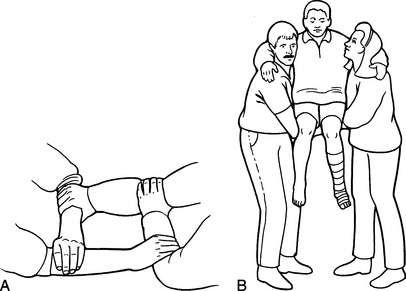
If a person is seriously injured, profoundly weak, or unconscious, he should be lifted so that he remains motionless and with his spine in as straight an alignment as possible. This can be accomplished by five rescuers. The first kneels at the head, controls the victim’s head and neck, and calls out commands. The other four rescuers kneel at the victim’s sides, one at chest level and one at hip level on one side, and the others at lower back level and leg level on the opposite side (Figure 232). In this way, they can slide their hands under the victim in a staggered fashion to provide a continuous chain of support. If necessary, the rescuer closest to the legs can free a hand to position a pad, backboard, or litter underneath the victim. The rescuers should lift the victim straight up into the air, taking care not to injure their backs.
Logrolling the Victim (See Figure 25)
1. The first rescuer approaches the victim from the head, and keeps the head and shoulders in a fixed position (no neck movement).
2. The second rescuer extends the victim’s arm (on the side over which the victim is to be rolled) above the victim’s head. The first rescuer takes this arm and uses it to help support the head in proper position. If the arm is injured, it is maintained at the victim’s side.
3. All rescuers work together to roll the victim, without moving his neck.
CARRIES AND LITTERS
Carries
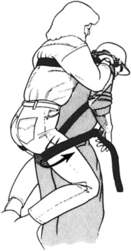
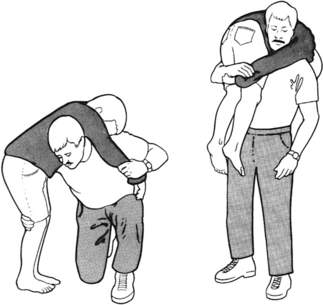
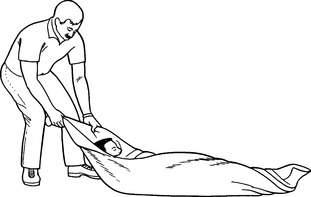
If the victim has suffered an injury that does not allow him to walk out, mechanical transport must be improvised. A single person who cannot walk but who does not need to be on a litter (one with, for example, a broken ankle, mild exhaustion, or acute mountain sickness) may be carried on the back of a strong rescuer using a rope seat. This is fashioned by passing a long 1 in (2.5 cm) rope or strap across the victim’s back and under his arms, then crossing the rope in front of his chest. The victim is loaded piggyback onto the rescuer’s back, and the rope ends are passed forward over the shoulders of the rescuer, under his arms, and around to the rescuer’s back, then between and through the victim’s legs from the front, and around the outside of the victim’s legs just under the buttocks, to be tied snugly in front of the rescuer’s waist (Figure 233). Such a rope seat is far preferable to a standard fireman’s carry, which is very fatiguing (Figure 234). A blanket drag (Figure 235) is only good for very short distances, such as to pull a person quickly away from an immediate hazard.
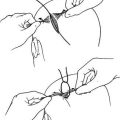
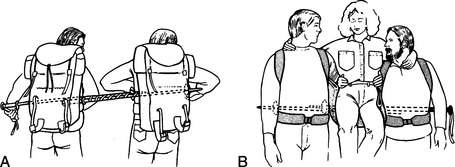
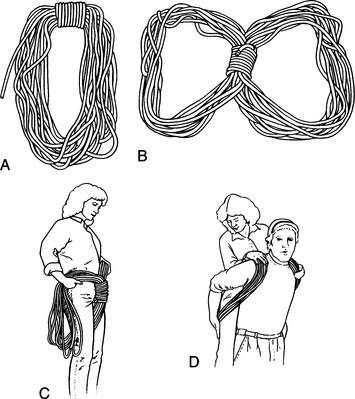
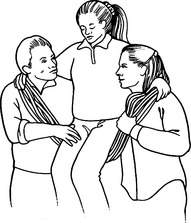
Other simple ways to carry a victim include the four-hand seat, backpack carry, ski pole or tree limb backpack carry, and coiled rope seat. In the first method, two rescuers interlock hands. Each rescuer first grasps his right wrist with his left hand. Holding the palms down, each rescuer then firmly grasps the left wrist or forearm of the other rescuer with his right hand, interlocking all four hands (Figure 236). The victim sits on the four-hand seat. In the second method, leg holes can be cut into a large backpack, so that a victim can sit in it like a small child would in a baby carrier. In the third method, two rescuers with sturdy backpacks stand side by side. Pack straps are looped down from each pack, and ski poles or tree limbs are slung across through the loops, or the poles are placed to rest on the padded hip belts. The poles should be padded so that the victim can sit on the rigid seat, steadying himself by draping his arms around the shoulders of his rescuers (Figure 237). The split-coil rope seat is created by coiling a rope, then fixing the coil at one segment. The coil’s loops are split and used to position the victim on the rescuer’s back (Figure 238). A two-rescuer split-coil technique is also useful (Figure 239).
Litters
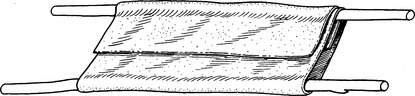
If a specialized litter or stretcher (such as a Stokes basket or split scoop frame) is not available, an improvised litter can be constructed from a blanket or sturdy drop cloth and two 6 to 7 ft (1.8 to 2.1 m) poles or sturdy tree limbs (saplings). Separate the poles by slightly more than the width necessary to carry the victim. Fold the blanket over one pole, then fold the edges over the other pole sequentially and back again over the first pole (Figure 240). Secure the outside blanket flap with safety pins or stitches of cord. Test it to be sure that it can support the victim. Carry the victim so that his body secures the outside (free) blanket flap. Be sure to immobilize the victim on the litter, and cushion his head and neck.
Litters resembling ladders can be fashioned from tree limbs or ski poles fastened with twine, rope, clothing, or pack straps. Two backpack frames can be fastened together with tape or rope (Figure 241) to form a ladder-like platform for a sleeping bag or pads and blankets. A “parka litter” can be created by running two skis or long tree limbs through zipped jackets that are aligned bottom-to-bottom (Figure 242).
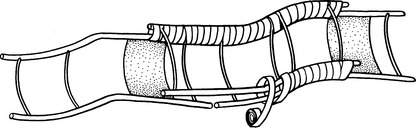
Figure 241 Construction of a backpack frame litter. Pads or a sleeping bag are placed on the litter.
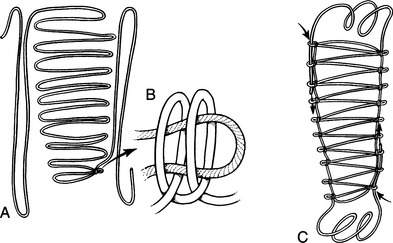
A rope stretcher is constructed by stretching a 150 to 200 ft (46 to 61 m) rope on the ground and determining its midpoint. At the midpoint, fold the rope back on itself. Measure 3 ft (91 cm) from the bend, and fold each half of the rope back again to the outside. This creates the central “rungs” of a “ladder” that will be 3 ft wide. Repeat the process of folding the rope back on itself in 3 ft segments, moving away from the central rungs in each direction and laying out a series of evenly spaced parallel loops. About 16 or 18 loops (rungs) should create a ladder approximately the same length as the victim. Take the two remaining long ends of the rope and lay them perpendicular to the rungs, alongside the bends in the rope (Figure 243). Use the long ends to secure the loops together (completing the long sides of the ladder) by tying a clove hitch (see Figure 259) or other secure knot onto each consecutive bend in the rope 2 to 3 in (5 to 7.5 cm) inside the bend, so that a small loop remains to the outside of the knot. Each pair of knots should be separated by 3 to 4 in (7.5 to 10 cm). After all the knots are tied, the rope ends are threaded through the small outside loops as the remaining lengths are circled around the outside of the stretcher and finally tied off.
A mummy litter (also called a daisy chain or cocoon wrap) can be constructed of a long climbing rope, large tarp, sleeping pads, blankets or a sleeping bag, and stiffeners (skis, poles, tree limbs, or the like). The rope is laid out with even U-shaped loops (Figure 244) that are roughly twice the victim’s width. Tie a small loop at the foot end of the rope. Lay a tarp on the rope. On the tarp, lay down foam pads, then lengthwise stiffening rods, then another layer of pads. Lay the victim on the pads, and cover with the sleeping bag or blankets. Pull the sides of the tarp up to wrap the victim. To secure him, bring the first untied loop above the tied end (foot) loop through the tied loop, and pull it toward the center. Moving toward the head, feed the next loop through the preceding loop, and so on until the armpits are reached. At this point, bring a loop up over one shoulder and tie the rope off in front of the victim after bringing the rope end over the opposite shoulder.

Test any litter on an uninjured person before trusting it to bear the weight of the victim. Be certain to fasten the victim securely into the stretcher or litter, so that he doesn’t fall out. Pad all injuries, and the head and neck in particular, to make the victim as comfortable as possible. Positioning on a litter is very important. In general, keep the injury uphill, to keep extra weight (pressure) and jostling from causing pain. If the chest is injured, keep the victim lying on his side with the wounded side (lung) down, to allow the good lung to expand more fully. If the victim has altered consciousness, is nauseated, or is vomiting, he should be kept on his side, to protect the airway (see page 24). If the victim has suffered a face, head, or neck injury, he should be transported with his head slightly elevated. Victims with shock (see page 60), bleeding, or hypothermia (see page 305) should be carried with the head down and feet elevated. Victims with chest pain and/or difficulty breathing, which might indicate a heart attack or heart failure (see page 47), should be carried with the upper body elevated.
HELICOPTERS
Most helicopters used for medical evacuation can safely land at altitudes of up to 10,000 ft (3,050 m) and are limited by visibility, landing space, and weather conditions. Rescue helicopters may operate under visual flight rules (“VFR”), which means that flight conditions must be free of clouds and where airspeed can be slow enough for the pilot to see far enough to avoid a collision. Larger military and search and rescue helicopters can fly under instrument flight rules (“IFR”), using special navigational instruments, and can land at higher altitudes.
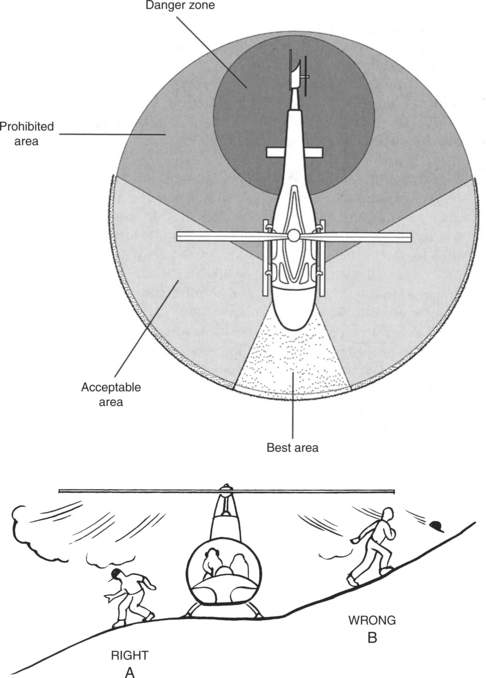
1. Prepare and brightly mark a proper landing site. The ideal location is on level ground (bare rock is best; snow is worst) with no more than 10 degrees of incline and access from all sides. If possible, choose a site where the helicopter will be able to drop off during takeoff, rather than having to climb up. It is also desirable to have a helicopter take off or land into the wind, to increase lift. Ideally, there will be 360-degree access so that the helicopter can take off in any direction, depending on wind conditions. Clear an area 100 ft (31 m) long by 100 ft wide of all debris that could interfere with landing or be scattered by gusts from the propellers. Although the absolute minimum ground dimensions for a “safety square” can, under ideal weather and visibility conditions, be somewhat less than this, you should clear the full area (or even up to 100 ft (31 m) by 300 ft (93 m), as a helicopter can rarely take off or land strictly vertically, particularly in the thinner air of high altitude. A smoky fire or smoke signal should be placed near the landing site so that the pilot can judge the wind (pilots prefer takeoffs and landings to be directed into the wind). If this is not possible, stand away from the landing site where the pilot can see you, and hold up an improvised wind flag (such as streamers), or position yourself with the wind behind your back, and point with both arms at the landing site. At night, if you have lights, shine them on objects that will alert the pilot to unseen danger (such as the poles of power lines). If there is a danger at the last minute before landing, signal “do not land” to the helicopter pilot by lifting your arms from a horizontal (to-the-side) outstretch to straight overhead several times. (Remember that waving your arms and hands frantically is the universal “wave-off” instruction!) If the landing area is on snow, place some large markers, such as backpacks, near the landing spot to offer the pilot some depth perception. At night, create a landing area at least half again as large as during the daytime, and position lights or small fires in the corners, pointing down at the ground rather than up into the air. Never shine a flashlight directly at a helicopter, to avoid blinding the crew. If fires are used, remember that the helicopter may scatter embers, so watch carefully for unintended fire spread. Minimize the number of people approaching the helicopter.
2. To summarize hand signals for guiding a helicopter pilot into a landing, stand with your back to the wind and extend both arms directly toward the landing area, which signifies where to land and that the wind is at your back. As the helicopter hovers over the proper landing site, extend your arms to the sides with clenched fists, which signifies to the pilot to hold the hover. As the helicopter begins to touch the ground, move your arms down at a 45-degree angle to the ground with hitchhiker thumbs pointing downward, signifying to the pilot to hold the ground position. When you want the rotors to be turned off, slice your hand across your neck with the palm pointed down.
3. Unless otherwise instructed, stay at least 150 ft (46 m) from a helicopter with rotors spinning. Look away as the ship lands, so as not to be struck in the face or eyes by flying debris. Protect the victim. Secure all loose objects or clear them from the landing area. Coil and secure all ropes. Because of the strong gusts from the approaching helicopter (up to 100 mph, or 161 km per hour), do not stand near the edge of a cliff! Do not stand in the landing zone if on snow, in case the helicopter settles.
4. Always approach or leave a helicopter at a 30- to 45-degree angle from the front, in sight of the pilot and crew (Figure 245). Never approach the helicopter from ground higher than the landing spot, to avoid walking into a rotor. Stay away from the tail rotor, because it is nearly invisible when rotating. All loading and unloading of a helicopter should occur on the downhill side of the aircraft, to avoid striking a rotor.
5. Keep your head down! You may not perceive that the rotor blade is dipping (up to 4 ft, or 1.2 m, from the center attachment) until it chops your head off. Don’t hold any objects (particularly not your arms) above your head. Protect your eyes from dust kicked up by the rotor wash.
6. Do not smoke a cigarette near a helicopter.
7. Follow the pilot’s and flight crew’s instructions. Do not approach, enter, leave, or load a helicopter until he gives the command. Establish eye contact with the pilot and obey his signals.
8. Do not stand under or anywhere near a helicopter during takeoff or landing. Everyone near the landing site should stay at a safe distance in a single group, clearly visible to the pilot. At night, carry a light or wear a reflective object or clothing.
9. If a cable or rope is lowered, allow it to touch the ground before you handle it, to avoid a shock from static electricity. Never tie the rope or cable to an immovable object on the ground; this could cause a crash.
10. If a rescue device (e.g., litter) is being used, put the victim into the rescue device and take care to keep the hoist cable clear of looping around anyone in the area. Be certain that the victim is properly strapped into the rescue device before anyone signals to haul up the cable.
11. All people should wear hard hats and eye protection, if available. Keep jackets zipped. Carry all packs, rather than wear them on your back.