Transitioning the Throwing Athlete Back to the Field
Luga Podesta
“Injuries to athletes happen every day. Some can be easily treated, while others require surgery and/or lengthy rehabilitation. An arm injury to a baseball player is potentially career ending and therefore needs very special attention. Every baseball player knows the demands put on an arm in training and competition, so we also realize the need for very intense and specialized rehabilitation. During my playing career I had three serious shoulder injuries. Much time and energy was spent on the strengthening of my shoulder, but the critical time of rehabilitation was the transition from physical therapy into a throwing program. An aggressive full-body conditioning program, including plyometrics, was essential in assisting my shoulder to function correctly when throwing a baseball. This program paved the way for a smooth transition onto the field and a successful return to competition.”
–Mike Scioscia, Anaheim Angels
A great deal of literature exists detailing the surgical technique and postoperative rehabilitation of the injured shoulder. However, little has been written on the difficult task of transitioning the throwing athlete from the rehabilitation setting back to throwing sports after surgery. This chapter outlines a program to return the throwing athlete back to his or her sport after surgery.
Numerous surgical procedures can be performed on a throwing athlete’s shoulder for a variety of pathologic conditions (e.g., glenohumeral [GH] instability, labral tears, rotor cuff tears, impingement syndrome, acromioclavicular joint injury). Because one short appendix cannot describe each surgical procedure and the postoperative rehabilitation course recommended for it, the program described in this chapter is based on the assumption that the athlete has already been cleared to begin an advanced throwing and conditioning program.
Assessment
Regardless of the surgical procedure performed, the physical therapist (PT) must assess the athlete’s overall physical condition before beginning a more aggressive conditioning and throwing program. Knowledge of the athlete’s flexibility, strength, and endurance is essential for the development of a program specific for his or her needs. The athlete’s throwing mechanics must be carefully evaluated throughout rehabilitation and the transition back to throwing sports.
Strengthening And Conditioning
In the past a great deal of emphasis was placed on developing mobility in the postoperative shoulder and developing strength in the shoulder-supporting musculature, including the rotator cuff and scapular stabilizers. Very little attention was given to the remainder of the musculature that plays a significant role in permitting the athlete to throw effectively and without injury.
Dynamic stability of the throwing shoulder requires fine, coordinated action of the GH and scapulothoracic stabilizers to facilitate synchronous function of the GH joint. After surgery, proper neuromuscular control must be reestablished to prevent asynchronous muscle-firing patterns, which can result in dysfunction.1,2
Neuromuscular control is defined as a purposeful act initiated at the cortical level.3 Payton, Hirt, and Newton3 stated that motor control is an involuntary associated movement organized subcortically that results in a well-learned skill operating without conscious guidance. The fine coordinated activity necessary for propelling a ball rapidly and accurately requires subcortical control of the muscles responsible for throwing.
Kinesthesia is the ability to discriminate joint position, relative weight of body parts, and joint movement, including speed, direction, and amplitude.4 Proprioception is the ability to discriminate joint position.
The ability to throw requires that joint proprioceptors (muscle and joint afferents present in ligament and synovial tissues) function normally. Joint proprioceptors within the GH joint are responsible for signaling a stretch reflex when the GH capsule is taut to prevent translation at extremes of motion.5 Many throwers recovering from surgery, especially those who have undergone procedures for instability, complain of stiffness and tightness in their shoulders. Neuromuscular controls may have been arrested by trauma and surgery, resulting in a new subcortical sense of joint tightness during throwing that was not present before the shoulder-stabilization procedure.
The upper extremity (UE) and shoulder represent the last link in the kinetic chain during the overhead-throwing motion, which begins distally as ground reactive forces are transferred caudally. Biomechanical analysis shows that tremendous forces are generated and extreme motion occurs in the shoulder with overhand throwing. Angular velocities in excess of 7000°/sec have been recorded during the transition from external rotation to internal rotation when throwing.6,7 Shearing forces on the anterior shoulder are estimated at 400 N.6 Approximately 500N of distraction force occurs during the deceleration phase of the throwing motion.6 These forces are short in duration, develop quickly, occur at extremely high intensity, and must be performed repeatedly. The direction and magnitude of the forces generated when throwing a ball cause anteroposterior translational and distraction vectors that stress the GH constraints.
However, these forces are not entirely generated in the shoulder. The shoulder-supporting musculature is not capable of generating the forces and motions measured at the shoulder during throwing. Throwing a ball effectively requires the athlete to generate, summate, transfer, and regulate these forces from the legs through the throwing hand. To generate the forces measured with throwing, the shoulder relies on its position at the end of the kinetic chain. It has been reported that 51% to 55% of the kinetic energy created is generated in the lower extremities (LEs).8,9 Use of ground reaction forces sequentially linked with the activity of the large LE and trunk muscles generate a significant proportion of the forces measured. Biomechanical data show that the shoulder itself contributes relatively little of the overall total energy necessary to the throwing motion. However, it provides a relatively high contribution to the total forces (21%), indicating that the shoulder, because of its position at the end of the kinetic chain, must effectively transfer and concentrate the developed energy. Conditioning of the shoulder and UE musculature is important in returning throwing athletes back to their sports. Moreover, the trunk and LE musculature must be adequately conditioned to provide the foundation to generate the forces required for effective and safe throwing.
When designing a program to return a throwing athlete back to sports, the physical therapist (PT) should consider two primary objectives: (1) enhancing current performance levels and (2) preventing injury. Gambetta10 has outlined ten key principles that are basic to the development of a conditioning program for the throwing athlete (Box 13-1). The many components of the program must work together to produce optimal performance. The quality of the effort and the overall intensity should be emphasized first. The clinician should monitor each exercise and eventually scrutinize the throwing technique to ensure the optimal training effect and minimize the potential for injury.
The development of muscle balance is essential for coordinated, efficient movement to occur, especially around the shoulder where muscle imbalance can easily develop. Muscles (e.g., the rotator cuff) cannot simply be trained solely and in isolation, as in the early phases of most postoperative programs. After base strength has been developed in the postoperative shoulder, functional activities and more sport-specific exercises must be added to mimic the activities the athlete will be performing.
The development of core strength in the abdominals, trunk, and spinal-stabilizing muscles cannot be overemphasized. Without adequate core strength, the throwing athlete becomes vulnerable to improper postural alignment, which can lead to compensatory movements that place even greater stress on the shoulder, further predisposing the athlete to injury. After adequate strength has been achieved in the shoulder-supporting musculature, abdominals, spinal stabilizers, and LEs, endurance training can be added.
Only after sufficient strength and endurance have been developed and normal, synchronous muscle-firing patterns have been reestablished can a more functional and sport-specific activity such as throwing be added. The ultimate success of the training program depends on its overall design in introducing a variety of training stimuli to maximize total conditioning. An ideal conditioning program should contain a preparation period, an adaptation period, and an application period.10 The preparation period should consist of general work, including strength and endurance training. Specialized work incorporating joint dynamics of the sport occurs during the adaptation period. Finally, the application period incorporates the specific joint actions and movements required to perform the sport.
Isotonic Exercises
A progressive weight- and functional-training program should start with body weight exercise. This allows the athlete to develop the proper exercise techniques and regain the synchronous muscle-firing patterns required to perform the overhand sport. This method of training also is adaptable to the more advanced plyometric exercises that follow after base strength has been gained.
Weight training is one of the most popular methods of training and can be performed with either free weights or machines. Free weight training with dumbbells is preferable, because it allows for unilateral training while permitting a full range of motion (ROM) of the extremity. Machines are better used in training the LEs. The use of rubber tubing or bands is another popular method of early strength training for the overhand-throwing athlete. These exercises can be performed as a warm-up for more strenuous weight resistance exercises or as a cool down exercise; they can accommodate all muscle actions. Rubber tubing or band exercises also allow for unilateral training of the extremity through a full ROM. They can be performed during the rehabilitation period and should continue when the thrower returns to play. Isotonic strengthening can be tailored to each athlete’s needs and can be used to maintain strength in all muscle groups. Jobe’s UE exercise program11 is the most popular group of isotonic exercises performed. They can be initiated early in the rehabilitation period and continued throughout the athlete’s career. However, they must be performed correctly to maximize their benefit (Table 13-1).
TABLE 13-1
| Exercise | Weight (lb) | Sets/Repetitions |
| Shoulder flexion | 3-5 | 3-4/10-15 |
| Shoulder elevation | 3-5 | 3-4/10-15 |
| Shoulder abduction | 3-5 | 3-4/10-15 |
| Shoulder scaption | 3-5 | 3-4/10-15 |
| Military press | 3-5 | 3-4/10-15 |
| Horizontal abduction | 3-5 | 3-4/10-15 |
| Shoulder extension | 3-5 | 3-4/10-15 |
| External rotation I (side lying) | 1-5 | 3-4/10-15 |
| External rotation II (prone) | 1-5 | 3-4/10-15 |
| Internal rotation | 1-5 | 3-4/10-15 |
| Horizontal adduction | 3-5 | 3-4/10-15 |
| Rowing | 3-5 | 3-4/10-1 |
*All exercises should be performed three times a week.
Modified from Jobe FW et al: Shoulder and arm exercises for the athlete who throws, Inglewood, Calif, 1996, Champion Press.
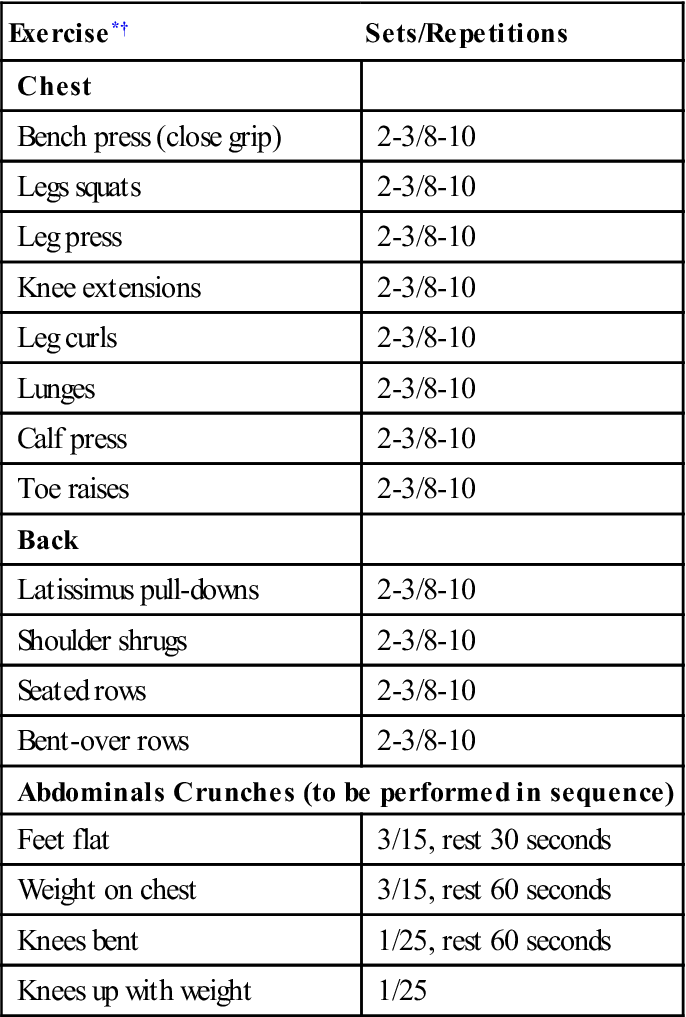
Core strength should first be developed using isotonic training. Only after base strength is developed should the intensity of the exercise program be increased (Table 13-2).
TABLE 13-2
Isotonic Core-Strengthening Exercises
< ?comst?>
| Exercise*† | Sets/Repetitions |
| Chest | |
| Bench press (close grip) | 2-3/8-10 |
| Legs squats | 2-3/8-10 |
| Leg press | 2-3/8-10 |
| Knee extensions | 2-3/8-10 |
| Leg curls | 2-3/8-10 |
| Lunges | 2-3/8-10 |
| Calf press | 2-3/8-10 |
| Toe raises | 2-3/8-10 |
| Back | |
| Latissimus pull-downs | 2-3/8-10 |
| Shoulder shrugs | 2-3/8-10 |
| Seated rows | 2-3/8-10 |
| Bent-over rows | 2-3/8-10 |
| Abdominals Crunches (to be performed in sequence) | |
| Feet flat | 3/15, rest 30 seconds |
| Weight on chest | 3/15, rest 60 seconds |
| Knees bent | 1/25, rest 60 seconds |
| Knees up with weight | 1/25 |
< ?comen?>< ?comst1?>
< ?comst1?>
< ?comen1?>
< ?comst1?>< ?comen1?>*< ?comst1?>< ?comen1?>All exercises should be performed two to three times a week.
< ?comst1?>< ?comen1?>†< ?comst1?>< ?comen1?>Wide-grip bench press, behind-neck pull-down, deep squats, and behind-neck military press should not be performed.
Plyometric Exercises
Plyometric training was first introduced in the late 1960s by Soviet jump coach Yuri Verkhoshanski.12 American track coach Fred Wilt13 first introduced plyometrics in the United States in 1975. The majority of the literature concerning plyometric exercise discusses its use in the LEs. Adapting these principles to the conditioning of throwing athletes is logical, considering the maximal explosive concentric contractions and rapid decelerative eccentric contractions that occur with each throwing cycle. Although agreement regarding the benefits of plyometric exercise in the training program is well documented, controversy exists regarding its optimal use.14–17
Plyometric exercise can be broken down into three phases: (1) the eccentric (or setting) phase, (2) the amortization phase, and (3) the concentric response phase. The setting phase of the exercise is the preloading period; it lasts until the stretch stimulus is initiated. The amortization phase of the exercise is the time that occurs between the eccentric contraction and the initiation of the concentric contraction. During the concentric phase the effect of the exercise (a facilitated contraction) is produced and preparation for the second repetition occurs.
Clinicians believe physiologic muscle performance is enhanced by plyometric exercise in several ways. The faster a muscle is loaded eccentrically, the greater the resultant concentric force produced. Eccentric loading of a muscle places stress on the elastic components, increasing the tension of the resultant force produced.
Neuromuscular coordination is improved through explosive plyometric training. Plyometric exercise may improve neural efficiency, thereby increasing neuromuscular performance.
Finally, the inhibitory effect of the Golgi tendon organs, which serve as a protective mechanism limiting the amount of force produced within muscle, can be desensitized by plyometric exercise, thereby raising the level of inhibition. This desensitization and the resultant raise in the inhibition level ultimately allow increased force production with greater applied loads.
Through neural adaptation, the throwing athlete can coordinate the activity of muscle groups and produce greater net force output (in the absence of morphologic change within the muscles themselves). The faster the athlete is able to switch from eccentric or yielding work to concentric overcoming work, the more powerful the resultant response. Effective plyometric training requires that the amortization phase of the exercise be quick, limiting the amount of energy wasted as heat. The rate of stretch rather than the length of stretch provides a greater stimulus for an enhanced training effect. With slower stretch cycles the stretch reflex is not activated.
Before implementing a plyometric training program, the patient must have an adequate level of base strength to maximize the training effect and prevent injury. Remedial shoulder exercises focusing on the rotator cuff and shoulder-supporting musculature are continued in order to develop and maintain joint stability and muscle strength in the arm decelerators. These exercises also should be used to warm up before the plyometric drill and cool down after it has been concluded.
 Plyometric exercise is contraindicated in the immediate postoperative period, in the presence of acute inflammation or pain, in athletes with gross shoulder or elbow instability, or in both. Plyometric training also is contraindicated in athletes who do not have an adequate degree of base strength and who are not participating in a strength-training program. This form of exercise is intended to be an advanced form of strength training. Postexercise muscle soreness and delayed-onset muscle soreness are common adverse reactions that the clinician should be aware of before beginning an athlete on this type of exercise.
 Tremendous amounts of stress occur during plyometric exercises; therefore they should not be performed for an extended period. A plyometric program should be used during the first and second preparation phases of training.
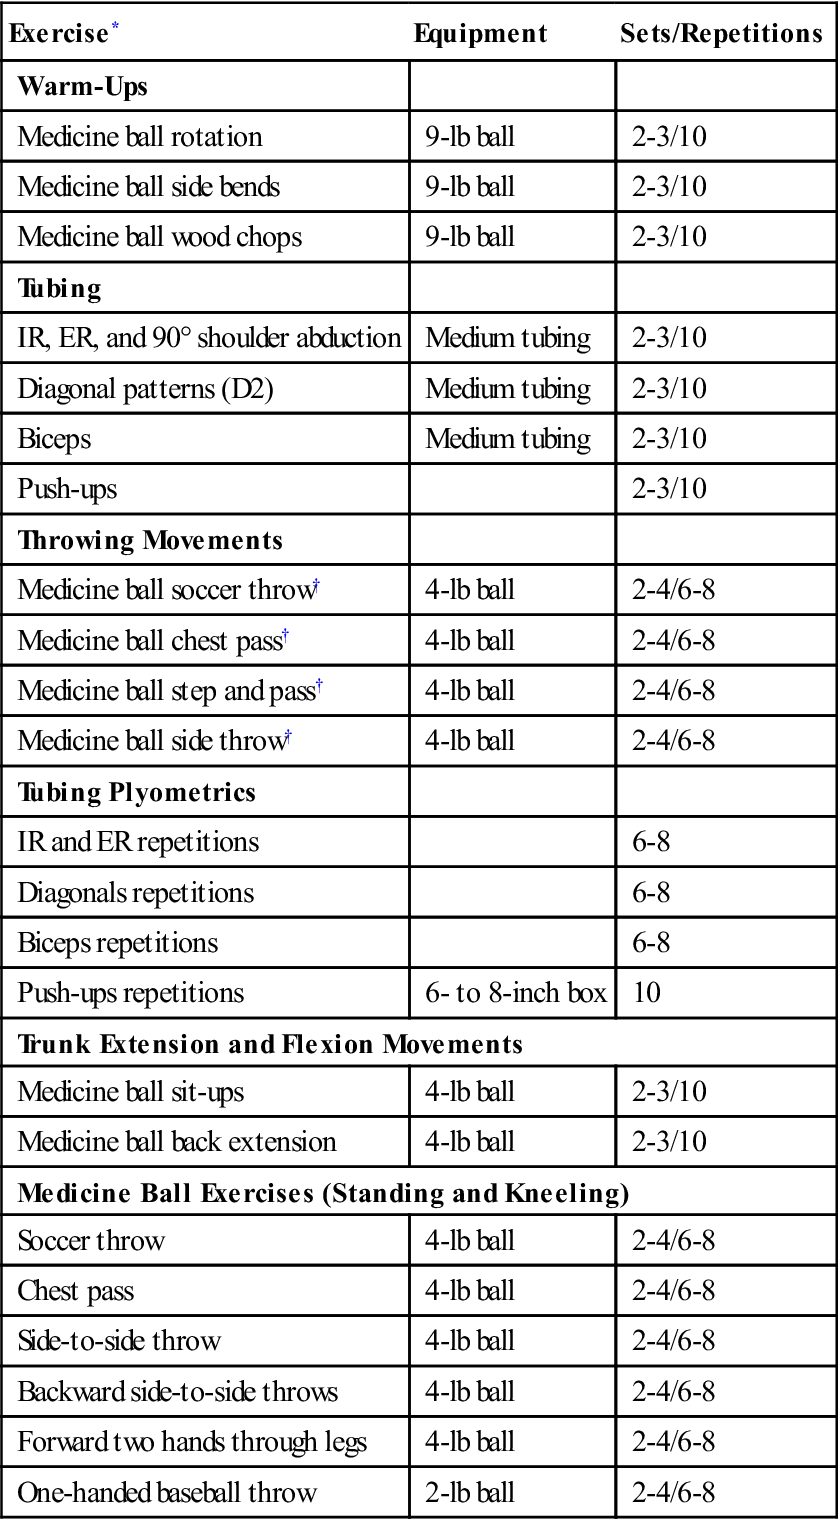
The plyometric training program for the UE can be divided into four groups of exercise as described by Wilk18 (Table 13-3):
TABLE 13-3
< ?comst?>
| Exercise* | Equipment | Sets/Repetitions |
| Warm-Ups | ||
| Medicine ball rotation | 9-lb ball | 2-3/10 |
| Medicine ball side bends | 9-lb ball | 2-3/10 |
| Medicine ball wood chops | 9-lb ball | 2-3/10 |
| Tubing | ||
| IR, ER, and 90° shoulder abduction | Medium tubing | 2-3/10 |
| Diagonal patterns (D2) | Medium tubing | 2-3/10 |
| Biceps | Medium tubing | 2-3/10 |
| Push-ups | 2-3/10 | |
| Throwing Movements | ||
| Medicine ball soccer throw† | 4-lb ball | 2-4/6-8 |
| Medicine ball chest pass† | 4-lb ball | 2-4/6-8 |
| Medicine ball step and pass† | 4-lb ball | 2-4/6-8 |
| Medicine ball side throw† | 4-lb ball | 2-4/6-8 |
| Tubing Plyometrics | ||
| IR and ER repetitions | 6-8 | |
| Diagonals repetitions | 6-8 | |
| Biceps repetitions | 6-8 | |
| Push-ups repetitions | 6- to 8-inch box | 10 |
| Trunk Extension and Flexion Movements | ||
| Medicine ball sit-ups | 4-lb ball | 2-3/10 |
| Medicine ball back extension | 4-lb ball | 2-3/10 |
| Medicine Ball Exercises (Standing and Kneeling) | ||
| Soccer throw | 4-lb ball | 2-4/6-8 |
| Chest pass | 4-lb ball | 2-4/6-8 |
| Side-to-side throw | 4-lb ball | 2-4/6-8 |
| Backward side-to-side throws | 4-lb ball | 2-4/6-8 |
| Forward two hands through legs | 4-lb ball | 2-4/6-8 |
| One-handed baseball throw | 2-lb ball | 2-4/6-8 |
< ?comen?>< ?comst1?>
< ?comst1?>
< ?comen1?>
ER, External rotations; IR, internal rotations.
< ?comst1?>< ?comen1?>*< ?comst1?>< ?comen1?>All exercises should be performed two to three times a week.
< ?comst1?>< ?comen1?>†< ?comst1?>< ?comen1?>Throw with partner or pitchback device.
Modified from Wilk KE, Voight ML: Plyometrics for the shoulder complex. In Andrews JR, Wilk KE, editors: The athlete’s shoulder, New York, 1994, Churchill Livingstone.
Warm-up exercises are performed to provide the shoulder, arms, trunk, and LEs an adequate physiologic warm-up before beginning more intense plyometric exercise. The facilitation of muscular performance through an active warm-up has been ascribed to increased blood flow, oxygen use, nervous system transmission, muscle and core temperature, and speed of contraction.4,19–22 The athlete should perform two to three sets of 10 repetitions for each warm-up exercise before proceeding to the next group of exercises.
Throwing movement plyometric exercises attempt to isolate and train the muscles required to throw effectively. Movement patterns are performed similar to those found with overhead throwing. These exercises provide an advanced strengthening technique at a higher exercise level than that of more traditional isotonic dumbbell exercises. The exercises in this group are performed for two to four sets of six to eight repetitions two to three times weekly. Adequate rest times should occur between each session for optimal muscle recovery.
Plyometric exercises for trunk strengthening include medicine ball exercises for the abdominals and trunk extensor musculature. The athlete performs two to four sets of 8 to 10 repetitions two to three times weekly.
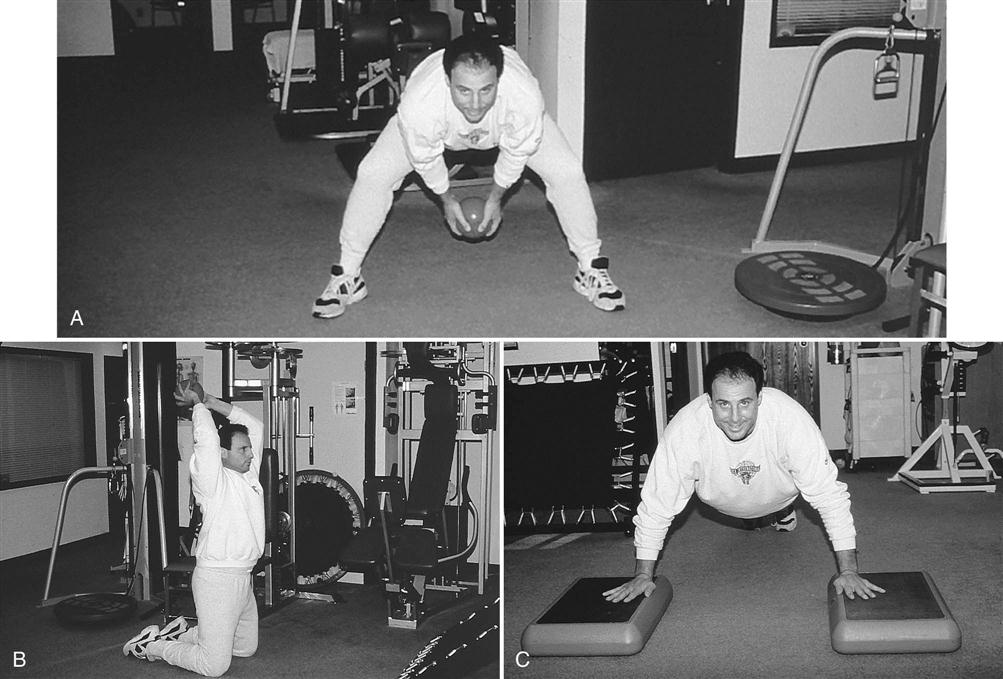
The final group of exercises, the Plyoball wall exercises, require the use of 2-lb and 4-lb medicine balls or Plyoballs and a wall or pitchback device to allow the athlete to perform this group of exercises without a partner. This group of drills starts with two-handed throws with a heavier 4-lb ball and concludes with one-handed plyometric throws using the lighter 2-lb ball. All the exercises in this phase of the program should be performed in the standing and kneeling positions to increase demands on the trunk, UE, and shoulder girdle and eliminate the use of the LEs. The same number of repetitions and sets should be performed two to three times weekly (Fig. 13-1).
Plyometric training of the LEs is essential in developing the throwing athlete’s explosive strength needed for speed, lateral mobility, and acceleration. LE plyometric training also helps develop the coordination and agility necessary to compete effectively. High demands are placed on the musculature supporting the hips, knees, and ankle joints during plyometric jump exercises. The PT must monitor exercise loads performed and allow adequate recovery time between sets. Proper technique in performing these exercises is vital to prevent injury. A variety of jump exercises can be used to train the LEs when preparing the throwing athlete to return to athletic competition (Table 13-4).
TABLE 13-4
| Exercise* | Equipment | Sets/Repetitions |
| Rapid box jumps (alternating height) | Boxes of varying heights | 2-3/8-10 |
| Box jumps | 12- to 24-inch boxes | 3-4 sets |
| Depth jump and sprint† | 24-inch box | 5-8 repetitions |
| Depth jump and base steal† | 24-inch box | 5-8 repetitions |
*All exercises should be performed two to three times per week.
†Jump from a 24-inch box followed by an immediate 10-yard sprint.
Rapid box jumps are performed to develop explosive power in the calf and quadriceps musculature. An explosive but controlled jump up onto the box, then down off the box is performed; box height can be increased as the exercise is mastered. The athlete should immediately jump back on the box, spending as little time as possible on the ground.
Alternating-height box jumps train the quadriceps, hamstrings, gluteals, and calf muscles and help develop explosive power. Box jumps are performed using three to five plyometric boxes of varying heights (from 12 to 24 inches) placed in a straight line 2 feet apart from one another. Starting at the smallest box, the athlete performs controlled jumps from the box to the ground to the next tallest box, spending as little time on the ground as possible; the athlete should rest for 15 to 20 seconds between sets.
The depth jump and sprint and the depth jump with base steal focus on teaching muscles to react forcefully from a negative contraction to an explosive positive contraction. The athlete immediately explodes into a 10-yard sprint or 10-yard base steal after jumping off a 24-inch box.
Aerobic Conditioning
Although the initial postoperative emphasis is on rehabilitation of the shoulder, the transition from formal therapy to return to play requires the throwing athlete to regain the preinjury aerobic condition. Therefore the aerobic conditioning component of the training program must not be neglected. Aerobic fitness can be developed using a variety of exercises (Box 13-2).
For any method of aerobic activity to be effective, the exercise should be performed continuously for 20 to 40 minutes four to five times weekly. Because this type of conditioning is long and repetitious, the athlete should enjoy the activity being performed.
Throwing
The overhead-throwing motion is not unique to throwing a baseball. Similar muscular activity is required to throw a softball, football, or javelin. However, the majority of research performed on overhead throwing has been conducted on the overhead pitch.
The clinician must appreciate the highly dynamic nature of the throwing motion to be effective in preparing and moving the rehabilitating athlete through a safe throwing program. A thorough understanding of normal and abnormal throwing mechanics and the biomechanical forces placed on the throwing arm are essential for the therapist wishing to implement a throwing program in the rehabilitation setting.
Baseball Pitching
Pitching a baseball is the most violent and dynamic of all overhead-throwing activities, producing angular velocities in excess of 7000°/sec across the shoulder. Maximal stability of the GH joint occurs at 90° of shoulder elevation.23 Because muscle weakness can result in abnormal compression and shear forces, muscle balance is necessary to maintain stability of the humeral head in the glenoid fossa. A favorable balance between compression and shear forces occurs at 90° of shoulder elevation, placing the shoulder in the optimal position for joint stability.1,3,23,24 All throwers therefore should maintain 90° of GH elevation relative to the horizontal surface regardless of technique or pitching style.
Dynamic control of the GH joint during throwing depends on the rotator cuff and biceps muscle strength.1,2 An abnormal throwing pattern can result from GH instability and inadequate control of the rotator cuff and biceps tendon. Neuromuscular conditioning and control of the GH joint allows for safer throwing by facilitating the dynamic coordination of the rotator cuff and scapulothoracic stabilizers.
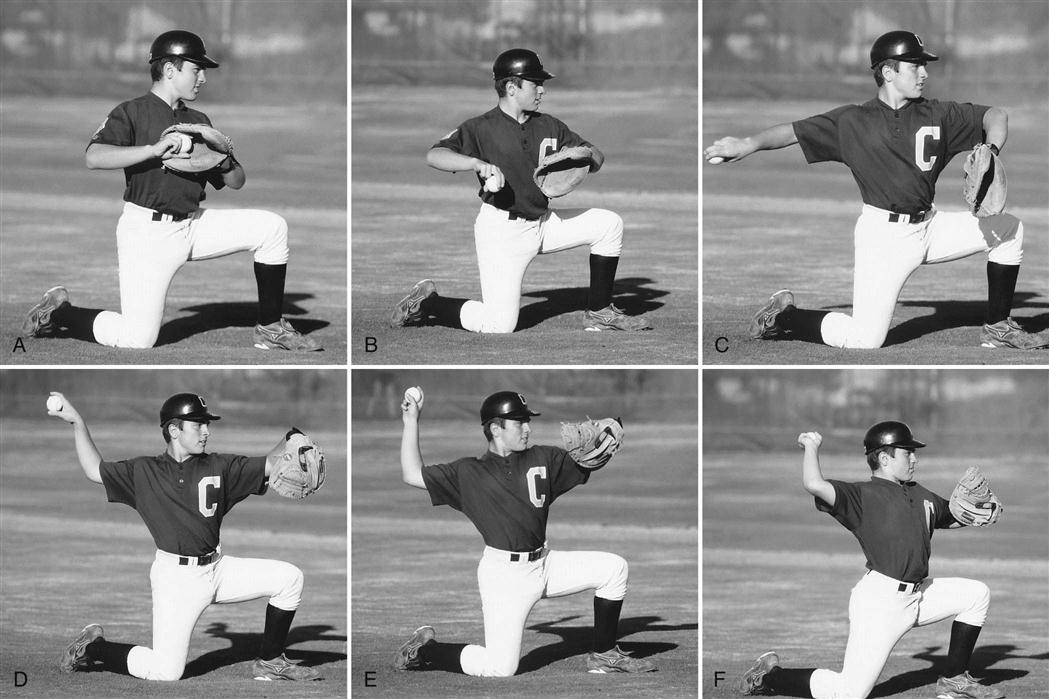
The throwing or pitching motion can be divided into six phases (Fig. 13-2):
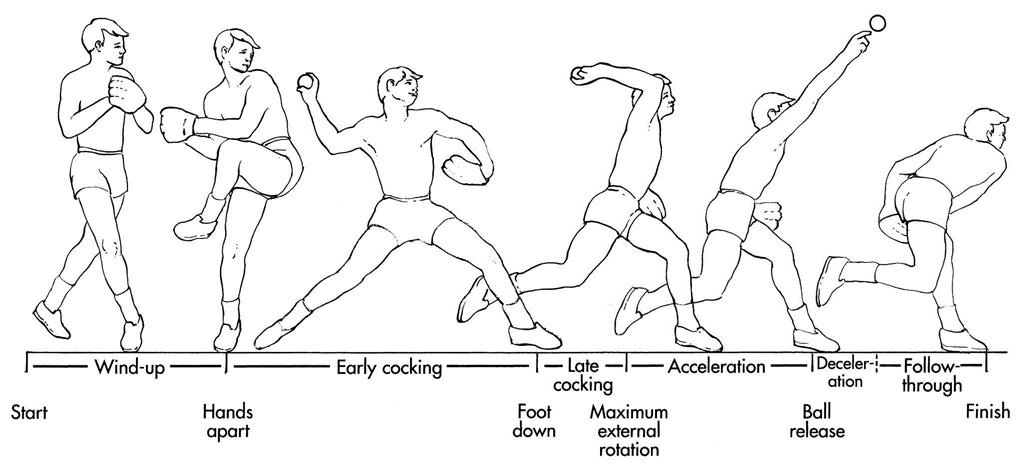
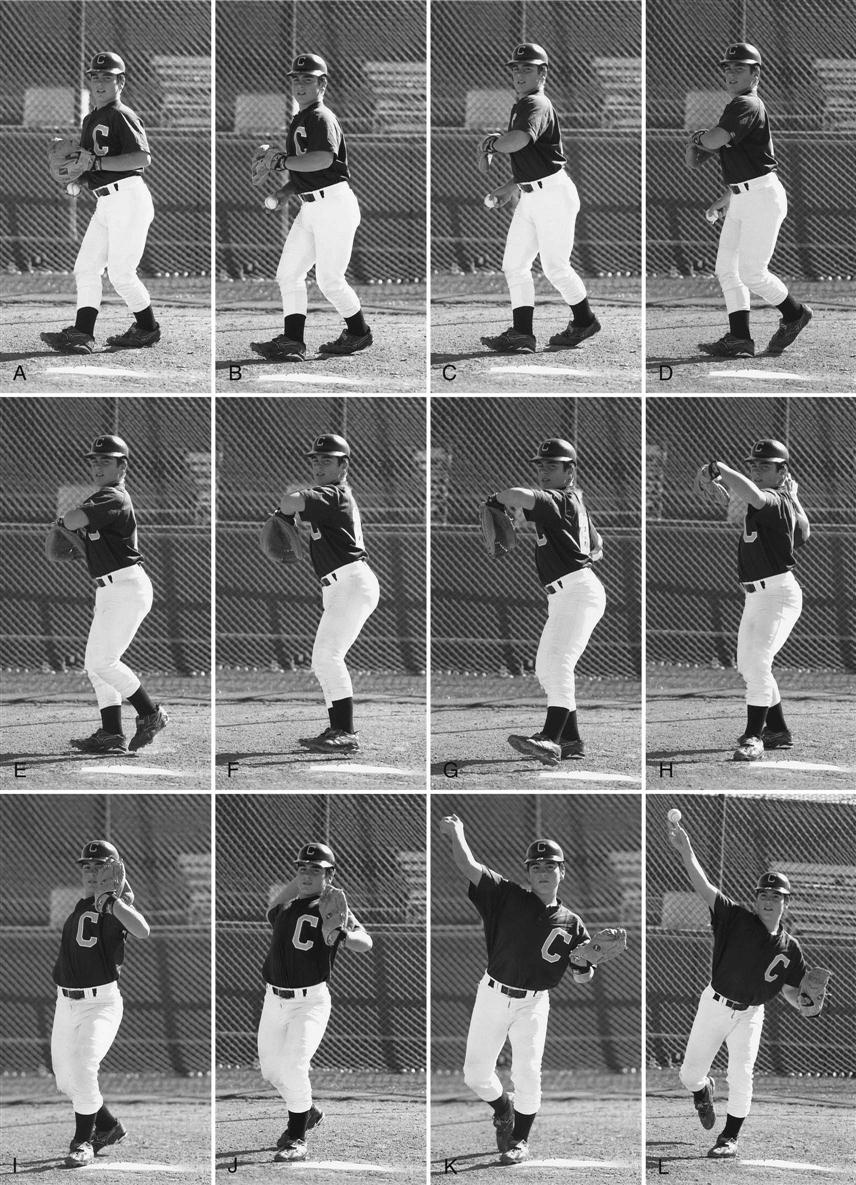
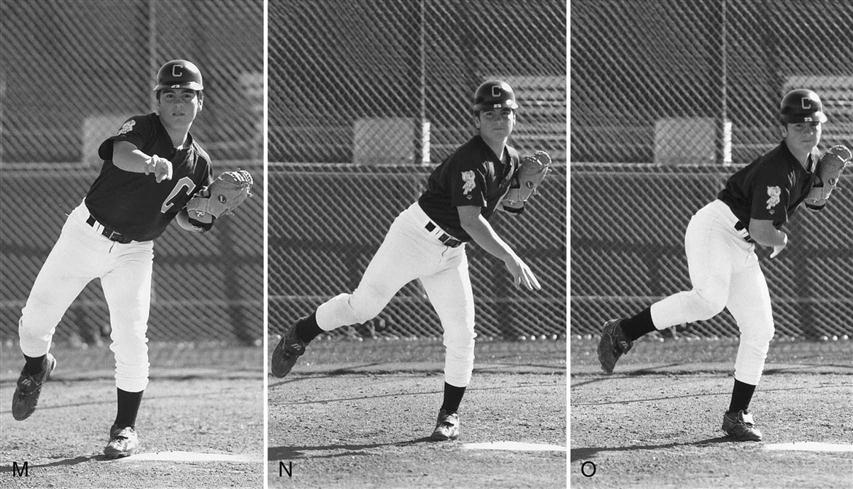
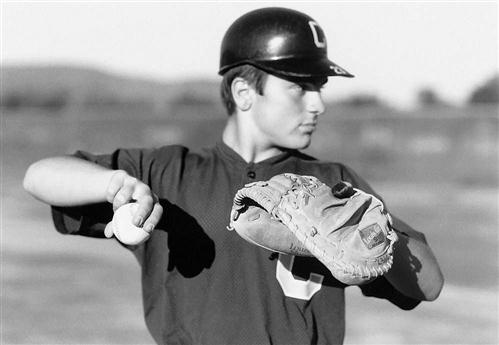
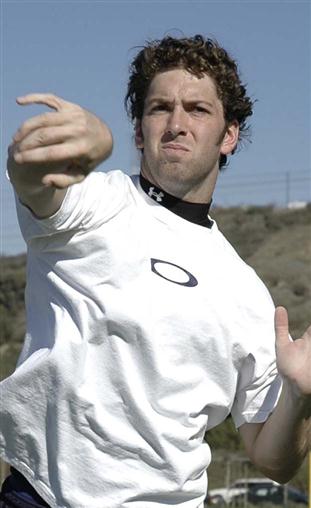
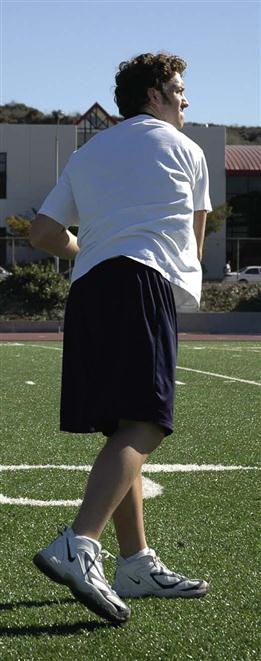
Windup is the preparatory phase of the throwing motion. Relatively little muscle activity occurs during this phase. From a standing position, the athlete initiates the throw by shifting the weight onto the supporting back leg. The weight shift from the stride leg to the supporting leg sets the rhythm for the delivery. Windup ends when the ball leaves the gloved nondominant hand (Fig. 13-3, A).
The position of the stance foot is also important to help generate forces up through the ankle into the leg. Repositioning of the stance foot can significantly enhance the biomechanical forces generated at push off. It is biomechanically advantageous during push off to position the stance foot in subtalar eversion (Fig. 13-4). Greater forces can be generated in this position than if the foot is placed on the side of the pitching rubber alone.

During early cocking, the shoulder abducts to approximately 104° and externally rotates to 46°.21 The scapular muscles are active in positioning the glenoid for optimal contact with the humeral head as the arm is abducted. The supraspinatus and deltoid muscles work synergistically to elevate the humerus. The deltoids position the arm in space, and the supraspinatus stabilizes the humeral head within the glenoid10 (Figs. 13-3, B-H, and 13-5).
The stride forward is initiated during the early cocking phase of throwing. The athlete should keep the trunk and back closed as long as possible to retain the energy stored, which later results in velocity.
As the stride leg moves toward the target, the ball breaks from the glove and the throwing arm swings upward in rhythm with the body. The positioning of the breaking hands followed by the downward then upward rotation of the throwing arm ensures optimal positioning of the arm (Fig. 13-6). Establishing this synchronous muscle-firing pattern is one of the most crucial aspects of the throw. If the throwing arm and striding leg are synchronized properly, then the arm and hand will be in the early cocked position when the stride foot contacts the ground (see Figs. 13-3, H, and 13-5, D).
The direction of the stride should either be directly toward the target or slightly closed (to the right side of a right-handed thrower) (see Figs. 13-3, H, and 13-5, E). When the stride is too closed, the hips are unable to rotate and the thrower is forced to throw across the body, losing kinetic energy from the LEs. When the stride is too open (i.e., the stride foot lands too far to the left of a right-handed thrower), the hips rotate too early, forcing the trunk to face the batter too early and dissipating stored kinetic energy. This also places tremendous stress on the anterior shoulder. After the stride leg contacts the ground, the stride is completed and cocking of the throwing arm is initiated.
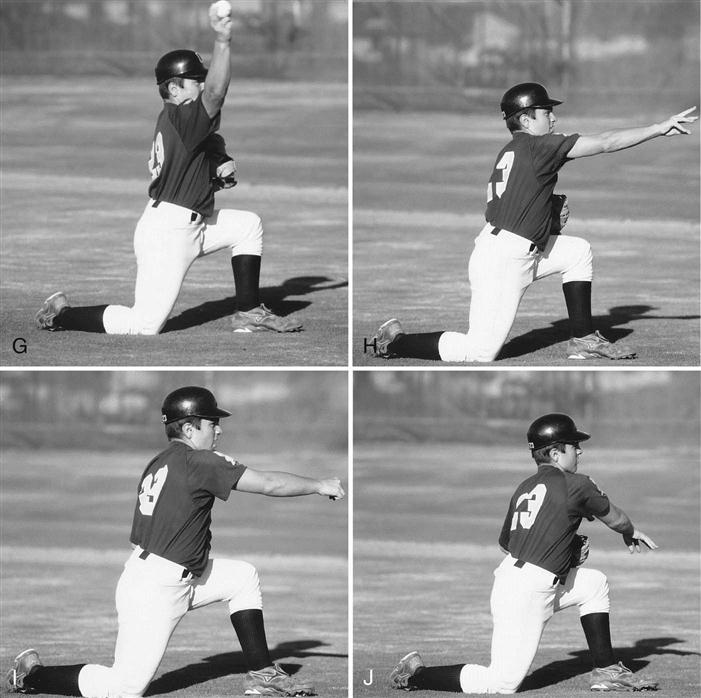
During the late cocking phase of throwing the humerus maintains its level of abduction while moving into the scapular plane. The arm externally rotates from 46° to 170°.21 In this position the humeral head is positioned to place an anterior-directed force, potentially stretching the anterior ligamentous restraints.
The trunk moves laterally toward the target, and pelvic rotation is initiated. As the trunk undergoes rotation and extension, the elbow is flexed, and the shoulder externally rotates. When the trunk faces the target, the shoulder should have achieved maximal external rotation. At the end of this phase, only the arm is cocked as the legs, pelvis, and trunk have already accelerated (see Figs. 13-3, I and J, and 13-5, F and G).
During the acceleration phase, the humerus internally rotates approximately 100° in 0.005 seconds. Tremendous torque and joint compressive forces and high angular velocities across the GH joint are present at this time.6,21,25
The acceleration phase begins when the humerus begins to internally rotate. Just before the beginning of internal rotation, the elbow should begin to extend (see Figs. 13-3, K, and 13-5, H and I). When ball release occurs, the trunk is flexed, the elbow reaches almost full extension, and the shoulder undergoes internal rotation (see Figs. 13-3, L, and 13-5, J). At ball release, the trunk should be tilted forward with the lead knee extending. Acceleration ends with ball release.
The deceleration phase of the throwing motion is the first third of the time from ball release to the completion of arm motion (see Figs. 13-3, M and N, and 13-5, K). During deceleration excess kinetic energy that was not transferred to the ball is dissipated. High calculated forces and torque also occur during this phase.26,27
Follow-through occurs during the final two thirds of the throwing motion, during which time the arm continues to decelerate and eventually stops (see Figs. 13-3, O, and 13-5, L). After ball release, the throwing arm continues to extend at the elbow and internally rotates at the shoulder. Internal angular velocities drop from their maximal level at ball release to zero. A proper follow-through is crucial in minimizing injury to the shoulder during this violent stage of throwing. Follow-through is completed when the throwing shoulder is over the opposite knee. This is achieved by allowing the supporting leg to rotate forward, finishing the rotation of the trunk across the body.
Football
The throwing mechanics necessary to throw a football are very similar to those required to throw a baseball.28 The most significant differences between the two are the size and weight of the ball and the positioning of the throwing hand during the acceleration and ball release phases of the throwing motion. Although the precise throwing mechanics are not well defined, studies are currently underway to determine and describe the specific mechanics. Similar forces and stresses appear to be applied to the shoulder and elbow. Dynamic control of the entire kinetic chain during the football throw is essential for the quarterback to be effective throwing to the right, left, and on the run. Neuromuscular conditioning and control of the LEs, core, and UEs allows for safer throwing by facilitating the dynamic coordination of the entire kinetic chain.
The football-throwing motion can be divided into six phases:
Windup is the preparatory phase of the throwing motion. From a squatting position, the quarterback steps backward from behind the center varying distances (i.e., steps) positioning the body to initiate the throw by shifting the weight onto the supporting back leg. The weight shift from the stride leg to the supporting leg sets the rhythm for the delivery. Windup ends when the ball and supporting hand separate (Fig. 13-7).
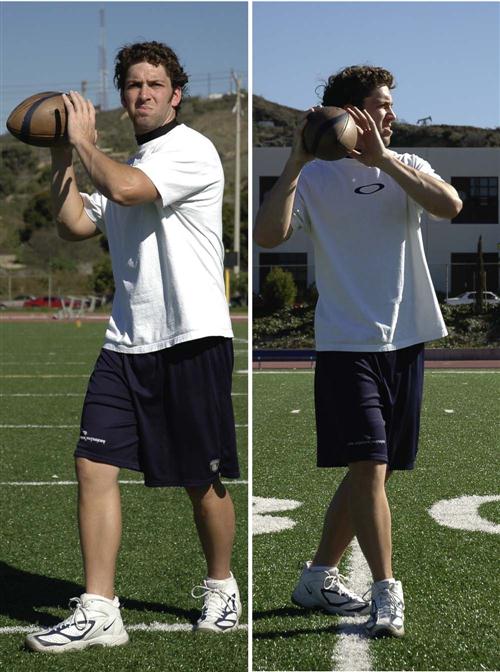
During early cocking, the shoulder abducts and externally rotates (Fig. 13-8). The stride forward is initiated during the early cocking phase of throwing. The athlete should keep the trunk and back closed as long as possible to retain the energy stored, which later results in velocity.
As the stride leg moves toward the target, the ball breaks from the hand and the throwing arm swings upward in rhythm with the body. Establishing this synchronous muscle-firing pattern from the feet to the LEs through the pelvis and trunk to the shoulder to the UE and finally the hand is one of the most crucial aspects of the throw. If the throwing arm and striding leg are synchronized properly, then the arm and hand will be in the early cocked position when the stride foot contacts the ground.
The direction of the stride should either be directly toward the target or slightly closed (to the right side of a right-handed thrower) regardless of the direction of the throw—straight, right, or left.
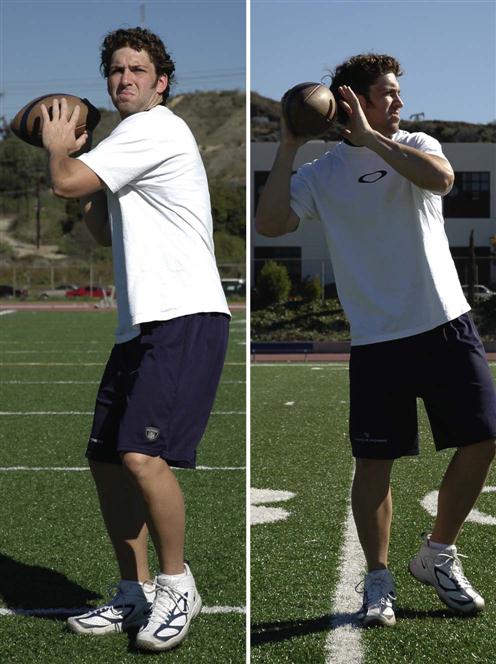
During the late cocking phase of throwing (Fig. 13-9), the humerus maintains its level of abduction while moving into the scapular plane. The arm externally rotates, the trunk moves laterally toward the target, and pelvic rotation is initiated. As the trunk undergoes rotation and extension, the elbow is flexed and the shoulder externally rotates. When the trunk faces the target, the shoulder should have achieved maximal external rotation. At the end of this phase, only the arm is cocked because the legs, pelvis, and trunk have already accelerated.

During the acceleration phase (Fig. 13-10) the humerus internally rotates, applying tremendous torque and joint compressive forces and high angular velocities across the GH.
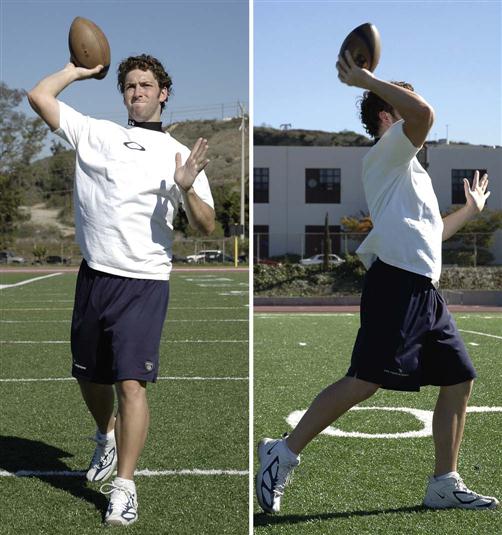
The acceleration phase begins when the humerus begins to internally rotate. Just before the beginning of internal rotation, the elbow should begin to extend. When ball release occurs, the trunk is flexed, the elbow reaches almost full extension, the shoulder undergoes internal rotation, and the forearm maximally pronates (Fig. 13-11). At ball release the trunk should be tilted forward with the lead knee extending. Acceleration ends with ball release.
The deceleration phase of the throwing motion is the first third of the time from ball release to the completion of arm motion (Fig. 13-12). During deceleration, excess kinetic energy that was not transferred to the ball is dissipated.

Follow-through (Fig. 13-13) occurs during the final two thirds of the throwing motion, during which time the arm continues to decelerate and eventually stops. After ball release, the throwing arm continues to extend at the elbow and internally rotates at the shoulder. A proper follow-through is crucial in minimizing injury to the shoulder during this violent stage of throwing. Follow-through is completed when the throwing shoulder is over the opposite knee. This is achieved by allowing the supporting leg to rotate forward, finishing the rotation of the trunk across the body.
Interval Baseball Throwing Program
The purpose of the interval throwing program is to return motion, strength, and confidence gradually to the throwing arm after injury or surgery. The interval throwing program allows the throwing patient the opportunity to reestablish timing, movement patterns, coordination, and synchronicity of muscle firing before returning to competition.12 This is accomplished by slowly increasing the throwing distances and eventually the velocity of the throws. The program should be individualized to each athlete. No set timetable is prescribed for the completion of the program; each patient’s time spent completing the program may vary. The throwing program is designed to minimize the chance of injury by emphasizing proper prethrowing warm-up, stretching, and cool down. It should be performed in the presence of a coach, trainer, or therapist knowledgeable in throwing mechanics. Careful supervision cannot be overstressed.
 The participants must resist the temptation to increase the intensity of the throwing program and understand that this may increase the incidence of reinjury, which would greatly retard the rehabilitation process.
Before initiating the interval throwing program, the athletic patient must exhibit the following criteria:
Specific attention throughout the interval throwing program to the maintenance of proper throwing mechanics is crucial (Box 13-3). Participants in the rehabilitation program may find videotaping throwing sessions extremely helpful in assisting with the analysis of the athlete’s throwing mechanics.
 Proper warm-up before beginning to throw cannot be overemphasized. A common mistake is for the thrower to begin throwing to warm up. Instead, the thrower should increase the blood flow to muscles and joints before throwing. Running or jogging long enough to break a sweat can accomplish this.
 The athletic patient must warm up to throw, not throw to warm-up.
A “crow hop” throwing technique uses a hop, skip, and throw to accentuate LE and trunk involvement in the throw. The use of the crow hop method simulates the throwing motion and emphasizes proper throwing mechanics (see Figs. 13-3, A to F, and 13-5, A to D).
 Throwing flat-footed encourages improper throwing mechanics and places increased stress on the throwing shoulder.
The throwing athlete progresses through each step of the program, throwing every other day, or three times weekly.
 The thrower progresses to the next step after the prescribed number of throws can be completed without pain or residual pain. If pain or difficulty throwing occurs, then the athlete should regress to the previous level or attempt the same level during the next session. The ultimate goal is for the athlete to throw 75 repetitions at 180 feet without pain for positional players and 150 feet for pitchers. Box 13-4 illustrates a progressive interval throwing program.29
When progressing through a pitcher-specific interval throwing program, it is extremely important to ensure that the person or target receiving the throws is at the same height as the thrower. When throwing on flat ground, the thrower should be throwing to a standing target. When throwing off the pitching mound, the target can get into a squatting position. Throwing on flat ground to a squatting catcher changes the point of ball release, which may lead to increased stress across the anterior shoulder and elbow. Pattern throwing (Fig. 13-14) also can be implemented to develop arm strength10:
Developing Throwing Mechanics
Once a flaw in a thrower’s mechanics has been identified, it becomes extremely important for the clinician to implement a change in that patient’s throwing mechanics to prevent further injury from developing. It can be very difficult to change established faulty mechanics or bad habits especially in the older thrower. Having the ability to teach proper throwing mechanics becomes extremely important. To be able to accomplish this we must provide the thrower with exercises and techniques that will sequentially reestablish the proper muscle firing patterns and muscle memory. The exercise programs are designed to reestablish proper kinematics from the feet up through the entire kinetic chain to the throwing hand.
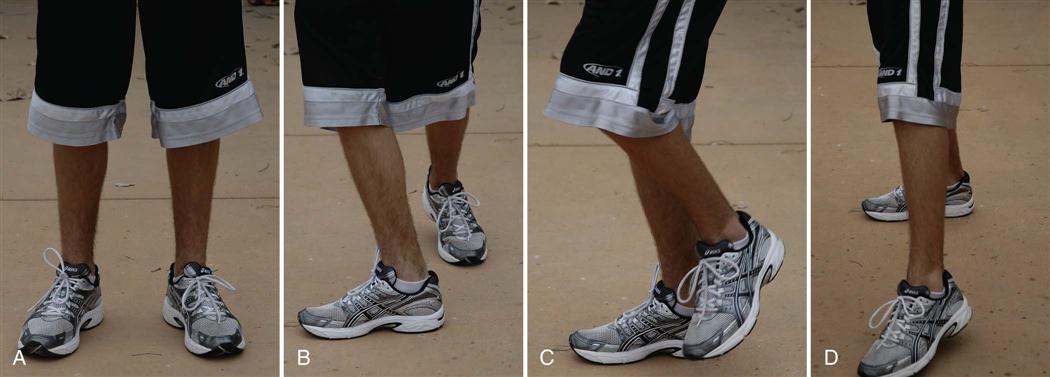
Foot Placement (Crow Hop) Drill
To throw properly, foot placement becomes extremely important. Proper foot placement during the windup phase and early cocking phase of the throwing cycle are the foundation for development of the remainder of the sequential motion patterns. It is important to get the thrower moving toward the target. To accomplish this, we have the athlete perform a drill reinforcing proper back (drive) as well as front foot (land/post) placement. The proper positioning of the back foot is extremely important. The back foot needs to be pointed outwardly (hip external rotation) 90° perpendicular to the target allowing the pelvis and trunk to rotate. This will allow the thrower to load the back foot, sequentially transfer ground reactive forces up the kinetic chain from the foot through the pelvis into the trunk. To teach this we have the athlete start the exercise facing forward. For the right hand thrower, they would take an exaggerated step forward with his back foot turning it outward 90°. This forces the hip and then pelvis to rotate externally, positioning the throwers body at 90° with the nonthrowing side hip, elbow, and shoulder facing the target (Fig 13-15). The front foot or landing foot is placed in a position just inside the nonthrowing shoulder in a slightly closed position. This is repeated until the athlete is comfortable stepping to his target and rotating his back foot and trunk during the windup through the early cocking phase of the throwing cycle. This drill can then be advanced depending on the player’s position, starting from a crouch with catchers and from a fielding position for position players.
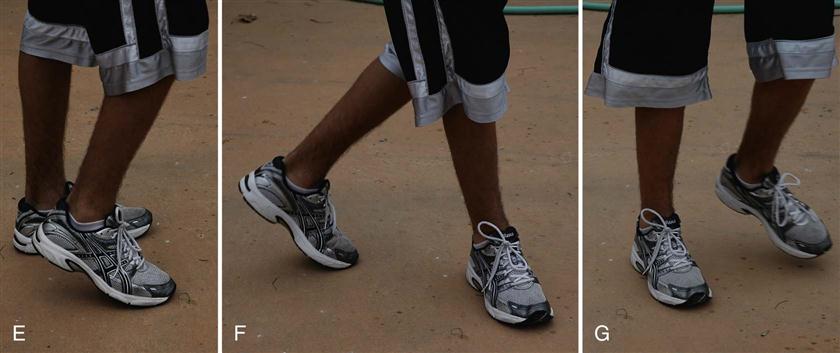
Hand Position/Ball Transfer Drill
The next drill we have young throwers practice is proper hand break technique. This is accomplished by having the thrower practice transferring the baseball from the nonthrowing hand to the throwing hand pronating both wrists. This can be practiced in front of a mirror for further visual reinforcement (Fig 13-16).
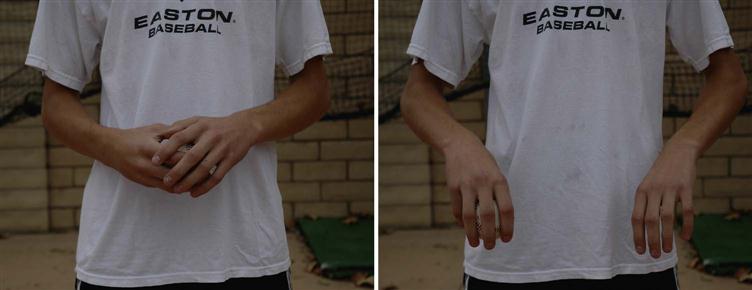
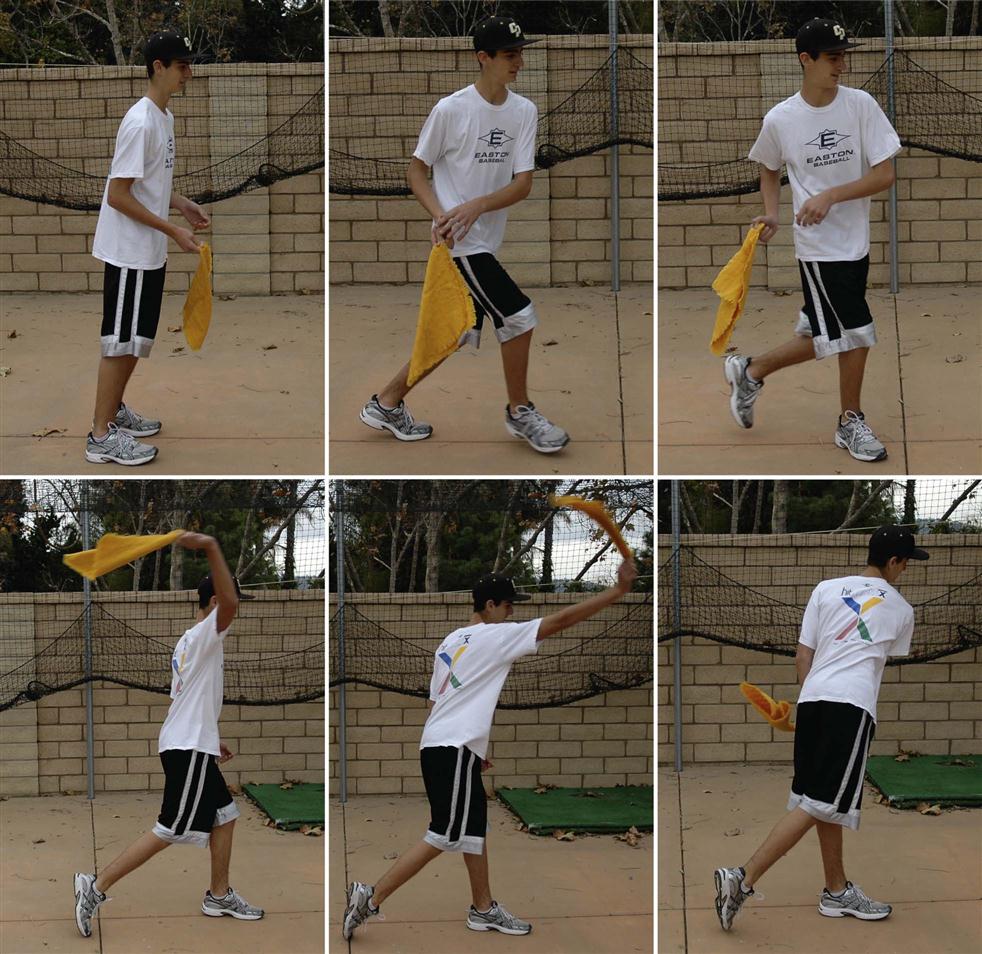
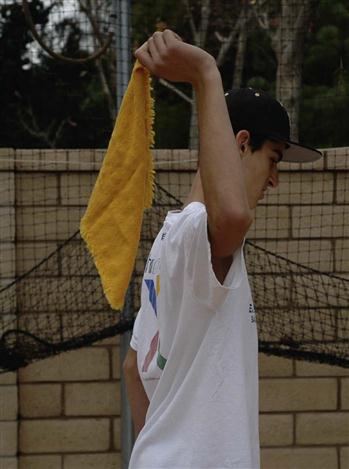
Trunk Rotation/Hand Towel Drill
This next drill is designed to develop a fluid trunk rotation during the late cocking through follow-through phases of the throwing cycle. To teach proper hand placement on top of the ball, many young throwers are told during the late cocking phase of the throwing cycle to “take the ball off the shelf.” This helps the athlete remember to place his hand on top of the ball but it essentially stops their trunk rotation. This drill is designed to further develop and incorporate the previous drills while maintaining the athlete’s fluid trunk rotation without loosing the kinetic energy developed from the legs. The drill begins the same as the previous foot placement and hand separation drills. However, the athlete is holding a small hand towel instead of a ball while performing the drill. The drill begins with the athlete facing the target. The back foot and leg step forward and rotate as in the previous drill. The hands separate with the wrists pronating and the thumbs facing down. As the throwing arm progresses through the early cocking, late cocking, and then acceleration phases of the throwing cycle, pelvis, trunk, and shoulder motion should continue and remain fluid with stopping. The hand towel is used to provide a visual and tactile stimulus as if the athlete was waving a flag (Figs. 13-17 and 13-18). The flag should never “drop” as the thrower transitions from late cocking through the acceleration phase of throwing (Fig 13-19). This drill should be practiced so that a fluid throwing motion is consistently performed, incorporating the feet, legs, trunk, and arms.
Summary
Rehabilitation goals for the shoulder after surgery emphasize pain management, reestablishing ROM, and developing strength in the shoulder-supporting musculature. To return the throwing athlete to sports after surgery requires further intense strengthening and conditioning to regain preinjury form and performance. Progressive strengthening followed by aerobic conditioning helps prepare the thrower recovering from surgery for an eventual return to throwing. After throwing has been introduced into the rehabilitation regimen, careful attention to throwing technique is imperative to prevent reinjury. An interval throwing program is followed to establish a time frame for a safe, gradual, and progressive return to throwing.
The program described in this chapter should only serve as a guide for the progressive return of the thrower to throwing; it is not a specific postoperative protocol applicable to all patient athletes. Each patient’s program requires individualization and should progress at its own rate.
Clinical Case Review
1When designing a program to return a throwing athlete back to sports, what two primary objectives should be considered?
(1) Enhance current performance levels and (2) prevent injury.
2Brandon returned from postoperative rehabilitation for rotator cuff repair and has been cleared to initiate a return to throwing program. Since this is his first visit with you, what must be considered before he picks up a baseball?
A complete physical examination must be completed to assess his LE, core, and UE flexibility, strength, and coordination. An aerobic capacity test also should be performed.
3Paul is eager to begin his baseball interval throwing program but has not been cleared by the physician yet. What factors must be met before initiating a return to throwing program (besides physician clearance)?
4Trevor is 16 years old and recovered from a UCL sprain in his throwing arm. He initiated a throwing program 1 week ago and is currently at step 3. He noted medial elbow pain in yesterday’s throwing session. What should be considered?
Throwing mechanics were reviewed and subsequent video analysis found that he was not following through with his back leg, thus decelerating with his arm. As a clinician you must not take for granted that the athlete is performing the throwing motion correctly, no matter what age or level of performance. This simple correction along with backing down to step 2 for a week allowed Trevor to progress through the program successfully.
5Kyler has completed step 10 of the interval throwing program. After yesterday’s session he complained of fatigue and inability to throw the full 150 feet. What could be the problem?
Upon questioning him further it was noted that he performed his throwing exercises before performing his throwing program, thus fatiguing his throwing muscles and increasing the potential for injury (altered throwing mechanics because of fatigue). It was emphasized that if he was going to be lifting on the same day as throwing, that he should throw first and lift after.
6During videotaping Ian’s throwing motion you note that he does not fully pronate his hand during the cocking phase. What exercises can be done to improve his mechanics?
Trunk rotation/hand towel drill and hand position/ball transfer drill are two effective ways to improve mechanics during the cocking phase. This can be practiced in front of a mirror for further visual reinforcement.