[level-membership-for-orthopaedics-category]
Transitioning the Patient Back to Running
Steven L. Cole*
For many patients a return to prior activity is a measure of the success of their rehabilitation. Usually an athlete’s first question is “When can I start running?” As clinicians our responsibility is to make sure that patients can return to some form of physical activity that stresses their cardiovascular system. For the purposes of this chapter, that form of exercise is running. Dr. Fries of Stanford University1 completed a 21-year longitudinal study comparing runners against a control group, and although the study had some limitations, it found that runners tended to have decreased disability and a better survival rate than the control group.
Regardless of the injury or the surgical procedure, it is the clinician’s responsibility to determine the patient’s level of readiness to progress to each stage of rehabilitation. Many programs exist on how to progress patients back to running and it the goal of this chapter to provide the clinician a framework from which to develop a comprehensive program while keeping in mind the factors that led to the initiation of a return to run program. The factors to consider are age, type and extent of injury, current and prior surgical procedures, pain levels, swelling, range of motion (ROM), strength, endurance, flexibility, patient goals, and psychological readiness.2
Most clinicians who will be initiating a return to run program are the same ones who have been treating patients through their postoperative rehabilitation. However, it is imperative in cases in which the patient is seen for the first time to initiate a running program and to communicate with the sports medicine team physician (surgeon, team: physician), physical therapist, certified athletic trainer, and so forth.
Assessment
Knowledge of the patient’s prior physical status and progression through his or her postoperative rehabilitation course is important in setting achievable goals. The patient’s overall physical condition level must be assessed: aerobic capacity (usually submaximal on bike), flexibility (ROM), strength (of the whole body not just the injured body part), balance, and coordination. A thorough gait analysis is also performed to assess any biomechanical deficiencies. Shoe wear should be assessed by a qualified professional and the patient’s shoes should be properly fit before this program is initiated.
Flexibility, Strength, and Balance/Coordination
In the running motion the clinician must consider all the joints that are directly involved once the foot hits the ground and transitions that force up the kinetic chain. While acknowledging that the upper quarter (cervical spine, thoracic spine, and upper extremities) also play an important role in the running motion, for the purposes of this chapter we will focus on the lumbar spine down to the foot. After a period of immobilization from surgery, the patient needs to reestablish normal ROM and efficient flexibility in the hip, knee, and ankle regions. The following major muscle groups should be assessed: lumbar paraspinals, latissimus dorsi, multifidus, gluteals, piriformis, hip flexors/adductors, hamstrings, iliotibial band, hip rotators, quadriceps (especially rectus femoris), gastrocnemius, and soles complex.
Ambulation
The patient needs to reestablish a normal gait pattern before starting an aggressive closed-chain exercise program. In most cases, gait training should have been completed during the patient’s postoperative rehabilitation. As a rule, if the patient cannot walk without a limp, he or she should be using crutches and/or a shortened stride length. If ambulation results in increased swelling, the patient should be using crutches and is not ready to progress until he or she can ambulate without deviations.
The tests in the following paragraphs are used to assess the ability of the lower extremity to provide a stable base during static and dynamic postures. The patient must successfully complete these tests before progressing.
Baseline Balance Test
Have patient can stand on both feet with equal distribution, free standing, with his or her eyes closed, and maintain balance for 20 seconds.
Tandem Stance
Have patient stand heel to toe with his or her nondominant foot in back, weight evenly distributed on both feet, with his or her hands on the hips and eyes closed. Count the number of times he or she moves out of that position in a 20-second period. To progress, the patient should have no more than 4 errors (such as lifting the hands off the hips, opening eyes, lifting the forefoot or heel, step, stumbling, or falling).
Balance Progression
Time each attempt at each level; as balance improves and the patient is able to maintain a stable position, progress to the next level.
Strength/Endurance
Strength of the trunk/core and the entire lower extremity should be assessed. The assessment should encompass not only isometric testing but also concentric and eccentric, since all are important to the acceleration and deceleration involved in the running motion. The patient must have the ability to maintain active control of spinal and pelvic posture during dynamic loading and movement. During running, good core strength will allow the patient to appropriately distribute force, allow for efficient and controlled movement, absorb ground impact forces, and decrease compression forces. The patient will need good core strength and balance before progressing into an aggressive return to running program.
Core Stability
Testing core stability forces the patient to move and control motion in multiple planes: sagittal, frontal, transverse, and multiplanar. It is essential to stabilize the proximal segment (in this case, trunk and pelvis) to allow efficient distal mobility.3–5 The following are simple tests for core stability that are easy to administer and can be measured both qualitatively and quantitatively.
Sagittal plane tests motion in a forward/backward or anteroposterior direction—stability here helps the runner move the body forward or slow down when stopping or descending a hill.
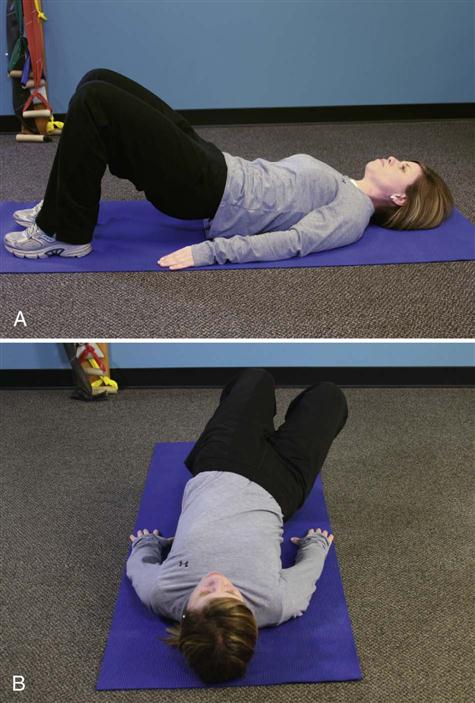
Bridge—Sagittal Plane:
• Lie on your back with knees bent
• Tighten abdominal and gluteal muscles
Bridge with Good Stability (Fig. 34-1):
• Hips remain level (Fig. 34-1, A)
• Lower extremities remain in proper alignment (Fig. 34-1, A)

Bridge with Poor Stability (Fig. 34-2):
• Back sags, and she wobbles with wobbling (Fig. 34-2, A)
• Hips not level (and she’s cheating by squeezing her knees together to use her adductors as a compensatory movement) (Fig. 34-2, B)
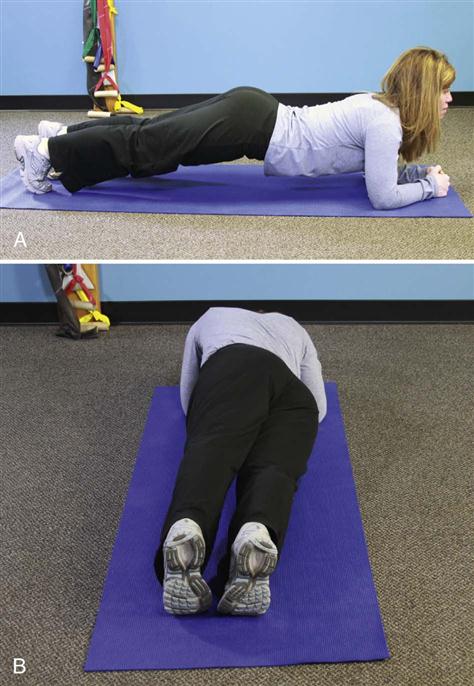
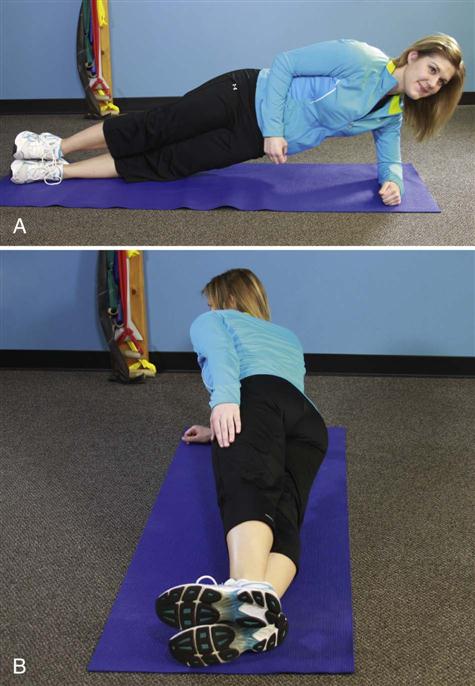
Prone Bridge—Sagittal Plane:
Prone Bridge (Plank) with Good Stability (Fig. 34-3):
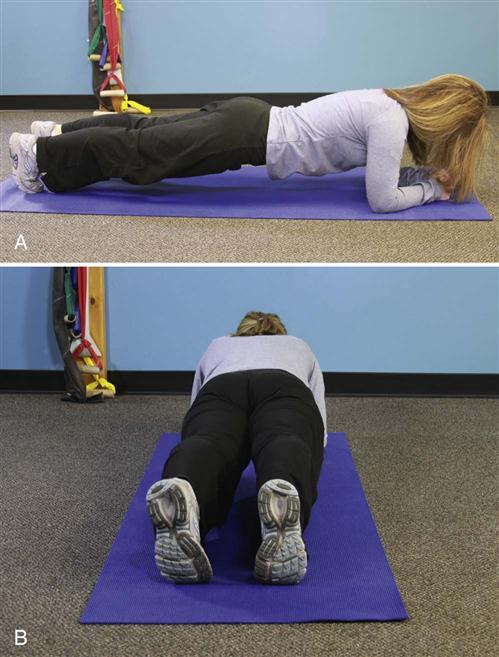
Prone Bridge with Poor Stability (Fig. 34-4):
Frontal plan stability and transverse plane stability help to keep the runner moving forward—weakness here makes the movement inefficient; there is wasted energy with side to side or rotational motion.
Side Bridge (Plank)—Frontal Plane:
• Begin on one side (test both sides)
• Prop on forearm and the foot that is in contact with the table
Side Bridge with Good Stability (Fig. 34-5):
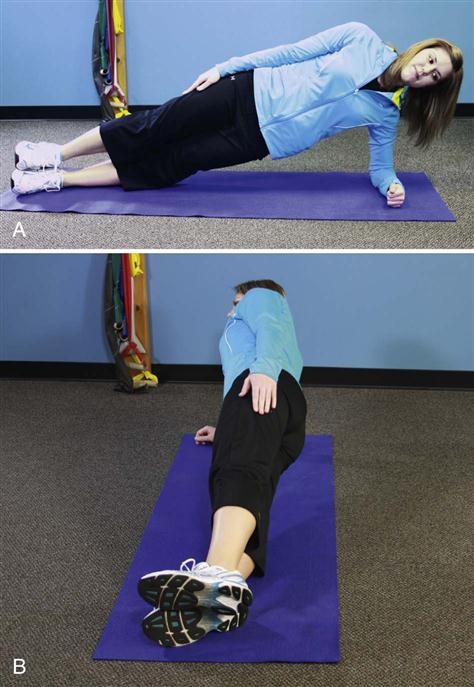
Side Bridge with Poor Stability (Fig. 34-6):
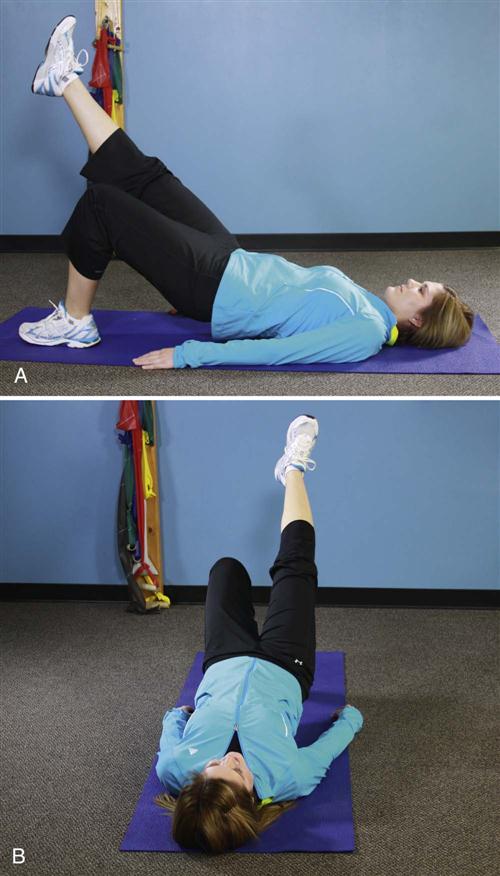
Bridge with Knee Extension—Transverse Plane (Fig. 34-7):
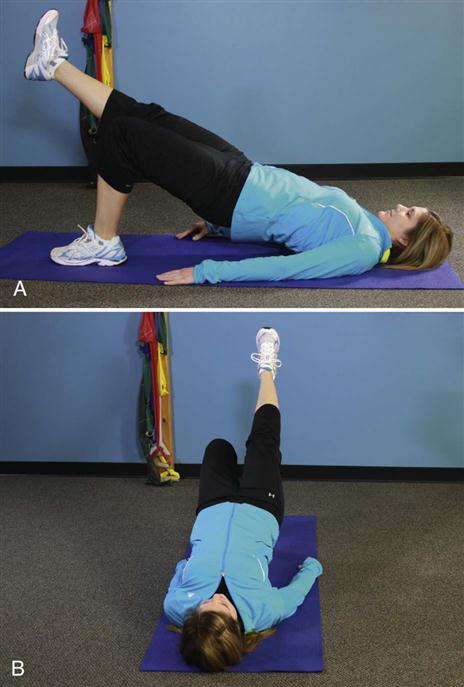
• Lie on back with both knees bent
• Contract abdominal and gluteal muscles
• Slowly raise bottom from the table
Bridge with Knee Extension with Good Stability:
Bridge with Knee Extension with Poor Stability (Fig. 34-8):
• Hips sag and not level (Fig. 34-8, A)
• Shoulders and back are not flat against the table (Fig. 34-8, B)
Multiplanar stability is the most functional, because running is a dynamic movement of the body in three dimensions simultaneously with one side of the body working independently of the other, all the while controlling ground reaction forces and delivering propulsion forces. Lack of adequate multiplanar stability has been shown to increase the risk of lower extremity injuries.6
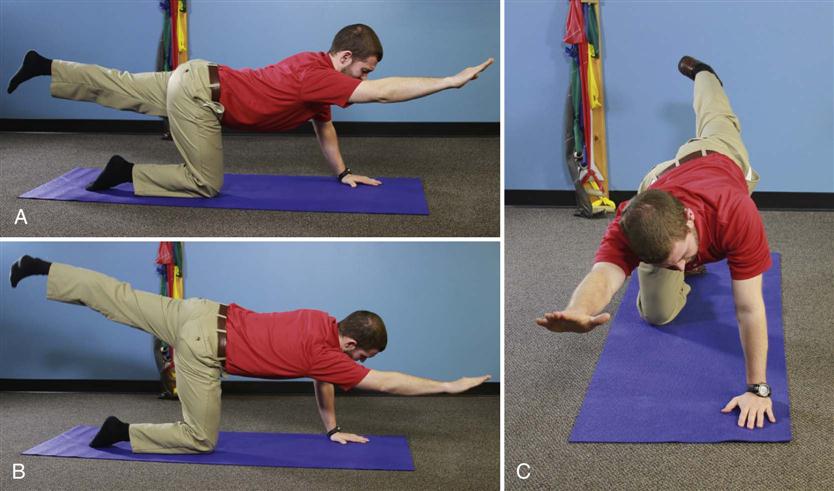
Quadruped Opposite Arm/Opposite Leg—Multiplanar (Fig. 34-9):
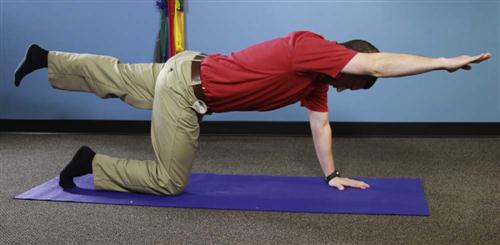
Quadruped Opposite Arm/Opposite Leg with Good Stability:
Quadruped Opposite Arm/Opposite Leg with Poor Stability (Fig. 34-10):
Lower Extremity Stability
In preparation to return to running, it is important to establish a strong initial contact base (gastroc-soleus). This can be accomplished progressively through closed-chain exercises focusing on technique and quality with progression into quantity.
Calf Raise Progression into Single-Leg Hop:
The emphasis should be on the quality of the movement and high repetition. Points of emphasis on quality are the height of the movement, rapid raise, slow controlled descent and landing, and maintaining balance. Repetitions should start with 5 and progress to 25.
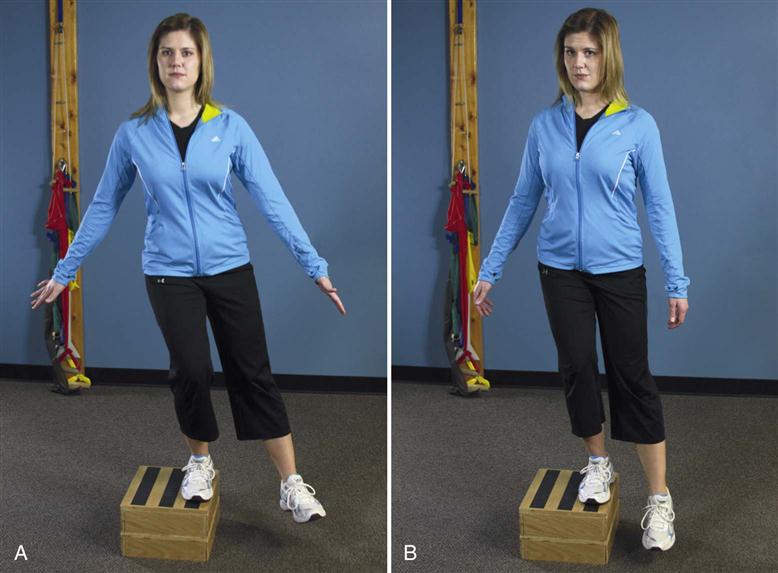
Single-Leg Squat Test—Multiplanar (Fig. 34-11):
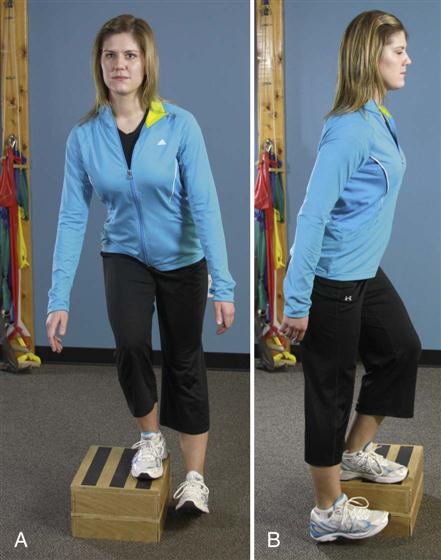
• Stand with one foot on a stool, keep foot flat on stool during descent
• Keep lower leg perpendicular to the floor and knee behind and within toes
Single-Leg Squat Test with Good Stability:
• Able to complete five repetitions with good form
• Knee remains in line with the second toe
Single-Leg Squat Test with Poor Stability (Fig. 34-12):
• Top left—too much adduction—weak glutes (Fig. 34-12, A)
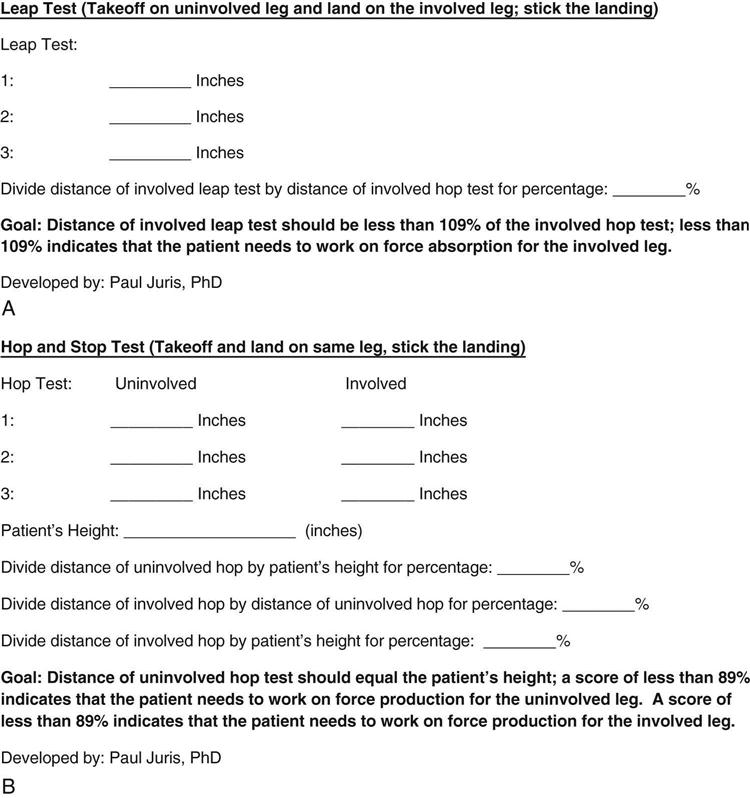
Useful objective measurement tools for assessing a patient’s ability for force absorption and force production with a lower extremity injury are the leap test and the hop and stop test (Fig. 34-13).7 Before attempting either test, the patient must have established normal ambulation, progressed through the calf raise progression, and phase I (walking program) and progressed through phase II (plyometric program) of the return to running progression.
Pain Management
It is important to have a consistent, objective way of grading the patient’s pain level. Try grading the level of pain the patient has over a period of several days to weeks. Is the pain getting worse, staying the same, or gradually dissipating? Use a pain scale of 0 to 10, in which 0 is normal and 10 is the worst.8
For the successful progression of the return to running program, it is critical to understand the level, location, and nature of discomfort that may develop as the patient increases the activity level. In general the patient should apply moist heat before the activity and stretch thoroughly, then ice immediately after the activity for 15 to 20 minutes.  If the patient develops swelling in a joint or muscular pain that lasts longer than 72 hours, he or she has done too much and needs to decrease activity (duration and/or intensity) and increase rest between workouts. Consultation with the physician should occur immediately if there is pain with weight bearing or antalgic persists.
Here are some useful tips: If the patient develops tightness during activity, he or she should stop and perform a static stretch (at least 3 repetitions, hold each for a 30 count each) of the affected area, then resume activity. If tightness returns, the patient should stop and stretch the affected area again. If pain develops or after three stretching sessions and the tightness remains, the patient needs to stop the activity and apply ice to the involved area for 20 minutes.
It is important for the patient to identify the exact location of the pain and to differentiate if the pain is in a constant location or if it “moves around” in a general area.
 be very cautious, incorporate more rest between exercise sessions, and keep the intensity low and exercise on level, soft surfaces.
 continue with progression but do not increase the intensity.
It is important for patients to identify when they have pain:
 If any joint pain and/or swelling develops, increase rest between exercise sessions and decrease activity level to previous level. Consult physician.
 This is a warning sign that the patient is doing too much or that the muscle/joint is not tolerating the amount of work. Plan: total rest until symptom free; decrease activity to previous level and keep intensity low.
Return to Running Program
Phase I: Walking Program
To progress to phase II (plyometric routine), the patient must be able to walk pain-free, aggressively (roughly 4.2 to 5.2 miles per hour), and preferably on a level treadmill, for 30 minutes before beginning the plyometric and walk/jog program. The patient must be pain-free, without residual swelling or loss of strength/ROM on the following day, especially upon waking.
Start each session with an easy warm up for at least 5 minutes. During the warm up, the patient should be able to maintain normal, comfortable stride mechanics and maintain a conversation. After the initial 2 minutes, the patient should increase the speed by 0.5 mph every 30 seconds for the remaining 3 minutes of the warm up.
End each session with an easy cool down for at least 5 minutes. During cool down, the patient should be able to maintain normal, comfortable stride mechanics and maintain a conversation. Decrease the speed by 0.5 mph every 30 seconds for the 5 minutes of the cool down period.
 If the patient experiences pain or is unable to complete an exercise, stop, stretch, and apply ice to the involved area. If the patient is pain-free the next day, attempt to restart the routine.
Progression
Complete a walking session (5 minute warm up, 30 minutes of aggressive walking, 5 minute cool down) for 2 consecutive days; take a day off, complete 2 more consecutive days. If pain-free, without residual swelling or loss of strength/ROM, progress to phase II after a day off.
Goal
The patient should be able to walk, pain-free, aggressively (roughly 4.2 to 5.2 mph), preferably on a level treadmill, for 30 minutes. He or she should be able to aggressively walk at a pace and stride mechanics just below the threshold where he or she would be jogging. During an aggressive walk, the patient maintains a heel/toe gait pattern without a flight segment (maintains contact with the surface with both feet).
Phase II: Plyometric Routine
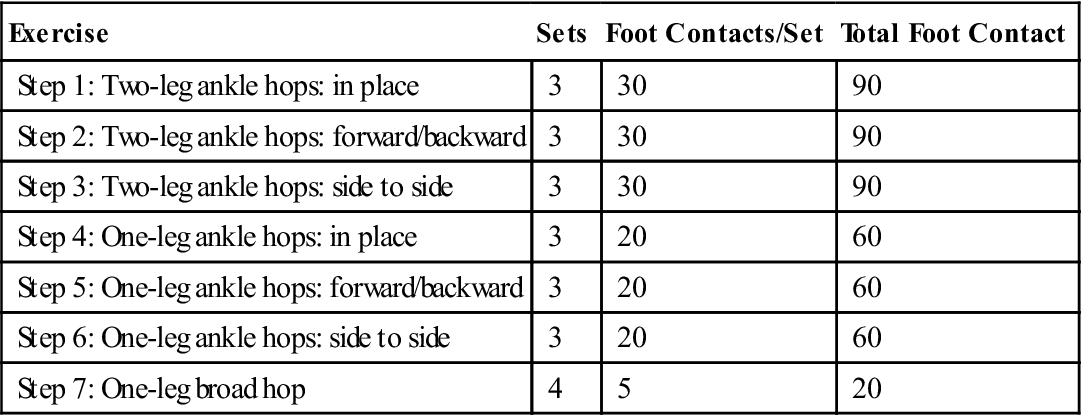
Plyometric exercises are essential to include in a return to a running program. Plyometrics works on the stretch-shortening cycle of the running motion to improve running efficiency and performance.9 To progress to the phase III walk/jog progression, the patient should complete the entire cycle within the time intervals without residual swelling, loss of strength or ROM, and pain. The patient must be pain-free the following day, especially on waking.
Rationalization
A mile run generally consists of 1500 foot contacts, 750 per foot. The program integrates 470 foot contacts per leg, which would be equivalent to two thirds the foot contacts of a mile. Successfully completing the routine (Table 34-1) is a good indicator of a patient returning to running a half to three quarters of a mile distance.
TABLE 34-1
< ?comst?>
| Exercise | Sets | Foot Contacts/Set | Total Foot Contact |
| Step 1: Two-leg ankle hops: in place | 3 | 30 | 90 |
| Step 2: Two-leg ankle hops: forward/backward | 3 | 30 | 90 |
| Step 3: Two-leg ankle hops: side to side | 3 | 30 | 90 |
| Step 4: One-leg ankle hops: in place | 3 | 20 | 60 |
| Step 5: One-leg ankle hops: forward/backward | 3 | 20 | 60 |
| Step 6: One-leg ankle hops: side to side | 3 | 20 | 60 |
| Step 7: One-leg broad hop | 4 | 5 | 20 |
< ?comen?>< ?comst1?>
< ?comst1?>
< ?comen1?>
22 sets for a total of 470 total foot contacts.
Note: The “one-leg” activities are performed on the involved extremity.
Rest intervals: Between sets, 90 seconds; between exercises, 3 minutes.
I prefer that the exercises be performed on a “forgiving” surface, such as a rubber mat. Gastrocnemius-soleus, quadriceps, and hamstrings should be stretched between exercises. Clinicians should stress quality of the movement, emphasizing toe-heel landing, triple flexion (hip and knee flexion, ankle dorsiflexion), triple extension (hip and knee extension, plantar flexion), and soft landing. Patients recovering from a knee, thigh, or hip injury should incorporate a greater degree of knee and hip flexion.
If the patient develops persistent tightness or increased discomfort during the exercise session, he or she should stop and note the foot count for the activity upon the onset of symptoms, such as if pain developed on repetition 21 of the third set in step 3, which is foot contact no. 261. This will provide a measurement of progress for future attempts.
 If the patient experiences pain or is unable to complete an exercise, he or she should stop, stretch, and apply ice to the involved area. If pain free the next day, he or she should attempt to restart the routine.
Phase III: Walk/Jog Progression (Table 34-2)
The patient may begin this program on level ground if he or she:
TABLE 34-2
< ?comst?>
| Stage | Walk | Jog | Repetitions | Total Time |
| Stage I | 5 minutes | 1 minute | 5 times | 30 minutes |
| Stage II | 4 minutes | 2 minutes | 5 times | 30 minutes |
| Stage III | 3 minutes | 3 minutes | 5 times | 30 minutes |
| Stage IV | 2 minutes | 4 minutes | 5 times | 30 minutes |
| Stage V | 1 minute | 5 minutes | 5 times | 30 minutes |
| Stage VI | Jog every other day with a goal of reaching 30 consecutive minutes. Begin with 5 minutes of walking, gradually increasing the pace. End with 5 minutes of walking, gradually decreasing the pace to a comfortable walk. | |||
< ?comen?>< ?comst1?>

< ?comst1?>
< ?comen1?>
Program Progression
Phase IV: Timed Running Schedule
During this phase, the duration of the running program progresses. The patient should try to jog/run on a flat, forgiving surface (i.e., golf course, athletic field) before hilly courses or even surfaces and follow the Ten Percent Rule10: only increase the weekly mileage by 10% of the previous week. If no pain is experienced when doing an activity level or afterward and there is no discomfort or tightness that limits normal movements the next morning, he or she can proceed to the next stage.
The intensity (how hard/fast) of the jog/run is increased before the duration (how long). When the patient increases the frequency (how many days per week) of the jog/run workouts, the clinician should also have them decrease the duration of the workout. When the patient begins running multiple days in a row, increases (duration or intensity) are made on the first day of activity after a day of rest, the duration of activity is decreased to the previous level.
If the patient develops persistent tightness or increased discomfort to a point of dysfunction (develops a limp or altered gait pattern) during the activity, he or she should stop and note the time of onset of symptoms (during a 30-minute planned exercise session, symptoms develop after 21 minutes). Consider splitting the duration of activity between two workouts, with each exercise session shorter than the time of the onset of symptoms during the previous attempt. For example, if during a 30-minute planned exercise session, symptoms develop after 24 minutes, each of the two exercise sessions would be 20 minutes long. The exercise sessions should be separated by 6 to 8 hours. The clinician should refer to the section on Pain Management in this chapter if the patient begins to develop pain/swelling and remember:  If pain/discomfort remains or increases, continue to return to a previous level until discomfort stabilizes or decreases.
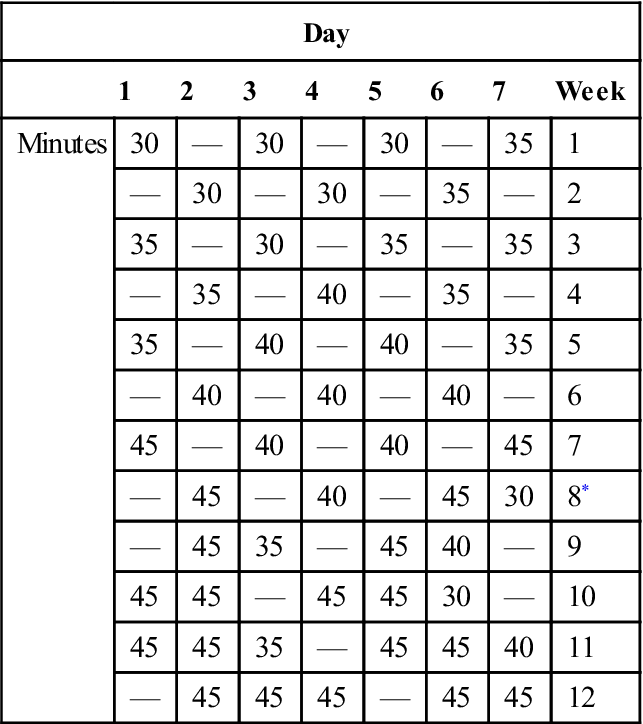
Phase IV: Timed Running Schedule—Intermediate (Table 34-3)
The patient may begin this program on level ground if they have completed phases I, II, and III.
TABLE 34-3
Timed Running Schedule—Intermediate
< ?comst?>
| Day | ||||||||
| 1 | 2 | 3 | 4 | 5 | 6 | 7 | Week | |
| Minutes | 30 | — | 30 | — | 30 | — | 35 | 1 |
| — | 30 | — | 30 | — | 35 | — | 2 | |
| 35 | — | 30 | — | 35 | — | 35 | 3 | |
| — | 35 | — | 40 | — | 35 | — | 4 | |
| 35 | — | 40 | — | 40 | — | 35 | 5 | |
| — | 40 | — | 40 | — | 40 | — | 6 | |
| 45 | — | 40 | — | 40 | — | 45 | 7 | |
| — | 45 | — | 40 | — | 45 | 30 | 8* | |
| — | 45 | 35 | — | 45 | 40 | — | 9 | |
| 45 | 45 | — | 45 | 45 | 30 | — | 10 | |
| 45 | 45 | 35 | — | 45 | 45 | 40 | 11 | |
| — | 45 | 45 | 45 | — | 45 | 45 | 12 | |
< ?comen?>< ?comst1?>
< ?comst1?>
< ?comen1?>
< ?comst1?>< ?comen1?>*< ?comst1?>< ?comen1?>Run multiple days in a row after 8 weeks.
The intermediate schedule is designed for the patient restarting running training or recovering from an injury, such as a stress fracture or significant illness that has kept them “off their feet” or on non–weight bearing activities for 4 weeks or longer. To allow for soft tissue adaptation, the patient should run every other day for 8 weeks. He or she should cross-train or be on active or total rest on days off. The patient’s pace should be 8 to 9 minutes per mile.
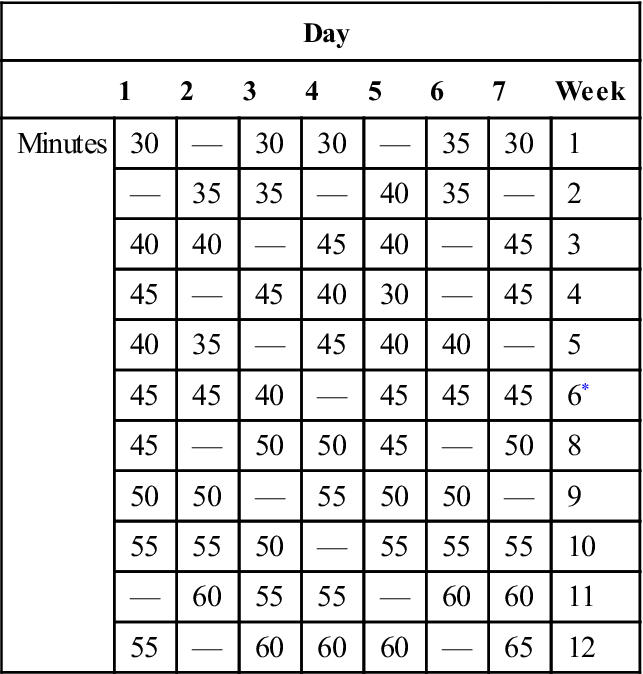
Phase IV: Timed Running Schedule—Advanced (Table 34-4)
The advanced schedule is designed for the patient/runner who is recovering from a soft tissue injury, such as a strained muscle, which has forced him or her to cross-train for less than 4 weeks. The patient may begin this program on level ground if he or she has completed phases I, II, and III. To allow for soft tissue adaptation, the patient runs every other day for 8 weeks. He or she should cross-train or be on active or total rest on days off. The patient’s pace should be 7.5 to 8 minutes per mile.
TABLE 34-4
Timed Running Schedule—Advanced
< ?comst?>
| Day | ||||||||
| 1 | 2 | 3 | 4 | 5 | 6 | 7 | Week | |
| Minutes | 30 | — | 30 | 30 | — | 35 | 30 | 1 |
| — | 35 | 35 | — | 40 | 35 | — | 2 | |
| 40 | 40 | — | 45 | 40 | — | 45 | 3 | |
| 45 | — | 45 | 40 | 30 | — | 45 | 4 | |
| 40 | 35 | — | 45 | 40 | 40 | — | 5 | |
| 45 | 45 | 40 | — | 45 | 45 | 45 | 6* | |
| 45 | — | 50 | 50 | 45 | — | 50 | 8 | |
| 50 | 50 | — | 55 | 50 | 50 | — | 9 | |
| 55 | 55 | 50 | — | 55 | 55 | 55 | 10 | |
| — | 60 | 55 | 55 | — | 60 | 60 | 11 | |
| 55 | — | 60 | 60 | 60 | — | 65 | 12 | |
< ?comen?>< ?comst1?>
< ?comst1?>
< ?comen1?>
< ?comst1?>< ?comen1?>*< ?comst1?>< ?comen1?>This activity level at 6 weeks is the same as the activity level at 12 weeks with the intermediate program and uses a higher intensity (faster running pace).
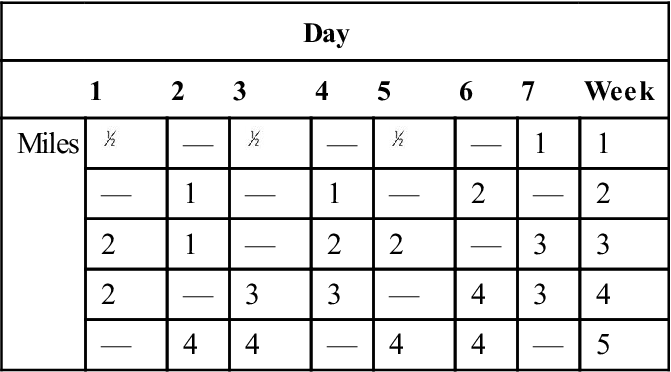
Mileage Schedule
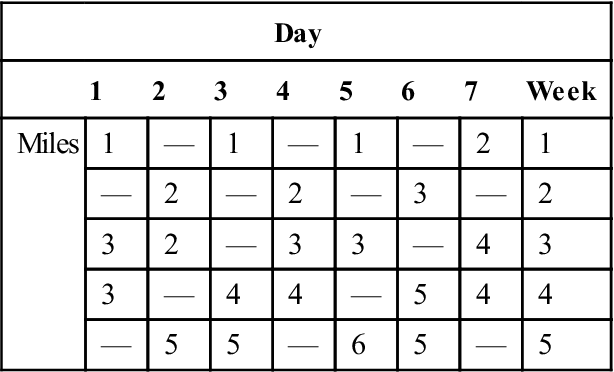
To allow for soft tissue adaptation. The patient should run every other day for 2 weeks, then a maximum of 5 days a week for the next 4 weeks. If the patient/runner’s previous level of training was less than 4 miles per session, the patient should follow the mileage schedule indicated in Tables 34-5 through 34-7.
TABLE 34-5
Mileage Table for Runners Below 4 Miles Per Session
< ?comst?>
| Day | ||||||||
| 1 | 2 | 3 | 4 | 5 | 6 | 7 | Week | |
| Miles |  |
— |  |
— |  |
— | 1 | 1 |
| — | 1 | — | 1 | — | 2 | — | 2 | |
| 2 | 1 | — | 2 | 2 | — | 3 | 3 | |
| 2 | — | 3 | 3 | — | 4 | 3 | 4 | |
| — | 4 | 4 | — | 4 | 4 | — | 5 | |
< ?comen?>< ?comst1?>
< ?comst1?>
< ?comen1?>
TABLE 34-6
Mileage Table for Runners Between 4 and 6 Miles Per Session
< ?comst?>
| Day | ||||||||
| 1 | 2 | 3 | 4 | 5 | 6 | 7 | Week | |
| Miles | 1 | — | 1 | — | 1 | — | 2 | 1 |
| — | 2 | — | 2 | — | 3 | — | 2 | |
| 3 | 2 | — | 3 | 3 | — | 4 | 3 | |
| 3 | — | 4 | 4 | — | 5 | 4 | 4 | |
| — | 5 | 5 | — | 6 | 5 | — | 5 | |
< ?comen?>< ?comst1?>
< ?comst1?>
< ?comen1?>
Note: Return to previous preinjury mileage level in 4-6 weeks.
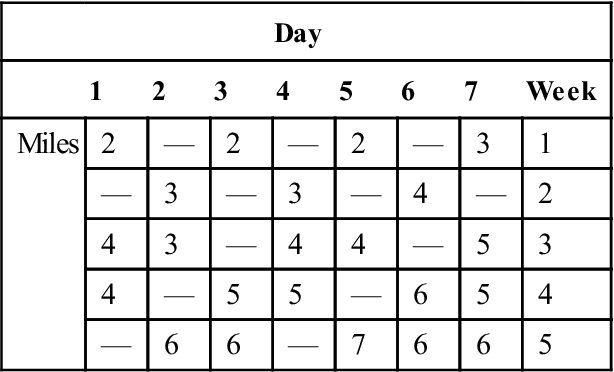
TABLE 34-7
Mileage Table for Runners Between 40 and 60 Miles Per Week
< ?comst?>
| Day | ||||||||
| 1 | 2 | 3 | 4 | 5 | 6 | 7 | Week | |
| Miles | 2 | — | 2 | — | 2 | — | 3 | 1 |
| — | 3 | — | 3 | — | 4 | — | 2 | |
| 4 | 3 | — | 4 | 4 | — | 5 | 3 | |
| 4 | — | 5 | 5 | — | 6 | 5 | 4 | |
| — | 6 | 6 | — | 7 | 6 | 6 | 5 | |
< ?comen?>< ?comst1?>
< ?comst1?>
< ?comen1?>
Future Considerations
Currently there is a lot of interest in the mechanics of running and the use (or nonuse) of running shoes. Of consideration is foot contact while running. Some authors have found a reduced rate of injury in barefoot runners whose initial contact is on the forefoot instead of the heel. Mechanically, this make sense from a force distribution standpoint because the ground forces acting on the lower extremity are decelerated via eccentric dorsiflexion (using forefoot-gastrocnemius-soleus) versus heel strike, which absorbs and distributes the forces through the calcaneus-tibia and deceleration happening at the knee. There is, however, a learning curve to adapt to this type of training, which stresses the soft tissues (foot and ankle plantarflexor soreness). Although there is controversy surrounding these mechanics, it is an interesting approach and may allow patients to run with less compressive force on the skeletal system. Running shoes provide an important barrier to environmental hazards (surface irregularities, sharp objects, extreme hot/cold) and foot mechanic deviations (e.g., over pronation). Further research is needed to quantify the benefit to foot contact and the need for “running” shoes.11,12
Summary
Many programs are available to clinicians to return their patients to running. The progression and tables in this chapter have been effective for me in successfully returning patients to running. The clinician should continually evaluate the patients’ mechanics and ensure that they are performing their strength, flexibility, and balance program regularly and cross-training as appropriate. Mileage progression may vary depending on a number of factors (e.g., muscle soreness, level of fitness). Shoe wear is another factor to consider when returning to running. Assessments of show wear should be performed by qualified professional, with foot mechanics thoroughly evaluated and taken into account.
Clinical Case Review
1The patient has been progressing through the return to running program and is pain free with activity. However, the morning after completing phase II (plyometric routine), the patient has tightness and pain in the Achilles tendon with the first several steps of the day. After walking around the house for a short period, the pain and tightness dissipates. What should the patient do for activity that day?
Take the day off, do gentle stretching, and ice the involved area. The following day, the patient should repeat the activity level from the previous attempt.
2The patient presents 3 months after partial hip labrum resection and wishes to return to running activity. What factors should be considered before he or she returns to running?
He or she should be fully evaluated for adequate ROM/flexibility, strength, and balance, making sure to focus on the whole body, not just the surgical site.
3The patient is progressing through the timed running schedule (phase IV) and is ready to start running multiple days in a row. Describe for the patient how increasing timed running periods should be approached.
Increase the timed session by 5 minutes after a day off, then decrease the timed session by 5 minutes the next day, then take a day off. When running 3 days in a row, the timed sessions are built on the front end of the sequence.
4The patient has passed the balance baseline test. What functional activities should be considered before the patient begins a running progression?
The patient must have normal ambulation and core stability.
5What is the importance of good core strength for a runner?
It allows for the appropriate distribution of forces, leads to the control and efficiency of movements, helps with the absorption of ground impact forces, and decreases compression forces.
6Paul had a meniscus repair and was cleared to begin a return to running program. He has made good progress through phase I and initiated phase II, but after the second week he has delayed onset of pain and swelling in his knee. What should be considered?
On reexamination it was found that his symptoms were aggravated by tibial compression and rotation (suspicious of a tear of the repair). Edema management techniques were initiated, and he was referred back to his surgeon.
[/level-membership-for-orthopaedics-category][not-level-membership-for-orthopaedics-category]<
[/not-level-membership-for-orthopaedics-category]
