Chapter 5 Tissue Sampling, Specimen Handling, and Chromoendoscopy
Biopsy
Pinch Biopsy Forceps
Larger Capacity Forceps
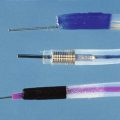
The large-cup (“jumbo” or “max capacity”) forceps requires a large channel, a so-called therapeutic endoscope (biopsy channel 3.6 to 3.7 mm). Some newer designs are intended to provide larger biopsy specimens with the conventional 2.8-mm channels and intermediate-sized channels such as pediatric colonoscopes.1 Larger capacity biopsy forceps are highly desirable to optimize the diagnostic yield. Part of the reason that only a few endoscopists have used the large-cup forceps is the reluctance to use larger capacity forceps that require the larger channel. There is also a puzzling antipathy toward the use of a larger forceps that obtains superior sized specimens. Studies have been done to show that a larger forceps is unnecessary, as if the larger forceps represented a serious threat or a “ploy.”2
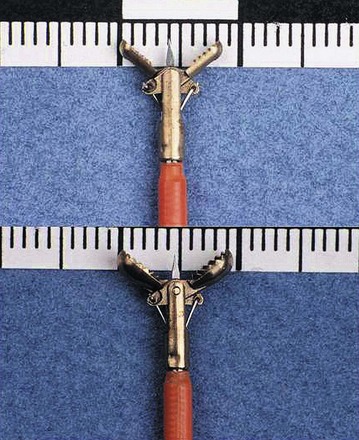
Larger capacity forceps biopsies yield two to three times the surface area but are not generally much deeper (Fig. 5.1).The main objective with biopsy is not to obtain more representative sampling of a whole organ but to enable the histotechnologist to see the biopsy specimens to orient them (see Fig. 5.1). Histotechnologists cannot orient small to tiny specimens. The resultant sections with larger capacity forceps are infinitely superior. Proper orientation during paraffin embedding is impossible with often delivered “fleabite”-sized specimens as part of a group of biopsies in a tissue block.
Cold Snare Biopsy
Cold snare biopsy is advocated instead of hot biopsy to remove diminutive polyps from the colon and submit them all to the pathology laboratory.3 A larger capacity biopsy forceps is just as effective for small polyps. In the absence of a cold snare, cold forceps is still preferable to hot biopsy.3 Fundic gland polyps have a characteristic appearance and location, and cold snare or any kind of snare is not generally required. However, in the case of larger fundic gland polyps, especially in the setting of familial polyposis, removing some may be done to rule out dysplastic change in them. The polyps almost always come off easily without bleeding. If the endoscopist is uncertain that a polyp is fundic gland type, a cautery forceps should be used. The endoscopist should always be prepared to apply a hemostasis technique if bleeding is excessive after a cold snare biopsy. Cold snare biopsy of gastric polyps less than 7 mm to distinguish hyperplastic from adenomatous polyps is useful in the appropriate clinical circumstances.
Laparoscopic Biopsy
Laparoscopic full-thickness gut biopsies are useful when diagnosis and type classification of intestinal pseudoobstruction is required.4,5
Improving the Quality of Forceps Pinch Biopsy Specimens
Double Bites
The term double bites refers to taking two specimens with a single pass of the biopsy forceps. With conventional-sized forceps, this double-bite technique often yields a tiny second biopsy specimen, or a “macrocytology” (Fig. 5.2). However, the double-bite technique may be used successfully in the colon in ulcerative colitis biopsy surveillance and in the small bowel using a larger capacity forceps. In the esophagus, the double-bite technique is difficult because of the need for angulation and risk of loss of the first biopsy specimen obtained. In the stomach, the size of the specimens is often so generous with the first pass that there is scant room for a second biopsy.
6 O’clock Position and Biopsies of Gastroesophageal Junction (Cardia) Lesions
When areas are difficult to get at, rotation of the endoscope to the 6 o’clock position makes it infinitely easier to obtain biopsy specimens and to target more accurately (Fig. 5.3). This position is especially invaluable in biopsy surveillance of Barrett’s esophagus where the 12 o’clock position tends to be ignored for visualization and biopsy targeting. The endoscope is rotated so that what was at 12 o’clock is now at 6 o’clock.
For lesions at the gastroesophageal (GE) junction, it is often invaluable to visualize the area on turnaround in the stomach and target biopsy or endoscopic resection from this perspective (see Fig. 5.3C). This maneuver works only if the patient has a hiatal hernia. After the turnaround is done in the stomach, air insufflation is set on high. The endoscope is advanced by slowly withdrawing until the endoscope tip advances right to the GE junction. In this way, there is end-on visualization of a lesion. Additionally, the endoscope can often be torqued slightly to place the lesion in or near the favored 6 o’clock position (see Fig. 5.3). If torque is required for biopsy positioning, the endoscopy assistant maintains it while the biopsy forceps is targeted to the lesion. In the turnaround position from the stomach, some lesions cannot be accessed despite torquing or twisting.
Tissue Handling
Transferring Biopsy Specimens from Forceps to Fixative
Orientation of biopsy specimens on support materials in the endoscopy unit is not required in clinical practice and in inexperienced hands may lead to more tissue trauma. The key to having well-oriented, high-quality biopsy specimens for histologic examination rests with the pathology histotechnologist’s ability and motivation to embed the tissue “on its edge” in paraffin and obtain sections through the central core of the specimens.6 That depends on providing the histotechnologist with specimens of adequate size.
Number of Biopsy Specimens in a Fixative Bottle
Most histotechnologists cannot line up more than four biopsy specimens in a tissue block during embedding and section them so that all are represented in optimal orientation for interpretation (Fig. 5.4). Endoscopists claim that they put 10 or more specimens in a single bottle to reduce the costs. They do not usually get feedback, however, and if they did, they would learn that only half or less of those 10 specimens may be fully interpretable (see Fig. 5.4). In one regional community pathology laboratory, the pathologists separate the biopsy specimens themselves for embedding at four or five per cassette.
Polyps: Identifying the Stalk Region
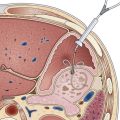
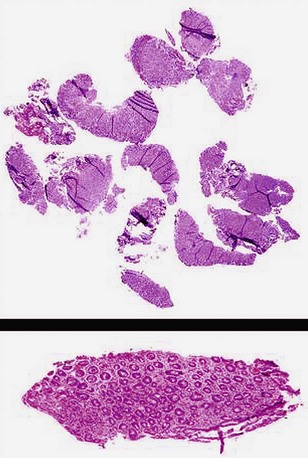
When snare polypectomy is used for the removal of pedunculated or sessile polyps, the key part of the specimen for cancer diagnosis is in the stalk region or the base in the case of sessile polyps (Fig. 5.5). Stalks retract right after removal of the polyp and often shrink further and disappear after fixation. The best way to identify the stalk is to impale it with a short (1-inch) 25-gauge needle, right to the hub with the needle point emerging at the most convex part of the tip of the polyp (see Fig. 5.5). An alternative is to ink the polyp stalk after removal. After fixation for a few hours, the polyp is bisected with a scalpel or razor blade in the pathology laboratory. The two bisected halves are embedded facedown, and this way the first sections to come off are those that show the stalk region in its best orientation.6 Larger specimens should go right to the pathology laboratory to be assessed as gross specimens.
Endoscopic Mucosal Resection and Endoscopic Resection
It is preferable not to remove the lesions in pieces for the reasons discussed previously. The lesions should be oriented in such a way that there is no doubt about how to handle them. Handling these specimens requires a protocol worked out in advance with the pathologists. The best scheme is to deliver the unfixed specimen to the pathology laboratory so that the pathologist examines it grossly and pins it out before placement in fixative. After fixation, the specimen should be cut into strips and each embedded so that the whole specimen is represented in histologic slides.7 In this way, the patient and the endoscopist can be reassured that the focal or early lesion was analyzed optimally with respect to maximal invasion.
Brush Cytology
Endoscopist-Pathologist and Pathologist-Endoscopist Communication to Optimize the Diagnostic Yield for Patient Care
A more detailed discussion of the pathologist-endoscopist interaction is available.8 Dialogue and communication with pathologists and vice versa are a weak and dysfunctional link, virtually unchanged since the advent of flexible endoscopes.8 The potential consequences of this dysfunctional relationship are described subsequently.
False-Positive Diagnoses
False-positive diagnoses may have grave worry consequences for the patients. Three examples follow.
Barrett’s Esophagus
The endoscopist asks the pathologist if there is Barrett’s esophagus in an eccentric Z line. An eccentric Z line precludes the diagnosis of Barrett’s esophagus. The first criterion for the diagnosis of Barrett’s esophagus is endoscopic. There is Barrett’s-type mucosa visible in the esophagus above the lower esophageal sphincter (LES). The second criterion is that a biopsy performed above the LES in the esophagus shows intestinal-type goblet cells. An eccentric Z line is not Barrett’s esophagus. Up to 30% of patients with gastroesophageal reflux disease (GERD) and no Barrett’s esophagus have intestinal metaplasia at the Z line.9 It is not considered an indication for surveillance. The pathologist may be more circumspect in this example, and instead of calling an eccentric Z line Barrett’s esophagus, the pathologist may call it intestinal metaplasia. The endoscopist may recognize the pathologist’s circumspection and tell the patient he or she has Barrett’s esophagus even if there were no endoscopic criteria for the condition. Commonly, some pathologists compound this in an “enabling” way where no landmarks are given and the biopsy report states “lower esophagus.” The enabling report includes a statement that “if the biopsies were from tubular esophagus then this is Barrett’s esophagus.” This attempt to cover the tracks of the endoscopist results in false-positive diagnoses of Barrett’s esophagus with patients worrying about cancer for life and having regular endoscopy assessments for dysplasia.
What Information Should Be Provided to the Pathologist
Tables 5.1 and 5.2 summarize the information that can be incorporated into a standardized biopsy requisition form. Table 5.1 lists examples of standardized biopsy locations. The endoscopy assistant can prompt the endoscopist if a site given is not “on the list.” Table 5.2 details the other information to be provided to pathologists for them to be able to give more focused diagnoses and differential diagnoses.
Table 5.1 Standardization of Biopsy Locations for Endoscopy Reports and for Pathology Requisition
| Esophagus | LES, Z line, and location of biopsy—all as centimeters from incisors. If no Barrett’s esophagus, LES region and Z line are assumed to be at the same location |
| Stomach | Fundus |
| Body, antrum—for each, greater or lesser curvature aspect; proximal, mid, or distal antrum or body | |
| Duodenum and jejunum | Bulb |
| Second duodenum | |
| Beyond second duodenum—estimate only, unless enteroscopy done under fluoroscopy | |
| Ileum | As centimeters from ileocecal valve |
| Colon | Cecum |
| Ascending colon—cecum and ascending colon normally have more inflammatory cells, so separate them from biopsy specimens from other sites | |
| Hepatic flexure region | |
| Transverse colon—if multiple sites here, proximal, mid, and distal | |
| Splenic flexure region | |
| Descending and sigmoid colon—if colon straight, as centimeters from anorectal margin; if not straight, site descriptions as descending colon, sigmoid, and rectum | |
| Rectum—as such or if important focal rectal disease, as centimeters or relationship to valves of Houston |
LES, Lower esophageal sphincter.
Modified from Weinstein WM: Mucosal biopsy techniques and interaction with the pathologist. Gastrointest Endosc Clin N Am 10:555–572, 2000.
Table 5.2 Information for the Pathologist to Facilitate More Precise and Relevant Diagnosis
| Lesion description | If abnormal, use simple language: Thick folds instead of hypertrophic or edematous; thin instead of atrophic |
| For description of lesion, give what was seen (e.g., erosions, erythema), rather than an interpretation (e.g., gastritis). Erythema is often equated with esophagitis and gastritis—a poor predictor | |
| Focal lesion: What does it look like? Biopsy it and the adjacent mucosa within a centimeter, and separate the specimens | |
| Biopsy instrument | Detail type of instrument (e.g., hot biopsy forceps, electrocautery snare) if other than a pinch biopsy forceps |
| Polyps | Give size and whether sessile or pedunculated, and instrument used (e.g., biopsy forceps, hot biopsy forceps, electrocautery snare) |
| Key drugs | For all sites: Immunosuppressives, chemotherapy (if recent) or radiotherapy (current, recent, past), NSAIDs |
| Stomach: Proton pump inhibitors, dose and duration; recent or current antibiotics or bismuth compounds | |
| Colon: Type of preparation, local or oral, and type of oral; 5-ASA compounds or other IBD drugs | |
| History | Brief—one or two lines usually suffices |
| Questions for the pathologist | Be as specific as possible: If biopsy specimens taken from different sites for different questions, indicate the site and the questions associated with it |
| What is it? Asking “what is it?” is perfect when the endoscopist does not have any concrete idea |
5-ASA, 5-Aminosalicylic acid; IBD, inflammatory bowel disease; NSAIDs, nonsteroidal antiinflammatory drugs.
Modified from Weinstein WM: Mucosal biopsy techniques and interaction with the pathologist. Gastrointest Endosc Clin N Am 10:555–572, 2000.
Questions for the Pathologist
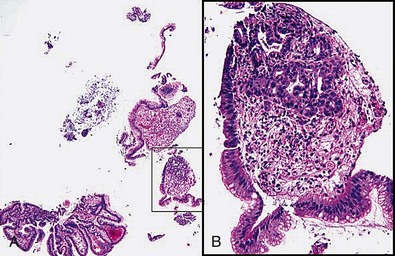
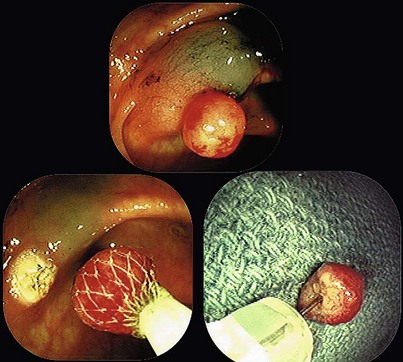
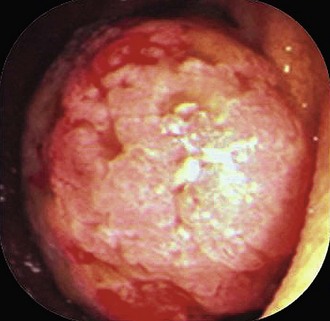
When an apparent colon cancer mass or large polyp is found, the dialogue should be: surgical resection is planned; rule out adenomatous change. Asking to rule out cancer may lead to a diagnosis of adenoma but can’t rule out cancer, recommend rebiopsy (see Fig. 5.6 to illustrate this point). By alerting the pathologist that surgery is necessary and asking to rule out adenomatous change, the endoscopist may avoid needless repeat biopsy or having the pathologist examine endless numbers of recuts.
Drugs may be responsible for various pathologies that were not imagined previously.10–12 Table 5.2 outlines the information regarding drugs or other therapies that can impact any part of the gut and some that are site-specific. Nonsteroidal antiinflammatory drugs should be in the differential diagnosis of unusual lesions anywhere in the gut, although cause and effect in such instances is often difficult to prove. In lymphocytic or collagenous colitis, drugs may trigger symptoms, and the symptoms may be reversed when the offending drugs are removed.13–16 The importance of some drugs a patient takes may become apparent only after review of the biopsy results. In ischemic colitis in younger people without generalized atherosclerotic disease, the possibility of a wider range of culpable drugs becomes important, including cocaine and oral contraceptives. These can be sought post hoc after the biopsy results are interpreted.
What Pathologists and Endoscopists Can Do to Improve Communication and Biopsy Diagnoses
Feedback
Poor communication between endoscopists and pathologists was discussed previously. For more than 40 years in the flexible endoscopy era, endoscopists have not asked about the quality of their biopsy specimens or the information pathologists need. Pathologists have complied by never spontaneously bringing up these issues. Endoscopists assume that whatever they have submitted is “adequate” and that none of the biopsy specimens in a group defy interpretation because of small size, superficial scrapings, crush to the villi, or crush of the whole specimen. Endoscopists continue taking rapid-fire biopsy specimens and putting 10 or 12 specimens into a bottle for a given site, and virtually all pathologists go along and embed all the specimens into one tissue block (see Fig. 5.4).
Improvements in the Quality of Pathology Reporting
The two most needed improvements in the quality of GI pathology reporting are the following:
Chromoendoscopy
These are exciting times in GI endoscopy. Novel imaging techniques are being tested.17–20 They are discussed elsewhere in this book. Optical methods either alone or in combination with chromoendoscopy are likely to hold the key to more targeted biopsies in the search for dysplastic or cancerous mucosa and other mucosal abnormalities. As the technology develops and becomes widely available, chromoendoscopy will become an adjunctive rather than primary tool.
A Cochrane Collaboration analysis,21 addressed the question of chromoendoscopy versus conventional endoscopy for detection of polyps in the colon and rectum. Five studies were included. There was strong evidence that chromocolonoscopy increased the yield of polyp detection. However, the discussion of the implications for practice correctly cited that the quality of the examination was dependent on complete and careful examination on withdrawal and that training should still focus on this aspect. Speedy withdrawal times have been shown to be one factor contributing to a higher “miss rate.”22,23 There is residual debate about this because of varied study designs and because there are no prospective data from the “fast withdrawal era” (<7 minutes). Some clinicians suggest that “less than 7 minutes” is a factor contributing to a greater miss rate of polyp detection.
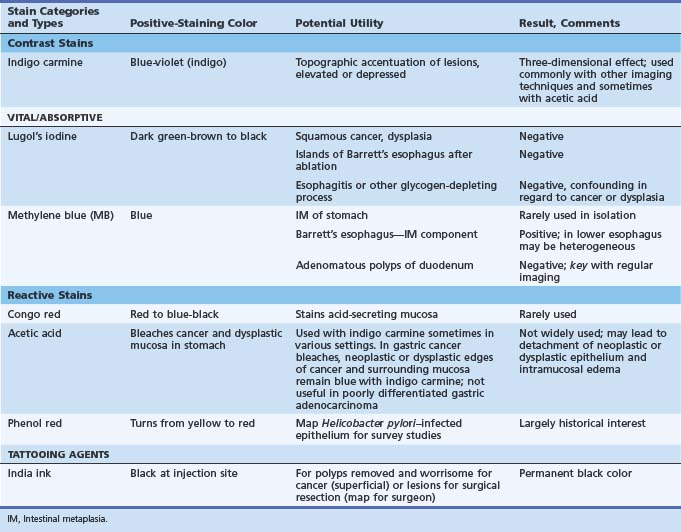
Table 5.3 lists the staining agents and an overview of their staining characteristics and potential utility. There has been a renaissance of research interest in chromoendoscopy worldwide, occurring long after it was developed and first used primarily in Japan. Dyes can help give a landscape view of an area for changes in contour (elevated, depressed) and to define the margins of sessile lesions.
Dyes That Are Most Useful with Conventional Endoscopy
Contrast Stains
Contrast stains help most in the delineation of superficial neoplastic lesions, such as in the stomach and of all lesions before endoscopic resection.7 In the latter instance, the often irregular margins of the lesion to be excised are better defined. One disadvantage of contrast stains is that it requires some experience to recognize what is normal mucosa and what is not if there are no obviously elevated areas. In the stomach, pit openings and areae gastricae may make the field look abnormal.
The most popular dye stain is indigo carmine used as a contrast stain (see Table 5.3). Although many experts indicate that it should not be washed off after application, some washing off after application leaves the innate color of the lesion in question still preserved (Fig. 5.7). Often all one needs are thin lines of stain in grooves or edges of lesions to define borders and provide a three-dimensional effect (see Fig. 5.7).
Esophagus
Squamous Carcinoma and Dysplasia of the Esophagus
The esophagus is sprayed with 10 to 30 mL of the solution (see Table 5.3). The esophagus can be sprayed efficiently by beginning at the GE junction and applying the spray as the endoscope is moved cephalad. The lumen can be partially collapsed, and when the upper extent of the sprayed area is reached, it can be totally collapsed to permit apposition of the stained walls for more uniform staining. After 1 to 2 minutes, the lumen is insufflated, and any pale-staining areas can be resprayed. The color ranges from dark green to brown to black in normal squamous epithelium. After 10 to 15 minutes, the stain intensity starts to fade, sometimes dramatically.
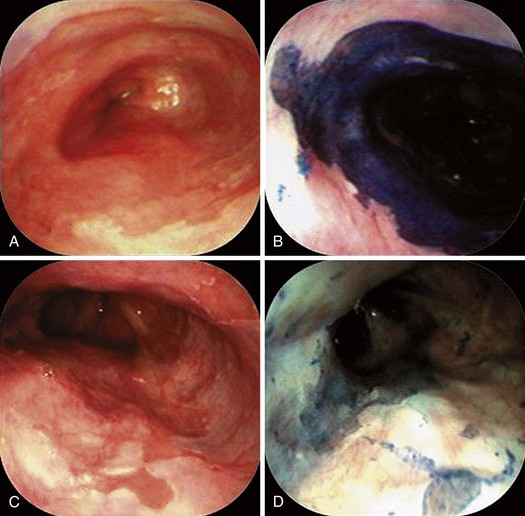
Areas of dysplasia and carcinoma are glycogen-depleted, so negative staining occurs; this is also true for areas of eroded mucosa, or mucosa markedly thinned by injury or regeneration.24 Examples of mucosa thinned by regeneration are after healing of erosive esophagitis and after restoration of neosquamous epithelium following ablation of Barrett’s esophagus.
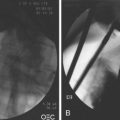
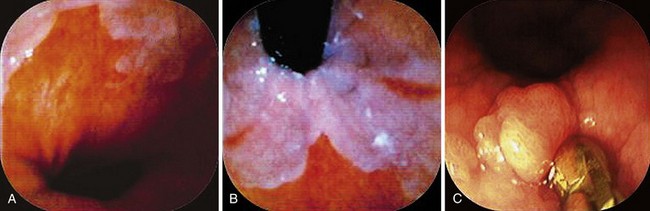
With negative staining, Lugol’s highlights areas of dysplasia or early carcinoma that can be missed or poorly visualized in terms of margins (Fig. 5.8A and B). In a study in Linxian, China, which has among the highest rates of esophageal cancer, the rate of dysplasia and cancer detection increased from 62% to 96% with a specificity of 63% with the use of Lugol’s stain.25 The technique is very useful to detect recurrent or metachronous squamous cell esophageal carcinoma.26 It is also useful in patients with head and neck cancers where there is an increased risk of squamous cell esophageal cancer.24

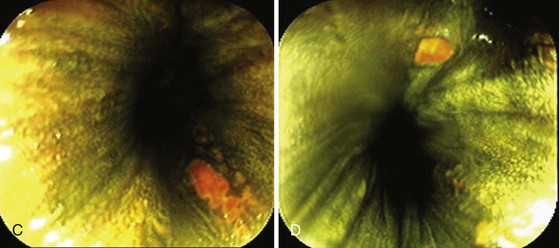
Residual Islands of Nonsquamous Mucosa after Ablation of Barrett’s Esophagus
Lugol’s makes it simple to do “final checks” for nonsquamous islands after ablation. These islands may be invisible in the unstained state (Fig. 5.8C and D). Neosquamous postablation mucosa is thinner initially, with less glycogen. It may be paler than usual with Lugol’s staining but not completely negative. I use Lugol’s iodine as the final “gold standard” for complete return of neosquamous epithelium after ablation of Barrett’s esophagus.
Methylene Blue
Sprayed MB induces oxidative damage of DNA when it is photosensitized by white light.27–29 The concern in Barrett’s esophagus is that the stain may further the promutagenic DNA damage that may already exist, and this raises the question about increased rate of carcinogenesis. This situation is controversial with vigorous arguments28 that the studies of cellular damage used higher doses for longer than the conventional spray at endoscopy and other variables. To resolve this controversy, cellular damage or lack of it needs to be studied in a fashion that is comparable in dose and duration to MB as used in chromoendoscopy.
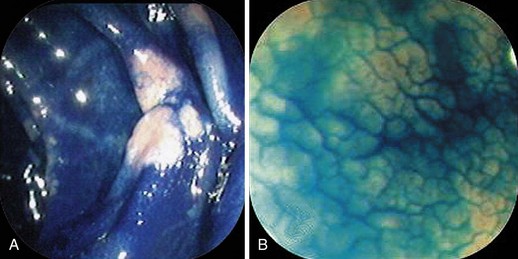
MB staining is and will be used even more as an adjunct to novel imaging techniques. It has been used alone in research studies of Barrett’s esophagus with conventional endoscopy (Fig. 5.9). Canto and colleagues30 did much of the seminal work with MB. MB binds to intestinal absorptive epithelium, be it normal small intestine or the intestinal metaplasia that is characteristic of Barrett’s esophagus and intestinal metaplasia of the stomach.
Methylene Blue Procedure
First, a mucolytic is given (N-acetylcysteine or pronase, the latter more commonly in Japan). Next, 0.5% MB is sprayed with a spray catheter, and 2 minutes later the mucosa is washed off. One should avoid staining clothing, and patients should be told not to be concerned by the passage of blue or green urine in the next 1 or 2 days. There is an acknowledged learning curve, and the staining procedure adds 2 to 12 minutes to the procedure and on the order of 10 to 15 minutes if one includes setup and postprocedure cleanup times and learning curves. Canto advised that beginners in chromoendoscopy take multiple photographs and compare staining characteristics with pathologic diagnoses of biopsy specimens of stained areas.34
In Barrett’s esophagus, there are two areas of interest in studies with MB. One is to identify intestinal epithelium (positive staining) in apparent or possible short-segment Barrett’s esophagus, and the second is to detect dysplasia by negative staining. With conventional endoscopy, a meta-analysis failed to show superiority of MB (to provide targeting of areas for biopsy) over random four-quadrant biopsy.31 In a prospective randomized crossover trial, the dysplasia detection rate was similar with MB versus four-quadrant biopsy.32 The miss fraction for dysplasia was 5/21 with MB and 3/21 with four-quadrant random biopsy. Fewer biopsy specimens were taken in the MB group (for targeting), however. MB may be useful in trying to define the region around the LES to determine whether there are short tongues of Barrett’s esophagus above a normally positioned Z line.
Short-Segment Barrett’s Esophagus and Intestinal Metaplasia of the Cardia
When used for the detection of short-segment Barrett’s esophagus (≤3 cm in length), the staining pattern is less diffuse and patchier than cephalad than in longer segments of Barrett’s esophagus (see Fig. 5.9). The reason is that in short-segment Barrett’s esophagus there is a greater mix of intestinal and nonintestinal columnar cells present than in the more diffuse intestinal change of long-segment Barrett’s esophagus.33,34 In the final analysis, the finding rate of intestinal-type goblet cells in short-segment Barrett’s esophagus of the tongue variety is no greater than targeted biopsies without chromoendoscopy. Fewer biopsies may be needed, so the main value is for clinicians who like it because it is a “biopsy aversion technique.”
MB staining has also been used to identify intestinal metaplasia of the cardia right at the GE junction in patients without endoscopically visible Barrett’s esophagus. In practice, there is no reason to biopsy a normal-appearing Z line. Intestinal metaplasia may occur in 30% of individuals with GERD and no Barrett’s esophagus. It is also common in individuals with no GERD.9 Its presence is not an indication for biopsy surveillance.
High-Grade Dysplasia and Endoscopically Invisible Adenocarcinoma
Studies with MB (with or without acetic acid) for detecting dysplasia or early cancer in Barrett’s esophagus generally have an adjunctive role coupled with novel imaging methods.35–38 Acetic acid (1.5%) blanches the esophagus white and leaves Barrett’s esophagus and gastric mucosa looking red. The objective is to target the areas most likely to contain neoplastic change and to reduce the numbers of random biopsies. Well-designed larger prospective studies are needed to settle whether these dyes with novel imaging have any advantage over dyes with conventional endoscopy.
Stomach
Apart from the use of contrast stains to detect subtle lesions or to define the margins of lesions39 with or without novel imaging, there is no type of chromoendoscopy that has widespread applications in the stomach. MB stains intestinal metaplasia of the stomach a dark blue, and it has been combined with magnification endoscopy to examine its utility in more precise characterization of intestinal metaplasia and gastric dysplasia.40,41
Small Intestine
Celiac Disease
The endoscopic signs of celiac disease include decreased numbers of valvulae, scalloped valvulae, a mosaic pattern, and visualization of underlying blood vessels. A host of new imaging technologies are being examined in celiac disease, including some with dyes such as MB or a contrast stain.42
Other Small Bowel Lesions
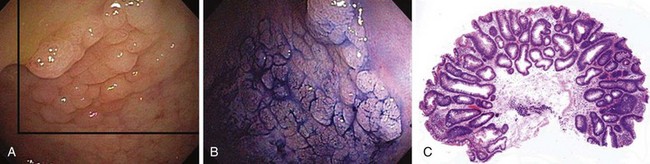
Nowhere is MB more useful than in the assessment of the duodenal sweep in patients with FAP or more atypical polyposis syndromes. Some lesions are easily visible; however, most duodenal adenomas in FAP are flat, often along valvulae, and barely raised if at all. MB stains the nondysplastic mucosa deep blue and leaves dysplastic areas unstained. Spraying of the whole duodenum permits a sweeping view of the terrain for targeting biopsy (Fig. 5.10). This stain or a contrast stain, such as indigo carmine, may be very useful before endoscopic resection of one or more of these lesions.
Colon
Polyps of the Colon
Chromoendoscopy has been directed toward two aspects of polyps of the colon. One is to determine the difference between hyperplastic and adenomatous polyps on gross examination. The second is to increase the detection rate, especially of adenomas. The favorite stain has been indigo carmine spray, with or without magnifying endoscopy or high-resolution endoscopy. Other creative approaches to dye staining have put the dye into the electrolyte purging solution or into capsules.43,44
Hyperplastic Versus Adenomatous Polyps
A pit or pitted pattern denotes a hyperplastic polyp, and a grooved or sulcus appearance denotes adenoma. Most of the pioneering work in this area was done in Japan.45 Among numerous studies examining the potential of chromoendoscopy has been a U.S. prospective multicenter study, in which 92.3% of the polyps could be classified according to the dye staining pattern. For adenomatous polyps, the sensitivity, specificity, and negative predictive values were 82%, 82%, and 88%.46
Increased Detection Rate of Adenomas
Flat and depressed adenomas refer to adenomas that are raised but pancakelike (with or without depressed centers) and not generally dome-shaped. One endoscopic definition that has been used is that they are either flat or depressed lesions with a height less than half of the diameter of the lesion.47 To prove that they were not just a Japanese phenomenon, a Japanese endoscopist, Saitoh, who was experienced in the detection of these lesions, was recruited to the United States to perform a study using indigo carmine and conventional endoscopy. He did left-sided colonic indigo carmine staining from splenic flexure to rectum for colonoscopies in 211 patients.47 Flat and depressed lesions were found in 22.7%. These were more likely adenomas than hyperplastic polyps (87% vs. 67%), and the advanced lesions with high-grade dysplasia or cancer were significantly smaller than comparable conventional polypoid lesions (10.75 mm vs. 20 mm). In a randomized controlled trial of 259 patients using total colonic dye spray, more diminutive adenomas were detected proximal to the sigmoid colon, and more patients were identified with three or more adenomas.48 Increased detection rates with indigo carmine staining were also found in a study in Korea, a country with a lower incidence of colorectal neoplasia compared with Western countries.49
Chromoendoscopy and Inflammatory Bowel Disease
Chromoendoscopy was studied in a randomized controlled trial of 174 patients with long-standing ulcerative colitis comparing conventional surveillance biopsy with total spray of the colon with MB.50 Investigators compared 32 lesions with intraepithelial neoplasia (24 of 32 low grade; 24 of 32 in flat mucosa) in the dye group with 10 lesions (8 of 10 low grade; 4 of 10 in flat mucosa) in the conventional endoscopy group. The dye spray group also predicted the degree of histologic inflammation better than the conventional group, but that is not the primary message.51
1 Gonzalez S, Yu WM, Smith MS, et al. Randomized comparison of 3 different-sized biopsy forceps for quality of sampling in Barrett’s esophagus. Gastrointest Endosc. 2010;72:935-940.
2 Enns R. Jumbo or large-capacity forceps for inflammatory bowel disease surveillance: Is it truly important or just a marketing ploy? Gastrointest Endosc. 2008;68:279-282.
3 Hewett DG, Rex DK. Colonoscopy and diminutive polyps: Hot or cold biopsy or snare? Do I send to pathology? Clin Gastroenterol Hepatol. 2011;9:102.
4 Knowles CH, Veress B, Tornblom H, et al. Safety and diagnostic yield of laparoscopically assisted full-thickness bowel biopsy. Neurogastroenterol Motil. 2008;20:774-779.
5 Dewit S, De Hertogh G, Geboes K, et al. Chronic intestinal pseudo-obstruction caused by an intestinal inflammatory myopathy: Case report and review of the literature. Neurogastroenterol Motil. 2008;20:343-348.
6 Lewin KJ, Riddell RH, Weinstein WM. Dialogue, handling of biopsies and resected specimens. In: Lewin KJ, Riddell RH, Weinstein WM, editors. Gastrointestinal pathology and its clinical implications. New York: Igaku-Shoin; 1992:15-18.
7 Soetikno RM, Gotoda T, Nakanishi Y, et al. Endoscopic mucosal resection. Gastrointest Endosc. 2003;57:567-579.
8 Weinstein WM. Mucosal biopsy techniques and interaction with the pathologist. Gastrointest Endosc Clin N Am. 2000;10:555-572.
9 Lembo T, Ippoliti AF, Ramers C, et al. Inflammation of the gastro-oesophageal junction (carditis) in patients with symptomatic gastro-oesophageal reflux disease: A prospective study. Gut. 1999;45:484-488.
10 Tutuian R. Adverse effects of drugs on the esophagus. Best Pract Res Clin Gastroenterol. 2010;24:91-97.
11 Sostres C, Gargallo CJ, Arroyo MT, et al. Adverse effects of non-steroidal anti-inflammatory drugs (NSAIDs, aspirin and coxibs) on upper gastrointestinal tract. Best Pract Res Clin Gastroenterol. 2010;24:121-132.
12 Zeino Z, Sisson G, Bjarnason I. Adverse effects of drugs on small intestine and colon. Best Pract Res Clin Gastroenterol. 2010;24:133-141.
13 Filik L. Collagenous colitis and nonsteroidal anti-inflammatory drugs. Eur J Intern Med. 2010;21:e11.
14 Kusnik B, Stolte M. Lymphocytic colitis under treatment with duloxetine. Z Gastroenterol. 2010;48:693-695.
15 Keszthelyi D, Jansen SV, Schouten GA, et al. Proton pump inhibitor use is associated with an increased risk for microscopic colitis: A case-control study. Aliment Pharmacol Ther. 2010;32:1124-1128.
16 Geramizadeh B, Taghavi A, Banan B. Clinical, endoscopic and pathologic spectrum of non-steroidal anti-inflammatory drug-induced colitis. Indian J Gastroenterol. 2009;28:150-153.
17 Fedeli P, Gasbarrini A, Cammarota G. Spectral endoscopic imaging: The multiband system for enhancing the endoscopic surface visualization. J Clin Gastroenterol. 2011;45:6-15.
18 Shahid MW, Wallace MB. Endoscopic imaging for the detection of esophageal dysplasia and carcinoma. Gastrointest Endosc Clin N Am. 2010;20:11-24.
19 Goetz M, Kiesslich R. Advanced imaging of the gastrointestinal tract: Research vs. clinical tools? Curr Opin Gastroenterol. 2009;25:412-421.
20 Wong Kee Song LM, Adler DG, Chand B, et al. Chromoendoscopy. Gastrointest Endosc. 2007;66:639-649.
21 Brown SR, Baraza W: Chromoscopy versus conventional endoscopy for the detection of polyps in the colon and rectum. Cochrane Database Syst Rev 2010;(10):CD006439.
22 Barclay RL, Vicari JJ, Doughty AS, et al. Colonoscopic withdrawal times and adenoma detection during screening colonoscopy. N Engl J Med. 2006;355:2533-2541.
23 Simmons DT, Harewood GC, Baron TH, et al. Impact of endoscopist withdrawal speed on polyp yield: Implications for optimal colonoscopy withdrawal time. Aliment Pharmacol Ther. 2006;24:965-971.
24 Freitag CP, Barros SG, Kruel CD, et al. Esophageal dysplasias are detected by endoscopy with Lugol in patients at risk for squamous cell carcinoma in southern Brazil. Dis Esophagus. 1999;12:191-195.
25 Dawsey SM, Fleischer DE, Wang GQ, et al. Mucosal iodine staining improves endoscopic visualization of squamous dysplasia and squamous cell carcinoma of the esophagus in Linxian, China. Cancer. 1998;83:220-231.
26 Williams JJ, Beck PL, Andrews CN, et al. Microscopic colitis—a common cause of diarrhoea in older adults. Age Ageing. 2010;39:162-168.
27 Davies J, Burke D, Olliver JR, et al. Methylene blue but not indigo carmine causes DNA damage to colonocytes in vitro and in vivo at concentrations used in clinical chromoendoscopy. Gut. 2007;56:155-156.
28 Hardie LJ, Olliver JR, Wild CP, et al. Chromoendoscopy with methylene blue and the risk of DNA damage. Gastroenterology. 2004;126:623-624.
29 Olliver JR, Wild CP, Sahay P, et al. Chromoendoscopy with methylene blue and associated DNA damage in Barrett’s oesophagus. Lancet. 2003;362:373-374.
30 Canto MI, Yoshida T, Gossner L. Chromoscopy of intestinal metaplasia in Barrett’s esophagus. Endoscopy. 2002;34:330-336.
31 Ngamruengphong S, Sharma VK, Das A. Diagnostic yield of methylene blue chromoendoscopy for detecting specialized intestinal metaplasia and dysplasia in Barrett’s esophagus: A meta-analysis. Gastrointest Endosc. 2009;69:1021-1028.
32 Horwhat JD, Maydonovitch CL, Ramos F, et al. A randomized comparison of methylene blue-directed biopsy versus conventional four-quadrant biopsy for the detection of intestinal metaplasia and dysplasia in patients with long-segment Barrett’s esophagus. Am J Gastroenterol. 2008;103:546-554.
33 Canto MIF, Setrakian S, Petras RE, et al. Methylene blue selectively stains intestinal metaplasia in Barrett’s esophagus. Gastrointest Endosc. 1996;44:1-7.
34 Canto MIF, Setrakian S, Willis J, et al. Methylene blue-directed biopsies improve detection of intestinal metaplasia and dysplasia in Barrett’s esophagus. Gastrointest Endosc. 2000;51:560-568.
35 Jeurnink SM, van Eijck CH, Steyerberg EW, et al. Stent versus gastrojejunostomy for the palliation of gastric outlet obstruction: A systematic review. BMC Gastroenterol. 2007;7:18.
36 Fortun PJ, Anagnostopoulos GK, Kaye P, et al. Acetic acid-enhanced magnification endoscopy in the diagnosis of specialized intestinal metaplasia, dysplasia and early cancer in Barrett’s oesophagus. Aliment Pharmacol Ther. 2006;23:735-742.
37 Canto MI. Acetic-acid chromoendoscopy for Barrett’s esophagus: The “pros.”. Gastrointest Endosc. 2006;64:13-16.
38 Conio M. Esophageal chromoendoscopy in Barrett’s esophagus: “cons.”. Gastrointest Endosc. 2006;64:9-12.
39 Tajiri H, Doi T, Endo H, et al. Routine endoscopy using a magnifying endoscope for gastric cancer diagnosis. Endoscopy. 2002;34:772-777.
40 Fennerty MB, Sampliner RE, McGee DL, et al. Intestinal metaplasia of the stomach: Identification by a selective mucosal staining technique. Gastrointest Endosc. 1992;38:696-698.
41 Sanders DL, Pfeiffer RB, Hashimoto LA, et al. Pseudomembranous gastritis: A complication from Aspergillus infection. Am Surg. 2003;69:536-538.
42 Cammarota G, Fedeli P, Gasbarrini A. Emerging technologies in upper gastrointestinal endoscopy and celiac disease. Nat Clin Pract Gastroenterol Hepatol. 2009;6:47-56.
43 Mitooka H, Fujimori T, Ohno S, et al. Chromoscopy of the colon using indigo carmine dye with electrolyte lavage solution. Gastrointest Endosc. 1992;38:373-374.
44 Mitooka H, Fujimori T, Maeda S, et al. Minute flat depressed neoplastic lesions of the colon detected by contrast chromoscopy using an indigo carmine capsule. Gastrointest Endosc. 1995;41:453-459.
45 Kudo S, Hirota S, Nakajima T, et al. Colorectal tumours and pit pattern. J Clin Pathol. 1994;47:880-885.
46 Eisen GM, Kim CY, Fleischer DE, et al. High-resolution chromoendoscopy for classifying colonic polyps: A multicenter study. Gastrointest Endosc. 2002;55:687-694.
47 Saitoh Y, Waxman I, West AB, et al. Prevalence and distinctive biologic features of flat colorectal adenomas in a North American population. Gastroenterology. 2001;120:1657-1665.
48 Brooker JC, Saunders BP, Shah SG, et al. Total colonic dye-spray increases the detection of diminutive adenomas during routine colonoscopy: A randomized controlled trial. Gastrointest Endosc. 2002;56:333-338.
49 Lee JH, Kim JW, Cho YK, et al. Detection of colorectal adenomas by routine chromoendoscopy with indigo carmine. Am J Gastroenterol. 2003;98:1284-1288.
50 Kiesslich R, Fritsch J, Holtmann M, et al. Methylene blue-aided chromoendoscopy for the detection of intraepithelial neoplasia and colon cancer in ulcerative colitis. Gastroenterology. 2003;124:880-888.
51 Bernstein CN. The color of dysplasia in ulcerative colitis. Gastroenterology. 2003;124:1135-1138.