[level-membership-for-surgery-category]
Chapter 13 Tissue and Fascial Expansion of the Abdominal Wall 
1 Introduction and Clinical Description
The abdomen lends itself to tissue expansion in patients of all ages and a multitude of clinical problems. Both congenital and acute defects of the abdominal wall can be addressed by the sequential expansion of adjacent tissues. These include the treatment of giant congenital nevi, tumors, burn scar contracture, posttraumatic defects, and loss of skin and fascial domain following previous surgery or injury. This chapter addresses the treatment of skin and sub-cutaneous tissue defects of the abdominal wall by utilizing prosthetic tissue expanders to both create new tissue and recruit tissue from healthy adjoining areas. It also discusses fascial expansion of the abdominal wall by the process of serial excision of a fixed prosthetic mesh. Because the anatomy of the abdominal wall is described elsewhere in this book, it is not repeated here.
1 Typical Skin Defect Requiring Tissue Expansion
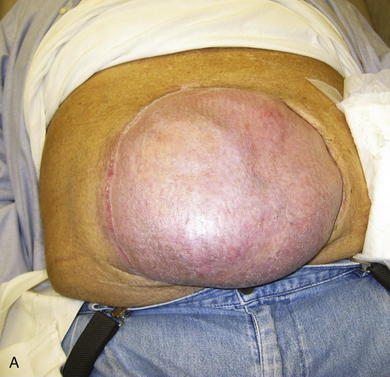
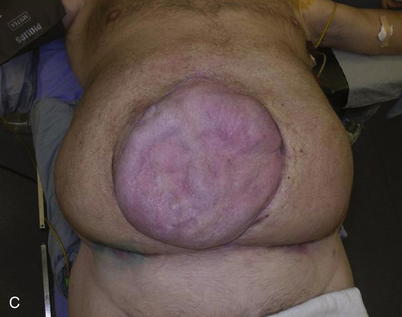
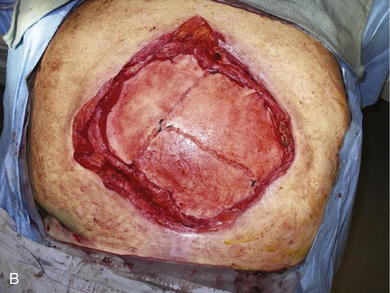
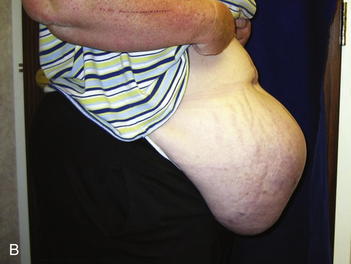
The typical defect that lends itself to repair via the insertion of tissue expanders is a well-defined defect that is well healed and stable (Fig. 13-1, A). Areas that have been irradiated or subject to diffuse trauma, such as burns and subsequent grafting and scar contracture, are less amenable to expansion. Open wounds or chronically draining wounds are also fraught with problems because of the high incidence of infection and subsequent extrusion of the expander. If a tumor is to be removed, there must be absolute certainty that the tumor is not contiguous with the tissue expanded pocket. In Fig. 13-1, A, a patient is shown with a large midline abdominal hernia and well-healed skin graft over bowel. The width of the graft is clearly too great to allow primary closure of the adjacent skin and subcutaneous tissues. He also has a large fascial defect, and if this is closed with prosthetic mesh, good skin closure over the mesh will be impossible. The shown defect will respond ideally to progressive expansion of bilateral crescenteric tissue expanders placed on either side of the central defect. The expanders are inserted on top of the abdominal wall fascia and completely underneath all of the skin and subcutaneous tissue lateral to the central graft and hernia. Over the course of several weeks to months, the expanders are filled with sterile saline via remote port. When they are deemed to be adequately expanded, they are removed in the operating room (OR), the central graft is excised, the hernia is repaired, and the skin flaps are advanced to the midline to adequately close the defect (see Figs. 13-2 and 13-5, p. 235).
2 Typical Fascial Defect Requiring Fascial Expansion
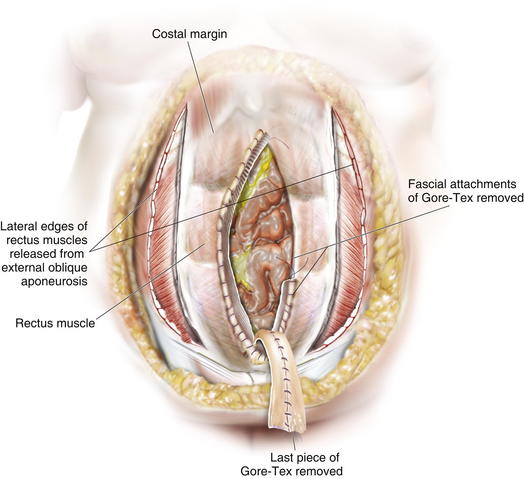
It is harder to define the typical fascial defect that will require or respond well to expansion via serial excision of prosthetic mesh. Frequently the type of procedure needed to close a fascial defect is not known until the hernia is dissected free during surgery, and the extent of the fascial loss or loss of domain is completely evaluated. In the patient shown in Fig. 13-1, B, on page 225, there is adequate skin coverage of the hernia, but there is a clearly massive hernia with obvious loss of abdominal domain. Approaches to the repair of this hernia include prosthetic or biologic mesh repair, separation of component parts repair, regional or free-flap reconstruction, or a combination of all three procedures. It is this author’s opinion that the best approach to abdominal wall reconstruction is to replace like with like and to return anatomic structures to their normal place. Thus, the ideal abdominal wall has innervated rectus abdominis muscles in the midline that contract during forced effort and help to maintain the integrity of the abdominal wall. To achieve this goal, the separation-of-parts procedure is ideal (see Chapter 8). Sometimes, however, the fascial defect is so large that the separation of parts is not sufficient. This is usually true if the defect exceeds 16 cm in width and the lateral abdominal wall is fixed and noncompliant. In this case the surgeon can attempt to bridge the defect with mesh (not an anatomic solution) or perform a staged procedure designed to gradually decrease the width of the fascial defect and reacquire abdominal domain. This multistage surgery involves three main components. The first is the initial operation where the hernia is dissected free, and the fascial defect is analyzed. At this time, a piece of nonadherent Gore-Tex mesh is sewn to the fascial edges completely bridging the defect under moderate tension. Ideally the skin is closed over the Gore-Tex and drains are placed. The second stage is a series of multiple operative trips to serially excise the central piece of Gore-Tex (usually no more than 4 cm in width). This process gradually pulls the rectus muscles and the fascia back to the midline. In the final operation, the last piece of Gore-Tex is removed, a separation of parts is performed, the closure is usually reinforced with mesh underlay or overlay, and the skin is closed on top (see Figs.13-7, p. 237; 13-8, p. 239; and 13-12, p. 243)
2 Tissue Expansion
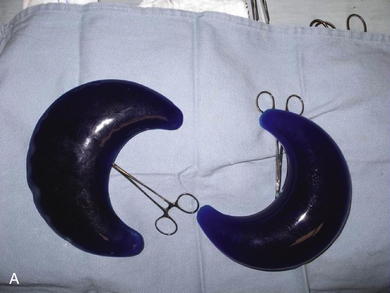
2 Choice of Tissue Expander Size, Shape, and Location
Fortunately today there are many options for tissue expansion. Multiple companies have premade expanders of all shapes and sizes and also have the ability to custom fabricate expanders of almost any desired dimensions. Most of the expanders come with remote ports, but several are also fitted with integrated ports. These ports are all composed of self-sealing silicone rubber backed by stainless steel and can be located by magnetic sensing devices placed over the skin. The length of the expander must match the length of the wound, and the height of the expander ideally should match the width (or when opposing symmetric expanders are placed, the height should match half the width). I prefer rectangular expanders for most defects except in the case of circular or elliptical defects where there is a large discrepancy in the width of the wound at the center versus either end. In those cases, a crescenteric expander is the ideal choice. Fill volume is not extremely important because the expanders are designed to tolerate overfilling by several times the official recommended volume. The placement location of the expander in the abdominal wall is not as complicated as it is in scalp expansion (for instance). In most instances, the expander or expanders will be adjacent to the long access of the defect. Care must be taken to visualize the final closure of the wound in order to properly place the expanders and subsequently close the defect with a minimum of disfiguring scars.
3 Operative Steps
1 Tissue Expansion and Closure of Abdominal Wall Skin
 Insertion of Tissue Expanders
After the abdominal wall has been analyzed and the expanders chosen and ordered, the first operation for insertion of the expanders is performed (Fig. 13-2, A-D and Fig. 13-3). The patient is asked to bathe with antimicrobial soap the night before the surgery (if practical). On the day of surgery, intravenous (IV) antibiotics are administered, and sequential compression devices are applied before induction. The wound should be prepped with alcohol and chlorhexidine because this provides the most effective antimicrobial barrier and the longest duration of action.
It is a natural instinct to place the incision for the expander at the edge of the wound to be closed. While this may work, it also subjects the incision to the forces of expansion and can lead to wound dehiscence and expander extrusion. I thus prefer to make a separate incision perpendicular and lateral to the long axis of the wound (see Fig. 13-2, A, and Fig. 13-3). The incision is subsequently incorporated into the final closure by acting as a release for the expanded flap. If this is deemed too impractical, then I recommend keeping the incision for the expander as small as possible to minimize the forces upon it. A pocket is dissected along the wound using a lighted retractor to visualize and create an appropriate space. The pocket lies completely under the skin and subcutaneous fat of the abdominal wall (including Scarpa fascia). It should rest on the anterior fascia of the rectus and external oblique (Fig. 13-2, A). Several authors have described placing the expanders under the anterior rectus and external oblique fascia to create an expanded fasciocutaneous flap. This has the advantages of maintaining excellent blood supply to the tissues and strength. It is a more complicated operation and should be approached with care, especially so as not to damage the rectus muscle.
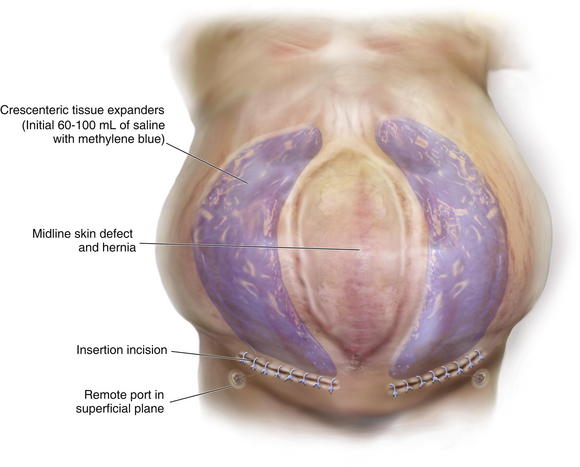
Once the pocket is made large enough to just fit the completely flat expander, it is irrigated with a triple antibiotic irrigation. I use 1 L of saline mixed with 1 g of cefazolin (Ancef), 80 mg of gentamicin, and 50,000 units of bacitracin. This mixture has a broad spectrum and minimal tissue toxicity. Excellent hemostasis must be achieved before the placement of the expander. The expander is then opened on the field and left in its plastic container. All gloves are changed, and fresh towels are applied around the wound. The abdominal wall is cleansed again with alcohol. The antibiotic solution is then added topically to the expander in its container, and the expander is lightly pressed to see if any air bubbles leak out (it comes prefilled with air). Depending on where the port is located (integrated or remote), the expander should then be accessed with a 23-gauge butterfly needle and all remaining air removed. Sixty to 100 mL of saline with methylene blue are then added to the expander to prevent distortion and allow it to lay flat (see Fig. 13-2, B). All remaining air (bubbles floating on the saline) is then removed from the expander. The expander is rolled into a tube and gently placed into the pocket with minimal contact with the outside skin. A finger that has been dipped in the antibiotic solution is then used to smooth the expander out and ensure that it completely fills the pocket and lays flat.
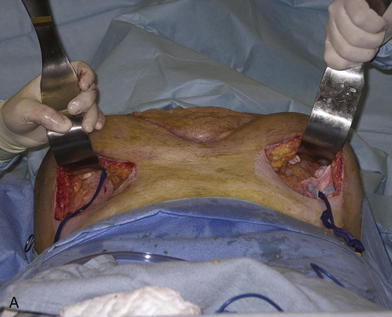
The patient shown in Figure 13-3 is lying prone with paired crescenteric tissue expanders inserted lateral to the midline abdominal skin defect and hernia. The insertion incisions are perpendicular to the long axis of the defect and will be incorporated into the final closure as back cuts used to help advance the skin flaps. If a remote port is being used, a tunnel and small pocket need to be created several inches away from the expander so that they can be easily accessed (see Fig. 13-3). It is very important not to kink the tubing and also to place the port in a relatively superficial plane (especially if the patient is obese). If the port is too deep, it may not be easily felt or accessed. If it is too close to the expander, then there is a risk of damaging the expander. If the tube is kinked, then the expansion is impossible and another procedure will need to be performed. The methylene blue is useful because sometimes a seroma forms around the expander and port. The blue ensures that the surgeon knows that he has indeed accessed the expander and not just the seroma cavity. I recommend a remote port in all obese patients because an integrated port may be difficult to locate through the thick tissue, even with the magnetic finder provided by the manufacturer. Although I do not like closed suction drains touching the expander, I also do not like seromas and feel that a drain is usually warranted for several days. I try to remove them as soon as possible and keep the patient on oral antibiotics for as long as the drains are in and then 48 hours after they are removed. The wound is closed with deep and superficial absorbable monofilament sutures, and Dermabond is applied. I then access the port and test it to make sure that it works. At that time, I may choose to inject more saline into the expander, depending on how tight the closure was. I like to use an abdominal binder to prevent tension on the wound for the first 7 to 10 days.
 Progressive Fill of Expanders
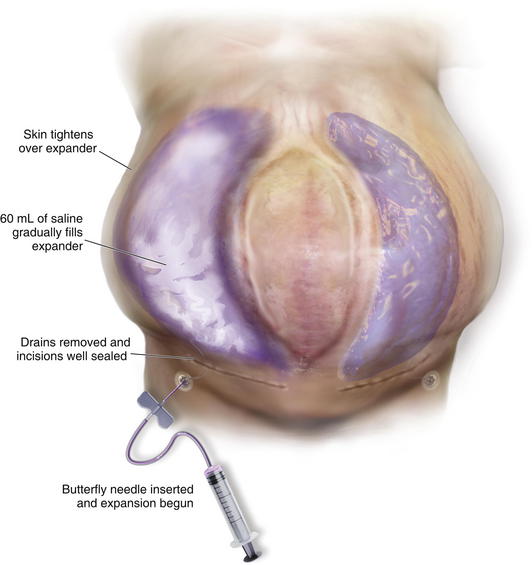
Two weeks after the initial operation, the drains should be out and the wound well sealed. I then begin inflation of the expander (or expanders as the case may be). The skin is prepped with alcohol, and a long butterfly needle is used to access the port. A 60-mL syringe filled with saline is attached to the needle, and the plunger is pulled back until methylene blue is seen in the butterfly needle tubing. I then feel confident to push the 60 mL of saline into the expander (Fig. 13-4). The amount to be injected varies by patient and size of expander. I like to feel the skin over the expander and also listen to the patient’s subjective report of tightness. It is always better to inject less than theoretically possible in order to minimize the risk of wound dehiscence or breakdown.
 Removal of Expanders and Closure of Skin Defect
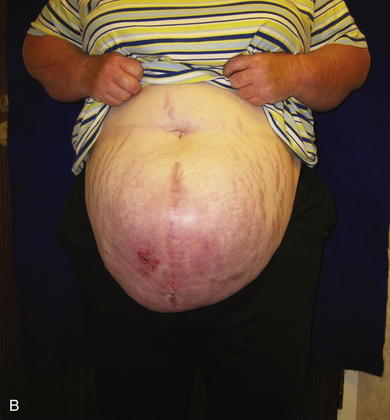
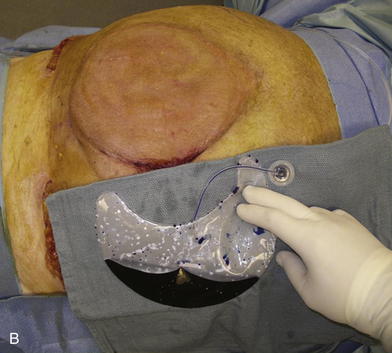
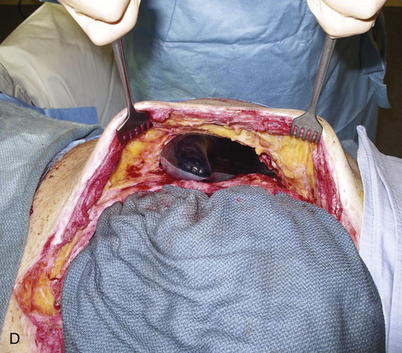
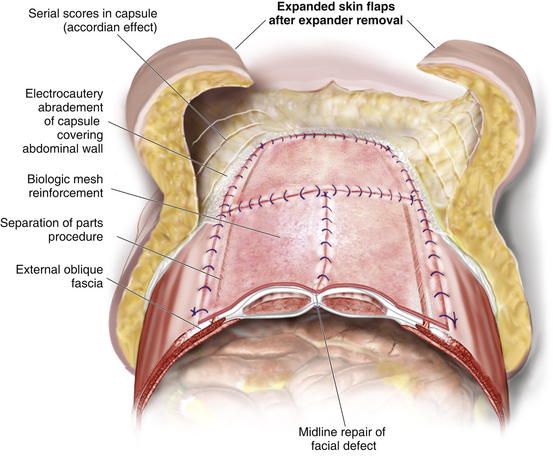
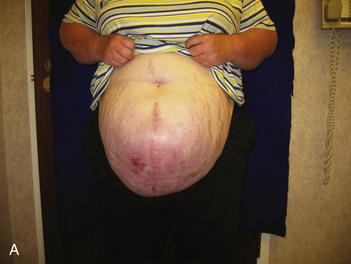
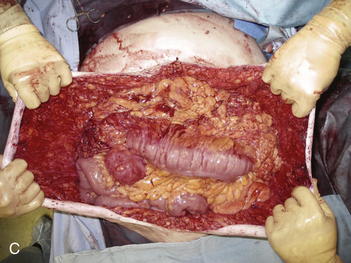
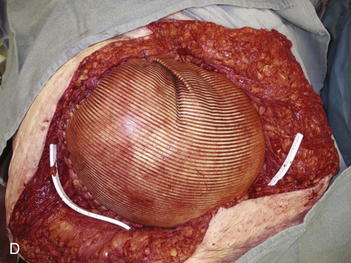
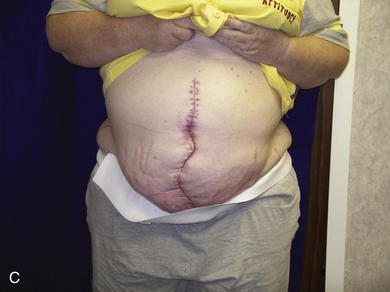
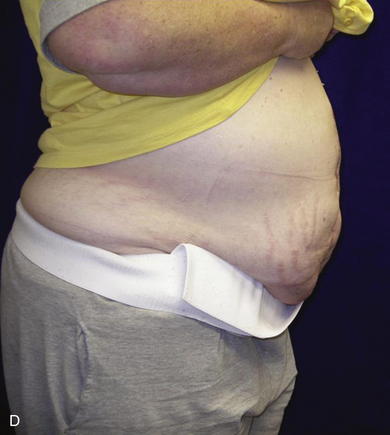
When the expanders have been inflated to their desired amount, the final operation is planned (see Fig. 13-2, C). The same antiseptic measures are taken, and then the wound is completely excised. In the example shown, the skin graft is removed from the bowels, and the intervening tissue between the tissue expanders and the defect is incised (see Fig. 13-2, D). The expanders and ports are removed (Fig. 13-5, A). This creates ready access to the lateral edge of the rectus muscle, facilitating a separation-of-parts procedure. After the fascial defect is closed and reinforced with biologic mesh (Fig. 13-5, B), the expanded skin and subcutaneous tissue are advanced to the midline (Fig. 13-6). The body forms a capsule around the tissue expander and this capsule contributes to the blood supply of the overlying skin. In general it is advisable to leave the capsule alone, but frequently the edges of the capsule and sometimes the skin need to be incised perpendicular to the line of the defect to allow easy advancement of the flap. The capsule also may be serially scored to create an accordion effect and allow flap advancement. The surface of the abdominal wall on which the tissue expander rests also is covered by capsule, and it is recommended to abrade this surface with electrocautery to generate adhesions between the abdominal wall and the overlying flap of skin and fat. This helps limit postoperative seromas. Drains are always placed and left in until total drainage is less than 30 mL/24 hours. An abdominal binder is placed, and the patient is advised to wear it at all times for 3 months (this is also to take tension off of the hernia repair). The patient in Figure 13-5 is shown at 3 months with good reduction of the hernia and closure of the skin defect (see Fig. 13-5, C and D).


4 Pearls/Pitfalls
1 Managing the Infected or Extruded Tissue Expander
If the expansion is almost complete and the skin breaks down to reveal the expander, I place the patient on antibiotics; have them apply topical mafenide acetate (Sulfamylon), a powerful topical antimicrobial, to the wound; and plan to electively take them to the OR for expander removal and definitive closure of the defect. If the expander becomes infected, I perform the same procedure but take them to the OR as soon as possible.
5 Fascial Expansion
1 Indication and Analysis of Fascial Defect
As mentioned previously, it is difficult in some cases to determine preoperatively whether a patient will require serial excision of mesh to facilitate closure of the fascial defect. In some patients the defect is so large, the need is obvious (see Fig. 13-1, B and Fig. 13-7, A and B). As outlined in Chapter 8, the best method of closure of large fascial defects is the separation of component parts of the abdomen with biologic or prosthetic mesh reinforcement. At the time of the initial take down of the hernia, the decision is made as to whether to proceed with definitive repair or to stage the repair. It is important not to perform the separation of parts until the final procedure. The patient should be informed preoperatively and give consent to any and all staged procedures necessary to close the fascial defect.
I find that the best response to reverse fascial expansion is in patients who have had midline incisions with loss of abdominal domain. Patients who have lost fascia and or parts of the rectus abdominis musculature due to trauma, infection, or cancer have less of a response to the expansion. Additionally, the fascial closure is less secure, and the risk of recurrence is greater because the paired innervated rectus muscles are not symmetric and in the midline. If one rectus is gone, then it is the edge of the external and internal obliques that are being pulled to the midline. While it is possible to do this, the muscles are not oriented in the same direction as the opposing rectus, and the forces working to pull the fascial repair apart are greater.
2 Fascial Expansion and Closure of Abdominal Wall Midline Defect
 Once the decision to perform serial closure of the fascia is made, the defect is carefully measured and photographed. The hernia is completely separated from the overlying abdominal wall, and a large sheet of Gore-Tex Dual mesh (WL Gore and Associates, Flagstaff, AZ) is sewn under moderate tension to the edges of the defect (see Fig. 13-7, C and D). Ideally the skin is viable and healthy enough to close over the Gore-Tex. If the skin is of poor quality, then the Gore-Tex can be covered by a VAC (vacuum-assisted closure) (see accompanying video). In this case the skin and the fascia must be advanced together, and the risk of skin necrosis and wound dehiscence is much higher. One way to approach this is to begin to undermine the skin edges at the level of the fascia during each subsequent operation with the ultimate goal of elevating it beyond the lateral edge of the rectus muscles. This is necessary anyway to perform the final separation-of-parts repair. Care should be taken to identify rectus perforators to the skin and preserve them as much as possible. This gradual process of elevating the skin acts to “delay” the skin flap, meaning that the ultimate blood supply is augmented by virtue of the body’s response to mild ischemia. This technique is tricky to perform, and it is easy to develop skin edge necrosis by going too fast.
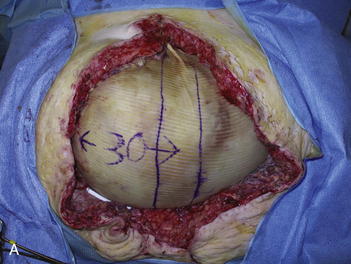
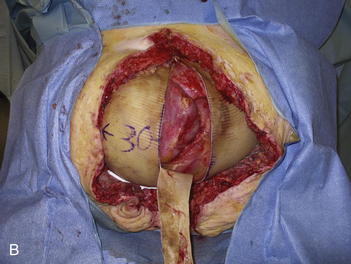
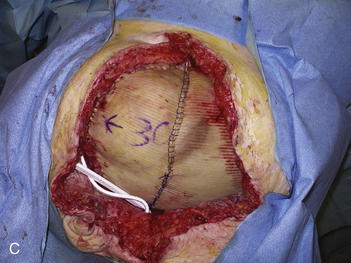
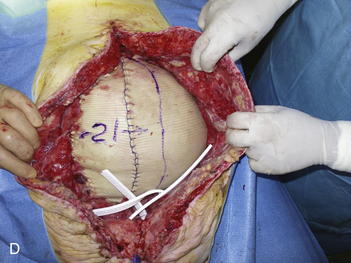
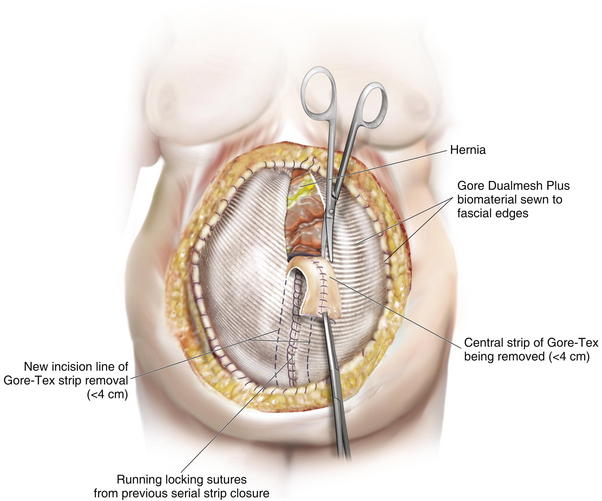
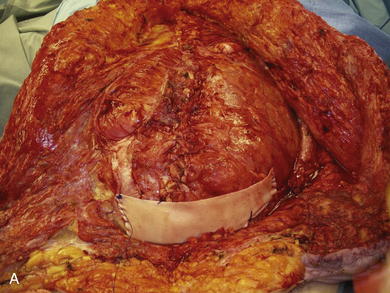
The second phase of the surgery involves the serial excision of the Gore-Tex in the midline with moderate to tight closure. The patient is brought to the OR and the skin is opened (or VAC removed, as the case may be). The Gore-Tex is assessed for tightness, and a pinch test is performed in the midline with the patient paralyzed (see video). Unless the closure was very loose at the initial operation, I do not recommend removing more than a 4-cm wide strip of central Gore-Tex. The two edges of the cut Gore-Tex are then sewn together with a running locking permanent suture, such as a #1 Prolene. The skin is then closed securely with deep stitches and superficial staples (drains are always placed), and a binder is applied. One trick I sometimes perform is to take a large adhesive, occlusive sheet and use it to take tension off of the skin closure. This is done by applying the adhesive sheet to the lateral aspect of one side of the abdomen, manually pushing the skin towards the midline, and then draping the sheet over the incision to the other side of the abdomen. The patient in Figure 13-8 has been taken back to the OR for serial excision of the Gore-Tex mesh. Figure 13-8, A shows the patient just before her first excision with a measured 30-cm fascial defect. In Figure 13-8, B, a midline 4-cm strip of Gore-Tex is being removed. The cut ends of the Gore-Tex are reapproximated with a running locking suture (C). Figure 13-8, D shows the patient now with a 21-cm wide defect, having undergone another excision of Gore-Tex. The excisions will proceed until the width of the Gore-Tex is no greater than 4 to 6 cm. Figure 13-9 shows the patient’s abdomen with the patient supine. The Gore-Tex mesh has been placed previously and a central strip of Gore-Tex is being removed to allow reduction of the width of the mesh with gradual stretching of the fascia and rectus muscles back to the midline of the abdomen.
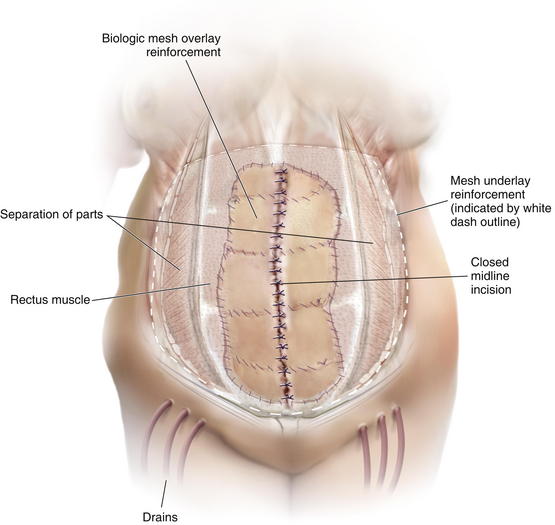
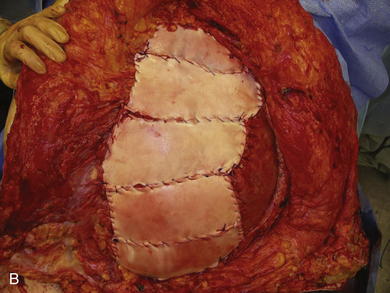
Once the Gore-Tex is down to its last few centimeters, the final operation is planned. The final strip of Gore-Tex is removed, and the bowel is separated from the lateral abdominal wall (Fig. 13-10). You will find that there is a capsule over the bowel where the Gore-Tex was in contact with it. Under the lateral edge of the abdominal wall there is no capsule and the bowel should be freed completely. It is important to break down adhesions on the lateral abdominal wall at each stage of the procedure to prevent fusion of the visceral block to the abdominal wall which will prevent medialization during final reconstruction. A separation of parts is performed, and then an underlay of mesh is placed. The fascial closure can even be further reinforced with an overlay of biologic mesh (Fig. 13-11). Figure 13-12, A on page 243 depicts the final operation in which the remaining Gore-Tex is removed, a separation of component parts is performed, and the fascia is closed. The first sheet of biologic mesh has been laid across the repair, and the entire fascial repair has been reinforced by biologic mesh in Fig. 13-12, B, p. 243. In Figure 13-12, C and D, on page 243, the patient is shown 3 weeks after the completion of her repair.
Drains should be placed and left in for a long time to prevent seroma and subsequent infection. An abdominal binder is placed, and the patient is advised to wear it at all times for 3 months or longer.
6 Pearls/Pitfalls
2 Preventing Skin Necrosis in the Final Abdominal Wall Closure
The separation-of-parts procedure can result in skin necrosis if the skin and subcutaneous tissue are elevated completely off of the fascia beyond the lateral edge of the rectus muscles. Perforators to the skin cluster around the umbilicus but extend along the entire length of the rectus muscles. There are medial and lateral row perforators. Not all need to be preserved. I try to preserve two to three lateral row perforators on each side. This is done by identifying one and using a Kelly clamp to dissect it free with a large cuff of subcutaneous tissue. The other perforators will be in roughly the same line as the first one. Even one perforator can make a huge difference and prevent skin flap necrosis. This is important, especially in the case of a tight skin closure. Exposure of the midline closure and mesh can seriously compromise all of the previous efforts.
Argenta L.C., Austad E.D. Principles and techniques of tissue expansion. In: McCarthy J.G., editor. Plastic Surgery. W.B. Saunders Co; 1990:475-507.
Carlson G.W., Elwood E., Losken A., Galloway J.R. The role of tissue expansion in abdominal wall reconstruction. Ann Plas Surg. 2000;44:147.
Hobar P.C., Rohrich R.J., Byrd S. Abdominal wall reconstruction with expanded musculofascial tissue in a posttraumatic defect. Plas Recon Surg. 1994;94(2):379-383.
Jacobsen W.W., Petty P.M., Bite U., Johnson C. Massive abdominal-wall hernia reconstruction with expanded external/internal oblique and transversalis musculofascia. Plas Recon Surg. 1997;100(2):326-335.
Lipman J., Medalie D.A., Rosen M.J. Staged repair of massive incisional hernias with loss of abdominal domain: a novel approach. Am J Surg. 2008;195(1):84-88.
Mander E.K. Reconstruction using soft tissue expansion. In: Cohen M., editor. Mastery of plastic and reconstructive surgery. ed1. Little, Brown and Co; 1994:201-215.
Paletta C.E., Huang D.B., Dehghan K., Kelly C. The use of tissue expanders in staged abdominal wall reconstruction. Ann Plas Surg. 1999;42:259.
[/level-membership-for-surgery-category][not-level-membership-for-surgery-category]
Chapter 13 Tissue and Fascial Expansion of the Abdominal Wall
1 Introduction and Clinical Description
The abdomen lends itself to tissue expansion in patients of all ages and a multitude of clinical problems. Both congenital and acute defects of the abdominal wall can be addressed by the sequential expansion of adjacent tissues. These include the treatment of giant congenital nevi, tumors, burn scar contracture, posttraumatic defects, and loss of skin and fascial domain following previous surgery or injury. This chapter addresses the treatment of skin and sub-cutaneous tissue defects of the abdominal wall by utilizing prosthetic tissue expanders to both create new tissue and recruit tissue from healthy adjoining areas. It also discusses fascial expansion of the abdominal wall by the process of serial excision of a fixed prosthetic mesh. Because the anatomy of the abdominal wall is described elsewhere in this book, it is not repeated here.
1 Typical Skin Defect Requiring Tissue Expansion
The typical defect that lends itself to repair via the insertion of tissue expanders is a well-defined defect that is well healed and stable (Fig. 13-1, A). Areas that have been irradiated or subject to diffuse trauma, such as burns and subsequent grafting and scar contracture, are less amenable to expansion. Open wounds or chronically draining wounds are also fraught with problems because of the high incidence of infection and subsequent extrusion of the expander. If a tumor is to be removed, there must be absolute certainty that the tumor is not contiguous with the tissue expanded pocket. In Fig. 13-1, A, a patient is shown with a large midline abdominal hernia and well-healed skin graft over bowel. The width of the graft is clearly too great to allow primary closure of the adjacent skin and subcutaneous tissues. He also has a large fascial defect, and if this is closed with prosthetic mesh, good skin closure over the mesh will be impossible. The shown defect will respond ideally to progressive expansion of bilateral crescenteric tissue expanders placed on either side of the central defect. The expanders are inserted on top of the abdominal wall fascia and completely underneath all of the skin and subcutaneous tissue lateral to the central graft and hernia. Over the course of several weeks to months, the expanders are filled with sterile saline via remote port. When they are deemed to be adequately expanded, they are removed in the operating room (OR), the central graft is excised, the hernia is repaired, and the skin flaps are advanced to the midline to adequately close the defect (see Figs. 13-2 and 13-5, p. 235).
2 Typical Fascial Defect Requiring Fascial Expansion
It is harder to define the typical fascial defect that will require or respond well to expansion via serial excision of prosthetic mesh. Frequently the type of procedure needed to close a fascial defect is not known until the hernia is dissected free during surgery, and the extent of the fascial loss or loss of domain is completely evaluated. In the patient shown in Fig. 13-1, B, on page 225, there is adequate skin coverage of the hernia, but there is a clearly massive hernia with obvious loss of abdominal domain. Approaches to the repair of this hernia include prosthetic or biologic mesh repair, separation of component parts repair, regional or free-flap reconstruction, or a combination of all three procedures. It is this author’s opinion that the best approach to abdominal wall reconstruction is to replace like with like and to return anatomic structures to their normal place. Thus, the ideal abdominal wall has innervated rectus abdominis muscles in the midline that contract during forced effort and help to maintain the integrity of the abdominal wall. To achieve this goal, the separation-of-parts procedure is ideal (see Chapter 8). Sometimes, however, the fascial defect is so large that the separation of parts is not sufficient. This is usually true if the defect exceeds 16 cm in width and the lateral abdominal wall is fixed and noncompliant. In this case the surgeon can attempt to bridge the defect with mesh (not an anatomic solution) or perform a staged procedure designed to gradually decrease the width of the fascial defect and reacquire abdominal domain. This multistage surgery involves three main components. The first is the initial operation where the hernia is dissected free, and the fascial defect is analyzed. At this time, a piece of nonadherent Gore-Tex mesh is sewn to the fascial edges completely bridging the defect under moderate tension. Ideally the skin is closed over the Gore-Tex and drains are placed. The second stage is a series of multiple operative trips to serially excise the central piece of Gore-Tex (usually no more than 4 cm in width). This process gradually pulls the rectus muscles and the fascia back to the midline. In the final operation, the last piece of Gore-Tex is removed, a separation of parts is performed, the closure is usually reinforced with mesh underlay or overlay, and the skin is closed on top (see Figs.13-7, p. 237; 13-8, p. 239; and 13-12, p. 243)
2 Tissue Expansion
2 Choice of Tissue Expander Size, Shape, and Location
Fortunately today there are many options for tissue expansion. Multiple companies have premade expanders of all shapes and sizes and also have the ability to custom fabricate expanders of almost any desired dimensions. Most of the expanders come with remote ports, but several are also fitted with integrated ports. These ports are all composed of self-sealing silicone rubber backed by stainless steel and can be located by magnetic sensing devices placed over the skin. The length of the expander must match the length of the wound, and the height of the expander ideally should match the width (or when opposing symmetric expanders are placed, the height should match half the width). I prefer rectangular expanders for most defects except in the case of circular or elliptical defects where there is a large discrepancy in the width of the wound at the center versus either end. In those cases, a crescenteric expander is the ideal choice. Fill volume is not extremely important because the expanders are designed to tolerate overfilling by several times the official recommended volume. The placement location of the expander in the abdominal wall is not as complicated as it is in scalp expansion (for instance). In most instances, the expander or expanders will be adjacent to the long access of the defect. Care must be taken to visualize the final closure of the wound in order to properly place the expanders and subsequently close the defect with a minimum of disfiguring scars.
3 Operative Steps
1 Tissue Expansion and Closure of Abdominal Wall Skin
Insertion of Tissue Expanders
After the abdominal wall has been analyzed and the expanders chosen and ordered, the first operation for insertion of the expanders is performed (Fig. 13-2, A-D and Fig. 13-3). The patient is asked to bathe with antimicrobial soap the night before the surgery (if practical). On the day of surgery, intravenous (IV) antibiotics are administered, and sequential compression devices are applied before induction. The wound should be prepped with alcohol and chlorhexidine because this provides the most effective antimicrobial barrier and the longest duration of action.
It is a natural instinct to place the incision for the expander at the edge of the wound to be closed. While this may work, it also subjects the incision to the forces of expansion and can lead to wound dehiscence and expander extrusion. I thus prefer to make a separate incision perpendicular and lateral to the long axis of the wound (see Fig. 13-2, A, and Fig. 13-3
[/not-level-membership-for-surgery-category]
