[level-membership-for-orthopaedics-category]
CHAPTER 18 Thoracic Spine
Surgical Approaches
Anatomy of Anterior Cervicothoracic Spine
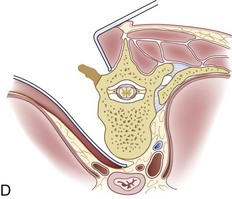
The cervicothoracic junction corresponds to the area just superior to the mediastinum and extends into the sternum and T4-5 intervertebral discs. The left brachiocephalic vein, formed by the confluence of the left internal jugular and subclavian veins, lies immediately posterior to the upper sternum. The thymus gland lies just anterior to this structure. The left and right brachiocephalic veins combine to form the superior vena cava at the right first intercostal space. The superior vena cava enters the left atrium posterior to the third costal cartilage. The vagus and phrenic nerves lie anterior to the arch of aorta (Fig. 18–1). The recurrent laryngeal nerve branches off the vagus nerve between T1 and T3 on the left side and reliably loops around the aorta to ascend into the tracheoesophageal groove. The right recurrent laryngeal nerve branches off the vagus nerve in the upper cervical region and loops around the right subclavian artery. On this side, it may also leave the carotid sheath at a higher level and course anteriorly behind the thyroid before entering the groove.
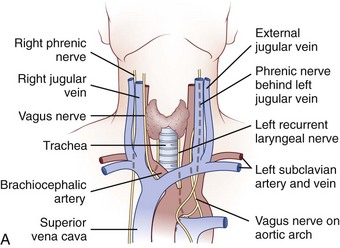
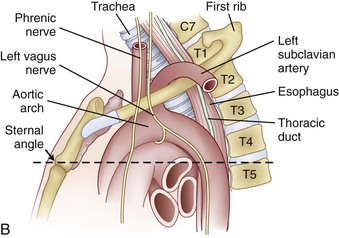
FIGURE 18–1 A, Anteroposterior view of cervicothoracic junction. B, Lateral view of cervicothoracic junction.
Injury to the recurrent laryngeal nerve may occur with indiscriminant dissection to the cervicothoracic junction. C5-T1 levels are especially vulnerable. Controversy exists regarding which approach (left-sided vs. right-sided) minimizes the risk of injury to the recurrent laryngeal nerve. Tew and Mayfield1 described the asymmetry between the right and left laryngeal nerves and described the anatomic loop of the nerve around the aortic arch on the left side as longer, more predictable, and more protected than the right-sided nerve. These authors believed that the anatomic loop on the left side rendered the recurrent laryngeal nerve less susceptible to contusion and stretch injury when a left-sided surgical approach was used. Other authors have reported that there is no statistical difference between the rate of injury and the side of the surgical approach.2 It is acknowledged that injury to this structure can cause mild dysphagia and dysphonia. The reported incidence of dysphagia after anterior surgery ranges from 28% to 57%, and the incidence of dysphonia is 2% to 30%.3
Surgical Approaches to Anterior Spine
Cervicothoracic Junction
Low Anterior Cervical and High Transsternal Approach
Indications for the anterior cervicothoracic approach include the following:
Operative Procedure
The patient is positioned supine on the operating table after general endotracheal anesthesia has been instituted. The arms should be tucked at the side, and the hands and wrist should be checked to ensure that they are positioned without undue pressure. Typically, a towel roll or other bolster is placed between the scapulae. This towel roll allows the head to be placed in a slight amount of extension and the shoulders to lie slightly extended at the side for adequate exposure of the junction. The head should also be turned either slightly right or slightly left depending on the surgeon’s preferred approach. A left-sided approach to a virgin neck is preferable because the laryngeal nerve has a more reliable course into the tracheoesophageal groove on this side.4,5
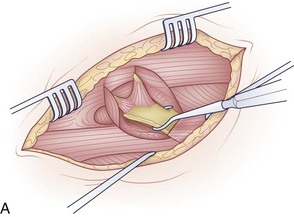
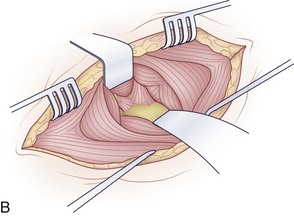
The surgical incision is typically made from the left anterior border of the sternocleidomastoid muscle to the notch and can be continued distally along the middle of the manubrium (Fig. 18–2A). The first portion of the approach is an extension of the standard Smith-Robinson approach. Other authors have described a transverse incision that parallels the medial half of the clavicle. The vertical extension of the incision depends on the overall exposure required by the treating surgeon. If exposure from C7 to T4 is needed in its entirety, the vertical portion of the incision is made with the distal portion terminating just distal to the suprasternal notch. The extent of the incision is typically to the third costal cartilage.
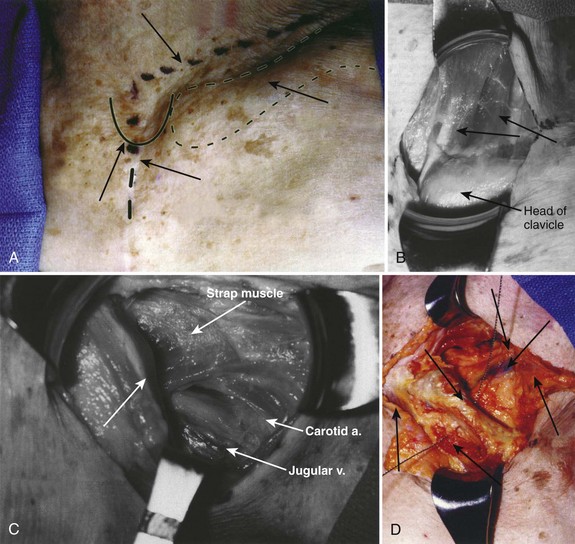
After marking the incision, a No. 10 blade scalpel is used to incise down to the subcutaneous layer. Dissection is done through the platysma, creating flaps on either side for easier closure at the end of the case. Care should be taken not to injure the jugular veins, but they may be sacrificed if further exposure is needed. The strap muscles including the sternocleidomastoid are identified as they insert into the clavicle (Fig. 18–2B and C). Next, the clavicular and manubrial insertions of the sternocleidomastoid muscle are elevated subperiosteally proximally and laterally. The remaining strap muscles should be elevated in a similar manner and taken medially.
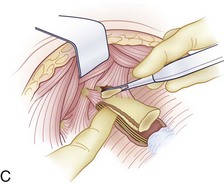
When visualized, subperiosteal stripping of the medial third of the clavicle and ipsilateral half of the manubrium should be performed. This stripping exposes the osseous structures for distal exposure to the lower cervical thoracic junction. The clavicle can be sectioned at the middle to medial third junction with an oscillating saw or osteotome (Fig. 18–2D). Care should be taken not to injure the underlying subclavian vein that is in close proximity. When freed laterally, the clavicle can be disarticulated from the manubrium providing exposure to the proximal cervicothoracic junction.
For a more extensive distal exposure, an alternative to clavicular resection and disarticulation involves a sternum-splitting approach. After performing the proximal incision, the skin incision can be extended further distally for added exposure (see Fig. 18–2A). Next, the sternocleidomastoid and strap muscles are dissected subperiosteally from the manubrium and sternum to expose the midline to the anticipated level desired. One is usually able to use this dissection to visualize down to the T4 vertebral level. The manubrium is split longitudinally in the midline with an oscillating or Gigli saw and retracted with self-retaining retractors. Care should be taken not to injure the structures in the retropleural fascia with the saw. This area is protected by dissecting the thymus and surrounding fat from behind the manubrium. Also, care should be taken to avoid injuring the thoracic duct because it ascends to the left of the esophagus from the level of T4 to its junction with the left internal jugular and subclavian veins. A Kerrison rongeur can be used to complete the osteotomy on the posterior aspect of the manubrium. The innominate vein and inferior thyroid vein may also be encountered and can be ligated if necessary for exposure.
Finally, closure should be performed in a stepwise manner.6 If a sternal split was performed, wiring of the sternum and manubrium should be employed to reapproximate the two halves. If the clavicle is disarticulated, it should be reintroduced and fixed into place. Next, strap muscles should be repaired with absorbable sutures, and the sternocleidomastoid should be reattached to its insertion in a similar manner. The platysma can be reapproximated with running or interrupted absorbable sutures, and a suction drain can be placed just underneath this muscle before its closure.
Key Points
Transthoracic (Third Rib Resection)
Disadvantages to using this approach include the need to mobilize the scapula and violation of chest wall muscles during dissection. This approach also requires violating the pleural space and necessitates placement of a chest tube at the end of the procedure.7
The indication for the transthoracic approach is as follows:
Operative Procedure
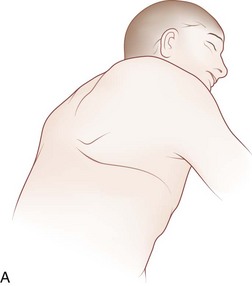
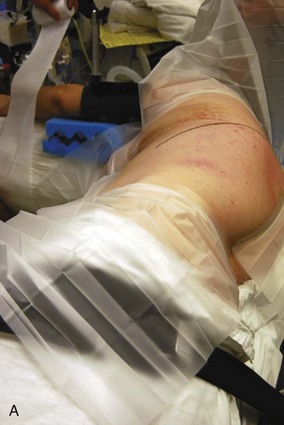
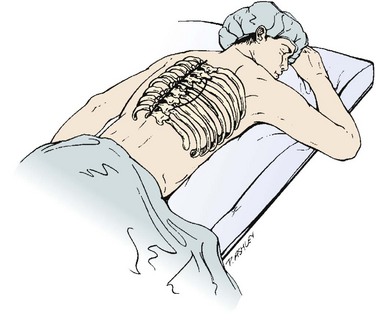
Before positioning the patient, it is recommended that a double-lumen endotracheal tube with lung isolation be used.8 The patient is placed in the lateral decubitus position with the desired operative side up (Fig. 18–3A). Positioning the patient in this manner can be accomplished using a deflatable beanbag or foam-type bolster. The surgeon should ensure that all bony prominences are well padded. A soft roll is placed just distal to the axilla to prevent pressure on the brachial plexus. The arms are abducted, and the elbows and knees are slightly flexed in a position of comfort. The ipsilateral arm may be positioned comfortably by keeping it abducted on stacked pillows or blankets just under the arm and forearm. The surgeon should ensure that the head is also positioned comfortably and that no undue stress is placed on the head-neck junction. Preparation and draping is done in the usual sterile fashion from the shoulder to just above the iliac crest and from below the mid-spine posteriorly to below the umbilicus anteriorly.
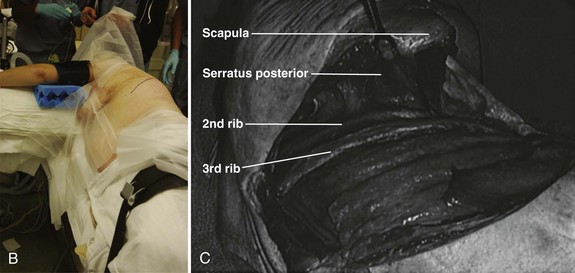
The incision is drawn from the T1 spinous process, following the curvature of the medial-to-inferior border of the scapula. The incision is continued anteriorly along the seventh rib and ends on the costal cartilage of the third rib. This same trajectory is followed by incising through skin and subcutaneous tissue with a No. 10 blade knife. Next, the muscles of the trapezius and latissimus dorsi are identified and divided in a layered fashion with electrocautery. Any bleeders that are encountered in the muscle during this approach are cauterized. Rarely, the rhomboid major and serratus posterior also need to be divided in a similar manner.7 As the muscle layers are divided further, using a retractor, the scapula is retracted proximally; doing this makes it easier to cut the muscles.
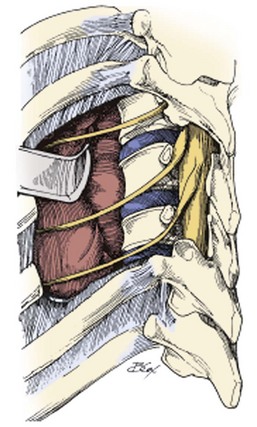
When exposure of the chest wall is accomplished, the surgeon counts down the ribs to the operative level. The second rib is often the highest easily palpated rib, and the first rib is situated inside the second (Fig. 18–3B). At this stage, the lung on the operative side can be selectively deflated. When the operative level (the third rib in this case) has been confirmed and the lung has been deflated, the intercostal muscles are stripped off of the rib extraperiosteally using a periosteal elevator. A Doyen rib elevator is an excellent dissection tool to strip the muscle circumferentially from the rib while preserving the underlying intercostal nerve and vessels. When exposed, the rib can be resected using a rib cutter. The rib is cut as far posterolaterally and anteromedially as possible. This rib can be used as bone graft if desired. The remaining rib bed can be transected, and the pleural cavity can be entered; this can be done safely with the lung selectively deflated on this side. A chest spreader can be used to provide retraction for entry into the chest cavity. A second spreader can be placed at a right angle in the surrounding soft tissue to allow for maximal exposure. The lung can be protected further with a malleable retractor shielded with a sponge.
With the lung deflated, the spine can be visualized at the base of the incision. At this time, it is important to identify clearly the neurovascular structures in the area. The aorta, the spine, parietal pleura, veins, and sympathetic plexus should be recognized. The parietal pleura is incised over the desired disc space with atraumatic pickups and Metzenbaum scissors in a longitudinal fashion with the spine. This area is typically relatively avascular and a safer plane for initial dissection than the vertebral body (Fig. 18–3C). When the vertebral body is exposed, the intercostal arteries and veins are visualized, ligated, and cut appropriately. Further exposure of the adjacent vertebral bodies and intervertebral discs can be obtained by extending the incision of the pleura proximally or distally or both, but with each level, ligature of the intercostal artery and vein may be required.
Key Points
Thoracic Spine
Thoracotomy
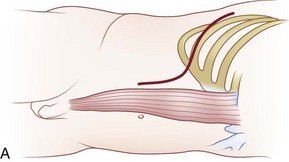
A traditional thoracotomy provides access to the anterior spine from T6 to T12. In addition to these levels, further manipulation of the thoracolumbar junction of T12-L1 can be performed if the diaphragm is taken down. Access to T4 and T5 can also be accomplished, but one frequently has to elevate the scapula to do so.7 The thoracotomy provides a versatile tool for exposure of much of the thoracic spine for manipulation and instrumentation.
The indication for thoracotomy is as follows:
Operative Procedure
A double-lumen endotracheal tube with lung isolation is used.8 The patient is placed in the lateral decubitus position with the desired operative side up. Approaching from the left side may require one to manipulate the aorta and segmental vessels on the left. When possible, a right-sided approach allows more spinal surface area exposure from behind the azygos vein than behind the aorta. Exposure from T10 to T12 is more easily accomplished from the left, however, because the liver causes the diaphragm to ride higher on the right; limiting the visibility of the spine on this side.
Selective positioning can be accomplished by using a deflatable beanbag or foam-type bolster placed underneath the patient’s right torso. The surgeon should ensure that all bony prominences are well padded. An intravenous fluid bag or other soft roll can be placed just distal to the axilla to prevent pressure on the brachial plexus. The arms are abducted and the elbows are slightly flexed in a position of comfort using blankets or pillows to hold them in position (Fig. 18–4A). The hip and knee nearest the bed are slightly flexed, and the contralateral extremity is allowed to remain more extended and slightly adducted. The weight of the contralateral leg helps open the rib interspace when exposure is accomplished. The surgeon also should ensure that the head is positioned comfortably in a neutral position.
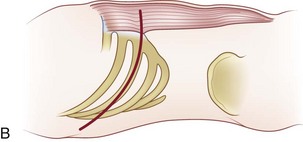
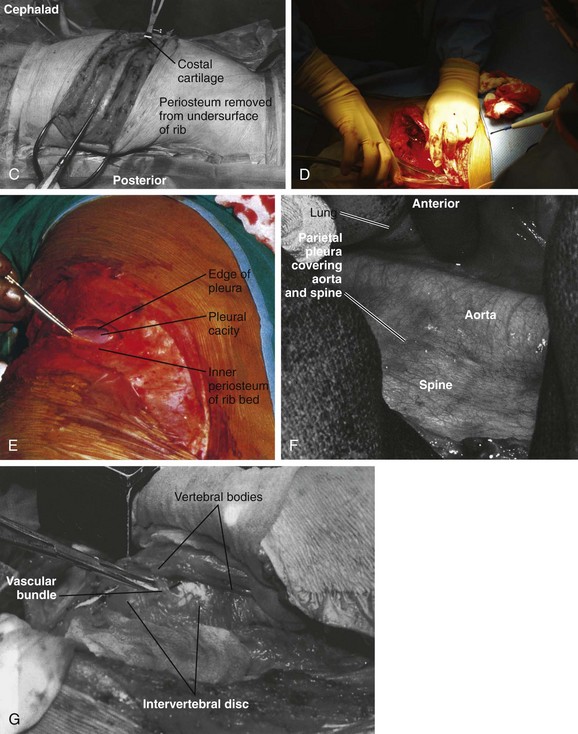
To localize the operative level, a fluoroscopic image can be obtained preoperatively before the incision. Otherwise, the desired rib level can be confirmed by counting the ribs by palpating from proximal to distal. One may also count from the 12th rib proximally. Typically, the numbered rib that is resected is considered to be two levels above the expected working area because of the oblique orientation of the ribs. When the numbered rib is identified, the incision is drawn from the posterior angle of the corresponding rib following its curvature anteriorly (Fig. 18–4B). The incision should be made through skin and subcutaneous tissue with a No. 10 blade knife. The incision is deepened with electrocautery, and any bleeders that are encountered are coagulated. Care should be taken not to injure the neurovascular bundle that runs on the undersurface of the rib.
Next, the muscles of the latissimus dorsi are identified and divided in a layered fashion in line with the incision and overlying the rib with the electrocautery. It should not be necessary to separate this muscle from the surrounding tissue. A portion of the posterior margin of the serratus anterior lies on the undersurface of the latissimus and may be divided. As the muscle is divided anteriorly, any bleeders that are encountered are cauterized. When the superficial surface of the rib is exposed, the intercostal muscles are separated from the periosteum with a periosteal elevator, such as an Alexander-Farabeuf periosteotome. Also, the undersurface of tissue is released from the rib; this can be done circumferentially with a Doyen dissector (Fig. 18–4C). Dissection should be far posteriorly and anteriorly for adequate exposure. Next, a rib cutter is used to cut the rib anteriorly at the costal junction and posteriorly at the costotransverse junction for sufficient surgical access (Fig. 18–4D). This rib can be used as bone graft if desired. The cut edges are smoothed with a rasp, and bone wax is applied if active bleeding is present.
The ipsilateral lung is selectively deflated, and the pleural cavity is entered with a pickup and Metzenbaum scissors (Fig. 18–4E). A rib spreader can be used to provide retraction for entry into the chest cavity. A second spreader can be placed at a right angle in the surrounding soft tissue to allow for maximal exposure. The lung can be protected further with a malleable retractor shielded with a sponge.
With the lung deflated, the spine can be clearly visualized. The neurovascular structures in the area are identified (Fig. 18–4F). The parietal pleura is incised over the desired disc space with atraumatic pickups and Metzenbaum scissors in a longitudinal fashion, and the pleura is retracted laterally. Care should be taken not to injure the segmental vessels, which may bleed incessantly if not tied or clipped in a controlled fashion. The vessels close to the middle of the vertebral body are dissected and ligated, and the arteries are clamped away from the aorta. If the segmental arteries are tied too close to the aorta, the tie can loosen, and bleeding can resume. A right-angle clamp is used to free the vessel, and a 2-0 tie is passed around the vessel (Fig. 18–4G). Further exposure of the adjacent vertebral bodies and intervertebral discs can be obtained by extending the incision of the pleura proximally or distally or both, but with each level ligature of the segmental vessels may be required. With adequate exposure, the disc interspace and pedicle can be identified by following the head of the rib to its base. The disc is the more prominent, white, soft structure flanking the larger recessed vertebral bodies.
Thoracolumbar Junction
Exposure of the thoracolumbar spine may be necessary to gain access to T10-L2 of the spine. The key to this approach is exposure and partial mobilization of the diaphragm and entry into the thorax and retroperitoneum.9
Indications for approaching the thoracolumbar junction include the following:
Anatomy of Thoracolumbar Junction
The thoracolumbar junction constitutes the lower three thoracic and upper two lumbar vertebrae. This region is a transition zone from a stiffer and less mobile kyphotic thoracic spine to a more mobile, lordotic lumbar spine. It is this characteristic that lends this region to a higher incidence of trauma.10
Operative Procedure
Either a left-sided or a right-sided surgical approach can be undertaken; a left-sided dissection is preferred. A left-sided approach avoids being obscured by the liver or having to mobilize the vena cava. If injured, the vena cava can bleed profusely, and the thin-walled vessel can often be difficult to suture. A right-sided approach may be necessary, however, to treat some pathology or may be the required approach in accessing the convexity in a scoliotic spine.11
The operative level is reconfirmed with a fluoroscopic image before incision. The desired rib level also can be isolated by counting the ribs; this can be accomplished by counting from the 12th rib proximally. The incision is typically made at the 9th, 10th, or 11th rib depending on the operative level and amount of exposure required (Fig. 18–5A). After the site of the incision is identified, the surgeon draws the incision from the posterior angle of the corresponding rib, following its curvature anteriorly and ending distally to the level just lateral of the pubic symphysis if needed. The curvilinear incision allows for exposure of the distal thoracic and lumbar spine. The incision should be made through skin with a No. 10 blade knife and deepened with the electrocautery. Any bleeders are coagulated as they are encountered. Care is taken not to injure the neurovascular bundle that runs on the undersurface of the rib during its exposure.
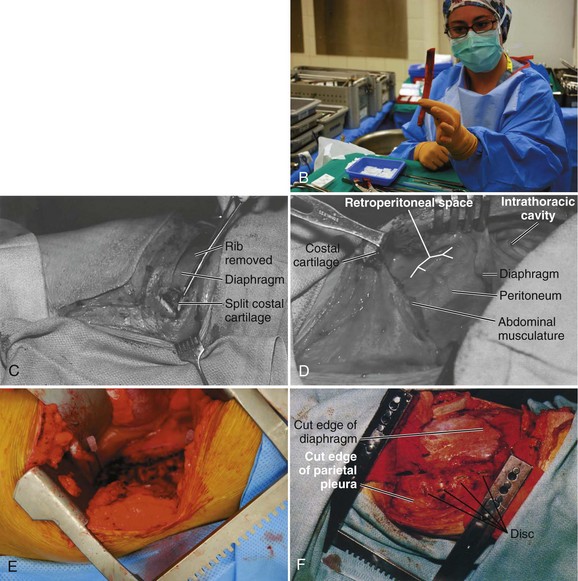
Next, the muscles of the latissimus dorsi and the external oblique muscle are identified and divided above the desired rib in a layered fashion with the electrocautery. As the muscle is divided anteriorly, any bleeders that are encountered are cauterized. The superficial surface of the rib is exposed to the costal cartilage, and the intercostal muscles are separated from the periosteum with a periosteal elevator. The release can also be performed with a Doyen dissector. Dissection should occur far posteriorly and anteriorly for adequate exposure. A rib cutter is used to cut the rib anteriorly at the costal junction and posteriorly at the costotransverse junction for sufficient surgical access. The rib bed is left intact at this junction of the exposure. This rib can be used as bone graft if desired (Fig. 18–5B). The cut edges are smoothed with a rasp, and bone wax is applied if actively bleeding.
The ipsilateral lung is selectively deflated, and the pleura is identified; this can be accomplished by splitting the undersurface of the costal cartilage anteriorly. Care is taken to avoid injuring the pleura. The retroperitoneal space is entered through the cartilaginous portion of the rib with blunt dissection (Fig. 18–5C). If resecting the 12th rib, the diaphragm attaches to it superiorly and the transverse abdominis muscle inferiorly. Retracing the diaphragm proximal and the abdominal muscle distal allows entrance into the retroperitoneum. The peritoneum should be swept off the abdominal muscles and diaphragm (Fig. 18–5D). The peritoneum occasionally extends to the tip of the 11th rib, but it usually extends to the mid-portion of the 12th rib. The surgeon can use a sponge gauze wrapped on his or her fingertip or a sponge stick to sweep off the peritoneum.
The internal and external oblique and transversus abdominis muscles are incised in a layered fashion as needed for exposure. With the pleura dissected, the rib bed can be opened with scissors. A rib spreader can be used to provide retraction for entry into the chest cavity. A second spreader can be placed at a right angle in the surrounding soft tissue to allow for maximal exposure. The lung is protected further with a malleable retractor shielded with a sponge (Fig. 18–5E).
When exposure into the thoracoabdominal cavity has been achieved, the peritoneum should be bluntly swept off the psoas muscle and the undersurface of the diaphragm to expose the retroperitoneal space further. This allows the diaphragm to be clearly visualized for release. The diaphragm is incised from the inside chest wall for a circumferential release (Fig. 18–5F). A 1-cm cuff of muscle must be left for later reapproximation during closure. It is beneficial to tag the ends of the muscle and diaphragm for anatomic positioning during the repair. The crus of the diaphragm may need to be taken down from L1 to L2 for further exposure; this allows access to vertebral bodies T12-L1.
Additional Anterior Approaches
Endoscopic Approach to Anterior Thoracic Spine
Endoscopic approaches to the thorax have been used to treat many pathologic conditions in the chest and mediastinum.12 Thoracoscopic techniques have been used to perform anterior decompression, reconstruction, and instrumentation of the entire thoracic spine and its junction. This alternative to traditional open techniques has been shown to reduce postoperative pain, improve recovery time, and minimize some associated complications of open procedures.13,14 Over several decades, many surgeons have attempted to improve and expand the use of video-assisted thoracoscopic surgery (VATS), also known as thoracoscopic surgery. Mack, Regan, Rosenthal, and colleagues were the first to report the application of VATS principles to an anterior approach to the thoracic and lumbar spine.15 Since then, numerous authors have described their experiences with video-assisted spine surgery for various operative indications, including treatment of fractures, correction of deformity, and decompression.
Advantages of VATS for spine procedures are as follows:
Surgical Procedure
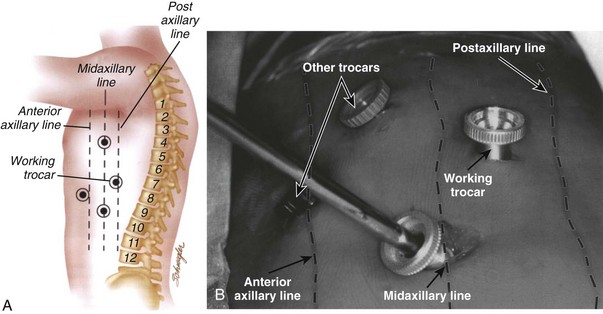
Mark the portal positions and check with intraoperative imaging to ensure they are in accordance to the desired operative level. These portals are placed in a manner to triangulate directly over the level of the pathology. There are numerous portal configurations ranging from T-shaped to L-shaped.7 Typically, two to three working portals are used, and two others are used for instrumentation (Fig. 18–6A and B). One portal may be placed directly over the pathology posterior to the midaxillary line. Another portal is placed two levels superiorly at the midaxillary line, and one is placed at the level of pathology or more distal. The fourth portal may be placed anterior to the midaxillary line also near the operative level.
Anatomy of Thoracic Spine
The thoracic spine is the largest part of the spinal column. It consists of 12 vertebral bodies, which diminish in size from T1 to T3 and increase in size to T12, with intervening intervertebral discs.16 The spinous processes of the posterior thoracic spine can often be palpated in most individuals despite their posteroinferior angulations. As one follows their projection from inferior to superior, the tip of the spinous process overlays the vertebral body that precedes it. At the midline, a layer of subcutaneous fat separates the skin from the thoracic fascia and supraspinous ligament. Deep to this fat on either side of midline are the muscles of the thoracolumbar spine.
The muscles can be grouped into three layers: superficial, intermediate, and deep layer (Fig. 18–7A). These layers are not distinct during the exposure, but grouping them in this manner helps to visualize their arrangement around the osseoligamentous spine. In the superficial layer, mooring muscles are located that attach the upper extremity to the spine. This layer contains the trapezius and the latissimus dorsi muscle. Deeper to this are the rhomboid major and minor muscles.17 The intermediate layer contains the serratus posterior inferior and superior muscles. These smaller muscles attach from the midline of the spinous process to the middle of the inferiormost and superiormost ribs. Deeper still is the last layer, which houses the erector spinae muscle column (Fig. 18–7B). These muscles, which consist of the semispinalis, multifidus, and rotator muscles, have an investing fascia whose dorsal layer constitutes the thoracolumbar fascia. This fascia becomes continuous with the aponeurosis of the transverse abdominis muscle.7
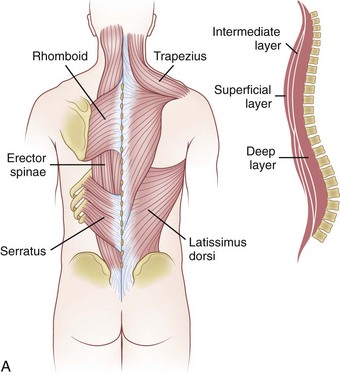
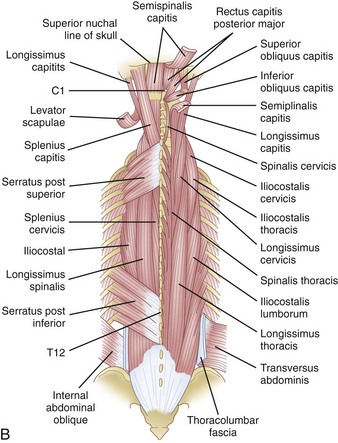
FIGURE 18–7 A, Muscles of thoracic spine. B, Intermediate and deep muscles of thoracic spine.
(B, From An HS: Principles and Techniques of Thoracic Surgery. Baltimore, Williams & Wilkins, 1998.)
The ligaments of the spine from superficial to deep include the supraspinous ligament, interspinous ligament, ligamentum flavum, facet capsule, posterior longitudinal ligament, and anterior longitudinal ligament (Fig. 18–8). The supraspinous ligament attaches the tips of the spinous processes. The interspinous ligament attaches to the adjacent spinous processes with the fibers running in an oblique fashion. The ligamentum flavum inserts on the top of each inferior lamina and to the undersurface of each cephalad lamina. This is the strongest and most well developed of the spinous ligaments and functions to maintain extension of adjacent vertebrae. The posterior longitudinal ligament traverses the dorsal aspect of the vertebral bodies and intervertebral disc spaces, whereas the anterior longitudinal ligament runs on the ventral surface.
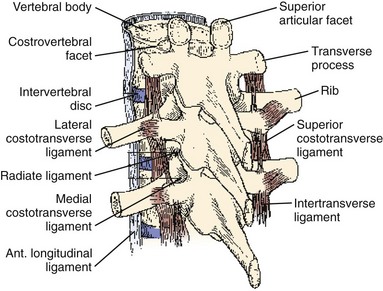
FIGURE 18–8 Ligaments of thoracic spine.
(From An HS: Principles and Techniques of Thoracic Surgery. Baltimore, Williams & Wilkins, 1998.)
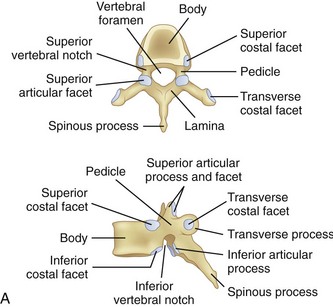
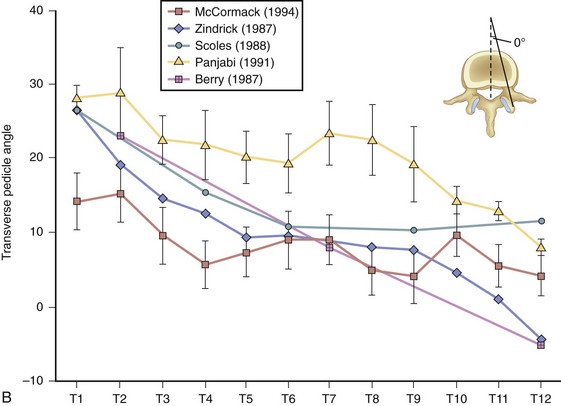
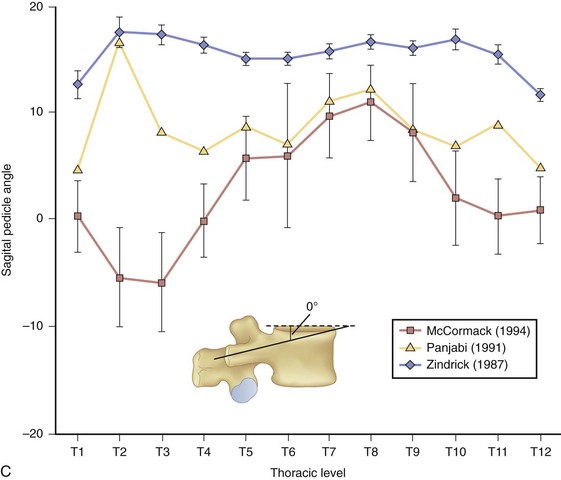
At the base of each facet is the pedicle of each vertebral body (Fig. 18–9A). Pedicle morphometry has been extensively studied and characterized by numerous authors in the past.18–23 With the development of more powerful reduction tools and robust fixation devices, pedicle screw fixation in the thoracic spine is becoming more and more popular as a method of instrumentation.21,24,25 A clear understanding of pedicle anatomy is essential for successful instrumentation at this level.26 The sagittal and axial angulation changes relatively reliably with each subsequent thoracic level (Fig. 18–9B and C).27 The pedicles are typically angled in a posterior lateral fashion from their respective vertebrae. As one moves distally from T1 to T12, the medial angulation of the pedicle decreases, however. The superoinferior pedicle diameter is consistently larger than the mediolateral pedicle diameter.18 Of all the thoracic pedicles, the T4 pedicle is usually the narrowest. The pedicle wall is also two to three times thicker medially than laterally.18
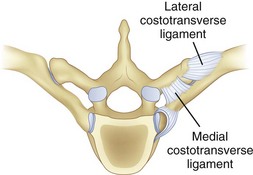
The thoracic ribs articulate with the vertebral bodies beginning with T1 via a costal facet. The first rib articulates with the vertebral body of only T1. Ribs 1 through 7 also intersect the sternum and are classified as true ribs. Ribs 8 through 10 connect through costal cartilage to the rib above and are termed false ribs. Ribs 11 and 12 are classified as floating ribs because they do not attach to either the sternum or the costal cartilage, only their corresponding vertebral bodies.16 The other rib heads overlie adjoining intervertebral disc space via two types of articulations. The costovertebral articulation is between the head of the rib and the vertebral body (Fig. 18–10). The articular capsule, radiate ligament, and intra-articular ligaments stabilize this articulation. The costotransverse articulation is between the neck and the tubercle of the rib and the transverse process. The superior and lateral costotransverse ligaments stabilize this junction. The T11 and T12 transverse processes do not articulate with their ribs.
The transverse process is at the junction of the facet and the par interarticularis. The nerve roots are anterior and superior to the transverse process, whereas the branches of the dorsal rami are found anteroinferiorly.7 The nerve roots run immediately ventral to the transverse process of the next lower spinal level. An intertransverse aponeurosis bridges between adjacent processes, and if dissection remains dorsal to this aponeurosis, the nerve roots remain relatively safe and protected.
Posterior Approaches to Thoracic Spine
Posterior Approach for Decompressive Laminectomy
Dorsal decompressive laminectomy can sometimes be indicated and advantageous in treating pathology in the thoracic spine. The exposure of the spine is typically very direct and avoids any major neurovascular structures. Laminectomy is often performed to decompress the thoracic spine and allow additional space for the spinal cord, but surgeons should be careful in using this approach alone in patients whose stability in this region may be compromised. The approach involves stripping the soft tissue of the posterior elements, which normally act as a tension band on the spine, off the osseous structures. Patients who have perioperative instability or anterior column incompetence may not benefit from isolated posterior thoracic decompression because of risk of secondary kyphosis.28 Additional augmented stability may be necessary, such as fusion with or without instrumentation.
Indications for laminectomy include the following:
From the time when laminectomy was first described by Smith in 182829 to its promotion by Hibb and Albee in the early 1900s and its use today, this surgical procedure has been used for a wide variety of applications. It provides access to the spinal canal for posterior decompression, posterior fusion, thoracic discectomy, access to intradural lesions, and stabilization procedures.30 The relative contraindications for each case and the surgeon’s expertise should be carefully reviewed with each preoperative plan.
After cutting through the subcutaneous tissue, the muscles of the back are encountered. The muscles are separated subperiosteally from either side of the spinous process and retracted laterally. The trapezius and rhomboid muscle aponeurosis is located in the upper thoracic spine, and the latissimus dorsi is located in the lower thoracic spine. Deeper still, the intrinsic muscles of the erector spinae and the transversospinal group are separated subperiosteally from the spinous processes and laminae.31 Staying subperiosteal helps to minimize bleeding.
When adequate exposure of the laminae is obtained, the formal laminectomy can be started. This can be accomplished by one of several ways. A high-speed bur or drill can be used to create a trough bilaterally at the junction of the lamina and facet. When thinned, a small or medium Kerrison rongeur should be used to complete the laminectomy (Fig. 18–11). The ligamentum flavum on the undersurface should also be cut sharply with the rongeur with complete visualization of the dura to keep it protected. Further decompression should be performed where appropriate by removing the facet or pedicle without destabilizing the spine.
Transpedicular Approach
The transpedicular approach of thoracic decompression is often used to debulk tumors, to treat herniated soft discs, or mainly to decompress the associated nerve root. Symptomatic thoracic discs occur in about 1% of patients requiring an operation. Wood and colleagues32 prospectively followed 20 patients with 48 thoracic disc herniations and performed serial magnetic resonance imaging (MRI) and clinical follow-up examinations. All patients remained asymptomatic during a median follow-up of 26 months. Most protruding discs occur below T8, and a common patient presentation is pain.9 About one third of patients complain of radiating pain in the distribution of the intercostal nerve, but paracentral and central disc protrusion causes compression of the spinal cord and clinical symptoms of myelopathy.
Multiple surgical approaches have been proposed over several decades to treat these rare lesions in this area of the spine. In 1978, Patterson and Arbit33 first published the posterior transpedicular approach to treatment of herniated thoracic discs, and it has gained acceptance as a reasonable way to access other pathology in the area. This approach evolved as other proposed procedures were discovered to have disappointing results and especially risked injury to the spinal cord.32,34,35
When the level is established, an incision is made midline over the spinous process with a No. 10 blade knife. Subperiosteal dissection is continued laterally underneath the paraspinal muscles until one has exposed the laminae and facet joint. Patterson and Arbit33 described a unilateral approach. Either a unilateral or a bilateral transpedicular approach can be accomplished depending on the goals of treatment. A unilateral approach may be less destabilizing to the spine but limits exposure to the posterolateral aspect of the vertebral body. A bilateral approach may allow one to perform almost a complete discectomy or even vertebrectomy.
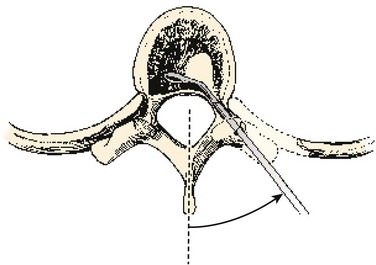
The surgeon enters and removes the cancellous, central portion of the pedicle with a high-speed bur. An image intensifier helps one reach the appropriate depth and stop short of the vertebral body. When the depth of the resection is established, the cortical bone adjacent to the spinal canal medially and superiorly is removed using small down-biting curets. The lateral and inferior portions of the pedicle do not need to be violated. The fasciae of the psoas and the quadratus lumborum muscles make up the lateral borders of this approach. Disc material is removed through this opening, and care is taken not to injure the cord or nerve roots during this process (Fig. 18–12).
Costotransversectomy
Costotransversectomy can be performed in either a prone position or with a classic posterolateral approach. In 1984, Menard provided the first known description of costotransversectomy in the treatment of a spinal abscess.36 This surgical procedure was traditionally performed to drain tuberculosis abscesses while avoiding the major risks associated with an anterior surgery. The utility of this procedure to treat other conditions of the posterior thoracic spine has grown as other surgeons have modified and expanded on the original technique over the years. The costotransversectomy approach has also been used for excising disc herniations, removing nonincarcerated hemivertebra, and accessing intraspinal lesions. Other authors have gone a step further and used this approach to treat congenital and acquired kyphoscoliosis.36
Indications for costotransversectomy include the following:
Various locations of incisions have been described in the past. A median or paramedian incision may be made straight or curved centered over the desired vertebral level. Traditionally, a curvilinear incision about 8 cm lateral to the intended spinous process and 10 to 13 cm long has been used (Fig. 18–13).17 After the skin incision is made with a knife, the incision is deepened through the superficial and deep fascia to the muscle of the trapezius or latissimus dorsi if at lower thoracic levels. The surgeon transects through the fibers of the trapezius close to the transverse processes of the ribs. The remaining muscles are taken down off the rib of interest in a parallel fashion. The exposure can be widened by dissecting the rib just superior to the one of interest. The muscle attachments are carefully detached from the desired rib with a periosteal elevator (Fig. 18–14A). Also, any muscle attachment is dissected from the transverse process and lamina to provide clear exposure of the operative level (Fig. 18–14B).
The rib and its arthrodial junction can now be disarticulated (Fig. 18–14C). The lateral division can be accomplished 6 to 8 cm from midline; this depends on the extent of pathology that needs to be addressed. Care should be taken not to injure the neurovascular bundle during resection. Identification of the nerve to its dural sleeve in the intervertebral foramen may aid in its safe retraction and allow one to locate the spinal cord reliably. After lateral division, the rib is lifted out of its periosteal bed and disarticulated from the costotransverse process. This bone can be saved for bone graft and used for fusion if appropriate. When cleared of any muscle, the transverse process may also be resected at its junction with the lamina and pedicle.
Next, the lateral pedicle is identified, and the neurovascular bundle is protected with further dissection. The surgeon subperiosteally dissects along the pedicle and upper and lower vertebral body to separate the pleura from the vertebral wall (Fig. 18–14D). By now, the site of the abscess for irrigation, if present, may have been encountered. Further exposure can be obtained by taking down the pedicle or resecting the facets. If the surgeon intends to dissect to the front of the spine to address fractures or perform a biopsy, he or she must take care to elevate the prevertebral fascia.
Lateral Extracavitary Approach
In 1976, Larson and colleagues at the Medical College of Wisconsin expanded on the work of Menard and Capener in the treatment of Pott disease.37 The lateral extracavitary approach allows for simultaneous exposure of posterior elements of the spine and anterior vertebral body and builds on the success of other approaches, such as costotransversectomy, to gain better access to the ventral thecal sac. This approach has evolved since its inception, and its use has expanded beyond treating just vertebral osteomyelitis and Pott disease. Today, the lateral extracavitary approach is used for various applications, including access to vertebral body tumors, treatment of infections, intraspinous decompression of neural lesions, and treatment of thoracic disc disease. Access can be obtained from C7 down to the thoracolumbar junction. It avoids thoracotomy and laparotomy and many of their associated complications.
Indications for the lateral extracavitary approach include the following:
When the posterolateral structures of the transverse process and pedicle have been removed, exposure should be adequate enough for discectomy (Fig. 18–15). The posterior vertebral body can be taken down with curets, a drill, or a pituitary rongeur. Further exposure can be developed toward the midline by decompressing the vertebral body. If this decompression is undertaken, a thin layer of cortical bone just ventral to the thecal sac should be maintained to protect the canal contents. This layer can be taken down in a controlled fashion after the remaining anterior cortical and cancellous bone has been decompressed. Corpectomy can proceed from the ipsilateral side of the vertebral body to the extent of the contralateral pedicle. The corpectomy may be facilitated by rotating the secured patient away from the surgeon 20 to 30 degrees.
After exposure of the posterior and ventral surfaces, stabilization can be accomplished with the use of autograft or other interbody device. If may be helpful to verify placement with intraoperative fluoroscopy. Pedicle screw instrumentation of adjacent segments may also be done through a separate fascial incision. With decompression completed, closure should be performed in a sequential fashion. A deep or subcutaneous drain can be placed, and any pleural breaches should be repaired. If the breach is significant, chest tube placement may be necessary.38 If a chest tube is placed, a postoperative chest x-ray should be obtained to confirm its placement and track its function.
Key Points
Summary
Pearls
Pitfalls
1 Tew JMJr, Mayfield FH. Complications of surgery of the anterior cervical spine. Clin Neurosurg. 1976;23:424-434.
2 Kilburg C, Sullivan HG, Mathiason MA. Effect of approach side during anterior cervical discectomy and fusion on the incidence of recurrent laryngeal nerve injury. J Neurosurg Spine. 2006;4:273-277.
3 Daniels AH, Riew KD, Yoo JU, et al. Adverse events associated with anterior cervical spine surgery. J Am Acad Orthop Surg. 2008;16:729-738.
4 Lu J, Ebraheim NA, Nadim Y, et al. Anterior approach to the cervical spine: Surgical anatomy. Orthopedics. 2000;23:841-845.
5 Miscusi M, Bellitti A, Peschillo S, et al. Does recurrent laryngeal nerve anatomy condition the choice of the side for approaching the anterior cervical spine? J Neurosurg Sci. 2007;51:61-64.
6 Liu YL, Hao YJ, Li T, et al. Trans-upper-sternal approach to the cervicothoracic junction. Clin Orthop Relat Res. 2008;467:2018-2024.
7 Kim DH. Surgical Anatomy and Techniques to the Spine. Philadelphia: WB Saunders; 2006.
8 Campos JH. Lung isolation techniques. Anesthesiol Clin North Am. 2001;19:455-474.
9 Fessler RG, Sekhar LN. Atlas of Neurosurgical Techniques: Spine and Peripheral Nerves. New York: Thieme; 2006.
10 Whang PG, Vaccaro AR. Thoracolumbar fracture: Posterior instrumentation using distraction and ligamentotaxis reduction. J Am Acad Orthop Surg. 2007;15:695-701.
11 Kirkpatrick JS. Thoracolumbar fracture management: Anterior approach. J Am Acad Orthop Surg. 2003;11:355-363.
12 Vaccaro AR, Bono CM. Minimally Invasive Spine Surgery. New York: Informa Healthcare; 2007.
13 Landreneau RJ, Hazelrigg SR, Mack MJ, et al. Postoperative pain-related morbidity: Video-assisted thoracic surgery versus thoracotomy. Ann Thorac Surg. 1993;56:1285-1289.
14 Hazelrigg SR, Landreneau RJ, Boley TM, et al. The effect of muscle-sparing versus standard posterolateral thoracotomy on pulmonary function, muscle strength, and postoperative pain. J Thorac Cardiovasc Surg. 1991;101:394-400. discussion 400-391
15 Mayer HM. Minimally Invasive Spine Surgery: A Surgical Manual, 2nd ed. Berlin; New York: Springer; 2006.
16 Magee DJ. Orthopedic Physical Assessment, 4th ed. Philadelphia: Saunders; 2002.
17 Hoppenfeld S, DeBoer P, Hutton R. Surgical Exposures in Orthopaedics: The Anatomic Approach, 2nd ed. Philadelphia: JB Lippincott; 1994.
18 Kothe R, O’Holleran JD, Liu W, et al. Internal architecture of the thoracic pedicle: An anatomic study. Spine. 1996;21:264-270.
19 Banta CJ2nd, King AG, Dabezies EJ, et al. Measurement of effective pedicle diameter in the human spine. Orthopedics. 1989;12:939-942.
20 Berry JL, Moran JM, Berg WS, et al. A morphometric study of human lumbar and selected thoracic vertebrae. Spine. 1987;12:362-367.
21 Krag MH, Weaver DL, Beynnon BD, et al. Morphometry of the thoracic and lumbar spine related to transpedicular screw placement for surgical spinal fixation. Spine. 1988;13:27-32.
22 Panjabi MM, Takata K, Goel V, et al. Thoracic human vertebrae: Quantitative three-dimensional anatomy. Spine. 1991;16:888-901.
23 Zindrick MR, Wiltse LL, Doornik A, et al. Analysis of the morphometric characteristics of the thoracic and lumbar pedicles. Spine. 1987;12:160-166.
24 Moran JM, Berg WS, Berry JL, et al. Transpedicular screw fixation. J Orthop Res. 1989;7:107-114.
25 Roy-Camille R, Saillant G, Mazel C. Plating of thoracic, thoracolumbar, and lumbar injuries with pedicle screw plates. Orthop Clin North Am. 1986;17:147-159.
26 Kim YW, Lenke LG, Kim YJ, et al. Free-hand pedicle screw placement during revision spinal surgery: Analysis of 552 screws. Spine. 2008;33:1141-1148.
27 McCormack BM, Benzel EC, Adams MS, et al. Anatomy of the thoracic pedicle. Neurosurgery. 1995;37:303-308.
28 Vaccaro AR, Albert TJ. Spine Surgery: Tricks of the Trade, 2nd ed. New York: Thieme; 2009.
29 Yasuoka SPH, MacCarty C. Incidence of spinal column deformity after multilevel laminectomy in children and adults. J Neurosurg. 1982;57:441-445.
30 Hoppenfeld S, DeBoer P, Hutton R, et al. Surgical Exposures in Orthopaedics: The Anatomic Approach. Philadelphia: JB Lippincott; 1984.
31 Shikata J, Yamamuro T, Shimizu K, et al. Combined laminoplasty and posterolateral fusion for spinal canal surgery in children and adolescents. Clin Orthop Relat Res. 1990;259:92-99.
32 Wood KB, Blair JM, Aepple DM, et al. The natural history of asymptomatic thoracic disc herniations. Spine. 1997;22:525-529. discussion 529-530
33 Patterson RHJr, Arbit E. A surgical approach through the pedicle to protruded thoracic discs. J Neurosurg. 1978;48:768-772.
34 Perot PLJr, Munro DD. Transthoracic removal of midline thoracic disc protrusions causing spinal cord compression. J Neurosurg. 1969;31:452-458.
35 Logue V. Thoracic intervertebral disc prolapse with spinal cord compression. J Neurol Neurosurg Psychiatry. 1952;15:227-241.
36 Campbell WC, Edmonson AS, Crenshaw AH. Campbell’s Operative Orthopaedics, 6th ed. St. Louis: CV Mosby; 1980.
37 Lifshutz J, Lidar Z, Maiman D. Evolution of the lateral extracavitary approach to the spine. Neurosurg Focus. 2004;16:E12.
38 Vaccaro AR. Fractures of the Cervical, Thoracic, and Lumbar Spine. New York: Marcel Dekker; 2003.
[/level-membership-for-orthopaedics-category][not-level-membership-for-orthopaedics-category]
CHAPTER 18 Thoracic Spine
Surgical Approaches
Anatomy of Anterior Cervicothoracic Spine
The cervicothoracic junction corresponds to the area just superior to the mediastinum and extends into the sternum and T4-5 intervertebral discs. The left brachiocephalic vein, formed by the confluence of the left internal jugular and subclavian veins, lies immediately posterior to the upper sternum. The thymus gland lies just anterior to this structure. The left and right brachiocephalic veins combine to form the superior vena cava at the right first intercostal space. The superior vena cava enters the left atrium posterior to the third costal cartilage. The vagus and phrenic nerves lie anterior to the arch of aorta (Fig. 18–1). The recurrent laryngeal nerve branches off the vagus nerve between T1 and T3 on the left side and reliably loops around the aorta to ascend into the tracheoesophageal groove. The right recurrent laryngeal nerve branches off the vagus nerve in the upper cervical region and loops around the right subclavian artery. On this side, it may also leave the carotid sheath at a higher level and course anteriorly behind the thyroid before entering the groove.
FIGURE 18–1 A, Anteroposterior view of cervicothoracic junction. B, Lateral view of cervicothoracic junction.
Injury to the recurrent laryngeal nerve may occur with indiscriminant dissection to the cervicothoracic junction. C5-T1 levels are especially vulnerable. Controversy exists regarding which approach (left-sided vs. right-sided) minimizes the risk of injury to the recurrent laryngeal nerve. Tew and Mayfield1 described the asymmetry between the right and left laryngeal nerves and described the anatomic loop of the nerve around the aortic arch on the left side as longer, more predictable, and more protected than the right-sided nerve. These authors believed that the anatomic loop on the left side rendered the recurrent laryngeal nerve less susceptible to contusion and stretch injury when a left-sided surgical approach was used. Other authors have reported that there is no statistical difference between the rate of injury and the side of the surgical approach.2 It is acknowledged that injury to this structure can cause mild dysphagia and dysphonia. The reported incidence of dysphagia after anterior surgery ranges from 28% to 57%, and the incidence of dysphonia is 2% to 30%.3
Surgical Approaches to Anterior Spine
Cervicothoracic Junction
Low Anterior Cervical and High Transsternal Approach
Indications for the anterior cervicothoracic approach include the following:
Operative Procedure
The patient is positioned supine on the operating table after general endotracheal anesthesia has been instituted. The arms should be tucked at the side, and the hands and wrist should be checked to ensure that they are positioned without undue pressure. Typically, a towel roll or other bolster is placed between the scapulae. This towel roll allows the head to be placed in a slight amount of extension and the shoulders to lie slightly extended at the side for adequate exposure of the junction. The head should also be turned either slightly right or slightly left depending on the surgeon’s preferred approach. A left-sided approach to a virgin neck is preferable because the laryngeal nerve has a more reliable course into the tracheoesophageal groove on this side.4,5
The surgical incision is typically made from the left anterior border of the sternocleidomastoid muscle to the notch and can be continued distally along the middle of the manubrium (Fig. 18–2A). The first portion of the approach is an extension of the standard Smith-Robinson approach. Other authors have described a transverse incision that parallels the medial half of the clavicle. The vertical extension of the incision depends on the overall exposure required by the treating surgeon. If exposure from C7 to T4 is needed in its entirety, the vertical portion of the incision is made with the distal portion terminating just distal to the suprasternal notch. The extent of the incision is typically to the third costal cartilage.
After marking the incision, a No. 10 blade scalpel is used to incise down to the subcutaneous layer. Dissection is done through the platysma, creating flaps on either side for easier closure at the end of the case. Care should be taken not to injure the jugular veins, but they may be sacrificed if further exposure is needed. The strap muscles including the sternocleidomastoid are identified as they insert into the clavicle (Fig. 18–2B and C). Next, the clavicular and manubrial insertions of the sternocleidomastoid muscle are elevated subperiosteally proximally and laterally. The remaining strap muscles should be elevated in a similar manner and taken medially.
When visualized, subperiosteal stripping of the medial third of the clavicle and ipsilateral half of the manubrium should be performed. This stripping exposes the osseous structures for distal exposure to the lower cervical thoracic junction. The clavicle can be sectioned at the middle to medial third junction with an oscillating saw or osteotome (Fig. 18–2D). Care should be taken not to injure the underlying subclavian vein that is in close proximity. When freed laterally, the clavicle can be disarticulated from the manubrium providing exposure to the proximal cervicothoracic junction.
For a more extensive distal exposure, an alternative to clavicular resection and disarticulation involves a sternum-splitting approach. After performing the proximal incision, the skin incision can be extended further distally for added exposure (see Fig. 18–2A). Next, the sternocleidomastoid and strap muscles are dissected subperiosteally from the manubrium and sternum to expose the midline to the anticipated level desired. One is usually able to use this dissection to visualize down to the T4 vertebral level. The manubrium is split longitudinally in the midline with an oscillating or Gigli saw and retracted with self-retaining retractors. Care should be taken not to injure the structures in the retropleural fascia with the saw. This area is protected by dissecting the thymus and surrounding fat from behind the manubrium. Also, care should be taken to avoid injuring the thoracic duct because it ascends to the left of the esophagus from the level of T4 to its junction with the left internal jugular and subclavian veins. A Kerrison rongeur can be used to complete the osteotomy on the posterior aspect of the manubrium. The innominate vein and inferior thyroid vein may also be encountered and can be ligated if necessary for exposure.
Finally, closure should be performed in a stepwise manner.6 If a sternal split was performed, wiring of the sternum and manubrium should be employed to reapproximate the two halves. If the clavicle is disarticulated, it should be reintroduced and fixed into place. Next, strap muscles should be repaired with absorbable sutures, and the sternocleidomastoid should be reattached to its insertion in a similar manner. The platysma can be reapproximated with running or interrupted absorbable sutures, and a suction drain can be placed just underneath this muscle before its closure.
Key Points
Transthoracic (Third Rib Resection)
Disadvantages to using this approach include the need to mobilize the scapula and violation of chest wall muscles during dissection. This approach also requires violating the pleural space and necessitates placement of a chest tube at the end of the procedure.7
The indication for the transthoracic approach is as follows:
Operative Procedure
Before positioning the patient, it is recommended that a double-lumen endotracheal tube with lung isolation be used.8 The patient is placed in the lateral decubitus position with the desired operative side up (Fig. 18–3A). Positioning the patient in this manner can be accomplished using a deflatable beanbag or foam-type bolster. The surgeon should ensure that all bony prominences are well padded. A soft roll is placed just distal to the axilla to prevent pressure on the brachial plexus. The arms are abducted, and the elbows and knees are slightly flexed in a position of comfort. The ipsilateral arm may be positioned comfortably by keeping it abducted on stacked pillows or blankets just under the arm and forearm. The surgeon should ensure that the head is also positioned comfortably and that no undue stress is placed on the head-neck junction. Preparation and draping is done in the usual sterile fashion from the shoulder to just above the iliac crest and from below the mid-spine posteriorly to below the umbilicus anteriorly.
The incision is drawn from the T1 spinous process, following the curvature of the medial-to-inferior border of the scapula. The incision is continued anteriorly along the seventh rib and ends on the costal cartilage of the third rib. This same trajectory is followed by incising through skin and subcutaneous tissue with a No. 10 blade knife. Next, the muscles of the trapezius and latissimus dorsi are identified and divided in a layered fashion with electrocautery. Any bleeders that are encountered in the muscle during this approach are cauterized. Rarely, the rhomboid major and serratus posterior also need to be divided in a similar manner.7 As the muscle layers are divided further, using a retractor, the scapula is retracted proximally; doing this makes it easier to cut the muscles.
When exposure of the chest wall is accomplished, the surgeon counts down the ribs to the operative level. The second rib is often the highest easily palpated rib, and the first rib is situated inside the second (Fig. 18–3B). At this stage, the lung on the operative side can be selectively deflated. When the operative level (the third rib in this case) has been confirmed and the lung has been deflated, the intercostal muscles are stripped off of the rib extraperiosteally using a periosteal elevator. A Doyen rib elevator is an excellent dissection tool to strip the muscle circumferentially from the rib while preserving the underlying intercostal nerve and vessels. When exposed, the rib can be resected using a rib cutter. The rib is cut as far posterolaterally and anteromedially as possible. This rib can be used as bone graft if desired. The remaining rib bed can be transected, and the pleural cavity can be entered; this can be done safely with the lung selectively deflated on this side. A chest spreader can be used to provide retraction for entry into the chest cavity. A second spreader can be placed at a right angle in the surrounding soft tissue to allow for maximal exposure. The lung can be protected further with a malleable retractor shielded with a sponge.
With the lung deflated, the spine can be visualized at the base of the incision. At this time, it is important to identify clearly the neurovascular structures in the area. The aorta, the spine, parietal pleura, veins, and sympathetic plexus should be recognized. The parietal pleura is incised over the desired disc space with atraumatic pickups and Metzenbaum scissors in a longitudinal fashion with the spine. This area is typically relatively avascular and a safer plane for initial dissection than the vertebral body (Fig. 18–3C). When the vertebral body is exposed, the intercostal arteries and veins are visualized, ligated, and cut appropriately. Further exposure of the adjacent vertebral bodies and intervertebral discs can be obtained by extending the incision of the pleura proximally or distally or both, but with each level, ligature of the intercostal artery and vein may be required.
Key Points
Thoracic Spine
Thoracotomy
A traditional thoracotomy provides access to the anterior spine from T6 to T12. In addition to these levels, further manipulation of the thoracolumbar junction of T12-L1 can be performed if the diaphragm is taken down. Access to T4 and T5 can also be accomplished, but one frequently has to elevate the scapula to do so.7 The thoracotomy provides a versatile tool for exposure of much of the thoracic spine for manipulation and instrumentation.
The indication for thoracotomy is as follows:
Operative Procedure
A double-lumen endotracheal tube with lung isolation is used.8 The patient is placed in the lateral decubitus position with the desired operative side up. Approaching from the left side may require one to manipulate the aorta and segmental vessels on the left. When possible, a right-sided approach allows more spinal surface area exposure from behind the azygos vein than behind the aorta. Exposure from T10 to T12 is more easily accomplished from the left, however, because the liver causes the diaphragm to ride higher on the right; limiting the visibility of the spine on this side.
Selective positioning can be accomplished by using a deflatable beanbag or foam-type bolster placed underneath the patient’s right torso. The surgeon should ensure that all bony prominences are well padded. An intravenous fluid bag or other soft roll can be placed just distal to the axilla to prevent pressure on the brachial plexus. The arms are abducted and the elbows are slightly flexed in a position of comfort using blankets or pillows to hold them in position (Fig. 18–4A). The hip and knee nearest the bed are slightly flexed, and the contralateral extremity is allowed to remain more extended and slightly adducted. The weight of the contralateral leg helps open the rib interspace when exposure is accomplished. The surgeon also should ensure that the head is positioned comfortably in a neutral position.
To localize the operative level, a fluoroscopic image can be obtained preoperatively before the incision. Otherwise, the desired rib level can be confirmed by counting the ribs by palpating from proximal to distal. One may also count from the 12th rib proximally. Typically, the numbered rib that is resected is considered to be two levels above the expected working area because of the oblique orientation of the ribs. When the numbered rib is identified, the incision is drawn from the posterior angle of the corresponding rib following its curvature anteriorly (Fig. 18–4B). The incision should be made through skin and subcutaneous tissue with a No. 10 blade knife. The incision is deepened with electrocautery, and any bleeders that are encountered are coagulated. Care should be taken not to injure the neurovascular bundle that runs on the undersurface of the rib.
Next, the muscles of the latissimus dorsi are identified and divided in a layered fashion in line with the incision and overlying the rib with the electrocautery. It should not be necessary to separate this muscle from the surrounding tissue. A portion of the posterior margin of the serratus anterior lies on the undersurface of the latissimus and may be divided. As the muscle is divided anteriorly, any bleeders that are encountered are cauterized. When the superficial surface of the rib is exposed, the intercostal muscles are separated from the periosteum with a periosteal elevator, such as an Alexander-Farabeuf periosteotome. Also, the undersurface of tissue is released from the rib; this can be done circumferentially with a Doyen dissector (Fig. 18–4C). Dissection should be far posteriorly and anteriorly for adequate exposure. Next, a rib cutter is used to cut the rib anteriorly at the costal junction and posteriorly at the costotransverse junction for sufficient surgical access (Fig. 18–4D). This rib can be used as bone graft if desired. The cut edges are smoothed with a rasp, and bone wax is applied if active bleeding is present.
The ipsilateral lung is selectively deflated, and the pleural cavity is entered with a pickup and Metzenbaum scissors (Fig. 18–4E). A rib spreader can be used to provide retraction for entry into the chest cavity. A second spreader can be placed at a right angle in the surrounding soft tissue to allow for maximal exposure. The lung can be protected further with a malleable retractor shielded with a sponge.
With the lung deflated, the spine can be clearly visualized. The neurovascular structures in the area are identified (Fig. 18–4F). The parietal pleura is incised over the desired disc space with atraumatic pickups and Metzenbaum scissors in a longitudinal fashion, and the pleura is retracted laterally. Care should be taken not to injure the segmental vessels, which may bleed incessantly if not tied or clipped in a controlled fashion. The vessels close to the middle of the vertebral body are dissected and ligated, and the arteries are clamped away from the aorta. If the segmental arteries are tied too close to the aorta, the tie can loosen, and bleeding can resume. A right-angle clamp is used to free the vessel, and a 2-0 tie is passed around the vessel (Fig. 18–4G). Further exposure of the adjacent vertebral bodies and intervertebral discs can be obtained by extending the incision of the pleura proximally or distally or both, but with each level ligature of the segmental vessels may be required. With adequate exposure, the disc interspace and pedicle can be identified by following the head of the rib to its base. The disc is the more prominent, white, soft structure flanking the larger recessed vertebral bodies.
Thoracolumbar Junction
Exposure of the thoracolumbar spine may be necessary to gain access to T10-L2 of the spine. The key to this approach is exposure and partial mobilization of the diaphragm and entry into the thorax and retroperitoneum.9
Indications for approaching the thoracolumbar junction include the following:
Anatomy of Thoracolumbar Junction
The thoracolumbar junction constitutes the lower three thoracic and upper two lumbar vertebrae. This region is a transition zone from a stiffer and less mobile kyphotic thoracic spine to a more mobile, lordotic lumbar spine. It is this characteristic that lends this region to a higher incidence of trauma.10
Operative Procedure
Either a left-sided or a right-sided surgical approach can be undertaken; a left-sided dissection is preferred. A left-sided approach avoids being obscured by the liver or having to mobilize the vena cava. If injured, the vena cava can bleed profusely, and the thin-walled vessel can often be difficult to suture. A right-sided approach may be necessary, however, to treat some pathology or may be the required approach in accessing the convexity in a scoliotic spine.11
[/not-level-membership-for-orthopaedics-category]
