The Structured TEE Examination
(or guidelines for a comprehensive evaluation)
John C. Sciarra
When you do a TEE exam you gather information for yourself. So the order in which it is done is your preference. But, if someone comes after and wants to look at your exam, it can be difficult to sort out all the information. That is why this chapter seeks to suggest a standard and logical way to perform your exam. In addition, if you do it the same way each time you will get more efficient. Plus the order suggested here just makes sense. It is broken down into three sections. First is ventricular function, second are the valves, and third are associated structures. This way you can confidently blast through a comprehensive examination and be confident you did not overlook a major item.
 Confirm that there is no absolute contraindication for TEE insertion.
 Treat the probe gently (expensive), always use a bite block.

 Enter patient details—name, MRN, DOB in the machine using the ‘Patient I.D’ button.
Ventricular Function
Left Ventricle
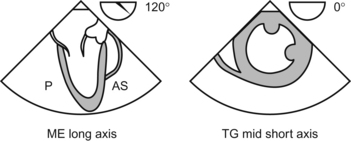
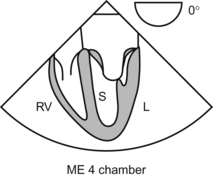
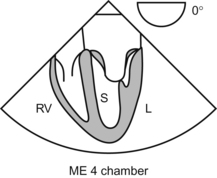
The first view is the ME 4 chamber where both atria and ventricles are seen with the two AV valves. The lateral and the septal walls of the left ventricle and the free wall of the right ventricle are seen. The next view is the transgastric short axis (TG SAX) obtained by advancing the probe further down to enter the stomach and anteflex. Cross section of the LV/RV (doughnut appearance) is seen at the level of the papillary muscles. This is the most commonly used view to assess the systolic function of the LV as it displays all the six regions corresponding to the distribution of the 3 coronary arteries. At this point record a loop of this view to compare with the post-operative study. The TG 2 chamber is seen by increasing the angle to 90 degrees.
Right Ventricle
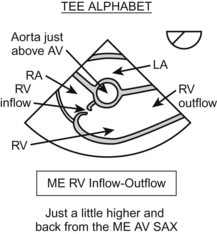
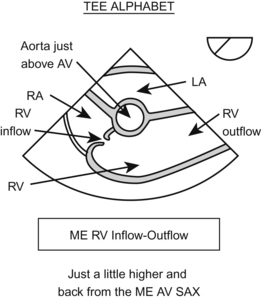
One of the most common views is the ME 4 chamber where the free wall of the right ventricle is visualized. Look for chamber size, dilatation, and contractility in relation to the left ventricle. Another common view is the ME RV inflow/outflow with both the tricuspid and pulmonary valve seen. Note the RV size and contraction. Color flow to be used across both the valves to look for any stenosis/regurgitation; the long axis of the right ventricle is also studied in the TG RV inflow view.

Valves
Mitral Valve
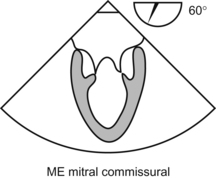
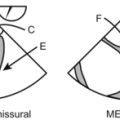
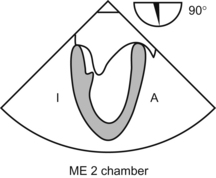
Note the leaflet morphology, motion, and coaptation. Examine with color flow. In the ME 2 Chamber view the anterior leaflet (lateral) is seen with all three scallops A1, A2, A3, and P3 seen medially. In the ME Commissural view, all 3 scallops of the posterior leaflet are seen, with P2/A2 in the center and P1, P2 on either side with their chordal attachments. The coaptation of both leaflets can be studied in detail in the TG basal SAX view, called the “fish mouth”.
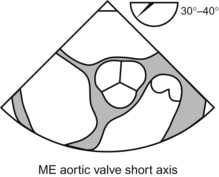
Aortic Valve
The aortic valve is examined in the ME and transgastric views.
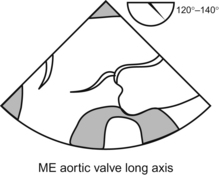

In the ME LAX, the long axis of the aorta is seen with the LV outflow and the mitral valve. Note the leaflet morphology, coaptation, and dimensions of the annulus, sinus, sino-tubular junction and ascending aorta. Examine with color flow. Look for any pathology in the outflow tract. This view is also used to study the A2, P2 of the mitral valve which are commonly associated with prolapse. Advance the probe further into the stomach, ante flex and go beyond the short axis of LV to visualize the Deep TG view of the aortic valve which is seen at the bottom of the sector. This view is used to measure the pressure gradient across the valve as the Doppler is in line with the blood flow. If getting this view is difficult, the gradient can also be measured in the TG LAX obtained by rotating the angle to 90 degrees from the TG mid papillary view.