[level-membership-for-emergency-medicine-category]
Chapter 6 The short cases
The short cases require practice over a period of time.
Format
As a guide, for each case approximately seven minutes is usually assigned to the clinical examination before presentation and questions. You will be given the choice of presenting your findings as you go or at the end. Any further discussion will relate only to the case at hand. The focus will be on synthesising findings for a diagnosis or differential diagnosis, including further methods to clarify this. On occasion you may be shown results of relevant investigations that assist in the differential diagnosis, although time constraints will usually prevent this.
Preparation
Top athletes are taught: ‘Train as you intend to compete, because you will always compete as you train.’ Become familiar with examining each system in a maximum of seven minutes. If your ‘normal’ approach varies with each patient and changes in duration, your performance at the examination (competition for marks) will reflect this. Practise individual examinations with someone timing you. This can be done at home with friends or family members who are happy to volunteer: they will soon be able to tell you when you have missed something. A word of warning: if your partner or family members become the ‘subjects’ for your practice, remember that time spent together in this way does not count as ‘quality time’.
Examining a candidate who provides the answers in a logical fashion without being asked is more satisfying than having to drag the answers out of a candidate one at a time. The more competent you are, the higher you will score. Later sections in this chapter include examples of responses that enable you to keep talking until you are stopped.
Examination approaches
The following sections provide a suggested method for approaching commonly encountered cases, along with possible introductions that may be used by your examiners. These descriptions are not exhaustive of the countless number of clinical signs that may be detectable, but they do provide an organised framework that will enable you to detect all abnormal findings.
Cardiovascular system examination
Getting started
Observe the patient’s general appearance, colour (anaemia, plethora, cyanosis), pursed-lip breathing, respiratory rate and obvious scars. The JVP may be visible at a distance. Head bobbing is an uncommon sign of aortic incompetence (AI), but easily missed if not specifically checked for.
Peripheries
As you move up the arm, feel the brachial pulse and politely ask the examiners:
Move to the neck, feel the carotid pulse for character and auscultate for bruits:
If breathing is noisy, give clear instructions:
Check briefly for conjunctival pallor and central cyanosis (lips and tongue).
Praecordium
After listening at the apex (mitral area), listen in turn to the lower left sternal edge (tricuspid area), then the left upper sternal edge (pulmonary area) and right upper sternal edge (aortic area). Confirm the timing of any murmur by simultaneously palpating the carotid pulse and listen in the axilla and carotids for radiation. Right heart murmurs are louder with inspiration and the opposite is true for left-sided murmurs, so ask the patient to take some slow, deep breaths while listening for changes with the respiratory cycle.
Discussion
I would complete my cardiovascular system examination with [whatever you have not done] as well as completing a general examination including [whichever observations have not been done] and a urinalysis looking for …
‘Can you put these findings together?’
‘What supports one differential over another?’
‘What else could you do to clarify things further?’
After completing the physical examination, the key initial investigations will be an ECG and chest X-ray. The ECG will confirm sinus rhythm and may demonstrate left ventricular hypertrophy. The chest X-ray may show valvular calcification, dilation of the left atrium if there is mitral valve disease and I expect it will also reveal enlargement of the left ventricle and absence of cardiac failure.
Neurological system examination
Cranial nerves
CN I: olfactory nerve
CN I is rarely tested. Asking the patient, Can you smell normally?, is generally sufficient.
CN II: optic nerve
Visual fields
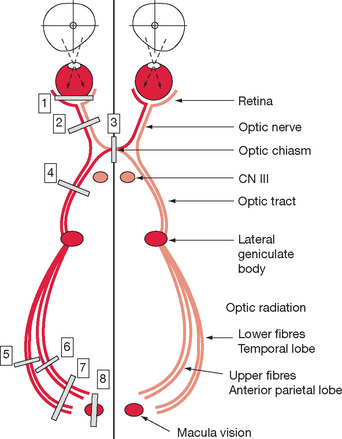
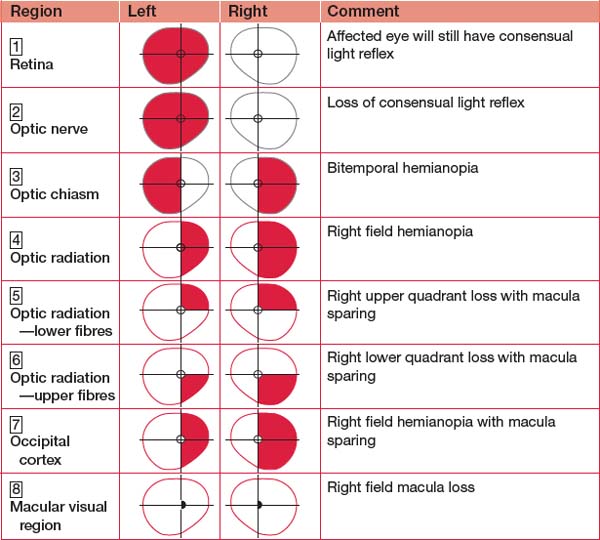
Repeat the same process for the other side. Note whether one or both blind spots are abnormally large (consider papilloedema, optic neuritis). Under standing the visual pathway anatomy is crucial to local ising lesions (see Figure 6.1). Table 6.1 illustrates the principal abnormalities that may be encountered.
CN III, IV and VI: oculomotor, trochlear and abducens nerves
Eye movements tend to confuse those who have forgotten their anatomy (or never learned it in the first place). Understanding anatomy is fundamental to appreciating why the ‘direction of action’ of some muscles is almost the opposite of the direction in which they are tested. Figure 6.2 will refresh your memory. The photographs and diagrams demonstrate the muscles involved when testing eye movements.
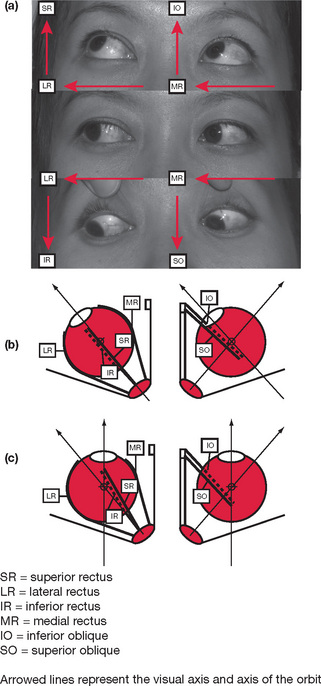
Figure 6.2 Anatomy of the extraocular muscles
(a) Muscles tested with eye movements
The key is to consider the difference between the alignment of the resting visual axis (forward), the line of the orbits (out at an angle) and the angle of pull of the extraocular muscles in relation to these. These align with the eyes deviated ∼45 degrees and this is why we test up and down gaze in this position. The oblique muscles insert posterior to the rotational axis of the globe. Acting on their own as an individual muscle in the resting position, they each abduct the globe. The superior oblique will also cause the eye to look down and internally tort. The inferior oblique has the opposite effects. However, when the eye is adducted, the visual axis is aligned with the direction of pull of the obliques and so their actions are reduced to simply causing the eye to look up (inferior oblique) or down (superior oblique).
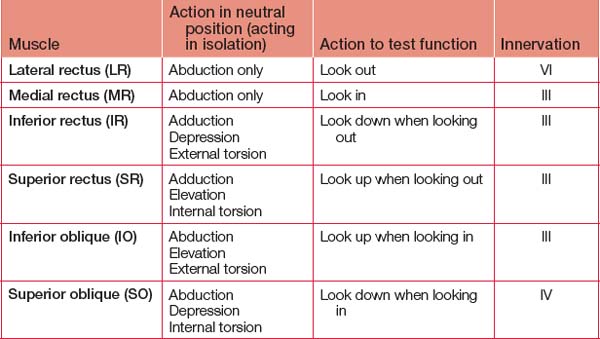
Once you have mastered this anatomy, practise drawing it and showing/teaching it to junior staff and medical students. A summary of the functions and innervations of the individual extraocular muscles is provided in Table 6.2.
Extraocular muscles
Next move the pin out to one side and test up (and hold it to confirm both sides have moved) and down (holding and checking again). Referring back to our anatomy discussion, this is testing the various obliques and recti. Move the pin to the other side. Repeat the up and then down movements.
Pupils
Disorders
Of note, lesions of the visual pathway posterior to the Edinger-Westphal nucleus will have intact pupil reflexes.
CN V: trigeminal nerve
Named for the three sensory branches, it has a motor component as well.
Taste
Although not often part of the examination, taste is easily tested with a salt sachet from the kitchen. Tear off the corner, dab the sachet on each side of the anterior two-thirds and posterior third of the tongue. Recall from your growing confidence with anatomy that taste sensation is derived from CN VII but the fibres travel with CN V after the chorda tympani join it shortly after exiting the skull in front of the ear. Innervation of the tongue is summarised in Table 6.3.
| Anterior two-thirds | Posterior one-third | |
| Touch | V3 | IX |
| Taste | VII (superior salivary nucleus via chorda tympani) | IX/X (inferior salivary nucleus) |
| Motor | XII | XII |
CN VII: facial nerve
CN VIII: auditory nerve
More sophisticated testing requires a tuning fork: 256 Hz is preferable but not essential.
CN XI: accessory nerve
The accessory (to the vagus) nerve provides motor supply to the trapezius and sternocleidomastoid.
Cerebellum
Minimal postural changes to the patient make the exam ination appear much more professional. There fore, it is best to not demonstrate these signs in the order of the mnemonic but rather to use the mnemonic to ensure that they are all part of the examination.
The following approach is suggested:
Get the patient to sit on the bed with their legs dangling over the side.
By now you have demonstrated most cerebellar signs but still have a couple left . It may be time to start the discussion regarding synthesising your findings or, if you’ve already put it together, to start talking about possible causes. If you have been presenting your findings as you go, turn to the examiners and ask: Would you like me to continue with reflexes and heel–shin? If you have not been presenting your findings, the examiners may stop you at this point. When asked, ‘What else would you do?’, the answer in this case is completed with, I would complete my examination by confirming other features of cerebellar dysfunction that I have not yet completed such as pendular reflexes and heel–shin testing. This lets the examiners know there is more and gives them the option of proceeding or, being happy that your slick examination so far would only be continued, moving on to see how deep your differential diagnosis/causes list is. Otherwise, continue with your examination as follows:
Upper limbs
A variety of introductions can be used, usually non-descript such as:
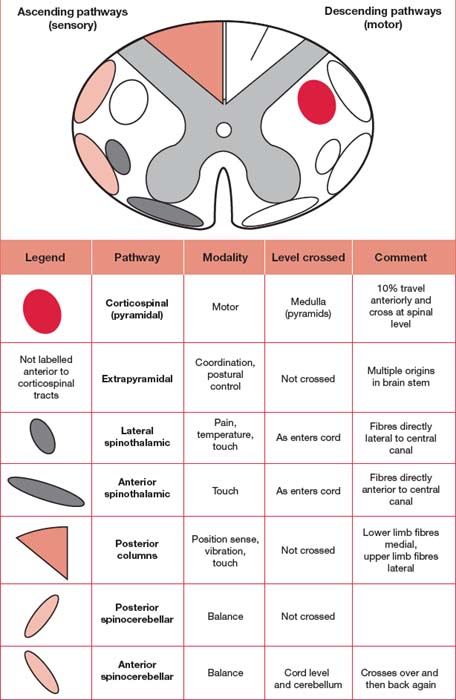
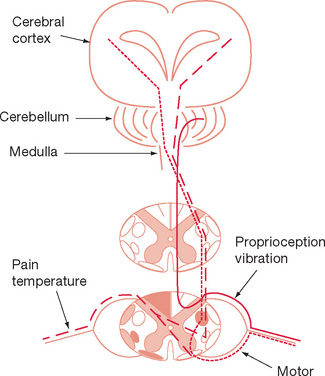
Mastering the anatomy will enable you to differ entiate between neuromuscular disorders, spinal lesions, brachial plexus injuries and peripheral nerve lesions. Learn the patterns of each. A useful starting point is to learn the features of a cord hemisection (Brown-Séquard), including which pathways are ipsilateral or contralateral (depending on the level the fibres cross). Table 6.4 shows a cross-section of the spinal cord demonstrating the principal pathways, while Figure 6.3 presents a coronal representation of the major spinal cord pathways. Note that a lesion affecting one side of the spinal cord (Brown-Séquard syndrome) will result in paralysis and loss of proprio ception and vibration sensation on the same side as the lesion, and loss of pain and temperature on the opposite side of the lesion. Once you have mastered the anatomy, learn the features of median, radial and ulna nerve lesions both proximal and distal.
Motor examination
Power is best assessed starting proximally and working distally.
Rapid assessment
Power
The technique is to get the patient to move if they can and then to push against you resisting. If power is limited, you may need to orientate the joint involved so that gravity is eliminated. For each joint, position the patient and then test power with the instruction, Push against me, as you hold your hand at the end of the ‘lever’ so you have maximal ability to resist their movement. For some movements the instruction, Stop me moving you, will work better. Practise each and see which works best for you. Table 6.5 contains mixed examples of these instructions. Grade each muscle group as per Table 6.6.
| Myotome | Examination technique |
| Shoulder abduction (C5, 6) | Mr Jones, lift your arms out to the side like chicken wings [demonstrate] Push against me [with your hands on top of the elbows] |
| Shoulder adduction (C6, 7, 8) | Bring your arms in to your side Push against me[with your hands on the medial aspect of the elbow] |
| Elbow flexion (C5, 6) | Pull your hands up to your shoulders [position the palms in full supination] Stop me moving you [pull outwards on each arm in turn] |
| Elbow extension (C7, 8) | Push against me [with your hands on the back of each hand in turn] |
| Wrist flexion (C6, 7) | Bend your wrists down [demonstrating yourself with the arms held forward, fully prone with fingers clenched into a loose fist] Stop me moving you |
| Wrist extension (C7, 8) | Now bend them up Stop me moving you |
| Finger extension (C7, 8) | Straighten your fingers Stop me moving you |
| Finger flexion (C7, 8) | Grip my finger [offer only one finger to grip; two or more can be crushed. Attempt to slide your finger out] |
TABLE 6.6 Grading muscle power
| Power | Description |
| 0 | Nothing |
| 1 | Flicker |
| 2 | Movement but unable to overcome gravity |
| 3 | Able to overcome gravity, not resistance |
| 4 | Able to overcome some resistance, not normal strength |
| 5 | Normal |
Specific tests of the peripheral nerves in the hand
Position sense
This is tested by holding either side of a joint, not top and bottom, as differences in light touch between the top and bottom ‘give the game away’. Tell the patient, Close your eyes. Begin with a finger. Advise, This is up, followed by This is down, as you demonstrate the movement. Then ask: Tell me which way I move it. Lift up or down. If there is no answer, prompt with: Where is it now? If proprioception is impaired at the fingers, repeat the procedure at the wrist and then elbow until a normal response is obtained.
Discussion
‘What else could it be?’ and ‘What supports one differential over another?’
Have a differential diagnosis list prepared for the var ious conditions.
Lower limbs
Motor examination
Power
Use the same technique as for the upper limbs, which is outlined in Table 6.7.
| Myotome | Examination technique |
| Hip flexion (L2, L3) | Push against me [with your hands on the distal thigh] |
| Hip extension (L5, S1, S2) | Stop me moving you [as you attempt to lift from behind the distal thigh] |
| Hip abduction (L4, L5, S1) | Push against me [with your hands on the proximal outer thigh] |
| Hip adduction (L2, L3, L4) | Stop me moving you [as you resist with your hands on the medial thigh] |
| Knee flexion (L5, S1) | If supine, test with the knees bent up to 90 degrees Push against me [as you resist with your hands underneath the leg] |
| Knee extension (L3, L4) | If supine, test with the knees bent up to 90 degrees Stop me moving you [as you push with your hands on the front of the leg below the knee] |
| Ankle dorsiflexion (L4, L5) | If supine, test after extending the knee Pull up against my hand [as you press on the front of the foot] |
| Ankle plantar flexion (S1, S2) | If supine, test after extending the knee Press down on my hand [as you press up on the sole of the foot] |
Position sense
Use the hallux. If proprioception is impaired, repeat the procedure at the ankle and then the knee until a normal response is obtained.
Discussion
‘What else could it be?’ and ‘What supports one differential over another?’
Have a differential diagnosis list prepared for the various conditions.
Parkinson’s disease
Propulsion and retropulsion (inability to stop shuffling once ‘pushed’) are classical signs, but are high risk just to demonstrate during a stressful exam. Mention that these features would be expected and give the examiners the opportunity to decline: I anticipate Mr Jones would demonstrate propulsion and retropulsion. Would you like me to demon strate these? This may give you points without risking unintentionally pushing Mr Jones over in your exam-fuelled enthusiasm! Should the examiners think both Mr Jones and you are up to it, they will permit it.
Speech
For example, Gerstmann’s syndrome (dominant parietal lobe disorder) is a combination of:
Dysphasias (or aphasia if no response)
Determine whether this is receptive, expressive, nominal or some other variety. Having already asked the patient to say ‘purple, turtle, lilac’, you will know whether there is a problem with reception. Present the patient with a pen. Ask: What is this? If there is no response (aphasia) or the wrong but a related word is given, progress to: What do you do with it? A fluent response with incorrect, often totally unrelated content suggests receptive dysphasia. Expressive dysphasia will be apparent if the patient seems to understand the question but struggles to structure a fluent response. These individuals will subsequently be able to follow written instructions such as ‘write your name’ or ‘close your eyes’. Nominal dysphasia will be detected by asking the patient to name a part of the pen, such as the nib or lid: they will be unable to do this.
Frontal lobe
Practise your frontal lobe reflex testing on babies during your paediatric sessions:
Asking the patient to explain a proverb such as ‘a rolling stone gathers no moss’ or ‘people who live in glass houses shouldn’t throw stones’ tests abstract thinking. Proverbs are culturally specific so, if the patient does not understand these, ask whether they know any others. As you do this more often you will learn new ones. An associated expressive dysphasia may also make this difficult.
Finish by asking the patient to recall your three objects again to test five-minute recall.
Respiratory system examination
Getting started
Encourage them to keep going if it is prolonged and/or if effort appears to be less than full. In some patients this will precipitate a coughing episode, which further clarifies their condition and physiological reserve. If a cough has not been induced already, ask for one now. Have a tissue ready in case it is productive, in which case you now have sputum to examine.
Chest
Check breath sounds carefully: Mr Jones, take some breaths in and out through your mouth. They don’t have to be too deep, but must be through your mouth. If necessary, you can instruct them to take larger breaths if breath sounds are still hard to hear. Bronchial breath sounds are equal in volume during inspiration and expiration with a pause in-between. Bronchial breath sounds result from solid material connecting larger airways with the lung periphery (consolidation, fibrosis including surgical scars, solid tumours). Tracheal breath sounds are ‘bronchial’ in nature.
Discussion
The most common opening from the examiners will be as follows.
‘What else could it be?’ and ‘What supports one differential over another?’
Use your pre-prepared and memorised lists of causes for clubbing, mediastinal shift, dullness to percussion, crackles that clear or not, bronchial breathing and so on to differentiate between exudative, ‘solid’ and ‘liquid’ conditions. If you are unsure, going through this rationally with the examiners demonstrates your clinical acumen, which is what the examination is all about.
Abdominal examination
It is difficult to begin with any introduction other than:
Peripheries
Examine the sclera for anaemia or jaundice. The eyes may demonstrate Kayser-Fleisher rings indicating Wilson’s disease. These signs are subtle and best appreciated after having seen them before (in clinics). Check for perioral pigmentation associated with Peutz-Jegher syndrome. Assess dental hygiene and look for glossitis and any other intra-oral abnormality.
Abdomen
After checking for organomegaly and defining any other masses that are palpable, test for ascites by the presence of a fluid thrill and shifting dullness. Both require the margin of dullness (fluid edge) to be determined initially in the supine position. Make a mental note of the position, but do not mark it — the examiners do not want evidence for subsequent candidates! A fluid thrill can be elicited by placing one hand over a flank ensuring it is over presumed fluid but not an organ. Tap the other side in the same position (fluid but not organ) with a finger. With fluid present, a percussion wave can be felt easily. This test can be made more sensitive by placing a hand in the middle of the abdomen to ‘stabilise’ it — however, this is not necessary and would require you to have a third hand or have one of the examiners leaning over the patient with you. Shifting dullness is elicited by rolling the patient onto their side after percussing the edge of the ascites and waiting preferably for a few minutes (although rarely does more than ∼20 seconds pass) before percussing again to find the edge has moved posteriorly. Rolling the patient away from you makes it easier when subsequently percussing, as you will not have to lean over the patient.
Discussion
‘Other’ examinations
Knee (orthopaedic)
Of the joints, the knee is the most likely to appear as a short case, although the general technique applies to other regions. Degenerative arthritis and ligamentous instability are the most likely conditions to be encountered. It is unlikely that you will be permitted to walk the patient at the beginning of the examination, although this should be requested. If granted, any functional deficit will be readily apparent. The general ‘orthopaedic’ approach should be adopted: look, feel, move, X-ray.
Move
Rheumatoid hands
The most likely ‘hand’ to be presented, other than one with a neurological finding, is the rheumatoid hand. If specifically directed to the hand (the most likely scenario), do not start with a general examination. You will gain some appreciation of the overall status of the patient as you proceed, and can include this at the end of your examination if presenting as you go (or at the start if you prefer to present later). Our advice is to present your findings as you go, as it is easy to omit certain findings if you are trying to remember too much. Develop a system to take you through each component of the pathology in a systematic fashion that ‘scans’ the hands, wrists and forearms.
Examine further
Continue with the examination beyond the request ed area by moving up the arm. Feel for rheumatoid nodules (ulna surface) and look for rash. Indicate that you would go on to examine all the other limb joints (say this convincingly, because you may be taken up on the offer if time permits) and then proceed to a full physical examination.
Thyroid
This may be introduced as ‘Mr Jones has a neck mass’ or simply ‘Examine Mr Jones’ neck’.
Examination
Hyperthyroidism will be evident by proptosis, lid lag and retraction, dry eyes and a variety of ophthal moplegias if eye disease is associated (e.g. Grave’s disease). Clubbing may be present along with an exaggerated physiological tremor, sweatiness, tachycardia, dysrhythmias and, in severe cases, cardiac failure. Moving down the body, check for proximal myopathy, pretibial myxoedema (thickened plaques over the tibia) and finally reflexes that are heightened.
Pregnancy
Definitely introduce yourself with a smile. Adding ‘congratulations’ as part of your ‘thanks for partici pating’ doesn’t hurt — and you might get a smile back! Check the patient is comfortable and mention the preferred position is wedged to the left (whether already on the left or not). Note the patient’s general appearance, skin colour (including skin pigmentation), and respiratory rate and effort.
Pregnancy-focused examination
Neonate/baby check
From the end of the bed
Head-to-toe examination
Paediatrics
Although most of the conditions found in adults can also be found in children, some are quite different. Children are more likely to have congenital conditions and ‘syndromes’ with particular patterns of signs. It is not important that you know all of these, apart from the more common ones such as Trisomy 21. Time spent inspecting the child from a distance is time well spent. Obvious dysmorphic features, scars, respiratory rate, skin colour, activity and size are all important. Ensure that you have an examination approach for examining children of all ages. In more ways than not, this will be analogous to the systematic exam in ation of an adult. Examination Paediatrics (by W Harris, Elsevier, Sydney) is an invaluable resource for assisting you to develop thorough, age-appropriate approaches. Recall that a sign of any chronic disorder in children, includ ing respiratory and cardiac failure, is failure to thrive.
For younger children in particular, you may be asked to assess developmental status. Knowledge of normal verbal and motor milestones is essential (see Table 6.8), while noting there is a large variation in normal: you should not be overly focused on a single milestone if the others appear to be normal.
| Age | Milestone | Terminology |
| 4 weeks | Fixes and follows through 180 degrees | Neonate — up to 28 days |
| 6 weeks | Smiles | Infant — 28 days to 1 year |
| 2 months | Holds head erect when held upright | |
| 3 months | Head turns to sound | |
| 4 months | Rolls over from front to back | |
| 5 months | Reaches and holds with one hand | |
| 6 months | Transfers between hands | |
| 7 months | Sits | |
| 9 months | Crawls; stands with support | |
| 12 months | Speaks single words | Toddler — 1 to 3 years |
| 13 months | Walks | |
| 15 months | Holds cup and drinks | |
| 18 months | Builds tower of 3 cubes | |
| 2 years | Speaks 2–3-word sentences | |
| 3 years | Can use fork and spoon | Preschooler — 3 to 5 years |
When discussing the possible diagnosis or differential diagnosis in children, ensure your responses are age-specific. For example, cardiac murmurs in children may be pulmonary flow murmurs or due to congenital heart disease. Disorders such as aortic dissection are exceedingly uncommon. Respiratory conditions such as cystic fibrosis are frequent (especially in exams). Abdominal organomegaly may be from storage disorders and not alcohol excess. Organ transplants are common, so make sure you look for scars if there are peripheral signs of disease (e.g. clubbing) but a relative lack or absence of central signs. The ‘cause’ may have been removed and replaced with a normal heart and/or lung!
Table 6.9, while not exhaustive, lists some of the conditions you should be familiar with. Similar to the adult cases, paediatric patients may commonly be introduced as having a symptom or sign (e.g. difficulty breathing or walking) that warrants examination to facilitate reaching a likely diagnosis or differential diagnosis. Alternatively, you may be asked to examine a specific system (e.g. cardiovascular) or body region (e.g. a joint or whole limb).
TABLE 6.9 Paediatric short cases
[/level-membership-for-emergency-medicine-category][not-level-membership-for-emergency-medicine-category]
Chapter 6 The short cases
The short cases require practice over a period of time.
Format
As a guide, for each case approximately seven minutes is usually assigned to the clinical examination before presentation and questions. You will be given the choice of presenting your findings as you go or at the end. Any further discussion will relate only to the case at hand. The focus will be on synthesising findings for a diagnosis or differential diagnosis, including further methods to clarify this. On occasion you may be shown results of relevant investigations that assist in the differential diagnosis, although time constraints will usually prevent this.
Preparation
Top athletes are taught: ‘Train as you intend to compete, because you will always compete as you train.’ Become familiar with examining each system in a maximum of seven minutes. If your ‘normal’ approach varies with each patient and changes in duration, your performance at the examination (competition for marks) will reflect this. Practise individual examinations with someone timing you. This can be done at home with friends or family members who are happy to volunteer: they will soon be able to tell you when you have missed something. A word of warning: if your partner or family members become the ‘subjects’ for your practice, remember that time spent together in this way does not count as ‘quality time’.
Examining a candidate who provides the answers in a logical fashion without being asked is more satisfying than having to drag the answers out of a candidate one at a time. The more competent you are, the higher you will score. Later sections in this chapter include examples of responses that enable you to keep talking until you are stopped.
Examination approaches
The following sections provide a suggested method for approaching commonly encountered cases, along with possible introductions that may be used by your examiners. These descriptions are not exhaustive of the countless number of clinical signs that may be detectable, but they do provide an organised framework that will enable you to detect all abnormal findings.
Cardiovascular system examination
Getting started
Observe the patient’s general appearance, colour (anaemia, plethora, cyanosis), pursed-lip breathing, respiratory rate and obvious scars. The JVP may be visible at a distance. Head bobbing is an uncommon sign of aortic incompetence (AI), but easily missed if not specifically checked for.
Peripheries
As you move up the arm, feel the brachial pulse and politely ask the examiners:
Move to the neck, feel the carotid pulse for character and auscultate for bruits:
If breathing is noisy, give clear instructions:
Check briefly for conjunctival pallor and central cyanosis (lips and tongue).
Praecordium
After listening at the apex (mitral area), listen in turn to the lower left sternal edge (tricuspid area), then the left upper sternal edge (pulmonary area) and right upper sternal edge (aortic area). Confirm the timing of any murmur by simultaneously palpating the carotid pulse and listen in the axilla and carotids for radiation. Right heart murmurs are louder with inspiration and the opposite is true for left-sided murmurs, so ask the patient to take some slow, deep breaths while listening for changes with the respiratory cycle.
Discussion
I would complete my cardiovascular system examination with [whatever you have not done] as well as completing a general examination including [whichever observations have not been done] and a urinalysis looking for …
‘Can you put these findings together?’
‘What supports one differential over another?’
‘What else could you do to clarify things further?’
After completing the physical examination, the key initial investigations will be an ECG and chest X-ray. The ECG will confirm sinus rhythm and may demonstrate left ventricular hypertrophy. The chest X-ray may show valvular calcification, dilation of the left atrium if there is mitral valve disease and I expect it will also reveal enlargement of the left ventricle and absence of cardiac failure.
Neurological system examination
Cranial nerves
CN I: olfactory nerve
CN I is rarely tested. Asking the patient, Can you smell normally?, is generally sufficient.
CN II: optic nerve
Visual fields
Repeat the same process for the other side. Note whether one or both blind spots are abnormally large (consider papilloedema, optic neuritis). Under standing the visual pathway anatomy is crucial to local ising lesions (see Figure 6.1). Table 6.1 illustrates the principal abnormalities that may be encountered.
CN III, IV and VI: oculomotor, trochlear and abducens nerves
Eye movements tend to confuse those who have forgotten their anatomy (or never learned it in the first place). Understanding anatomy is fundamental to appreciating why the ‘direction of action’ of some muscles is almost the opposite of the direction in which they are tested. Figure 6.2 will refresh your memory. The photographs and diagrams demonstrate the muscles involved when testing eye movements.
Figure 6.2 Anatomy of the extraocular muscles
(a) Muscles tested with eye movements
The key is to consider the difference between the alignment of the resting visual axis (forward), the line of the orbits (out at an angle) and the angle of pull of the extraocular muscles in relation to these. These align with the eyes deviated ∼45 degrees and this is why we test up and down gaze in this position. The oblique muscles insert posterior to the rotational axis of the globe. Acting on their own as an individual muscle in the resting position, they each abduct the globe. The superior oblique will also cause the eye to look down and internally tort. The inferior oblique has the opposite effects. However, when the eye is adducted, the visual axis is aligned with the direction of pull of the obliques and so their actions are reduced to simply causing the eye to look up (inferior oblique) or down (superior oblique).
Once you have mastered this anatomy, practise drawing it and showing/teaching it to junior staff and medical students. A summary of the functions and innervations of the individual extraocular muscles is provided in Table 6.2.
Extraocular muscles
Next move the pin out to one side and test up (and hold it to confirm both sides have moved) and down (holding and checking again). Referring back to our anatomy discussion, this is testing the various obliques and recti. Move the pin to the other side. Repeat the up and then down movements.
Pupils
Disorders
Of note, lesions of the visual pathway posterior to the Edinger-Westphal nucleus will have intact pupil reflexes.
CN V: trigeminal nerve
Named for the three sensory branches, it has a motor component as well.
Taste
Although not often part of the examination, taste is easily tested with a salt sachet from the kitchen. Tear off the corner, dab the sachet on each side of the anterior two-thirds and posterior third of the tongue. Recall from your growing confidence with anatomy that taste sensation is derived from CN VII but the fibres travel with CN V after the chorda tympani join it shortly after exiting the skull in front of the ear. Innervation of the tongue is summarised in Table 6.3.
| Anterior two-thirds | Posterior one-third | |
| Touch |
