The severely injured patient
PRINCIPLES OF DAMAGE CONTROL
1. Damage control surgery (DCS) is a well-established suite of techniques relevant to the management of severely injured patients.
2. The essence of the damage control approach is to tailor the extent of the surgical intervention to that which will most rapidly restore physiological normality in the patient. Control of haemorrhage takes precedence, with completeness of surgical reconstruction sacrificed, in order that the physiological burden of surgery is as light as possible. Keep the first operation (DCS phase one) short, completing the procedure within 60–90 minutes, and deferring definitive closure of body cavities if required. After a period of time in intensive care (DCS phase two – which may be hours or days depending on how rapidly the patient can be returned to physiological normality), the patient may be transferred back to theatre for re-inspection and completion of surgery plus closure if appropriate (DCS phase three).
3. Patients with serious injury, particularly when shocked, are at risk of acute coagulopathy of trauma (ACoT). Hypoperfusion and tissue damage, exacerbated by hypothermia and acidaemia, can serve to disable the normal clotting pathways, leading to continued haemorrhage (often from multiple sites) and a lethal outcome. By choosing a damage control approach, you can rapidly reduce the chance of ACoT developing, or mitigate the extent of ACoT if it is already present. An important and recently developed adjunct to damage control is the use of matched ratios of blood (packed cells) and plasma during initial and ongoing fluid resuscitation efforts. Published experience from the wars in Iraq and Afghanistan, combined with data from civilian centres, supports early use of equal or near-equal ratios (1:1–1:2) of packed cells and plasma in reducing mortality, organ failure rates and ongoing need for blood transfusion, especially if used in conjunction with aggressive, early use of platelet transfusion. Damage control resuscitation (DCR) is the overarching term used to describe this haemostatic transfusion strategy plus damage control surgery to optimally treat the major trauma patient. As a practitioner of damage control surgery, you must be conversant with modern fluid resuscitation in order to ensure that your anaesthetic colleagues and other members of the trauma team are optimally managing the patient’s physiological requirements.
4. Having decided on which cavity or body area requires initial attention, you next need to determine whether the patient will tolerate a definitive repair of their injury complex, or whether damage control mode needs to be selected. This can only be answered by rigorously seeking information from other members of the trauma team – particularly the anaesthetist – as to the current and anticipated physiological state of the patient. Remember that this state is dynamic, and although a patient may appear to be stable on cursory assessment, never underestimate the ability of fit young patients to compensate for severe haemorrhage until they enter a rapid and unanticipated phase of terminal decline. Always be prepared to ‘course-correct’ according to new information that is presented to you.
Prepare
1. Ensure that you have gained sufficient information from physical examination and relevant investigations to undertake the operation you deem necessary. Whilst a thorough physical examination is required (always examine the back), this does not mean exhaustive special investigations, particularly when you suspect haemorrhage. There is a danger in utilizing additional investigations as a means of ‘opting out’ (or deferring) decision-making in trauma, particularly when faced with the prospect of performing an unfamiliar surgical intervention in unfamiliar clinical circumstances. Transfer for surgical control of haemorrhage is occasionally indicated very early on in the primary survey – sometimes as part of ‘C’ (Circulation) – so address it before making the rest of the assessment.
2. Ensure rapid transport to the operating theatre. Activate the hospital’s massive transfusion protocol. Relay your intentions to the anaesthetic and scrub teams, stating what you expect to find, what you plan to do about it, and your back-up plan. Give your anaesthetic colleagues an opportunity to do the same. Ensure that all relevant surgical sets, equipment and sutures are available, including two suckers and multiple large packs. Call for assistance from colleagues early, particularly if you require specialist assistance. Alert intensive care and ensure that they are updated regularly with the progress of the case. In cases of competing injury sets (e.g. abdominal haemorrhage plus open femoral fracture; pelvic fracture plus knee dislocation with lower limb ischaemia) decide upon surgical priority with relevant colleagues before beginning operation.
3. Supervise the transfer of the patient on to the operating table and ensure adequate access. The standard patient position for truncal trauma is supine with arms outstretched at 90 degrees (cruciform position). Ensure ECG leads and tubing (ventilation, urethral catheter, chest drains) are routed away from your preparation area. Place a warming blanket over the extremities and the head; adjust operating room temperature upwards to mitigate hypothermia.
4. Prepare the entire torso from the level of the mid thighs to the clavicles. Lay drapes, covering the groin with a separate towel. If necessary, control active bleeding (from a neck or groin wound) with a sponge stick during the preparatory phase.
Access
1. Make all surgical incisions in trauma patients large enough to allow full access to the relevant cavity or structure that is injured. Incisions should be extensile, i.e. amenable to elongation along an appropriate axis. The workhorse incisions for torso trauma are full-length midline laparotomy (abdominal and pelvic trauma), left/right anterolateral thoracotomy – proceeding to clamshell thoracotomy if required (thoracic trauma), and median sternotomy (control of aortic arch vessels). Any of these incisions can be combined with other incisions – for instance, laparotomy may be combined with a right anterolateral thoracotomy in cases of severe liver injury – if that is what is required to effect rapid visualization and control.
Assess
1. The keys to making an accurate assessment of the injury set and determining the source(s) of haemorrhage are:


2. If the degree of bleeding is not consistent with the degree of physiological instability, you must ensure that another cavity does not harbour the primary source of shock. For instance, if you performed a laparotomy, but are unconvinced that the degree of haemorrhage encountered explains the shock, search for bulging of the diaphragm and check chest drainage output as a means of re-assessing the thoracic cavity.
Action
1. Having identified the bleeding organ or vessel, first control the haemorrhage. Initially you should use your hands to accomplish this, judiciously applying direct pressure (e.g. to a bleeding vessel), pinching tissue (such as the hilar vessels supplying a bleeding spleen or liver), or packing around a bleeding structure (such as the liver) in order to diminish blood loss and give yourself a little time to organize yourself and your team.
2. Whilst performing this initial manoeuvre, think: ‘Is my incision large enough for what I wish to accomplish? Have I got the correct retractors? Have I deployed my assistants correctly to use them properly? Are the lights angled correctly to give maximum illumination? What clamps/sutures/needle-holders/forceps do I need? Are the instruments the scrub team has laid out for me sufficient?’ Getting these factors addressed – setting yourself up correctly for success – is easier whilst maintaining digital haemorrhage control.
3. Communicate with the anaesthetist and explain what the source of the bleeding is, what you plan to do about it, and allow him or her a short period of time to optimize the requirements before removing your hands and proceeding.
4. Typically, gaining definitive control requires definitive visualization, often preceded by some dissection, and application of a clamp or haemostatic sutures, and/or resection of tissue or organ removal. These steps in haemostatic control may be made difficult by excessive haemorrhage, distorsion of normal anatomy by haematoma, and unfamiliarity with the procedure or anatomy. Your difficulties may be compounded by your natural anxiety at, and awareness of, the time-critical nature of the procedure. In such circumstances, energy and visual focus may become funnelled in to a particular task (‘I must correctly clamp the thoracic aorta’) at the expense of overall situational awareness (‘The internal mammary arteries, sectioned on entry to the chest, are still bleeding and need to be ligated’). Furthermore, under excessive stress, you lose creativity, so surgical technique and action resort to stereotype (‘This haemostatic suture has not worked; I shall ask for another suture and repeat the manoeuvre until something changes, even though this technique did not work the first time round’) – a phenomenon that Mattox and Hirschberg aptly describe as ‘flailing’. Be aware of this phenomenon, monitor yourself and the success of the manoeuvre you are employing to dissect/control/clamp/suture – above all, maintain situational awareness.
Checklist
1. DCS laparotomy is always accompanied by temporary means of abdominal cavity closure in order to diminish (but not abolish) the risk of abdominal compartment syndrome and to allow for easy re-exploration in DCS phase three. Similarly, when operating on the injured extremity, the likelihood of compartment syndrome is significantly reduced by adequate fasciotomy. Have a very good reason NOT to leave the operated cavity open.
2. Having completed the surgery, consider and plan for the actions needed so that the patient can be eventually returned to the theatre for completion of surgery.


NECK AND THORACIC OUTLET
Appraise
1. Penetrating trauma to the neck is more likely to require intervention than blunt trauma. The key decision you need to make is: does the patient need to go to theatre immediately or not? Patients who need urgent surgical exploration are those who display active arterial bleeding, have an expanding haematoma, or are shocked with poor response to haemostatic resuscitation. If your patient does not fall in to this category, examine the wound and determine if it has breached the platysma. You should be able to do this without formally exploring the wound. If the wound is superficial to platysma, simply close the skin. If the platysma is breached, investigate with imaging to exclude damage of the vascular or visceral structures. Contrast enhanced multi-detector CT has largely replaced screening by formal selective arteriography and barium contrast swallows for penetrating neck injuries. Reviewing the images, you should be able to follow the track of any penetrating mechanism and account for the integrity of all structures in the path, marrying up structural information with clinical features such as haemoptysis, haematemesis, neurological injury, or an obvious air leak, to enhance diagnosis.
2. Injuries to the lateral aspect of the neck, related to the thoracic outlet, may be associated with vascular compromise to the upper limb (damaged subclavian or axillary vessel) and damage to the brachial plexus. Endovascular stent grafting of these vessels may be an acceptable alternative to open surgery.
3. You must ensure that the airway is definitively controlled in the unstable patient. In the stable patient it is also wise to default to early intubation and ventilation when you have sufficient information to predict that the patient will require surgery.
Prepare
1. When operating on injured structures in the neck, be aware of the zone of likely injury and ready yourself accordingly. Zone I injuries (inferior to the cricoid cartilage) are likely to require a median sternotomy to gain access to the proximal aortic branches. Zone III injuries, superior to the angle of the mandible, prove problematic in gaining distal control of the internal carotid and may require manoeuvres such as dislocation of the mandible to gain access.
2. Ensure that your preparation and draping takes account of these issues. In general, have the patient’s head rotated away from the side of the injury to gain better access to the carotid sheath.
Access
1. When exploring the neck for possible vascular injury, begin by making a full-length incision along the anterior border of the sternocleidomastoid muscle, from mastoid process to jugular notch. Retract the SCM muscle laterally as you deepen the incision. The first structure you encounter is the internal jugular vein. Divide the facial vein and the omohyoid muscle, stretching across the carotid artery, to gain access to this vessel and its bifurcation. Divide the stylohyoid muscle in the superior part of the wound to gain access to the higher internal carotid. Be wary of the XII nerve as it crosses the internal carotid artery (see Chapter 23).
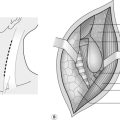
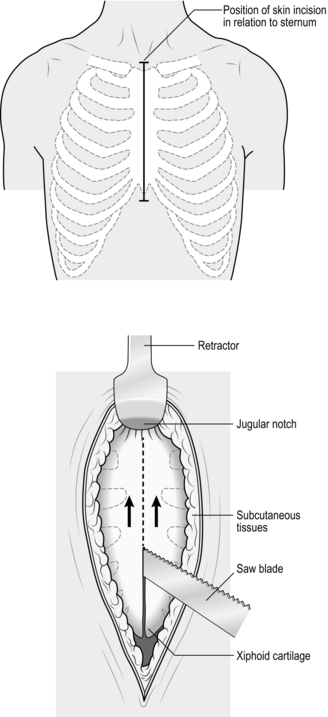
2. Be prepared to commence exploration of a Zone I injury by performing a median sternotomy (see Chapter 27), particularly if the patient is unstable. Open the pericardium and identify the aortic origin, then follow the vessel as it curves upwards and posteriorly, giving off the brachiocephalic, left common carotid and left subclavian arteries. Dividing the innominate vein gives better access; it can be repaired at the completion of the procedure if circumstances permit (Fig. 3.1).
3. Expose the 2nd part of the subclavian artery by a supraclavicular incision that runs above the medial two-thirds of the clavicle. Cut through platysma and the clavicular head of the sternocleidomastoid. Sweep the scalene fat pad laterally and palpate the anterior scalene muscle, running supero-inferiorally. Divide this muscle, sparing the phrenic nerve lying on the anterior surface, to reveal the subclavian artery lying in the base of the wound.
4. Having gained proximal and distal control, consider your options. Simply ligate veins. Repair damaged arteries if possible. Always repair the common or internal carotid. Excise injured arterial tissue and tack down the intima if there is a danger of a flap. Close simple lacerations transversely to avoid luminal narrowing. Usually, a patch of vein or Dacron is required. Prefer to repair segmental loss with an in-situ graft. In patients unable to tolerate definitive repair, then shunt the vessel with a commercial shunt or a short segment of diameter-matched IV tubing. You may safely ligate the external carotid artery. Haemorrhage from the vertebral artery is usually more difficult to deal with. Obtain access by retracting the carotid sheath medially and incising the prevertebral tissue plane so revealed. Beware of the prevertebral venous plexus which adds to the haemorrhage if damaged. You may achieve haemostasis using bone wax and pressure but otherwise control the artery above and below the injury by removing the costal face of the appropriate cervical transverse processes with bone nibblers. Repair of the vessel is technically difficult and ligation or clipping is usually the most practical option.
5. Explore tracheal wounds through a transverse skin crease incision or, if associated with a carotid injury, via medial dissection from the standard anterior sternocleidomastoid approach. You can normally repair the trachea using a single layer of absorbable material over the endotracheal tube. Check for associated pharyngeal injuries and repair them in two layers. Ensure that the two repairs are separated, to avoid a fistula forming. A mobilized length of strap muscle serves this purpose well.
CHEST
THORACOTOMY
Appraise
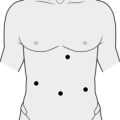
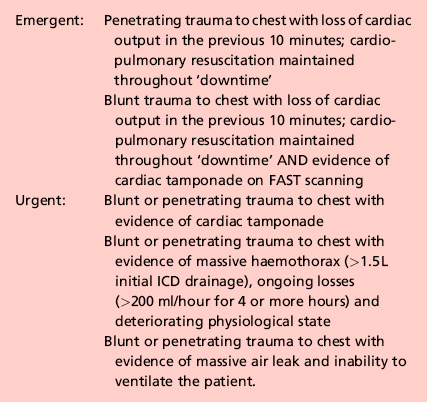
1. Perform thoracotomy for trauma under emergent or urgent conditions. Undertake emergency thoracotomy on an in-extremis casualty who has no detectable circulation. The patient’s condition usually precludes transport to the operating theatre and for this reason the surgery is often performed in the Emergency Department. The outcome is far better following penetrating trauma than after blunt trauma. Survivors of emergent thoracotomy are generally those patients who have sustained a small stab wound to the front of the heart where loss of circulation has occurred in the presence of the trauma team. Factors mitigating against successful outcome include blunt mechanism of injury without evidence of tamponade, exsanguinating hypovolaemia, and prolonged ‘downtime’ (absence of circulation) prior to presentation to hospital. Tamponade is the injury pattern most amenable to emergency thoracotomy. Always search for it in the in-extremis or unstable casualty with thoracic trauma. This is particularly so when the injury is to ‘The Box’ of the anterior chest wall – an area demarcated superiorly and inferiorly by horizontal planes passing through the xiphisternum and jugular notch respectively, and bounded laterally by vertical planes passing through each nipple. Ultrasound scan is the most useful emergency department tool for detecting tamponade.
2. Urgent thoracotomy is usually performed in the operating theatre on a casualty who is unstable but exhibiting spontaneous circulation and has yet to decompensate. The diagnosis is usually either massive haemothorax or cardiac tamponade, but there is more time for you to plan your approach. In circumstances other than emergencies always ensure you have addressed the fundamental principles of current trauma management in Advanced Trauma Life Support® protocols, including appropriate imaging and correctly sited chest drainage.
Prepare
1. Double lumen tubes are seldom required for these patients. Do not allow the search for double lumen tubes or a ‘cardiac anaesthetist’ familiar with double lumen intubation to delay surgery.
2. Standard trauma preparation and drape; cruciform position. Preparation consists of pouring of antiseptic skin solution onto the chest in the emergent situation.
Access
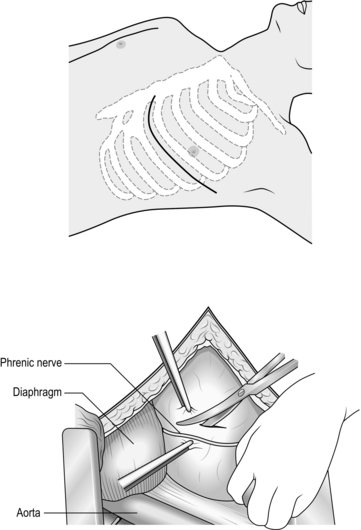
1. For suspected tamponade, perform a left anterolateral thoracotomy (Fig. 3.2). Identify the fifth interspace immediately inferior to the male nipple, or by counting down from the angle of Louis (2nd costal cartilage meets sternum at this point). Make a bold transverse incision from the midline of the sternum, curving posteriorly and superiorly, following the fifth interspace as far back as the space between the mid and anterior axillary lines (Fig. 3.2). Deepen the incision. Retract the lowermost portion of pectoralis major superiorally or cut through these inferior fibres to reach and swiftly divide intercostal muscle with knife or scissors. Cleave the muscles toward the lower rib and avoid the intercostal bundle.
2. Prior to perforating the pleura, ask the anaesthetist to disconnect the patient from the ventilator in order to drop the lung away from the knife. Extend the perforation medially and laterally with scissors prior to re-ventilation.
3. Place the blades of a Finnecetto retractor in the wound and open up the incision to expose the pleural contents. Obtain maximal exposure. If time allows, examine the medial (sternal) portion of the wound as you widen the retractor, clamping and ligating the ipsilateral internal mammary artery.
Assess
1. Examine the thoracic cavity. Quickly evacuate any clot. Keep the operative field clear with effective and intelligent retraction and suction. Gently push the left lung down (inferiorally) and identify the pericardial sac and phrenic nerve running supero-inferiorally. A bulging, purple pericardial sac indicates tamponade. Open the pericardium correctly by grasping it at least 2 cm anterior to the phrenic nerve with long-handled haemostats, then incising this tented portion with scissors. If it is difficult to gain purchase with haemostats on a very tense sac, carefully perforate the pericardium with an 11 bladed scalpel, avoiding the heart itself. Generously lengthen the incision supero-inferiorally so that the clot can be evacuated and the heart delivered.
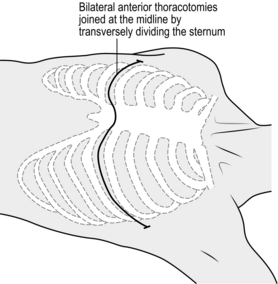
2. Usually a bleeding wound is observed on the front aspect of the heart. Control it digitally whilst optimizing access. If you are inexperienced in cardiac repairs it is advisable to convert the left anterolateral thoracotomy into a clamshell thoracotomy (Fig. 3.3). Perform a mirror incision on the right chest wall and thence a right anterolateral thoracotomy. Expeditiously divide the sternum with a Gigli saw, a set of bone cutters, a Lebske knife, or a pair of paramedic ‘tough-cut’ scissors. Reposition the Finnecetto retractor or insert a second one, to maximize exposure. Throughout this manoeuvre, be sure that you, or your assistant, have digital control of the myocardial wound.
3. Even when performing a thoracotomy for massive haemothorax or air leak, open the pericardium to ensure that you have not missed a tamponade.
Action
1. Temporarily control myocardial wounds of the atrial appendages using a side-biting vascular clamp. Under-run (beneath the clamp limbs) a 3/0 polypropylene stitch in a haemostatic ‘sewing machine’ continuous suture technique, prior to removing the clamp. Add a second layer of ‘over and over’ sutures using the remainder of the polypropylene. For atrial wounds temporize (gain time) by using a Foley catheter. Insert a collapsed Foley catheter into the wound, after ensuring that you have clamped off the urinary channel. Inflate the balloon and pull it gently against the inner edges of the defect. Place a purse string suture around the wound, avoiding inadvertant bursting of the balloon and loss of control. Tighten the purse string, deflate the balloon and withdraw the catheter. For ventricular lacerations use interrupted, deeply-placed pledgetted sutures, maintaining digital control between needle placement. Use a large, curved, round bodied needle of 2/0 or 3/0 prolene. Avoid entrapment of the coronary vessels when dealing with injuries adjacent to these structures. When suturing myocardium, a large curved round-bodied needle (2/0 or 3/0 prolene) is valuable, particularly when dealing with injuries adjacent to the left anterior descending artery.
2. If a coronary vessel has been transected, and cardiac by-pass/cardiothoracic assistance is not immediately available, prefer ligation rather than attempting inexpert repair.
3. Now examine the other structures of the chest, including lungs, diaphragm, chest wall, and mediastinum.
4. When performing a thoracotomy for massive haemorrhage, evacuate the clot and blood and determine the source. In penetrating trauma check for bleeding from the chest wall (intercostal artery, internal mammary artery), the lung (parenchyma, hilar vessels), the mediastinum (superior vena cava, inferior vena cava, azygous vein, aortic arch vessels, aorta) and diaphragm (intra-abdominal source demanding exploratory laparotomy). If the lung is bleeding from a tract, or bubbling air and blood due to a major airway injury, you need to mobilize the lung by dividing the inferior pulmonary ligament (investing the hilar vessels like a cuffed sleeve of pleura). If the air leak or bleeding is particularly severe you will then be in a position to control the hilum, either between fingers and thumb, or by using a curved atraumatic vascular clamp (or even a non-crushing bowel clamp). Alternatively, temporarily twist the lung through 180 degrees, bringing the apex downwards and the lower lobe into the superior part of the pleural cavity, to lock off the hilum. These manoeuvres render the patient into a one-lung state, producing considerable right heart strain. Ensure that the anaesthetist is fully aware of your plans.
5. Never simply oversew the bleeding tract. Open it up by the technique of ‘tractotomy’. Pass the limb of a linear-cutter stapler device down the tract to its natural extent. Now apply compression of the intervening parenchyma with the opposite limb. Activate the device and the tract is opened up to allow visualization and under-running of the bleeding vessel. If a stapler is not available, undertake the technique using two straight clamps (Fig. 3.4). Divide the intervening tissue bridge with a knife to open the tract and visualize bleeding vessels. Be sure to oversew the edges of the tract following haemostasis of the tract and clamp removal or the cut edges will bleed.
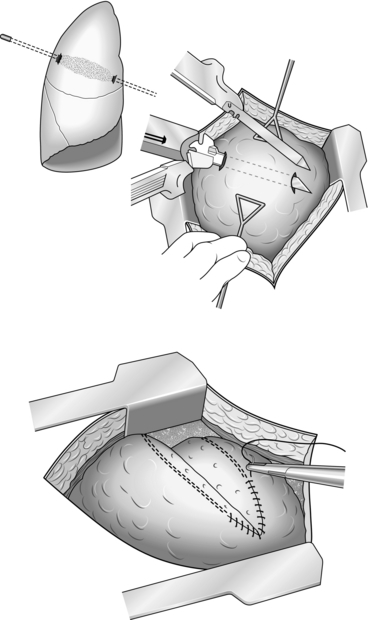
6. In blunt trauma, discrete areas of haemorrhage easily amenable to control are not usually found. Instead, you often see multiple areas of fractured ribs or traumatized chest wall in association with contused segments of lung. Bleeding intercostal vessels may be difficult to control with sutures, especially when located posteriorly. Incise and dissect off the parietal pleura overlying the intercostal space and visualize the vessel before applying a ligaclip to stem the haemorrhage. With massive chest wall trauma, maintain firm manual compression through large swabs for at least 20 minutes while anaesthetic efforts are made at 1:1 resuscitation to encourage haemostasis. Resect areas of irretrievably damaged lung that are bleeding in non-segmental, lung-sparing fashion, using linear-cutter stapler devices. Request suspension of ventilation. Compress the injured lung tissue between your hands. Apply the stapler across the injured portion of lung where you judge the line of demarcation to be. Resect the injured portion before resuming ventilation. Rarely, the lung is so damaged, or there is such severe haemorrhage from torn hilar vessels, that the only viable manoeuvre is pneumonectomy. Clamp the hilum as described and apply and activate a linear stapler device across the hilum, sectioning the tissue on the lung side of the device with a long-handled knife before disengaging the stapler. Oversew the staple line with continuous 3/0 polypropylene for added security.
7. When performing thoracotomy in a patient who has no circulatory output, ensure that, following rapid application of one of the preceding manoeuvres (rapid control of myocardial bleeding, application of a hilar clamp) you reassess the contractile state of the heart and augment cardiac output if required. This is best done between two hands with your thenar and hypothenar eminences in opposition; the heart itself lying between the flat surfaces offered by your palm and extended digits. Undertake compressions in a way that ensures that blood is moved from the apical parts of the ventricles toward the outflow tracts in a coherent manner. Rate of compression is affected by how quickly the heart refills following each compression, but should not be less than 60 beats per minute. Recognize arrhythmia and treat ventricular fibrillation with appropriate defibrillation – internal paddles oriented across the heart, 10–30J DC. External paddles can be used across the chest wall in the conventional way using standard charges if no internal paddles can be located. Treat pulseless electrical activity primarily by continued attempts to volume-load the circulation, guided by your observations as to how ‘full’ the heart is. Gauge this as you apply internal cardiac massage. Effective massage results in endotracheal carbon-dioxide (ETCO2) readings of > 3.0.
8. During such efforts, manually applying pressure to the distal thoracic aorta (lying in the left posterior mediastinum immediately anterior to the vertebral bodies) ensures maximal pre-load and re-distribution of blood to the cerebral and coronary circulation. If the patient fails to return a spontaneous cardiac output despite this manoeuvre, and you have transfused the patient to the extent that there is a ‘full heart’, further resuscitative effort is futile.
Closure
1. The techniques of formal thoracotomy closure in the trauma patient are no different from those used in elective procedures (see Chapter 27). Always leave the pericardium open. Insert two large wide-bore, fenestrated chest drains to each pleural cavity.
2. There are infrequent occasions (transfer to another facility, worsening of instability on attempting chest wall closure) when the chest should be temporarily left open. Achieve this by means of a Bogota bag, stapled to the skin edges, or simply invest the wound with wet swabs and place an over-sized sterile adherent plastic drape over the chest.
Postoperative
1. Ensure that the patient is carefully monitored in a critical care unit. Complications such as atelectasis and chest infection must be anticipated and avoided by vigorous physiotherapy, regular airway suctioning, appropriate antibiotic therapy and early extubation if possible.
2. Order an echocardiogram in those with myocardial trauma to exclude valvular damage or dysfunction.
Complications
1. Check for cessation of haemorrhage by gauging chest drain output and normalization of physiological trends. If, in spite of aggressive haemostatic resuscitation, the chest drain output continues to exceed 250 ml per hour, or the patient’s haemoglobin level continues to drop, or the need for inotropic support becomes more pronounced, then you should re-open the chest. Visually confirm that you have addressed all the potential sources of bleeding.
2. Infection of the thoracotomy incision or of sustained entry and exit wounds is common, particularly if resources are constrained. Employ first principles, including re-opening the wound, draining any pus and giving appropriate antibiotics.
3. Intrathoracic infection usually presents later as an empyema, presenting as swinging fever and evidence of a pleural effusion. Prevent this by aggressively tapping any residual signs of retained haemothorax under ultrasound control. If this proves ineffective, proceed to video-assisted thoracoscopic surgery (VATS) – washing out the retained blood and repositioning fresh chest drains. Prefer to treat an established empyema by posterolateral thoracotomy and decortication of the fibrous membrane, which encapsulates the intra-pleural collection of pus, plus drainage.
4. Continuing air leak is common following lung parenchymal injury. Provided the lung is fully expanded it stops spontaneously over 24–48 hours. Leaks beyond this point may be associated with previously unrecognized bronchial or even tracheal injury. Consider this if the lung fails to expand despite the presence of two large drains and suction.
ABDOMINAL TRAUMA
LAPAROTOMY
Appraise
1. The indications for laparotomy can be categorized according to whether the patient is unstable (physiologically unwell, transiently or not responding to IV fluids) or stable (normal or near-normal physiology, sustained response to IV fluid resuscitation). The threshold for proceeding to laparotomy in a stable patient is higher than in an unstable patient and you may use the time to characterize the injury better and determine if laparotomy might be avoided.
2. The exact criteria that warrant laparotomy in stable patients depend upon your work environment. There are two broad and complementary strategies of management. The first is to image the entire torso with multi-detector CT. In penetrating trauma, CT allows you to determine the trajectory of the wound track and to decide if the peritoneum has been breached. If the wound track is followed in to a solid organ (such as the liver), but does not exit the organ, and there is little evidence of ongoing haemorrhage (in the form of a contrast blush) then conservative management is often possible. Conversely, if there is blush then the patient requires angio-embolization or surgical haemostasis. If the breach does not overlie a solid organ then there is a much higher risk of visceral perforation and the threshold for laparotomy drops accordingly. In blunt trauma, multi-detector CT allows you to determine if there is intra-peritoneal fluid and to check for solid organ damage. Again, solid organ trauma without active extravasation may be managed conservatively, although evidence of bleeding demands action. If there is intra-peritoneal fluid without solid organ trauma then you must explain the source of the fluid. Has the bladder been ruptured, is there a mesenteric laceration (with risk of bowel ischaemia), or is there a perforation of the bowel (with liberation of bowel content)? The presence of free intra-peritoneal gas suggests the latter. The safest way to exclude these injuries is via laparotomy.
3. The second strategy of managing stable patients with abdominal trauma is to place the casualty in a high-dependency area and ensure repeated re-examination at 6-hourly intervals. Follow conservative management if the patient does not develop peritonitis, maintains stability (with little need for ongoing fluid therapy), and records no drop in the serum Hb. If these criteria are not fulfilled the patient requires a laparotomy. Treat such an event not as a failure but as a declaration of the need for surgery.
4. There is little place for digital exploration of abdominal wounds in the emergency department, since failure to palpate a breach within the peritoneum does not mean that no breach exists. The abdominal wall consists of a series of moveable baffles, which interfere with apparent wound trajectory and make the information gained from exploration unreliable.


Action
1. Control of haemorrhage is the first priority within the abdomen. As soon as the peritoneum has been opened fully pack the abdomen in quadrants with large abdominal packs, starting from the left upper quadrant and moving clockwise around the abdominal cavity. Then remove the packs, starting from the least likely source, removing the packs from the ‘compelling’ source of bleeding last.
2. Splenectomy is the safest approach to the ruptured spleen. Sweep your hand between the diaphragm and the spleen to break down any adhesions and deliver the spleen medially and forwards into the wound. Clamp and divide the gastrosplenic and lienorenal ligaments, avoiding the tail of the pancreas and the greater curvature of the stomach. Resect the spleen and suture-ligate the pedicles with heavy absorbable ligatures. Control oozing from disrupted adhesions by packing. It usually stops without further attention; if it does not, use diathermy current coagulation.
3. Splenic salvage surgery may spare the patient from splenectomy. It involves applying haemostatic agents to the injury such as microfibrillar collagen or Vicryl mesh bags, together with diathermy coagulation and oversewing of the defect. Alternatively, pack the spleen with the intent to remove the packs within 48 hrs. Pursue conservative management or splenic salvage surgery in children who are haemodynamically stable. They are more likely than adults to develop overwhelming post-splenectomy infections. Remember to arrange for immunization against encapsulated cocci and long-term antibiotics if the spleen must be resected.
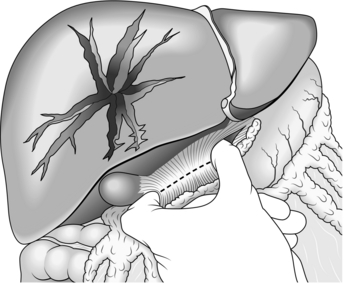
4. Hepatic tears are often mild. Bleeding may already have ceased by the time you perform the laparotomy. Larger lacerations are generally controllable with appropriate packing. First appraise the site and orientation of the tears, then determine the direction of the pressure needed to establish apposition of parenchymal surfaces. In severe tears use your hands to compress the liver directly along this pressure vector. Evaluate how your packs need to lie to continue exerting sufficient pressure. This dictates whether you need to take down any of the triangular ligaments to accommodate your packs. It is unusual to require much mobilization. Place folded abdominal packs into the various spaces adjacent to the liver – laterally, superiorly, inferiorly – to re-oppose planes of cleavage. If there is substantial haemorrhage from the liver use the manoeuvre described in 1908 by the Glaswegian surgeon J. Hogarth Pringle (1863–1941) (Fig. 3.5). Place a non-crushing clamp across the portal triad, with one blade through the foramen of Winslow into the lesser sac. This compresses the hepatic artery and portal vein while you assess and repair the liver damage. If bleeding continues after clamping, it is from the hepatic veins or inferior vena cava. Do not leave the clamp in place for more than 45 minutes. Suture liver tears using a large blunt needle, taking care to prevent the needle from moving laterally in the parenchyma and so increasing the tear. Be aware that the deeper portions of the tear may not be encompassed, leaving a space for haematoma to accumulate and setting the conditions for liver abscess. Over-tight sutures devitalize liver parenchyma, leading to the same complication.
5. Damage to the retrohepatic inferior vena cava is particularly challenging as efforts to lift or rotate the liver in order to address the area usually result in torrential bleeding. Ensure your Pringle manoeuvre is applied. Attempt to press down on the liver in the antero-posterior plane and maintain compression using aggressive packing. You may succeed in controlling smaller tears in the retrohepatic inferior vena cava in this way, although at the expense of significant reduction in cardiac output secondary to very reduced venous return. Inform your anaesthetist before contemplating this manoeuvre. AP compression may allow you time to complete haemostatic resuscitation and seek expert help. If this fails, ready yourself for exploration of the retrohepatic area. First, medially rotate the viscera from the right and ‘Kocherize’ the duodenum to expose the suprarenal IVC and clamp it. This isolates the liver from below and may diminish the bleeding sufficiently to allow full mobilization, taking down the liver’s peritoneal attachments and ‘medializing’ it to expose the hepatic veins and retrohepatic inferior vena cava. However, controlling the IVC from below infrequently slows the haemorrhage sufficiently enough to allow accurate visualization of the bleeding point. In such cases, control from above is often required to ‘isolate’ the liver. Do this by extending your laparotomy incision into a right anterolateral thoracotomy. Open the pericardium, find the intra-pericardial inferior vena cava and control it. Expect profound reduction in cardiac filling and output. Injuries requiring this manoeuvre are very often fatal.
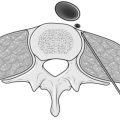
6. Repair diaphragmatic injuries with non-absorbable interrupted mattress sutures. Facilitate the repair by grasping the apices of the defect with long-handled artery forceps and applying traction to bring the mobile diaphragm in to a more superficial position.
7. Retroperitoneal injury usually presents as a haematoma sited centrally, laterally, or in the pelvis (Fig. 3.6). There are two absolute indications for exploring retroperitoneal haematoma. Firstly, visible expansion associated with physiological instability, irrespective of the site of the haematoma or the mechanism of injury. Secondly, central haematomata caused by a penetrating mechanism (associated with a high risk of damage to a major branch or tributary of the aorta or inferior vena cava). A penetrating mechanism indicates potential loss of tamponade, underlining the early need to seek definitive control.
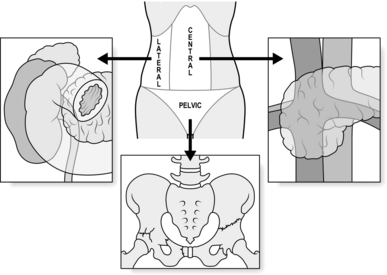
8. Characterize central haematoma as lying to the left or right of the midline. Right-sided haematomata are more likely to be due to caval injury. Achieve access to the inferior vena cava on the right of the abdomen by dividing the congenital adhesions in the right paracolic gutter and sweeping the entire right colon together with the duodenum to the left in an extended kocherization manoeuvre (medial visceral rotation from the right – Fig. 3.7). You can then control the cava proximally and distally with swab-sticks and suture a tear with 3/0 polypropylene. In the case of a through and through injury, open the anterior laceration as much as is required to inspect and repair the posterior surface from within the lumen. Never try to rotate the inferior vena cava to achieve this or you risk avulsing lumbar veins with disappointing results. Central haematomas that are to the left of the midline are best explored by rotating the left-sided abdominal viscera to the midline. Divide the congenital adhesions in the left paracolic gutter and swing the entire left colon, including if necessary the spleen and left kidney, to the right (Fig. 3.8). In this way you can expose, control and deal with injuries to the suprarenal and coeliac levels of the aorta. High, tense central haematomas, lying in the supracolic compartment above the mesentery of the transverse colon, demand control of the suprarenal aorta before beginning the rotation manoeuvre. Achieve this by retracting the liver toward the patient’s right shoulder, counter-tracting the stomach toward the left hip. Bluntly pierce the stretched lesser omentum between liver and stomach and expose the peritoneum overlying the conjoined crura (median arcuate ligament) of the diaphragm. Feel for the aortic pulse and make a vertical incision in the overlying peritoneal membrane to reveal the fibres of the crura, encircling the supracoeliac aorta as it transits from the thoracic cavity into the abdomen. These muscular fibres can be spread apart in the plane of orientation using long-handled dissecting scissors, to reveal the pearly white adventitia of the aorta. Develop a plane either side, extending down to the prevertebral fascia, to accommodate the limbs of a straight vascular clamp which can be positioned prior to opening the haematoma from the left during your rotation manoeuvre. Ligate all bleeding branches of the aorta save the superior mesenteric artery. Repair this if possible, as injury can result in midgut infarction.
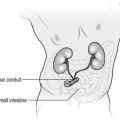
9. Exploration of supracolic, central haematomas may also reveal trauma to the pancreatic–duodenal complex. Biliary discoloration in the region of the duodenum usually indicates a duodenal or extra-hepatic biliary tract disruption. Mobilize the duodenum by Kocher’s manoeuvre to examine its posterior surface. If possible, repair it rather than resect it. Most duodenal tears can be repaired primarily or patched with a loop of jejunum. Protect an extensive repair by undertaking a diversionary gastrojejunostomy, having closed off the pylorus from within via a purse string of absorbable suture. Extensive damage to the bile duct can be temporized by crossing the damaged area with the long limb of a T-Tube, inserted via a distal incision in to normal adjacent duct, or by widely draining the affected area. Manage head of pancreas injuries similarly with haemostatic sutures and wide drainage. Deal with superficial injuries to the body and tail of the pancreas with debridement and drainage combined with judicious suture repair. Treat more extensive trauma by distal resection using a transverse linear cutter-stapler device.
10. Lateral haematomas usually indicate renal trauma. Avoid opening these unless the patient is unstable or the haematoma is growing before your eyes. Use the relevant left or right medial visceral rotation procedure to expose the kidney, then incise Gerota’s (Bucharest anatomist 1867–1939) fascia vertically, releasing the haematomata and delivering the kidney. If there is profound haemorrhage, control the hilum between finger and thumb and then apply a vascular clamp while you assess the damage. Repair renal lacerations using pledgeted absorbable monofilament sutures. A damaged pole can be filleted and then closed in ‘fishmouth’ fashion. Be aware of the intolerance of renal parenchyma to warm ischaemia and remove any hilar clamp within 15 minutes of application. Overwhelming renal trauma necessitates nephrectomy, best done by individual suture ligation of the pedicle vasculature using polypropylene but mass ligation is preferred when time does not permit a nuanced approach. In such circumstances, manually confirm the presence of the contralateral kidney – there is no role for on-table intravenous urography in the shocked patient – although note that congenital absence of the contralateral kidney does not change the indication for nephrectomy in a patient unable to tolerate prolonged attempts at renal salvage.
11. The excellent vascularity of the stomach means that it usually tolerates repair of injury well. Close lacerations in two layers with absorbable sutures. Small bowel injuries are generally easily dealt with. It is not uncommon for a single stab wound to traverse several loops of small bowel. Carefully oversew all penetrating wounds or tears in a single layer of extra-mucosal absorbable sutures. Consider resection if there are a large number of tears in a short length of bowel, or if you are in doubt about viability. If operating in damage control mode, simply isolate segments of damaged bowel by placing them into discontinuity using a linear cutter stapler. Defer re-anastomosis until phase three of the DCS process.
12. The large bowel is less tolerant of poorly executed repair, particularly if the patient has been shocked. Always mobilize the relevant segment of large bowel fully to exclude through and through injury. Beware of overlooking injuries around the hepatic and the splenic flexure. Repair small penetrating wounds, particularly on the right side of the colon, by freshening up the edges of the laceration and closing them carefully with interrupted sutures. Treat larger defects or areas of significant tissue loss by resecting the affected area in the standard manner (right hemicolectomy, extended right hemicolectomy, left hemicolectomy). Perform a primary anastomosis if the patient’s physiological state is normal. If not, leave the bowel ends in discontinuity, deferring restoration or stoma formation until DCS phase three. Treat the right side of the colon by right hemicolectomy and primary anastomosis. Injuries which declare themselves after a period of initial conservatism (or neglect) may be associated with significant contamination – do not be tempted to repair anything definitively other than the simplest lacerations in these circumstances.
13. Treat intra-peritoneal rectal injuries in the same way as left colon injuries. Treat discrete extra-peritoneal injuries by defunctioning the sigmoid colon. Extensive dissection around the extra-peritoneal rectum may compromise vascularity. Also, avoid damaging the neurological supply of the sphincter unless there is significant disruption, as with high energy transfer missile trauma.
14. Repair injured ureters and bladder primarily, using absorbable sutures. Insert a single layer to the ureter over a double ‘J’ stent or neonatal feeding tube. Insert a double layer into the bladder. For small lacerations a suprapubic catheter is not usually necessary if a large bore urethral catheter is in place. Larger disruptions have a greater propensity for leakage and combined suprapubic and per-urethral catheter drainage is advisable.
Checklist
1. Check that you have secured haemostasis and that you have ‘run the bowel’ adequately to exclude all injuries.
2. Make sure that the peritoneal cavity is well washed out and confirm that all the viscera are viable once they have been returned to the abdomen.
3. Specific drainage is not usually required if the abdomen is being managed with topical negative pressure dressings. Drains to biliary or pancreatic injuries are wise if you intend to close the abdomen.
Closure
1. If you are in DCS mode leave the abdomen open (Table 3.1).
Table 3.1
Management of the open abdomen
| Technique | Method | Comments |
| Bogota bag | Open up a sterile 1 L bag of crystalloid. Overlay bowel and suture the outer margin to circumferential skin of the laparotomy wound using continuous nylon. | Readily available materials and easy technique. Leaks fluid ++. |
| Topical negative pressure wound dressing (e.g. Opsite®-sandwich) | Encapsulate a large, opened abdominal pack (or sterile dressing towel) between two sterile adhesive transparent plastic drapes. Using a blade, perforate this several times and place the fenestrated ‘sandwich’ over the bowel (and well under the circumferential wound margins). Place suction tubing over the exterior surface of the sandwich and bring out via a separate stab incision cephalad to the laparotomy incision. Place fluffy gauze (e.g. Kerlix®) over the sandwich and the drains, then seal in the Opsite sandwich, drains and gauze by overlaying a generously sized adhesive drape over the laparostomy wound. Connect the drains to negative pressure at 100 mg Hg and seal any residual airleaks with further adhesive dressings. | Readily available materials; inexpensive. Significantly less leakage than the Bogota bag. Slower to configure than commercial variants; less control of amount of pressure. Pack count may be confused with use of abdominal packs in ‘sandwich’. |
| Commercial vacuum-therapy (VAC®) dressing | Open VAC consumable pack; tuck in the pre-perforated plastic sheeting; trim VAC sponge to match size of laparostomy; staple to edges of wound; apply overlying adhesive dressing; perforate and apply connector to negative pressure system. | Quick to set up; negative pressure can be readily controlled. More costly than improvised variants. May not be readily available in some institutions. |
2. If DCS is not required, close the laparotomy wound using a mass closure technique, usually with a single layer looped no. 1 nylon thread. Very heavy contamination is an indication for leaving the superficial tissues and skin open, to be addressed later at delayed primary closure.
3. DCS laparotomy mandates transfer of the patient to the intensive care unit for continued haemostatic resuscitation. It is usually necessary to maintain sedation and continued ventilation throughout this period until such time that physiological normality has been attained and the patient can be submitted to scheduled definitive surgery.
Postoperative
1. Perform definitive or second-look surgery when the patient is fit enough and you have gathered the requisite theatre time, equipment and expertise sufficient to ensure optimal outcome. It is essential to ensure that any specialist help you require is available, and that you have factored in other procedures such as orthopaedic or plastic surgery, that may be undertaken at the same operation. It may not be possible to formally close the abdomen at this time due to visceral oedema, in which case you should plan to re-dress the laparostomy until such time that you can effect closure. Techniques used to definitively cover the bowel include mesh coverage followed by interval split skin grafting, use of composite or allograft materials, progressive advancement of the rectus sheath through incrementally tensioned sutures, or components separation procedures.
Complications
1. The most important postoperative complication is bleeding. It demands re-laparotomy.
2. Occasionally, an imperfect seal in the laparostomy dressing requires buttressing with further transparent adhesive dressings. Escape of bowel demands removal of the original dressing and re-application – which can be readily undertaken on the intensive care unit.
3. Despite laparostomy, the complication of abdominal compartment syndrome may still develop due to the constraining effect of the adhesive drapes or Bogota bag. Avoid this by insisting on regular measurements of intra-abdominal pressure via the urinary catheter. Pressures greater than 25 mmHg merit re-laparotomy.
4. Sepsis is a potent cause of collapse after 48–72 hours. Immediate postoperative temperature increase is nearly always respiratory. Actively treat the patient with physiotherapy and appropriate antibiotics and with suction if the patient is on a ventilator. Abdominal causes of sepsis tend to be related to intra-peritoneal collections 2–7 days post closure of the abdomen. Contrast enhanced CT is the prime mode of investigation. Re-laparotomy may be required in the setting of sepsis and an identified abscess cavity related to adjacent and probably leaking anastomosis. Isolated pelvic or subphrenic collections may be amenable to image-guided percutaneous drainage, avoiding re-laparotomy.
PELVIS
Appraise
1. In some circumstances the source of shock in a polytrauma patient will be from retroperitoneal haemorrhage following major pelvic injury. The pelvic ring may be disrupted secondary to force vectors applied across the antero-posterior (AP) plane (causing ‘open book’ type distraction of the pelvic ring), transversely across the lateral plane (with lateral compression (LC) fractures), or in the supero-inferior axis, with vertical displacement of elements of one hemi-pelvis compared to the other (vertical shear fractures). Each mechanism involves disruption of the venous plexus and tributaries, plastered to the side walls of the pelvis, draining in to the internal iliac vessels. According to the type of injury, damage may be sustained by the arterial branches of the internal iliac artery, with vertical shear fractures often associated with combined arterial and venous trauma.
2. You should ensure that all patients with a mechanism of trauma consistent with pelvic trauma have had their legs brought together in the neutral position and that a pelvic binder or sheet has been correctly applied (with the equator of the binder superimposed over a transverse plane drawn across the greater trochanter of the femurs). If the patient is responsive to resuscitation and remains well, then you can take the patient for multi-detector CT scanning and interrogation of the torso and pelvis. Any contrast blush in association with a pelvic haematoma indicates an ongoing haemorrhage and needs to be addressed via interventional radiology and urgent embolization.
3. Management of the shocked, unstable patient with a major pelvic ring fracture – diagnosed on gentle clinical palpation (once only!) or (preferably) by plain radiography – calls for urgent decision-making. You need to stop the haemorrhage from the pelvis and address other areas of co-incident bleeding. If the chest X-Ray and FAST scan are grossly clear, and you have the services of an interventional radiologist and an on-site endovascular suite immediately available, then the whole trauma team may transport the patient for selective angiography of the internal iliac arteries and embolization. If these services are not available, or the patient is decompensating, or if you envisage having to make other rapid surgical interventions such as a laparotomy for a positive FAST scan, then it is better to take the patient to theatre and address the pelvic haemorrhage using the technique of extra-peritoneal packing (EPP).
Prepare
1. Ensure that you have a laparotomy set open and that there is a vascular set ready. You do not need an external fixator set if the pelvic belt is correctly positioned and adequately (but not over-) tightened.
2. Standard trauma cruciform position and preparation. Ensure that the anaesthetic team is following DCR principles and that the scrub team is forewarned of your intent to perform EPP. Alert the interventional radiology team, which should be mustered toward the end of the procedure.
Access
1. EPP is usually performed in the context of a deteriorating patient where there is little tolerance to missed sources of haemorrhage. For this reason, even if your FAST scan was negative, perform a midline laparotomy in the standard fashion. The lowermost part of the incision may reveal haematoma spreading up and around from the pelvic fracture but this is not of major concern.
Assess
1. If there is major intra-abdominal haemorrhage, deal with it expeditiously but do no more than what is required (packing, organ removal). Turn your attention to the pelvis. The haematoma is largest on the side of maximal disruption, and may have tracked upward into the peri-renal tissues, displacing colon anteriorly.
Action
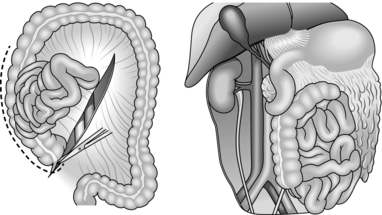
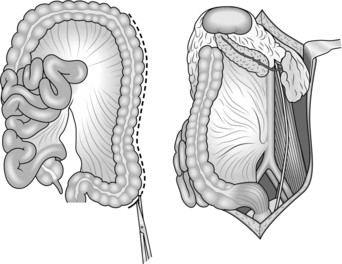
1. Apply two haemostats to the anterior edge of the cut peritoneum in the lower portion of your laparotomy wound on the side of the haematoma. Using scissors, rapidly develop the plane in front of the grasped peritoneum. You quickly encounter more haematoma as you work your way at first laterally and then posteriorly into the true pelvis. The dissection rapidly becomes easier as the haematoma has already dissected the plane for you, and you can then use your hand to sweep the peritoneum medially, liberating much of the haematoma as you do so. Now develop the plane posteriorly as far as the sacro-iliac joints, and you feel bony fragments as you encounter the fracture line (Fig. 3.9).
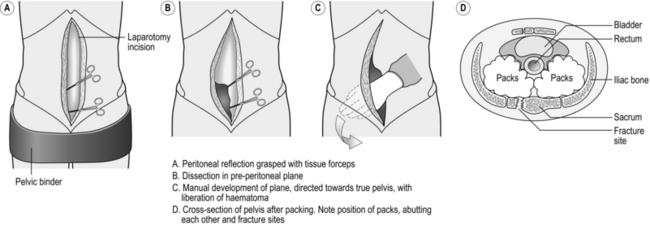
2. Take a large, open abdominal swab and, using a pair of forceps, push it into the furthest reaches of this plane, whilst retracting the peritoneum and viscera with your non-dominant hand. Be sure that this initial swab is as posterior and as deep as possible, abutting the fracture line. Lowering the operating table, or calling for a step, facilitates this process. Then take a second and then a third swab and sequentially pack on top of the initial swab. Take down the peritoneum on the contralateral side and repeat the packing process. The two sets of swabs should efface each other posteriorly, much like a pair of boxer’s gloves pushed against each other at the knuckles.
3. Now focus on the superficial, lower portion of the laparotomy incision. Hitch up the medial edge of the peritoneal shelf (where you placed your haemostats when ‘taking down’ the peritoneum initially) against the medial edge of the rectus muscles with absorbable sutures. This ‘seals’ the extra-peritoneal space and helps prevent swab migration.
Postoperative
1. This is a temporizing manoeuvre (‘a bridge to embolization’). Ensure that, unless there are competing priorities, the patient is transferred to the interventional radiology suite for follow-on embolization.
2. The scheduled re-look and pack-removal procedure should involve your orthopaedic colleagues, preferably within 24 hours. Make sure that image intensification is available. Take down the peritoneum again by cutting your sutures and remove the packs under copious warm saline. If there is no further bleeding your orthopaedic colleague can assess the suitability for internal fixation or external fixation. Close the abdomen, remove the belt and stabilize the pelvic ring. If you encounter further bleeding, re-pack and schedule further inspection and attempted pack removal in 48 hours’ time.
Complications
1. EPP patients are amongst the sickest trauma patients you encounter as the injury set includes profound haemorrhage often associated with severe injuries to multiple body regions. Expect prolonged ICU and inpatient stay with a protracted rehabilitation process.
2. Patients are usually bed-bound for many weeks. Introduce aggressive anti-thrombo-embolism measures within 24 hours of pack removal.
SOFT-TISSUE WOUNDS
Appraise
1. In general, wounds caused by handguns do not require formal surgical excision, but you do need to clean and dress them. Administer a broad-spectrum antibiotic and tetanus prophylaxis, assuming that the missile track has not crossed into a body cavity, a joint, a vascular structure or the thecal sac.
2. Wounds caused by missiles from military assault rifles require full exploration, due to the higher energy exchange between the round and the tissue, potentially damaging structures beyond the wound track. With few exceptions, leave the wound open. Perform delayed primary closure after 4–7 days.
3. Soft-tissue wounds associated with significant disruption of the long bones require special attention as these are frequently limb-threatening wounds. Use the BOAST4 guidelines (see Further reading) to guide your management.
Access
1. You usually need to enlarge the wound in order to obtain adequate access to damaged structures. Further enlargement may be necessary later during definitive repair.
2. Digital exploration may indicate the direction of the wound but cannot reliably reveal its depth or eventual extent. The most direct way of doing this is usually to incise tissue immediately overlying the track. Bear in mind the site and extent of the resulting wound, particularly if it needs to be extended as part of the definitive procedure, or if it crosses major skin creases. However, cosmesis (the future appearance) is not of primary concern during life-saving surgery. Whenever possible, incise in the long axis of a limb. In some circumstances be willing to make counter-incisions.
Assess
1. Explore the wound in layers. Follow any puncture wound through the layers, opening each in turn until you can detect no further penetration. Remember that the tissues may no longer be in the same relationship that they were at the time of the injury, and a penetrating wound may seem to take a different course from that expected. The tissue layers form a series of baffles, as in the abdomen, mentioned above.
2. Identify neurovascular bundles in the wound track and note any damage, but you need not dissect out nerves. The majority of nerve injuries are neuropraxias [Greek: neuron (= nerve) + a (= not) + prassein (= to do)], described by H.J. Seddon as temporary paralysis without degeneration, and recover spontaneously. If a nerve appears to be injured, requiring later exploration, mark its position with a non-absorbable suture.
Action
1. Arrest haemorrhage, temporarily compressing the bleeding point with swabs, controlling major vessels proximally and distally with slings or with arterial clamps. Do not apply haemostatic arterial clamps indiscriminately but capture and ligate small bleeding vessels under vision as you encounter them.
2. Once you have achieved this, start by cleaning the wound. Irrigate it with copious quantities of saline followed by aqueous antiseptic. This removes most superficial foreign material and improves visualization. Remove deeper contaminants as the exploration progresses.
3. It is not necessary to remove every piece of metal or glass visible on a radiograph. Use your clinical judgment. Vegetable material or slivers of wood form potent sources of chronic infection. Remove them.
4. Identify and rigorously excise dead muscle, which is pale, non-contractile, mushy and does not bleed when incised. Inspect for tendon damage. Tendon repair need not be performed initially. Trim tattered ends and mark them with a non-absorbable suture as for nerves (see above).
5. Pay particular attention to comminuted bony injuries. Clean contaminated bone but do not remove it if it is still attached to viable periosteum or healthy muscle. Discard small detached bony fragments, which contribute to postoperative wound infection. Ensure that the skeleton is stabilized after restoring limb perfusion. Temporize by using a vascular shunt prior to external or definitive fixation, then complete the vascular repair in definitive fashion.
6. Identify injuries to joints and clean them rigorously. Cover exposed cartilage with at least one layer of healthy tissue, ideally with synovium.
7. Irrigate the wound again at the end of the repair procedure. Secure haemostasis before dressing an open contaminated wound or before closing a clean one.
Open wound
Dress an open wound with lightly fluffed gauze to allow free drainage. Avoid tight packing.
Closure
1. Do not close a wound unless you are sure it is recent, clean and healthy. Use delayed primary closure if in doubt. Approximate tissue loosely during closure, never under tension, and in its natural layers. It is seldom necessary to repair muscle, but approximate subcutaneous tissue with absorbable sutures, preferably interrupted, to reduce the risk of tissue fluid collecting in dead spaces.
2. Close the skin with interrupted non-absorbable sutures, trimming the edges where required to reduce bevelling.
3. Consider the use of primary split-skin grafting in addition to suturing at delayed primary closure, particularly when there has been tissue loss.
Postoperative
1. Immobilize the injured soft tissue with cotton wool, conforming bandages and, if necessary, a splint, even in the absence of bony injury.
2. Watch for the signs of postoperative limb ischaemia, haemorrhage and sepsis (fever, worsening limb pain and swelling) and ensure that antibiotics are continued until definitive wound coverage has been achieved, or after 72 hours, whichever is the sooner.
British Orthopaedic Association and British Association of Plastic, Reconstructive and Aesthetic Surgeons. Standard for Trauma – 2009. BOAST4: The management of severe open lower limb fractures. Available at http://www.boa.ac.uk/.
Brohi, K., Cohen, M.J., Ganter, M., et al. Acute traumatic coagulopathy: initiated by hypoperfusion: modulated through the protein C pathway? Ann Surg. 2007; 245:812–818.
Holcomb, J.B., Jenkins, D., Rhee, P., et al. Damage control resuscitation: directly addressing the early coagulopathy of trauma. J Trauma. 2007; 62:307–310.
Maier R.V., ed. Trauma care today. Surg Clin North America; 87. 2007:1–278.
Mattox, K., Hirschberg, A. Top Knife: the Art and Craft of Trauma Surgery. TFM Publishing; 2004.
Milia, D.J., Brasel, K. Current use of CT in the evaluation and management of injured patients. Surg Clin North Am. 2011; 91:233–248.
Rossaint, R., Bouillon, B., Cerny, V., et al, Management of bleeding following major trauma: an updated guideline. Crit Care. 2010; 14(R52). Available at:. http://ccforum.com/content/14/2/R52
Rotondo, M.F., Bard, M.R. Damage control surgery for thoracic injuries. Injury. 2004; 35:649–654.
Shapiro, M.B., Jenkins, D.H., Schwab, C.W., Rotondo, M.F. Damage control: collective review. J Trauma. 2000; 49:969–978.
Starnes, B.W., Beekley, A.C., Sebasta, J.A., et al. Extremity vascular injuries on the battlefield: tips for surgeons deploying to war. J Trauma. 2006; 60(2):432–442.
Tai, N.R.M., Dickson, E.J., Military junctional trauma. JRAMC 2009; 115:285–292 Available at:. www.ramcjournal.com/2009/dec09/tai3.pdf
Tisherman, S.A., Bokhari, F., Collier, B., et al, Clinical Practice Guidelines: Penetrating Neck Trauma. Clinical Practice Guidelines of the Eastern Association for the Surgery of Trauma, 2008. Available at. http://www.east.org/tpg.asp
Totterman, A., Madsen, J.E., Skaga, N.O., Røise, O. Extraperitoneal pelvic packing: a salvage procedure to control massive traumatic pelvic haemorrhage. J Trauma. 2007; 62:843–852.