[level-membership-for-dermatology-category]
10 The Punch Biopsy
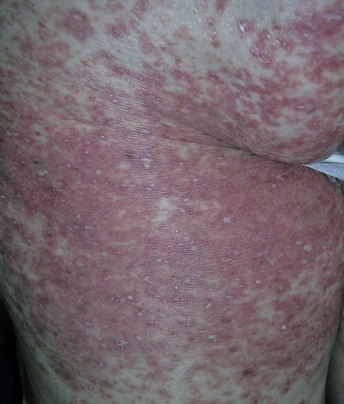
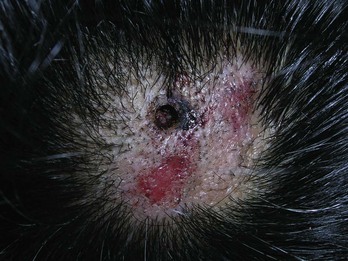
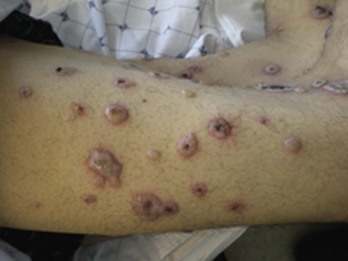
Flat lesions that are amenable to punch biopsy include inflammatory skin conditions such as drug eruptions, dermatoses, psoriasis, and cutaneous lupus (Figure 10-1). Infiltrative skin conditions such as sarcoidosis and granuloma annulare also can be diagnosed with a punch biopsy (Figure 10-2). In addition, a punch biopsy may be used to diagnose all types of skin cancers including melanoma and cutaneous lymphomas (Figure 10-3).
A punch biopsy is one option in the diagnosis of melanoma if the entire lesion is large, making it too difficult to remove the whole lesion at the time of biopsy. In this case, the diagnostic yield will generally be best if a biopsy is performed on the darkest, most elevated, and/or most suspicious areas (Figure 10-4). Using a dermatoscope may help identify a suspicious area for the punch biopsy (see Chapter 32, Dermoscopy). If the suspicion for melanoma is high, excising the entire lesion is preferred, when possible, to improve the diagnostic yield. There are also times when a broad scoop shave may provide better tissue for the pathologist. The highest risk of using a punch biopsy to diagnose a melanoma is the risk of a false-negative result. If the lesion remains suspicious for melanoma and a punch biopsy was performed with a negative result, the remainder of the lesion should be excised for histology (see Chapter 8, Choosing the Biopsy Type).
Indications


A punch instrument can be used to create an opening in an epidermal inclusion cyst for a minimally invasive cyst removal. Some clinicians use a punch incision to remove small lipomas (see Chapter 12, Cysts and Lipomas).
Relative Contraindications and Cautions
Punch biopsy is a more invasive biopsy technique than needed for most BCCs or SCCs, which can be diagnosed by shave biopsy. In one study there was no significant difference in the accuracy rate for histologic classification of BCCs with both the shave and the punch biopsy.1 Punch biopsies generally bleed more than shave biopsies and the risk of infection is somewhat higher than for a shave biopsy.
A punch biopsy does have certain risks that are greater than those of a shave biopsy, including the possibility of cutting larger blood vessels and nerves. Therefore, clinicians must be familiar with the underlying anatomy. Fortunately, most major nerves and blood vessels are deeper than a punch instrument, but digital nerves and the temporal branch of the facial nerve are more superficial and care needs to be taken in these areas (Figure 11-2 of Chapter 11). Punch biopsies over the digits or the eyelid margins are generally to be avoided. When possible, it is also prudent to avoid doing a punch biopsy over superficial arteries such as digital or temporal arteries. Caution should also be exercised over areas where there is little soft tissue between the skin and the bone (over the tibia, digits, and ulna) because the punch can cut through the underlying bone.
Advantages of A Punch Biopsy
The advantages of a punch biopsy for the clinician include the following:
The following advantages of a punch biopsy benefit the patient:
Disadvantages of A Punch Biopsy
The disadvantages of a punch biopsy for the clinician include the following:
For the patient, the disadvantages of a punch biopsy include the following:
Making A Diagnosis
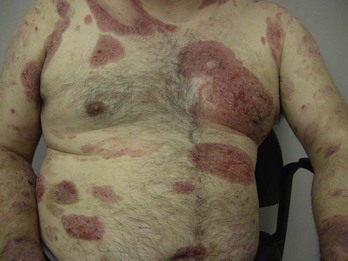
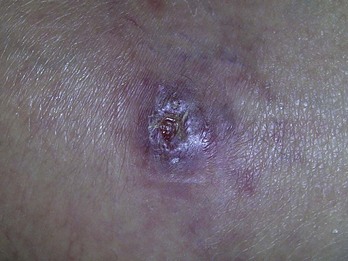
It helps to have a good idea of the differential diagnosis before choosing the biopsy type and location. For most punch biopsies, a clinician should choose a punch size that will result in excision of the whole lesion or will provide a sample of the portion of the lesion that appears to have the worst pathology. However, for bullous disorders such as pemphigus or pemphigoid, it is best to punch the edge of the bulla to include the perilesional skin (Figure 10-10). A scoop shave under an intact bulla or at the border of a bulla may yield an equally good specimen. The goal is to keep the epidermis attached to the dermis at the edge of the bulla.
FIGURE 10-10 Bullous lichen planus on the back. A punch biopsy should include a whole intact bulla or the edge of a bulla.
(Copyright Richard P. Usatine, MD.)
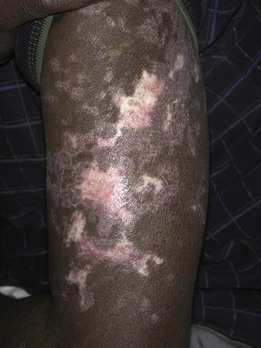
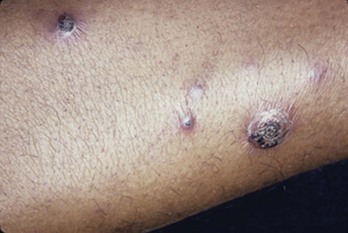
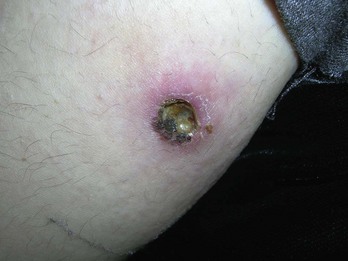
When performing a biopsy on an ulcerative lesion of unknown origin, it is helpful to remove tissue from the edge of the ulcer rather than the center portion. For example, if pyoderma gangrenosum is suspected, the biopsy should include the edge of the lesion, with some perilesional skin (Figure 10-11).
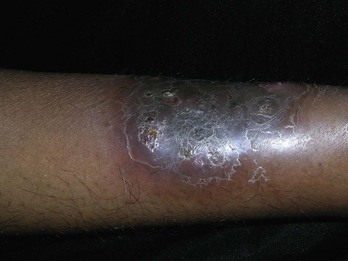
FIGURE 10-11 Pyoderma gangrenosum on the leg, with diagnosis confirmed by punch biopsy of an active edge.
(Copyright Richard P. Usatine, MD.)
If a fungal infection is suspected, periodic acid Schiff (PAS) stains are useful and can be done from the specimen in the formalin. If a culture is desired for a deep fungal infection such as sporotrichosis, the specimen can be sent on a sterile saline-soaked sterile gauze pad in a sterile urine container (Figure 10-15). This technique also works for suspected atypical mycobacterial infections (Figure 10-16).
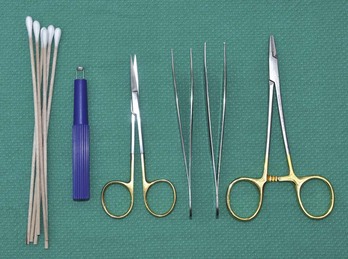
Equipment
The following equipment is used to perform a punch biopsy (Figure 10-17):
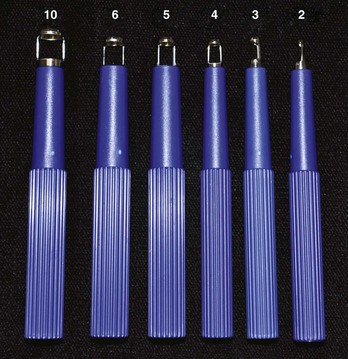
Punches come in various sizes ranging from 2 to 10 mm and are available as reusable steel punches and disposable punches (Figure 10-18). Disposable punches have the advantage of being presterilized and there is no concern about them losing their sharp edge. Reusable punches are more expensive, require sterilization between procedures, and must be maintained by proper, skilled sharpening. We use disposable punches for quality and convenience.
The Huot VisiPunch has the wonderful advantage of allowing the clinician to see through the punch instrument while performing the procedure. This allows one to place the punch on the skin and make sure the whole lesion is within the punch before starting the cut. Also, one can see the depth better and have a better idea of when the punch core releases from the dermis below. (Fusiform punches are available and are described in Chapter 11, The Elliptical Excision).
Choosing the Punch Size
A 4-mm punch is usually adequate to obtain sufficient tissue for pathology. When the lesion is smaller than 6 mm, the punch size can be determined by the diameter required to completely excise the tissue. Punch biopsies done with 10-mm punches may produce standing cones (“dog ears”) when closure is attempted (see Chapter 12). If the lesion requires a punch of larger than 6 mm, it is best to do an elliptical excision (see Chapter 11). Punch biopsies between 3 and 6 mm should obtain adequate tissue and be easy to close with a good cosmetic result. A minimum of a 4-mm punch is generally preferred by the dermatopathologist to provide adequate tissue for diagnosis.
Choosing Whether to Suture the Punch Defect
Punch Biopsy: Steps and Principles
Critical steps in a punch biopsy procedure include the following:
Preoperative Measures
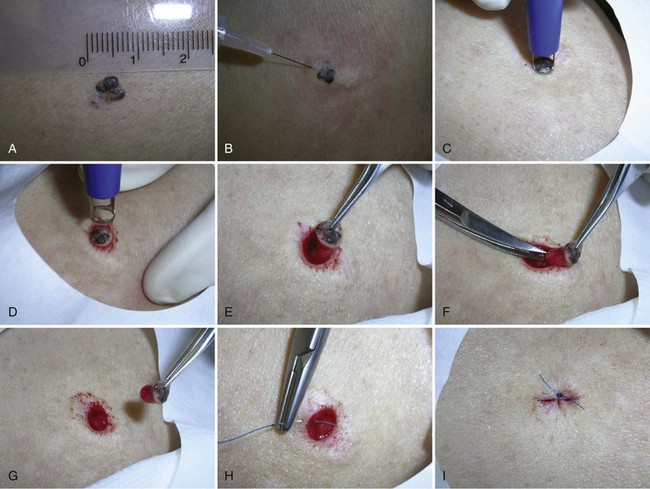
Cutting the Punch Biopsy
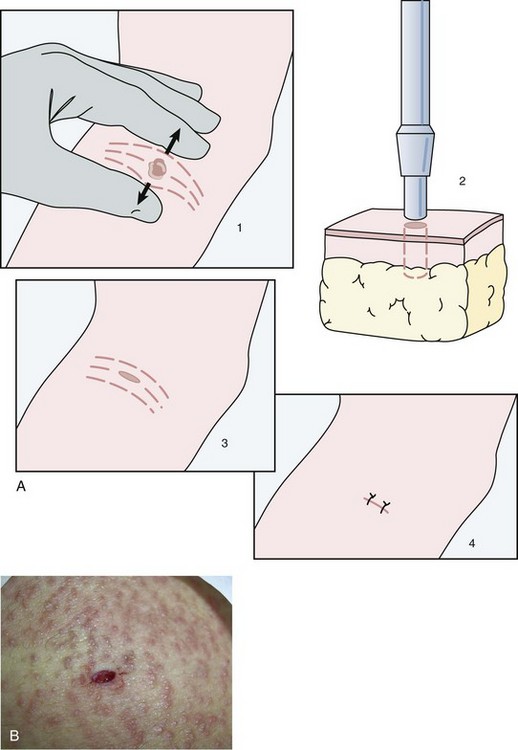
Stretching the Skin to Prevent Standing Cones
Stretching the skin to prevent standing cones (“dog ears”) is especially important when doing a punch larger than 5 mm or performing a punch on the face or other cosmetically important area. Figure 10-20 shows how stretching the skin perpendicular to skin lines will allow for a better cosmetic outcome.
Hemostasis and Repair
Dressing and Aftercare
Suggestion for Learning the Punch Biopsy Technique
Less than Optimal Outcomes
Complications that may arise from a punch biopsy include the following:
Serious complications are extremely infrequent with punch biopsy.
Specific Examples for Punch Biopsies
Erythroderma
It is important to establish the cause of erythroderma (Figure 10-24) quickly so that specific therapy can be initiated. A 4-mm punch biopsy is a good start. Call the pathologist to ask for a rush order because erythroderma can be a life-threatening condition.
Palmoplantar Psoriasis
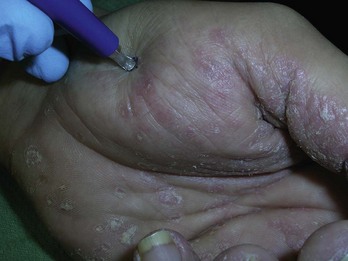
The diagnosis of psoriasis can be made based on the clinical presentation in most cases by using clues such as the distribution, appearance, and chronicity of the lesions. A punch biopsy can be used to confirm the diagnosis in an atypical presentation when there is uncertainty. Sometimes it is difficult to determine whether hyperkeratosis on the palms and soles is from psoriasis or other conditions such as dyshidrotic eczema or dermatophytosis. A punch biopsy can help direct therapy (Figure 10-25). It is especially helpful to confirm a diagnosis of palmoplantar psoriasis because these patients often need potent systemic therapy with agents that are known to have serious potential risks. Perform the punch over an area of the hand that is affected but has soft tissue below it. A shave biopsy is another option.
Morphea
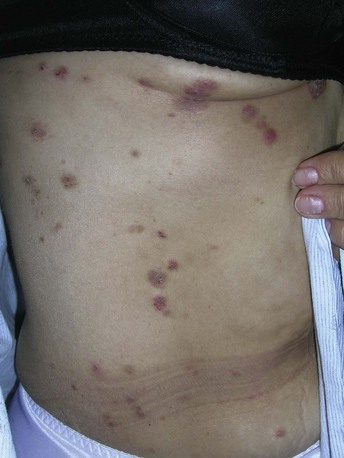
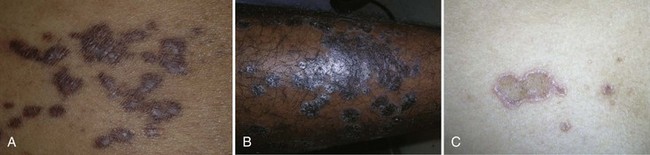
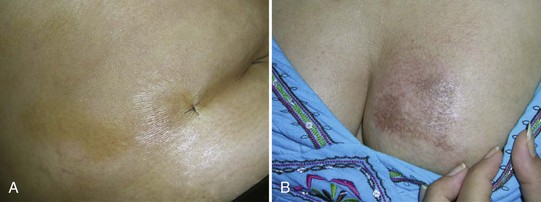
Flat atrophic shiny or wrinkled patches on the skin can be morphea (localized scleroderma) or lichen sclerosis. It is difficult to tell just by looking so a punch biopsy is very helpful. Figure 10-26A shows a 4-mm punch site from morphea on the abdomen of a young woman. In Figure 10-26B, morphea is seen on the breast of a 30-year-old woman. Diagnosis was confirmed with a 4-mm punch.
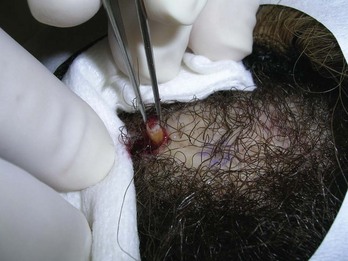
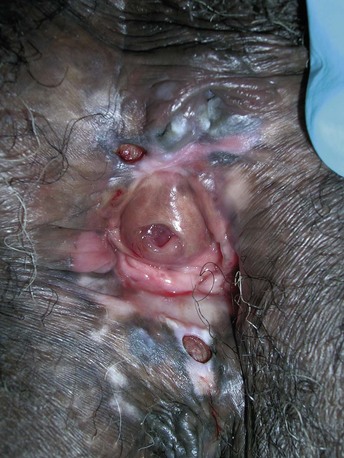
Trichotillomania versus Other Types of Alopecia
The cause of hair loss is not always obvious by history and physical exam. In Figure 10-27, a 37-year-old woman was concerned about an area of alopecia on her scalp. She admitted that her scalp was pruritic and that she was under much stress. Trichotillomania was suspected due to the story and broken hairs, but the patient did not initially admit to pulling her hairs. A 4-mm punch biopsy confirmed the suspected diagnosis. Note that the biopsy site was not closed and hemostasis was obtained with electrocoagulation. When the histology supported trichotillomania, the patient took responsibility for her behavior and was able to stop the hair pulling and excoriations.
Pemphigus
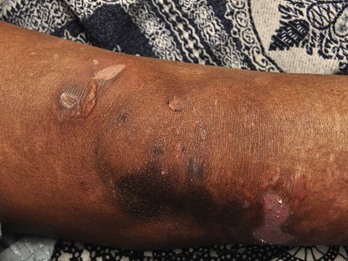
A man presented with blisters on his arms. A 4-mm punch biopsy of the edge of a bulla led to the diagnosis of pemphigus vulgaris (Figure 10-28). A second 4-mm punch biopsy of perilesional skin was also sent for direct immunofluorescence in Michel’s media. The result confirmed the diagnosis.
Coding and Billing Pearls
Punch biopsy CPT codes and fees are summarized in Table 38-7 of Chapter 38, Surviving Financially. Note that, although these codes cover punch biopsies they also cover biopsies done by shave or curette. The codes are based on location only and not on the size of the biopsy or lesion. The codes are also independent of whether the lesion turns out to be benign or malignant, so there is no need to wait for the pathology result to submit the bill. The codes are also independent of whether or not a suture was placed to close the punch.
CPT codes and fees for punch excisions are the same as for small benign excisions and are provided in Table 11-2 of Chapter 11. These codes are based on size and location so it is crucial to measure the lesion before excising it. If the lesion is cutaneous and will be fully removed, then the punch size is the lesion size for billing. If the lesion is subcutaneous, such as a lipoma or deep cyst, then the lesion size is the actual measured size before surgery and not the punch size. Do not estimate the size later because estimates are usually rounded to the nearest centimeter and the reimbursement goes up 0.1 cm above each rounded number (e.g., payment is greater for an excision of a 1.1-cm lesion than a 1.0-cm lesion). The codes are also independent of whether or not a suture was placed to close the punch, but in many cases one or more sutures will be used because punch excisions tend to be larger than biopsies only.
Conclusion
The punch is a relatively easy and convenient procedure for getting a full-thickness biopsy. It is much easier to perform than an elliptical excision, but neither as easy nor as fast as the shave biopsy. It is preferentially used when a shave biopsy is too superficial, and a small 3- to 6-mm biopsy will provide adequate tissue sampling. Although the punch biopsy is a critical skill to master, a clinician should not be performing more punch biopsies than shave biopsies (see Chapter 9, The Shave Biopsy).
1. Russell EB, Carrington PR, Smoller BR. Basal cell carcinoma: a comparison of shave biopsy versus punch biopsy techniques in subtype diagnosis 4. J Am Acad Dermatol. 1999;41:69-71.
2. Christenson LJ, Phillips PK, Weaver AL, Otley CC. Primary closure vs second-intention treatment of skin punch biopsy sites: a randomized trial. Arch Dermatol. 2005;141:1093-1099.
3. Tran KT, Wright NA, Cockerell CJ. Biopsy of the pigmented lesion—when and how. J Am Acad Dermatol. 2008;59(5):852-871.
4. Lo SJ, Khoo C. Improving the cosmetic acceptability of punch biopsies: a simple method to reduce dog-ear formation. Plast Reconstr Surg. 2006;118:295-296.
5. Gabel EA, Jimenez GP, Eaglstein WH, et al. Performance comparison of nylon and an absorbable suture material (polyglactin 910) in the closure of punch biopsy sites. Dermatol Surg. 2000;26:750-752.
[/level-membership-for-dermatology-category][not-level-membership-for-dermatology-category]
10 The Punch Biopsy
Flat lesions that are amenable to punch biopsy include inflammatory skin conditions such as drug eruptions, dermatoses, psoriasis, and cutaneous lupus (Figure 10-1). Infiltrative skin conditions such as sarcoidosis and granuloma annulare also can be diagnosed with a punch biopsy (Figure 10-2). In addition, a punch biopsy may be used to diagnose all types of skin cancers including melanoma and cutaneous lymphomas (Figure 10-3).
A punch biopsy is one option in the diagnosis of melanoma if the entire lesion is large, making it too difficult to remove the whole lesion at the time of biopsy. In this case, the diagnostic yield will generally be best if a biopsy is performed on the darkest, most elevated, and/or most suspicious areas (Figure 10-4). Using a dermatoscope may help identify a suspicious area for the punch biopsy (see Chapter 32, Dermoscopy). If the suspicion for melanoma is high, excising the entire lesion is preferred, when possible, to improve the diagnostic yield. There are also times when a broad scoop shave may provide better tissue for the pathologist. The highest risk of using a punch biopsy to diagnose a melanoma is the risk of a false-negative result. If the lesion remains suspicious for melanoma and a punch biopsy was performed with a negative result, the remainder of the lesion should be excised for histology (see Chapter 8, Choosing the Biopsy Type).
Indications
A punch instrument can be used to create an opening in an epidermal inclusion cyst for a minimally invasive cyst removal. Some clinicians use a punch incision to remove small lipomas (see Chapter 12, Cysts and Lipomas).
Relative Contraindications and Cautions
Punch biopsy is a more invasive biopsy technique than needed for most BCCs or SCCs, which can be diagnosed by shave biopsy. In one study there was no significant difference in the accuracy rate for histologic classification of BCCs with both the shave and the punch biopsy.1 Punch biopsies generally bleed more than shave biopsies and the risk of infection is somewhat higher than for a shave biopsy.
A punch biopsy does have certain risks that are greater than those of a shave biopsy, including the possibility of cutting larger blood vessels and nerves. Therefore, clinicians must be familiar with the underlying anatomy. Fortunately, most major nerves and blood vessels are deeper than a punch instrument, but digital nerves and the temporal branch of the facial nerve are more superficial and care needs to be taken in these areas (Figure 11-2 of Chapter 11). Punch biopsies over the digits or the eyelid margins are generally to be avoided. When possible, it is also prudent to avoid doing a punch biopsy over superficial arteries such as digital or temporal arteries. Caution should also be exercised over areas where there is little soft tissue between the skin and the bone (over the tibia, digits, and ulna) because the punch can cut through the underlying bone.
Advantages of A Punch Biopsy
The advantages of a punch biopsy for the clinician include the following:
The following advantages of a punch biopsy benefit the patient:
Disadvantages of A Punch Biopsy
The disadvantages of a punch biopsy for the clinician include the following:
For the patient, the disadvantages of a punch biopsy include the following:
Making A Diagnosis
It helps to have a good idea of the differential diagnosis before choosing the biopsy type and location. For most punch biopsies, a clinician should choose a punch size that will result in excision of the whole lesion or will provide a sample of the portion of the lesion that appears to have the worst pathology. However, for bullous disorders such as pemphigus or pemphigoid, it is best to punch the edge of the bulla to include the perilesional skin (Figure 10-10). A scoop shave under an intact bulla or at the border of a bulla may yield an equally good specimen. The goal is to keep the epidermis attached to the dermis at the edge of the bulla.
FIGURE 10-10 Bullous lichen planus on the back. A punch biopsy should include a whole intact bulla or the edge of a bulla.
(Copyright Richard P. Usatine, MD.)
When performing a biopsy on an ulcerative lesion of unknown origin, it is helpful to remove tissue from the edge of the ulcer rather than the center portion. For example, if pyoderma gangrenosum is suspected, the biopsy should include the edge of the lesion, with some perilesional skin (Figure 10-11).
FIGURE 10-11 Pyoderma gangrenosum on the leg, with diagnosis confirmed by punch biopsy of an active edge.
(Copyright Richard P. Usatine, MD.)
