[level-membership-for-plastic-reconstructive-surgery-category]
CHAPTER 11 The “High SMAS” facelift technique
History
The High SMAS technique was developed in the 1980s as a modification of the procedure described by Tord Skoog in 1974.1 Anatomic studies2,3 have documented the benefit of leaving the skin and subcutaneous mass attached to the SMAS in facial rejuvenation.
The initial challenge was to do so, yet still mobilize the cheek mass adequately. The second goal in designing this procedure was to lift the entire malar and mandibular subcutaneous cheek mass, as a single unit suspended by the SMAS.4 No portion of this repositioning technique was to place the skin on any form of greater than normal tension.
Physical evaluation
• Assess the overall quality and volume of the soft tissues.
• Examine the skeletal proportions of the face (height of the maxilla, bi-zygomatic diameter, chin projection, etc.)
• Evaluate the subcutaneous facial fatty mass particularly looking at variations in volume, shape and position. The malar area descends into the upper buccal region, the anterior cheek descends over the nasolabial fold and the buccal fat accumulates as a “jowl”. The shape turns from an oval shape to a squared appearance. Volume changes affect both the amount of improvement without augmentation as well as the sequence of the operation.
• Note whether or not there is shelving of the orbicularis over a prominent malar membrane attachment (malar crescent).
• Assess the depth and prominence of the nasolabial fold as an index of cheek descent.
• Analyze the contour of the fatty cheek mass at the mandibular border by looking for jowls. If present, manually reposition the cheek with the patient sitting and feel the thickness of the jowl fat. Here the prominence of the mandibulocutaneous ligament is assessed.
• Evaluate the resting dermal tension to measure the tone of the patient’s skin. Actinic exposure and smoking deteriorates dermal quality at a much more rapid rate manifesting clinically as fine lines in the perioral area for example.
Technical steps
Begin the dissection by elevating the skin flap in the preauricular area about 4 to 5 cm. Elevate only the skin that you anticipate removing. Perform subcutaneous dissection above the zygomatic arch in the lateral orbital area to release the cutaneous attachments of the crow’s feet and to facilitate a smooth redraping of the temporal skin. This maneuver also exposes the superficial side of the upper SMAS that will be divided later (Fig. 11.1).
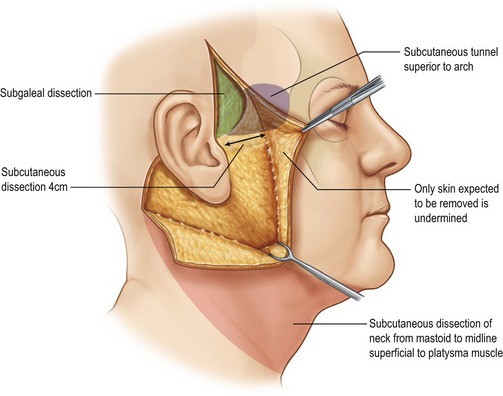
Fig. 11.1 Extent of subcutaneous dissection.
Fritz E. Barton Jr., The ‘high SMAS’ face lift technique. Aesthetic Surgery 2002;22(5):481–486, with permission of Elsevier.
From the mastoid, carry subcutaneous dissection below the mandible to join the anterior neck dissection, if present. In the neck, the skin and platysma are managed as separate layers because more skin than platysmal advancement is desired. A separate submental approach is added when defatting or when midline platysmal plication is indicated (Fig. 11.2).
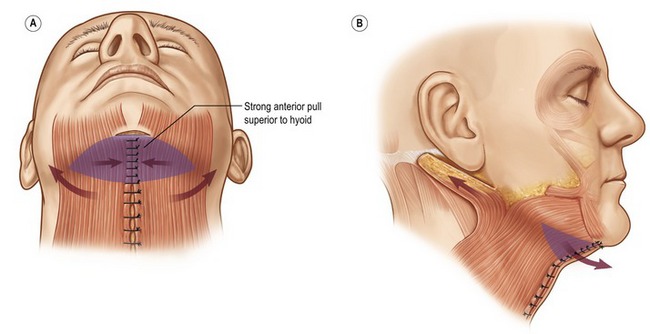
Fig. 11.2 Strong medial tension above the hyoid; lax below the hyoid.
Fritz E. Barton Jr., The ‘high SMAS’ face lift technique, Aesthetic Surgery 2002;22(5):481–486, with permission of Elsevier.
From a surgical standpoint, establish the plane by delaminating the parotid capsule until only a thin layer of fascia remains over the gland (Fig. 11.3). Once the SMAS dissection is established, carry the dissection forward to the anterior border of the parotid. It is at this point that the facial nerve branches exit the parotid, requiring that you change dissection from sharp to blunt. Vertical spreading will release the remaining restricting fibers, the so-called masseteric cutaneous ligaments, exposing the translucent masseteric fascia that covers the facial nerve branches. It is important to visually check for the presence of this filmy fascia over the masseter muscle to confirm that the dissection in the buccal area is superficial to the facial nerve branches.

Fig. 11.3 Transition of the SMAS dissection plane.
Fritz E. Barton Jr., The ‘high SMAS’ face lift technique. Aesthetic Surgery 2002;22(5):481–486, with permission of Elsevier.
Release the attachments of the SMAS investments of the zygomaticus major muscle. The lateral orbicularis muscle serves as a guide to the proper depth of the zygomaticus muscle. Starting from the zygomaticus origin, dissect from deep to the SMAS, up over the lateral border of the zygomaticus muscle, breaking through the investing fascia to enter the subcutaneous plane. Carry the dissection forward to, or beyond the nasolabial fold into the upper lip as needed. The extent of anterior dissection is determined preoperatively by the depth of the nasolabial fold.
Once the investing fascia has been released, the dissection has transitioned to the subcutaneous plane superficial to the mimetic muscles. Here, the entire subcutaneous malar and mandibular mass will move freely as a single unit (Fig. 11.4). By preserving the high lateral SMAS, the vector of pull can be delivered quite high over the zygomatic prominence.
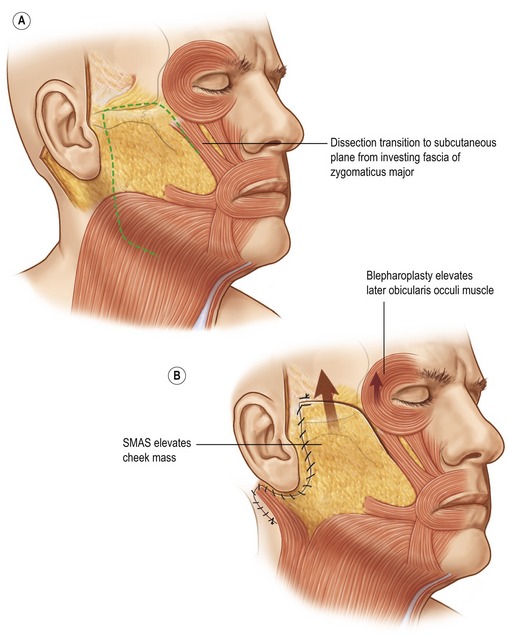
Fig. 11.4 SMAS suspends the cheek mass, orbicularis suspension corrects the lower lid.
Fritz E. Barton Jr., The “high SMAS” face lift technique. Aesthetic Surgery 2002;22(5):481–486, with permission of Elsevier.
Suspend the cheek, primarily in a vertical direction, taking care to balance the vector to avoid lower eyelid distortion. Suture the SMAS flap to the temporalis muscle fascia to achieve a firm high anchor point (Fig. 11.5) and set the lifting tension. Trim the horizontally redundant SMAS in a vertical direction to oppose the cuff originally left undissected down to the level of the earlobe. Now, rotate the extension retroauricularly and place a second fixation point onto the SMAS posteriorly to the mastoid fascia. Take care to place the line of traction in the platysma just below the mandibular border. Then close the SMAS around the anterior auricular cuff to provide a broad, secure closure and to avoid the vulnerability of having only two points of fixation carrying the entire weight of the cheek.
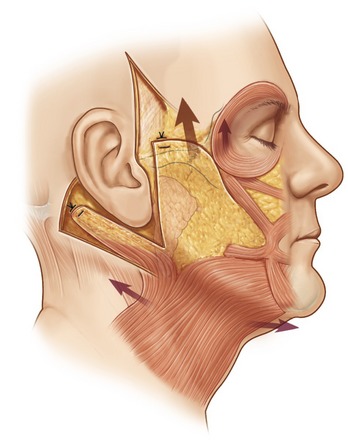
Fig. 11.5 Cheek mass suspended.
Fritz E. Barton Jr., The “high SMAS” face lift technique. Aesthetic Surgery 2002;22(5):481–486, with permission of Elsevier.
With the cheek mass securely suspended, you can then lift the ptotic orbicularis through the a lateral upper and lower blepharoplasty incision (Fig. 11.6). You need not attempt to lift the malar fat pad via the eyelid, because the malar portion of the cheek mass has been suspended as part of the high SMAS procedure. The power of this malar lift is evidenced by bunching of the orbicularis on the lower lids. The cheek suspension afforded by the high SMAS technique adds additional support to the lower lid orbicularis suspension, thus removing cheek weight as a cause of postoperative scleral show.
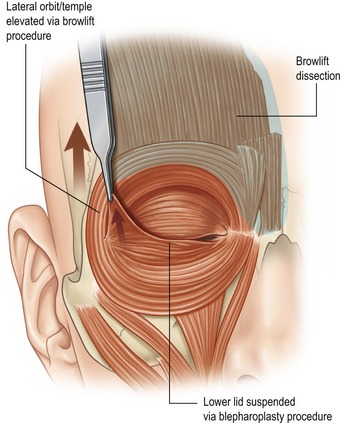
Fig. 11.6 Orbicularis flap suspended through a subciliary incision.
Fritz E. Barton Jr., The “high SMAS” face lift technique. Aesthetic Surgery 2002;22(5):481–486, with permission of Elsevier.
See Fig. 11.7 for results of this procedure.

Fig. 11.7 A–F, Left column preoperative; Right column postoperative views of patient status post-endoscopic browlift, bilateral upper and lower blepharoplasty, high SMAS rhytidectomy, submental suction lipectomy, perioral and glabellar dermabrasion.
Fritz E. Barton Jr., The “high SMAS” face lift technique. Aesthetic Surgery 2002;22(5):481–486, with permission of Elsevier.
Complications
• While mild temporary terminal facial nerve neuropraxia may occur, we have never had, nor seen a permanent nerve injury after employing this technique both in the hands of the experienced surgeon and during educational cases with our residents.
• Hematoma occurs approximately 3% of the time in women and 8% in men and hypertensive patients of either sex.
Pearls & pitfalls
• The procedure is performed under anesthetic induced hypotension for clear visualization of all necessary structures.
• If a corset platysmaplasty is to be performed, the procedure is initiated in the submental region with the midline platysmal plication.
• The vertical power of this cheek lift requires resuspension of a ptotic orbicularis.
• Performing the high SMAS cheek lift without resuspension of the orbicularis will place the weight of the cheek mass on the lower lid predisposing scleral show.
Summary of steps
1. The high SMAS repositions the cheek without depending on dermal pull.
2. The skin and subcutaneous mass remain attached to the SMAS as a handle.
3. The cheek mass is mobilized vertically once released properly.
4. A high vector of pull on the cheek is emphasized.
5. Lower eyelid suspension is necessary after the cheek is raised.
6. Many patients receive some form of submental repair (usually a corset type).
7. A forehead redraping procedure is performed if indicated.
8. Blending the facial units to preserve harmony in tone is a critical component as opposed to the traditional segmental or quilting approach.
1. Skoog T. Plastic surgery – new methods. Philadelphia: WB Saunders; 1974.
2. Zilmer ME, Barton FE, Jr. The sub-SMAS cervicofacial flap I: Anatomic investigation. Presented at the 1982 Plastic Surgery Chief Residents Conference, Washington DC.
3. Barton FE, Jr. The SMAS and the nasolabial fold. Plast Reconstr Surg. 1992;89:1054–1057.
4. Barton FE, Jr. Rhytidectomy and the nasolabial fold. Plast Reconstr Surg. 1992;90:601–607.
[/level-membership-for-plastic-reconstructive-surgery-category][not-level-membership-for-plastic-reconstructive-surgery-category]
CHAPTER 11 The “High SMAS” facelift technique
History
The High SMAS technique was developed in the 1980s as a modification of the procedure described by Tord Skoog in 1974.1 Anatomic studies2,3 have documented the benefit of leaving the skin and subcutaneous mass attached to the SMAS in facial rejuvenation.
The initial challenge was to do so, yet still mobilize the cheek mass adequately. The second goal in designing this procedure was to lift the entire malar and mandibular subcutaneous cheek mass, as a single unit suspended by the SMAS.4 No portion of this repositioning technique was to place the skin on any form of greater than normal tension.
Physical evaluation
• Assess the overall quality and volume of the soft tissues.
• Examine the skeletal proportions of the face (height of the maxilla, bi-zygomatic diameter, chin projection, etc.)
• Evaluate the subcutaneous facial fatty mass particularly looking at variations in volume, shape and position. The malar area descends into the upper buccal region, the anterior cheek descends over the nasolabial fold and the buccal fat accumulates as a “jowl”. The shape turns from an oval shape to a squared appearance. Volume changes affect both the amount of improvement without augmentation as well as the sequence of the operation.
• Note whether or not there is shelving of the orbicularis over a prominent malar membrane attachment (malar crescent).
• Assess the depth and prominence of the nasolabial fold as an index of cheek descent.
• Analyze the contour of the fatty cheek mass at the mandibular border by looking for jowls. If present, manually reposition the cheek with the patient sitting and feel the thickness of the jowl fat. Here the prominence of the mandibulocutaneous ligament is assessed.
• Evaluate the resting dermal tension to measure the tone of the patient’s skin. Actinic exposure and smoking deteriorates dermal quality at a much more rapid rate manifesting clinically as fine lines in the perioral area for example.
Technical steps
Begin the dissection by elevating the skin flap in the preauricular area about 4 to 5 cm. Elevate only the skin that you anticipate removing. Perform subcutaneous dissection above the zygomatic arch in the lateral orbital area to release the cutaneous attachments of the crow’s feet and to facilitate a smooth redraping of the temporal skin. This maneuver also exposes the superficial side of the upper SMAS that will be divided later (Fig. 11.1).
Fig. 11.1 Extent of subcutaneous dissection.
Fritz E. Barton Jr., The ‘high SMAS’ face lift technique. Aesthetic Surgery 2002;22(5):481–486, with permission of Elsevier.
From the mastoid, carry subcutaneous dissection below the mandible to join the anterior neck dissection, if present. In the neck, the skin and platysma are managed as separate layers because more skin than platysmal advancement is desired. A separate submental approach is added when defatting or when midline platysmal plication is indicated (Fig. 11.2).
Fig. 11.2 Strong medial tension above the hyoid; lax below the hyoid.
Fritz E. Barton Jr., The ‘high SMAS’ face lift technique, Aesthetic Surgery 2002;22(5):481–486, with permission of Elsevier.
[/not-level-membership-for-plastic-reconstructive-surgery-category]
