[level-membership-for-dermatology-category]
11 The Elliptical Excision
Contraindications
Contraindications by lesion include the following:
Contraindications by lesion include the following:
Equipment
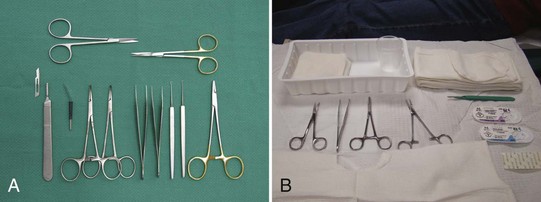
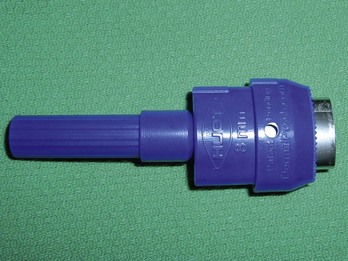
The following equipment is required to perform an elliptical incision (also see Figure 11-1), although excision of small ellipses may not require all of the items on the list:
 to
to  inch for injection
Disposable instrument setups (Figure 11-1B) may be the only option in practices that do not do regular surgeries and don’t have an autoclave. Note that disposable instruments are of lower quality than nondisposables.
The Elliptical Incision: Steps and Principles
The major steps involved in the elliptical excision involve the following:
Perform a check of vital signs and be aware of coexisting medical issues such as anticoagulation before starting any surgical procedure. Obtain informed consent in writing at the time of the procedure and perform a surgical time-out before starting (see Chapter 1, Preoperative Preparation).
Planning and Designing the Excision
Important factors to consider when planning an excision are listed in Box 11-1.
Box 11-1 Factors to Consider When Planning an Excision
Important factors to consider when planning an excision include the following:
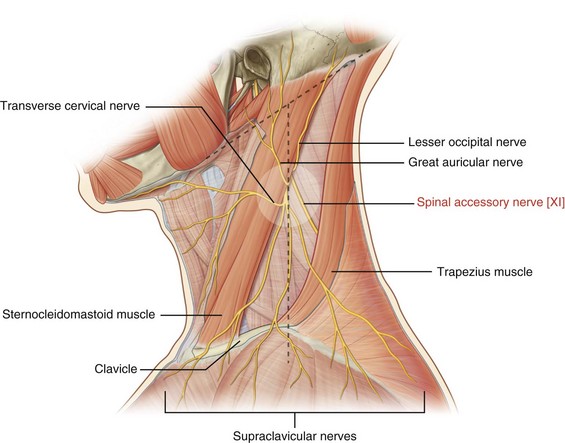
Danger Zones

Placement of the Incision Line
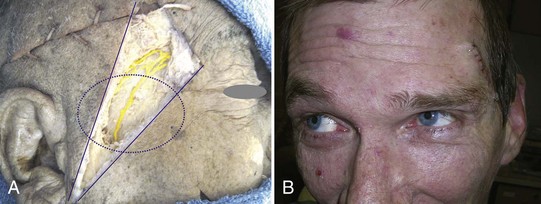
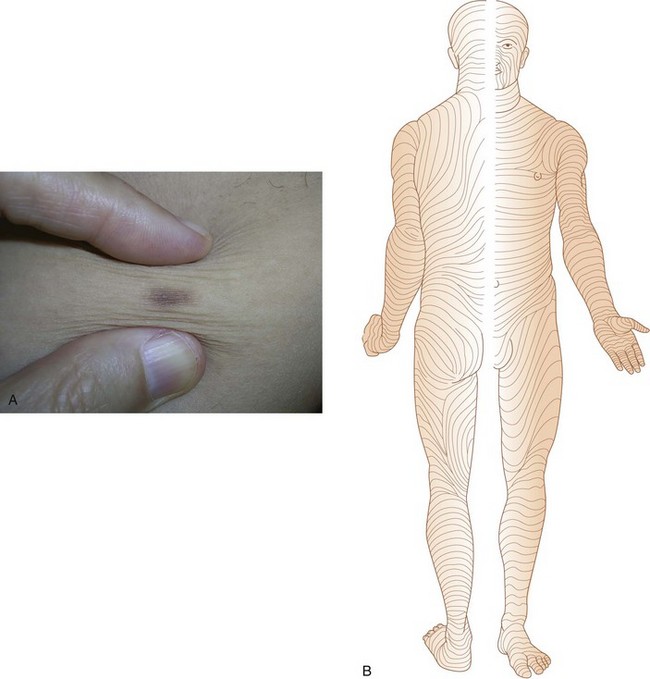
Major factors to be considered when determining the placement of the incision line are wrinkle lines and relaxed skin tension lines (RSTLs). The design of an ellipse on the face is usually done within wrinkle lines. If wrinkles are not apparent, asking the patient to smile, lift the eyebrows or tightly close the eyes can bring out lines of facial expression (Figure 11-5A). That is because these lines run perpendicular to the muscles of facial expression (Figure 11-5B).
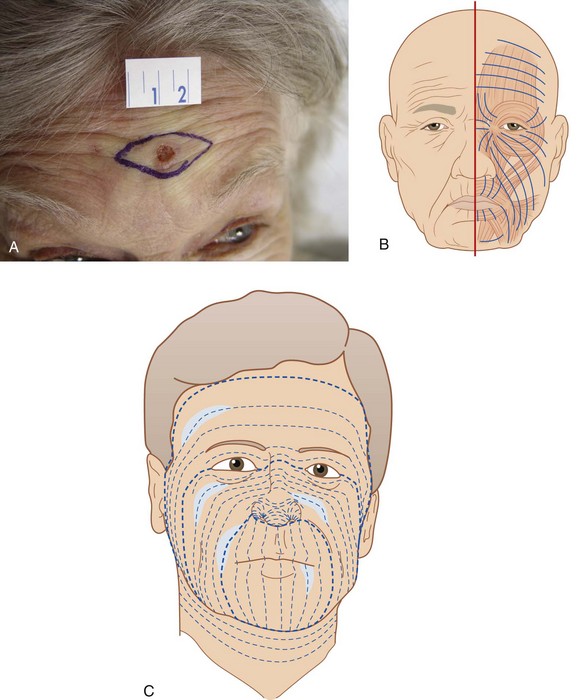
The RSTLs are the parallel skin lines that are seen when the skin is pinched together while the muscles are relaxed (Figure 11-5C). For example, when the skin is pinched together on the wrist, the RSTLs run horizontally from the lateral wrist to the medial wrist (Figure 11-6A). The RSTLs are used to plan the ellipse on the trunk, extremities, and on facial areas where wrinkle lines are not apparent (Figures 11-5 and 11-6).
Surgical Margin
The ellipse is designed so that the lesion is cleared with a margin. When possible, knowing the type of lesion in advance can guide the amount of tissue to be removed. The surgical margin may be 3 to 5 mm for basal cell carcinomas, 3 to 6 mm for squamous cell carcinomas, and 1 to 2 cm for diagnosed melanomas (Table 11-1).1,2 When the suspicion for malignancy is low, a shave biopsy or an excision with smaller margins of 1 to 2 mm is usually adequate. For the initial excision of a suspected melanoma the margin should be 1 to 2 mm so as not to affect subsequent lymph node testing,7 and additional tissue will be excised later based on depth of invasion seen on pathology. One option for some suspected melanomas is to do a scoop shave excision with 2-mm margins since a full excision may be premature before histology is obtained (see Chapter 8, Choosing the Biopsy Type). It is important to balance taking enough tissue to reduce the need for repeat procedures due to positive margins while minimizing impact to form and function.8 In some cases it may be necessary to utilize Mohs surgery or take a smaller margin if the lesion is too close to vital structures.
|
Lesion Type |
Surgical Margin |
|---|---|
| Uncertain | Consider shave or punch biopsy to delineate prior to elliptical excision or start with 1- to 2-mm margins to avoid unnecessary tissue removal. |
| Benign | Visible lesion removed. |
| BCC | 3–5 mm |
| SCC | 3–6 mm |
| Initial excision of possible melanoma | 1–3 mm |
| Melanoma in situ | 5 mm |
| Melanoma < 1 mm | 10 mm (may need referral for lymph nodes 0.75 to 1 mm depending on ulceration, regression, or mitotic figures) |
| Melanoma > 1 mm | 20 mm and lymph node evaluation |
Ellipse Geometry
The ends of the ellipse should be approximately 30-degree angles so that potential dog ears (standing cones) are minimized (Figure 11-7). Standing cones consist of bulging skin at the ends of a sutured wound. Looser skin areas sometimes allow slightly larger angles at the end of the ellipse because the standing cones flatten slightly. Undermining the end of the ellipse also helps minimize these potential standing cones. A clinician should explain to patients before the surgery that the length of the incision needs to be about three times the diameter of the lesion. It is helpful to draw this for patients so they can see how large their incision will be.
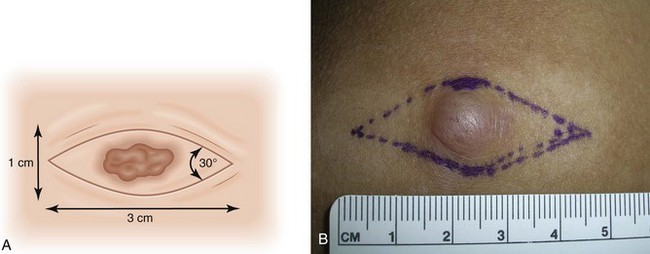
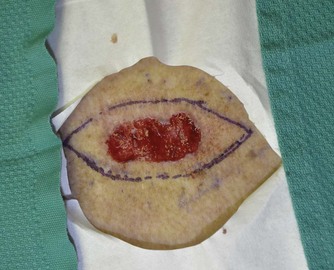
It is very helpful to mark the biopsy margins with a surgical marking pen (Figure 11-8). To orient the ellipse properly, determine the wrinkle line or relaxed skin tension line that will define the axis of the ellipse. The area to be cut may be prepped with alcohol first. A clean and nonsterile surgical marking pen is acceptable if you prep the skin again after marking the lesion. The usual ellipse is drawn so that the length of the ellipse is at least three times the width of the ellipse (Figures 11-7 and 11-8). Conditions in which a greater than 3 : 1 ratio may be desirable include tighter skin, skin over the joints, and curved surfaces.

Avoiding Distortion of Tissue
Elliptical excisions on the forehead, upper lip, and around the eye require careful planning because they can distort the eyebrow, lip, or eyelid. When possible it is better to orient an ellipse perpendicular to the eyelid or lip margin (Figure 11-5). For facial excisions, it is important to understand cosmetic units that relate to the organs of the face. Ask the patient to perform the following maneuvers: smile, show the teeth, raise the eyebrows, and purse the lips. It is best to keep the excision within one cosmetic unit rather than crossing between two units. When planning an excision, try to avoid creating functional problems with the eyes and mouth. Avoid pulling down eyelids and causing ectropion, pulling up eyebrows, cutting significant facial nerves, or distorting the look of the lip or nasal alae.
If there is doubt about whether the ellipse can be closed or if the potential exists for anatomic distortion, creation of a flap may be necessary (see Chapter 13, Flaps). In some instances the closure can be very tight. Wider undermining or thicker sutures may be required to accomplish the closure.
Anesthesia
Epinephrine is valuable for all elliptical excisions and is used for virtually all patients in all surgical locations. For patients with normal circulation, it is safe to use epinephrine for local anesthesia in areas such as the tip of the nose, the fingers and toes, the ears, or the penis despite old dogma. In one study there was no evidence that buffered 0.5% lidocaine with epinephrine 1 : 200,000 causes ischemia or necrosis when injected into digits at the surgical site (not digital blocks).3 That was true despite a history of circulatory disorders, thrombosis, diabetes, smoking, anticoagulation, or significant preoperative hypertension.3 However, in patients with severe peripheral vascular disease or Raynaud’s phenomenon, one might discuss the risks and benefits with the patient.
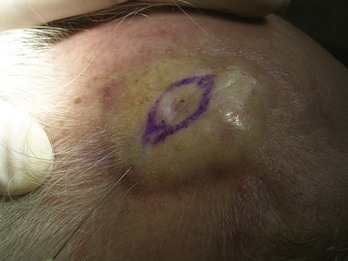
The amount of anesthesia needed depends on the location of the surgery and the thickness of subcutaneous tissue in the area. For example, the forehead and scalp have very little subcutaneous tissue because of the skull bones below, so a small amount of anesthesia will go far to distend tissue for hemostasis and numbness (Figure 11-9). However, excising an ellipse on the thigh or abdomen will require more anesthetic volume because the thicker subcutaneous tissues will soak up the volume faster. For an ellipse in the range of 1 × 3 cm to 2 × 6 cm, it is not unusual to need at least 20 to 30 mL of anesthesia. This should be safe for even the smallest adult. Plan ahead by drawing up at least one to two 10- to 12-mL syringes with anesthesia.
 -inch needle on the forehead.
Add 8.4% bicarbonate in a 1 : 9 dilution to minimize pain and burning upon injection (see Chapter 3, Anesthesia). Pinch the skin at the area to be injected while injecting (based on the gate theory of pain). Start with a 30-gauge needle for the most sensitive areas and use a 27-gauge needle for less sensitive areas or when the initial anesthesia begins to work. Inject slowly because tissue distention hurts.
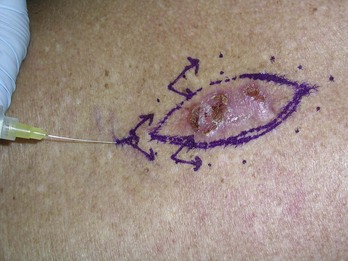
There are many ways to cover the needed area with anesthesia. Small ellipses can be anesthetized by a single injection distal to one end of the ellipse (Figure 11-9). For large excisions, one method that will minimize the number of painful injection sites begins with a single injection at one end of the ellipse that is far enough out to get the area to be undermined. The anesthesia is then delivered in a fanlike fashion until adequate volume is given (Figure 11-10). The next injection can be placed within the area of anesthesia and the anesthetic fanned out toward the other end of the ellipse. A third or fourth injection may be needed if the ellipse is large, but each of these injections may be placed within areas already numb. Injecting in the subcutaneous layer is less painful than injecting in the dermis and gives good anesthesia and reduction of blood flow via the epinephrine effect. This is a very humane method of anesthetizing a large area for surgery.
Preparing the Room, the Patient, and the Equipment
Once your sterile gloves are on, turn your attention to creating your sterile surgical field. Fenestrated paper fields that come in a sterilized packet are very convenient. Sterile towels may be used as an alternative. When placed on the face, patients should be able to breathe comfortably. Because these paper drapes have a tendency to move easily during surgery, it helps to place one or two sterile cloth drapes on top of the paper away from the hole, to increase the size of the sterile field and keep the paper in place (Figure 11-11).
Now look at your equipment and make sure that you have the following:
Incision
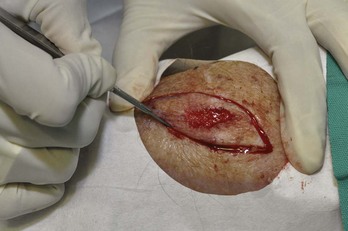
Check that the patient is numb and start your incision. The scalpel should be held like a pencil, with the hand holding the scalpel resting comfortably on the patient. The corner of the ellipse is incised with the tip of the blade. The sharper belly of the blade is used to cut the majority of the ellipse. Care should be taken to make the incision perpendicular to the skin surface (Figure 11-12). It may be helpful to stabilize the skin with your nondominant hand (Figures 11-12 and 11-13) to keep the ellipse from “stretching.” Note how the scalpel is not as perpendicular as it should be in Figure 11-13. If the incision is made so that the skin is beveled inward or outward, it may be more difficult to obtain a fine-line closure. (If this error is made, it is still possible to use your scissors to straighten the skin edge before beginning the repair.)
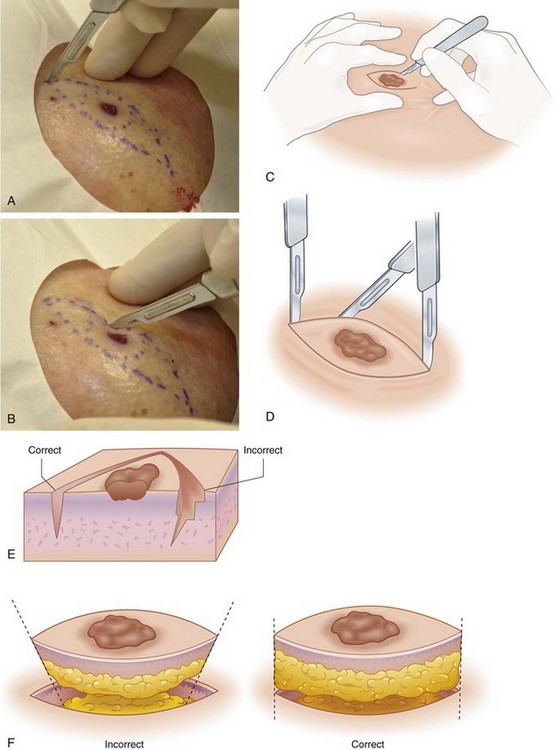
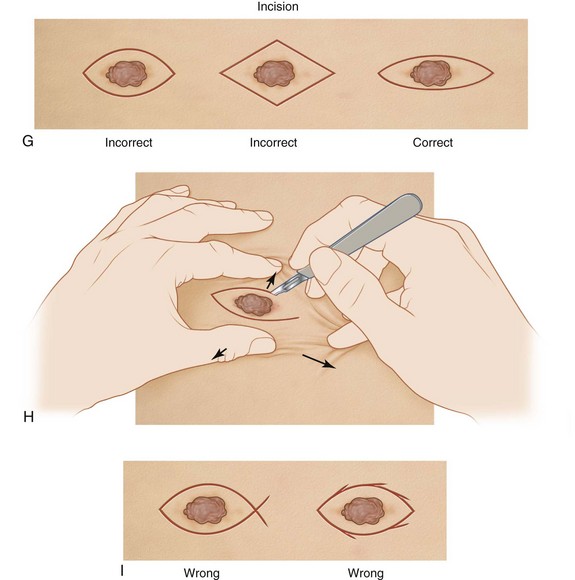
Use caution to not cut beyond the point of the ellipse causing an overcut or fish-tail pattern at the end (Figure 11-12I). It can be helpful to reverse the scalpel so that the point of the scalpel is at the second end of the ellipse to prevent cutting beyond the point of the ellipse.
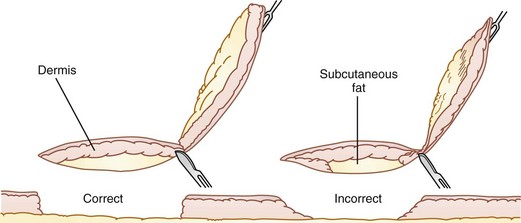
Grasp one point of the ellipse with a toothed forceps and using the scalpel, scissor, or electrosurgical device cut horizontally under the ellipse from that point to the other end of the ellipse (Figure 11-14). Use caution to stay at the same level in the subcutaneous fat to facilitate a good repair (Figure 11-15).
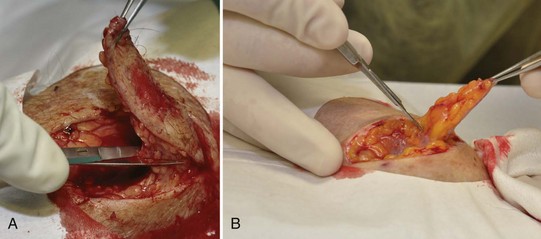
FIGURE 11-14 (A) Cutting horizontally under the ellipse using a sharp iris scissor. (B) Cutting using a scalpel.
(Copyright Richard P. Usatine, MD.)
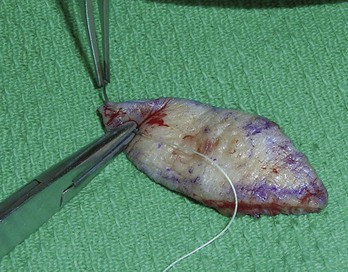
If the lesion is being sent for pathology to evaluate for clear margins, tag the excised lesion by putting a suture through one end of the sample and recording the location (medial, lateral, etc.) on the pathology slip and medical record (Figure 11-16). If your assistant can attend to the patient by putting pressure on the cut area with gauze, you can use this time to mark the excised lesion. If you are operating alone, you may put the specimen on the sterile tray in an orientation that is similar to the anatomic position within the patient. Then you may finish repairing the defect and place the marking suture at the end of the procedure. If the procedure is taking a long time so that the specimen may dry out, you can choose to place the suture and put the specimen in the formalin at a time when bleeding is controlled. Although a surgical marker may be adequate for marking the corner of an ellipse, there is a risk that the formalin will dissolve the marking and the proper direction will be lost. Using a suture to orient the pathologist provides for greater certainty if the margin is not clear.
Hemostasis
The major techniques to produce electrocoagulation are as follows:
The electrosurgical unit should be used just enough to stop significant bleeding so that tissue injury is minimized. Slight oozing at the wound edges can be left alone or stopped with pressure only because the suturing should stop this later. Avoid creating large areas of char and tissue necrosis because this can increase the risk of wound infection. When a vessel is not responding to electrocoagulation, use a suture. One method is to use absorbable suture with a small figure-of-eight around the vessel (see Figure 4-5 in Chapter 4). For example, if you are already using Vicryl for your deep sutures, just use this for the hemostatic stitch. The U-suture (square suture) is another method of obtaining hemostasis with a deep absorbable suture (see Figure 4-6 in Chapter 4).
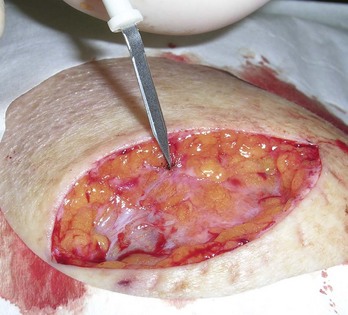
Once hemostasis has been achieved, make sure that the whole tumor is excised. Look at and feel the base and edges of the elliptical defect and the specimen removed. If it appears that some of the tumor or cancer remains (see Figure 34-11 in Chapter 34), cut it out and explain the site and orientation of this second piece to the pathologist. It is better to do this now than to wait and discover the margins were not clear.
Undermining
Undermining allows the clinician to mobilize the tissue so that it can be advanced to close a defect. Most small wounds will not need undermining. Determine if and how much undermining will be needed by testing to see how mobile the skin edges are using one skin hook on either side of the wound (Figure 11-18A). When skin hooks are not available, fingers and forceps can be used, but this is a less desirable method (Figure 11-18B). More tension will require more undermining. Repeat this after the undermining is done to determine if there was sufficient undermining. If not, keep going until the skin is able to close in a side-to-side fashion. Minimize undermining with patients on anticoagulation, because they are at higher risk for a hematoma.
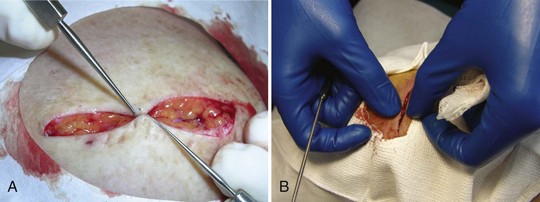
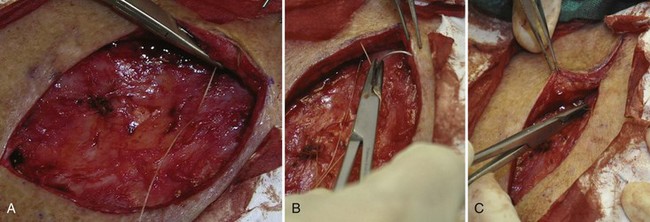
Undermining may be performed by spreading the iris scissors (or other tissue scissor) under the edges of the incision (Figure 11-19). The skin hook is a very atraumatic way to hold up the skin edge for undermining. It is especially helpful if your assistant can hold the skin up with two skin hooks giving maximal visualization for undermining. Using blunt dissection the undermining plane is achieved with less bleeding. However, there will be some strands of connective tissue that are better and more quickly snipped than broken with blunt dissection. Therefore, the most efficient and atraumatic method of undermining involves a combination of blunt dissection and snipping (Figure 11-19).
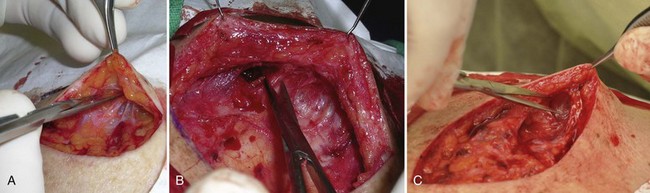
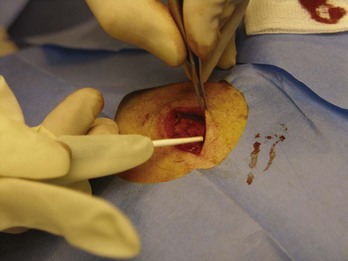
Alternatives include using a scalpel, which will generally provoke more bleeding, or using an electrosurgical cutting device, which can minimize bleeding (Figure 11-20). Because it is easier to undermine the edge furthest away from you, it might help to have an assistant standing on the other side of the table retracting the skin with two skin hooks. The roles are then reversed and the assistant undermines the side nearest you while you hold the skin hooks. Do not forget to undermine at the points of the ellipse to diminish the formation of standing cones (wrinkling or bunching of the skin) at the ends of the repair (Figure 11-19C). With the edges held up with skin hooks, electrocoagulation of bleeders can easily be achieved. Cotton-tipped applicators are helpful to look for bleeders under the undermined skin.
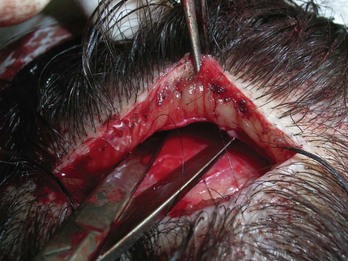
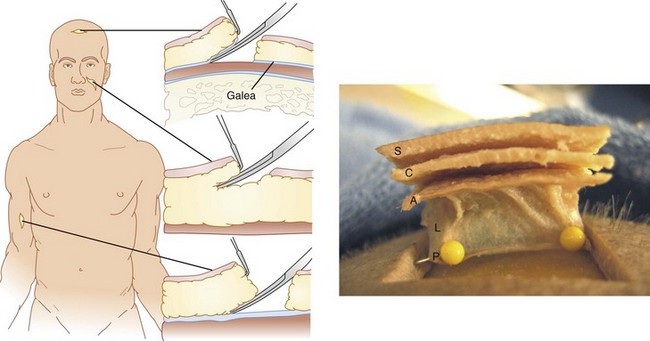
Most areas of the body are undermined within the subcutaneous fat. Some areas of the body, such as the scalp, are better undermined in a deeper plane. The scalp should be undermined in a subgaleal plane (below the galea and above the periosteum) because it is a bloodless, easy plane in which to widely separate the tissue. Although this may seem anxiety provoking at first, there is much less bleeding in this plane than in the subcutaneous fat and you will not damage the skull or underlying central nervous system. See Figure 11-21 for a view of the galea.
Appropriate levels of undermining include the following (Figure 11-22):
Wound Closure (Repair)
The surgical site should be dry before initiating wound closure. If the ellipse is small and narrow and not under much tension, buried sutures may not be needed. In this case, close the wound with interrupted nonabsorbable sutures such as nylon or polypropylene (Prolene). Closure by the rule of halves is a good method in these cases (Figure 11-23).
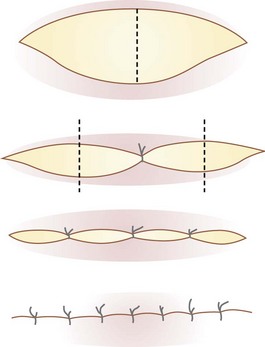
FIGURE 11-23 Using the rule of halves to close an ellipse not under tension.
(Copyright Richard P. Usatine, MD.)
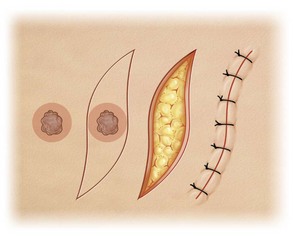
Most ellipses will benefit from using buried absorbable sutures to bring the skin edges together. The goal is to have the wound edges closely approximated using only buried sutures (buried vertical mattress sutures, deep sutures; see Chapter 6, Suturing Techniques).
The buried sutures take advantage of the undermined area. Use absorbable suture such as 4-0 polyglactin (Vicryl) on a 13- or 16-mm-long plastic needle (see Chapter 5, Suture Material). It is easiest to start the buried sutures at one end of the ellipse rather than the middle. The greatest tension is in the middle of an ellipse, and the skin edges tend to pull apart while you are trying to tie the deep suture. By starting at the apex furthest from you, you can begin to take tension off the wound in an area in which there is less tension to begin with. As you move the deep sutures from the apex toward the middle of the ellipse, the wound will narrow and the sutures will be easier to tie. If a deep suture is not placed well, do not hesitate to take it out and redo it.
The buried suture is performed in the following manner (Figure 11-24):
If the wound is well approximated, start a running suture with 4-0 to 6-0 polypropylene (Prolene) or nylon to hold the epidermal edges together for optimal healing. A single interrupted suture is placed at one end of the wound and only the short end is cut. The remainder of the suture is looped around the skin edges one throw at a time (Figure 11-25). This is taken to the end and then the knot is tied to the final loop (see Chapter 6, Suturing Techniques). While the running suture is quick, if it does open or needs to be opened with a wound infection, it will no longer retain its strength.
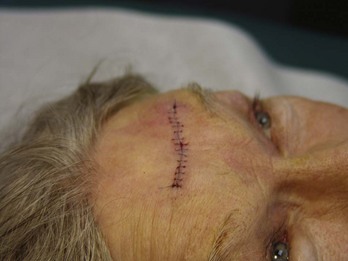
If the skin is not well approximated with the deep sutures or there continues to be much tension on the wound, use interrupted sutures rather than a running suture. Simple interrupted sutures can be very useful and can be combined with a running suture. If greater wound eversion is needed and skin tension remains high, vertical mattress sutures can be beneficial (Figure 11-25). In areas where there is natural inversion such as in the creases of the forehead, vertical mattress sutures can be used for wound eversion (see Chapter 6).
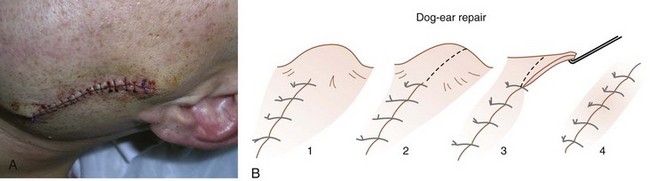
Standing Cones (Dog-Ear) Repair
The best way to avoid standing cones is by planning and drawing your ellipse as described earlier. However, even with the best planning, a standing cone can still happen. Repair of a standing cone of tissue at either end of an elliptical excision is accomplished by extending the length of the excision (Figure 11-26). One method involves cutting a line through the center of the standing cone at a slight angle from the original incision. This results in one overhanging edge of tissue that needs to be trimmed. This trimming is done with a No. 15 blade or scissor to neatly trim the tissue to the very end of the excision. A No. 15 blade or a sharp scissor is preferred to keep the cut perpendicular with the skin. When trimming this tissue, it is important to trim only a small amount at a time so that not too much tissue is removed.
Clean and Dress the Wound
Aftercare
Complications and their prevention are described in detail in Chapter 36.
Notes on Infection
Variations
Variations in the standard ellipse include the following shapes:
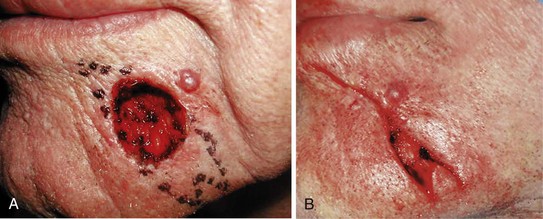
Crescent Excision
On the cheek of the face it often looks better for the final repair to be a crescent rather than a straight line. Asking the patient to smile can show the crescentic pattern of the smile lines. See Figure 11-27 to visualize how the crescent excision is drawn and executed.

M-Plasty
In certain situations the ellipse should be shorter on one side to avoid having the ellipse cross into another cosmetic unit. See Figure 11-28 as an example of how the M-plasty is used on the face to shorten one side of the ellipse.
S-Plasty
Another variation of the ellipse that works well on convex surfaces such as the cheek is the S-plasty (Figure 11-29). Each side of the ellipse is drawn in an S configuration to avoid standing cones. Use of the rule of halves is helpful when closing this type of excision. If standing cones still form, they can be excised as described previously. Cosmetically this can give a better result than a straight line over some convex surfaces.
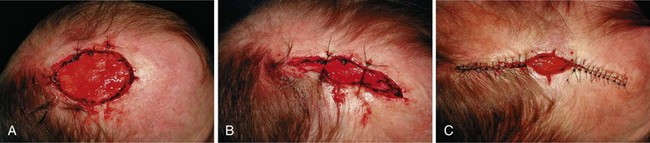
Partial Closure
Some large excisions on the scalp may be very difficult to close even with extensive undermining. Although the scalp may be allowed to heal by second intention, the clinician may want to obtain a partial closure to decrease the size of the area required to heal secondarily (Figure 11-30). Temporary pulley stitches are put in as step 1 to begin the closure. The wound is then closed from the apices with interrupted sutures zippering toward the center. This leaves a smaller wound to heal by second intention, thereby reducing final healing time.
Alternatives to An Elliptical Excision
The alternatives to an elliptical excision include the following:
Coding and Billing Pearls
Tables 11-2 and 11-3 summarize the CPT codes and Medicare fees for excisions. Note how the fee goes up 0.1 cm above each round centimeter. Do not round the measurements or make estimates; use exact numbers.
|
CPT codes |
|
2010 Medicare National Nonfacility Price |
|---|---|---|
| Trunk, Arms, or Legs | ||
| 11400 | 0.5 cm or less | $105 |
| 11401 | 0.6 to 1.0 cm | $130 |
| 11402 | 1.1 to 2.0 cm | $145 |
| 11403 | 2.1 to 3.0 cm | $168 |
| 11404 | 3.1 to 4.0 cm | $191 |
| 11406 | Over 4.0 cm | $276 |
| Scalp, Neck, Hands, Feet, Genitalia | ||
| 11420 | 0.5 cm or less | $106 |
| 11421 | 0.6 to 1.0 cm | $139 |
| 11422 | 1.1 to 2.0 cm | $155 |
| 11423 | 2.1 to 3.0 cm | $181 |
| 11424 | 3.1 to 4.0 cm | $209 |
| 11426 | Over 4.0 cm | $302 |
| Face, Ears, Eyelids, Nose, Lips, Mucous Membranes | ||
| 11440 | 0.5 cm or less | $117 |
| 11441 | 0.6 to 1.0 cm | $149 |
| 11442 | 1.1 to 2.0 cm | $167 |
| 11443 | 2.1 to 3.0 cm | $202 |
| 11444 | 3.1 to 4.0 cm | $255 |
| 11446 | Over 4.0 cm | $352 |
TABLE 11-3 Excision of Malignant Lesions
|
CPT codes |
|
2010 Medicare National Nonfacility Price |
|---|---|---|
| Trunk, Arms or Legs | ||
| 11600 | 0.5 cm or less | $165 |
| 11601 | 0.6 to 1.0 cm | $203 |
| 11602 | 1.1 to 2.0 cm | $222 |
| 11603 | 2.1 to 3.0 cm | $253 |
| 11604 | 3.1 to 4.0 cm | $281 |
| 11606 | Over 4.0 cm | $401 |
| Scalp, Neck, Hands, Feet, Genitalia | ||
| 11620 | 0.5 cm or less | $168 |
| 11621 | 0.6 to 1.0 cm | $204 |
| 11622 | 1.1 to 2.0 cm | $231 |
| 11623 | 2.1 to 3.0 cm | $271 |
| 11624 | 3.1 to 4.0 cm | $306 |
| 11626 | Over 4.0 cm | $371 |
| Face, Ears, Eyelids, Nose, Lips, Mucous Membranes | ||
| 11640 | 0.5 cm or less | $175 |
| 11641 | 0.6 to 1.0 cm | $214 |
| 11642 | 1.1 to 2.0 cm | $246 |
| 11643 | 2.1 to 3.0 cm | $292 |
| 11644 | 3.1 to 4.0 cm | $360 |
| 11646 | Over 4.0 cm | $476 |
The CPT code for an intermediate repair is based on the length of the final closed wound. The codes for intermediate repairs encompass wide ranges of wound length and most of the coding will be within the 2.6- to 7.5-cm range. See Box 38-1 in Chapter 38, Surviving Financially, for the CPT codes and Medicare fees for intermediate repairs.
A complex repair can be billed if a lot of undermining is needed. Start by billing for intermediate repairs and make sure payments are received before attempting to bill at the complex repair level. Flaps are addressed in Chapter 13 and have their own billing codes.
Resources
 -inch sharp/sharp scissors, 5-inch metal tissue forceps along with drapes and gauze; these instruments are of sufficient quality to perform large elliptical excisions and are all disposable; priced at under $6 (www2.mooremedical.com).
1. Minton TJ. Contemporary Mohs surgery applications. Curr Opin Otolaryngol Head Neck Surg. 2008;16(4):376-380.
2. Thissen MR, Neumann MH, Schouten LJ. A systematic review of treatment modalities for primary basal cell carcinomas. Arch Dermatol. 1999;135:1177-1183.
3. Smeets NW, Krekels GA, Ostertag JU, et al. Surgical excision vs Mohs’ micrographic surgery for basal-cell carcinoma of the face: randomised controlled trial. Lancet. 2004;364(9447):1766-1772.
4. Leibovitch I, Huilgol SC, Selva D, et al. Cutaneous squamous cell carcinoma treated with Mohs micrographic surgery in Australia I. Experience over 10 years. J Am Acad Dermatol. 2005;53(2):253-260.
5. Silapunt S, Peterson SR, Goldberg LH. Squamous cell carcinoma of the auricle and Mohs micrographic surgery. Dermatol Surg. 2005;31(11, Pt 1):1423-1427.
6. Robinson JK, Hanke CW, Sengelmann RD, et al. Surgery of the Skin—Procedural Dermatology. St Louis, MO: Elsevier/Mosby; 2010.
7. Tran KT, Wright NA, Cockerell CJ. Biopsy of the pigmented lesion—when and how. J Am Acad Dermatol. 2008;59:852-871.
8. Kimyai-Asadi A, Alam M, Goldberg LH, et al. Efficacy of narrow-margin excision of well-demarcated primary facial basal cell carcinomas. J Am Acad Dermatol. 2005;53(3):464-468.
9. Wright TI, Baddour LM, Berbari EF, et al. Antibiotic prophylaxis in dermatologic surgery: advisory statement 2008. J Am Acad Dermatol. 2008;59(3):464-473.
10. Bennett R. Surgical complications (Chap 248. In Wolff K, Goldsmith LA, Katz SI, et al, editors: Fitzpatrick’s Dermatology in General Medicine, 7th ed, New York: McGraw-Hill, 2007.
11. Dengel L, Turza K, Noland MM, et al. Skin mapping with punch biopsies for defining margins in melanoma: when you don’t know how far to go. Ann Surg Oncol. 2008;15(11):3028-3035.
12. Kimyai-Asadi A, Katz T, Goldberg LH, et al. Margin involvement after the excision of melanoma in situ: the need for complete en face examination of the surgical margins. Dermatol Surg. 2007;33(12):1434-1439. discussion: 1439–1441
13. Thomas DJ, King AR, Peat BG. Excision margins for nonmelanotic skin cancer. Plast Reconstr Surg. 2003;112(1):57-63.
14. Bisson MA, Dunkin CS, Suvarna SK, Griffiths RW. Do plastic surgeons resect basal cell carcinomas too widely? A prospective study comparing surgical and histological margins. Br J Plast Surg. 2002;55(4):293-297.
Arora A, Attwood J. Common skin cancers and their precursors. Surg Clin North Am. 2009;89:703-712.
Firoz B, Davis N, Goldberg LH. Local anesthesia using buffered 0.5% lidocaine with 1:200,000 epinephrine for tumors of the digits treated with Mohs micrographic surgery. J Am Acad Dermatol. 2009;61:639-643.
Garbe C, Hauschild A, Volkenandt M, et al. Evidence and interdisciplinary consensus-based German guidelines: surgical treatment and radiotherapy of melanoma. Melanoma Res. 2008;18:61-67.
Garbe C, Peris K, Hauschild A, et al. Diagnosis and treatment of melanoma: European consensus-based interdisciplinary guideline. Eur J Cancer. 2010;46:270-283.
Lane JE, Kent DE. Surgical margins in the treatment of nonmelanoma skin cancer and Mohs micrographic surgery. Curr Surg. 2005;62:518-526.
Ricotti C, Bouzari N, Agadi A, Cockerell CJ. Malignant skin neoplasms. Med Clin North Am. 2009;93:1241-1264.
[/level-membership-for-dermatology-category][not-level-membership-for-dermatology-category]
11 The Elliptical Excision
Contraindications
Contraindications by lesion include the following:
Contraindications by lesion include the following:
Equipment
The following equipment is required to perform an elliptical incision (also see Figure 11-1), although excision of small ellipses may not require all of the items on the list:
Disposable instrument setups (Figure 11-1B) may be the only option in practices that do not do regular surgeries and don’t have an autoclave. Note that disposable instruments are of lower quality than nondisposables.
The Elliptical Incision: Steps and Principles
The major steps involved in the elliptical excision involve the following:
Perform a check of vital signs and be aware of coexisting medical issues such as anticoagulation before starting any surgical procedure. Obtain informed consent in writing at the time of the procedure and perform a surgical time-out before starting (see Chapter 1, Preoperative Preparation).
Planning and Designing the Excision
Important factors to consider when planning an excision are listed in Box 11-1.
Box 11-1 Factors to Consider When Planning an Excision
Important factors to consider when planning an excision include the following:
Danger Zones
Placement of the Incision Line
Major factors to be considered when determining the placement of the incision line are wrinkle lines and relaxed skin tension lines (RSTLs). The design of an ellipse on the face is usually done within wrinkle lines. If wrinkles are not apparent, asking the patient to smile, lift the eyebrows or tightly close the eyes can bring out lines of facial expression (Figure 11-5A). That is because these lines run perpendicular to the muscles of facial expression (Figure 11-5B).
The RSTLs are the parallel skin lines that are seen when the skin is pinched together while the muscles are relaxed (Figure 11-5C). For example, when the skin is pinched together on the wrist, the RSTLs run horizontally from the lateral wrist to the medial wrist (Figure 11-6A). The RSTLs are used to plan the ellipse on the trunk, extremities, and on facial areas where wrinkle lines are not apparent (Figures 11-5 and 11-6).
Surgical Margin
The ellipse is designed so that the lesion is cleared with a margin. When possible, knowing the type of lesion in advance can guide the amount of tissue to be removed. The surgical margin may be 3 to 5 mm for basal cell carcinomas, 3 to 6 mm for squamous cell carcinomas, and 1 to 2 cm for diagnosed melanomas (Table 11-1).1,2 When the suspicion for malignancy is low, a shave biopsy or an excision with smaller margins of 1 to 2 mm is usually adequate. For the initial excision of a suspected melanoma the margin should be 1 to 2 mm so as not to affect subsequent lymph node testing,7 and additional tissue will be excised later based on depth of invasion seen on pathology. One option for some suspected melanomas is to do a scoop shave excision with 2-mm margins since a full excision may be premature before histology is obtained (see Chapter 8, Choosing the Biopsy Type). It is important to balance taking enough tissue to reduce the need for repeat procedures due to positive margins while minimizing impact to form and function.8 In some cases it may be necessary to utilize Mohs surgery or take a smaller margin if the lesion is too close to vital structures.
|
Lesion Type |
Surgical Margin |
|---|---|
| Uncertain | Consider shave or punch biopsy to delineate prior to elliptical excision or start with 1- to 2-mm margins to avoid unnecessary tissue removal. |
| Benign | Visible lesion removed. |
| BCC | 3–5 mm |
| SCC | 3–6 mm |
| Initial excision of possible melanoma | 1–3 mm |
| Melanoma in situ | 5 mm |
| Melanoma < 1 mm | 10 mm (may need referral for lymph nodes 0.75 to 1 mm depending on ulceration, regression, or mitotic figures) |
| Melanoma > 1 mm | 20 mm and lymph node evaluation |
Ellipse Geometry
The ends of the ellipse should be approximately 30-degree angles so that potential dog ears (standing cones) are minimized (Figure 11-7). Standing cones consist of bulging skin at the ends of a sutured wound. Looser skin areas sometimes allow slightly larger angles at the end of the ellipse because the standing cones flatten slightly. Undermining the end of the ellipse also helps minimize these potential standing cones. A clinician should explain to patients before the surgery that the length of the incision needs to be about three times the diameter of the lesion. It is helpful to draw this for patients so they can see how large their incision will be.
It is very helpful to mark the biopsy margins with a surgical marking pen (Figure 11-8). To orient the ellipse properly, determine the wrinkle line or relaxed skin tension line that will define the axis of the ellipse. The area to be cut may be prepped with alcohol first. A clean and nonsterile surgical marking pen is acceptable if you prep the skin again after marking the lesion. The usual ellipse is drawn so that the length of the ellipse is at least three times the width of the ellipse (Figures 11-7 and 11-8). Conditions in which a greater than 3 : 1 ratio may be desirable include tighter skin, skin over the joints, and curved surfaces.
Avoiding Distortion of Tissue
Elliptical excisions on the forehead, upper lip, and around the eye require careful planning because they can distort the eyebrow, lip, or eyelid. When possible it is better to orient an ellipse perpendicular to the eyelid or lip margin (Figure 11-5). For facial excisions, it is important to understand cosmetic units that relate to the organs of the face. Ask the patient to perform the following maneuvers: smile, show the teeth, raise the eyebrows, and purse the lips. It is best to keep the excision within one cosmetic unit rather than crossing between two units. When planning an excision, try to avoid creating functional problems with the eyes and mouth. Avoid pulling down eyelids and causing ectropion, pulling up eyebrows, cutting significant facial nerves, or distorting the look of the lip or nasal alae.
If there is doubt about whether the ellipse can be closed or if the potential exists for anatomic distortion, creation of a flap may be necessary (see Chapter 13, Flaps). In some instances the closure can be very tight. Wider undermining or thicker sutures may be required to accomplish the closure.
Anesthesia
Epinephrine is valuable for all elliptical excisions and is used for virtually all patients in all surgical locations. For patients with normal circulation, it is safe to use epinephrine for local anesthesia in areas such as the tip of the nose, the fingers and toes, the ears, or the penis despite old dogma. In one study there was no evidence that buffered 0.5% lidocaine with epinephrine 1 : 200,000 causes ischemia or necrosis when injected into digits at the surgical site (not digital blocks).3 That was true despite a history of circulatory disorders, thrombosis, diabetes, smoking, anticoagulation, or significant preoperative hypertension.3 However, in patients with severe peripheral vascular disease or Raynaud’s phenomenon, one might discuss the risks and benefits with the patient.
The amount of anesthesia needed depends on the location of the surgery and the thickness of subcutaneous tissue in the area. For example, the forehead and scalp have very little subcutaneous tissue because of the skull bones below, so a small amount of anesthesia will go far to distend tissue for hemostasis and numbness (Figure 11-9). However, excising an ellipse on the thigh or abdomen will require more anesthetic volume because the thicker subcutaneous tissues will soak up the volume faster. For an ellipse in the range of 1 × 3 cm to 2 × 6 cm, it is not unusual to need at least 20 to 30 mL of anesthesia. This should be safe for even the smallest adult. Plan ahead by drawing up at least one to two 10- to 12-mL syringes with anesthesia.
Add 8.4% bicarbonate in a 1 : 9 dilution to minimize pain and burning upon injection (see Chapter 3, Anesthesia). Pinch the skin at the area to be injected while injecting (based on the gate theory of pain). Start with a 30-gauge needle for the most sensitive areas and use a 27-gauge needle for less sensitive areas or when the initial anesthesia begins to work. Inject slowly because tissue distention hurts.
There are many ways to cover the needed area with anesthesia. Small ellipses can be anesthetized by a single injection distal to one end of the ellipse (Figure 11-9). For large excisions, one method that will minimize the number of painful injection sites begins with a single injection at one end of the ellipse that is far enough out to get the area to be undermined. The anesthesia is then delivered in a fanlike fashion until adequate volume is given (Figure 11-10
[/not-level-membership-for-dermatology-category]
