Chapter 33 The Bone-Anchored Cochlea Stimulator (Baha)
 Videos corresponding to this chapter are available online at www.expertconsult.com.
The bone-anchored cochlea stimulator (Baha) system is based on the concept of direct bone conduction stimulation of the cochlea. Baha combines an osseointegrated implant and a percutaneous abutment placed behind the external ear, and a specially designed impedance matched electromagnetic temporal bone stimulator (transducer). Using this system, acoustic energy is transferred directly to the fluids of the inner ear, bypassing the external ear and the middle ear. The damping effect from soft tissues of the mastoid process, which is in the range of 7 to 15 dB depending on the frequency, is eliminated.1 Elimination of this effect is important because a significant amount of sound energy is lost in the soft tissues, especially in the high-frequency range because this is where most of the consonant sounds are located. These sounds are important for speech understanding, especially in noisy surroundings. A direct coupling between the transducer and the skull without any soft tissue between is of great acoustic advantage.2–6
HISTORICAL ASPECTS
Several factors combined to promote the development of Baha. From the mid-1970s, the use of osseointegrated implants in the treatment of edentulousness was in clinical practice. In conjunction with this, Brånemark sought an acoustic means to evaluate the degree of osseointegration. In one experiment, a patient with implants in the upper jaw had a special adapter secured to a dental implant and an Oticon bone transducer attached. Although it was impossible to measure the stability of the implant at that time, it was clear that the patient experienced sound very clearly, even when stimulation was of a low level; this had important implications regarding the ability to transmit sound via bone. A Ph.D. thesis by Kylén, who measured the sound reaching the cochlea during ordinary mastoid drilling, also contributed to the Baha concept.7 Kylén and Arlinger7 found that high noise levels produced a temporary threshold shift. A third factor was the problems patients with transcutaneous bone vibrators experienced.
HEARING THROUGH BONE CONDUCTION
In his Ph.D. thesis, Stenfelt8 discussed the different bone conduction theories of von Békésy, Barany, Tonndorf, and others. Most of the studies cited refer to patient groups with a normal ear, which is seldom the case for Baha patients. One exception is after acoustic tumor surgery, in which the eighth cranial nerve has been sacrificed, but the ear canal, middle ear, and cochlea are normal. Research has proven hearing through bone conduction to be highly complex. First, for frequencies less than 1.5 kHz, the relative movement of the ossicular chain dominates the bone conduction response; this is the inertia of the middle ear ossicles. Even with damage to the middle ear and ossicles, however, there is a bone conduction response in the low frequencies because the skull moves like a solid body. Second, for frequencies greater than 1.5 kHz, the response is attributed to the compression of the labyrinth. A third means of bone conduction is due to the relative movement of the mandible. Air in the external ear is set in motion and transmits sound through the intact drum and ossicles to the cochlea.
Several other factors probably also play a role, such as the oval and round window release, inner ear fluid inertia, and cochlea aqueduct effect. These factors are often interrelated, and it is difficult to isolate one from another. Almost regardless of the location of bone stimulation, the waves of the basilar membrane travel from the base of the cochlea, where the membrane is stiffer, toward the helicotrema, as is the case with air conducted sound. This means that the cochlea has difficulties in differentiating between bone conducted and air conducted sound. Cancellation experiments have verified this difficulty. Stenfelt8 also showed that bone conducted sound from 0.1 to 10 kHz for levels up to 77 dB HL is linear; this is important because the distortion level of the bone conducted sound would be low.
OSSEOINTEGRATION
The term osseointegration was coined by Brånemark and refers to direct contact between bone and an implant that can withstand a functional load. Numerous papers on osseointegration were published in the late 1970s.9–12 Osseointegration is a fundamental prerequisite for direct bone conduction; without it, the Baha would not function. Among the factors identified by Brånemark as key to establishing osseointegration was choice of implant material. Commercially pure titanium has been the material of choice since the start. Commercially pure titanium has a purity of 99.75%. The level of ferromagnetic contamination is 0.02% to 0.05% in the bulk metal, but no traces are found in the oxide layer, which means that the implant would not jeopardize magnetic resonance imaging (MRI).13,14 Because of the difference in density between bone and titanium artifacts, less than 1 mm would appear around the implants.
When a commercially pure titanium implant is machined, the surface is covered with an oxide layer within milliseconds. The implant can be regarded as a ceramic. The oxide layer has unique biocompatible properties; it is also dense and adheres to the bulk metal. Proteins from the host would not denature when in contact with the oxide. Titanium oxide has a high electrochemical value, which means that the surface attracts foreign material that could contaminate the implant.11 This is why the implant should be handled with the utmost care, avoiding contact even with sterile particles from gloves and draping during surgery.
In the treatment of edentulousness with implants, early loading often caused loss of osseointegration. This was the reason why the two-stage procedure was initially recommended for the Baha.10 The load produced by the Baha is very low, however, compared with the forces produced during chewing. Based on a study comparing a one-stage with a two-stage procedure in adults, the one-stage procedure is now recommended because no difference in osseointegration could be found.15 In irradiated bone, a two-stage procedure with a 6-month interval is suggested, often in combination with hyperbaric oxygen treatment.16
PATIENT SELECTION
Congenital Malformations
Patients with bilateral atresia often have normal or near-normal cochlea function and are ideal patients for the Baha. Because reconstructive atresia surgery is complex and high risk, a lasting hearing improvement is not always possible to achieve. In patients with a Jahrsdoerfer rating of 7 or worse, we often suggest a bone-anchored hearing implant instead of reconstructive trials.17 One advantage of the Baha for these patients is that the treatment does not interfere with atresia surgery if this becomes necessary later on. Although regulations regarding the minimum age for implantation vary from country to country, Baha has been successfully used in children 2 years old. Children can benefit from hearing with the Baha until they are old enough for an evaluation of the final anatomic situation to be made. The final decision can be made whether or not atresia surgery should be recommended.
Unilateral external ear canal atresia has been said to have little or no importance for child development. In a review published in 2004, Cho Lieu18 found, however, that speech development and the learning capacity of these children are at risk, even when hearing is normal in the contralateral ear.
Down Syndrome
Conductive hearing impairment is common in Down syndrome. Narrow external ear canals and middle ear malformations are prevalent in patients with Down syndrome. Serous otitis media is also frequent in these children and can be hard to treat sometimes. It is clinically proven that the Baha improves the quality of life for these patients.19
Single-Sided Deafness
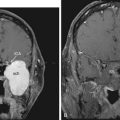
Cochlear deafness in one ear is not unusual. One cause is acoustic tumor surgery. Patients with single-sided deafness often experience verbal communication problems even when the opposite ear functions normally. Problems with speech understanding are most commonly experienced in noisy surroundings. One reason is the head shadow effect, but several other factors are involved. Processing is highly complex and is not yet fully understood. One finding is that patient satisfaction is often greater than indicated by test results.20–25
PATIENT COUNSELING
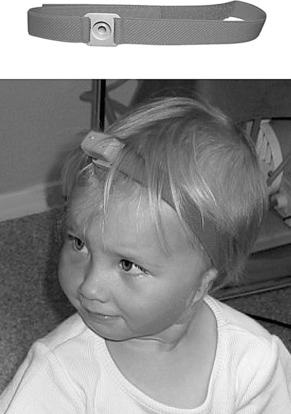
Age is not a contraindication for the Baha per se. The oldest patient who has undergone surgery at the Sahlgrenska unit was more than 90 years old, and the youngest was 18 months old. Because surgery becomes easier and less risky with age, it is suggested that the Baha Softband be used until the child is 3 years old (Fig. 33-1) (see subsequent section “Baha in Children ”.)
AUDIOMETRIC CRITERIA
Generally, the better the cochlea function, the better the result. The air-bone gap is not important. As of September 2007, there was only one manufacturer of direct bone conduction cochlea stimulators, Cochlear Bone Anchored Solutions (a division within Cochlear Ltd, Göteborg, Sweden). Two ear-level devices and one body-worn device are available. The major difference between the ear-level devices is that they target different patient groups. The Baha Divino (Fig. 33-2) is for patients whose average bone conduction thresholds are at 0.5 to 3 kHz should be better than 30 to 35 (45) dB.20 The Divino also has a directional microphone setting. The other ear-level device, the Baha Intenso (Fig. 33-3), is recommended when the cochlea reserve is worse. Patients with a bone conduction threshold of 40 to 45 (55) dB can benefit from this hearing instrument.
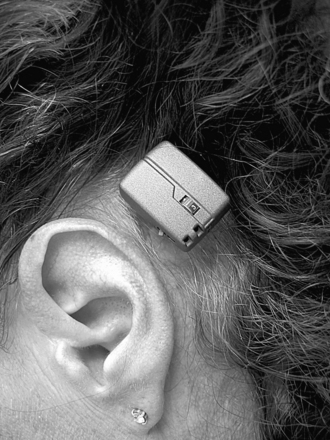

The body-worn device, the Baha Cordelle II (Fig. 33-4), has the transducer in a separate housing that is worn at ear level, connected to the Baha coupling. The microphone, electronics, and batteries are in the body-worn unit. Patients with cochlea hearing loss of 50 to 55 (60) dB could benefit from this device. The levels of hearing impairment discussed here are only guidelines. Some patients have not been satisfied even when well within the audiometric criteria, whereas others are satisfied even though their hearing capacity is lower than technically required.

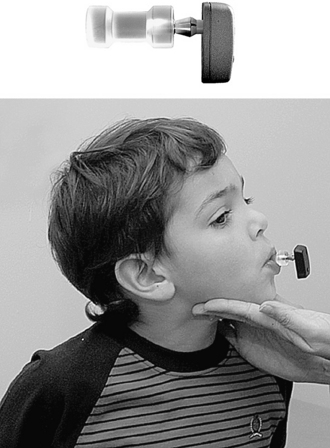
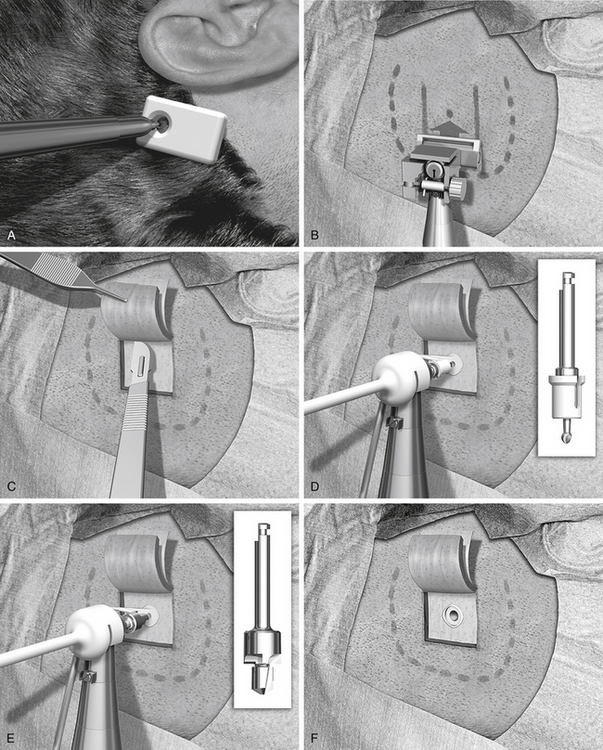
In the preoperative evaluation, a testband with a Baha can be very helpful. The Baha is attached to a steel spring that the patient wears over his or her head (Fig. 33-5). With this test device, the patient still has skin between the transducer and the skull bone. If the patient is satisfied with this testband, the chances of implant surgery being successful are very high. The test rod can also be used as an alternative means to give the patient an idea of the outcome (Fig. 33-6). The Baha is attached to the coupling of a plastic rod and pressed onto the skin over the mastoid. To reduce the damping effect of the skin, the patient can hold the rod firmly between his or her teeth, which would simulate direct bone conduction.

SURGICAL TREATMENT
Preparation of the Patient
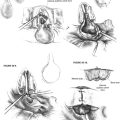
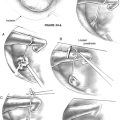
The author prefers magnifying lenses to the otomicroscope because this makes it easier to find the exact angle of direction for the different steps of the procedure. An indicator for the Baha is used to make a mark for the implant site (Fig. 33-7A). It is important that the sound processor not touch the pinna because this could cause acoustic feedback. The implant should be placed as close as possible to the external ear canal opening, however. This is often about 50 to 55 mm from the center of the external ear canal opening. A suitable position in the cranial-caudal direction is at the level of the superior auricular fold, or just below the linea temporalis. A mark for the implant site is made with a pen, and the area is shaved. Before cleaning and draping the patient, a small scratch with a needle allows the surgeon to identify the implant site even if the ink mark has disappeared. Cleaning and draping is done in the same manner as for standard mastoid surgery. If there is secretion from the ear, the pinna could be folded anteriorly and kept in place with some adhesive draping to seal off the ear canal.
SURGICAL TECHNIQUE
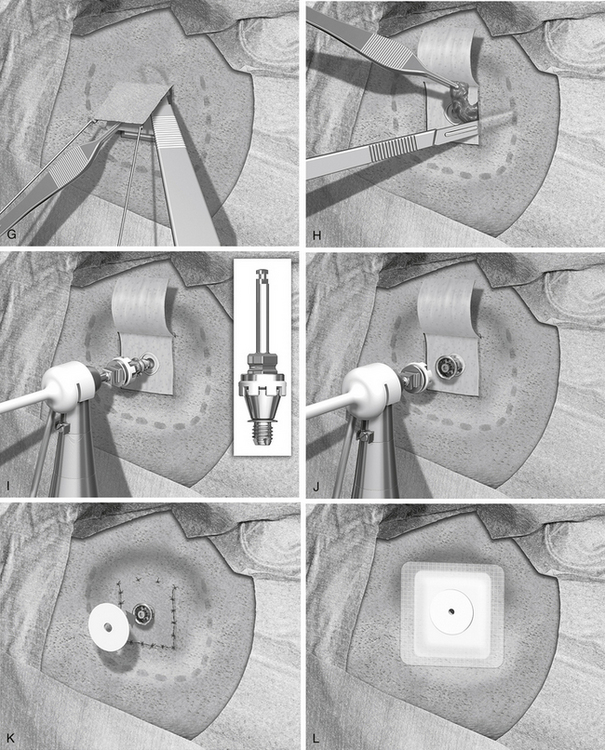
The surgical procedure is illustrated in Figure 33-7B through L.
Preparing Thin Hairless Flap
A local anesthetic of 10 mL of lidocaine with epinephrine is injected, making sure that some of the anesthetic is administered in and under the periosteum, and that it also reaches the periphery of the intended surgical field. The disposable sterile blade for the Baha dermatome is taken out of its pack. There are two grooves on one side of the base of the blade and only one on the other side. The side with the single groove should face upward when placed in the dermatome. The driver pin is placed in the handpiece, and the dermatome is firmly secured to the handpiece. The thickness and width of the dermatome are set, and no adjustment is needed; the width is 25 mm, and the thickness is 0.6 mm. This thickness produces a flap where the hair follicles are left for removal in conjunction with soft tissue reduction (see Fig. 33-7B).
The next step is to expose the implant site. A cut is made along the three sides of the subcutaneous flap leaving the base still attached (see Fig. 33-7C). The cut should be down to, but not through, the periosteum. Two small self-retaining retractors keep the flap out of the implant area. The periosteum is trimmed especially close to the actual implant site. The outer layer of the periosteum should be removed, leaving only the innermost layer in place. A hole about 6 mm in diameter is made in the thinned periosteum for the implant.
Guide Hole Drilling
The sterile packed guide drill is attached to the handpiece (see Fig. 33-7D). The white plastic spacer is initially left in place. This spacer prevents drilling deeper than 3 mm. The drill speed is 2000 rpm. During drilling, generous cooling is used to reduce heat trauma to the bone. The drill should be moved up and down in short sequences about 3 seconds long. In addition, it is important to widen the hole to be able to inspect and check the bottom for any underlying soft tissues, such as the dura mater or the sigmoid sinus. The width should be almost 3.75 mm, which is the diameter of the implant. This widening also allows the irrigation to reach the area where the cutting is taking place. The drill flutes should be kept free from bone because this would otherwise induce heat. If there is still bone at the base of the implant site when the spacer is all the way down, the spacer is removed to allow an additional 1 mm of drilling so that the 4 mm implant can be used.
Countersink Drilling
The next step is to widen the hole to the final diameter of 3.75 mm; this is done with a spiral drill, which also has countersink edges (see Fig. 33-7E). Drill speed is still 2000 rpm. The surgeon should work up and down in two to four steps with generous cooling. The grooves on the side of the drill should be cleaned of bone, which collects here. If the grooves are not kept clean, the drilling temperature may become too high. The countersink edges are designed to provide an even surface for the flange of the implant to improve initial stability. The depth of the countersink should be kept at a minimum, however, because the cortical shell has high density and provides good implant stability; this is especially important if the bone is thin and soft as in children (see section “Baha in Children”).
Subcutaneous Soft Tissue Reduction
The implant site has now been secured, and the soft tissue reduction can start (see Fig. 33-7F). This is one of the most important steps for establishing a lasting and reaction-free skin penetration for the years to come. The soft tissue reduction starts when the implant site has been secured, but before placing the implant. The self-retaining retractors are removed, and two small skin hooks are used. The assistant stretches out the skin flap with the hooks, and by folding the flap back and forth the surgeon can remove the soft tissue under the base of the flap (see Fig. 33-7G). The other three sides are undermined in the same way with the aim of creating tension-free sloping edges down to the periosteum (see Fig. 33-7H).
Placing the Baha Coupling
The drill speed is set on low, which is 15 to 30 rpm, and the torque is adjusted to suit the bone quality. In the sclerotic mastoid of a patient with chronic ear disease, the torque often needs to be 40 to 45 NCM. In soft bone and with a thin cortical shell, a much lower setting should be used, 20 to 25 N/cm2, to avoid trauma to the implant site. The Baha abutment inserter is placed in the handpiece. The self-tapping implant with premounted abutment is picked up from its plastic container and should not be touched by anything (see Fig. 33-7I). The implant is kept over the implant site, and the engine is started. With a slight pressure, the self-tapping implant finds its way. After the first few turns, no pressure is needed. When the implant is placed, the engine stops automatically at the set torque. The surgeon should now turn the handpiece about 5 degrees counterclockwise, put his index finger close to the abutment, and remove the abutment inserter from the abutment; this is to reduce any counter lever effect on the implant (see Fig. 33-7J).
Suturing the Flap
The thin flap is positioned over the coupling, and using a biopsy punch, a hole is made in the flap. The coupling is pulled through the hole, and the edges of the flap are sutured down to the periosteum with 5-0 nylon monofilament (see Fig. 33-7K). A healing cap is snapped onto the coupling, and a piece of 1 cm wide cotton gauze, soaked in antibiotic ointment, is very loosely packed under the cap to avoid swelling and hematoma (see Fig. 33-7L). An ordinary mastoid dressing is applied, which is removed after 1 to 2 days.
POSTOPERATIVE MANAGEMENT
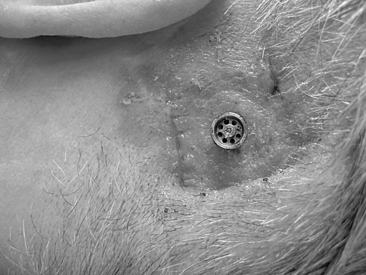
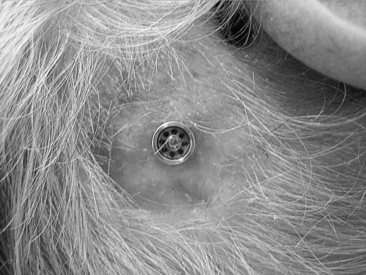
In most cases, this surgery is performed as a day procedure. After a few hours in the recovery room, the patient is discharged and can go home. The patient is instructed to remove the mastoid dressing the following day. The patient should clean the area with ordinary soap and water, and leave it without any further dressing. The healing cap with the gauze is left for 7 to 10 days. At this time, the patient comes for the first postoperative visit. The healing cap is snapped off, and the gauze is removed (Fig. 33-8). Often some or all stitches can be removed. If the healing is delayed for some reason, the healing cap can be put back on, and fresh gauze can be loosely placed around the coupling for another few days. Sometimes a healing cap is put on without any gauze just to provide a little protection.
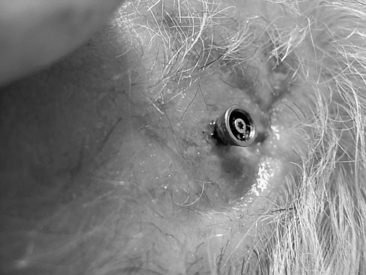
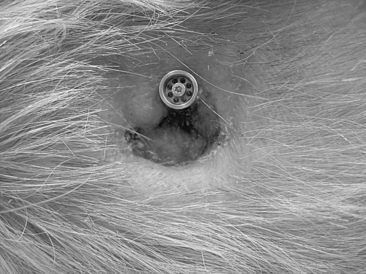
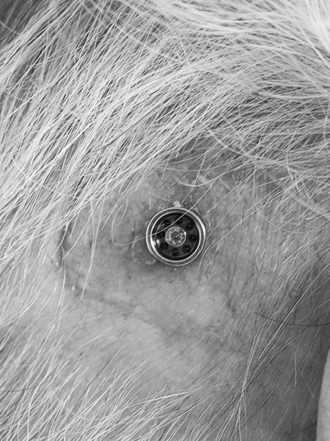
Three weeks after surgery, the patient is back for the next postoperative check, and, in most cases, a time for fitting the Baha is decided. Most of our patients get their Baha about 6 weeks after surgery (Fig. 33-9). This timing is mainly due to practical and logistical issues and could probably be shortened. During the first 2 weeks, after the healing cap has been removed, the patient should use a mild ointment to keep the implant area clean and soft. After this time, the patient is told to use some mild soap or shampoo every day. The situation 3 months after surgery is shown in Figure 33-10 with the Baha coupling in place. Cleaning is crucial, and a high level of personal hygiene is imperative. Relatives are often asked to participate in the postoperative visits to be instructed on how to help the patient. After this, the patient comes back for follow-up at 6 to 12 month intervals.
PITFALLS AND COMPLICATIONS IN SURGERY AND DURING FOLLOW-UP
Flap Necroses
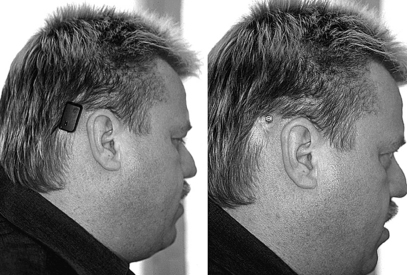
Using the technique described, the frequency of flap necroses during the first 6 postoperative weeks was found to be 3%.26 Only minor necroses (defined as <25% of the flap area) have been noted. Before the introduction of the Baha dermatome, the flap was thinned manually with a knife. With this method, the frequency of minor necroses was 9.2% and 1.3% for medium necroses. A flap necrosis, whether minimal or complete, has a very good prognosis with local treatment with mild ointment. Healing may take a long time, however, up to several months. A medium-sized flap necrosis is shown in Figure 33-11, and the final result after 3 months is shown in Figure 33-12.
Adverse Skin Reactions
Adverse skin reactions of any significance are very infrequent during the years after Baha surgery with the manual technique and with the dermatome. In a study with 4 to 8 years of follow-up, a blade was used to thin the flap manually.27 Using the classification system by Holgers and associates,28 only 2.8% of this group, with a grade 2 condition or worse, needed active treatment. With the Baha dermatome, the corresponding figure was 2%.29
Implant Stability
The possibility to establish osseointegration for the Baha is high. In an early study with 149 Baha patients, we had a success rate of 97.3% over 1 to 4 years. During the following 4 years, the success rate declined to 94.7%.27 In a study with 144 implants, the success rate was 98.6% over 3 years.30
HANDLING OF COMPLICATIONS
Related to Soft Tissue
A slight redness around the implant, grade 1 according to the Holger classification,28 was noted in 4.3% of observations over a 4 to 8 year period.31 The first thing to check in a patient who has skin problems is if the implant is mobile. The internal screw keeping the abutment connected to the implant sometimes may come loose and has to be tightened. Over the same period, 69.7% of the patients did not have one episode of adverse skin reaction, and 87.1% had only one episode. The handling of a grade 1 reaction is often simply to ask the patient to intensify the daily cleaning procedure and apply some mild ointment. Extra outpatient controls are seldom needed. Even in more extensive negative soft tissue reactions, there is seldom any pain. As mentioned earlier, pain is often a sign of loss of implant integration.
BAHA IN CHILDREN
Most authorities agree that hearing is crucial for normal speech, language, and mental development.18 This also seems to be true for unilateral hearing impairment. If a hearing-impaired child cannot use a conventional air conduction hearing aid and is not a candidate for a cochlear implant, the Baha is a strong alternative.
Surgical Aspects
The thickness of the temporal bone is crucial for implant integration. If a 3 mm long fixture were to be inserted, a minimum of 2.5 mm bone would be needed. The bone thickness at the implant site has been measured in 30 children.32 The mean thickness, at age of 5 years, was found to be only 2 mm, but with great variations. In patients younger than 4 years, the bone thickness is often reduced, and bone augmentation to be able to install an implant may be needed. A bone augmentation technique of this kind has been described earlier.33 With expanded polytetrafluoroethylene membranes, appositional bone can be directed to grow under the flange of the fixture. The technique seems biologically sound because it can be used together with standard fixture and abutment placement, and it does not change therapy planning or time needed for osseointegration. If possible, a 4 mm implant should also be used in young children because the failure rate for 3 mm implants is much higher than for 4 mm implants.
In a study of 160 children, the success rate for osseointegration was 94.4%—that is, a failure rate of 5.6%.34 If these figures are broken down, however, it becomes evident that the implant losses for the 3 mm implants were 8%, and the corresponding figure for the 4 mm implant was 1.7%
1. Brandt A. On sound transmission characteristics of the human skull in vivo. Thesis; Technical Report No. 61L. Göteborg. Sweden: School of Electrical Engineering, Chalmers University of Technology; 1989.
2. Håkansson B., Tjellström A., Carlsson P. Percutaneous vs. transcutaneous transducers for hearing by direct bone conduction. Otolaryngol Head Neck Surg. 1990;102:339-344.
3. Håkansson B., Tjellström A., Rosenhall U. Hearing thresholds with direct bone conduction versus conventional bone conduction. Scand Audiol. 1984;13:3.
4. Håkansson B., Carlsson P., Tjellström A. The mechanical point impedance of the human head, with and without skin penetration. J Acoust Soc Am. 1986;80:1065-1075.
5. Carlsson P., Håkansson B., Rosenhall U., Tjellström A. A speech reception threshold test in noise with the bone-anchored hearing aid: A comparative study. Otolaryngol Head Neck Surg. 1986;94:421-426.
6. Håkansson B., Tjellström A., Rosenhall U. Acceleration levels and threshold with direct bone conduction versus conventional bone conduction. Acta Otolaryngol. 1985;100:240-252.
7. Kylén P., Arlinger S. Drill-generated noise levels in ear surgery. Acta Otolaryngol. 1976;82(5-6):402-409.
8. Stenfelt S. Hearing by bone conduction: Physical and physiological aspects. Technical Report No. 358. Göteborg. Sweden: School of Electrical and Computer Engineering, Chalmers University of Technology; 1999.
9. Brånemark P.I., Hansson B., Adell R. Osseointegration in the treatment of the edentulous jaw: Experience from a 10 year period. Scand J Plast Reconstr Surg. 1977;16:1-132.
10. Brånemark P.I. Introduction to osseointegration. In: Brånemark P.I., Zarb G., Albrektsson T., editors. Tissue-Integrated Prostheses. Chicago: Quintessence; 1985:11-76.
11. Albrektsson T., Brånemark P.-I., Hansson H.-A., et al. The interface zone of inorganic implants in vivo: Titanium implants in bone. Ann Biomed Eng. 1983;11:1-27.
12. Tjellström A. Osseointegrated systems and their application in the head and neck. Adv Otolaryngol Head Neck Surg. 1989;3:39-70.
13. Kasemo B., Lausmaa J. Aspects of surface physics on titanium implants. Swed Dent J Suppl. 1985;28:19-36.
14. Devge C., Tjellström A., Nellström H. Magnetic resonance imaging in patients with dental implants: A clinical report. J Oral Maxillofac Implant. 1997;12:354-359.
15. Tjellström A., Granström G. One stage procedure to establish osseointegration: A zero to five years follow-up report. J Laryngol Otol. 1995;109:593-598.
16. Granström G. Osseointegration in irradiated cancer patients: An analysis with respect to implant failures. J Oral Maxillofac Surg. 2005;63:579-585.
17. Jahrsdoerfer R.A., Yeakley J.W., Aguilar E.A., et al. Grading system for the selection of patients with congenital aural atresia. Am J Otol. 1992;13:6-12.
18. Cho Lieu J.E. Speech-language and educational consequences of unilateral hearing loss in children. Arch Otolaryngol Head Neck Surg. 2004;130:524-530.
19. Sheehan P.Z., Hans P.S. UK and Ireland experience of bone anchored hearing aids (BAHA) in individuals with Down syndrome. Int J Pediatr Otorhinolaryngol. 2006;70:981-986.
20. Snik A., Mylanus E., Cremers C., et al. Consensus statement on the BAHA system: Where do we stand 2004? Nijmegen Consensus Meeting. Ann Otol Rhinol Laryngol. 2005;114(Suppl 195):1-12.
21. Wazen J.J., Spitzer J.B., Ghossaini S.N., et al. Transcranial contralateral cochlear stimulation in unilateral deafness. Otol Head Neck Surg. 2003;129:248-254.
22. Niparko J.K., Cox K.M., Lustig L.R. Comparison of the bone anchored hearing aid implantable device with contralateral routing of offside amplification in the rehabilitation of unilateral deafness. Otol Neurotol. 2003;24:73-78.
23. Hol M.K.S., Bosman A.J., Snik A.F.M., et al. Bone-anchored hearing aid in unilateral inner ear deafness: A study of 20 patients. Audiol Neurotol. 2004;9:274-281.
24. Lin L.-M., Bowditch S., Anderson M., et al. Amplification in the rehabilitation of unilateral deafness: Speech in noise and directional hearing effects with bone anchored hearing and contralateral routing of signal amplification. Otol Neurotol. 2006;27:172-182.
25. Vaneecloo F.M., Ruzza I., Hanson J.N., et al. Appareillage mono pseudo stereophonique par BAHA dans les cophoses unilateral: A propos de 29 patients. Rev Laryngol Otol Rhinol (Bord). 2001;121:343-350.
26. Tjellström A., Granström G. How we do it: Frequency of skin necrosis after BAHA surgery. Clin Otolaryngol. 2006;31:216-220.
27. Reyes R., Tjellström A., Granström G. Evaluation of implant losses and skin reactions around extra-oral bone anchored implants: A zero to eight years follow-up report. Otolaryngol Head Neck Surg. 2000;122:272-276.
28. Holgers K.M., Tjellström A., Erlandsson B.E., et al. Soft tissue reactions around percutaneous implants: A clinical study of tissue conditions around skin-penetrating titanium implants for bone-anchored hearing aids. Am J Otol. 1988;9:56-59.
29. Stalfors J., Tjellström A. Skin reactions after BAHA surgery: a comparison between the U-graft technique and the BAHA dermatome. Otol Neurotol. 2008;29:1109-1114.
30. Tjellström A., Granström G., Odersjo M. Survival rate of self-tapping implants for bone-anchored hearing aids. J Laryngol Otol. 2007;121:101-104.
31. Jacobsson M., Tjellström A. Clinical application of percutaneous implants. In: Szycher M., editor. High Performance Biomaterials: A Comprehensive Guide to Medical and Pharmaceutical Applications. Basel: Technomic Publishing; 1991:207-229.
32. Granström G., Bergström K., Odersjö M., Tjellström A. Osseointegration in children: Experience from our first 100 patients. Otolaryngol Head Neck Surg. 2001;125:85-92.
33. Granström G., Tjellström A. Guided tissue-generation in the temporal bone. Ann Otol Rhinol Laryngol. 1989;108:349-354.
34. Tjellström A., Håkansson B., Granström G. Bone anchored hearing aids: Current status in adults and children. Otolaryngol Clin North Am. 2001;34:337-364.