Chapter 23 Techniques in Enteral Access
 Video related to this chapter’s topics: Jejunal Feeding Tube Placement Through an Existing Gastrostomy
Introduction
Using the gut and providing nutritional therapy by the enteral route play a pivotal role in patient outcome in the critical care setting. When there is failure to obtain enteral access and gut disuse ensues, the gut becomes a proinflammatory organ, increasing oxidative stress and the risk of complications.1 Early enteral access and use of the gut promote or support the mass of gut-associated lymphoid tissue and mucosal-associated lymphoid tissue at distant sites such as the liver, lungs, and kidney.2 This process contributes to an appropriate immune response, downregulation of inflammation, and a reduction in the rate of long-term complications. The sicker the patient, the greater the need to maintain gut integrity, and enteral nutrition support becomes a therapeutic tool or pharmacologic agent capable of changing outcome by reducing nosocomial infection, multiple organ failure, and hospital length of stay.3,4
The literature confirms that aggressive enteral tube feeding decreases the rate of complications compared with “standard therapy” (patients advance to oral diet on their own as tolerated) or total parenteral nutrition.5,6 However, obtaining enteral access early in the course of a critically ill patient may be difficult. Patients in this setting are at the height of the hypermetabolic response, often requiring high doses of narcotic analgesia and sedation; they are prone to ileus, gastroparesis, and high gastric residual volumes. Transporting these patients to the radiology suite for placement of feeding tubes is difficult because they are unstable. Transport leads to delays in getting tubes placed and has been shown to increase the risk of complications (e.g., aspiration, hemodynamic instability, and new cardiac dysrhythmias).7,8 Bedside techniques to place feeding tubes are essentially blinded, which carries some additive risk. Although bedside techniques may be sufficient in many patients in the critical care setting, the success rate for bedside placement decreases as disease severity increases, and there is greater need to place the tube lower in the gastrointestinal (GI) tract.
In long-term acute care and in the long-term management of patients recovering from stroke and neurologic injury, percutaneous endoscopic techniques provide a more reliable semipermanent enteral access, affording numerous options in a variety of patients. Getting a tube down below the stomach into the small bowel has been shown to reduce the incidence of regurgitation and aspiration.9,10 In a meta-analysis, small bowel feeding was shown to reduce significantly the incidence of aspiration pneumonia compared with gastric feeding.11 In patients with severe gastroparesis, percutaneous endoscopic techniques may provide a gastrostomy tube for decompression and a direct jejunostomy tube for continued enteral feeding. In patients with recurrent flares of chronic pancreatitis, placement of an endoscopic jejunostomy tube may provide therapeutic options that preserve nutritional status, decrease dependence on narcotic analgesia, and reduce the number of hospitalizations per year. In patients with dysphagia resulting from neurologic injury, percutaneous endoscopic feeding tubes are easily removable should the patient recover function and resume adequate volitional oral intake.
Endoscopic Nasoenteric Tubes
Over-the-Guidewire Technique
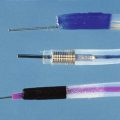
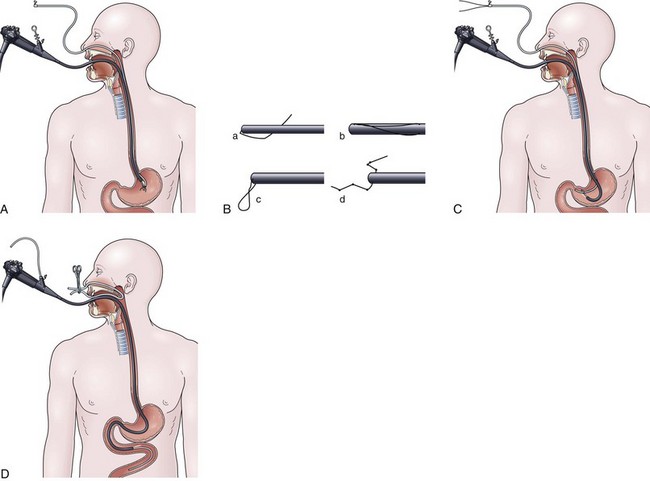
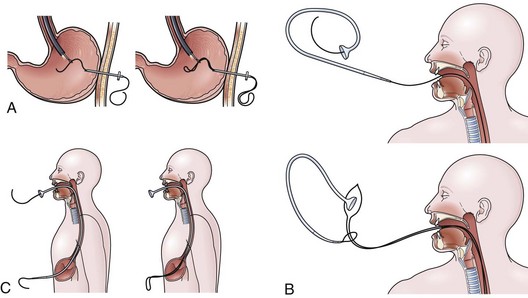
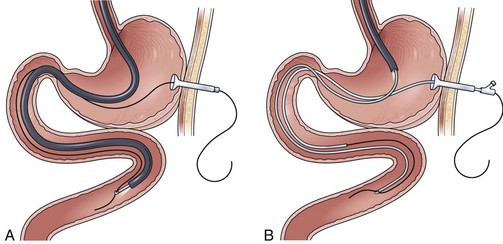
The over-the-guidewire technique may be more difficult technically than other ENET procedures because of the oronasal transfer and wire exchanges (removing the endoscope from the wire and placing the feeding tube over the wire). However, this technique is the one ENET procedure that most reliably places the feeding tube at or below the ligament of Treitz. Before performing endoscopy, the oronasal transfer tube is placed through one nostril, brought out the mouth, and clamped to the side using a hemostat. The pediatric colonoscope is passed through the mouth down the esophagus and stomach into the small bowel. As the endoscopist traverses the duodenum, it is important to pay attention to landmarks of the duodenal bulb and the C-loop. The long straight segment immediately after the duodenal C-loop is the distal duodenum leading up to the ligament of Treitz. The ligament of Treitz is the first turn after this long segment. Paying attention to these landmarks helps assure the endoscopist of the location of the tip of the endoscope within the GI tract. Passing the endoscope one to two loops below the ligament of Treitz helps to anchor the tip of the wire ultimately during subsequent wire exchanges (Fig. 23.1A). Once the endoscope has been passed as deep as possible, the wire is extended out from the end of the endoscope until it meets gentle resistance.
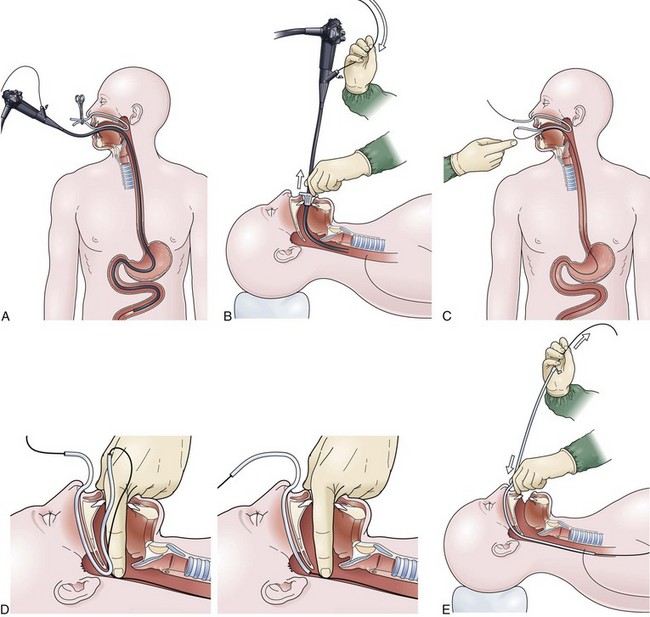
The first wire exchange involves removing the endoscope off of the wire without displacing the tip. The key point to this aspect of the procedure is that the endoscopist places one hand on the endoscope as he or she removes it from the mouth and the other hand on the wire as it is passing into the operating channel of the endoscope at the other end (Fig. 23.1B). An assistant may support the weight of the scope, keeping it from bowing in the middle during the wire exchange. The point at which the colonoscope has been withdrawn off the wire, the tip of the wire is protruding from the patient’s mouth. If done incorrectly, the oronasal transfer of the wire causes a loop to form in the mouth or displacement of the tip of the wire from the small bowel back into the stomach or both. The tip of the wire is placed through the oronasal transfer tube, passing the excess wire out of the end of the transfer tube protruding from the nose (Fig. 23.1C).
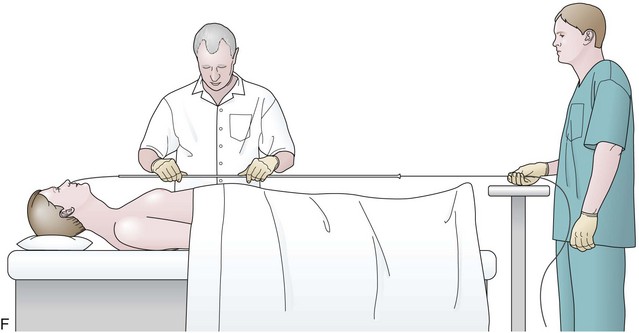
Before the final loop protruding from the mouth is withdrawn or eliminated, the index finger is passed through the mouth, pinning the wire against the posterior wall of the oropharynx (Fig. 23.1D). While firmly holding the wire against the posterior pharyngeal wall, traction is placed on the end of the wire protruding from the nose, completely eliminating the loop protruding through the mouth (see Fig. 23.1D). With the wire now protruding from the nose, the second and final wire exchange is made. This latter wire exchange may be accomplished using one of two different techniques. One technique involves carefully passing the feeding tube over the wire in a manner similar to the first wire exchange (Fig. 23.1E). The endoscopist is careful to place one hand at the nose as he or she inserts the tube, with the other hand at the opposite end of the feeding tube where the wire is being withdrawn. The rate of the tube passing down into the nose should match exactly centimeter for centimeter the rate of the wire being withdrawn at the other end, to avoid deflecting the tip of the wire (see Fig. 23.1E). An alternative technique for this second wire exchange involves pinning the end of the wire to a bed rail or bedside table to establish a “point in space” (Fig. 23.1F). Assistants help keep the wire straight and level while the endoscopist slides the feeding tube over the fixed wire into final position.
Drag and Pull Technique
The drag and pull technique is facilitated by placing one or two extra guidewires (for a total of two or three) through the nasoenteric tube before placement. Two to 3 cm of the soft tip of one wire should protrude out through the distal end of the tube. This assembly is passed down through the nose into the stomach, followed by passage of the endoscope alongside the tube down through the mouth into the stomach. Once in the stomach, a long biopsy forceps is used to grab the soft tip of the wire protruding from the feeding tube. The endoscope holding the wire is passed into the small bowel, it is hoped down to or beyond the ligament of Treitz (Fig. 23.2A). From the point of deepest insertion, the endoscope is slowly withdrawn back toward the stomach as the biopsy forceps holding the wire is advanced holding the tip of the wire in place in the small bowel. Once the endoscope is positioned back into the stomach, the feeding tube is advanced over the wire down to its tip, which is still being held by the biopsy forceps (Fig. 23.2B). Only at this point are the biopsy forceps opened, and the wire is released. The biopsy forceps are withdrawn back into the endoscope, and the endoscope is slowly withdrawn back out through the esophagus and mouth. The keys to success for this procedure are a pair of biopsy forceps that are long enough (≥240 cm) and the stiffening of the feeding tube with extra guidewires (which facilitates removal of the endoscope without displacing the tube back into the stomach) (see Fig. 23.2B).
Transnasal Technique
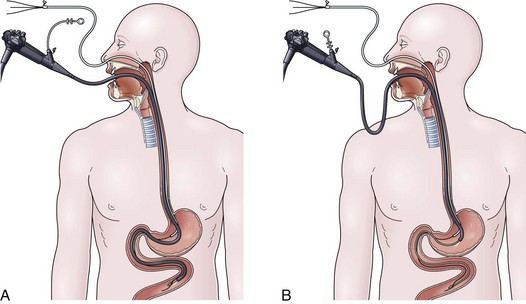
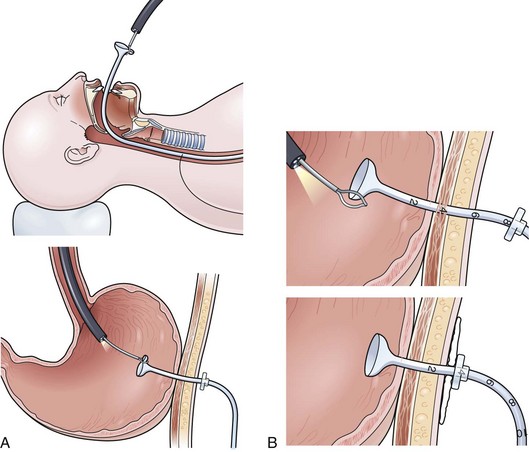
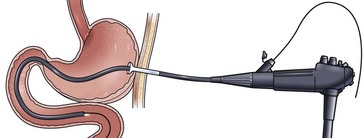
Availability of a small-caliber gastroscope affords the endoscopist the opportunity for a simple technique for ENET placement. The key to success with this technique is the placement of a biopsy forceps or a Savory guidewire down through the operating channel, which serves to stiffen the instrument and increase the ease with which it may be passed through the bowel. Transnasal passage of the endoscope is tolerated well by the patient, and sedation is not usually required. After intubating the esophagus and stomach, the endoscope is passed as far as possible, usually to the third or fourth portion of the duodenum. At this point, the stiffening device is withdrawn, and a guidewire is placed down through the operating channel out as far as possible until meeting gentle resistance (Fig. 23.3). Using the wire exchange system described in the section on the over-the-guidewire technique, the small-caliber gastroscope is withdrawn off the wire. No oropharyngeal transfer of the wire is required, and the feeding tube may be passed immediately directly over the wire. Wire exchanges are more tenuous and difficult with this procedure because the wire is usually not passed as deep into the small bowel as in the over-the-guidewire technique, and the tip may be displaced more easily back into the stomach.

Alternative Options
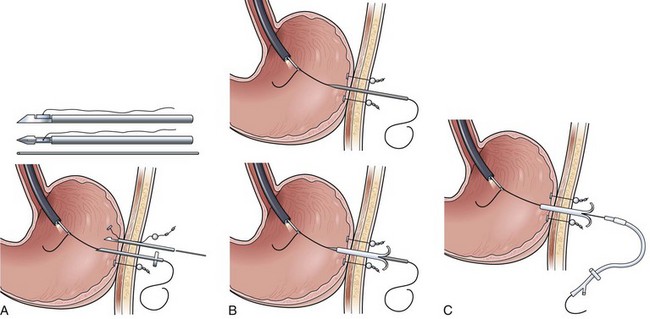
In a simpler version of the previously mentioned drag and pull technique, knotted suture line is attached to the distal end of the feeding tube, and the tube is passed through the nares down into the stomach. The endoscopist passes the endoscope alongside the tube through the mouth down into the stomach, grabbing the knotted suture with biopsy forceps (Fig. 23.4A). It can be difficult and frustrating to drag the tip of the feeding tube through the pylorus and down into the duodenum. The success of this sometimes awkward procedure is improved by using knotted suture line instead of a loop or single strand on the tip of the tube (Fig. 23.4B), by adding a second guidewire to stiffen the tube to prevent displacement on withdrawal of the endoscope, and by keeping the biopsy forceps 1 to 2 cm out away from the tip of the endoscope to enhance visualization (see Fig. 23.4A).
In another alternative technique, one or two extra guidewires (for a total of two or three) are added to the feeding tube to increase stiffness, and the tube is passed through the nares down into the esophagus and stomach. The endoscope is passed through the mouth alongside the tube down into the stomach, and the tip of the stiffened tube is simply pushed or nudged using open biopsy forceps through the pylorus into the duodenal bulb (Fig. 23.4C). Continuing to watch endoscopically from the stomach, the endoscopist pushes the stiffened feeding tube from the outside proximal end in an effort to pass the distal tip around the C-loop and into the third and fourth portion of the duodenum (see Fig. 23.4C). The most reliable of the three alternative methods uses an 8-Fr nasoenteric tube, which is passed through the operating channel of the endoscope after it has been passed through the esophagus and stomach into the small bowel. The success of this procedure is enhanced by using a large-channel therapeutic endoscope and a small-bore (8-Fr) nasoenteric tube whose proximal feeding cap can be removed. Because the endoscope is passed through the mouth, it requires placement of an oronasal transfer tube and the subsequent transfer of the tube from the mouth out through the nose (Fig. 23.4D) using the method described in the over-the-guidewire technique.
Securing Tube with Nasal Bridle
For any case in which the time and expense of endoscopic placement of a nasoenteric tube is required, consideration should be given to securing the tube with a nasal bridle. Although this technique may seem barbaric and overly punitive to the patient, selection of the proper tube for the nasal bridle results in a degree of discomfort that is no different than the presence of the nasoenteric tube alone. The timing of the nasal bridle placement is important; placement should be done initially before endoscopy is performed (before the patient is agitated from the passage of the endoscope). Two separate but similar techniques may be used to establish a nasal bridle. In one technique, two 5-Fr neonatal feeding tubes are used. The first tube is passed through one nares and brought out the mouth, and the second is passed through the other nares and likewise brought out the mouth. The two ends protruding from the mouth are secured together by a single suture (Fig. 23.5A) or are tied together by hand using a square knot. Traction is placed on one end protruding from the nares, pulling the nasal bridle into place (pulling the knotted juncture out through the nares such that one of the tubes passes into the nares around the nasal septum and out the other nares) (see Fig. 23.5A).
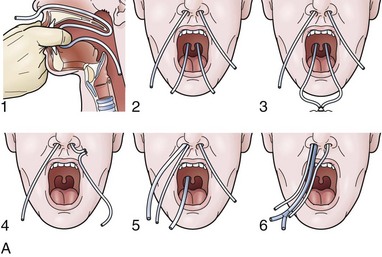
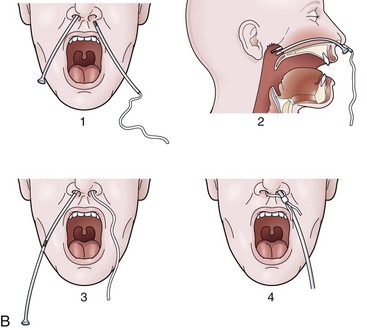
An alternative technique uses a commercial device with two flexible rubber sticks, each with a magnet at one end. A cloth ribbon is attached to the opposite end of one of the sticks. Each stick is passed through a separate nares, allowing the magnetic tips to click together in the posterior hypopharynx. Traction is applied to one of the sticks to pull the cloth ribbon into final position in one nares, around the nasal septum, and then out the other nares (Fig. 23.5B). The oronasal transfer tube is placed, and the rest of the ENET procedure commences thereafter. At the completion of the ENET placement, the feeding tube is taped to the 5-Fr nasal bridle tube (beginning 1 cm below the nose and wrapping the tape downward over the feeding tube and bridle until the bridle is completely covered; see Fig. 23.5A) or clipped to the cloth ribbon (see Fig. 23.5B).
Percutaneous Endoscopic Gastrostomy
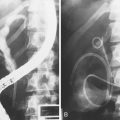
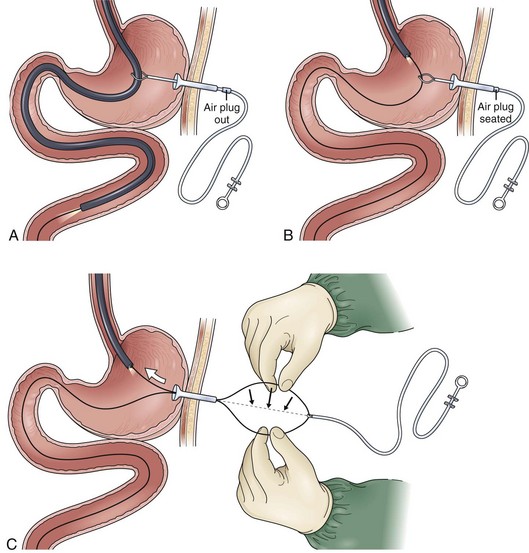
In the past, the traditional location for PEG placement was in the left upper quadrant in the vortex formed by the midline and left costal margin (Fig. 23.6A). Relocating the site of routine PEG placement down lower close to the umbilicus and to the right of the midline should be considered for two good reasons. First, as shown on computed tomography (CT) scan (Fig. 23.6B), the area of greatest interface between the stomach and anterior wall that provides the shortest, most direct passage into the stomach is located at this site. The traditional site in the left upper quadrant creates a tract that is longer and more tangential as it enters the stomach. Even more importantly, this lower position on the abdomen places the PEG in the antrum, which facilitates conversion of the PEG to a PEGJ should the patient develop intolerance to gastric feeding later on.
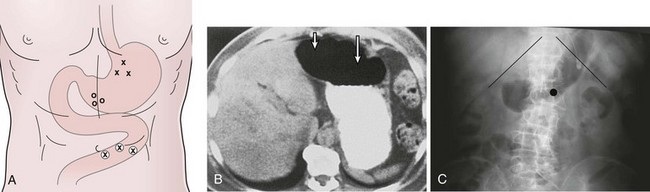
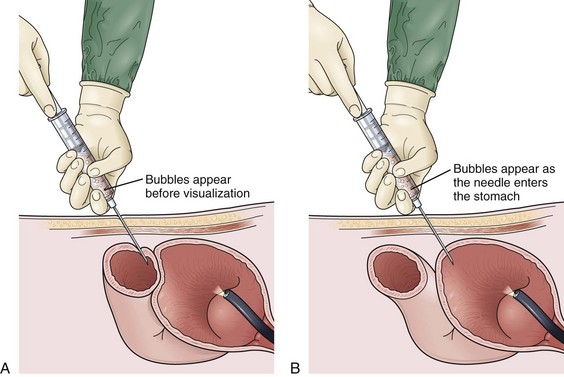
Site selection is enhanced further by instilling 500 mL of air through the nasogastric tube into the stomach and obtaining an abdominal film 1 hour before PEG placement. Putting a coin in the umbilicus serves as an obvious landmark on the abdominal film, the position of which can be compared with the costal margin. The position of the air bubble with respect to the coin and the costal margins helps select the specific PEG site (Fig. 23.6C). Palpating the stomach and obtaining translumination through the abdominal wall is a valuable reassurance for proper PEG site selection. If there is any question (especially in cases of obesity), a safe tract technique may be used to ensure that no intervening loop of bowel exists between the stomach and the anterior abdominal wall (Fig. 23.7). Using a 21-gauge to 23-gauge spinal needle and a syringe with 1 to 2 mL of saline, the needle is passed through the abdominal wall at the proposed PEG site. If bubbles appear in the saline while aspirating just as the needle passes into the lumen of the stomach (as seen by endoscopy), there is some reassurance that the tract is appropriate. If bubbles appear before the needle passes into the stomach, there may be an intervening loop of bowel present (see Fig. 23.7).
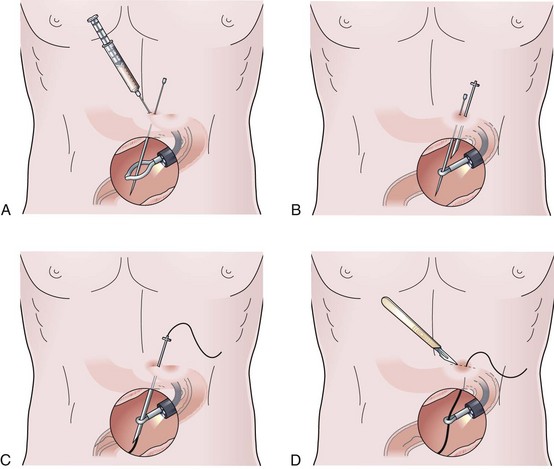
Ponsky Pull and Sachs-Vine Push Technique
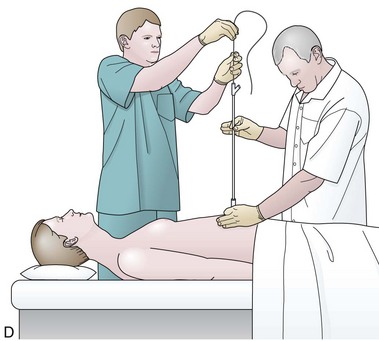
The Ponsky pull and Sachs-Vine push techniques are virtually indistinguishable, with one providing no real advantage over the other, and may be selected based on personal preference of the operator. After the PEG site is selected, the skin is anesthetized, a small incision is made, and the initial trocar is passed into the stomach. In the Sachs-Vine push technique, a single-stranded wire is passed through the trocar in the stomach and secured by a snare passed through the endoscope. With the Ponsky pull technique, a blue double-stranded wire loop is passed through the trocar and grabbed by the snare (Fig. 23.8A). The wire passed by either technique is brought out the mouth. In the Sachs-Vine push technique, a long 2- to 3-foot plastic pointed leader is fused to the proximal end of the feeding tube, facilitating passage over the single-stranded guidewire. This assembly is pushed down the wire through the esophagus and out through the gastric and abdominal wall (Fig. 23.8B). The Ponsky pull technique involves a loop on the end of the feeding tube that is affixed to the double-stranded blue loop of wire protruding from the patient’s mouth. Attaching the two wire loops is made easier by remembering the phrase “blue through,” which describes the blue double-stranded wire being passed first through the loop on the end of the feeding tube (see Fig. 23.8B). Once the knot between the wire loops is secured, the feeding tube is pulled down through the esophagus into the stomach and out through the abdominal wall into the final position (Fig. 23.8C).
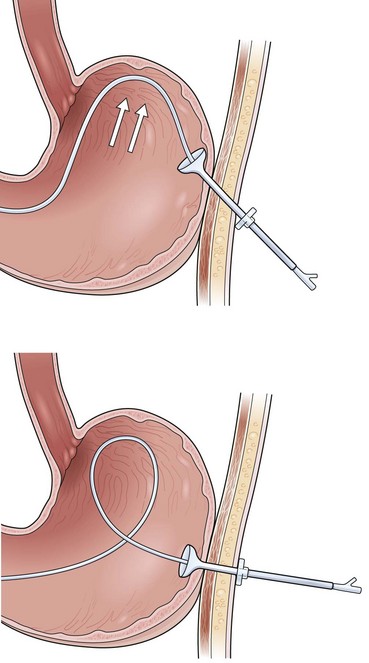
As a general rule when setting the external bumper, a close fit causes fewer subsequent complications than a tight fit, which can later lead to pressure necrosis and buried bumper syndrome. A quick and easy procedure to facilitate setting adequate tension between the bumpers involves following the PEG tube down through the esophagus by snaring the endoscope to the enteral bolster (Fig. 23.9A). As shown at the top of Fig. 23.9A, snaring one-third of the enteral bolster makes it easy to release the bolster when the endoscope is led down into the stomach. As the tube is pushed or pulled down through the esophagus and stomach, the endoscope is brought down easily with it into position into the stomach. Once the snare is released, the external bolster may be set with the enteral bolster under direct endoscopic visualization (Fig. 23.9B). Drawing a figure and marking the exact number on the tube for the position of the external bolster is a valuable aid for nursing care and may be placed on the chart for reference at any time (see Fig. 23.9B).
Russell Introducer Technique
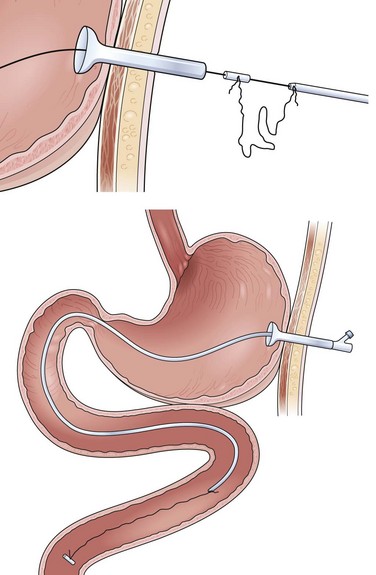
In patients with a large exophytic oropharyngeal or esophageal carcinoma, the Russell introducer technique should be considered to reduce the likelihood for tumor implantation of the PEG site. This is a technique commonly used by radiologists, but it is easily performed by the endoscopist. Localization of the PEG site, position of the endoscope, and passage of the initial trocar are identical to the previous two techniques. With the trocar in place, a single-stranded guidewire is passed into the stomach and held firmly by a snare protruding from the endoscope (Fig. 23.10A). Gentle external traction is maintained on the wire from outside the abdomen throughout the procedure by pulling against the end held by the snare inside the stomach. The stomach first has to be secured to the anterior wall by T-fasteners (see Fig. 23.10A). Although various commercial models of these fasteners exist, the design for deployment is similar. As shown in Fig. 23.10A, this particular technique involves a narrow-gauge introducer trocar in which the T-fastener is placed in a distal slot. A 21-gauge to 23-gauge spinal needle is helpful as a sounding device to determine the appropriate tract for each T-fastener. After making a nick in the skin with a scalpel blade, the device is passed through the abdominal wall.
The T-fastener is deployed in the stomach by a central cannula. After removing the small trocar and cannula for the T-fastener, a cotton roller ball and two metal fastening devices are cinched down until there is mild tension on the outer abdominal wall against the T-fastener on the inside of the stomach. Crimping the two metal fasteners holds the T-fastener in place. Two to four T-fasteners should be placed circumferentially around the trocar before proceeding further (see Fig. 23.10A). With the stomach affixed to the anterior wall by the T-fasteners, the tract over the wire is dilated by Seldinger-type dilators of increasing size. Two to three dilators are passed over the wire as external traction is again placed against the snare holding the wire on the inside of the stomach (Fig. 23.10B). After the tract has been fully dilated, a peel-away sheath overlying a larger bore cannula is passed over the wire and into the stomach (see Fig. 23.10B, bottom).
Most Russell introducer kits do not come with an external bolster and are designed or anticipated instead to be sutured to the skin. A simple homemade external bolster may be created by a short segment from any small Salem sump, Foley catheter, or other larger gauge feeding tube and placed over the feeding tube before passage into the stomach (Fig. 23.10C). Once the external bolster is in place, the feeding tube may be placed over the wire through the peel-away sheath into the stomach. The enteral balloon is inflated, the peel-away sheath is removed, and the external bolster is placed into position (see Fig. 23.10C).
Percutaneous Endoscopic Gastrojejunostomy
One of the most important elements in the success of this procedure is the function of an air retention valve (Fig. 23.11). Although numerous commercial models are available (see top of Fig. 23.11), a homemade air valve can be made from the cap of the feeding tube (creating a hole with a pair of scissors) (see bottom of Fig. 23.11). The air valve allows passage of a wire or a snare through the PEG into the stomach without losing air insufflation. Failure to use or create an air valve significantly prolongs the procedure and can make visualization very difficult when passing the endoscope from the stomach into the small bowel.
Through-the-Snare Technique
The key to success of this technique is the selection of a very long 480-cm standard guidewire. The usual wire that comes with PEG and PEGJ kits is usually substantially shorter than this (Fig. 23.12A). Using proper wire exchange techniques, the endoscope is withdrawn back to the proximal stomach above the level of the snare, keeping the tip of the wire in position in the small bowel (Fig. 23.12B). Once the endoscope has been brought back to approximately 45 cm (from the incisors), the air valve is placed back into the PEG to insufflate the stomach and confirm the position of the endoscope above the snare (see Fig. 23.12B). The snare is closed on the wire, and a loop of the wire is pulled out through the PEG to the outside (Fig. 23.12C). The endoscopist manually separates the loop and has an assistant pull on the proximal wire extending out from the proximal operating channel of the endoscope. The movement of one side of the loop helps identify that end of the wire coming from the endoscope (see Fig. 23.12C). This end of the wire is pulled out through the PEG, resulting in a straightened single-strand guidewire passing through the PEG and down into the small bowel (Fig. 23.12D). The jejunal tube is passed over the wire (using good wire exchange technique) into position in the small bowel. Having an assistant provide a “point in space” above the abdomen secures or fixes the guidewire, facilitating passage of the jejunal tube into final position.
Over-the-Guidewire Technique
Although the over-the-guidewire technique appears to be more simplified than the through-the-snare technique, it may be slightly more frustrating for getting proper placement of the jejunal tube well down into the small bowel. For this technique, an air retention valve is placed over a wire, and the wire is passed through the PEG into the stomach. After passing the endoscope through the esophagus into the stomach, biopsy forceps are used to grasp the wire and walk it on down into the small bowel. The key to the success of this procedure is using biopsy forceps that are at least 240 to 320 cm in length to afford a sufficient working length out beyond the end of the colonoscope. The colonoscope is passed, it is hoped, down to a level at or below the ligament of Treitz (Fig. 23.13A). While still holding the wire in place at its distal tip, the biopsy forceps are slowly advanced as the endoscope is withdrawn back into the proximal stomach. The jejunal tube is passed over the wire all the way down until it strikes the biopsy forceps still holding the tip of the wire in the small bowel (Fig. 23.13B). Only at this point are the biopsy forceps opened, releasing the wire. The biopsy forceps are withdrawn back into the endoscope. If shorter biopsy forceps are used, the jejunal tube may strike the forceps holding the end of the wire while there is still a significant length of jejunal tube remaining outside the PEG. Although it is appropriate to open the biopsy forceps and release the wire at this point, the added length of the jejunal tube outside the PEG as the jejunal tube is pushed down and seated into position in the PEG often forms a loop in the stomach, and the procedure has to be repeated.
Trans-Percutaneous Endoscopic Gastrostomy Gastroscopy Technique
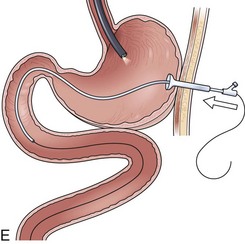
The trans-PEG gastroscopy technique may be performed with a small-caliber gastroscope if the patient’s original PEG is 28-Fr in diameter. The technique can be performed through a PEG tube of smaller diameter, but a bronchoscope or ureteroscope may need to be substituted. The key to success with any of these small endoscopes is to stiffen the instrument by placing a biopsy forceps or a stiff guidewire down through the operating channel. Failure to do so causes excessive looping or curling in the stomach and possible inability to transcend the pylorus. In this simple technique, the endoscope is passed through the PEG, down through the pylorus, and through the third and fourth portion of the duodenum. It is difficult to get beyond the ligament of Treitz with this endoscope alone, but passing the wire out through the end of the endoscope once it is positioned in the distal duodenum may allow passage of the wire into the proximal jejunum below the ligament of Treitz. The endoscope is withdrawn, and the jejunal tube is placed over the guidewire (Fig. 23.14).
Securing the Percutaneous Endoscopic Gastrojejunostomy
The most frustrating aspect of the PEGJ procedure is that the jejunal tube frequently migrates back into the stomach. Two techniques may help prevent this migration. One is to use a rotatable hemoclip (Olympus America, Melville, NY) device to clip a suture affixed to the distal end of the feeding tube to the intestinal mucosa. Although this technique is easy to perform, the hemoclip holds the suture reliably in place only for 7 to 10 days. A second technique is shown in Fig. 23.15, in which an anchor is created with a 1-cm segment from some other piece of tubing. A Salem sump, Foley catheter, or some other feeding tube may be used to create the 1-cm anchor. A 20-cm length of suture is affixed to the distal end of the feeding tube and secured to the anchor. The anchor is placed over the guidewire ahead of the jejunal feeding tube in the final step of the PEGJ procedure as the jejunal tube is passed over the wire into position in the small bowel (see Fig. 23.15).
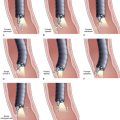
At the completion of the PEGJ procedure by any of these methods, it is important that the operator confirms the proper position endoscopically. If the jejunal tube forms a loop up toward the gastroesophageal junction or forms a loop upon itself, the procedure may need to be repeated to achieve deeper positioning into the small bowel (Fig. 23.16). The natural action of this loop is to displace the tube upward toward the fundus, out from the small bowel. Proper positioning instead should have the appearance that the jejunal tube passes from the PEG directly toward the pylorus and down into the small bowel (see Fig. 23.15).
Direct Percutaneous Endoscopic Jejunostomy
At the beginning of the procedure, the assistant at the skin should have the anesthetic needle and syringe in one hand and the sounding needle in the other hand. As the assistant observes translumination, a quick brief injection of the local anesthetic is followed by a quick abrupt puncture with the sounding needle. Care should be taken not to pass the sounding needle more proximally into the shaft of the endoscope. The endoscopist should place a snare through the instrument and out into the lumen, anticipating passage of the sounding needle into the lumen of the small bowel (Fig. 23.17A). Once the small bowel is intubated, the sounding needle is grasped firmly with the snare and held in place by the endoscopist. The assistant at the skin takes the trocar and passes alongside the sounding needle in the same axis to achieve intubation in the small bowel (Fig. 23.17B). Glucagon may be given intravenously at this point to maintain a hypotonic bowel.
A commercial model of a DPEJ device has combined the sounding needle and trocar together as one piece, making this section of the DPEJ technique a one-step procedure. After the trocar is passed into the lumen of the small bowel, the snare is released from the sounding needle and repositioned on the trocar. The sounding needle is withdrawn and removed. Still holding the bowel in place with the snare affixed to the trocar, a wire is passed through the trocar into the small bowel, and the snare is slipped off the trocar, grabbing the wire within the lumen of the small bowel (Fig. 23.17C). The wire is fed through the trocar as the endoscopist removes the wire through the stomach, esophagus, and the patient’s mouth. Only at this point (Fig. 23.17D) is further local anesthesia applied in the area of the wire, and an incision is made with the scalpel. With the wire protruding out from the patient’s mouth, the DPEJ tube is placed using the Ponsky pull technique.
Endoscopic Nasoenteric Tube Complications
The most common complication of the ENET procedure is postinsertion displacement. Tubes placed intentionally in the small bowel may be displaced back into the stomach in 3.7% to 7.0% of cases.12 Inadvertent removal of the nasoenteric tube completely occurs in 21% to 41% of patients.13,14 Inadvertent removal does not always occur in a setting with the typical profile of a patient with altered mental status. Most cases of inadvertent removal involve patients with normal mental status, occurring as a result of routine nursing duties (e.g., arising from bed, transport out of the unit, physical therapy) when there has been failure to secure the tube by proper methods.13 Securing the distal end of the nasoenteric feeding tube by using a hemoclip (securing a suture on the tip of the tube to the intestinal mucosa) does not prevent displacement of the tube manually by the patient. Securing the proximal end with a nasal bridle or some kind of bandage clipping device (securing the proximal end to the skin) is needed. Displacement of nasoenteric tubes on initial placement occurs in 0.3% to 15% of cases (mean 3% to 4%), but this is related more to blinded, bedside techniques using aspirate pH and auscultatory methods.12,14,15 In these cases, pneumothorax, bronchopleural fistula, and empyema (resulting from infusion of formula into the lung) may occur.12 These latter complications do not usually occur as a result of endoscopic placement.
Additional minor complications include epistaxis; persistent gagging; knotting, breaking, and kinking of the tube; and occlusion of the tube from clogging of the formula. Clogged feeding tubes are best treated with a pancreatin (Viokase) tablet crushed in warm water with bicarbonate, placed in a 10-mL syringe, and used as an irrigating solution. This solution has been shown in formal testing to be superior to various soft drinks and papain (or meat tenderizer).16 If the clot fails to clear with this irrigating solution alone, an endoscopic retrograde cholangiopancreatography catheter should be placed down through the tube to the level of the clot, and infusion of the irrigating solution should be delivered directly at the site of the clot. If the clogged tube persists, further efforts to clear the clot may be accomplished by a mechanical declogging device, such as an endoscopy brush or spiral-shaped mechanical declogger that can be rotated or screwed through the obstruction.
Sinusitis is a complication of prolonged nasoenteric tube placement and should be a consideration in patients with such tubes who develop an unexplained fever. The incidence of sinusitis based on opacification of sinuses on radiograph or CT scan tends to be overreported at approximately 25%; needle puncture and culture of effluent from the sinuses more accurately places the incidence at approximately 11.4%.17 Esophageal stricture is a theoretical complication of long-standing nasoenteric tubes, but the incidence is unclear and is probably underreported. A long-standing nasal bridle, in place for greater than 1 to 2 months’ duration, may erode through the nasal septum.
Percutaneous Endoscopic Gastrostomy Complications
Reports from the literature of overall complications related to PEG placement indicate that this minimally invasive procedure has low morbidity and negligible mortality.18,19 Two large series showed that the incidence of minor complications ranged from 4.9% to 13%, with major complications ranging from 1.3% to 3%.18,19 Mortality in these two large series was 0.2% to 1.0%.18,19 Two more recent large series duplicated these results, showing that the rate of minor complications ranged from 10.3% to 10.7%, with major complications ranging from 1.0% to 2.4%.20,21 There was no mortality in these more recent series. Minor complications described in these reports include peristomal wound infections, tube disintegration, clogging, leakage, prolonged ileus, late inadvertent extubation, subcostal neuralgia, laceration of the left lobe of the liver, and delayed closure after removal. Major complications reported include aspiration, peritonitis, premature removal, tumor implantation at the PEG site, buried bumper syndrome, gastrocolocutaneous fistula, necrotizing fasciitis, and hemorrhage.18–21
A benign pneumoperitoneum occurs in 40% of cases after routine PEG placement.22 In the absence of peritoneal signs (e.g., rebound tenderness), this finding is innocuous and does not preclude feeding within 4 hours of tube placement. Pneumoperitoneum may or may not be accompanied by a large air-filled distended stomach, which can be decompressed easily by uncapping the newly placed PEG tube.23 Prolonged ileus after PEG placement was described in 1% of patients in one large series.21
The incidence of aspiration after PEG placement is difficult to determine because of varying definitions (witnessed aspiration event vs. new infiltrate on chest radiograph vs. aspiration of gastric contents labeled with a radioisotope or fluoroscopic colorimetric microsphere). The risk of aspiration immediately related to the procedure of PEG placement has been reported to be less than 1% of cases18,24 and is thought to be related to oversedation, overinflation of the stomach, and performance of the procedure in the supine position. Aspiration as a long-term complication of PEG placement has been reported in 18% of cases.25 In one small prospective study, patients randomly assigned to PEG placement had lower gastroesophageal reflux (as measured by 24-hour pH monitoring) compared with patients randomly assigned to nasogastric feeding.26
Risk for aspiration over the long-term is related to patient age (>70 years), reduced level of consciousness, history of neuromuscular disease, delayed gastric emptying, endotracheal intubation, trauma to the abdomen or pelvis, bolus versus continuous feeds, and nursing care.27,28 Risk for aspiration increases fourfold when patients are moved from the ICU (low patient-to-nurse ratio) out to the medical or surgical floor (high patient-to-nurse ratio).27 These studies reporting aspiration after PEG placement do not usually differentiate aspiration of contaminated oropharyngeal secretions from regurgitation and aspiration of contaminated gastric contents. Three studies suggest that the aspiration of contaminated oropharyngeal secretions compared with aspiration of bacteria-laden gastric contents is at least an equivalent if not greater factor in colonizing the trachea and upper respiratory tree.29–31 Poor oral health has been well defined as an additional risk factor for aspiration in patients receiving tube feeding.32
Buried bumper syndrome is an underreported complication ranging from ulceration underneath the enteral bolster to total erosion of the PEG tube out through the gastric and abdominal wall. It most often occurs as a result of excessive tension between the external and enteral bolster; additional predisposing factors include smaller, stiffer enteral bolsters (made from silicone compared with polyurethane), presence of malnutrition or poor wound healing, or a significant weight gain in response to feeding.24 Buried bumper syndrome may manifest simply as increased leakage around the PEG, infection at the PEG site, immobility of the catheter, resistance to infusion, or abdominal pain occurring with infusion of formula.23,24,33,34 Various techniques are described in the literature to manage this complication. Usually the PEG tube has to be removed either by pulling it back into the stomach and out through the mouth or by pulling it out through the abdominal wall. In patients in whom the PEG tube has not been used for several weeks to months, the enteral bolster may be completely buried within the gastric and abdominal wall. In this situation, a needle-knife thermocoagulation catheter may be required to cut down to the bolster to facilitate removal.33
Gastrocolocutaneous fistulas may occur because of inadvertent puncture of an overlying loop of bowel at the time of initial placement or as a delayed complication occurring because of migration or erosion of the tube over time into the colon.24,35 Insufficient translumination, inadequate gastric insufflation at the time of initial placement, and previous abdominal surgery in which a loop of bowel may be tacked down by scar tissue all are risk factors increasing the likelihood for this complication.23,24 Gastrocolocutaneous fistula may manifest acutely with peritonitis, infection, fasciitis, or obstruction to flow of infusion of the formula. More often, it occurs chronically, manifesting after several months with either stool appearing around the PEG tube or insidious diarrhea in which the stool has the appearance of formula identical to that infused into the PEG. Frequently, this complication is not identified until the tube is removed and stool appears at the ostomy site. This complication is managed by first documenting the fistula with radiographic contrast studies. It is managed easily by removing the PEG, placing a bandage over the defect, and allowing the site to heal. Operative takedown is required only if the fistula fails to close.23,24
PEG site infection is one of the most common complications of PEG placement. Risk for developing PEG site infection is related to patient factors (e.g., diabetes, obesity, malnutrition, or long-term use of steroids), factors involving technique (pull or push type PEGs vs. introducer PEGs, small incisions, and lack of antibiotic prophylaxis), and nursing care (excessive traction on the bolsters). The incidence of wound infection around the PEG site ranges from 5.4% to 17.0%,25,36,37 but most (>70%) are minor in degree.38 Antibiotic prophylaxis at the time of initial placement is an important measure to reduce the incidence of this complication. In an older study, a single dose of antibiotic prophylaxis at the time of placement reduced the incidence of PEG site infection from 32% down to 7% (P < .05).39 In a more recent study, a single dose of one or two antibiotics at the time of placement reduced the incidence of PEG site infection significantly from 13.2% to 0.5% compared with controls receiving no antibiotic prophylaxis (P < .01).38 Patients already receiving concurrent antibiotics do not need additional prophylaxis at the time of PEG placement.40 If infection develops around the PEG site, usually intravenous antibiotics and local wound care are sufficient to correct the complication. Surgical incision and drainage is rarely required. Peritonitis occurs less frequently in 0.4% to 1.5% of cases18,24,35,41 and is differentiated from simple PEG site infection by the development of peritoneal signs and rebound tenderness. Prompt broad-spectrum intravenous antibiotics are usually sufficient. In the presence of peritonitis, however, contrast studies should be performed to rule out the presence of a leak. If there is leakage into the peritoneum, surgical intervention is required.24
Hemorrhage is a rare complication involving less than 2.5% of cases.24,35 Various etiologic factors may contribute to this complication, including direct puncture of a blood vessel or traumatic tearing of the esophagus or stomach on initial placement, concomitant peptic ulcer disease, development of gastric ulcer underneath the enteral bolster, or erosion of the posterior gastric wall opposite from the enteral bolster of the PEG tube.24,35 Management involves urgent endoscopy to document the source and appropriate steps to achieve hemostasis.
Leakage around the PEG site is reported in only 1% to 2% of cases,21,41 but this probably represents underreporting of the incidence of this complication. Etiologic factors include corrosive agents (vitamin C [ascorbic acid] infused with formula, increased gastric acid arising from stop orders for prescribed acid-reducing agents, and continued hydrogen peroxide washes of the site after initial placement), cutaneous fungal infection around the site, development of granulation tissue, side-torsion on the tube creating ulceration on one wall of the tract, absence of an external bolster (allowing to-and-fro motion of the PEG tube through the tract), buried bumper syndrome, and PEG site infection. Management depends on defining the exacerbating factors, which can usually be ascertained by careful examination of the PEG site. Initial physical examination should rule out PEG site infection, confirm there is no fixation of the tube (suggesting buried bumper syndrome), and ensure there is no ulceration of the tract indicating side-torsion. The patient’s list of medications should be reviewed, a proton pump inhibitor should be added if this agent has not been ordered, ascorbic acid should be stopped, and consideration should be given to providing an antifungal cream or zinc oxide to the site. Side-torsion creating ulceration in the tract may require stabilization of the PEG tube with a vertical clamp (which prevents side-to-side motion). Granulation tissue around the PEG site may be treated with silver nitrate sticks. Options for cases in which there is no external bolster include replacing the PEG tube with a commercial replacement PEG set that contains an external bolster and creating a homemade external bolster from the funneled end of a Foley catheter. PEG site infection should be treated, as should existence of the buried bumper syndrome according to previously described methods. In more severe cases, the tract may be damaged to the point that diverting the stream of infused formula down into the small bowel (by converting the PEG to a PEGJ) or completely removing the PEG tube and placing a nasoenteric aspirate or feed tube to allow the site to heal may be required.
Accidental extubation of the PEG tube occurs in 1.6% to 4.4% of cases; half of these cases occur prematurely before complete maturation of the PEG site.20,25,35,37,42 Normally, the PEG site should mature over 7 to 10 days, at which point the gastric wall becomes fused to the anterior abdominal wall. Maturation of the PEG tract may be delayed 3 to 4 weeks in the presence of long-term steroid use, malnutrition, or ascites. Management is simple as long as no peritonitis is present.35 A nasogastric tube can be placed for decompression, a broad-spectrum antibiotic should be started, and the PEG may be replaced within 7 to 10 days. Surgical intervention is required only if peritonitis develops.35 Once the PEG tract is mature, simple bedside replacement with a PEG tube (or endoscopic placement if the site closes down) may be sufficient. Less common complications of PEG placement include tumor implantation at the PEG site, development of a bronchoesophageal fistula, migration of the enteral balloon bolster causing gastric outlet obstruction at the level of the pylorus, reversible apnea, subcostal neuralgia, and development of a gastroileocutaneous fistula.20,43–47
Percutaneous Endoscopic Gastrojejunostomy and Direct Percutaneous Endoscopic Jejunostomy Complications
Patients requiring placement of a PEGJ are at risk for all of the complications previously described for placement of a routine PEG tube. The most common additional problem encountered with PEGJ tubes is inadvertent migration of the jejunal tube from the small bowel back into the stomach, which occurs in 27% to 42% of cases.48–50 Numerous factors contribute to this complication including a large dilated atonic stomach, failure to cut the PEG tube down to a shortened length, insufficient length of the jejunal tube, placement of the initial PEG high in the stomach, surgical PEG placement (in which the PEG tube is tunneled pointing toward the gastroesophageal junction), and recurrent nausea and vomiting. Steps that can be taken at the time of initial placement to reduce this complication include positioning the PEG tube immediately above and to the right of the umbilicus so that the entrance is in the gastric antrum, cutting the PEG tube down to approximately 10 cm in length, selecting a jejunal tube with the greatest length, and ensuring there is no loop in the stomach as the jejunal tube passes from the PEG to the pylorus. As mentioned earlier in the section on technique of PEGJ placement, securing the distal end to the intestinal mucosa with a hemoclip or placement of an anchor device may help hold the jejunal tube in place for a brief time.
Complications arising from DPEJ placement differ very little from the complications encountered with routine PEG placement. Of note, a jejunocolocutaneous fistula may occur. Intermittent small bowel obstruction may occur when a larger, balloon-type enteral bolster is selected for the procedure. Volvulus leading to necrotic bowel has been described with DPEJ.51
1 McClave SA, Mallampalli A. Nutrition in the ICU. Part I: Entreat feeding—when and why? J Crit Illness. 2001;16:197-204.
2 Kudsk KA. Importance of internal feeding in maintaining gut integrity. JPEN J Parenter Enteral Nutr. 2001;25:S2-S8.
3 Kudsk KA, Croce MA, Fabian TC. Entreat versus parenteral feeding: Effects on septic morbidity after blunt and penetrating abdominal trauma. Ann Surg. 1992;215:503-513.
4 McClave SA, Snider HL. The gut in nutritional management of acute pancreatitis. Clin Perspect Gastroenterol. 1999;2:86-92.
5 Braunschweig CL, Levy P, Sheean PM, et al. Entreat compared with parenteral nutrition: A meta-analysis. Am J Clin Nutr. 2001;74:534-542.
6 Lewis SJ, Egger M, Sylvester PA, et al. Early internal feeding versus “nil by mouth” after gastrointestinal surgery: Systematic review and meta-analysis of controlled studies. BMJ. 2001;323:1-5.
7 Smith I, Fleming S, Cernaianu A. Mishaps during transport from the intensive care unit. Crit Care Med. 1990;18:278-281.
8 Evans A, Winslow EH. Oxygen saturation and hemodynamic response in critically ill, mechanically ventilated adults during intrahospital transport. Am J Crit Care. 1995;4:106-111.
9 Heyland DK, Drover JW, Macdonald S, et al. Effect of postpyloric feeding on gastroesophageal regurgitation and pulmonary microaspiration: Results of a randomized controlled trial. Crit Care Med. 2001;29:1495-1501.
10 Lien HC, Chang CS, Chen GH. Can percutaneous endoscopic jejunostomy prevent gastroesophageal reflux in patients with preexisting esophagitis? Am J Gastroenterol. 2000;95:3439-3443.
11 Heyland DK, Drover JW, Dhaliwal R, et al. Optimizing the benefits and minimizing the risks of internal nutrition in the critically ill: Role of small bowel feeding. JPEN J Parenter Enteral Nutr. 2002;26(6 Suppl):S51-S55.
12 Levy H. Nasogastric and nasoenteric feeding tubes. Gastroenterol Endosc Clin N Am. 1998;8:529-550.
13 McClave SA, Sexton LK, Spain DA, et al. Entreat tube feeding in the intensive care unit: Factors impeding adequate delivery. Crit Care Med. 1999;27:1252-1256.
14 Metheny N, Dettenmeier P, Hampton K, et al. Detection of inadvertent respiratory placement of small-bore feeding tubes: A report of 10 cases. Heart Lung. 1990;19:631-638.
15 Roubenoff R, Ravich WJ. Pneumothorax due to nasogastric tubes: Report of four cases, review of the literature, and recommendations for prevention. Arch Intern Med. 1989;149:184.
16 Marcuard SP, Stegall KL, Trogdon S. Clearing obstructed feeding tubes. JPEN J Parenter Enteral Nutr. 1989;13:81-83.
17 George DL, Falk PS, Umberto Meduri G, et al. Nosocomial sinusitis in patients in the medical intensive care unit: A prospective epidemiological study. Clin Infect Dis. 1998;27:463-470.
18 Larson DE, Burton DD, Schroeder KW, et al. Percutaneous endoscopic gastrostomy: Indications, success, complications, and mortality in 314 consecutive patients. Gastroenterology. 1987;93:48-52.
19 Grant JP. Percutaneous endoscopic gastrostomy. Ann Surg. 1993;217:168-174.
20 Rimon E. The safety and feasibility of percutaneous endoscopic gastrostomy placement by a single physician. Endoscopy. 2001;33:241-244.
21 Lin HS, Ibrahim HZ, Kheng JW, et al. Percutaneous endoscopic gastrostomy: Strategies for prevention and management of complications. Laryngoscope. 2001;111:1847-1852.
22 Gottfried EB, Plumser AB, Clair MR. Pneumoperitoneum following percutaneous endoscopic gastrostomy. Gastroenterol Endosc. 1986;32:397-399.
23 Baskin WN. Entreat access techniques. Gastroenterologist. 1996;4:S40.
24 Safidi BY, Marks JM, Ponsky JL. Percutaneous endoscopy gastrostomy. Gastroenterol Endosc Clin N Am. 1998;8:551-558.
25 James A, Kapur K, Hawthorne AB. Long-term outcome of percutaneous endoscopic gastrostomy feeding in patients with dysphagic stroke. Age Ageing. 1998;27:671-676.
26 Johnson DA, Hacker JF, Benjamin SB, et al. Percutaneous endoscopic gastrostomy effects on gastroesophageal reflux and the lower esophageal sphincter. Am J Gastroenterol. 1987;82:622-624.
27 Mullan H, Roubenoff RA, Roubenoff R. Risk of pulmonary aspiration among patients receiving internal nutrition support. JPEN J Parenter Enteral Nutr. 1992;16:160-164.
28 McClave SA, DeMeo MT, DeLegge MH, et al. North American Summit on Aspiration in the Critically Ill Patient: Consensus statement. JPEN J Parenter Enteral Nutr. 2002;26(6 Suppl):S80-S85.
29 Pingleton SK, Hinthorn DR, Liu C. Entreat nutrition in patients receiving mechanical ventilation: Multiple sources of tracheal colonization include the stomach. Am J Med. 1986;80:827-832.
30 Torres A, el-Ebiary M, Gonzalez J, et al. Gastric and pharyngeal flora in nosocomial pneumonia acquired during mechanical ventilation. Am Rev Respir Dis. 1993;148:352-357.
31 Bonten MJ, Gaillard CA, van Tiel FH, et al. The stomach is not a source for colonization of the upper respiratory tract and pneumonia in ICU patients. Chest. 1994;105:878-884.
32 DeRiso AJ2nd, Ladowski JS, Dillon TA, et al. Chlorhexidine gluconate 0.12% oral rinse reduces the incidence of total nosocomial respiratory infection and nonprophylactic systemic antibiotic use in patients undergoing heart surgery. Chest. 1996;109:1556-1561.
33 Ma MM, Semlacher EA, Fedorak RN, et al. The buried gastrostomy bumper syndrome: Prevention and endoscopic approaches to removal. Gastroenterol Endosc. 1995;4:505-508.
34 Boyd JW, DeLegge MH, Schamburek RD, et al. The buried bumper syndrome: A new technique for safe, endoscopic PEG removal. Gastroenterol Endosc. 1995;41:508-511.
35 Schapiro GD, Edmundowicz SA. Complications of percutaneous endoscopic gastrostomy. Gastroenterol Endosc Clin N Am. 1996;6:409-422.
36 Lockett MA, Templeton ML, Byrne TK, et al. Percutaneous endoscopic gastrostomy complications in a tertiary-care center. Am Surg. 2002;68:117-120.
37 Dwyer KM, Watts DD, Thurber JS, et al. Percutaneous endoscopic gastrostomy: The preferred method of elective feeding tube placement in trauma patients. J Trauma. 2002;52:26-32.
38 Gossner L, Keymling J, Hahn EG, et al. Antibiotic prophylaxis in percutaneous endoscopic gastrostomy (PEG): A prospective randomized clinical trial. Endoscopy. 1999;31:119-124.
39 Jain NK, Larson DE, Schroeder KW, et al. Antibiotic prophylaxis for percutaneous endoscopic gastrostomy. Ann Intern Med. 1987;107:824-828.
40 Sturgis TM, Yancy W, Cole JC, et al. Antibiotic prophylaxis in percutaneous endoscopic gastrostomy. Am J Gastroenterol. 1996;91:2301-2304.
41 Abuksis G, Mor M, Segal N, et al. Percutaneous endoscopic gastrostomy: High mortality rates in hospitalized patients. Am J Gastroenterol. 2000;95:128-132.
42 Galat SA, Gerig KD, Porter JA, et al. Management of premature removal of the percutaneous endoscopic gastrostomy. Am Surg. 1990;56:733.
43 De Vogelaere K, De Backer A, Vandenplas Y, et al. Gastroileocutaneous fistula: An unusual complication of percutaneous endoscopic gastrostomy. Endoscopy. 2000;32:S3-S4.
44 Clancy MJ, Hunter DC. Tube migration causing gastric outlet obstruction: An unusual complication of percutaneous endoscopic gastrostomy. Endoscopy. 2000;32:S58.
45 Bilijam C, Hulsbergen M, Bosman D, et al. Bronchoesophageal fistula as a complication of percutaneous endoscopic gastrostomy. Endoscopy. 2000;32:S26-S27.
46 Segal D, Michaud L, Guimber D, et al. Late-onset complications of percutaneous endoscopic gastrostomy in children. J Pediatr Gastroenterol Nutr. 2001;33:495-500.
47 Schiano TD, Pfister D, Harrison L, et al. Neoplastic seeding as a complication of percutaneous endoscopic gastrostomy. Am J Gastroenterol. 1994;89:131-133.
48 Fan AC, Baron TH, Rumalla A, et al. Comparison of direct percutaneous endoscopic jejunostomy and PEG with jejunal extension. Gastrointest Endosc. 2002;56:890-894.
49 Doede T, Faiss S, Schier F. Jejunal feeding tubes via gastrostomy in children. Endoscopy. 2002;34:539-542.
50 DiSario JA, Foutch PG, Sanowski RA. Poor results with percutaneous endoscopic jejunostomy. Gastrointest Endosc. 1990;36:257-260.
51 Rumalla A, Baron TH. Results of direct percutaneous endoscopic jejunostomy, an alternative method for providing jejunal feeding. Mayo Clin Proc. 2000;75:807-810.