[level-membership-for-dermatology-category]
6 Suturing Techniques
Basic Skills
The clinician must acquire certain basic suturing skills as discussed next.
Loading the Needle Holder (Driver)
Using Forceps in the Nondominant Hand
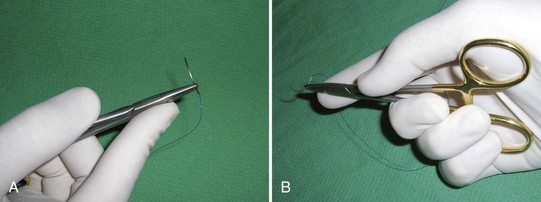
Learn to suture with a good pair of Adson forceps in the nondominant hand (Figure 6-2). The forceps can be used to:
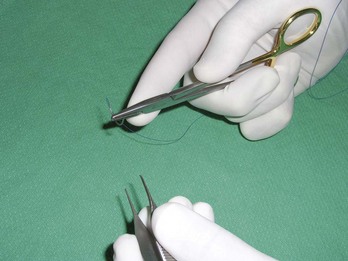
FIGURE 6-2 Using Adson forceps in the nondominant hand while suturing.
(Copyright Richard P. Usatine, MD.)
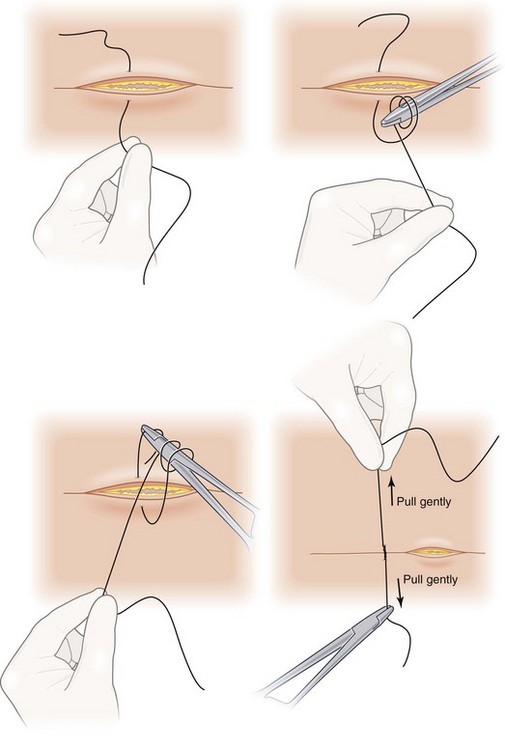
Performing an Instrument Tie
To perform an instrument tie (Figure 6-3):
Specific Suturing Techniques
Simple Interrupted Suture
The simple interrupted suture (Figure 6-4) is the most basic suturing technique to master and is used to close anything from small incisions under little tension to a large excision under tension in conjunction with deep sutures. Pronate the wrist to place the point of the needle perpendicular (or even 10° more than perpendicular) to the skin, and then rotate the needle through the skin. The needle should enter and exit the skin at the same depth from the skin surface on both sides to maintain good apposition. Also the needle should enter and exit the epidermis equidistant from the wound margin on each side.
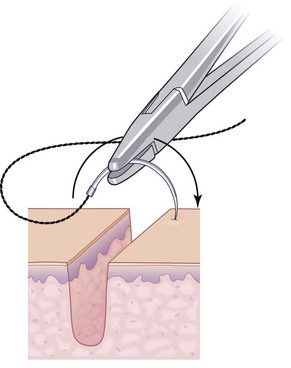
FIGURE 6-4 Inserting the needle perpendicular to the skin while initiating a simple interrupted suture.
(From Vidimos A, Ammirati C, Poblete-Lopez C. Dermatologic Surgery. London: Saunders; 2008.)
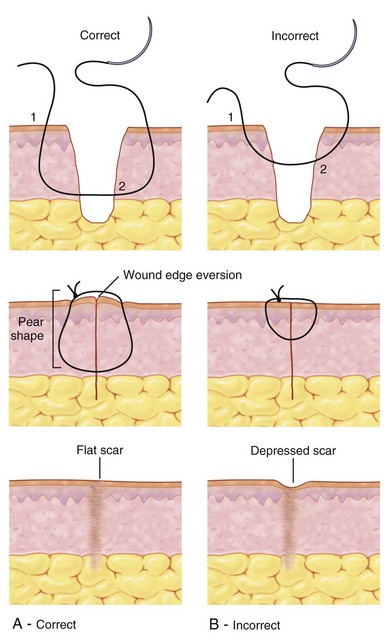
The reason for creating a flask shape path is to promote eversion of the wound edge. Eversion will heal in a flat scar when the fibrosis of healing pulls the skin edges downward. Without wound eversion the scar may be depressed (Figure 6-5). Methods of obtaining eversion include the following (Figure 6-6):
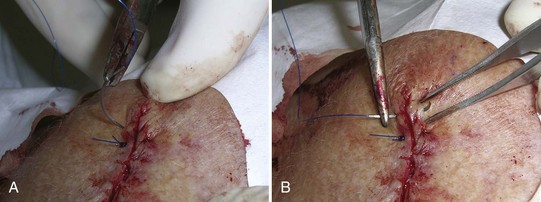
If the skin edges are uneven, this can be corrected by keeping the depth from the surface equal on both sides (Figure 6-7).
Simple interrupted sutures are useful for small wounds as well as for excellent control and placement along larger wounds. The rule of halves is to place the first suture at the midpoint of the wound and then to place subsequent sutures halfway between the first suture and the end of the wound and then proceed in a similar fashion until the wound is closed (see Figure 11-23 in Chapter 11, The Elliptical Excision). This technique is useful to avoid standing cones (dog ears) at the ends from uneven suturing and can also be used to even out an asymmetrical defect where one side is longer than the other.
Deep or Buried Sutures
Deep sutures perform five important functions:
Deep Vertical Sutures (Figure 6-8)
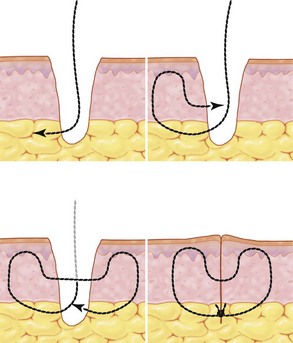
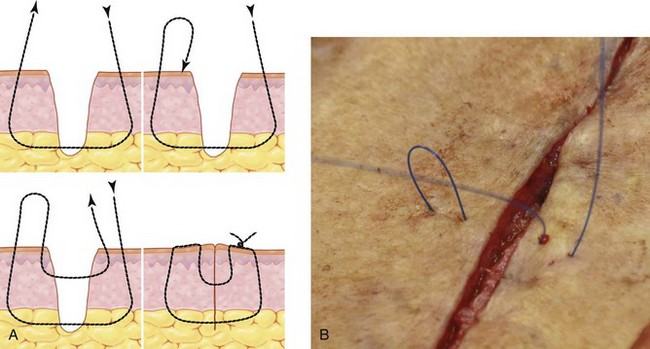
The path of a deep or buried suture (Figure 6-8) is designed to bury the knot and keep it from poking through the skin. Insert the needle point in the undermined area at the base of the wound. Then pass the needle through the tissue away from the midline of the wound and come up in the superficial dermis. Hold the needle with your forceps and let go of the needle with your needle holder. Then pass the needle back to the needle holder in the direction needed for the second half of the stitch. Pull the suture through, leaving a short end in the middle of the wound and reload the needle.

Buried Vertical Mattress Sutures
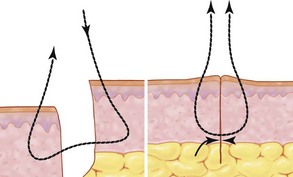
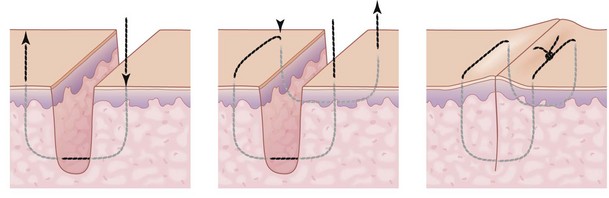
The buried vertical mattress suture (Figure 6-9) is created using a special technique that produces a heart-shaped pattern in the deep tissue to improve wound eversion. The needle is placed as described above but will go up to dermal-epidermal junction (DEJ) then come out 2 mm below the DEJ. If you merely make a circle with the deep stitch, the tension vectors may pull the edges down and invert the wound.
Deep Horizontal Mattress Suture
The deep or buried horizontal mattress suture (Figure 6-10) can be useful when it is desirable to take tension off the wound but the skin is not very thick, such as that on the face. The absorbable suture is placed through the dermis at the same level on both sides and tied in the same manner as the deep vertical mattress suture. This suture does not close dead space as well as the deep vertical mattress suture, but it can be easier to place when the skin is thin and not much undermining is needed.
Running Simple Sutures
A running simple suture (Figure 6-11) is an efficient way to close long repairs that are not under tension or no longer under tension after the deep sutures were placed. Start by placing a simple interrupted suture at one end of the wound and tie it with at least four to five throws. Instead of cutting both ends of the suture, cut only the short end and preserve the length of the suture with the needle attached. Continue the repair by placing the next stitch further along the wound and passing the needle through the skin on both sides and repeating the process along the length of the surgical defect. Insert the needle perpendicular to the skin to promote wound eversion. Once the end of the wound is reached and the wound is closed, instead of pulling the last loop tight, leave it long enough to use it as an end to tie. Tie the suture to this loop and then cut the loop and the needle end of the suture.
Vertical Mattress Sutures
Vertical mattress sutures (Figure 6-12) distribute some of the stress and cutting force of the suture over a broader area. The vertical mattress suture shifts much of the tension away from the skin edge. The suture is placed similarly to a simple interrupted suture, but it is started further from the skin margin and emerges equidistant on the other side of the wound often referred to as far-far. The course of the needle is then reversed and the needle is placed closer to the skin edge on the same side where the needle just emerged. The needle is then advanced to come out equidistant from the wound on the opposite side of the wound and back toward the first insertion of the needle. These are placed close to the skin edge, near-near, and the two ends are tied with the knot lying away from the skin edge. This allows the skin edges to evert while placing the greatest amount of tension between the far and near entrance points of the suture instead of directly on the skin margin. To learn the sequence of steps in this technique it may be helpful to remember the saying far-far-near-near. Additional vertical mattress sutures may be placed along the wound to complete the repair.
Horizontal Mattress Sutures
Horizontal mattress sutures (Figure 6-13) are another option for placing tension away from the skin edges. Instead of placing the suture far-far-near-near, the four entrance/exit sites are equidistant from the wound margin, but the two lines of suture crossing the wound margin are parallel in a horizontal plane in contrast to the two lines of suture in the vertical mattress, which are in a vertical plane. Start the horizontal mattress suture on one side of the wound as in a simple interrupted suture and exit on the opposite side of the wound equidistant from the wound. Reverse the needle and insert it equidistant from the wound edge several millimeters lateral to the exit site and then emerge equidistant on the opposite side of the wound. Finally, tie the suture on the side of initial needle entry. This places the tension mostly along the section of the suture where the open loop is and the segment with the knot that is parallel to the wound margin. As above, the repair can be completed with additional horizontal mattress sutures or simple interrupted sutures or a running simple suture to approximate the skin edges.
Running Horizontal Mattress Sutures
This variation combines the distribution of tension away from the wound edge possible with a traditional horizontal mattress suture with some of the speed of a running simple suture (Figure 6-14). The suture is started as a simple suture at the end of the incision or beyond the end of the incision where there is little or no tension and the suture is tied and the short non-needle end is cut. The needle is then moved parallel to the incision several millimeters away from the exit of the first suture and is placed through the skin and subcutaneous tissues across the incision to emerge equidistant on the other side of the incision. The needle is then placed several millimeters further along and parallel to the incision to repeat the process in the other direction. This will make a series of alternating dashes on either side of the incision, which will carry the tension of the suture instead of the tension being on the wound edges themselves. The suture material will be traversing the wound incision perpendicular and deep to the incision.
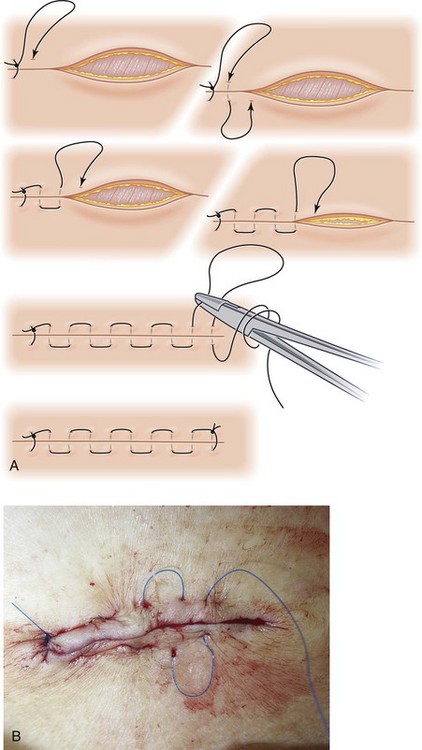
Once the end of the incision is reached in this fashion, the suture can be tied to itself as in the simple running suture above. If the repair is long, removal can be facilitated by occasionally placing a simple suture across and over the incision instead of under it.1 This segment can be easier to cut in contrast to the segments parallel to the incision, which due to the tension on them may be difficult to elevate. This tension is also what helps to approximate the wound, evert the skin edges, and avoid undue tension at the skin edges. Because there are only two knots to tie (one at each end), it is relatively quick to place.
Corner (Tip) Stitch
The corner, or tip, stitch (Figure 6-15) is useful in more complex wounds, advancements, and Z-plasties where a point needs to be sutured into a corner. This suture is very similar to the horizontal mattress suture and it distributes tension away from the point of the flap or similar tissue. Start the needle on the side of the wound opposite the point but lateral to where the point of tissue is to reside. Pass it through the tissue in the dermis. Next, enter into the corresponding portion of the point of tissue in the same level of the dermis and travel through it, remaining in the dermis and coming out on the other side of the point. Return to the original side of the wound via the dermis and tie the initial and emerging suture ends on the wound edge opposite from the point of loose tissue. The suture never emerges through the epidermis of the point of tissue and the tension is distributed somewhat away from the fragile point of tissue and its blood supply.
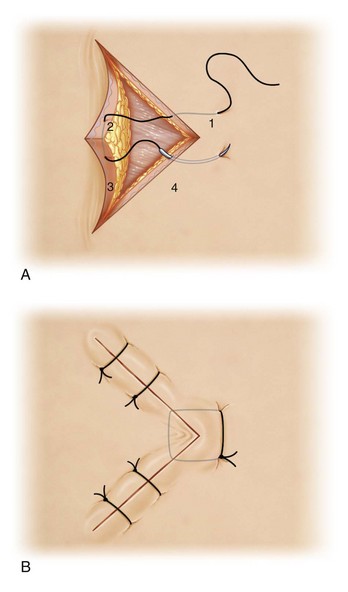
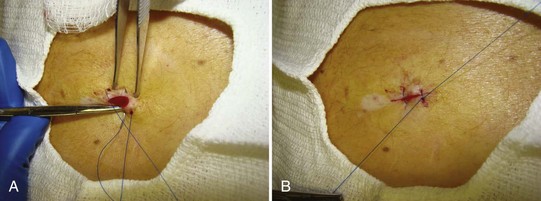
Figure-of-Eight Sutures
The advantage of a figure-of-eight suture (Figure 6-16) is that it acts like two interrupted sutures, but only has one knot to tie. It is useful for medium-sized punch biopsies 4 to 6 mm in diameter that can be closed with a single figure-of-eight suture. Start the needle on one side of the wound and emerge equidistant on the other side of the wound. Without tying, return the needle to the original side of the wound, insert it further along the wound and equidistant from the wound margin as the first site and emerge equidistant on the other side. Tying the suture from the entry point to the final point will pull the wound together and the suture will cross over itself in an X or figure-eight pattern. This technique does not provide as much control as two simple interrupted sutures, but is quicker and adequate for medium-sized punch biopsies. Alternatively, the figure-of-eight process can be reversed by placing the suture diagonally across the wound, then returning the needle to the original side opposite the exit point to place the next suture diagonally crossing the first suture under the skin to the opposite side. This will place the X deep and two parallel lines of suture over the skin (Figure 6-16).
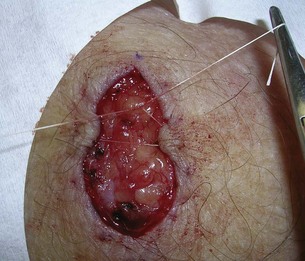
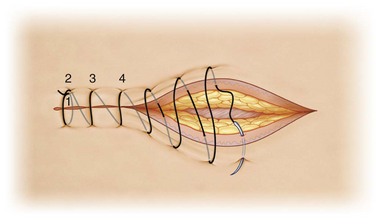
Running Subcuticular Sutures
A running subcuticular stitch (Figure 6-17) is used to avoid making punctures through the epidermis and may leave less scarring. It can be performed with absorbable suture remaining in the tissues or can have nonabsorbable suture knots at both ends above the skin that are removed at a later time. If it is completely buried, then one advantage is that there is no need for suture removal. Before placing this suture the wound should be approximated with deep sutures as described above to reduce any tension on the skin edges because control of wound approximation is reduced with this technique.

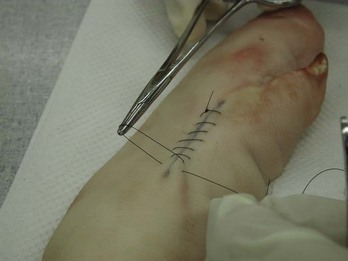
Two-Layer Closure
After excising a skin cancer with margins, a two-layer closure (Figure 6-18) is often required. This is the strongest closure for skin surgery because the buried absorbable suture will take more than 1 month to dissolve. So whenever the superficial sutures are removed, the deep sutures go on working to prevent dehiscence and unattractive scar widening. This method also is the best at preventing hematomas because it effectively closes the dead space. Learn to use the two-layer closure because it should be the workhorse for performing skin surgery.
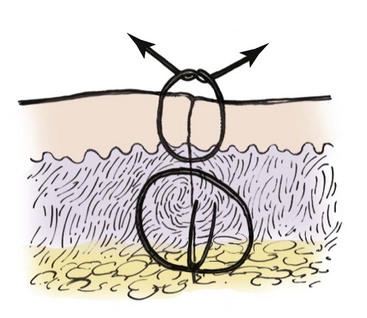
FIGURE 6-18 The two-layer closure consists of a deep absorbable suture with a more superficial nonabsorbable suture.
(From Baker SR. Local Flaps in Facial Reconstruction, 2nd ed. London: Mosby; 2007.)
Additionally, the two-layer closure automatically can be billed as an intermediate closure (see Chapter 38, Surviving Financially). Billing for an intermediate closure will approximately double what is paid for the surgical procedure. Many insurance companies will require prior approval so keep this in mind when scheduling an excision that will require a two-layer closure. Most importantly this closure provides the best result for many skin excisions.
Alternative Suturing Techniques
 -,
-,  -, and
  -inch widths, can be cut in half so they are not as long for small wounds typical in the office setting.
Glues
Cyanoacrylate glues (2-octylcyanoacrylate, Dermabond) have been used for years for closure of wounds due to lacerations when there is no tension on the skin edges. A review of their use in the operating room found no increased rate of infection or dehiscence, but the studies excluded wounds under high tension.2 If a surgical wound of an excision is approximated with no significant tension due to well-placed deep sutures, then skin glue is an option for the final skin closure3 (see Chapter 7, Laceration Repair).
Learning the Techniques: Suggestions on How to Practice
Pigs’ feet (fresh or previously frozen) and artificial skin pads provide a good medium for practice (Figure 6-19). Nectarines can be sutured to practice a deft touch because their skin is fragile and care is needed to follow the curve of the needle and avoid tension or it will tear (similar to the fragile skin of the elderly).
Conclusion
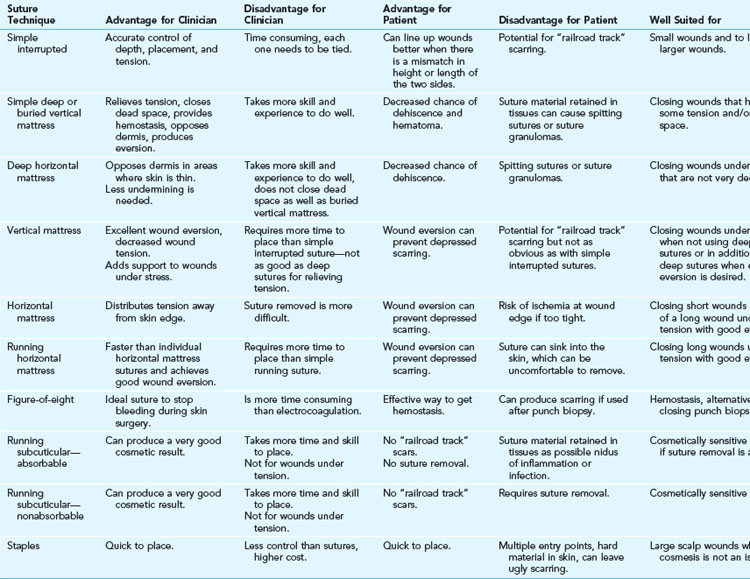
Skin can be sutured in various ways to achieve good healing and cosmesis. Clinicians should be familiar with several techniques so they can use them—or often a combination of them—as the situation requires to achieve good approximation of the deep tissues, reduction or distribution of tension, and apposition of the dermis with slight eversion of the skin to reduce the risk of dehiscence and unnecessary scarring. Table 6-1 summarizes the advantages and disadvantages of the suturing techniques discussed in this chapter.
1. Wang SQ, Goldberg LH. Surgical pearl: Running horizontal mattress suture with intermittent simple loops. J Am Acad Dermatol. 2006;55:870-871.
2. Coulthard P, Esposito M, Worthington HV, et al. Tissue adhesives for closure of surgical incisions. Cochrane Database Syst Rev. 2002;3:CD004287. DOI:10.1002/14651858.CD004287.pub2.
3. Toriumi DM, Bagal AA. Cyanoacrylate tissue adhesives for skin closure in the outpatient setting. Otolaryngol Clin North Am. 35(1), 2002.
[/level-membership-for-dermatology-category][not-level-membership-for-dermatology-category]<
[/not-level-membership-for-dermatology-category]
