Suture Material, Suturing Techniques, and Knot Tying
Suture Types
Sutures are utilized to close wounds, to secure bleeding vessels, and to seal off visceral structures. A wide variety of suture materials are available, which vary in terms of size, material, content, and consistency. For purposes of explanation, sundry sutures can be divided into absorbable and nonabsorbable. Absorbable materials are broken down by the body’s enzyme systems and virtually disintegrate (Fig. 4–1). Nonabsorbable sutures resist enzymatic action and remain more or less permanently (with the exception of silk, which is gone within 2 years) in the body (Tables 4–1 and 4–2, Fig. 4–2). Tensile strength, particularly over time, is greater with nonabsorbable sutures. Sutures are sized on the basis of U.S. Pharmacopeia (USP)-equivalent diameters (Table 4–3). In infected tissues and otherwise dirty areas, absorbable sutures have an advantage in that they provide short-term tensile strength and then disappear. They are less likely to provide a foreign body nidus for continuous inflammation and infection, and for subsequent sinus formation. On the other hand, abdominal closure in the face of gross infection is an indication for the use of nonabsorbable suture material, to minimize the risk of dehiscence and/or evisceration. Almost all modern sutures are swaged onto a needle (Fig. 4–3). Needles generally may be divided into two overall groups: cutting and tapered. Cutting needles are used to penetrate denser and firmer tissues (e.g., fibrous tissue, periosteum, ligament fascia). Cutting needles have a triangular point (Fig. 4–4). If the additional cutting edge is on the inside curve of the needle, it is a standard cutting needle. If it is on the outside curvature of the needle, it is a reverse cutting needle. Tapered needles have a cone-shaped tip and are ideal for penetrating soft tissue and for producing the smallest hole (Fig. 4–5).
A variety of needle configurations accompany the suture to which they are swaged. Straight needles are ideal for subcuticular closures. Very fine sutures (e.g., 5-0, 6-0) are usually equipped with ¼ or  circle needles. Intermediate sutures (e.g., 2-0, 3-0) usually have ½ to
  circle needles. Large sutures most often have ½ circle needles (Fig. 4–6).
Suture Selection
Suture should be selected on the basis of several parameters: (1) the volume of tissue to be secured, (2) the tensile strength of the tissue to be sutured, and (3) the potential for bacterial contamination. A general guideline that can guide a gynecologic surgeon recommends that the smallest suture that can adequately accomplish the work at hand is the best suture for the job. For example, to select a 0 or 1 suture to secure a small bleeding arteriole deep in the pelvis makes no sense when a 3-0 or 4-0 stitch would suffice. On the other hand, attempting to secure a uterine vessel pedicle or infundibulopelvic ligament pedicle with a 3-0 suture rather than a 0 suture is equally foolhardy. Braided suture has a greater propensity to become contaminated with debris and bacteria within the interstices of the braid compared with monofilament suture. Silk suture is easy to handle and easy to tie down, hence it forms a secure knot. It should never be used in the urinary bladder, and for that matter, neither should any nonabsorbable suture material. Nylon suture is very strong but requires many throws to avoid unraveling. Polyester suture material has all the advantages of silk and better strength and integrity. Polypropylene (Prolene) does not adhere to tissue and is less reactive than nylon. It is ideal for situations in which tissues are infected or contaminated. A very new structure concept has been developed by Covidien (New Haven, CT). The unidirectional barbed technology does not slip and does not require knot tying (Fig. 4–6B).
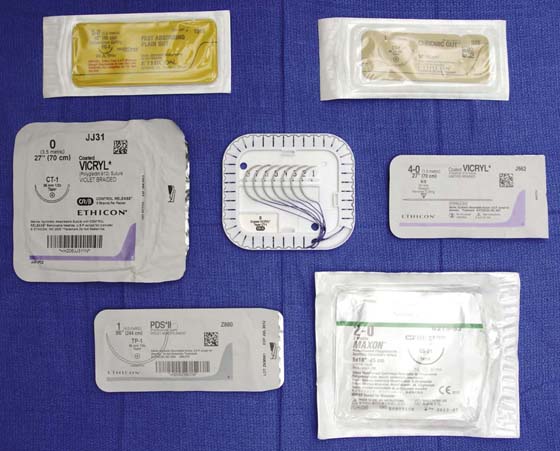
FIGURE 4–1 A number of absorbable suture materials are illustrated: plain gut, chromic gut (top row), Vicryl (middle row), PDS, Maxon (bottom row).
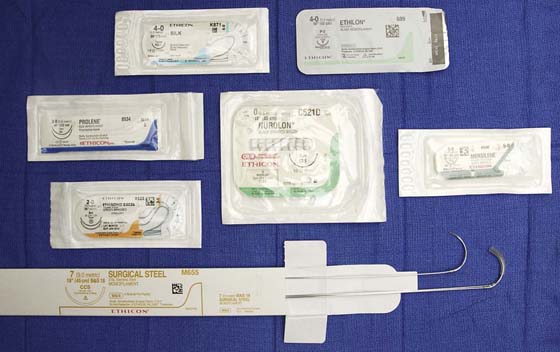
FIGURE 4–2 Nonabsorbable sutures include silk, monofilament nylon (top row), polypropylene, braided nylon, Mersilene, polyester (middle row), steel wire (bottom row).
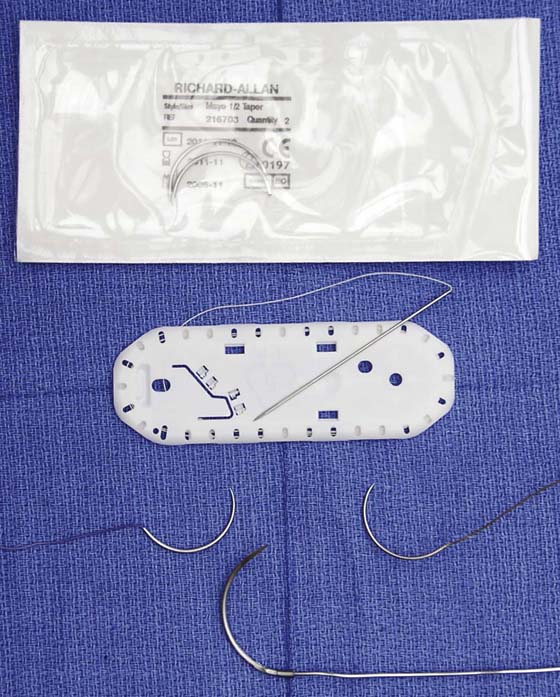
FIGURE 4–3 Several needle types are shown here with the suture material swaged to the needle.
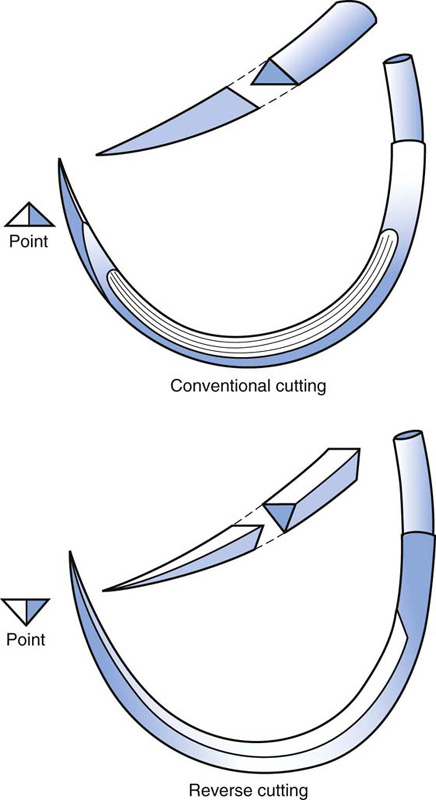
FIGURE 4–4 The top figure shows a standard cutting needle with triangular tip and cutting edge located on the inside curve of the needle. At bottom is a reverse cutting needle with the cutting edge positioned on the outer curve of the needle.
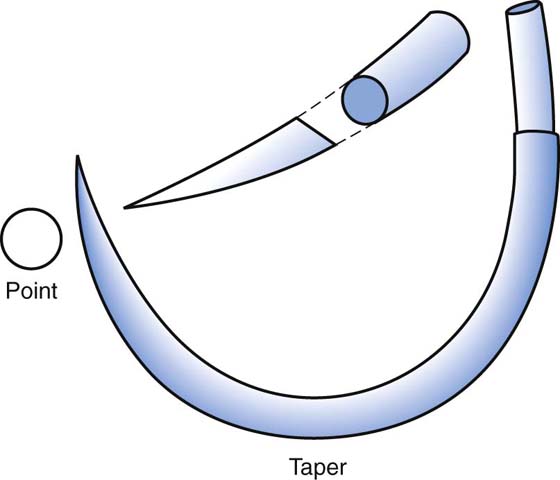
FIGURE 4–5 The taper needle is seen to have a conical tip and creates a relatively smaller hole than does a cutting needle.
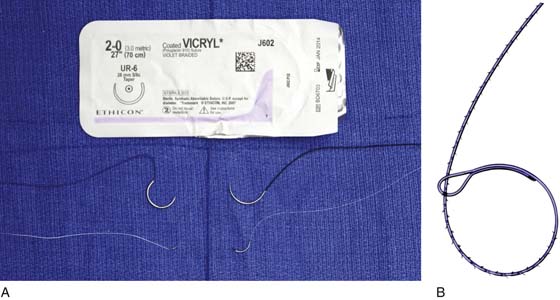
FIGURE 4–6 A. This picture illustrates several varieties of circular needles. Top, a package containing a  circle. In the middle, a
  circle and a ½ circle. Bottom, a ¼ circle and a
  circle. B. The V-Loc (polyglyconate) absorbable wound closure suture is barbed to prevent slippage and requires no terminal knot.
 Types of Suture Material
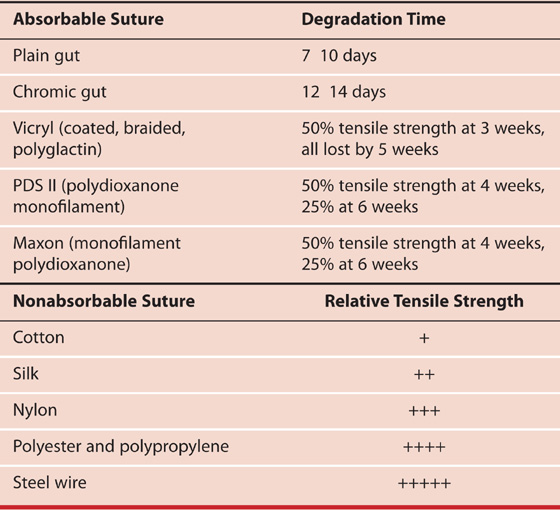
 Ethicon Suture Characteristics
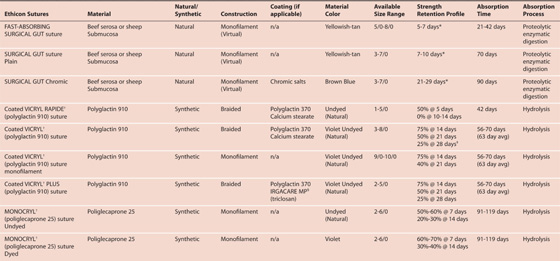
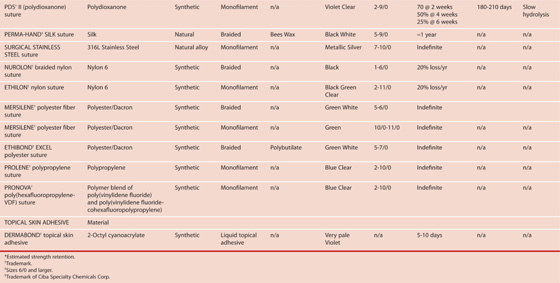
 Suture Size
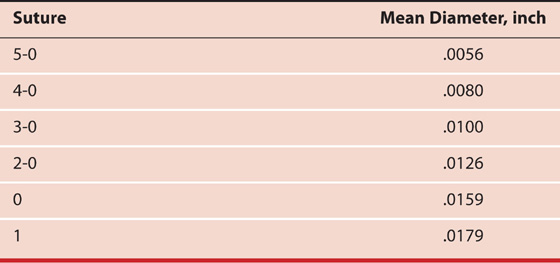
Suture Techniques
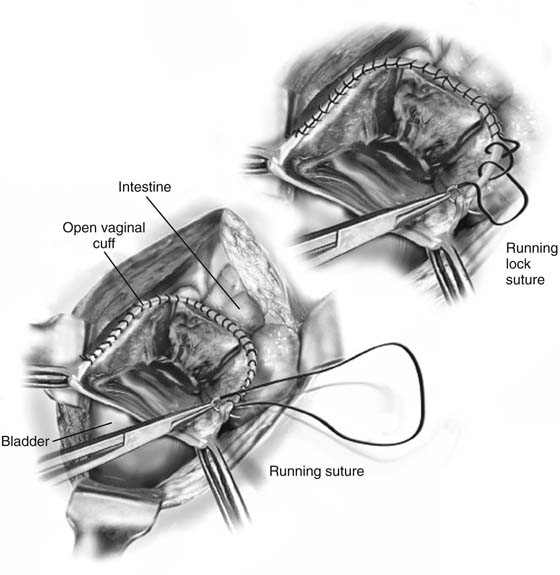
Several suture techniques are useful for pelvic surgery. The fascia or skin may be closed by simple interrupted sutures (Fig. 4–7A) or alternatively by mattress sutures (Fig. 4–7B, C). Subcuticular skin closures are commonly utilized for transverse abdominal incisions and for episiotomy closures (Fig. 4–8A, B). Alternatively, skin, subcutaneous tissue, and peritoneum may be closed by a continuous running suture (Fig. 4–8C). Visceral peritoneum is usually closed by a continuous running suture (Fig. 4–9). Bladder lacerations are typically closed with a continuous through-and-through chromic suture (Fig. 4–10). Fascia may be closed securely with a running monofilament suture of PDS, or polypropylene (Prolene) (Fig. 4–11). In critical circumstances, stainless steel wire, nylon, or Prolene may be utilized as interrupted sutures taken widely through the fascia and peritoneum en masse (Fig. 4–12). The Smead-Jones far-near technique may be utilized for patients at risk for dehiscence (Fig. 4–13A, B). Mass ligature techniques may be indicated with the use of #1 Prolene to repair eviscerated abdomens (Fig. 4–14). Vascular pedicles are secured by suture ligatures (Fig. 4–15A through E). Large vessel pedicles and ligament pedicles are transfixed via Heaney-type suture ligatures (Fig. 4–15F, G). Bleeding vessels and uterine incisions are closed by hemostatic figure-of-8 ligatures (Fig. 4–16). Cul de sac obliteration, cervical cerclage, and vaginal peritoneal closure are implemented by purse string sutures (Fig. 4–17A, B). Open technique for a vaginal cuff hemostasis is referred to as a baseball or reefing stitch (Fig. 4–18). This continuous suture may be locked for additional hemostasis (Fig. 4–18). Exposed raw surfaces with sinus-type oozing can be best managed by a pleating suture (Fig. 4–19A through G). Intestines are anastomosed via a Connell continuous suture pattern (Fig. 4–20).
Knot Tying
Every surgeon is required to tie a secure knot. New residents typically experience difficulty in tying a secure square knot. They end up not uncommonly tying granny knots, which tighten to such an extreme that the tissues strangulate. The first maneuver is to cross the suture to lay down a flat first throw. One of two techniques may be utilized: single-hand tie (Fig. 4–21A through I) or two-hand tie (Fig. 4–22A through I). Regardless of the technique selected, the sine qua non of a good tie-down is a square knot, which does not slip (i.e., the knot is tied under continuous tension).
Surgeon’s Knot
This knot is useful to prevent slippage (Fig. 4–23). New residents frequently use the technique. An extra loop is taken during the first throw of the tie. The two loops are tightened down and do not loosen during the maneuver of completing the second throw.
Instrument Tie
This is a handy method for tying a fine suture (i.e., 5-0 and smaller) (Fig. 4–24). The short end is held with a long clamp (e.g., a tonsil clamp). The suture material is looped over the clamp, and the short end of the stitch is pulled through the loop. The maneuver is repeated, but the loop is reversed, thereby creating a square knot.
Finishing a Continuous Stitch
At the termination of a running suture, the free end is held, as is a final loop of the suture material (Fig. 4–25). The two are tied together in a square knot.
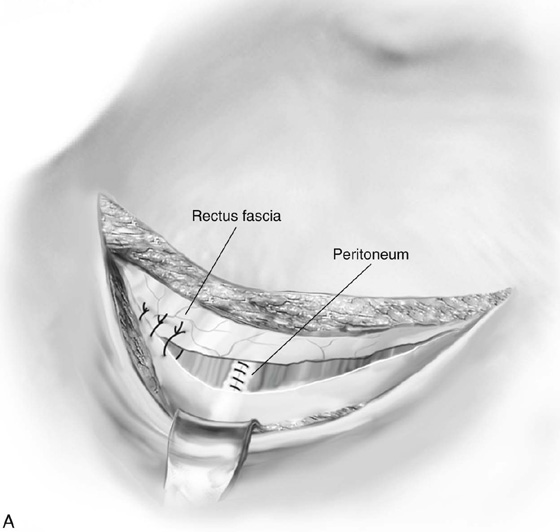
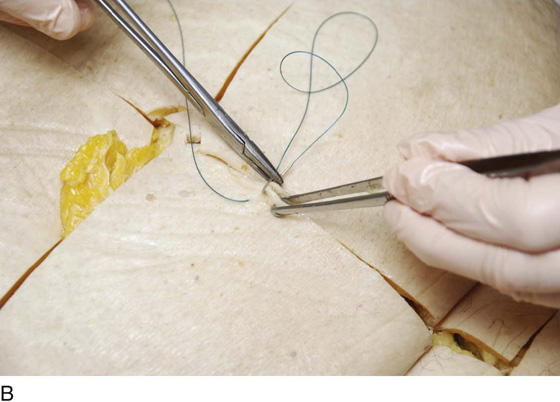
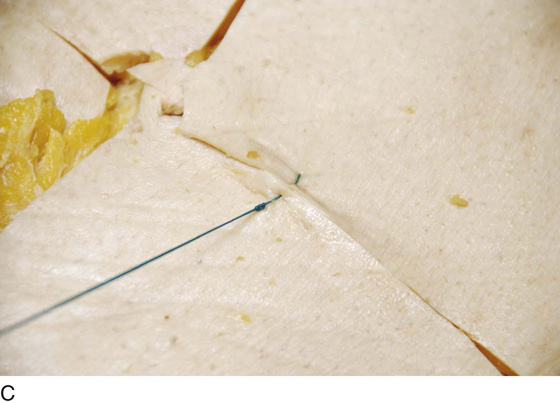
FIGURE 4–7 A. Transverse incisions may be closed with simple interrupted sutures through the fascia. B. An everting mattress suture is illustrated here. The stitch is passed through the skin, existing on the opposite side. The needle is reversed and is passed back through the skin, exiting on the same side as the initial needle bite. C. The suture is tied on the initiating side of the skin.
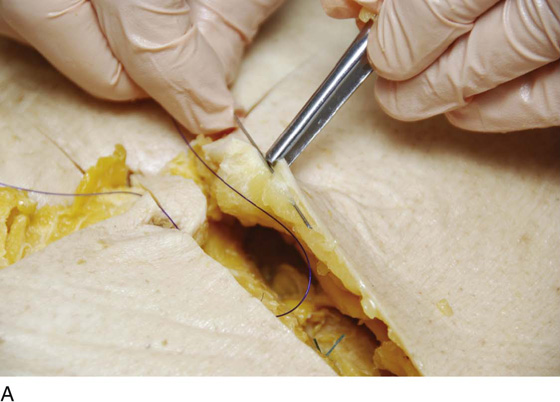
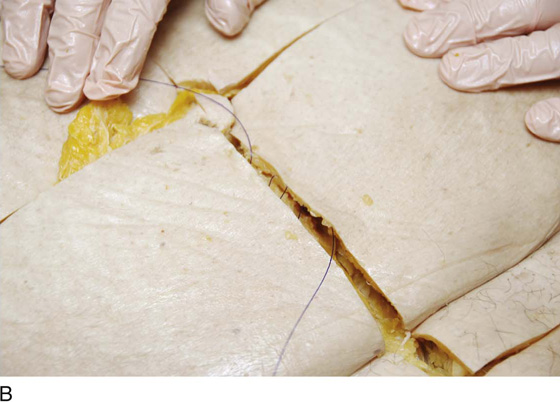
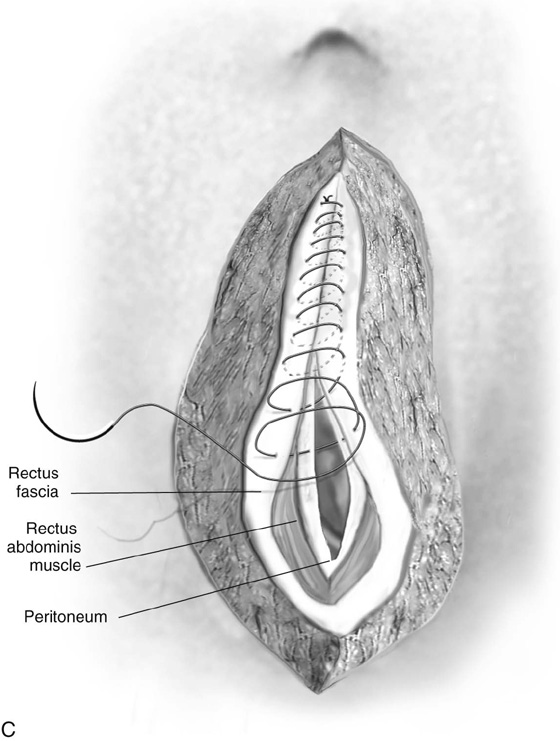
FIGURE 4–8 A. A straight cutting needle provides the best tool for placing a subcuticular stitch. B. Detail of the subcuticular suture line placement. C. Continuous closure with monofilament suture material, 0 or 1 (e.g., PDS II, Prolene).
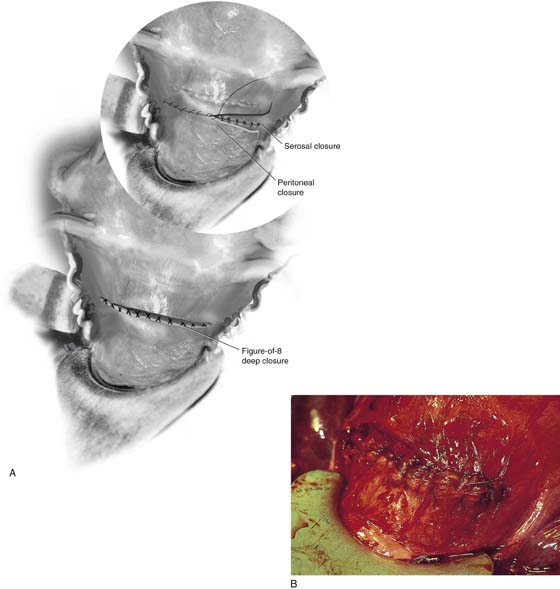
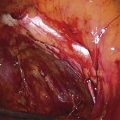
FIGURE 4–9 A. The superficial muscle and uterine serosae are closed with running or running lock sutures of 0 Vicryl. B. After the serosa is closed, the bladder peritoneum is sutured to the uterus at the upper margin of the incision.
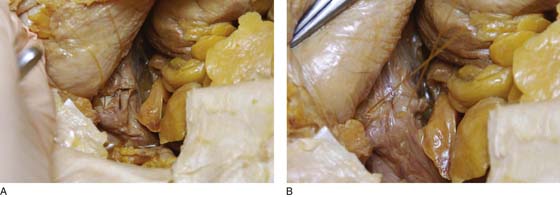
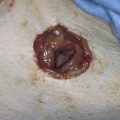
FIGURE 4–10 A. This bladder laceration is closed with a 2-0 running chromic suture, which is placed through all layers of the bladder dome. B. The laceration is closed.
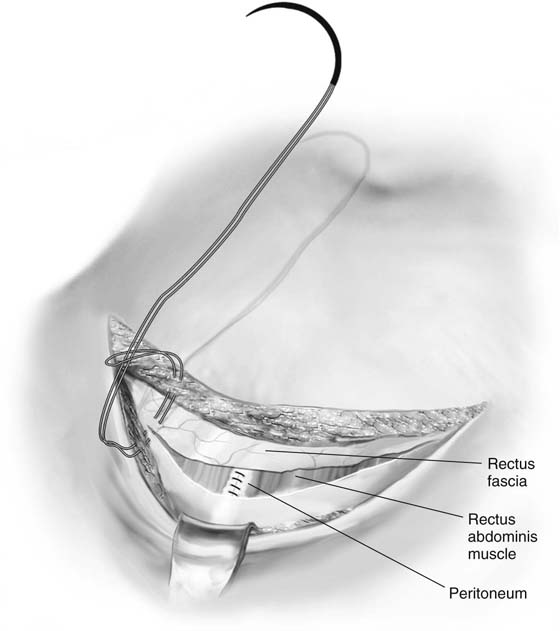
FIGURE 4–11 A looped PDS II or Prolene closure of a transverse incision is illustrated in this drawing.
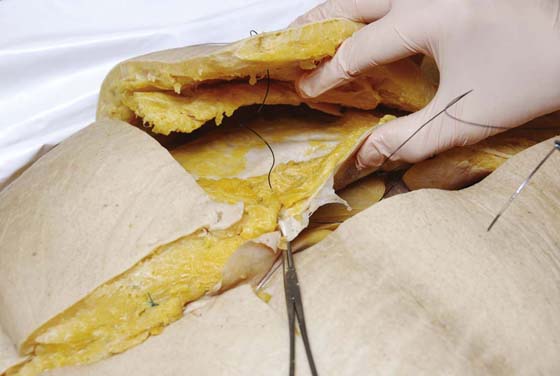
FIGURE 4–12 A mass closure is performed using #4 nylon with a swaged surgeon’s needle. The stitch penetrates skin, fat, fascia, and peritoneum.
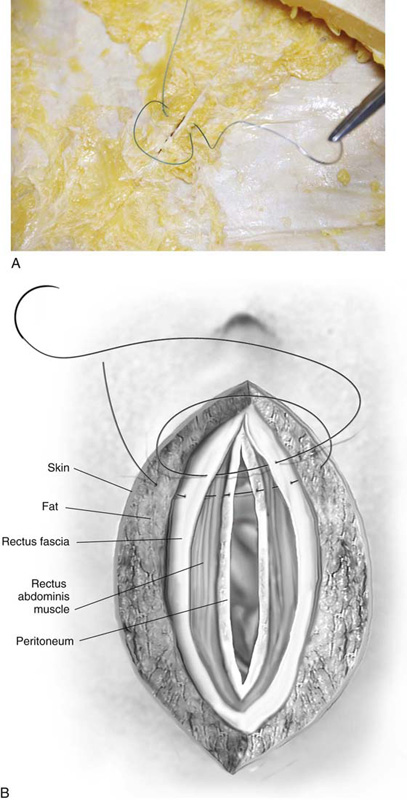
FIGURE 4–13 A. The far-near fascial closure technique consists of an initial deep bite into the fascial margin, which protects against the suture cutting through the tissue. This is followed by fascial margin bites. The entire technique represents antidehiscence prophylaxis. B. A schematic view of the Smead-Jones closure.
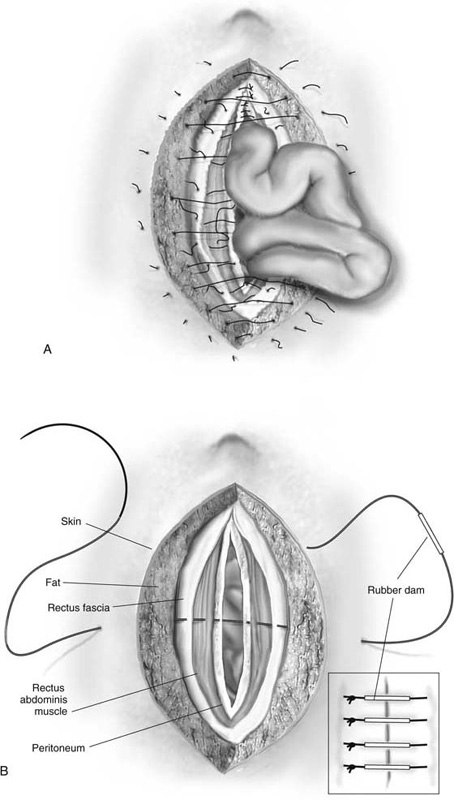
FIGURE 4–14 A. Burst abdomen with evisceration. Typically, the suture material exceeds the tensile strength of the tissue, is tied too tightly, or is placed too close to the cut edge of the fascia. The sutures can pull through the tissue. Alternatively, inadequately tied knots can unravel. B. Closure of the burst abdomen is accomplished with #2 Prolene or #28 or grated steel wire as a mass closure. The large surgeon’s needle is placed with a wide margin lateral to the incision’s edge and is placed through all layers of the abdominal wall. The inset depicts rubber dams inserted through the sutures to protect underlying skin.
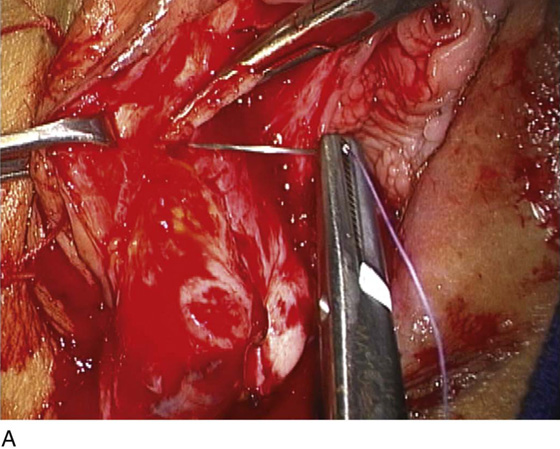
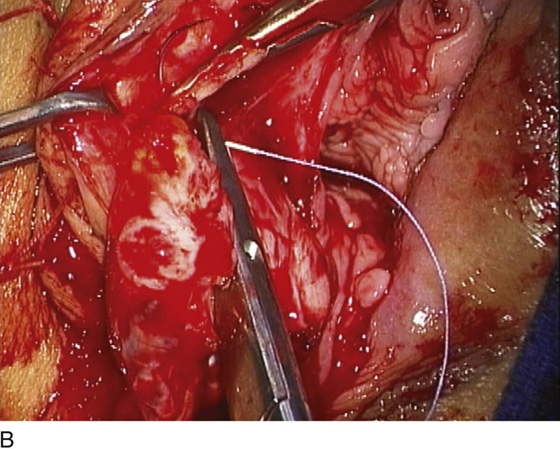
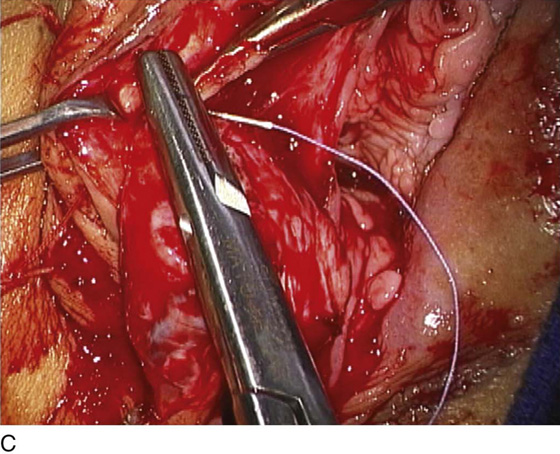
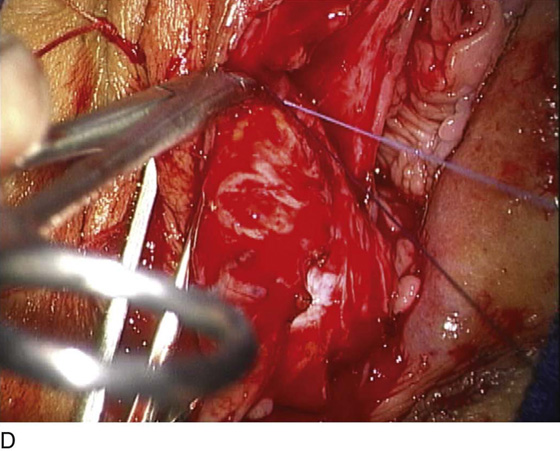
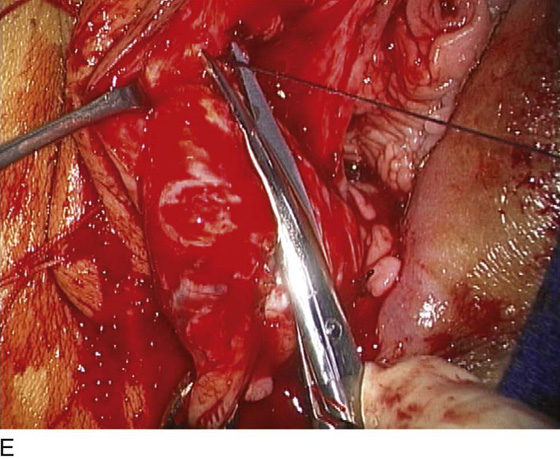
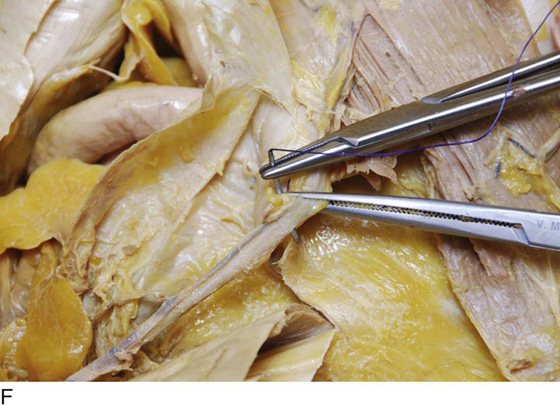
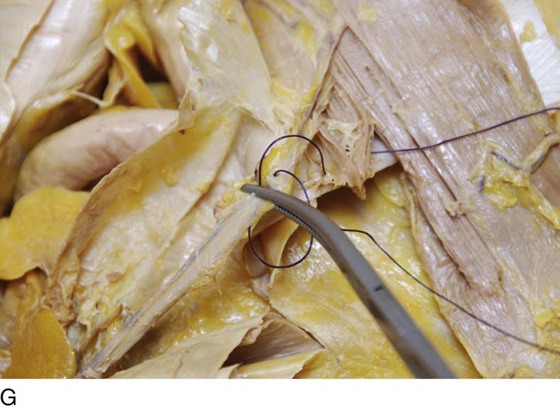
FIGURE 4–15 A. The technique of suture ligation is initiated by passing the needle beneath the tip of the hemostatic clamp. B. The needle exits the tissue held in the tip of the hemostat. C. The needle holder grasps the needle and pulls the stitch through the tissue. D. The hemostat is turned or tipped, and the stitch is tied behind the clamp. E. The stitch is snugged down, and the clamp is removed. The stitch is triply tied and is cut just above the knot. F. The transfixing suture is placed first through the tissue at the toe of the clamp. G. Then it is carried through the tissue held in the heel of the clamp.

FIGURE 4–16 The figure-of-8 stitch is a hemostatic measure designed to seal off bleeding vessels.
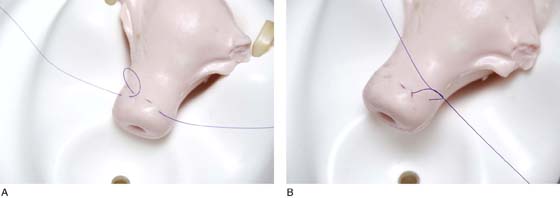
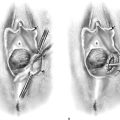
FIGURE 4–17 A. The purse string suture is illustrated on this uterine model. B. The circumference of the cervix will be included in this running stitch.
FIGURES 4–18 The vaginal cuff may be left open or closed at the end of a hysterectomy operation. This drawing illustrates the baseball or reefing technique for securing hemostasis when the cuff remains opened. Above, a running lock stitch is shown; below, a simple continuous stitch.
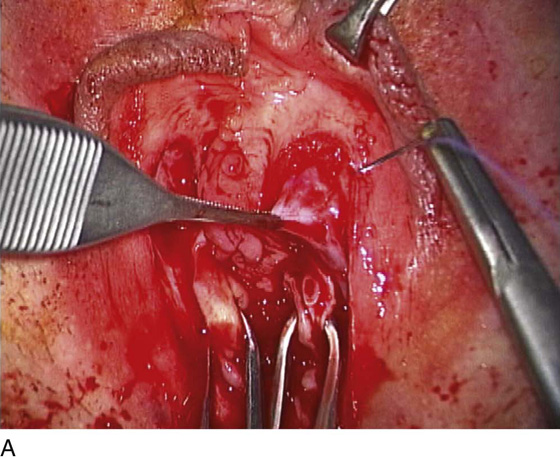
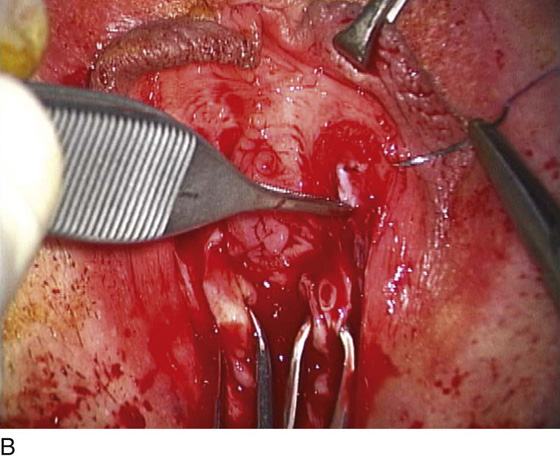
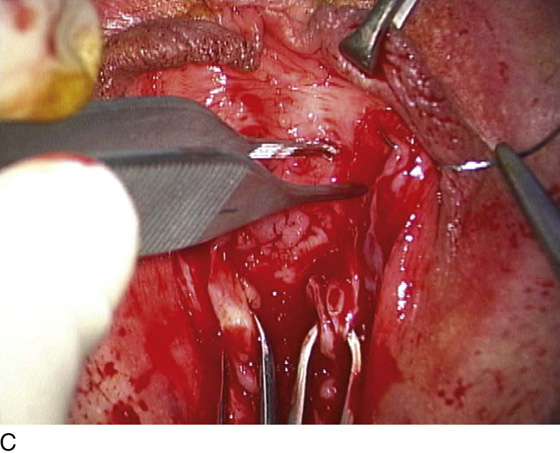

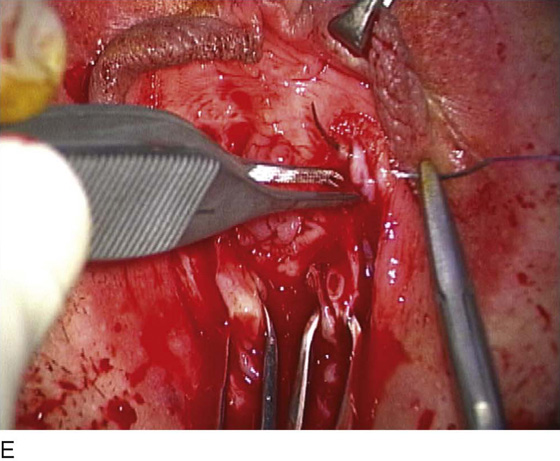
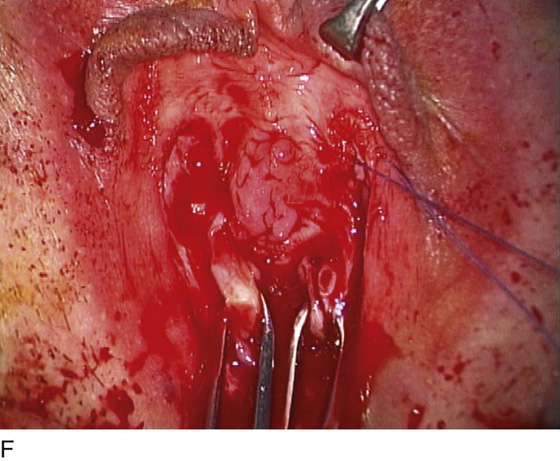
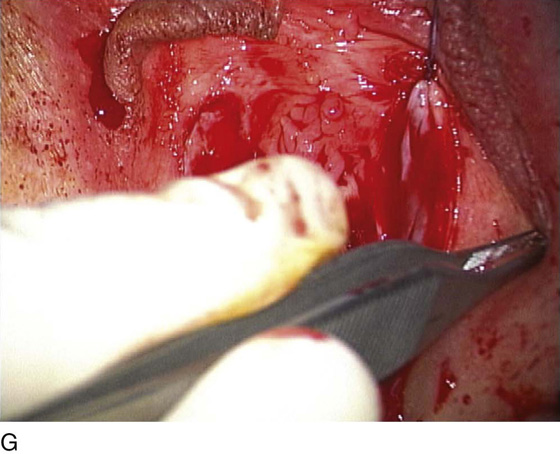
FIGURE 4–19 A. The pleating stitch begins with a needle bite at one edge of the fascia (Colles’). B. The fascia is gathered in the next needle bite. C. A third needle bite gathers more fascia. D. A fourth bite is taken. E. Finally, a fifth bite is taken at the far edge of the incision. F. The two ends of the stitch are tightened and crossed. G. The suture is tied, with the edges of the fascia brought together and the small, oozing blood vessels sealed.
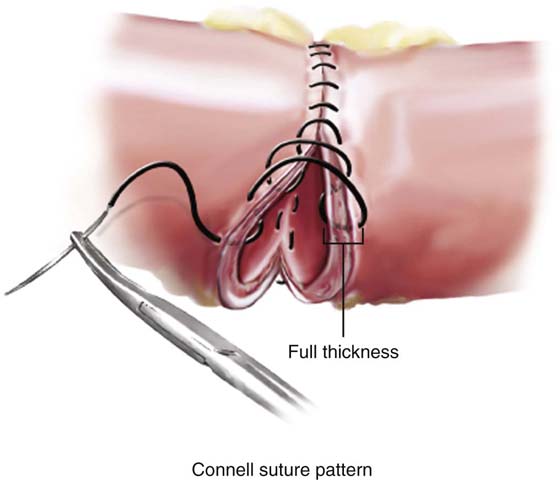
FIGURE 4–20 The Connell stitch enters from the serosal side, penetrates the full thickness of the intestinal wall, and exits through the mucosa. The stitch is carried back when a second needle stick is made in the opposite direction (i.e., through mucosa and bowel wall and through the serosa) then is carried to the opposite side, where the sequence is repeated.
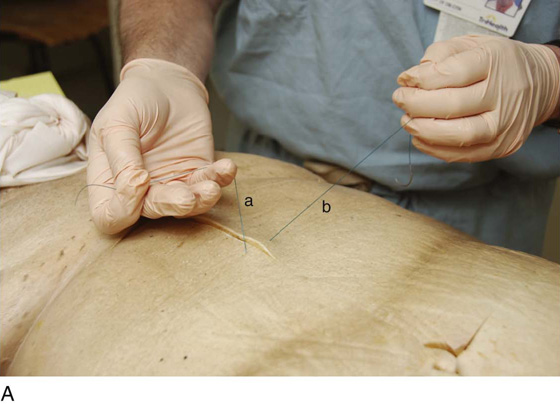
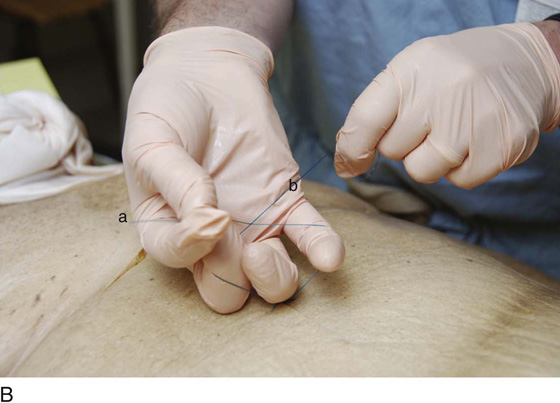
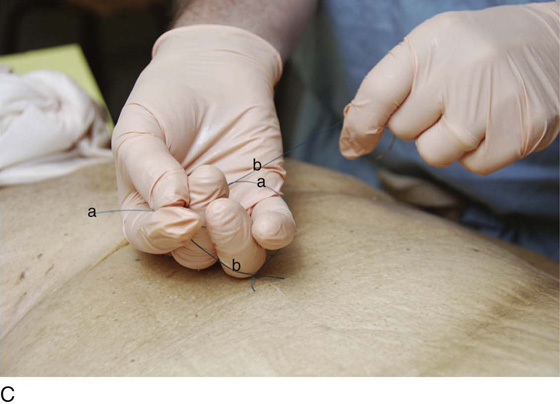
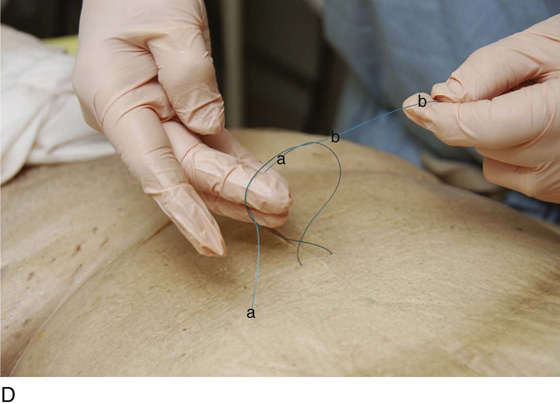
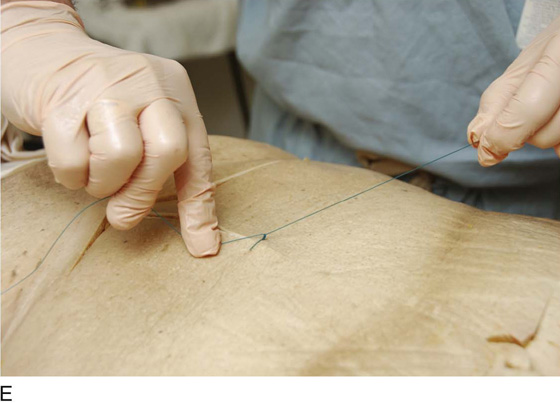
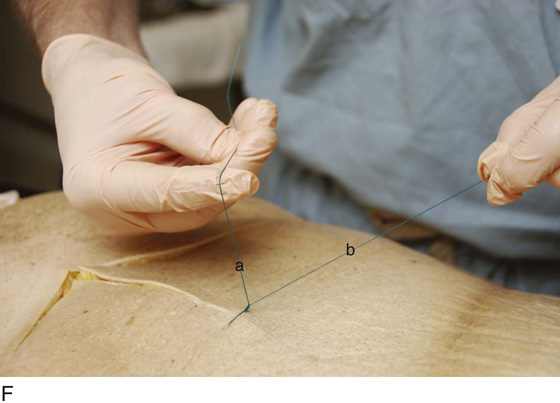
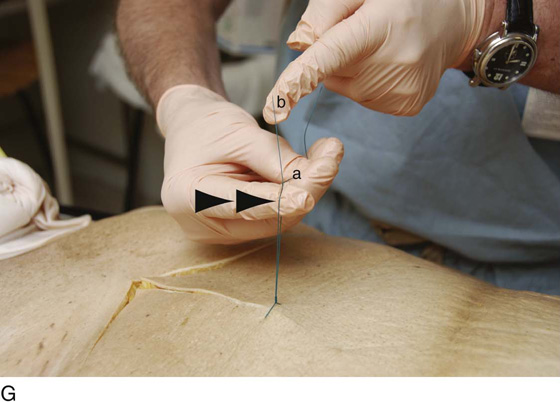
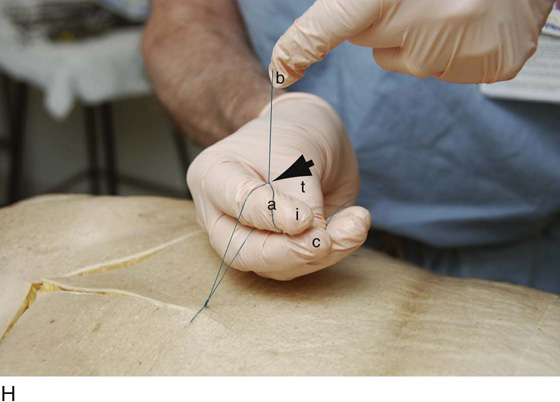
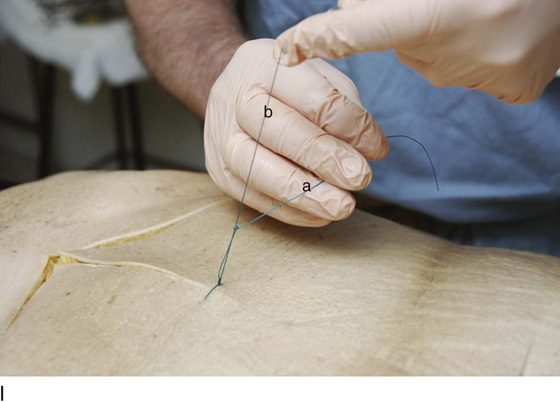
FIGURE 4–21 A. The single-hand tie is demonstrated. The first step is initiated by the surgeon laying the “a” limb of the suture across the palmar surface of the fingers of the dominant hand (in this case, right). The “a” suture is secured between the right thumb and index finger. The “b” portion of the suture is held under tension with the left hand. B. This magnified view of the “a” and “b” limbs of the suture illustrates the placement of fingers at the beginning of the tie. Note the “a” limb running across the palmar portion of the little finger, ring finger, and center finger and fixed by apposition of the index finger. The “b” limb crosses “a” in front of “a,” behind the index, and in front of the center finger (between the index and center fingers). This begins the formation of a loop. C. At this point, the “b” limb role is entirely passive. The center and ring fingers flex back toward the palm, catching the “a” limb between these two fingers. D. While clasping the “a” limb suture tightly (between center and ring fingers), the loop is completed by drawing the fingers holding “a” backward, thereby withdrawing them from the loop while simultaneously completing the loop. E. The two ends of the stitch are pulled in opposite directions, snagging down the first loop (throw). F. The second portion (throw) of the one-hand tie is initiated by the right thumb and center finger opposing to secure suture “a,” as the suture crosses the index finger between the crease of the distal joint and the end of the finger. Suture limb “b” is held taut and passively by the left hand. G. By utilizing the dorsal surface of the index finger to push upward on limb “a” to create tension, the next loop is created by moving limb “a” so as to cross over “b” at a 90° angle, with the index finger directed through the center of the incipient loop (arrows). H. The index finger (i) is flexed in a fashion analogous to pulling the trigger of a gun. It crosses under limb “b,” while catching limb “a” between the point where “a” is held by the thumb (t) and the center finger (c), and the point where “a” and “b” cross each other (arrow). At this point, the index finger is flicked (straightened out from its previously flexed position), carrying with it the “a” suture limb and completing the second loop of the single-hand tie. I. The “a” and “b” limbs are pulled in opposite directions to cinch down the tie and complete the second portion of the single-hand tie.
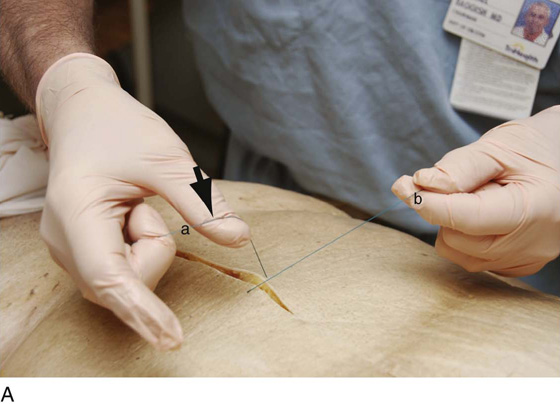
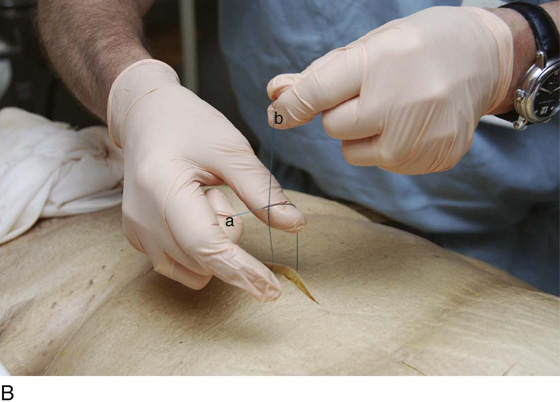
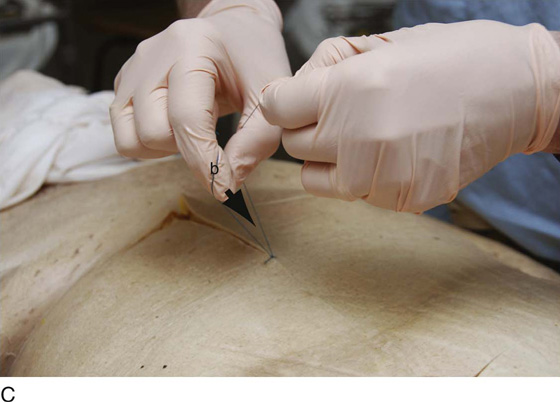
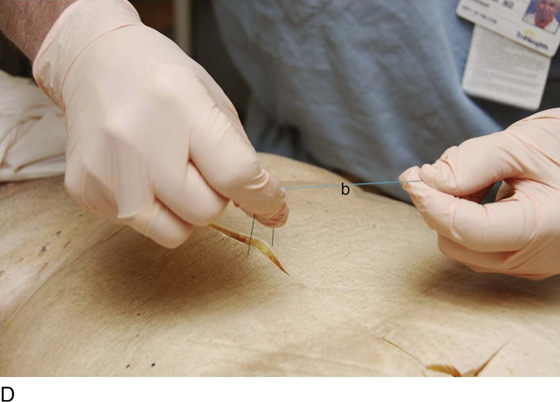
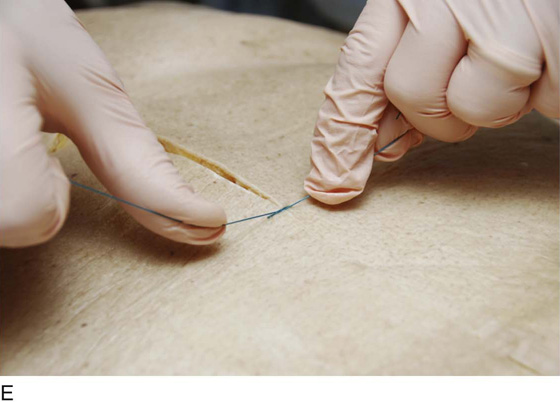
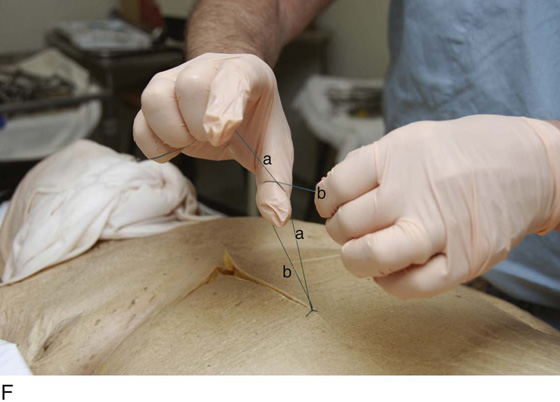
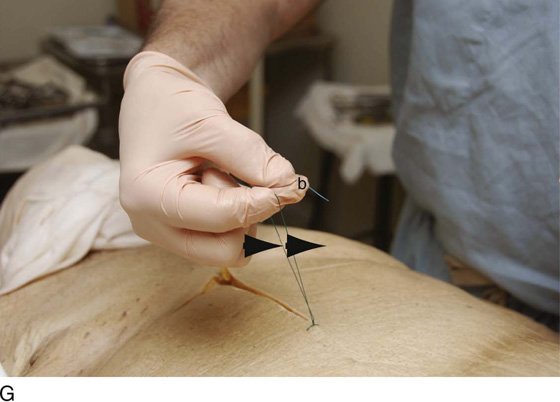
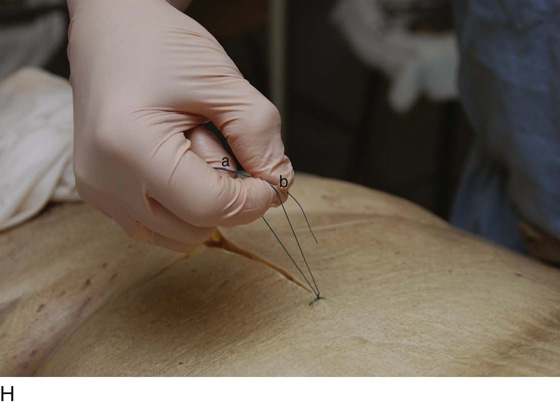
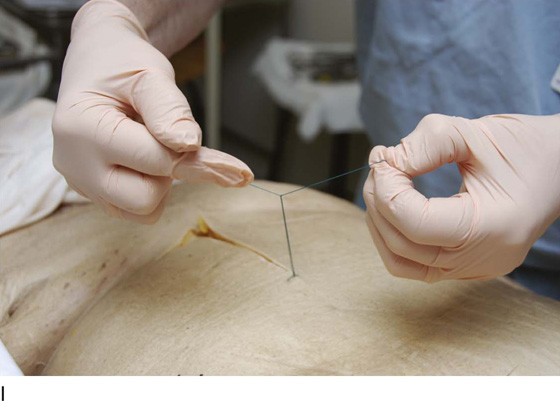
FIGURE 4–22 A. The two-handed tie begins with a tension grab of the suture limb “a,” using the center ring and baby fingers, and allowing the thumb and index finger of the dominant hand free for manipulation. The “a” limb of the suture is placed across the dorsal dip of the thumb in a diagonal direction (arrow). B. Suture limb “b” is carried over the thumb so as to cross the thumb over limb “a” to initiate the loop. C. The index finger is moved into the loop pinching the thumb, thereby creating one side of the loop, with the right index finger holding loop “b” (between index and center fingers). The index finger points down through the loop (arrow). D. As the thumb is pulled from the loop, the index finger drops into the center of the loop. The thumb pushes limb “b” upward to the index finger, completing the loop. The left (nondominant) hand pulls limb “b” to close the loop. E. The squared loop is snugged down with the use of left or right index fingers. F. The second part begins when the “a” limb is grasped in the right hand, allowing the thumb and index finger to be free to move. The “b” limb is carried over the palmar (ventral) surface of the right thumb, and the thumb is flexed over “b,” while the right hand holding “a” is rotated medially. This brings “a” across the thumb and carries “a” limb across “b” to form a loop. G. Suture limb “b,” which has been looped over “a,” is now brought forward by the left hand so as to cross the ventral aspect of the thumb. Limb “b” is held in a pincer action between the right thumb and index finger. The right index finger actually pushes through the newly formed loop (arrows). H. View of Fig. 4-22G from the back. I. The limbs of the suture are now tightened down.
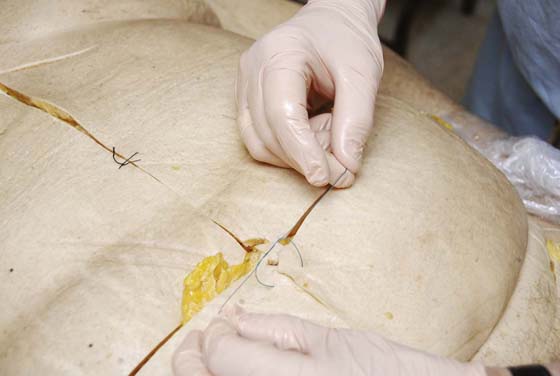
FIGURE 4–23 A triple loop can be created to prevent slipping of the first tie-down. The technique is an alternative to a tension tie. This is called a “surgeon’s knot.”
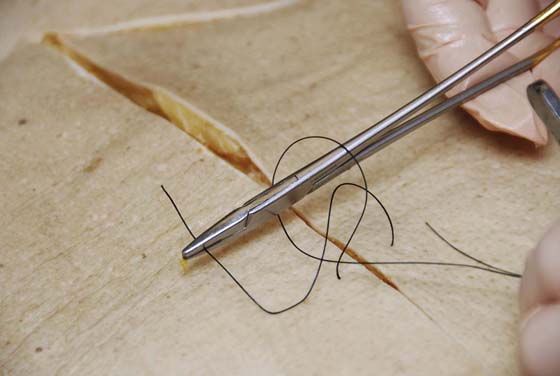
FIGURE 4–24 An instrument tie is performed by circling the tip of the needle holder with the suture material, then grasping the short end of the stitch. This technique is well suited for fine sutures (e.g., 5-0, 6-0). The maneuver is repeated in the opposite direction to create a square knot.
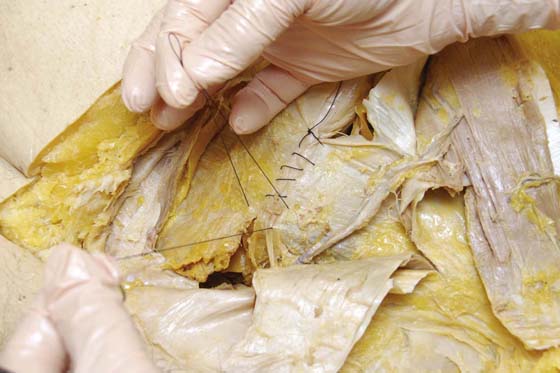
FIGURE 4–25 A running (continuous) stitch is completed by securing the final loop, the needle end of the stitch.