[level-membership-for-emergency-medicine-category]59
Survival
Cold Weather Survival
1. How quickly is the shelter needed? (Or, how much time do you have to build the shelter?)
2. Is there a sick or injured person that needs shelter?
3. How many people will be in the shelter at one time? (How big does the shelter need to be?)
4. What is the length of time you anticipate using the shelter? (One should always overestimate.)
1. Is the shelter needed solely for warmth or also for protection from wind and snow?
2. Where should the shelter be built?
3. What are the avalanche or rock-fall risks in the area?
4. Avoid exposed windy ridges.
5. Avoid any areas at risk for flooding (drainages, dry riverbeds).
6. Avoid low-lying areas, such as basins that tend to collect the colder night air.
7. A timbered area provides protection from foul weather, but can also block the sun.
8. Select a shelter site where there is access to water.
9. In windy conditions, a shelter should be built with the entrance at 90 degrees to the prevailing winds.
10. Shelters can be built in small caves or indentations in a rock outcropping, in a “tree well,” or under downed trees.
11. Environmental resources that can be used for building and insulating a shelter include small trees, branches, thick grass, or leaf piles.
12. Snow is a good insulator because it traps the warmed air generated by body heat; however, direct contact with snow must be avoided.
13. An insulation barrier between the snow and an individual can be created by using equipment, such as a closed cell foam pad or backpack, or it can be created by piling up small tree branches and boughs.
14. The insulation layer if using tree boughs should be 25.4 to 30.5 cm (10 to 12 inches) thick to allow for compression when sitting or lying on this layer.
Types of Shelters
Tarpaulins
1. Cut open a 3- to 4-mil (1 mil = 0.0254 mm [0.001 inch]) large, heavy-duty plastic bag to form a tarp.
2. Fifty feet of cordage is also needed.
3. A tarp can be rigged into either a lean-to or an A-frame shelter. In cold weather, an A-frame provides the best method for retaining heated air.
4. Tie cordage between two trees situated approximately 3 m (10 feet) apart. The tree at the entrance end should be a large tree if a fire is going to be made (see later). If there is a slight slope to the terrain, the head end of the shelter should be uphill.
5. Tie the foot end of the cord 45.2 to 61 cm (18 to 24 inches) above the ground.
6. Tie the head end of the cord 1.1 to 1.2 m (3.5 to 4 feet) above the ground.
7. Fold the tarp in half over the cord, and secure both ends to the cord.
8. Ideally, place the foot end next to a large tree, which offers a natural closure for that end of the shelter.
9. Secure the edges of the sides of the tarp to the ground by tying them to rocks or other trees.
10. To prevent heat from escaping along the edges of the A-frame, the sides should have an overlapping flap on the ground that can be secured with dirt, snow, or rocks.
11. Close the foot end to prevent heat escape.
12. Leave the front end, or entrance, open if a fire is going to be built.
13. If there will be no fire, the entrance can be at least partially closed off by stacking a backpack or tree branches in the opening.
14. Insulate the sides of the constructed shelter by thatching brush, branches, or broad leaves (e.g., the first layer is placed at ground level, with each successive layer overlapping the one below it).
Plastic Bag Shelters (Fig. 59-1)
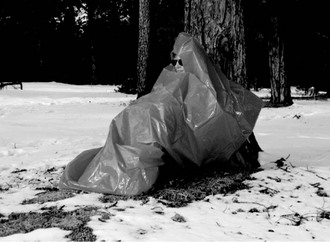
FIGURE 59-1 Example of two large plastic bags used to form a one-person survival shelter. (Courtesy Peter Kummerfeldt.)
1. Large, heavy-grade (3 to 4 mil) orange plastic 208.2-L (55-gallon) drum liners make good short-term emergency shelters.
2. Alternatively, heavy-duty trash bags can be used (although orange drum liners have the advantage of increased durability and visibility for rescue purposes).
3. Cut an opening in the bottom end of the bag that is just large enough for your head, and then pass the bag over your head so that your face is at the opening.
4. When creating the hole, cut the plastic at 90 degrees to the fold to reduce the likelihood of the bag tearing along the seam.
5. A second bag, pulled over the legs, used in conjunction with the system described above, will form a one-person survival shelter.
Space Blankets and Bags
1. Space blankets and bags are lightweight, inexpensive, and compact, but are of limited value in an emergency.
2. A space blanket is frequently difficult to get out of its package, unfold, and manage in windy conditions.
3. Depending on the brand, space blankets are usually too small to fully encase an adult.
4. When wrapped up, the survivor will find that a space blanket makes a shelter that is so noisy that even an approaching aircraft or ground search party may not be heard.
5. Space blankets tear easily when they are nicked or punctured.
6. The space bag has the same flaws as does the space blanket, except that it is easier to encase an individual and for that person to stay encased.
Tube Tents (Fig. 59-2)
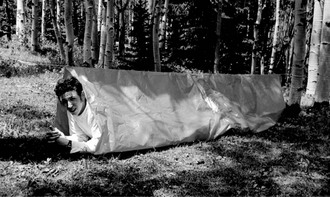
1. Tube tents are inexpensive polypropylene sleeves that are 2.4 m (8 feet) long and provide a tubular shelter that is 0.9 to 1.5 m (3 to 5 feet) high, depending on the brand.
2. A tube tent can be pulled over the body to provide a quick shelter or pitched as a “pup tent.” To do this, find two anchors (e.g., rocks, trees) that are the proper distance apart, tie a line to one of them, spread the tent out along the length of the line, run the line through it, and then tie off the other end of the line. The height of the line should be such that the tent can be spread out to accommodate the occupant.
3. To avoid ripping, the tent plastic should be 3 to 4 mil thick.
4. Tube tents can be improvised from two plastic 208.2-L (55-gallon) drum liners, which are 3 to 4 mil thick, or from large, heavy-grade household trash bags by opening up the closed end of one bag, sliding it into the open end of the second bag, and then duct taping the bags together.
Tents and Bivouac Sacks
1. Tents are generally comfortable and dry, but in very cold weather they are not as warm as snow shelters.
2. Tents are preferable to snow shelters at mild temperatures, during damp snow conditions at temperatures above freezing, or when the snow cover is minimal.
3. Bivouac sacks are carried by climbers on long alpine-style climbs or for emergencies. They are usually made of Gore-Tex or waterproof fabric and hold one or two persons. They pack small, are lightweight, and can easily be carried for an emergency shelter on any trip into the backcountry.
4. Many modern packs have extensions, so when used with a cagoule or mountain parka, form acceptable bivouac sacs. The cagoule is donned, and the backpack is pulled on the feet and legs, extending the top of the pack as high up the body as it can be placed.
Natural Shelters
1. Caves and alcoves under overhangs are good shelters and can be improved by building barrier walls with rocks, snow blocks, or brush to protect from wind.
2. In deep snow, large fallen logs and bent-over evergreens frequently have hollows underneath them that can be used as small snow caves.
3. Cone-shaped depressions around the trunks of evergreens (tree wells) can be improved by digging them out and roofing them over with evergreen branches or a tarp (Fig. 59-3).
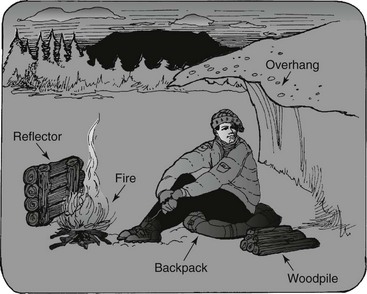
FIGURE 59-3 Natural shelter.
Snow Shelters
Snow Trenches (Figs. 59-4 and 59-5)
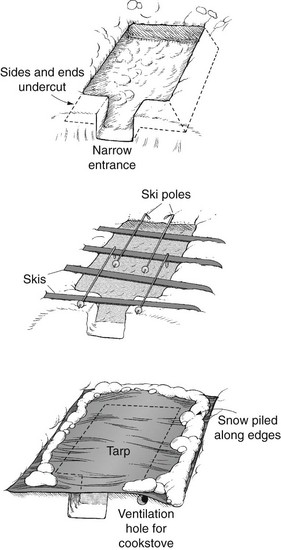
FIGURE 59-4 Three-person snow trench.
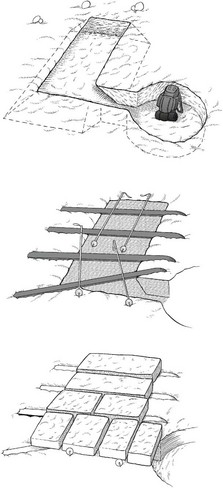
FIGURE 59-5 Above-timberline snow trench.
1. A snow trench is the easiest and quickest survival snow shelter and the one least likely to make the diggers wet.
2. If a shovel, large tarp, structural support items (skis, poles, trees), and a small fire, candle, or stove are available, a trench can be created that is as comfortable as a snow cave.
3. It is easiest to dig a trench in a flat area. However, if the snow is deep enough, it can be dug out on an incline, keeping the trench itself level.
4. If possible, dig all the way to the ground. If the snow is too deep to dig to the ground, dig to a depth of 0.9 m (3 feet). If the snow is not deep enough, pile snow up around all four sides of the trench to make walls, until the total depth of the trench is 0.9 m (3 feet).
5. The trench width should be just slightly wider and 0.6 to 0.9 m (2 to 3 feet) longer than the person(s) that will be lying in the shelter. The additional length allows for a fire pit at one end of the shelter.
6. Ski poles, skis, or long tree branches are placed perpendicular to the length of the trench.
7. The trench is then covered with a tarp, leaving one end open for the entrance.
8. Secure the tarp on all sides by packing the edges into the snow.
9. Gently toss snow on top of the reinforced tarp to provide insulation to the shelter.
10. The snow pack on top should be 20.3 cm (8 inches) or more.
11. The object is to keep the maximal amount of snow around and over the trench for optimal insulation.
12. If the trench is going to be wide enough to accommodate more than one person, the entrance should still be only wide enough for one person to pass through at a time. A narrow entrance is easier to close off and helps contain heat within the shelter.
13. A barrier can be created at the entrance by stacking backpacks or snow blocks, or hanging a tarp across the opening.
14. When the entrance is closed, a small votive-size candle or stove and the occupants’ body heat will raise the interior temperature to -4° to -1° C (24.8° to 30.2° F).
15. Higher temperatures should be avoided so that clothing and bedding will not become wet from melting snow.
16. Ventilation is necessary to prevent build-up of carbon monoxide within the shelter.
17. Anywhere that deep snow has been wind packed, as happens above timberline, the trench can be roofed with snow blocks.
18. The blocks are cut to a width of 45.2 to 50.8 cm (18 to 20 inches), a depth of 10.2 cm (4 inches), and a length equal to the length of the snow saw.
19. They are then laid horizontally for a narrow trench or vertically for a wider trench, set as an A-frame, or laid on skis (see Fig. 59-5).
Snow Caves (Fig. 59-6)
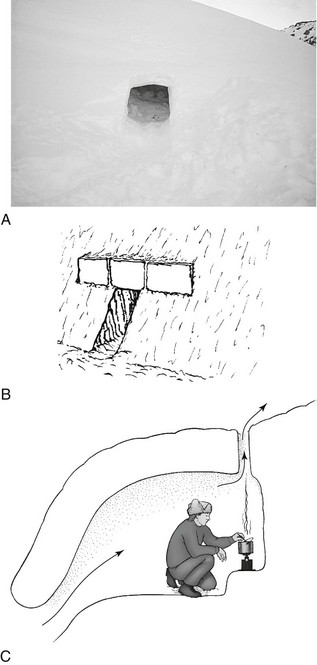
FIGURE 59-6 A, Snow cave entrance. B, Snow cave partly closed with snow blocks. C, Interior of snow cave.
1. A shovel is the best item to use when digging a snow cave, although small snow caves large enough for one person can be dug with a ski or cooking pot.
2. The optimum site is a large snowdrift, often found on the lee side of a small hill.
3. Areas in avalanche zones must be avoided.
4. Ski poles, skis, or tree branches are poked in the snowdrift to a depth of 45.2 cm (18 inches) around the area that will be the outside walls of the cave.
5. The entrance is dug just large enough to crawl through and is angled upward toward the sleeping chamber (see Fig. 59-6).
6. After the entrance is dug with the shovel, the digger crawls inside, lies supine, and uses the shovel to excavate the chamber, which should be large enough for a stove and the number of occupants requiring shelter.
7. The snow is removed from the walls inside the shelter until the ends of the ski poles, skis, or tree branches are met. This ensures that the snow cave walls maintain a depth of 45.2 cm (18 inches), necessary to prevent collapse of the walls.
8. Because diggers tend to become wet, water-resistant or waterproof jackets and pants should be worn.
9. Pine branches or other natural materials can be used to cover the floor if a sleeping pad is not available.
10. The entrance to the snow cave can be blocked off using backpacks or blocks of snow.
11. If the group is large and there are several people available to dig out the cave, a larger entrance can be created, providing room for multiple diggers to excavate the interior.
12. The disadvantage is the larger opening that needs to be closed to maintain warmth inside the snow cave.
13. The cooking area for the snow cave can be in the entrance area outside the cave itself.
14. If cooking is going to be done inside the cave, a ventilation hole as large as a ski pole basket must be cut in the roof over the cooking area to provide adequate ventilation.
15. A snow cave large enough for two persons takes several hours to dig and therefore is not the primary choice of shelter in an emergency.
16. It can be built after a faster-improvised shelter is provided for the safety and well-being of the group.
Quinzhee (Snow Dome)
1. The snow is piled into a large dome 1.8 to 2.1 m (6 to 7 feet) in height and width and left to harden for a few hours. The waiting time allows the snow crystals to adequately consolidate so that the dome will not collapse when it is excavated.
2. After the settling time, the dome is dug out in the same method as described earlier for the snow cave.
3. Sticks can be used as spacers; walls should be 25.4 to 30.5 cm (10 to 12 inches) thick.
4. A low entrance is dug on one side, and from there the interior is carved out to make a dome-shaped room that is large enough to sleep three or four people.
5. The sleeping platform should be higher than the entrance.
6. Another method is to make a “form” (i.e., a pile of vegetation or equipment), cover this form with snow, allow the snow to set, and then open one end and remove the form.
Igloos (Fig. 59-7)
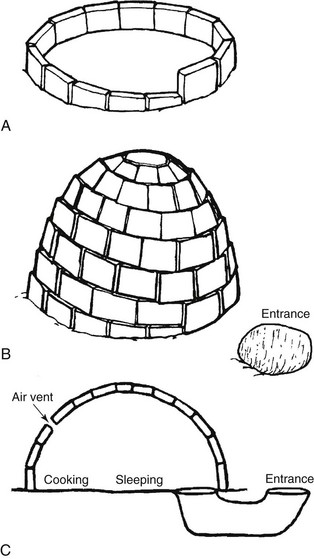
FIGURE 59-7 A to C, Stages of igloo construction.
1. An igloo requires one, or ideally two, snow saws and snow that is well packed and easy to cut into multiple uniform blocks.
2. This type of packed snow is found in wind-blown, treeless areas
3. Packed, consolidated snow can be created by stamping a large area of snow and letting it settle and harden for several hours
4. To mark the diameter of the igloo, a ski pole is held by the handle and the body turned so that the pole basket makes a large circle. This will outline the base of an igloo suitable for three people. The first snow blocks are cut from inside the circle. This will lower the floor so that fewer blocks are required for the dome.
5. At least two persons are needed for this project: one to cut and carry the blocks and the other inside the igloo to lay the blocks.
6. The blocks should be about 45.2 cm (18 inches) wide, 76.2 cm (30 inches) long, and 20.3 cm (8 inches) thick.
7. They are laid in a circle leaning in 20 to 30 degrees toward the center of the igloo, with the sides trimmed for a snug fit.
8. The tops of the first few blocks in the first circle are beveled so that a continuous line of blocks is placed down, with the first few blocks of each succeeding circle cocked upward (see Fig. 59-7, A).
9. A common error is to not lean the blocks inward enough, resulting in an open tower instead of a dome.
10. Gaps between the blocks are caulked with snow.
11. The dome should be 1.5 to 1.8 m (5 to 6 feet) high inside and can be closed with a single capstone of snow.
12. The entrance is dug as a tunnel underneath rather than through the edge of the igloo, preventing warm air from escaping (see Fig. 59-7, B and C).
Fire
Mandatory equipment for starting a fire includes the following:
Three other helpful items for fire preparation are as follows:
1. Solid-shank, nonfolding knife with a 10.2- to 15.2-cm (4- to 6-inch) blade
2. Waterproof/windproof matches. Windproof matches have longer and fatter heads than do normal matches; as much as one-half of the matchstick is covered with pyrophoric material. These matches can be difficult to light under benign conditions and almost impossible in adverse weather. Some brands are better than others. Experiment before your trips (Fig. 59-8) (Note: All of the matches that are currently available were tested under field conditions, and REI Stormproof Matches proved to be the most reliable for starting fires under adverse weather conditions, and are particularly effective in windy and wet conditions.)
FIGURE 59-8 REI Stormproof Matches.
3. Match containers. The ability to light a match is tied directly to the condition of the matchbox, most of which are made from cardboard or thin wood, with striking pads along each side. Neither of these materials is particularly durable, and both tend to disintegrate quickly when wet. For this reason, matches should be protected in a container that is waterproof, easy to open with one hand, and easy to find if dropped. Do not take it for granted that a match case is as waterproof as claimed; be sure to test it. These also make perfect containers for storing fire starter (i.e., petroleum jelly–saturated cotton balls) (Fig. 59-9).
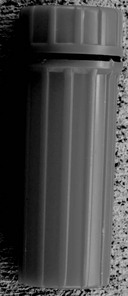
FIGURE 59-9 Orange military-style match case.
A heat source can be thought of as a spark to start the fire.
1. Matches or lighters are the easiest way to create the spark.
2. However, in adverse conditions in wilderness environments, matches and lighters do not always work and are not reliable 100% of the time.
3. The heat source that is always reliable is a metal match. Like a regular match, it needs to strike against something. A knife blade, when scraped briskly against a metal match, readily produces a shower of very hot sparks that can be used to ignite tinder.
4. Other strikers similar in appearance to a 5.1-cm (2-inch) piece of hacksaw blade are often packaged with a metal match.
5. A metal match and striker are the perfect fire-starting tools for a survival scenario, because they will work in any weather condition, at any altitude, and last for 10,000 or more strikes (Fig. 59-10).
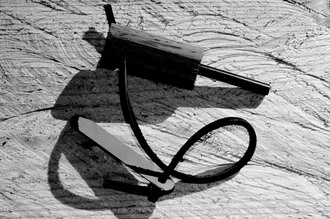
FIGURE 59-10 Metal match with a hacksaw blade scraper.
6. Metal matches are a composite of several different types of metals heated and molded into a round or rectangular bar.
7. This molded metal is usually joined to a piece of wood or a magnesium bar, which then acts as a handle for the match.
1. Natural tinder includes dry grass and leaves, dry pine needles, inner bark of birch trees, shavings from dry sticks, and pitch wood (or “fat wood”).
2. Natural materials are not always readily available when a fire is necessary.
3. Tinder should be carried in a survival kit.
4. The most practical tinder for this purpose is a cotton ball generously saturated with petroleum jelly (Vaseline) that is prepared and placed in a container before leaving home (Fig. 59-11).
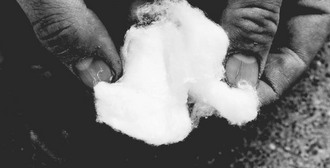
FIGURE 59-11 Smearing petroleum jelly into a cotton ball disk.
5. Small screw-top containers the size of a film canister can hold 8 to 12 cotton balls, depending on the size of the cotton ball. Commercial match containers also work well for this purpose.
Kindling and fuel are necessary to maintain the fire.
1. Kindling is small to medium pieces of wood, usually sections of small dead branches or larger branches that have been split lengthwise with a knife or ax.
2. In a wet environment, standing dead wood is preferable to wood lying on the ground, and wood that has lost its bark to wood with bark, because both will be drier and less rotten than the alternatives.
1. Several times more fuel than the predicted need should be collected.
2. Long, dead sections of trees can be shortened by first laying them across a fire. When they burn through, two shorter sections result.
3. Fires generally should be kept small to conserve wood, to allow them to be approached more closely, and to be able to easily extinguish the flames should the wind pick up and threaten the safety of having a fire.
4. Firewood for the kindling and fuel must be gathered and prepared before lighting the fire.
5. It is helpful to stack the wood by the designated fire site, arranging it into piles according to size, beginning with pine needle kindling, progressing to pencil size, then thumb size, and then up to wrist and arm size.
6. Wood that is too big will not burn as efficiently unless the fire is very hot.
7. Some logs can be split with a knife or ax.
8. If a knife is used, the knife blade is placed on the end of a piece of wood. Another log or rock is used to hammer the knife until a piece of the log splits off.
9. The fuel supply should be protected from rain and snow.
10. The fire needs a platform and a brace to protect it from the natural earth contact surface (snow or grasses).
11. The platform can be as simple as several logs of similar diameter laid side by side.
12. The brace is laid perpendicular to the platform logs.
13. Wind direction needs to be considered when placing the brace.
14. The brace should be placed parallel to the direction of the wind.
15. The fire can also be built behind a rock or log.
16. In a snow environment, if possible, dig to the ground to build the fire.
17. If the snow is too deep and it is not possible to dig to the ground, build the fire on the platform on the snow.
Fire Starting
1. A fire should be built in such a way that heat reflects onto the occupant, regardless of the type of shelter. If the shelter is a natural cave or underneath a rock overhang, the fire should be 1.5 to 1.8 m (5 to 6 feet) from the back of the shelter. A reflector wall of logs or stones on the opposite side of the fire should be constructed. The occupant should sit between the fire and the back of the shelter (see Fig. 59-3).
2. For an A-frame type of shelter, the fire is built in the 0.9- to 1.2-m (3- to 4-foot) space between the entrance and the large tree. If reflective material is available, it is secured to the tree. This fire is a small fire and needs to be monitored at all times.
3. Fires can be built in tree wells but should not be positioned under snow-laden branches. Fires can be built on a platform at the entrance of a trench. The entrance area needs to be large enough to allow ingress and egress from the trench without risk for coming in contact with the fire.
4. All fires should be observed and carefully controlled. It is imperative that water, sand, dirt, or snow be readily available should the fire need to be immediately extinguished.
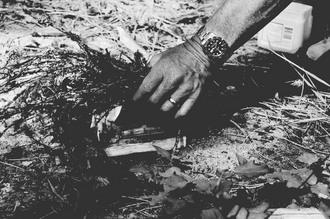
Additional Concepts and Fire-Building Tips
1. Gather far more fuel than you expect to need, and then go out and gather more; one can never have too much.
2. Having accumulated a substantial pile of fuel, separate the wood into three piles by size. The first pile should be matchstick size or thinner; the second pile should be sticks up to the thickness of a thumb; and the third pile is the remainder.
3. When collecting fuel, gather it in long lengths. It is easier to carry or drag into the campsite, and the fire will burn the long lengths into shorter pieces, thereby saving the effort of needing to use a saw.
4. It saves energy if one can break the wood into pieces rather than having to saw it into pieces.
5. When the ground is wet, it is advisable to assemble a platform of sticks to protect the tinder.
6. If tinder is placed directly on wet ground, it tends to absorb moisture from soil that may make it more difficult to light. There is no practical way for a survivor to build a fire on top of snow. Try to locate an area where the snow is shallow enough to scrape it away down to ground level.
7. Wind has a dramatic effect on fire-building efforts. To provide the best chance of having tinder ignite and continue to burn, place a log that is about 25.4 to 30.5 cm (10 to 12 inches) long and 10.2 cm (4 inches) in diameter along the windward side of the platform. Place the tinder in the lee of the log, where it is protected from the wind.
8. When trying to build a fire in rainy conditions or when snow is falling, find a sheltered area that is protected from precipitation, or erect a temporary roof over the fire site to shelter the tinder until the larger fuel is burning.
9. Before lighting the tinder, everything must be ready. A very common mistake made by those who are inexperienced is igniting tinder and then having to scramble to find kindling to add to the rapidly burning tinder before it burns out.
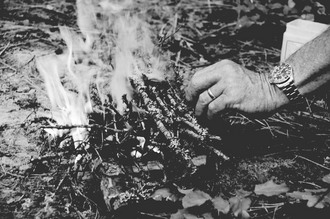
10. With everything ready to build out the fire, place the tinder on the platform in the lee of the windbreak, and ignite it (Fig. 59-12).
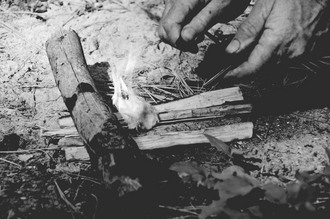
11. As soon as the tinder is burning, place a handful of the smallest fuel directly over the flames, with one end of the twig bundle resting on the log brace (Fig. 59-13); this will work well only if you have resisted the urge to break the twigs into overly short pieces.
12. The fuel should be broken into lengths that are 25.4 to 30.5 cm (10 to 12 inches) long. Resting one end of the twigs on the brace ensures that good airflow is maintained and that the tinder is not smothered when additional fuel is added.
13. If it appears that more oxygen is needed, lift up one end of the brace to allow more oxygen to flow to the core of the fire.
14. As the twigs begin to burn and flames appear through the first layer of fuel, lay a second handful of twigs at a 90-degree angle over the first layer (Fig. 59-14).
15. As the flames appear above this layer, place another handful of slightly larger twigs on the fire, again at a 90-degree angle to the previous layer. (Fig. 59-15). This process continues until the larger fuel has been added and until the fire will sustain itself without the immediate attention of the person building it.
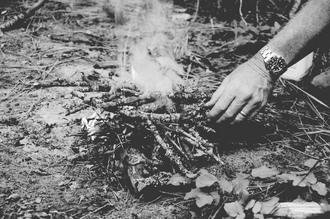
FIGURE 59-15 Adding another layer to a fire.
16. Your fire-building success with the use of this method is contingent on the use of tinder that produces a lot of heat, that is well ventilated, and that graduates step by step from the smallest twigs to the largest sizes of fuel (Fig. 59-16).
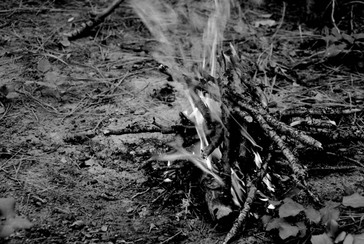
FIGURE 59-16 Self-sustaining fire.
Water
1. A human can survive 3 to 5 days without water. Because about 800 mL (27.1 oz) of water per day are contained in food and 300 mL (10.1 oz) produced by metabolism, a minimum daily intake of 1200 mL (40.6 oz) is necessary in a temperate climate at sea level to avoid dehydration.
2. In a hot, dry climate, at high altitude, or with exertion, insensible losses and sweating increase considerably, so fluid intake should be increased proportionally.
3. Electrolyte drinks and salt tablets are generally unnecessary in cold weather because the electrolytes lost in sweat are easily replaced by a normal diet.
4. Whenever open water is encountered, individuals should drink their fill of disinfected water and then top off all water bottles.
5. Almost all surface water should be considered contaminated by animal or human wastes, with the possible exception of small streams descending from untracked snowfields; springs erupting from underground; or high, uninhabited areas.
6. If survival forces you to drink from a stagnant or muddy pool, remember that it is always better to drink dirty water than to die of dehydration.
7. Let water filled with particulates settle, and then strain it through a cloth.
8. Water can be disinfected by heat, filtration, or addition of chemicals (see Chapter 45). At altitudes below 5486 m (18,000 feet), simply bringing water to a boil will kill Giardia cysts and most harmful bacteria and viruses.
9. Rainwater can be collected by spreading out a survival tarp and channeling it into a container.
10. On a sunny day in a snow environment, snow can be spread on a dark plastic sheet to melt and then be channeled into a container.
11. On cloudy days, in subfreezing temperatures, and in locations above the snow line where liquid water is difficult to find, snow or ice must be melted to obtain water. This requires a metal pot (which should be included in every survival kit), fire-starting equipment, and wood for fuel.
12. If it is possible to melt the snow and heat the water, enough snow should be melted to provide water for rehydration and to fill a water bottle. The water bottle is placed in the bottom of the sleeping bag to keep it from freezing and is ready for drinking during the night or the next day.
13. Melting ice or hard snow is more efficient than melting light, powdery snow.
14. Melting enough snow to maintain hydration in harsh winter environments requires a significant amount of vigilance.
15. Enough snow should be melted to provide everyone with at least one or two one-liter water bottles for the day. Adding fruit flavors and making hot drinks improve the palatability of water.
Several general guidelines apply when water supplies are limited:
1. Overexertion is avoided, and energy expenditure is kept to a minimum.
2. Do not drink seawater, alcohol, or urine.
3. Thirst is not an adequate indicator of dehydration. Monitoring urine output determines whether intake is adequate; 1 to 1.5 L (33.8 to 50.7 oz) of light-colored urine should be excreted per day.
4. Food intake should be kept to a minimum (i.e., do not overeat).
5. You may eat snow or ice, but only if hypothermia is not a risk. There is significant heat loss when melting snow in one’s mouth.
Emergency Snow Travel
Travel in deep snow is almost impossible without skis or snowshoes.
1. Emergency snowshoes (Fig. 59-17, A) can be made from poles that are 1.8 m (6 feet) long, 1.9 to 2.5 cm (0.75 to 1 inch) thick at the base, and 0.64 cm (0.25 inch) thick at the tip, and sticks 1.9 cm (0.75 inch) thick and 25.4 cm (10 inches) long.
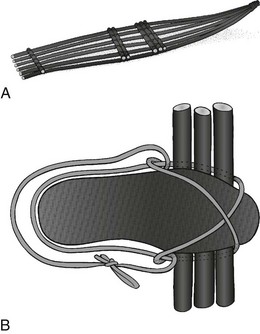
2. Snowshoes require 12 long poles and 12 short sticks. For each snowshoe, 6 long poles are placed side by side on the ground, and the middle point of the poles is marked.
3. One short stick is lashed crosswise to the tail (base) of the poles, and three short sticks are lashed side by side just forward of the midpoint of the poles where the toe of the boot will rest.
4. Two sticks are lashed where the heel of the boot will strike the snowshoe. The tips of the six poles are tied together.
5. Each binding (Fig. 59-17, B) is made of a continuous length (about 1.8 m [6 feet]) of nylon cord, preferably braided, because it will eventually fray.
6. The midpoint of the cord is positioned at the back of the boot above the bulge of the heel.
7. Each end of the cord is run under the three side-by-side short sticks at the side of the boot, then up and across the boot toe so that it crosses the other end on top of the toe, forming an X.
8. Then, each end is looped around the cord running along the opposite side of the boot, and the ends are brought around the back of the boot heel.
9. The cord is pulled tight around the boot, and the ends are tied together at the lateral side of the heel.
10. When walking, the tip of the snowshoe should rise, the boot heel should rise, and the boot sole should remain on the snowshoe.
11. Snow travelers should avoid stepping close to trees (because of funnel-shaped tree wells around tree trunks), large rocks (because of weak snow or moats around them), and overhanging stream banks.
12. A person who falls into a stream or lake should roll repeatedly in powdery snow to wick the water from clothing, brushing the snow off each time. A fire completes the drying process.
Stalled or Wrecked Vehicle
Automobile
1. Survival equipment should be removed from the trunk as soon as possible if it cannot be accessed via the back seat of the automobile.
2. The marooned driver should tie brightly colored flagging tape to the antenna and at night should leave the inside dome light on to be seen by snowplow drivers and rescuers. Headlights consume too much battery current.
3. If there are people only in the front seat of the car, a space blanket is duct-taped to the back of the front seat, cutting in half the amount of space in the car that needs to be heated via body heat or the candle.
4. One 36-hour candle is placed on the dashboard and lit. Although variation occurs depending on the air tightness of the vehicle and the outside air temperature, a candle can raise the interior temperature above freezing.
5. A window should be cracked 2.5 to 5.1 cm (1 to 2 inches) to prevent build-up of carbon monoxide.
6. Reusable carbon monoxide detectors are available and can be carried in the survival kit.
7. Running the motor and heater for a couple of minutes each hour has its disadvantages. Someone will need to regularly get out of the automobile to check if the exhaust pipe is free of snow. In doing so, too much heat from the interior of the car is lost, negating the benefit of running the engine and heater.
Airplane
1. In most circumstances, it is advisable to remain with the aircraft.
2. Sizeable parts from the aircraft can be used for the shell of a shelter.
3. Because aircraft often do not provide sufficient insulation, a fire is optimal for providing warmth in a cold environment.
4. Cloth and stuffing from the seats and life vests can be used for insulation.
5. Seat belts can be cut away from the aircraft, clipped together, and used for rope.
6. Any accessible baggage should be investigated for useful supplies.
7. Creating a signal in clear weather is important.
a. The area of the crash site should be made visible from the air.
b. Anything of color and contrast that will help to identify the site should be tied to trees around the area or laid out in a large X on the ground.
c. Words can be stomped in snow and then lined with tree branches.
d. Rocks can be arranged to form SOS or HELP.
e. A smoke signal can be made by white or black smoke from a fire. Black smoke can be created by burning a chunk of tire, gasoline, or oil.
f. Dried wood creates white smoke.
g. The color of smoke desired depends on the environment.
h. Black smoke is preferred in contrast with snow.
i. Oil and gasoline are more safely ignited when poured over a container full of dirt or sand.
Hot Weather/Desert Survival
The body adapts better to heat and altitude than to cold. It acclimatizes to heat by increasing the blood volume, dilating skin blood vessels, and improving cardiac efficiency in order to carry more heat from the body core to the shell. The process of acclimatization takes about 10 days, during which the subject begins to perspire at a lower temperature, the volume of perspiration increases, and the perspiration contains fewer electrolytes (see Chapter 5). The following discussion emphasizes survival in a desert environment.
Practical Methods for Adjusting to Hot Weather
1. Heat loss by conduction, convection, and radiation can be increased by exposing the maximum amount of skin to the circulating air. This should be done only when in the shade; when in the sun, skin should be completely protected by clothing.
2. Wearing clothing when exposed to hot sun also reduces water loss by reducing sweating.
3. Because heat loss and sweating may be impaired by sunscreens, a good compromise is to cover the face and hands with sunscreen and to wear a long-sleeved shirt and long trousers of tightly woven, loose-fitting, and light-colored (preferably white) cotton.
4. Consider special clothing with an SPF of 30 or greater (e.g., Solumbra). T-shirts have an SPF of only 5 to 9.
5. If desired, ventilation holes can be cut at the axillae and groin.
6. Hydration is maintained by drinking adequate fluids, some of which can contain electrolyte supplements. Optimal hydration maintains blood volume and shell circulation and supports the sweating mechanism.
7. Enough water must be carried or be available in the field. Water bottles may be wrapped with clothing to insulate them and be buried in the backpack.
8. The layer principle of clothing is recommended in the desert, as well as in cold weather. Layers can be taken off during the heat of the day and added at night when the dry desert air cools rapidly.
9. Because high winds and sandstorms occur frequently in desert areas, a wind-resistant parka and pants are desirable; because rains occasionally occur as well, the garments should also be water repellent.
10. Because of its high thermal conductivity, poor insulating ability, and good wicking ability, cotton—which is avoided in cold weather—is a reasonable fabric for hot weather clothing.
11. Clothing should be loose to promote air circulation.
12. Before exposure to prolonged or strenuous hot weather exertion, individuals should allow time for acclimatization.
13. Heat gain from the environment can be minimized by using clothing to protect the head and body from the direct rays of the sun.
14. A hat with a wide brim or a Foreign Legion–style cap with a neck protector and ventilation holes in the crown is recommended.
15. A neck protector can be improvised from a large bandanna by placing it on the head with the point just above the forehead, bringing the two tails around in front of the ears, tying them under the chin, and then replacing the hat.
16. Travelers should seek shelter during the hottest part of the day.
17. Caves and overhangs can be used.
18. Be aware that gullies and other dry watercourses can be the sites of flash floods.
19. A sun shelter can be made by suspending a tarp from brush or cacti or by laying the tarp on a framework of poles.
20. Travelers who become stranded in a vehicle should lie under it, not in it.
21. Because desert air is much cooler a foot above or a few inches below the ground surface, the desert traveler should lie on a platform or in a scooped-out depression rather than directly on the ground.
22. Direct contact with the hot ground and other hot objects, particularly hot metal, should be avoided.
23. Sturdy hiking or climbing boots should be worn to protect the feet, not only from the hot ground but also from sharp rocks, the spines of cacti, and snakes.
24. Gaiters should be worn or improvised from strips of cloth to keep sand and insects out of boots and socks.
25. Rest periods should be taken in the shade rather than in the direct sun.
26. High-quality sunglasses should be used to protect the eyes; if necessary, sunglasses can be improvised from a piece of cardboard or wood with a narrow slit cut for each eye.
27. Body heat production can be minimized by avoiding muscular exertion during periods of high heat and humidity. Persons should travel only early in the morning, late in the evening, or at night.
Desert Water Procurement
Table 59-1 shows the expected days of survival in the desert in relation to the amount of water available.
Table 59-1
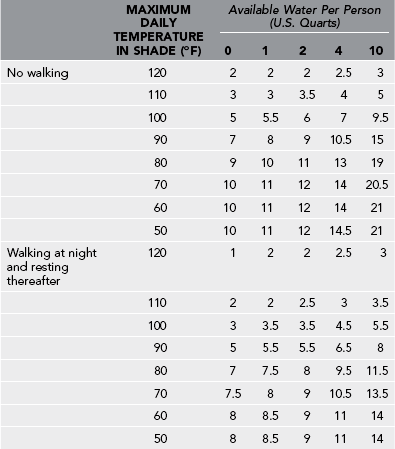
From Adolph EF et al: Physiology of man in the desert, New York, 1947, Interscience.
1. There is no substitute for water in the desert, although a person can prolong life in a survival situation by decreasing water loss.
2. Waterholes and oases are rare in deserts. They occasionally may be located by watching the behavior of animals and birds, which travel toward water at dawn and dusk.
3. Animal trails tend to lead to water and may be joined by other trails and become wider as they approach it.
4. Birds may circle before landing at a waterhole, especially in the morning. A pool of water with no animal tracks or droppings may be poisonous.
5. Muddy and dirty water should be filtered through cloth, and all water should be treated chemically or by filtration or boiling before drinking (see Chapter 45).
6. Persons should not drink urine or water from a vehicle radiator.
7. A device often mentioned for producing potable water is a solar still (Fig. 59-18). Be advised that water output may be negligible if vegetation is desiccated.
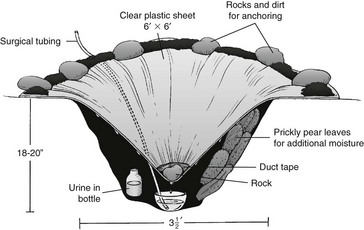
FIGURE 59-18 Solar still.
a. The materials needed include a 1.8 × 1.8 m (6 × 6 foot) piece of sturdy, clear plastic sheeting (preferably reinforced with duct tape in the center), a shovel, a 1.8- to 2.4-m (6- to 8-foot) piece of surgical tubing, a 1-L (1-quart) plastic bowl, duct tape, and a knife.
b. A cone-shaped hole about 1.1 m (3.5 feet) in diameter and 45.2 to 50.8 cm (18 to 20 inches) deep should be dug in a low area where water would stand the longest after a rain.
c. With the surgical tubing taped securely to its bottom, the bowl is placed in the center of the hole.
d. The plastic sheet is positioned loosely on top of the hole and weighted with a fist-sized rock in the center so that it sags into a cone whose apex is just above the bowl.
e. Crushed desert vegetation, preferably barrel and saguaro cactus parts, is placed inside the hole to provide additional moisture.
f. Unknown or possibly poisonous plants are avoided.
g. Dirt and rocks are piled around the rim on top of the plastic sheet to seal the edges of the hole (see Fig. 59-18).
h. Urine can be placed inside the hole in an open container.
i. Contaminated surface water can also be purified inside a solar still, but water from a vehicle radiator should not be used because the glycols will distill along with the water.
j. The still is not opened once it starts operating.
k. Optimally it will produce 0.5 to 1 L (1 pint to 1 quart) of water per 24 hours without added urine or vegetation and up to 3.8 L (4 quarts) with these present.
l. The surgical tubing is used to suck water from the bowl periodically as it collects.
8. If vegetation is plentiful, another type of solar still can be made from a large, clear plastic bag:
a. On a slope, a hole several feet in diameter is dug with a crater-like rim surrounded by a moat that drains downhill into a small hole.
b. The bag is centered on the large hole with its edges over the moat and its mouth downhill at the small hole.
c. An upright stick is placed inside the bag in the middle and clean rocks along the crater rim inside the bag to keep the bag anchored and ballooned out.
d. Duct tape reinforces the bag where the stick tents it. After the bag is filled with vegetation, its mouth is tied shut.
e. The vegetation should not touch the sides of the bag or spill into the part of the bag that is over the moat.
f. The warmth of the sun causes water to evaporate from the vegetation and condense on the inside of the bag, run down into the part of the bag that is over the moat, run downhill toward the mouth of the bag, and collect in the part of the bag’s neck that is in the small hole.
g. Survivors open the mouth of the bag and pour out the water as needed.
Navigation
Compass
1. Even if in a familiar area, backcountry travelers should always carry a compass, map, and altimeter.
2. The best type of compass for the layperson is an orienteering compass that adjusts for magnetic declination.
3. It is important to note that not all compasses work all over the world. Many compasses purchased in the northern hemisphere will not work south of the equator. A compass that works anyplace in the world is called a “global compass.”
4. The compass is always followed even if at odds with “gut feelings” about direction.
5. Some navigation experts recommend carrying two compasses. The second compass can be part of a GPS unit, a watch, or another regular compass. That way, if there is concern about a compass not working, it can be checked against the other compass.
Global Positioning System
1. GPS units are small electronic devices that can mark a traveler’s position by receiving signals from satellites.
2. Although very useful and a worthy adjunct to navigation, it is important to note that they should never be relied on as the only source for navigation.
3. Drawbacks include the fact that they are battery dependent, they require at least three satellites to mark a position, and the satellite system is provided by the U.S. government.
4. The government is at liberty to “take away” access to GPS information at any time and without warning.
5. GPS also requires some prior practice to accurately translate output into a position on a map.
6. The backcountry traveler should be expert with map and compass and not rely solely on a GPS unit for navigation safety.
Weather
1. Blue sky, a few cirrus or cumulus clouds, cold temperatures, low to medium winds, and a steady or dropping altimeter are predictors of good weather.
2. A lowering cloud pattern (cirrus followed by cirrostratus, altostratus, and nimbostratus), rising temperatures, wind freshening and shifting to blow from the southeast or south, and an altimeter rise of 152.4 to 243.8 m (500 to 800 feet) indicate a possibly severe winter storm.
3. Building cumulus congestus clouds changing to cumulonimbus clouds indicate probable thunderstorms and possible hail. A thunderstorm is often immediately preceded by a rush of cold air (gust front).
4. Signs that a severe winter storm is abating include clouds thinning, cloud bases rising, temperature falling, altimeter dropping (i.e., pressure rising), and winds shifting to originate from the north or northwest.
General Aspects of Survival
1. A person with a minor injury or illness should be encouraged to self-evacuate, accompanied by at least one healthy party member.
2. When a person with a severe injury or illness needs to be evacuated, the party must decide whether to use the resources at hand or send for help.
3. The decision will depend on the weather; party size; training; available equipment; distance; type of terrain involved; type of injury or illness; the patient’s condition; and availability of local search and rescue groups, helicopters, and other assistance.
4. Unless the weather is excellent, the party strong and well equipped, the route short and easy, and the patient comfortable and stable, the best course of action generally is to make a comfortable camp and send the strongest party members for help.
5. A written note should include each patient’s name, gender, age, type of injury or illness, current condition, and emergency care; the party’s resources and location (preferably map coordinates); and names, addresses, and telephone numbers of relatives.
6. The patient who must be left alone should have an adequate supply of food, fuel, and water.
As soon as you realize that you are lost, do the following:
1. Stop, sit down in a sheltered place, calmly go over the situation, and make an inventory of your survival equipment and other resources.
2. If it is cold or becoming dark, start a fire and eat if you have food.
3. Take out your map or draw a sketch of your route and location on the basis of natural features.
4. Unless you know your location and can reach safety before dark, prepare a camp and wait until morning.
5. Do not allow yourself to be influenced by a desire to keep others from worrying or the need to be at work or keep an appointment.
6. Your life is more important than anyone else’s peace of mind.
7. If you are alone and unquestionably lost, and especially if injured, you must decide whether to wait for rescue or attempt to walk out under your own power.
8. Almost always, it is better to use the time to prepare a snug shelter and conserve strength if rescue is possible.
9. If you decide to leave, mark the site with a cairn or bright-colored material such as surveyor’s tape; leave a note at the site with information about your condition, equipment, and direction of travel; and then mark your trail.
10. These actions will aid rescuers and enable you to return to the site if necessary. Travel should never be attempted in severe weather, desert daytime heat, or deep snow without snowshoes or skis.
11. If no chance of rescue exists, prepare as best possible, wait for good weather, and then travel in the most logical direction.
Signaling
1. Besides radios, cell phones, and other electronic equipment, signaling devices are either auditory or visual.
2. Three of anything is a universal distress signal: three whistle blasts, three shots, three fires, or three columns of smoke.
3. The most effective auditory device is a whistle. Blowing a whistle is less tiring than shouting, and the distinctive sound carries farther than a human voice.
4. A very effective visual ground-to-air signal device is a glass signal mirror, which can be seen up to 16.1 km (10 miles) away, but requires sunlight.
5. Smoke is easily seen by day, and a fire or flashlight is visible at night. On a cloudy day, black smoke is more visible than white; the reverse is true on a sunny day.
6. Black smoke can be produced by burning parts of a vehicle such as rubber or oil and white smoke by adding green leaves or a small amount of water to the fire (see Airplane, earlier).
7. Ground signals (e.g., SOS, HELP) should be as large as possible—at least 0.9 m (3 feet) wide and 5.5 m (18 feet) long—and should contain straight lines and square corners, which are not found in nature.
8. They can be tramped out in dirt or on grass or can be made from brush or logs. In snow, the depressions can be filled with vegetation to increase contrast.
9. Many pilots do not know the traditional 18 international ground-to-air emergency signals, so remember the following two:
10. When using cell phones, radios, and other electronic devices, persons should move out of valleys and gullies to higher elevations if possible.
11. Operational pay phones in campgrounds closed for the season or other facilities can be used to call for help.
12. Most will allow 9-1-1 or another emergency number to be dialed without payment, but carrying the right change and memorizing your telephone credit card number are recommended.
[/level-membership-for-emergency-medicine-category][not-level-membership-for-emergency-medicine-category]59
Survival
Cold Weather Survival
1. How quickly is the shelter needed? (Or, how much time do you have to build the shelter?)
2. Is there a sick or injured person that needs shelter?
3. How many people will be in the shelter at one time? (How big does the shelter need to be?)
4. What is the length of time you anticipate using the shelter? (One should always overestimate.)
1. Is the shelter needed solely for warmth or also for protection from wind and snow?
2. Where should the shelter be built?
3. What are the avalanche or rock-fall risks in the area?
4. Avoid exposed windy ridges.
5. Avoid any areas at risk for flooding (drainages, dry riverbeds).
6. Avoid low-lying areas, such as basins that tend to collect the colder night air.
7. A timbered area provides protection from foul weather, but can also block the sun.
8. Select a shelter site where there is access to water.
9. In windy conditions, a shelter should be built with the entrance at 90 degrees to the prevailing winds.
10. Shelters can be built in small caves or indentations in a rock outcropping, in a “tree well,” or under downed trees.
11. Environmental resources that can be used for building and insulating a shelter include small trees, branches, thick grass, or leaf piles.
12. Snow is a good insulator because it traps the warmed air generated by body heat; however, direct contact with snow must be avoided.
13. An insulation barrier between the snow and an individual can be created by using equipment, such as a closed cell foam pad or backpack, or it can be created by piling up small tree branches and boughs.
14. The insulation layer if using tree boughs should be 25.4 to 30.5 cm (10 to 12 inches) thick to allow for compression when sitting or lying on this layer.
Types of Shelters
Tarpaulins
1. Cut open a 3- to 4-mil (1 mil = 0.0254 mm [0.001 inch]) large, heavy-duty plastic bag to form a tarp.
2. Fifty feet of cordage is also needed.
3. A tarp can be rigged into either a lean-to or an A-frame shelter. In cold weather, an A-frame provides the best method for retaining heated air.
4. Tie cordage between two trees situated approximately 3 m (10 feet) apart. The tree at the entrance end should be a large tree if a fire is going to be made (see later). If there is a slight slope to the terrain, the head end of the shelter should be uphill.
5. Tie the foot end of the cord 45.2 to 61 cm (18 to 24 inches) above the ground.
6. Tie the head end of the cord 1.1 to 1.2 m (3.5 to 4 feet) above the ground.
7. Fold the tarp in half over the cord, and secure both ends to the cord.
8. Ideally, place the foot end next to a large tree, which offers a natural closure for that end of the shelter.
9. Secure the edges of the sides of the tarp to the ground by tying them to rocks or other trees.
10. To prevent heat from escaping along the edges of the A-frame, the sides should have an overlapping flap on the ground that can be secured with dirt, snow, or rocks.
11. Close the foot end to prevent heat escape.
12. Leave the front end, or entrance, open if a fire is going to be built.
13. If there will be no fire, the entrance can be at least partially closed off by stacking a backpack or tree branches in the opening.
14. Insulate the sides of the constructed shelter by thatching brush, branches, or broad leaves (e.g., the first layer is placed at ground level, with each successive layer overlapping the one below it).
Plastic Bag Shelters (Fig. 59-1)
FIGURE 59-1 Example of two large plastic bags used to form a one-person survival shelter. (Courtesy Peter Kummerfeldt.)
1. Large, heavy-grade (3 to 4 mil) orange plastic 208.2-L (55-gallon) drum liners make good short-term emergency shelters.
2. Alternatively, heavy-duty trash bags can be used (although orange drum liners have the advantage of increased durability and visibility for rescue purposes).
3. Cut an opening in the bottom end of the bag that is just large enough for your head, and then pass the bag over your head so that your face is at the opening.
4. When creating the hole, cut the plastic at 90 degrees to the fold to reduce the likelihood of the bag tearing along the seam.
5. A second bag, pulled over the legs, used in conjunction with the system described above, will form a one-person survival shelter.
Space Blankets and Bags
1. Space blankets and bags are lightweight, inexpensive, and compact, but are of limited value in an emergency.
2. A space blanket is frequently difficult to get out of its package, unfold, and manage in windy conditions.
3. Depending on the brand, space blankets are usually too small to fully encase an adult.
4. When wrapped up, the survivor will find that a space blanket makes a shelter that is so noisy that even an approaching aircraft or ground search party may not be heard.
5. Space blankets tear easily when they are nicked or punctured.
6. The space bag has the same flaws as does the space blanket, except that it is easier to encase an individual and for that person to stay encased.
Tube Tents (Fig. 59-2)
1. Tube tents are inexpensive polypropylene sleeves that are 2.4 m (8 feet) long and provide a tubular shelter that is 0.9 to 1.5 m (3 to 5 feet) high, depending on the brand.
2. A tube tent can be pulled over the body to provide a quick shelter or pitched as a “pup tent.” To do this, find two anchors (e.g., rocks, trees) that are the proper distance apart, tie a line to one of them, spread the tent out along the length of the line, run the line through it, and then tie off the other end of the line. The height of the line should be such that the tent can be spread out to accommodate the occupant.
3. To avoid ripping, the tent plastic should be 3 to 4 mil thick.
4. Tube tents can be improvised from two plastic 208.2-L (55-gallon) drum liners, which are 3 to 4 mil thick, or from large, heavy-grade household trash bags by opening up the closed end of one bag, sliding it into the open end of the second bag, and then duct taping the bags together.
Tents and Bivouac Sacks
1. Tents are generally comfortable and dry, but in very cold weather they are not as warm as snow shelters.
2. Tents are preferable to snow shelters at mild temperatures, during damp snow conditions at temperatures above freezing, or when the snow cover is minimal.
3. Bivouac sacks are carried by climbers on long alpine-style climbs or for emergencies. They are usually made of Gore-Tex or waterproof fabric and hold one or two persons. They pack small, are lightweight, and can easily be carried for an emergency shelter on any trip into the backcountry.
4. Many modern packs have extensions, so when used with a cagoule or mountain parka, form acceptable bivouac sacs. The cagoule is donned, and the backpack is pulled on the feet and legs, extending the top of the pack as high up the body as it can be placed.
Natural Shelters
1. Caves and alcoves under overhangs are good shelters and can be improved by building barrier walls with rocks, snow blocks, or brush to protect from wind.
2. In deep snow, large fallen logs and bent-over evergreens frequently have hollows underneath them that can be used as small snow caves.
3. Cone-shaped depressions around the trunks of evergreens (tree wells) can be improved by digging them out and roofing them over with evergreen branches or a tarp (Fig. 59-3).
FIGURE 59-3 Natural shelter.
Snow Shelters
Snow Trenches (Figs. 59-4 and 59-5)
FIGURE 59-4 Three-person snow trench.
FIGURE 59-5 Above-timberline snow trench.
1. A snow trench is the easiest and quickest survival snow shelter and the one least likely to make the diggers wet.
2. If a shovel, large tarp, structural support items (skis, poles, trees), and a small fire, candle, or stove are available, a trench can be created that is as comfortable as a snow cave.
3. It is easiest to dig a trench in a flat area. However, if the snow is deep enough, it can be dug out on an incline, keeping the trench itself level.
4. If possible, dig all the way to the ground. If the snow is too deep to dig to the ground, dig to a depth of 0.9 m (3 feet). If the snow is not deep enough, pile snow up around all four sides of the trench to make walls, until the total depth of the trench is 0.9 m (3 feet).
5. The trench width should be just slightly wider and 0.6 to 0.9 m (2 to 3 feet) longer than the person(s) that will be lying in the shelter. The additional length allows for a fire pit at one end of the shelter.
6. Ski poles, skis, or long tree branches are placed perpendicular to the length of the trench.
7. The trench is then covered with a tarp, leaving one end open for the entrance.
8. Secure the tarp on all sides by packing the edges into the snow.
9. Gently toss snow on top of the reinforced tarp to provide insulation to the shelter.
10. The snow pack on top should be 20.3 cm (8 inches) or more.
11. The object is to keep the maximal amount of snow around and over the trench for optimal insulation.
12. If the trench is going to be wide enough to accommodate more than one person, the entrance should still be only wide enough for one person to pass through at a time. A narrow entrance is easier to close off and helps contain heat within the shelter.
13. A barrier can be created at the entrance by stacking backpacks or snow blocks, or hanging a tarp across the opening.
14. When the entrance is closed, a small votive-size candle or stove and the occupants’ body heat will raise the interior temperature to -4° to -1° C (24.8° to 30.2° F).
15. Higher temperatures should be avoided so that clothing and bedding will not become wet from melting snow.
16. Ventilation is necessary to prevent build-up of carbon monoxide within the shelter.
17. Anywhere that deep snow has been wind packed, as happens above timberline, the trench can be roofed with snow blocks.
18. The blocks are cut to a width of 45.2 to 50.8 cm (18 to 20 inches), a depth of 10.2 cm (4 inches), and a length equal to the length of the snow saw.
19. They are then laid horizontally for a narrow trench or vertically for a wider trench, set as an A-frame, or laid on skis (see Fig. 59-5).
Snow Caves (Fig. 59-6)
FIGURE 59-6 A, Snow cave entrance. B, Snow cave partly closed with snow blocks. C, Interior of snow cave.
1. A shovel is the best item to use when digging a snow cave, although small snow caves large enough for one person can be dug with a ski or cooking pot.
2. The optimum site is a large snowdrift, often found on the lee side of a small hill.
3. Areas in avalanche zones must be avoided.
4. Ski poles, skis, or tree branches are poked in the snowdrift to a depth of 45.2 cm (18 inches) around the area that will be the outside walls of the cave.
5. The entrance is dug just large enough to crawl through and is angled upward toward the sleeping chamber (see Fig. 59-6).
6. After the entrance is dug with the shovel, the digger crawls inside, lies supine, and uses the shovel to excavate the chamber, which should be large enough for a stove and the number of occupants requiring shelter.
7. The snow is removed from the walls inside the shelter until the ends of the ski poles, skis, or tree branches are met. This ensures that the snow cave walls maintain a depth of 45.2 cm (18 inches), necessary to prevent collapse of the walls.
8. Because diggers tend to become wet, water-resistant or waterproof jackets and pants should be worn.
9. Pine branches or other natural materials can be used to cover the floor if a sleeping pad is not available.
10. The entrance to the snow cave can be blocked off using backpacks or blocks of snow.
11. If the group is large and there are several people available to dig out the cave, a larger entrance can be created, providing room for multiple diggers to excavate the interior.
12. The disadvantage is the larger opening that needs to be closed to maintain warmth inside the snow cave.
13. The cooking area for the snow cave can be in the entrance area outside the cave itself.
14. If cooking is going to be done inside the cave, a ventilation hole as large as a ski pole basket must be cut in the roof over the cooking area to provide adequate ventilation.
15. A snow cave large enough for two persons takes several hours to dig and therefore is not the primary choice of shelter in an emergency.
16. It can be built after a faster-improvised shelter is provided for the safety and well-being of the group.
Quinzhee (Snow Dome)
1. The snow is piled into a large dome 1.8 to 2.1 m (6 to 7 feet) in height and width and left to harden for a few hours. The waiting time allows the snow crystals to adequately consolidate so that the dome will not collapse when it is excavated.
2. After the settling time, the dome is dug out in the same method as described earlier for the snow cave.
3. Sticks can be used as spacers; walls should be 25.4 to 30.5 cm (10 to 12 inches) thick.
4. A low entrance is dug on one side, and from there the interior is carved out to make a dome-shaped room that is large enough to sleep three or four people.
5. The sleeping platform should be higher than the entrance.
6. Another method is to make a “form” (i.e., a pile of vegetation or equipment), cover this form with snow, allow the snow to set, and then open one end and remove the form.
Igloos (Fig. 59-7)
FIGURE 59-7 A to C, Stages of igloo construction.
1. An igloo requires one, or ideally two, snow saws and snow that is well packed and easy to cut into multiple uniform blocks.
2. This type of packed snow is found in wind-blown, treeless areas
3. Packed, consolidated snow can be created by stamping a large area of snow and letting it settle and harden for several hours
4. To mark the diameter of the igloo, a ski pole is held by the handle and the body turned so that the pole basket makes a large circle. This will outline the base of an igloo suitable for three people. The first snow blocks are cut from inside the circle. This will lower the floor so that fewer blocks are required for the dome.
5. At least two persons are needed for this project: one to cut and carry the blocks and the other inside the igloo to lay the blocks.
6. The blocks should be about 45.2 cm (18 inches) wide, 76.2 cm (30 inches) long, and 20.3 cm (8 inches) thick.
7. They are laid in a circle leaning in 20 to 30 degrees toward the center of the igloo, with the sides trimmed for a snug fit.
8. The tops of the first few blocks in the first circle are beveled so that a continuous line of blocks is placed down, with the first few blocks of each succeeding circle cocked upward (see Fig. 59-7, A).
9. A common error is to not lean the blocks inward enough, resulting in an open tower instead of a dome.
10. Gaps between the blocks are caulked with snow.
11. The dome should be 1.5 to 1.8 m (5 to 6 feet) high inside and can be closed with a single capstone of snow.
12. The entrance is dug as a tunnel underneath rather than through the edge of the igloo, preventing warm air from escaping (see Fig. 59-7, B and C).
