Surgical Management of Detrusor Compliance Abnormalities
W. Stuart Reynolds  Roger Dmochowski
When conservative and medical therapies for detrusor compliance abnormalities fail, few surgical options remain for “refractory” patients. Presently, there are three accepted modalities of surgical treatment: (1) sacral nerve stimulation (sacral neuromodulation [SNM]), (2) injectable bladder neuromodulation with neurotoxins, most notably botulinum toxin (BoTN), and (3) bladder augmentation. Uses, indications, and techniques for these three modalities continue to evolve as experience and understanding of each are gained. Patient selection, therefore, remains an important aspect of determining which surgical option is best for the patient; an appropriate patient evaluation is required.
Evaluation of Patients
A full patient history is necessary to elucidate the character of urinary symptoms, to evaluate any previous attempts at medical or surgical treatment, and to identify concomitant medical conditions that may influence the success of treatment or provide contraindications to different therapies. In general, a patient who may be considered for surgical treatment of detrusor abnormalities will need to have failed more conservative treatment modalities, and a complete understanding of previous treatments is essential. A thorough physical examination is warranted that focuses on the lower abdomen and pelvis to note any structural abnormalities, including a vaginal speculum examination and bimanual physical examination in women to evaluate for any associated pelvic organ prolapse, as well as a prostate examination in men. Also, inspection and palpation of the lower back and spine can uncover signs of bony abnormality or scars from any previous spine surgery that may suggest a potential neurologic insult. Finally, the extremities should be examined for pedal edema and neurologic or musculoskeletal abnormalities.
A bladder or voiding diary can be considered to better quantify the degree of urinary dysfunction, not only for diagnostic purposes but also to serve as a baseline for subsequent posttreatment comparison. Similarly, patient self-reported quality-of-life and symptom severity questionnaires can provide a more objective, comparable picture of the degree of urinary dysfunction. Finally, in any patient who fails conservative or empirical therapy, multichannel urodynamics is warranted to objectively characterize the nature of the urinary dysfunction and to identify any negative or worrisome prognostic factors associated with the voiding complaints, including bladder capacity and compliance, the presence of detrusor overactivity, the magnitude of resting detrusor pressures, and the coordination of detrusor and sphincter function, all of which may have negative implications for renal function. Combining fluoroscopy (“videourodynamics”) can add important information regarding structural abnormalities of the bladder or ureters, including vesicoureteral reflux, bladder morphology, and bladder neck function.
General Introduction to Three Modalities
Sacral neuromodulation has been available since FDA approval in 1997 (Interstim, Medtronic, Inc, Minneapolis, Minnesota) and is currently indicated for the treatment of urge urinary incontinence, frequency-urgency syndrome, and idiopathic urinary retention. Although the exact mechanism of action of SNM has not been fully determined, it appears to modulate bladder behavior through electrical stimulation of somatic afferent axons in the spinal roots, which in turn modulate voiding and continence reflex pathways in the central nervous system, likely by inhibiting interneuronal transmission in the bladder reflex pathway.
With the present configuration, the Interstim device (comprising a battery-powered neurostimulator, an extension cable, and a tined electrical lead) (Fig. 92–1A) is implanted via a staged, two-step process involving initial percutaneous placement of a semipermanent, tined electrical lead within close approximation of the third sacral nerve root (S3) by placement of the lead through the S3 spinal foramen (Fig. 92–1B). This is typically done with fluoroscopic guidance but may be done without. The tined lead is an insulated, electrical stimulation lead with four contact points near the tip and four plastic collapsible projections, which help to anchor the lead to the surrounding tissue. A temporary, external electrical stimulator is attached and a clinical trial period of 1 to 4 weeks ensues, during which the patient evaluates his or her response to therapy. If appropriate benefit occurs (defined as greater than 50% improvement in symptoms), then an implantable pulse generator (IPG) is connected to the previously placed lead and is surgically implanted in the upper buttocks during a second surgical stage procedure. If there is not a significant response, the implanted lead is removed without implanting an IPG. Adjustments to the impulse generator settings can be made with a remote programming device.
Interest in and use of BoTN injection into the bladder for treatment of voiding dysfunction have increased over the past several years, although BoTN is not currently FDA approved for use in the genitourinary system. The causative toxin for botulism, produced by the bacterium Clostridium botulinum, may be one of seven distinct toxins depending on the serotype of the organism (BoTN types A, B, C1, D, E, F, and G). Presently, only BoTN A (Botox, Allergan, Irvine, California; or Dysport, Ipsen, Luxembourg) and B (Myobloc or Neurobloc, Elan, Dublin, Ireland) are commercially available for clinical use. BoTN acts by cleaving a specific site (specific to each BoTN serotype) of a protein complex (soluble N-ethylmaleimide-sensitive factor attachment protein receptor [SNARE] complex) responsible for exocytosis of neurotransmitter vesicles from the neuron. In the case of BoTN A, the most well-studied toxin subtype, the specific substrate is the synaptosome-associated protein of 25 kD (SNAP-25), a component of the SNARE complex; this results in inhibition of synaptic release of acetylcholine from the peripheral motor neurons (Fig. 92–2).
At therapeutic doses used for the urinary system, BoTN is understood to inhibit the release of acetylcholine from the motor neuron end plant at the neuromuscular junction, inducing paralysis in the affected muscle, or the bladder in the case of bladder injections. Additionally, BoTN may directly inhibit sensory nerve activity and thus modulate bladder sensory input to the central nervous system. In cases of bladder overactivity or diminished bladder compliance, both mechanisms of action are exploited. Presently, no standardized technique or approach to cystoscopic bladder injections of BoTN is used: a wide range of doses have been used, and a number of different injection templates have been followed. In general, however, BoTN can be injected into the wall of the bladder under cystoscopic vision in an outpatient setting, with local or general anesthesia. The effects of BoTN injection are generally immediately apparent, and symptom improvement can be seen after the first day or so of injection. However, the effects are generally short-lived and wear off after approximately 6 months.
When more conservative or less invasive measures have failed in the treatment of bladder compliance abnormalities, the most aggressive management option is augmentation cystoplasty. The goal of bladder augmentation is to create a large-capacity, low-pressure (i.e., high-compliance) reservoir for urine storage. Larger volumes of urine may be stored for longer periods of time, which is beneficial for continence, while detrusor pressure remains low, protecting the urinary system upper tracts from dysfunction and ultimately from renal failure. This is generally achieved at the cost of bladder emptying, and many patients are dependent on intermittent catheter bladder drainage after augmentation.
Many different techniques have been developed for augmentation cystoplasty employing a variety of different tissues, including segments of detubularized bowel (ileocystoplasty, cecocystoplasty, sigmoid cystoplasty, and gastrocystoplasty), dilated ureter (ureteroplasty), autoaugmentation (removal of the overlying detrusor muscle of the dome of the bladder), and, more recently, biologic substitution using techniques of bioengineered tissue. The most common procedure involves the use of small intestine, specifically the ileum, and because it has been the best characterized, the ensuing discussion focuses on this technique.
Efficacy with use of any of the described techniques can be expected in the properly selected patient. Overall, 70% of patients with urgency, frequency, or urge incontinence achieve success with SNM, defined as “a greater than 50% improvement in symptoms.” Furthermore, for many patients, outcomes are durable for longer than 5 years. Among patients treated with BoTN injection, up to 80% of those treated for overactive bladder symptoms will demonstrate symptom improvement, and up to 70% of those with neurogenic detrusor abnormalities will show improvement. Efficacy in general is limited to 6 months because the effects abate at that time. Repeat injection can be performed with similar efficacy anticipated. Among patients undergoing augmentation cystoplasty, improvement in continence can be expected in more than 75%, with 50% or more completely continent. In some reports, this occurs in 95% of patients. Upward of 80% of patients will experience resolution of preoperative urgency.
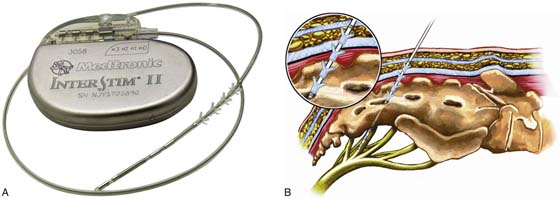
FIGURE 92–1 A. Interstim device (Medtronic, Inc, Minneapolis, Minnesota), composed of a battery-powered, remote-programmable neurostimulator (implantable pulse generator [IPG]), a semipermanent tined electrical lead, and an insulated extension cable. B. Illustration depicting the final position of the four electrical contact points of the stimulation lead in close proximity to the third sacral nerve root (S3) and the four plastic projections or tines embedded in and securing the lead to the tissue overlying the sacral foramen. (Images source: Medtronic, Inc.)
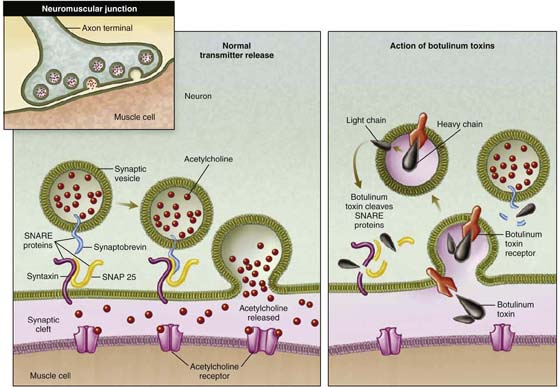
FIGURE 92–2 Schematic depicting the molecular action of botulinum toxin. (Adapted with permission from Rowland LP. New Engl J Med 2002;347:382.)
Surgical Techniques
Sacral Neuromodulation
Surgical implantation of an SNM device proceeds by a two-stage process: during the first stage, the electrical stimulation lead is percutaneously placed and positioned in close proximity to the S3 nerve root via the S3 foramen; during the second stage, an IPG is surgically implanted in the upper buttocks, after a successful trial of an external device demonstrating clinical effectiveness.
For the first stage, percutaneous lead placement, the patient is placed prone on the operative table; the upper thighs, buttocks, and lower back are widely cleansed, and surgical drapes are placed to allow visualization of the buttocks and gluteal crease, as depicted in Fig. 92–3. With the use of fluoroscopy and a metal surgical instrument, the approximate location of the S3 foramen is noted at the skin level (Fig. 92–3D). A 20-gauge foramen needle is inserted at a 60-degree angle to the skin approximately 2 cm cranial to the actual location of the S3 foramen and is directed into the S3 foramen (Fig. 92–4A). The correct position is verified by electrical stimulation of the foramen needle with an external stimulator (Fig. 92–4B) and by examination for appropriate motor and sensory responses, which for S3 include a bellows response of the pelvic floor and ipsilateral great toe plantar flexion (Table 92–1). Bilateral foramen needles may be used to assess for better response on each side (see Fig. 92–4). Using the Seldinger technique concept, the directional guide wire (23 gauge) is placed through the foramen needle and the needle is removed, leaving the wire in place. A scalpel is used to nick the skin along the wire, and the introducer (composed of a 16-gauge dilator nestled in a 14-gauge introducer sheath) is then passed over the wire to an appropriate depth of insertion determined by lateral fluoroscopy (Fig. 92–4C). Radio-opaque markings on the introducer (one at the dilator tip and one at the introducer sheath tip) allow accurate positioning of the device within the S3 foramen. The introducer sheath marking should be at the level of the ventral S3 foramen, and the dilator tip marking just beyond (Fig. 92–4D). The introducer wire and dilator are removed, leaving the introducer sheath behind.
Next, the tined lead is inserted into the sheath (Fig. 92–5A) and is positioned such that electrical contact point #1 is straddling the ventral S3 foramen (Fig. 92–5B). The introducer sheath is withdrawn slightly to the level of a white marking on the lead, thereby exposing the lead contact points without deploying the tined plastic projections. Electrical stimulation confirms the position of the lead at the appropriate level; all four positions are tested for proper motor and sensory functions. After satisfactory positioning, the sheath is completely removed, deploying the tined plastic projections that anchor the lead to surrounding soft tissue.
At this point, a second 3-cm skin incision is made in the upper buttock on the contralateral side from the lead insertion, and a small subcutaneous pocket is developed (Fig. 92–6A). This will serve as the future implantation site for the IPG. A tunneling trocar device is used to pass the stimulation lead into the IPG pocket: the tunneler is passed to the pocket, the sharp trocar blade is removed, and the lead is passed through the remaining plastic sheath or tunneler (Fig. 92–6B, C). A temporary, external lead extension is connected to the stimulation lead within the IPG pocket, and the external extension is further tunneled to exit the skin superolaterally to the IPG pocket (Fig. 92–6D). The leads are tunneled to decrease the risk of infection to the IPG device with externalized wires. The externalized lead is connected to the external stimulator. The redundant lead wire and connection covers are buried in the subcutaneous pocket previously developed, and the subcutaneous tissue and overlying skin are closed with absorbable sutures. The percutaneous tined lead insertion site is also closed with simple interrupted absorbable sutures.
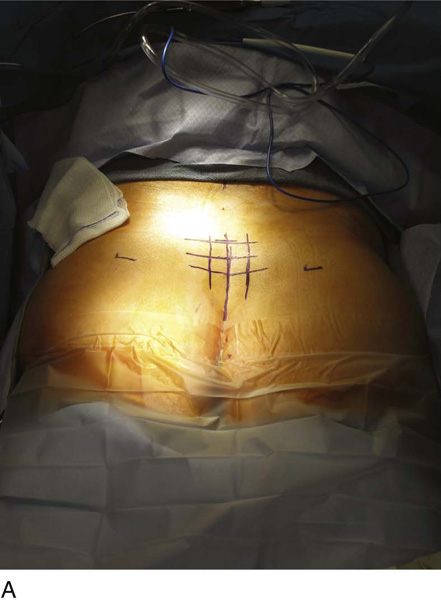
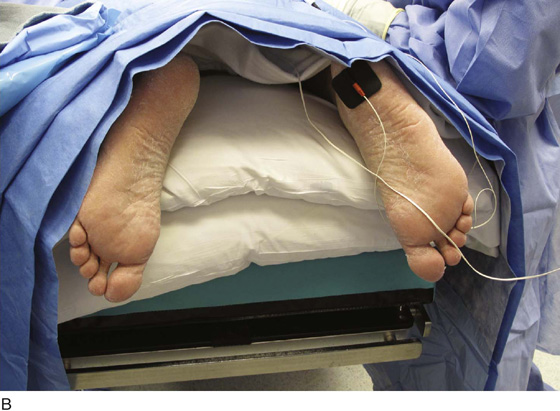
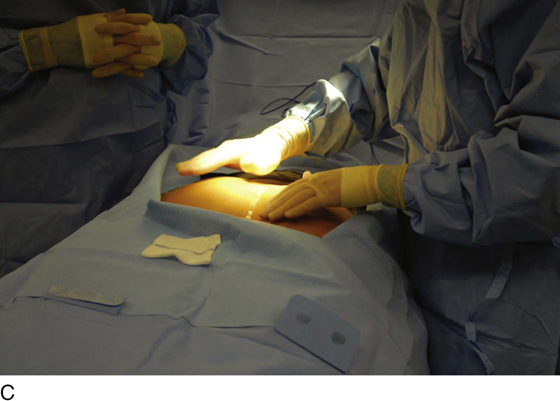
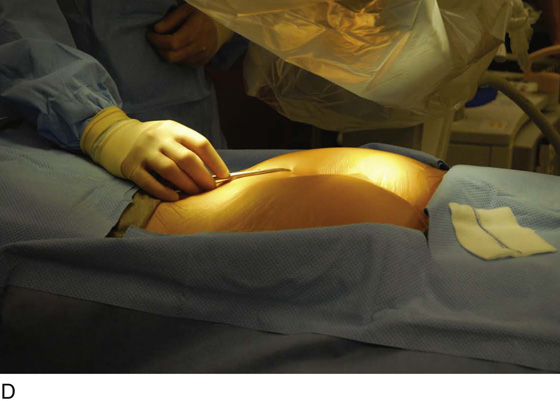
FIGURE 92–3 A. With the patient in the prone position, the posterior thighs, buttocks, and lower back are sterilely prepared and draped as depicted, allowing visualization of the buttocks and gluteal cleft, as well as the feet (B). Skin markings outlining the approximate location of the sacral foramen have been made using a combination of palpation (C) and fluoroscopic guidance (D).
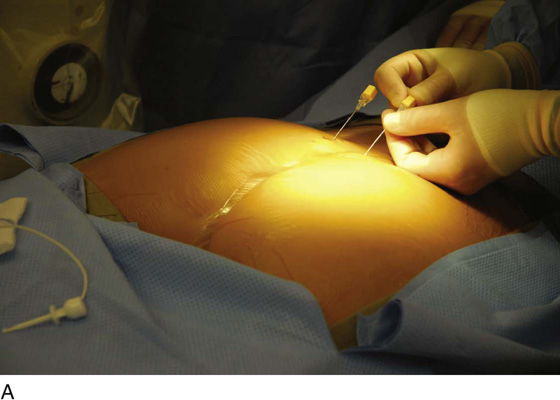
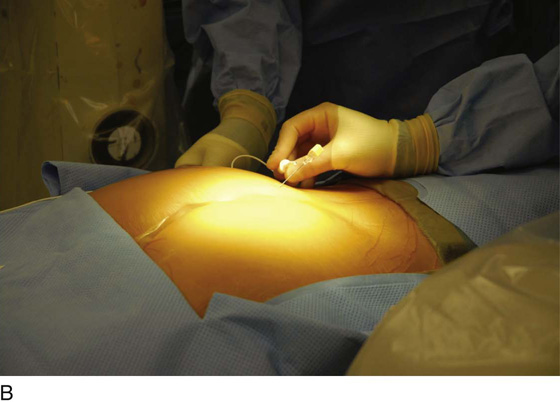
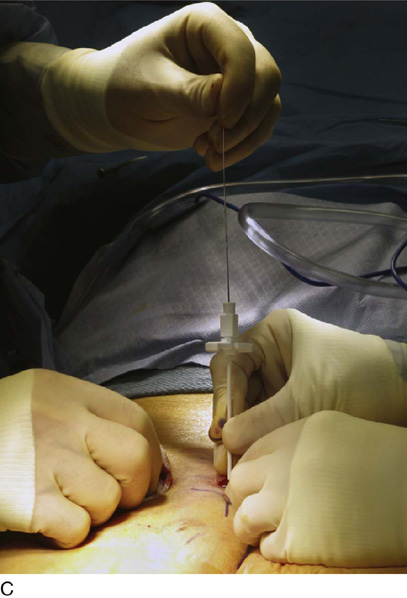
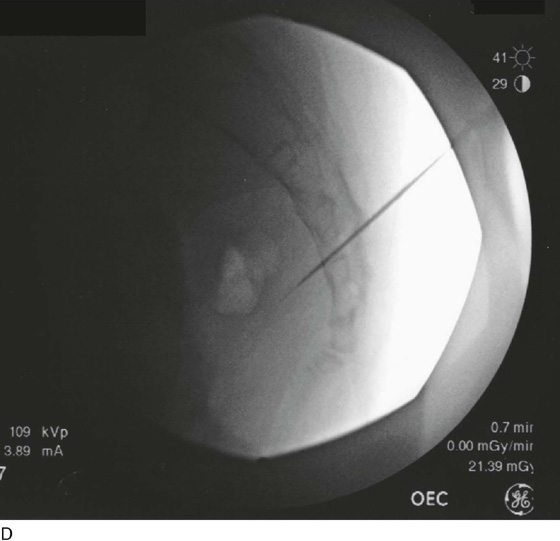
FIGURE 92–4 A. A foramen finder needle is inserted approximately 2 cm cranial to the actual location of the S3 foramen at a 60-degree angle to the skin and is blindly positioned in the foramen using palpation of the needle against the bone. B. Positioning of the needle within the correct sacral foramen is confirmed fluoroscopically and with the use of test stimulation and monitoring for the appropriate motor response (see Table 92–1). C. The foramen needle is exchanged for the directional guide wire by inserting the wire through the needle lumen and removing the needle over the wire. The introducer is then passed over the wire, after a small skin nick is made. D. Correct depth positioning of the introducer is confirmed by lateral fluoroscopy: the distal opaque marking should be positioned just below the S3 foramen, and the proximal marking at the level of the ventral foramen.
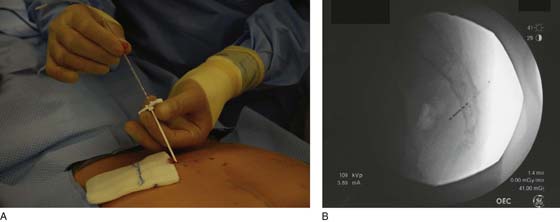
FIGURE 92–5 A. After the directional wire and dilator are removed from the inside of the introducer sheath, the tined lead is inserted through the lumen of the sheath and the sheath is backed out slightly to the level of a white marking on the lead, thereby exposing the lead contact points. B. On fluoroscopy, electrical contact point #1 should be straddling the S3 foramen. The sheath is then completely removed, deploying the tined projects and securing the lead to surrounding tissue.
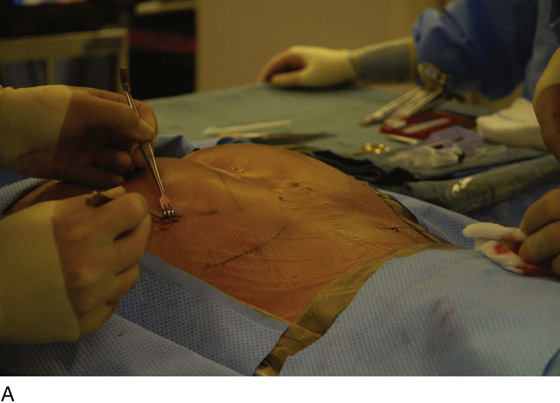
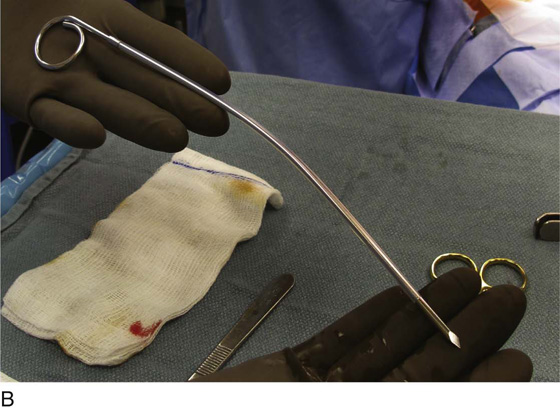
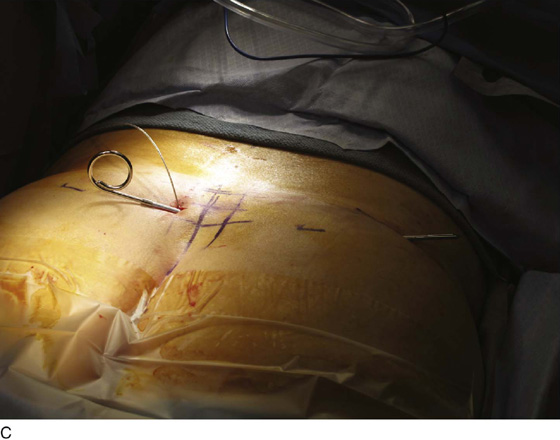
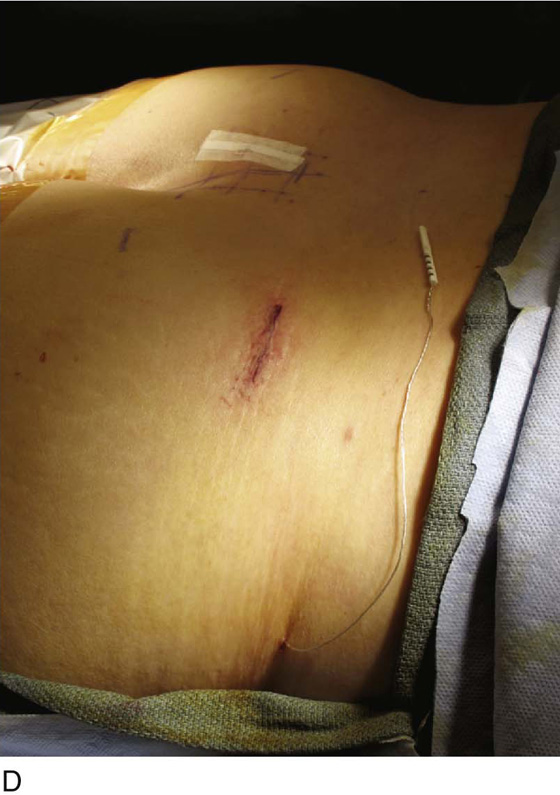
FIGURE 92–6 A. A 3- to 4-cm incision is made in the contralateral upper buttocks, while a subcutaneous pocket is developed at the future implantation site of the implantable pulse generator (IPG). B. The sharp-pointed tunneling trocar device is used to tunnel the stimulation lead to the IPG pocket. C. With the trocar in place, the sharp blade and obturator are removed, and the lead is passed through the tunneling sheath. D. A temporary, external lead extension is attached to the lead, the connection is buried in the IPG pocket, and the external end is further tunneled laterally to exit superolaterally to the IPG pocket site.
TABLE 92–1  Sacral Nerve Root Responses to Electrical Stimulation

After a successful trial period with the external stimulator, defined as a “greater than 50% reduction of symptoms,” the IPG is implanted during the second stage of the procedure. The previous incision over the buttocks is opened, and the buried electrical connection is exposed. The external lead extension is removed and the subcutaneous pocket enlarged to accommodate the IPG. The IPG is then connected to the tined stimulation lead, and the IPG is buried in the subcutaneous pocket (Fig. 92–7). Again, the skin incision is closed with absorbable sutures. Once the patient is awakened, the IPG is programmed using the remote programming device.
Few complications are seen with SNM, and they generally are related to lead migration and loss of clinical benefit, device malfunction, or infection. For lead migration and device malfunction, a revision procedure in which the lead or the IPG or both can be removed and reinserted can be curative. For infection, prompt surgical removal is warranted; a new device can be inserted at a later date. No neurologic complications have been reported. It is important to note that the safety and efficacy of SNM implants have not been established for use with magnetic resolution imaging (MRI), and patients who may require future or repeated MRI should not undergo SNM implantation.
Botulinum Toxin Bladder Injections
Because most clinical experience involves the use of BoTN A (Botox), this discussion focuses on use of this toxin subtype. It is important to note that dosing of BoTN is defined by units of biologic activity, which are neither interchangeable nor directly comparable with those of other botulinum toxin types. BoTN A is supplied in 100-unit (U) vials as a desiccated powder (Fig. 92–8), which is reconstituted immediately before injection with injectable-grade, preservative-free normal saline. Dosing protocols are variable, and anywhere from 100 to 300 U may be injected at a single session. Depending on the desired concentration of injection solution, anywhere from 1 to 10 mL of injectable saline is used to dissolve each vial of BoTN A, and the solution is drawn up in appropriately sized syringes. The filled syringe is then attached to a long, 23-gauge needle for use with cystoscopic equipment.
Botulinum toxin bladder injections are performed via a cystoscopic approach. Injection may be performed in an outpatient setting with any level of anesthesia, including local, regional, or general. Local anesthesia typically involves the instillation of intraurethral 2% lidocaine jelly followed by intravesical 2% lidocaine solution. Additionally, a rigid or flexible cystoscope can be used for bladder injections of BoTN with an appropriately matched cystoscopic injection needle (Fig. 92–9). Typically, injection of BoTN proceeds with 20 to 30 submucosal injection sites spread across the base and posterior wall of the bladder, including or not including the trigone; 0.1 to 1 mL of BoTN solution is given, depending on the concentration (approximately 10 U per injection) (Fig. 92–10). Injecting at the appropriate depth is important so as to avoid extravasating BoTN through the bladder wall or depositing the BoTN too superficially within the bladder mucosa. Ideally, injecting the solution will raise the overlying mucosa only minimally, avoiding large blebs on the mucosal surface (Fig. 92–11).
Some controversy exists as to whether or not the bladder trigone should be included in the injection template because of theoretical concerns about inducing vesicoureteral reflux by injecting near the ureteral orifices. This has not been substantiated clinically, and indeed, because the trigone is thought to be densely innervated, many regularly include it in the template. The major adverse event related to BoTN bladder injection is urinary retention; although this is relatively uncommon, it occurs frequently enough that patients must be counseled on and/or instructed in clean intermittent catheterization (CIC) if retention ensues. This is typically transient and resolves with time. Minor complications of the procedure include transient dysuria, hematuria, and occasional urinary tract infection (UTI). More worrisome are rare reports of generalized weakness, malaise, and muscle weakness, possibly due to systemic effects of BoTN absorption. In general, any effect of BoTN injection diminishes and abates by approximately 6 months, and repeated injection is necessary to recoup any clinical benefit previously seen.
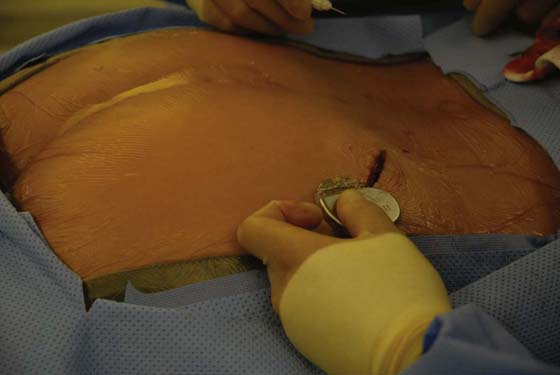
FIGURE 92–7 During the second stage of implantation, the incision over the implantable pulse generator (IPG) site is incised and the tined lead–extension lead connection is disconnected. An IPG device is connected to the tined stimulation lead and is inserted into the subcutaneous pocket. The overlying skin is closed with absorbable sutures.
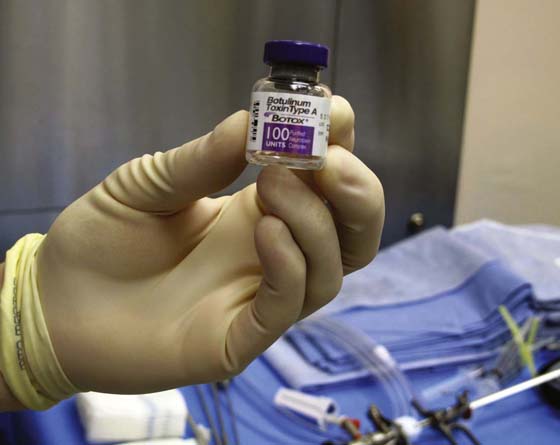
FIGURE 92–8 Botulinum toxin A is supplied as a desiccated powder in 100-unit vials and must be reconstituted with preservative-free, injectable-grade normal saline.
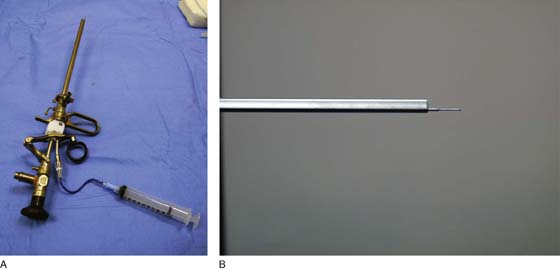
FIGURE 92–9 A. A 22-French rigid injection cystoscope with a 22-gauge injection needle is used to inject botulinum toxin A (BoTN A). B. Alternatively, a flexible cystoscope and corresponding injection needle can be used.
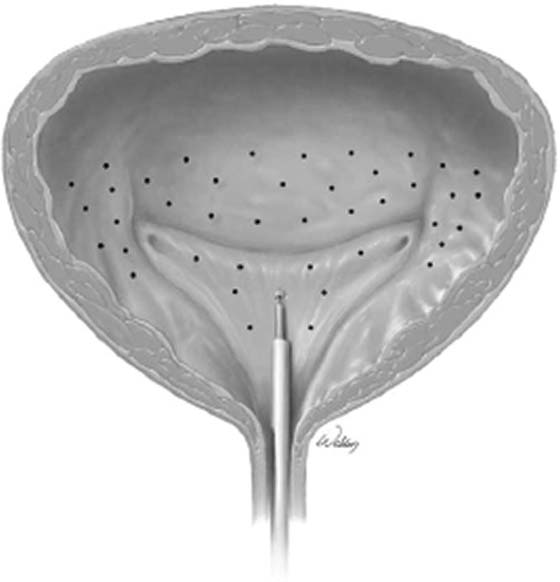
FIGURE 92–10 Injection techniques vary, and many different injection templates have been described. A typical template involves 20 to 30 bladder injections spread over the posterior aspect of the bladder and dome and may or may not include the bladder trigone. (Image sources: Kim D et al: Urol Clin N Am 33:503-510, 2006.)

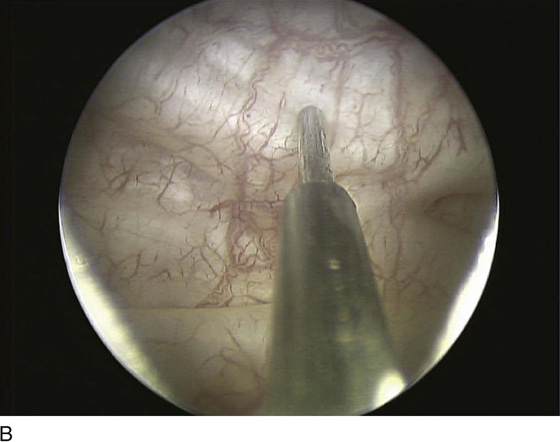
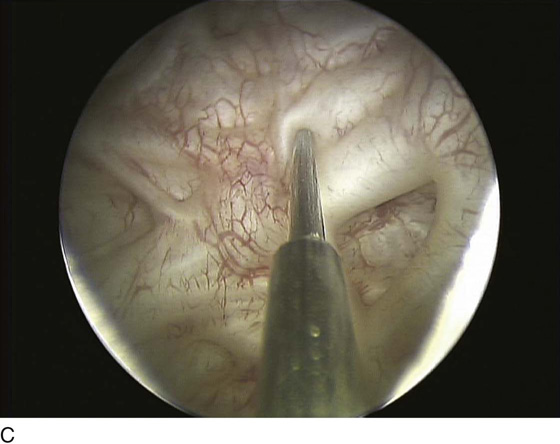
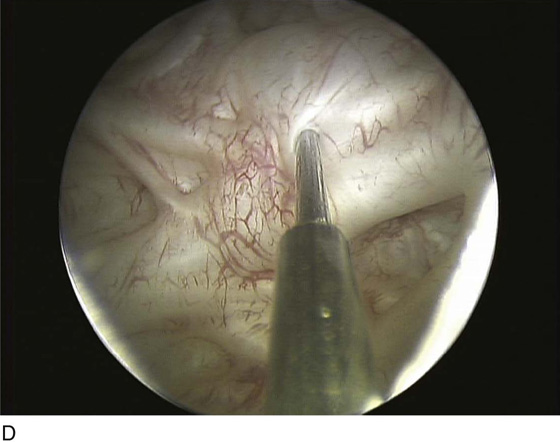
FIGURE 92–11 To achieve the proper depth of injection, the needle should be inserted through the mucosa (A and C), typically with a slight “popping” feel, and the injected material should raise the overlying mucosa minimally, as demonstrated in the images by the “filling” of areas between bladder trabeculae (B and D).
Augmentation Cystoplasty
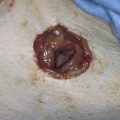
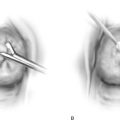
The procedure for augmentation ileocystoplasty is generally illustrated by Fig. 92–12. The operation proceeds via a standard lower midline laparotomy incision. The patient typically is positioned supine on the operating room table or in the low lithotomy position with legs in stirrups. Although the genitalia are not necessarily needed as part of the surgical field, access to the urethral catheter to fill the bladder with saline during detrusororrhaphy can be helpful. A midline incision is made from the pubis to the umbilicus and is carried down through the anterior abdominal fascia, splitting the rectus muscles and opening the transversalis fascia and peritoneum. To prepare the bladder, a sagittal incision is made to almost completely bivalve the bladder, extending from 3 cm above the bladder neck anteriorly to 2 cm above the trigone posteriorly (see Fig. 92–13). Filling the bladder with saline before incising the detrusor can help to maintain a sagittal plane of incision.
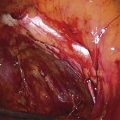
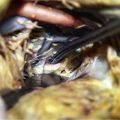
To prepare the bowel segment, the terminal ileum is identified and a segment of ileum approximately 20 to 40 cm in length is isolated 15 cm or more proximal to the ileocecal valve. Care is taken to divide the mesentery so as to preserve blood supply to both the ileum segment and the eventual bowel anastomosis (Fig. 92–14A). Bowel division and subsequent anastomosis can be performed with handsewn sutures or with bowel anastomotic staplers (Fig. 92–14B). The isolated section of ileum is then opened longitudinally along its antimesenteric border (Fig. 92–15B). Typically, the bowel is then reconfigured in one of several ways, in a U-shape or S-shape, by folding the bowel and suturing the inner edges with full-thickness, running 3-0 absorbable suture (see Fig. 92–15).
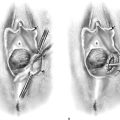
The reconfigured bowel is then anastomosed to the bivalved bladder, starting at the posterior margin, with running 3-0 absorbable suture, along each of the sagittally incised bladder edges (see Fig. 92–12C). Before complete closure, a suprapubic tube is placed to exit through the native bladder wall; a urethral catheter is also placed. The bladder is then irrigated with saline to confirm water-tight integrity (Fig. 92–16); a closed-suction drain is placed, and both it and the suprapubic tube are brought out through the skin in separate stab incisions. The abdominal wall is finally closed in standard fashion.
The suprapubic tube and the urethral catheter are left in place for approximately 10 to 21 days, at which time a cystogram can be obtained to confirm that there is no extravasation. The urethral catheter is then removed, the suprapubic tube clamped, and the patient started with CIC. When the patient is comfortable with this, the suprapubic tube can be removed. Typically, the patient is instructed to CIC every 2 to 3 hours during the day and once or twice at night. The frequency of catheterizations can be increased to every 4 hours. If the patient demonstrates the ability to completely empty, then CIC can be discontinued.
Patients post augmentation should be followed with regular renal imaging (ultrasound, intravenous pyelography [IVP], or renal scan) during the first year and subsequently at regular intervals to monitor for upper urinary tract changes. Additionally, serum electrolytes and creatinine levels should be monitored regularly during this time to screen for electrolyte and metabolic abnormalities. Finally, because of the risk of tumor formation, surveillance should be performed regularly with cystoscopy.
Bacteriuria is a common finding after augmentation, particularly in patients on CIC. However, it need not be treated unless associated with a bone fide urinary tract infection, considered to be bacteriuria associated with symptoms of fever, suprapubic pain, hematuria, foul-smelling urine, incontinence, and increased production of mucus. Antibiotic therapy should be organism-specific and directed by urinary culture results. Other complications of bladder augmentation include bladder stone formation, thought to be related to urease-splitting bacterial UTI, uncleared mucus, hypercalciuria, residual urine or bladder foreign bodies, overproduction of mucus, metabolic acidosis due to abnormal reabsorption of urinary ammonium, and idiopathic bladder perforation.
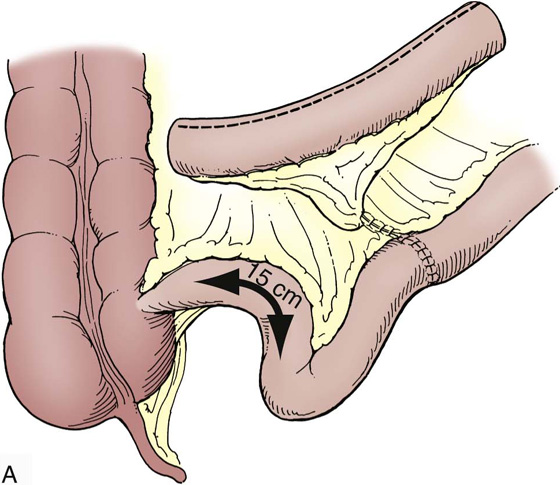
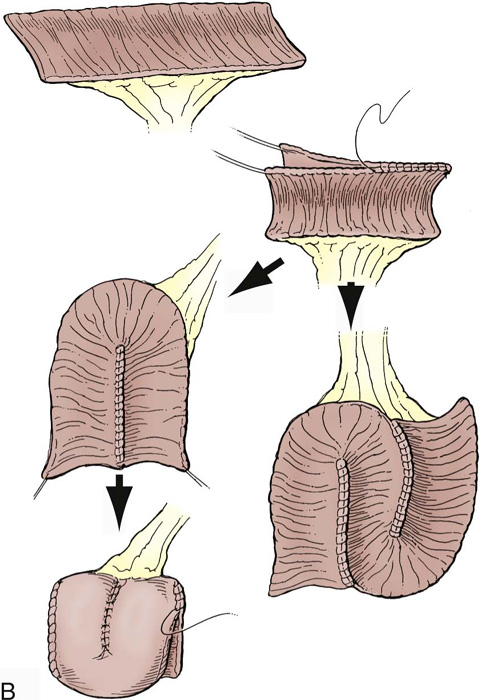
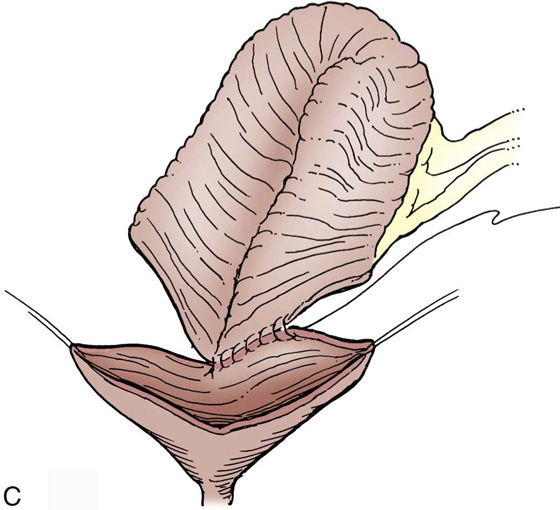
FIGURE 92–12 As depicted in the illustration, augmentation ileal cystoplasty entails isolating a segment of distal ileum (while preserving the terminal ileum and ileocecal valve), opening the segment longitudinally, reconfiguring the ileal patch, and anastomosing the reconfigured patch to a sagittally bivalved bladder. (From Adams MC, Joseph DB: Urinary tract reconstruction in children. In Wein AJ, Kavoussi LR, Novick Andrew C, et al, eds: Campbell-Walsh Urology. 9th edition. Philadelphia, 2007, Saunders, p. 3674.)
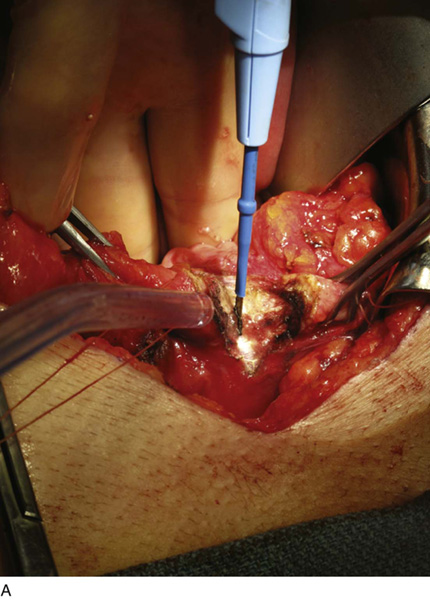
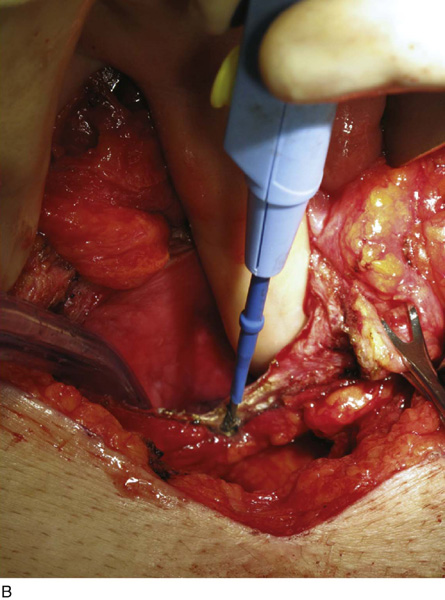
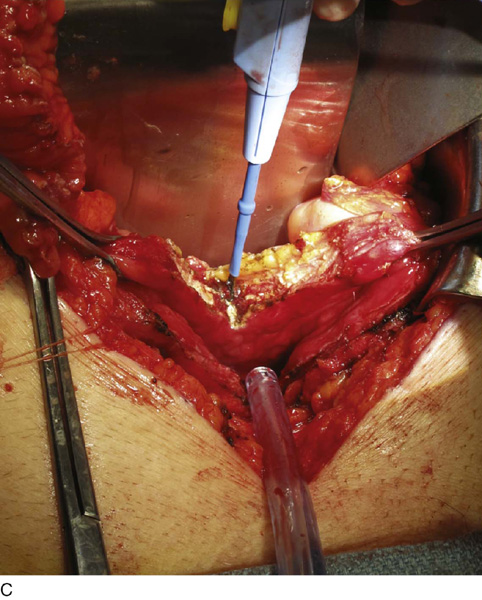
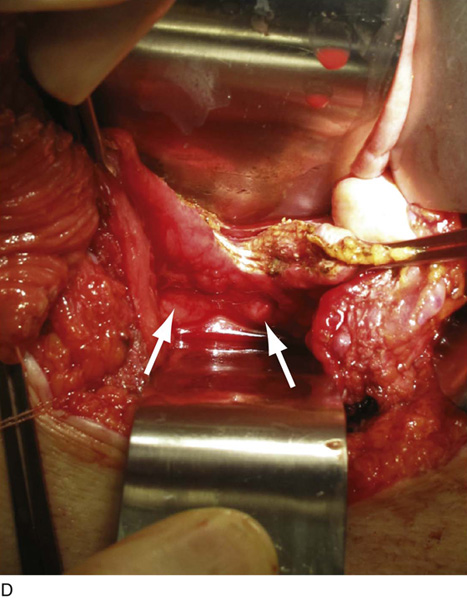
FIGURE 92–13 A. To prepare the bladder, a sagittal cystotomy is made in the dome of the bladder. B. The cystotomy is carried anteriorly to 3 cm above the bladder neck and (C) posteriorly to 2 cm above the trigonal ridge. D. The prepared bladder is thus almost completely bivalved in the sagittal plane as depicted in the figure. The ureteral orifices are denoted by the arrows.
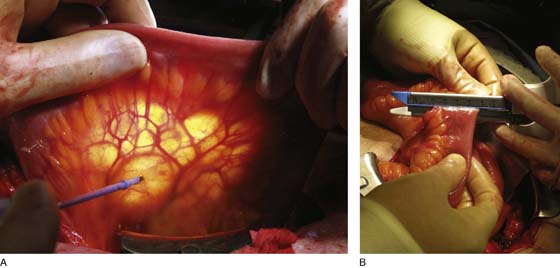
FIGURE 92–14 A. To isolate the bowel segment, the mesentery is divided so as to preserve blood supply to both the ileum segment and the eventual bowel anastomosis. B. Bowel division and reanastomosis may be performed using a handsewn technique or with bowel anastomotic staplers, as pictured in the figure. Here a 3.8-mm straight gastrointestinal stapler is used to divide the ileum.
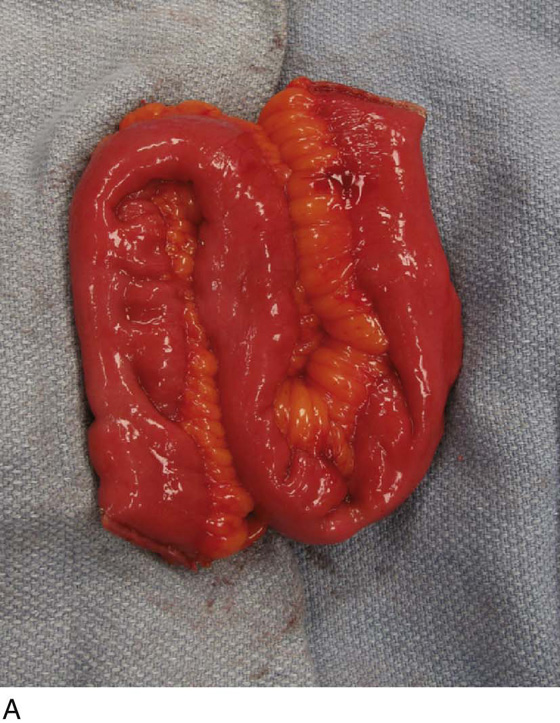
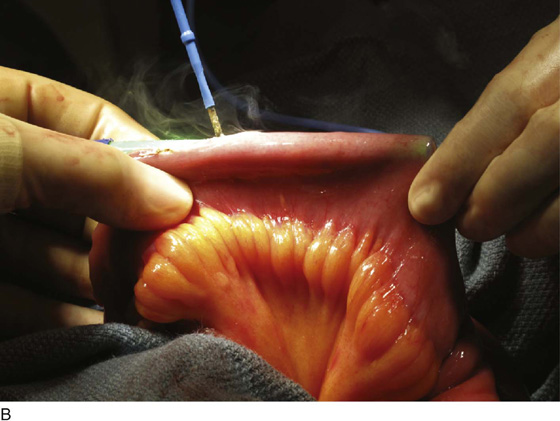
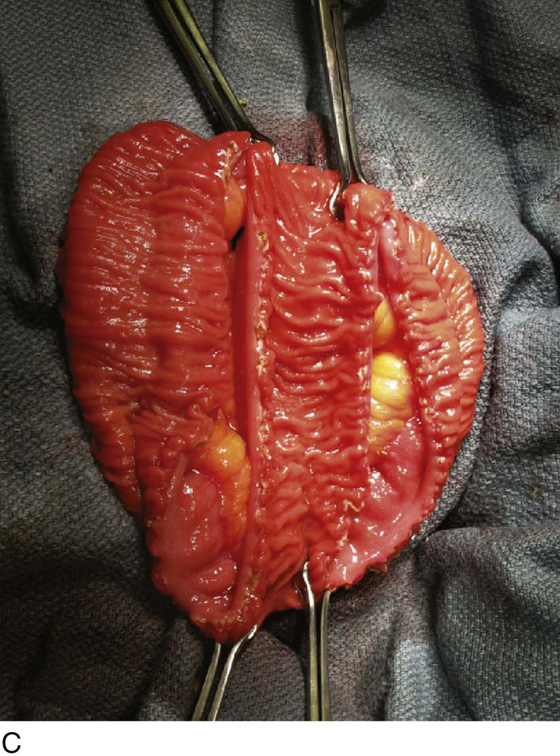
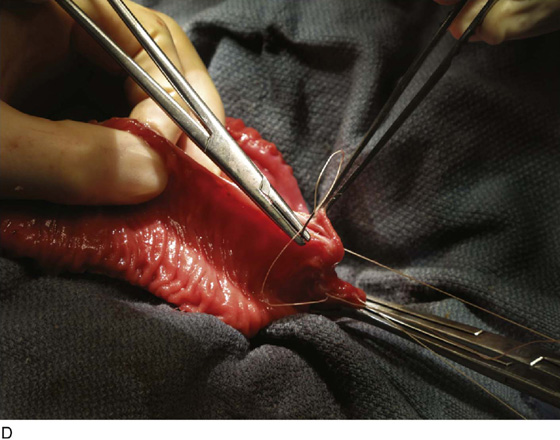
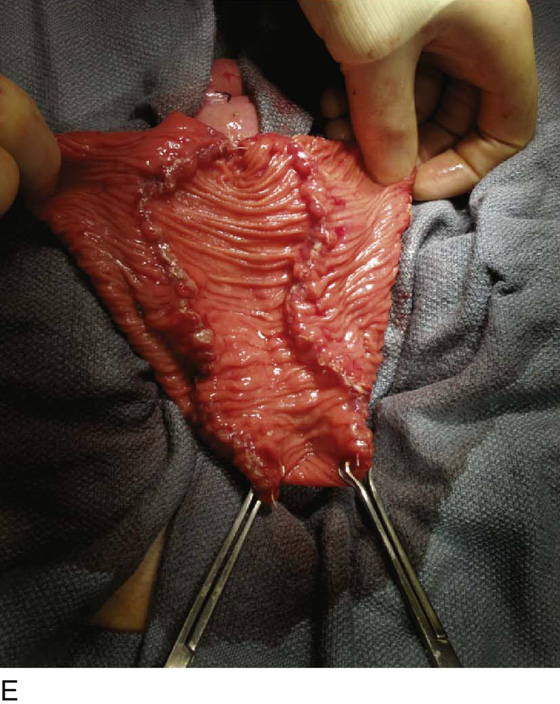
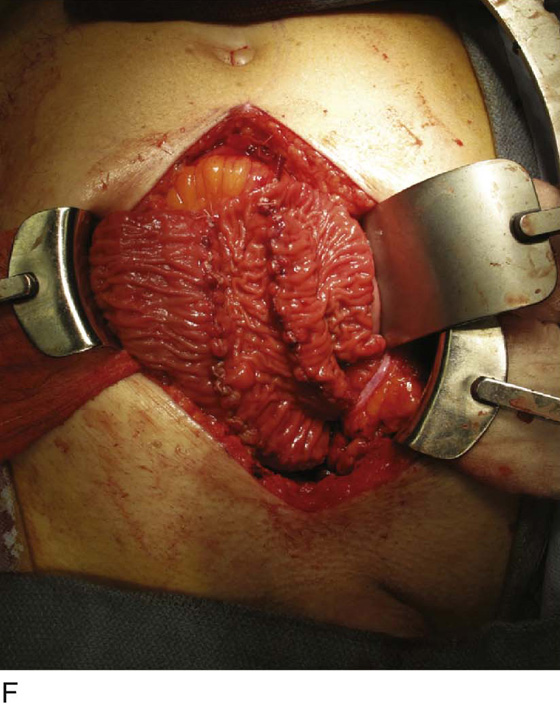
FIGURE 92–15 A. Typically, the bowel is reconfigured before anastomosing to the bladder to maximize spherical surface area; in this case, the bowel was arranged in an S shape as depicted. B. The bowel is incised longitudinally along the antimesentery border with electrocautery to completely detubularize the segment. C. This figure demonstrates the S configuration of the incised bowel before suturing. D. The two internal cut edges of the bowel are sutured longitudinally in a simple, running technique with 2-0 absorbable suture. E. The completely reconfigured ileal patch is shown aligned for anastomosis to the bladder. F. Beginning at the posterior apex of the bladder incision, the outer cut edges of the ileal patch and the bivalved bladder are sutured in a single layer with 2-0 absorbable suture, progressing in an anterior fashion until the entire patch is anastomosed to the bladder, effectively “clam-shelling” the ileal segment onto the dome of the bladder.
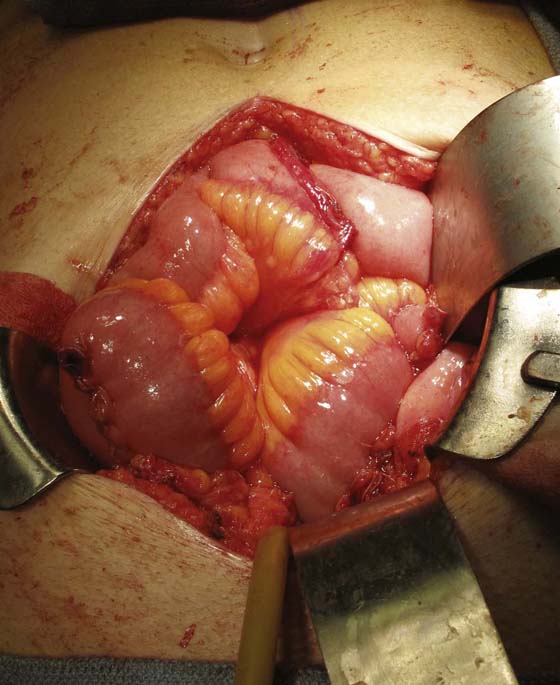
FIGURE 92–16 The completed ileal augmentation is shown in the figure and is filled with saline, confirming the water-tightness of the closure. A suprapubic tube is placed before complete closure and is brought out to the abdominal wall through a separate stab incision.