CHAPTER 8 Surgical Approach
For primary unconstrained shoulder arthroplasty we use a deltopectoral approach in all cases. This chapter details this commonly used surgical approach to the glenohumeral joint.
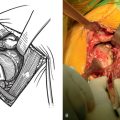
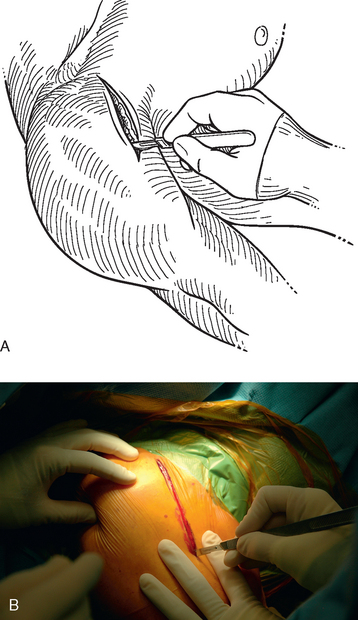
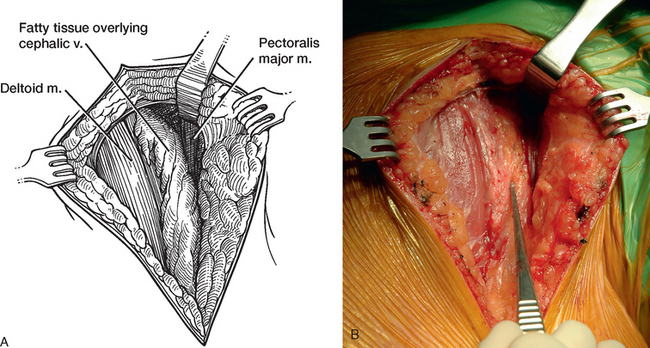
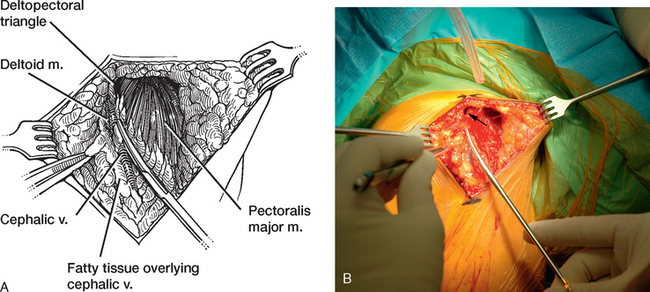
The surgical approach begins with identification of the topographic anatomy (Fig. 8-1). The coracoid process is readily palpable in all but the most obese patients and those who have previously undergone a surgical procedure involving the coracoid process. In thin patients, the deltopectoral interval may be palpable and is useful in guiding orientation of the skin incision. The skin incision, made with a no. 10 scalpel blade, is extended distally and laterally along the anticipated location of the deltopectoral interval from the tip of the coracoid process for 10 to 15 cm, depending on the size of the patient (Fig. 8-2). To minimize hemorrhage, we use a needle tip electrocautery for subcutaneous dissection and for most of the deep dissection throughout the procedure. Medium-size skin rakes are used for retraction during this portion of the approach. The cephalic vein is located to identify the interval between the deltoid and the pectoralis major. In many cases the cephalic vein is covered with a layer of fatty tissue, and identification of this tissue aids in location of the vein (Fig. 8-3). If difficulty is encountered in locating the cephalic vein (congenitally small or absent vein), the deltopectoral interval can be readily detected proximally by identifying a small triangular area devoid of muscle tissue between the proximal portions of the deltoid and pectoralis major muscles (Fig. 8-4). Once located, the cephalic vein is dissected free of the pectoralis major muscle with Metzenbaum scissors. We prefer to retract the cephalic vein laterally with the deltoid because most of the branches of the cephalic vein are based on the deltoid. Medial retraction of the cephalic vein with the pectoralis major disrupts these deltoid branches and introduces unwanted hemorrhage.
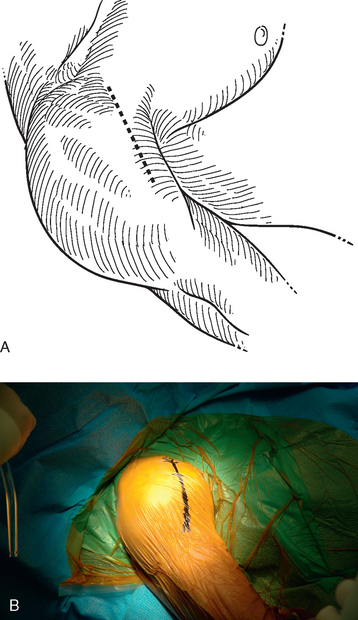
Figure 8-1 A and B, Topographic anatomy of the shoulder delineated for use in the deltopectoral approach.
After the deltopectoral interval has been identified and developed, Army-Navy retractors are used to maintain the interval. The humeral insertion of the pectoralis major tendon is identified. Dividing the superior centimeter of the pectoralis major tendon enhances exposure of the inferior aspect of the subscapularis, the anterior humeral circumflex vessels, and the axillary nerve (Fig. 8-5). A self-retaining deltopectoral retractor—we prefer a cerebellar-type retractor—is inserted to maintain exposure. Next, the conjoined tendon is identified and traced proximally to its insertion on the coracoid process. Large curved Mayo scissors are used to create a space superior to the coracoid process by placing the scissors just over the top of the coracoid and spreading the blades. Creating this space allows the surgeon to place the tip of a Hohmann-type retractor behind the base of the coracoid process to provide proximal retraction (Fig. 8-6).
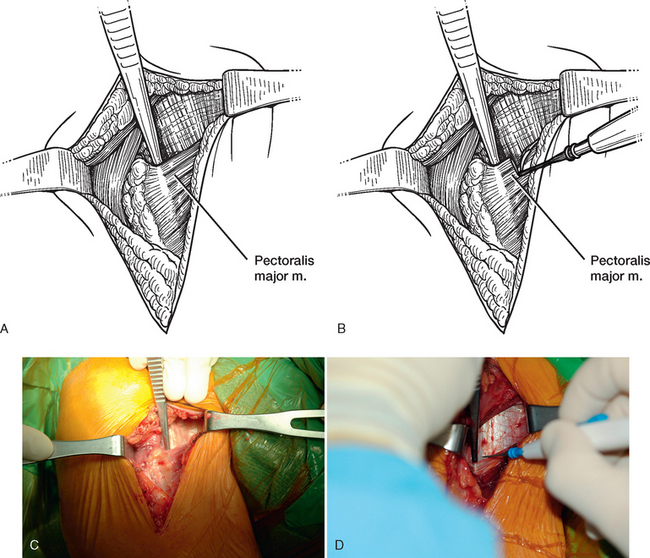
Figure 8-5 A to D, Identification and release of the superior aspect of the pectoralis major tendon.
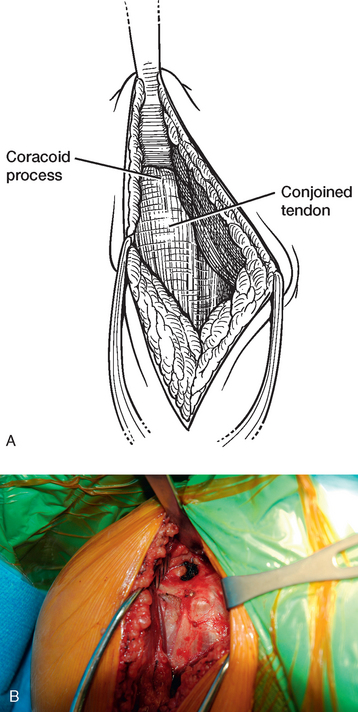
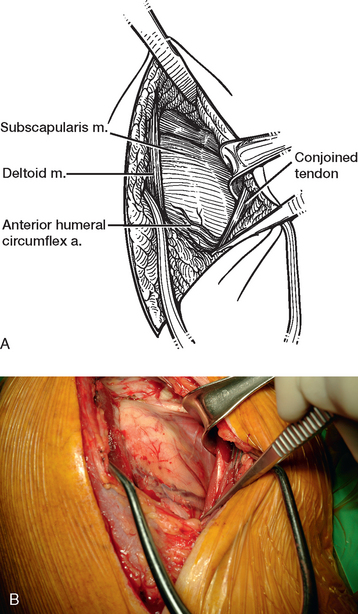
The arm is placed in an abducted and externally rotated position, and the apex that is formed by the insertions of the coracoacromial ligament and conjoined tendon to the coracoid process is identified (Fig. 8-7). This apex is developed with the needle tip electrocautery. The lateral aspect of the conjoined tendon is released with the electrocautery, and the conjoined tendon is retracted medially with a narrow Richardson retractor to expose the subscapularis tendon and anterior humeral circumflex vessels (the “three sisters”) (Fig. 8-8). We prefer to use a narrow Richardson retractor for the conjoined tendon instead of a self-retaining type of retractor because we believe that it minimizes the possibility of prolonged compression and damage to the musculocutaneous nerve.

Figure 8-7 A and B, Identification of the coracoacromial ligament and lateral aspect of the conjoined tendon.
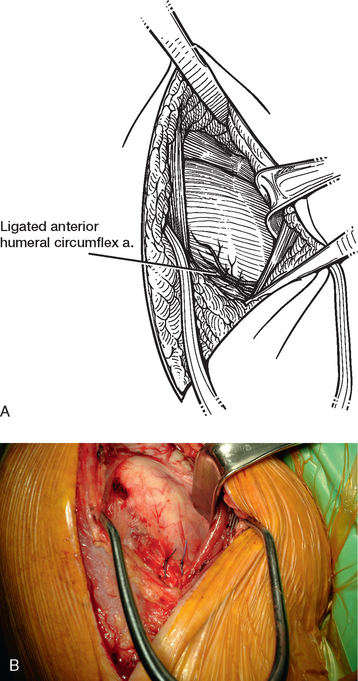
With the arm externally rotated, the anterior humeral circumflex vessels are suture-ligated at the inferior border of the subscapularis with no. 0 dyed absorbable braided suture. The proper site of ligation approximates the location of the anatomic neck of the humerus, with the vessels being ligated on each side of the anatomic neck. The suture limbs are cut approximately 15 mm long. This, combined with the dyed suture, allows easier identification of the ligation site during subsequent subscapularis tenotomy (Fig. 8-9).
The axillary nerve is next identified by direct visualization. The narrow Richardson retractor is moved slightly inferiorly along the conjoined tendon to just below the location of the anterior humeral circumflex vessels. The arm is flexed forward in neutral rotation, and blunt dissection is undertaken by spreading the tips of Metzenbaum scissors in the axillary fat inferior and deep to the humeral circumflex vessels. Identification of the axillary nerve ensures its protection throughout the procedure (Fig. 8-10). We identify the axillary nerve routinely. In primary surgery this vital nerve is almost always in its normal location, but in revision surgery this is rarely the case. The experience gained by dissecting the nerve in primary surgery pays great dividends when the surgeon must find the nerve in the scar tissue associated with revision operations. Table 8-1 lists the steps in the deltopectoral approach for easy reference.
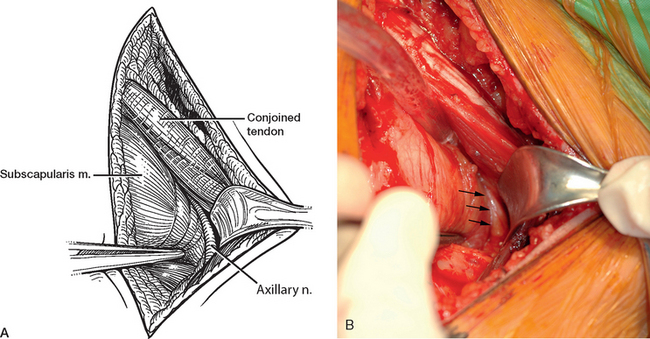
Figure 8-10 A and B, Identification of the axillary nerve (arrows in B) through direct visualization.
Table 8-1 STEPS IN THE DELTOPECTORAL APPROACH
| Step | Procedure |
|---|---|
| 1 | Palpate the coracoid process |
| 2 | Perform skin incision of the tip of the coracoid process 15 cm along the deltopectoral interval |
| 3 | Perform subcutaneous dissection with needle tip electrocautery |
| 4 | Dissect and retract the cephalic vein laterally with the deltoid |
| 5 | Identify the pectoralis major tendon insertion on the humerus and divide the superior 1 cm |
| 6 | Apply self-retaining retractor to the deltopectoral interval |
| 7 | Identify the conjoined tendon and trace it to the coracoid process |
| 8 | Place a Hohmann retractor superior to the coracoid process |
| 9 | Abduct and externally rotate the arm |
| 10 | Identify the lateral aspect of the conjoined tendon |
| 11 | Release the lateral aspect of the conjoined tendon |
| 12 | Retract the conjoined tendon medially with a narrow Richardson retractor |
| 13 | Expose the subscapularis and anterior humeral circumflex vessels |
| 14 | Suture-ligate the anterior humeral circumflex vessels with dyed no. 0 braided suture |
| 15 | Move the Richardson retractor slightly inferiorly along the conjoined tendon |
| 16 | Flex the arm to neutral |
| 17 | Identify the axillary nerve in fat inferior and deep to the circumflex vessels |