Surgery and Rehabilitation for Primary Flexor Tendon Repair in the Digit
Linda J. Klein and Curtis A. Crimmins
Surgical Indications and Considerations
Flexor tendon injuries have a long history of challenging the hand surgeon and therapist. Surgical and rehabilitation techniques have evolved significantly since Bunnell1 suggested that tendon lacerations over the proximal phalanx not be repaired, but ultimately grafted. This basic premise went unchallenged until early mobilization techniques were developed in an attempt to prevent tendon adhesions during the healing process. In the 1960s multiple investigators were able to document that primary flexor tendon repair was superior to delayed tendon grafting.2–4
Despite dramatic improvement in outcome over the past 25 years, research has continued with both clinical and laboratory investigations at a breakneck pace. Biomechanical studies of human cadaver tendons have been extraordinarily useful. Investigators have established how much force is applied to a tendon during rehabilitation motions and during normal hand activities.5–8 The most recent repair techniques have greater tensile strength,9 which has allowed early postrepair motion to advance from passive flexion to controlled active flexion. The results are fewer adhesions, with better active motion and functional outcomes.
Tendon Healing Stages
Tendon healing occurs in three general stages. The inflammatory phase lasts about 1 week and begins with a fibrin clot at the repair site. Macrophages and other inflammatory cells begin work by removing nonviable material and attracting fibroblasts. Epitenon cells bridge the repair site to restore the gliding surface. The active repair phase lasts from 1 to 2 months. Collagen bundles form and reorient to strengthen the bond between the tendon ends. The tendon begins to revascularize primarily from the intrinsic supply of the proximal stump. The remodeling phase follows until the collagen is mature along the lines of tension and the repair site strength is maximized. The maturation phase, as with all healing tissue, lasts a number of months.10
Surgical Procedure
The principles of flexor tendon repair are well established and must be rigorously applied to achieve consistently good results. The first step is to educate the patient about the inherent complexity of the injury. The patient should not only understand the demanding technical nature of the injury but also the extraordinarily demanding rehabilitation. The patient must accept that a successful outcome will depend in large part on his or her commitment to and involvement in the rehabilitation protocol. If possible, the patient should be counseled by a hand therapist preoperatively to establish rapport and discuss the therapy protocol. Finally, every patient must be informed that a perfect outcome is unusual and multiple surgical procedures may be necessary.
Flexor tendon repairs should be done in the operating room by experienced hand surgeons within 1 week of the injury. Precise surgical technique is rewarded by better outcomes. Tendon ends usually retract after being cut, and an adequately large surgical incision is generally needed to locate and retrieve the tendon ends. Incisions require careful planning to allow adequate exposure without compromising the vascularity of the skin flaps. Zigzag or midaxial approaches are preferred to prevent scar contracture (Fig. 11-1).

The hallmark of successful flexor tendon repair surgery is atraumatic handling of the soft tissue, especially of the tendon itself. Flexor tendons almost always retract and must be retrieved and advanced back through the flexor sheath. This may well be the most difficult part of the operation. Great care must be exercised to avoid injury to the delicate synovial lining of the fibro-osseous sheath or the epitenon of the flexor tendon. Damage of one or the other may increase the probability of adhesion formation and a poor outcome.
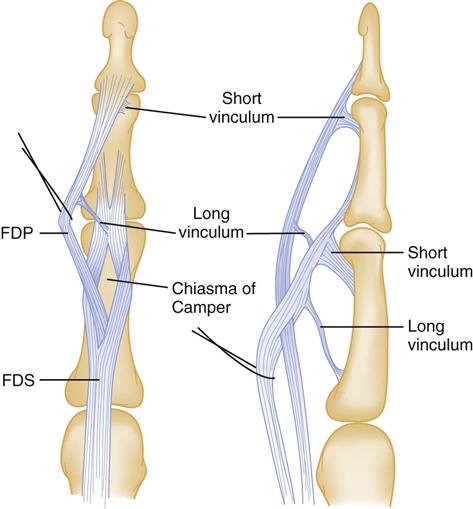
Once the tendon ends have been located and threaded back through the sheath and pulleys as carefully as possible, the tendons are repaired through a window between the pulleys, while maintaining the anatomic relationship of the profundus and superficialis tendons. The flexor digitorum superficialis tendon divides into two slips over the proximal phalanx, then it merges again, creating a buttonhole type opening referred to as the chiasm of Camper, just before inserting into the middle phalanx. The flexor digitorum profundus (FDP), which lies deep to the superficialis until this point, emerges through the chiasm of Camper, continuing distally, to insert on the distal phalanx of the digit (Fig. 11-2). When both tendons are lacerated over the proximal phalanx, the surgeon must be certain to reestablish this special relationship. Furthermore, each divided slip of the superficialis has a tendency to derotate 180° as it retracts. This must also be corrected as the tendon is repaired. Only restoration of normal anatomic relationships will allow excellent return of function after repair of lacerated flexor tendons.
The actual suturing of the flexor tendons has been a major focus in the evolution of stronger repairs. The current state of the art suggests that suture repair achieve adequate strength to allow early active-flexion rehabilitation protocols. To achieve this, the repair must ensure secure knots, provide a smooth juncture of tendon ends at the repair site, prevent gapping, maintain tendon vascularity, and be relatively straightforward to perform. Biomechanical studies have definitively shown that multistrand core suture techniques can withstand forces encountered during active motion protocols. In general, at least four strands of 3-0 or 4-0 sutures are needed to cross the repair site to ensure adequate strength for an early active motion protocol. Numerous suture techniques to achieve a repair of at least four strands are described in the literature. The authors prefer a double Kessler suture to produce the four strands of suture crossing the repair site, with a running epitendinous suture9 (Fig. 11-3).
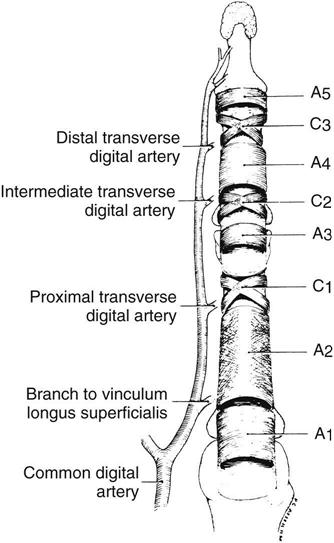
During the process of repairing the flexor tendons, it is important to preserve as much of the flexor tendon sheath and pulley system as possible. The surgeon must attempt to preserve the A2 and A4 pulleys to prevent tendon bowstringing (Fig. 11-4).
 A tendon injury at the level of either of these pulleys is technically demanding. Even repairs at other levels must be technically precise to allow gliding of the repair under preserved portions of the flexor sheath. Suture knots should be placed to minimize impingement of the flexor tendon repair as it passes through the pulley system. Current techniques meet these requirements, and results are expectedly good, with 75% or more tendon repairs falling consistently within the excellent to good categories.
Recent and future trends in flexor tendon surgery research include investigations of the ability of substances such as platelet-derived growth factor-BB, hyaluronic acid, and 5-flourouracil to enhance tendon healing.11–13 Polyvinyl alcohol shields and antiadhesion gels have been proposed and studied with some success to decrease adhesions.14 As these trends continue, we must stay abreast of current developments to maximize functional outcomes for patients after flexor tendon injury.
Therapy Guidelines for Rehabilitation
Flexor tendon repairs in the hand require a special rehabilitation effort. Flexor tendons will heal if positioned without tension or stress; however, adhesions to surrounding tissue will prevent tendon gliding necessary to allow active flexion once the tendon has healed. Thus the need to move a flexor tendon early in the healing process has been evident since repair of flexor tendons has begun.
 After repair it takes approximately 12 weeks for a flexor tendon to regain enough tensile strength to avoid rupture with normal strong use of the hand required to grasp, hold, or lift objects during daily activities. A variety of protocols for flexor tendon rehabilitation have been developed over the past 50 years, making the choice of which protocol to use difficult. No exact method exists to determine the strength of a tendon repair during the healing process; therefore the therapist and surgeon rely on general guidelines regarding tendon healing, as well as factors that affect rate of healing to determine advancement of the patient within a flexor tendon rehabilitation protocol. The factors that are considered include the type of injury; status of the tendon, sheath, and vessels at the time of repair; injury to surrounding structures; patient health issues such as diabetes; lifestyle factors such as smoking, which decreases oxygen to the tissues; and ability to comply with the rehabilitation program. Consideration of these factors and clear communication with the surgeon are necessary to determine the most appropriate approach to choose for each particular patient. Before describing the variety of guidelines from which to choose for flexor tendon rehabilitation, it is important to understand how exercise concepts are modified for flexor tendon repair rehabilitation.
Concepts of Healing and Exercises for Flexor Tendon Repair
Role of Adhesions After Flexor Tendon Repair
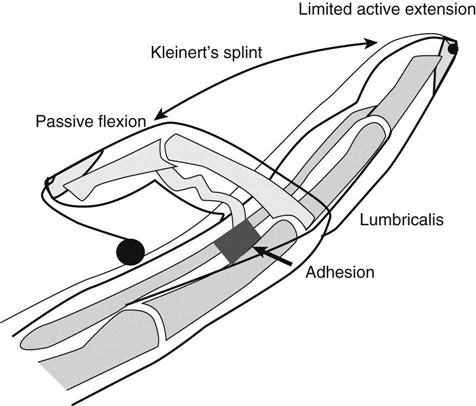
Adhesions occur very early in many cases, often within 1 week after surgery, preventing gliding of the flexor tendon needed to flex the digit. The end result of dense adhesions can be a digit that does not flex any further than it did before the tendon repair was performed, but with the additional pain, discomfort, and cosmetic changes caused by extensive surgical incisions in the digit, as well as many weeks of lost use of the hand while rehabilitation is attempted. Adhesions are the most difficult to deal with in zones I and II of the hand. Zones I and II extend from the distal palmar crease of the hand to the distal phalanx, and they incorporate the area of the digit in which the flexor tendons pass under a very tight pulley system, encompassed within a tendon sheath filled with synovial fluid that allows the tendon to glide under the tight pulleys (see Fig. 11-4). When adhesions form within the sheath-pulley system in zones I and II of the digit, they are very difficult (in many cases impossible) to overcome, and the result is a digit that is limited in active flexion. Historical perspectives on tendon healing help clinicians understand the reasoning behind current approaches to flexor tendon surgery and rehabilitation. Before the 1960s, flexor tendons were allowed to heal by immobilization for the first few weeks because it was thought that the tendon could not heal without nutrition from the surrounding scar tissue.15 This immobilization for the first few weeks resulted in dense adhesions, especially with repairs in zones I and II, with the inability to actively flex the digit. These results spurred the development of immediate passive-flexion protocols. The goal was that by passively flexing the digit and allowing partial, protected extension, the flexor tendon would glide far enough under the pulley system to prevent dense restricting adhesions and allow active motion when the tendon was adequately healed. However, in many cases, tendinous adhesions still developed. Research has shown that proximal gliding of the FDP tendon is inconsistent during passive flexion.16 The flexor tendon, when the digit is passively flexed, is thought in some cases to kink, or bunch up, between the pulleys, rather than passively glide through the pulley system (Fig. 11-5). To ensure proximal gliding of the flexor tendon, an active contraction of the muscle is needed to pull the tendon proximally through the pulley system. Because research has shown that tendons do heal intrinsically without surrounding adhesions,17–19 an effort to actively flex the repaired flexor tendon immediately after repair was initiated to prevent the onset of dense adhesions. To avoid rupture of the flexor tendon with active motion immediately after surgery, however, stronger suture techniques had to be developed.
Understanding Repair Strength
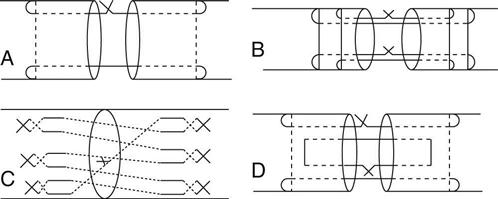
Flexor tendon surgery has undergone an evolution over the past 10 to 20 years. This evolution has resulted in the development of stronger suture repair techniques that will withstand the tension placed on the repair with controlled active flexion immediately after the repair. These new and stronger tendon repair techniques, as discussed in the earlier portion of this chapter, allow immediate controlled active motion without rupture, preventing the formation of dense adhesions. In general, the more strands of suture material that cross the tendon repair, the stronger the repair (Fig. 11-6).7–9,20,21
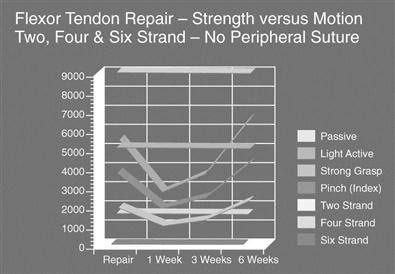
Traditional surgical procedure, using a two-strand repair, will tolerate passive motion, but is not shown to be sufficiently strong enough to tolerate active motion immediately after repair.22 A four-strand repair will tolerate gentle active motion. An eight-strand repair will certainly tolerate active motion; however, it is technically demanding and may become so bulky as to not glide under the pulleys, creating friction, possible wearing, and eventual rupture.20 Thus a four- to six-strand repair technique is frequently chosen to apply an immediate active motion protocol.
 After the traditional two-strand repair, it is safe to perform immediate passive-flexion protocols (described later in the chapter), or where necessary by patient limitation, immobilization. Immediate active-flexion protocols are generally not applied to the tendon with a traditional two-strand technique, but require a stronger four-strand technique and must be discussed with the surgeon. It is extremely important for the therapist to understand the type of suture repair that was done for a flexor tendon repair, to ensure that the protocol chosen for a particular patient stays within the tension limits of the repair.
Edema Control and Scar Management After Flexor Tendon Repair
Elevation is essential in the early phase after flexor tendon repair, because other forms of edema control are limited by the continuous splinting. Shoulder, elbow, and cervical motion exercises are performed to help with lymphatic function and circulation. In the intermediate and late phases of flexor tendon healing, use of a light compressive wrap at night is appropriate.  This should not be used during the day because compressive wraps will increase resistance to the flexor tendon during active flexion. The therapist initiates gentle massage of the scar (for firmness) and edema massage after sutures are removed; the patient can continue this process at home when made feasible by the presence of the splint. Commercially available scar management pads may be placed or formed over the scar, applied at night only, if scars become thickened or raised. Because the splint is worn full time in the early phase of the rehabilitation programs, it is difficult for the patient to safely apply the scar management pads at night, and they are often applied beginning in the intermediate phase for this reason.
Passive-Flexion Exercises After Flexor Tendon Repair
Passive flexion of the digits is performed through all the phases of flexor tendon rehabilitation. Passive flexion of the digit after a flexor tendon repair places the repaired tendon on slack. Very little tension develops within the flexor tendon during passive flexion of the digit, as long as the patient is truly relaxed and not actively assisting the passive flexion.5,6 After flexor tendon repair, a finger will become stiff because of swelling, incisional scarring, and pain if passive flexion is not performed within 1 week after the procedure. If passive flexion remains limited after sutures are removed, then other therapy techniques may be used to assist in regaining passive flexion, such as heat combined with stretch into flexion before manual passive flexion within the patient’s pain tolerance.
Wrist Tenodesis Exercises After Flexor Tendon Repair
Wrist tenodesis exercises use wrist motion to assist in moving the flexor tendons. The wrist is flexed to comfortable tolerance, and the fingers allowed to gently straighten at all three joints. This will give the tendon slack at the wrist and glide the tendon distally during finger extension. Next, the fingers are relaxed, the wrist is extended to 30°, and the fingers are gently flexed. The wrist extension pulls the flexors slightly proximally and gives slack to the finger extensors, allowing the flexors to glide proximally (Fig. 11-7). The wrist tenodesis exercise is started in the intermediate phase of rehabilitation after a two-strand repair, because it creates tension in the tendon. It is started within 3 days after surgery within an immediate active-flexion approach after a four (or more) strand repair unless otherwise directed by the physician.
Active Extension of the Fingers After Flexor Tendon Repair
Full extension of all three finger joints at the same time must be limited immediately after flexor tendon repair to avoid pulling the repair apart by stretch. Extension is limited in the early phase of tendon healing by positioning within the dorsal blocking splint that places the metacarpophalangeal (MP) joints in flexion. However, interphalangeal (IP) extension is very important to obtain shortly after the repair in zones I and II because the proximal interphalangeal (PIP) and distal interphalangeal (DIP) joints contract into flexion very quickly after repairs in these zones. All flexor tendon protocols emphasize attaining full IP extension immediately after surgery, unless a digital nerve has been lacerated or another injury prevents placement of the IP joints in full extension, as directed by the surgeon. When a digital nerve has been repaired in the digit, the PIP joint is generally allowed to extend to 15° less than full extension.  Composite extension of all three finger joints at the same time will place an adverse stretch effect on the flexor tendon repair in zone I or II initially after surgery, but it can be tolerated at 4 weeks after surgery with the wrist in flexion. Wrist and full finger extension are not performed at the same time until the late stage of tendon healing.
Passive Finger Extension After Flexor Tendon Repair
Passive extension of the fingers is potentially more dangerous than active extension, because if done overaggressively, it may stretch the tendon repair apart. It is also possible for the patient to have some tension within the flexor tendon during the passive extension, resulting in resistance to the repaired tendon and possible rupture.
 In the early phase of tendon healing, passive IP extension is only performed when active IP extension is limited (in the presence of PIP or DIP joint flexion contractures). When IP joint flexion contractures appear early, passive IP joint extension can be performed carefully, with the flexor tendon in a protected position and ensuring that the patient’s hand is fully relaxed. The protected position for a flexor tendon is with all other joints supported in flexion while one joint is extended. For instance, to treat a PIP flexion contracture 3 weeks after repair, the therapist flexes the wrist and MP joints as far as can be tolerated, then passively extends the PIP joint by applying pressure under the middle phalanx into extension. The DIP joint is not passively extended at the same time as the PIP joint to avoid stressing the tendon across two joints in the early phase of tendon healing.
Active Finger Flexion After Flexor Tendon Repair
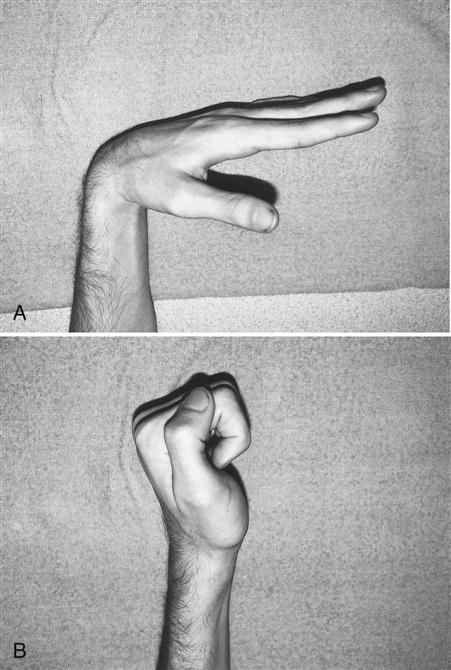
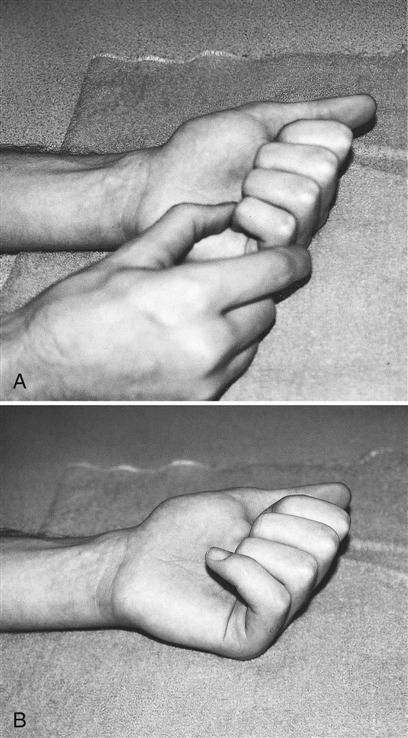
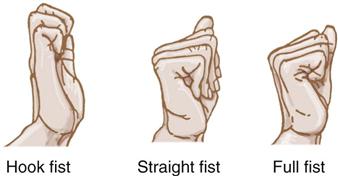
Active flexion introduces significantly increased tension in the repaired flexor tendon. Traditional approaches using immediate passive flexion or immobilization for the early phase of tendon healing introduce active flexion of the repaired digit in the intermediate phase of healing (4 weeks after surgery). An assessment of flexor tendon gliding is done to determine what type of active flexion is appropriate. To assess flexor tendon gliding, passive flexion is compared with active flexion.  The initial assessment of active flexion is done cautiously, with the wrist in 20° to 30° of extension (Fig. 11-8). When a difference exists in the repaired digit between passive and active flexion of 15° or more,23 it indicates the presence of adhesions, limiting tendon gliding. When flexor tendon adhesions limit active more than passive flexion 3 to 4 weeks after surgery, active tendon-gliding exercises are initiated. Tendon gliding can be achieved by performing a sequence of three fists: hook fist, straight fist, and composite fist (Fig. 11-9). A hook fist is similar to a claw position, flexing the PIP and DIP joints with the MPs extended. This type of fist results in the largest differential gliding of the FDP and flexor digitorum superficialis. A straight fist results in the most excursion of the flexor digitorum superficialis. A composite fist results in the most excursion of the FDP tendon.
Active flexion is begun in the early phase of tendon healing when the patient is placed in an immediate active motion flexor tendon rehabilitation approach. At the first postoperative physician or therapy visit 2 to 3 days after surgery, a controlled method of active flexion termed place-hold is begun. Place-hold flexion uses the therapist’s or patient’s other hand to passively place the fingers into a light fist; then the patient holds the fingers actively in the light-fist position as the other hand is removed. This requires an active muscle contraction and flexor tendon gliding in a proximal direction to keep the finger in a flexed position actively. The place-hold exercise is believed to result in less tension on the repaired tendon than if the finger were actively flexed without the assistance of the patient’s opposite hand or the therapist’s hand.  Within an immediate active motion approach, the three types of fists described earlier are not performed until the intermediate phase of tendon healing if flexor tendon adhesions develop in spite of early active motion attempts.
Postoperative Guidelines
In general, three types of flexor tendon rehabilitation guidelines exist. These are (1) immobilization, (2) immediate passive flexion, and (3) immediate active-flexion approaches. The reasoning for choosing one approach over another is based on the complexity of injury, the age of the patient, patient compliance, patient health factors, and the suture repair technique. The choice of which set of guidelines within which to place a patient is best determined in conjunction with the referring surgeon, with the final decision resting with the surgeon.
Within each approach the patient progresses through three general levels or phases: early, intermediate, and late phases. The decision of when to advance a patient to the next level within each approach is determined by the amount of flexor tendon adhesion that limits the tendon gliding and the amount of time after repair. To determine the level of flexor tendon adhesion, the therapist compares passive flexion with active flexion. When a large discrepancy exists between passive and active flexion, with passive flexion 15° or more better than active flexion, it signifies the presence of flexor tendon adhesions. When adhesions limit gliding of the flexor tendon, and the time period after repair is adequate to allow increased tension on the tendon, the patient is progressed to the next level of the rehabilitation approach.  The tendon that does not have limiting adhesions is more at risk for rupture than the tendon with strong adhesions that surround the tendon repair site. When tendon adhesions limit active flexion more than passive flexion, the tendon can tolerate more tension before rupture, and thus can be advanced to the next level sooner than the tendon without limiting adhesions.23 Flexor tendon adhesions are assessed on a continual basis to determine the level of the rehabilitation program that is appropriate for the patient at that time. The time after surgery, combined with the level of flexor tendon adhesion, determines the placement of the patient in the program.23 When adhesions prevent gliding of the flexor tendon, it is appropriate to advance the patient to the next phase of rehabilitation to encourage tendon gliding, with surgeon approval. When flexor tendon gliding is adequate, the patient is kept in the current level of the program until the number of weeks after surgery dictates that the repair is strong enough to tolerate the increased tension of the next phase of the treatment protocol.
The appropriate choice of which guideline to use and advancement of the patient within the chosen guideline require in-depth knowledge of flexor tendon healing and tensile strength guidelines at various times after repair, awareness of the type of repair, and the patient’s compliance level, as well as communication with the referring surgeon.
Immobilization Approach
Indications for Immobilization
Immobilization is rarely used after a flexor tendon repair; however, some situations call for its application. Immobilization is used for young children, who are unable to adhere to a motion protocol with its specific precautions. Children younger than age 12 are most often placed in immobilization for the first 3 to 4 weeks, but each child should be evaluated related to his or her maturity level. Other population types that may be placed in immobilization after a flexor tendon repair would be those that have cognitive limitations (e.g., Alzheimer disease, noncompliant patients). It is sometimes difficult to know the patient’s compliance ability at the first therapy session. When a patient demonstrates inability to appropriately comply with the precautions and exercises within a certain approach, it may become necessary to change the rehabilitation approach to one with less early motion, or a cast may be needed instead of a removable splint in the first 4 to 5 weeks after surgery. When a concomitant fracture or significant loss of skin requiring a skin graft occurs, a period of immobilization may be necessary to allow the bone or skin to heal adequately before beginning motion. Not all fractures require immobilization. Stable fractures or those that have had open reduction internal fixation may tolerate immediate controlled motion, as determined by the surgeon. Few sets of guidelines exist for therapy after immobilization of the repaired flexor tendon because of dense adhesion formation. The most frequently sited guideline, described as follows, encourages motion and light resistance to facilitate tendon gliding after the initial phase of tendon healing.24,25
Immobilization Guidelines
Phase I (Early)
TIME: 0 to 4 weeks
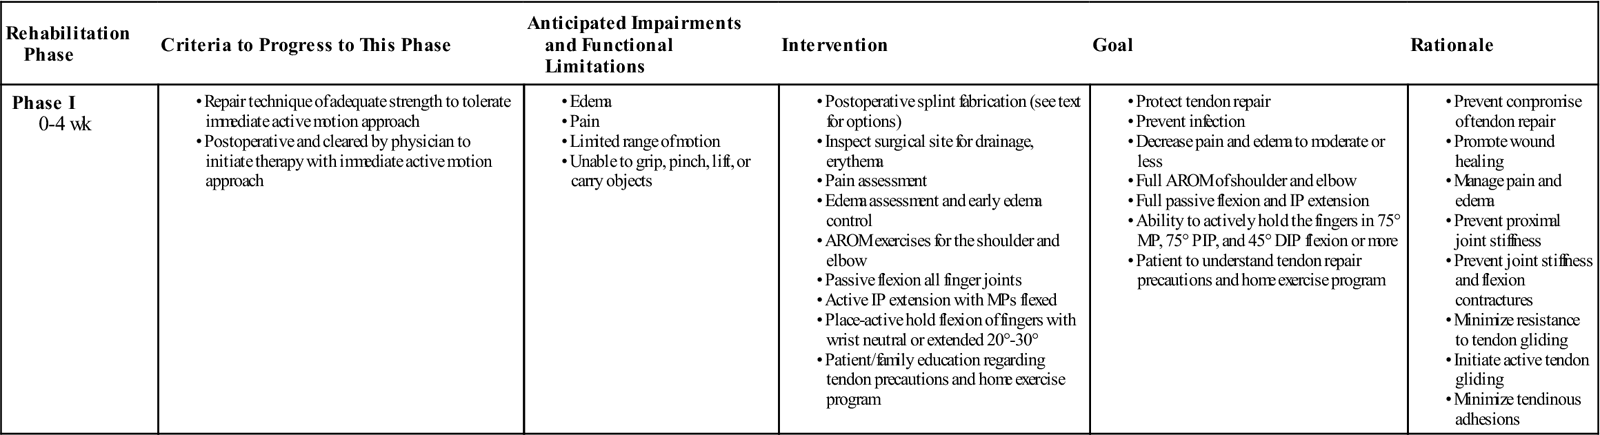
GOALS: Prevent joint stiffness, avoid tension on tendon repair, prevent flexion contractures, patient and family education regarding tendon protection, manage edema, full active range of motion (AROM) of upper extremity (UE) joints proximal to the wrist (Table 11-1)
TABLE 11-1
Flexor Tendon Repair in the Digit (Immobilization Approach)
< ?comst?>
< ?comen?>< ?comst1?>

< ?comst1?>
< ?comen1?>
AROM, Active range of motion; IP, interphalangeal; MP, metacarpophalangeal; ROM, range of motion.
< ?comst1?>< ?comen1?>*< ?comst1?>< ?comen1?>In cases cleared by physician.
Splinting.
When used, the immobilization approach will place the patient’s hand in a dorsal blocking cast (or in a dorsal blocking splint wrapped securely in place, with instructions not to remove the splint at home). The position of the cast or splint in the early phase of immobilization is 20° to 30° of wrist flexion, and 40° to 50° of MP flexion, with IP extension. This position keeps the flexor tendons on slack, yet prevents the most difficult joint problems (e.g., PIP flexion contractures). The cast or splint will stay in place for 3 to 4 weeks.
Exercises.
Within phase I (zero to 3 or 4 weeks after surgery) the patient generally remains immobilized in the dorsal blocking splint or cast. When referred to therapy during the early phase, the therapist may perform passive flexion to prevent joint stiffness and a significant other, such as a parent, may be taught to perform passive flexion at home if he or she is reliable. Goals in the early phase of the immobilization approach include protecting the repaired flexor tendon(s) from rupture with full time splinting and patient education, obtaining passive flexion when allowed, edema control, and obtaining full active motion of the UE proximal to the wrist.
Phase II (Intermediate)
TIME: 3 or 4 weeks to 6 weeks
GOALS: Improve joint mobility (full flexion passive range of motion [PROM], partial flexion AROM, full IP extension), patient and family education, scar management, splinting to prevent tendon repair rupture between exercises (Table 11-2)
TABLE 11-2
Flexor Tendon Repair in the Digit (Immobilization Approach)
< ?comst?>
| Rehabilitation Phase | Criteria to Progress to This Phase | Anticipated Impairments and Functional Limitations | Intervention | Goal | Rationale |
| Phase II 3/4-6 wk |
|
< ?comen?>< ?comst1?>
< ?comst1?>
< ?comen1?>
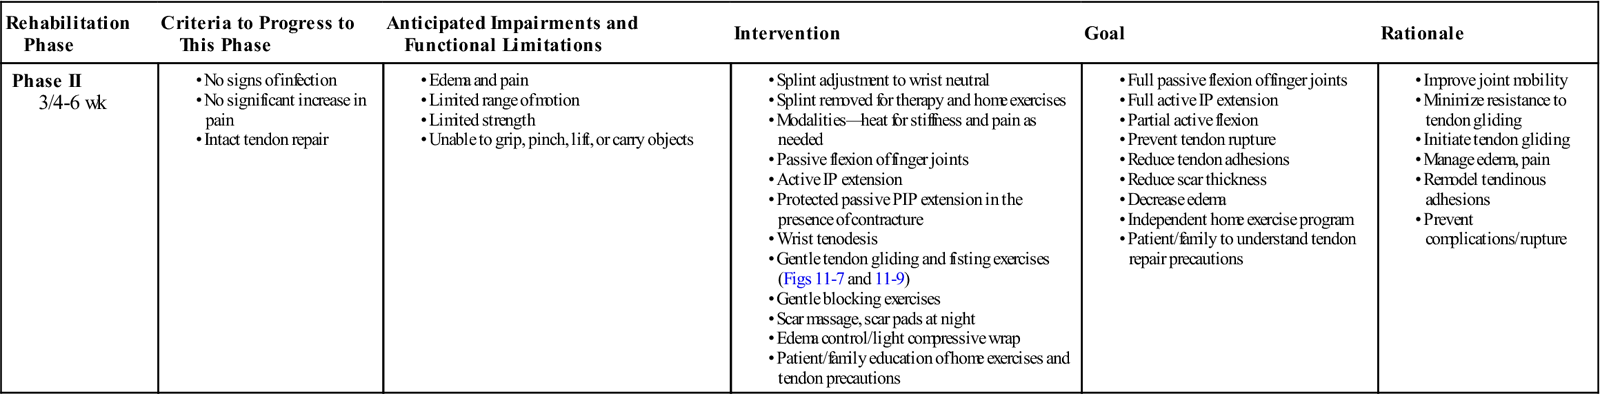
Exercises.
With phase II exercises, the splint position is adjusted to bring the wrist to neutral. The splint is removed for exercises hourly. Passive flexion is initiated first, to loosen stiff joints created by immobilization, swelling, and scarring. After passive flexion, wrist tenodesis is initiated as described previously, to begin gentle tendon gliding (see Fig. 11-7). Tendon-gliding exercises are initiated, with three types of fisting exercises (i.e., straight fist, hook fist, and composite fist; see Fig. 11-9), as described previously. Assessment of flexor tendon adhesions is performed after 3 to 4 days of these exercises by comparing passive flexion with active flexion of the digit or digits. When active flexion is significantly more limited than passive flexion, blocking exercises of the PIP and DIP joints are added. Additional flexor tendon gliding can be obtained with isolated tendon gliding exercises. The therapist can isolate the FDP tendon by blocking the MP and PIP in extension while performing active DIP flexion. The flexor digitorum superficialis (FDS) tendon is isolated with blocking of the FDP tendon by holding all other fingers in complete extension and allowing the injured finger to flex at the PIP joint. If improvement is noted in tendon gliding 1 week later, then these exercises are continued until 6 weeks after surgery.
 If no improvement occurs in active flexion with blocking and tendon gliding exercises, then light resistance of gripping with very soft putty is initiated at 5 weeks after surgery. This resistance is initiated in the intermediate phase of healing only in the presence of flexor tendon adhesions that limit active flexion more than passive flexion by 15° or more.23 Extension of the fingers is performed with the wrist flexed. When PIP flexion contractures are present, limiting the PIP joints, DIP joints, or both from full extension, they are splinted in a volar extension splint at night, beginning at 4 or 5 weeks after surgery. Goals in the intermediate phase of the immobilization approach include obtaining full passive flexion and partial active flexion, full IP extension, and protecting the repaired tendon from rupture with appropriate splinting between exercises and patient education, as well as scar management.
Phase III (Late)
TIME: 6 to 12 weeks
GOALS: Normalize PROM and AROM, improve strength to allow a light fist, patient and family education to avoid tendon repair rupture (Table 11-3)
TABLE 11-3
Flexor Tendon Repair in the Digit (Immobilization Approach)
< ?comst?>
| Rehabilitation Phase | Criteria to Progress to This Phase | Anticipated Impairments and Functional Limitations | Intervention | Goal | Rationale |
| Phase III 6-12 wk |
|
< ?comen?>< ?comst1?>
< ?comst1?>
< ?comen1?>
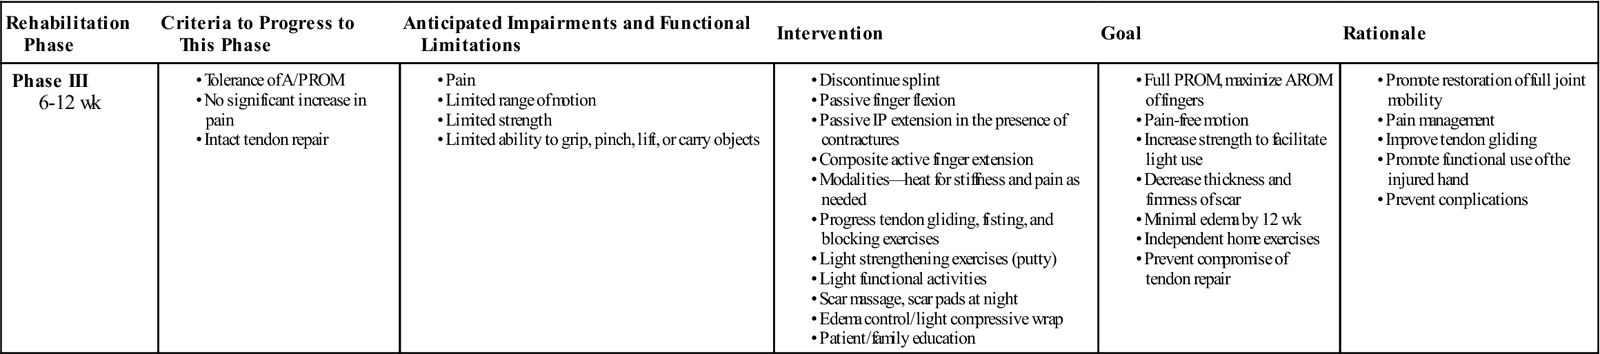
Exercises.
This phase generally lasts from 6 to 12 weeks after surgery. All protective splinting is discontinued. When passive flexion continues to be limited by joint stiffness and swelling, therapeutic techniques such as heat and PROM are continued. Active flexion, joint blocking, and tendon gliding exercises continue to attempt to bring active flexion to match the level of passive flexion. Resistance can be introduced or advanced during this phase. Light resistance can be provided with putty or light manual resistance of the therapist, and it can be advanced to light grippers in the middle of the late phase of tendon healing.
 If flexor tendon adhesions are minimal, then resistance is initiated at 8 weeks after surgery, gently at first, with strong resistance restricted until after 12 weeks after surgery. Goals in the late phase of the immobilization approach include obtaining full passive and active flexion and extension of the injured finger or fingers, increasing strength to obtain a light fist, and protecting the repaired tendon from rupture with patient education.
Regardless of the goals, active motion after use of an immobilization approach is frequently limited because of adhesion formation. Limited active flexion of the repaired digit, especially the DIP joint, is frequently seen, and there may be difficulty actively flexing the adjacent digits because of the common muscle belly of the FDP to the last three digits (i.e., quadriga effect). Grip strength will be diminished secondary to loss of active flexion. It is common for flexor tendons with adhesions to require a prolonged time of therapy, with a strong emphasis on a home program of blocking exercises and resistance even longer than the 12-week healing period, to continue to facilitate tendon gliding during the long remodeling process. Further surgical procedures are available for the repaired flexor tendon with significant adhesions that limit functional use of the hand, which are most often performed between 3 and 6 months after repair.
Immediate Passive-Flexion Approach
Immediate passive-flexion approaches apply passive flexion to the fingers, beginning within 3 or 4 days after surgery. These guidelines are appropriate for, and have been traditionally applied to, the patient with a two-strand repair of the flexor tendon. No active contraction of the repaired flexor muscle and tendon unit occurs; therefore limited proximal gliding of the flexor tendon occurs in the early phase of tendon healing within this approach. The benefits of an immediate passive-flexion approach are that the finger does not become overly stiff, and a limited amount of gliding of the repaired tendon occurs. Results vary widely regarding results of the immediate passive-flexion approach and tendinous adhesions. Two main categories encompass all the immediate passive-flexion guidelines. These two categories are approaches that use either elastic traction or static-positioning splints during the early phase of tendon healing. Both approaches use a dorsal blocking splint with the wrist at 20° to 30° of flexion and the MPs at 50° to 60° of flexion, with the IPs allowed full extension within the splint. The difference between the two approaches (the positioning of the fingers in either dynamic flexion or static IP extension in the early phase of healing) will be described within each guideline.
The static-positioning guideline follows the modified Duran and Houser25–27 rehabilitation program, while the elastic traction guideline is patterned after the modified Kleinert,3 Washington,28 or Chow29 rehabilitation programs. These guidelines will be generalized in the following paragraphs.
Immediate Passive Flexion With Static-Positioning Guidelines
Patients are placed into an immediate passive-flexion approach that does not use elastic traction on the fingers when it is the preference of the surgeon and therapist or when elastic traction is contraindicated.  These contraindications include questionable soft tissue tolerance to prolonged flexion, early development of IP flexion contractures, or presence of a concomitant injury such as a fracture that would not tolerate passive flexion.
Phase I (Early)
TIME: 0 to 4 weeks
GOALS: Attain full passive flexion, full active IP extension, minimize edema, prevent rupture of flexor tendon by splinting and patient education, full AROM of UE joints proximal to the wrist (Table 11-4)
TABLE 11-4
Flexor Tendon Repair in the Digit (Immediate Passive-Flexion Approach)
< ?comst?>
| Rehabilitation Phase | Criteria to Progress to This Phase | Anticipated Impairments and Functional Limitations | Intervention | Goal | Rationale |
| Phase I 0-4 wk |
Postoperative and cleared by physician to initiate therapy |
• Passive flexion of all finger (or thumb) joints (see Fig. 11-11 in addition to composite flexion of all finger or thumb joints)
• Active IP extension with MPs flexed (see Fig. 11-12, B, for IP extension with elastic traction approach)
|
< ?comen?>< ?comst1?>
< ?comst1?>
< ?comen1?>
AROM, Active range of motion; IP, interphalangeal; MP, metacarpophalangeal.
< ?comst1?>< ?comen1?>*< ?comst1?>< ?comen1?>Unless digital nerve is repaired, then slight flexion of the proximal interphalangeal or physician direction.
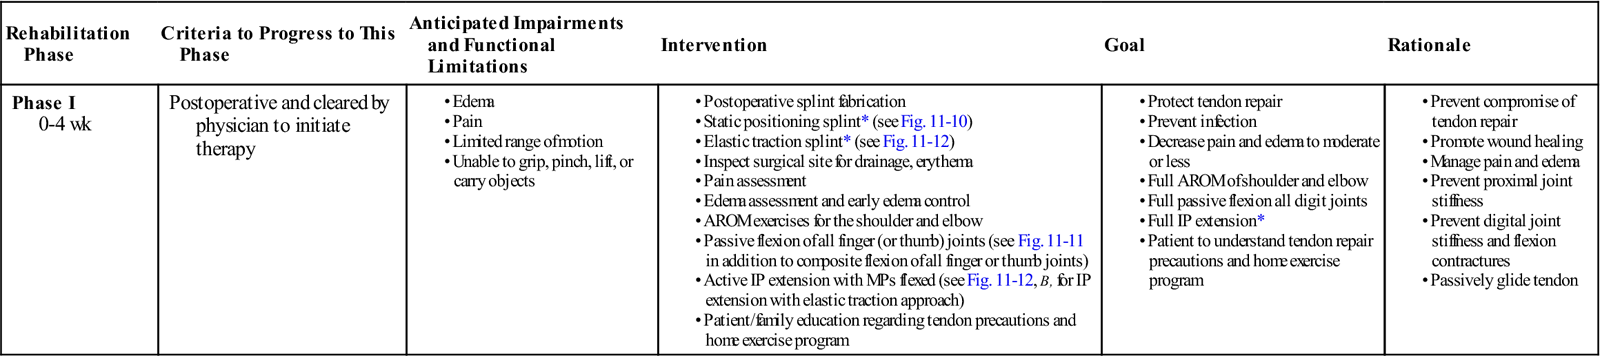
Splinting.
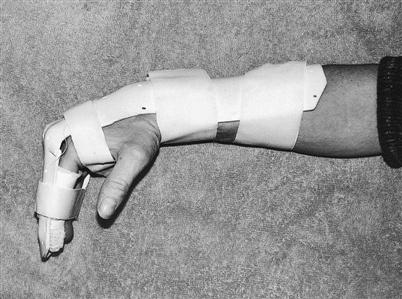
A dorsal blocking splint is fabricated and applied within the first 5 days after surgery. The wrist is placed in 20° to 30° of flexion, the MP joints are placed in approximately 50° of flexion, and the IP joints are straight (Fig. 11-10). The patient is instructed to remain in the splint at all times for the first 4 weeks after surgery. It is removed in therapy for cleansing of the skin and splint, as well as skin assessment for pressure and fit.
Exercises.
Exercises should be performed in therapy and at home, 10 repetitions every hour. Within the splint, passive PIP flexion to tolerance, passive DIP flexion to tolerance, and then composite passive flexion of MP, PIP, and DIP joints to tolerance. Duran and Houser25,26,30 described specific passive exercises (Fig. 11-11). Active IP extension exercises to the hood of the dorsal blocking splint are also performed.
Phase II (Intermediate)
TIME: 4 to 7 weeks
GOALS: Attain partial active flexion (at least 50%) of the injured digit, full passive flexion, full active extension, protect flexor tendon from rupture with splinting between exercises and patient education (Table 11-5)
TABLE 11-5
Flexor Tendon Repair in the Digit (Immediate Passive-Flexion Approach)
< ?comst?>
| Rehabilitation Phase | Criteria to Progress to This Phase | Anticipated Impairments and Functional Limitations | Intervention | Goal | Rationale |
| Phase II 4-7 or 8 wk |
|
|
< ?comen?>< ?comst1?>
< ?comst1?>
< ?comen1?>
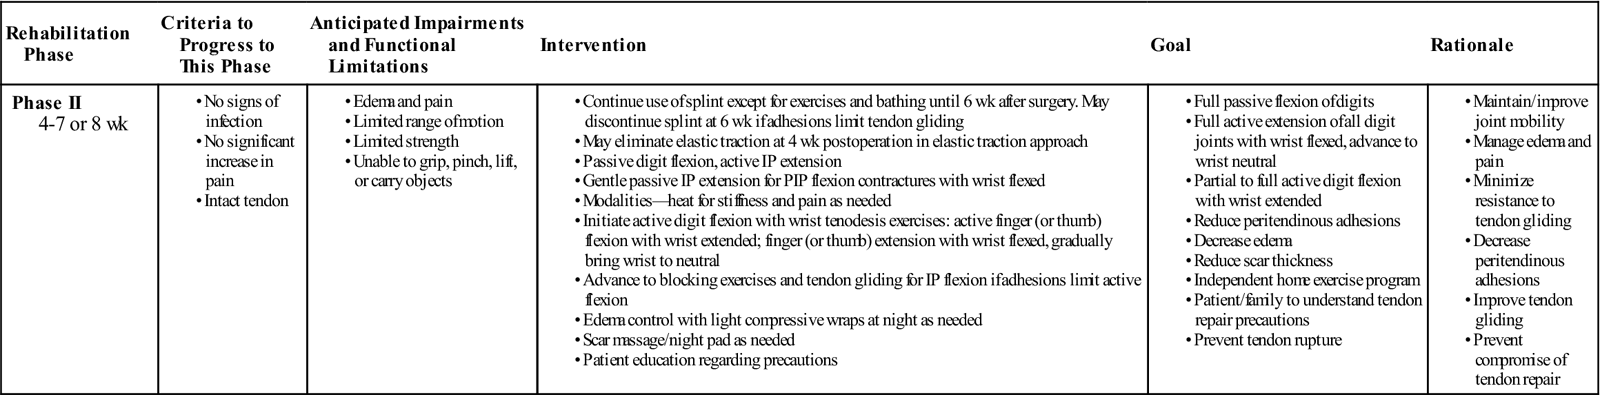
Exercises.
Exercises continue to be performed in therapy and at home, 10 repetitions every hour. Remove splint at home for exercises and bathing. Begin with wrist tenodesis exercises, and place-active hold flexion. Advance to gentle active-flexion exercises. If flexor tendon adhesions are noted (active flexion limited by 15° or more compared with passive flexion), begin blocking exercises for PIP and DIP flexion. Active finger extension is performed with wrist flexed until 6 weeks, then with the wrist neutral. Passive IP extension is begun if PIP or DIP flexion contractures exist, with the tendon in a protected position.
Phase III (Late)
TIME: 7 or 8 to 12 weeks
GOALS: Attain full active and passive flexion and extension of digits, light grip strength, protect repaired tendon from rupture with patient education
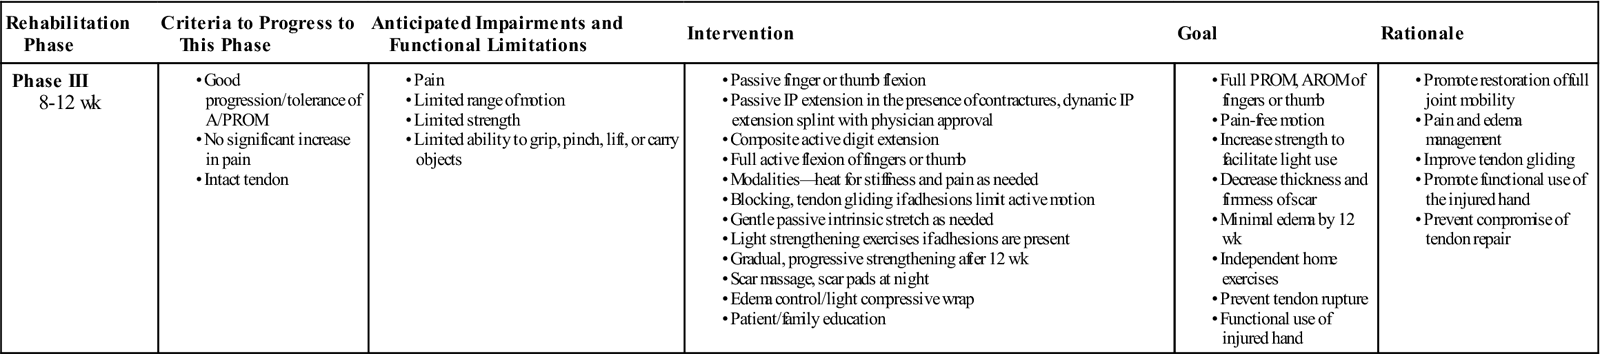
Discontinue use of splint. Continue with active motion exercises. If flexor tendon adhesions are present, then begin light resistive exercises. Dynamic IP extension splinting after 8 weeks is initiated if flexion contractures persist. At 12 weeks after surgery, the patient is allowed to perform normal activities (Table 11-6).
TABLE 11-6
Flexor Tendon Repair in the Digit (Immediate Passive-Flexion Approach)
< ?comst?>
| Rehabilitation Phase | Criteria to Progress to This Phase | Anticipated Impairments and Functional Limitations | Intervention | Goal | Rationale |
| Phase III 8-12 wk |
|
< ?comen?>< ?comst1?>
< ?comst1?>
< ?comen1?>
Immediate Passive Flexion with Elastic Traction Approach (refer to Tables 11-4 through 11-6 for guidelines)
Indications
Elastic traction was added to the early phase of the passive-flexion guidelines described previously in an attempt to increase proximal tendon gliding by placement of the fingers in flexion between exercises, in part by allowing more time for the tendon to be resting proximally in relation to the repair site and to the pulley system. It also decreases stiffness of the digits in the direction of flexion by applying passive flexion for a greater portion of time.  Placement in passive flexion with elastic traction to the fingers between exercises also decreases the potential for even inadvertent active flexion of the fingers in the early phase of flexor tendon healing, protecting the tendon from rupture. The negative effect of elastic traction is the increased potential to develop IP flexion contractures, as well as the increase in complexity perceived by the patient by having a dynamic splint on the hand (as opposed to a less complicated static splint). Patients are placed into this approach by preference of the surgeon-therapist team (those patients that are not showing signs of IP flexion contracture, those that can be compliant with the rehabilitation program, and those who have no soft tissue healing complication).
Immediate Passive Flexion With Elastic Traction Guidelines
Phase I (Early)
TIME: 0 to 4 weeks
GOALS: Attain full passive flexion, full active IP extension, minimize edema, prevent rupture of flexor tendon with splinting and patient education, full AROM of UE joints proximal to the wrist
Splinting.
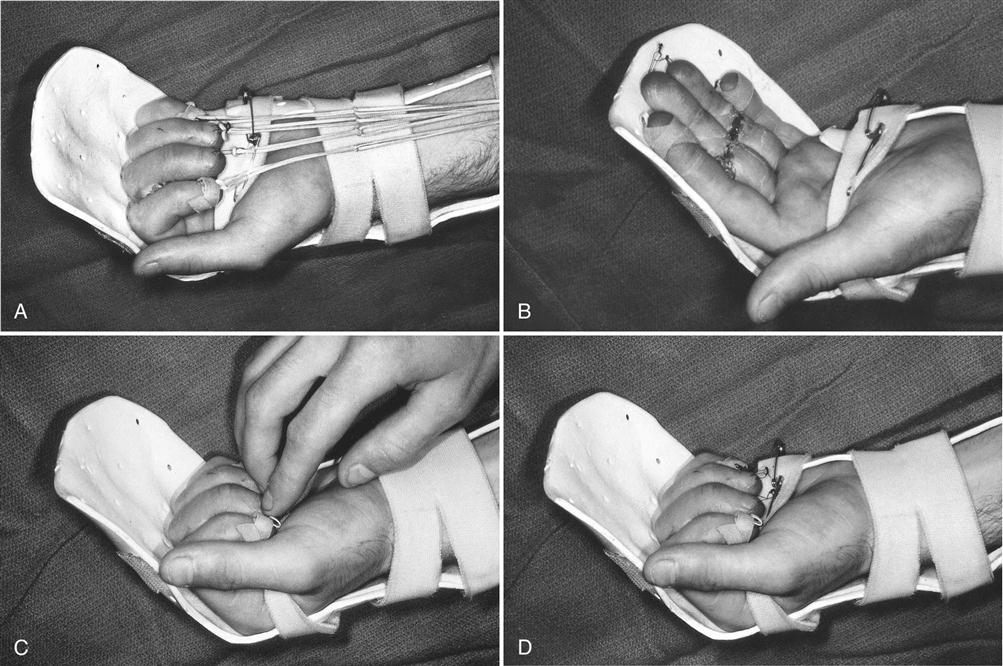
The splint applied for this approach is the same dorsal blocking splint base as described for the static position approach, with the addition of elastic traction applied from the fingertip of the injured finger or fingers, which passes under a distal palmar pulley and is connected at the midforearm level to the proximal splint strap on the volar forearm (Fig. 11-12, A). The wrist is in 20° to 30° flexion, the MP joints in 50° to 60° flexion, and the IP joints straight. The elastic traction may consist of rubber bands, rubber band and monofilament line combination, or other elastic thread. It can be attached to the tip of the finger by a suture placed by the surgeon through the fingernail or an attachment such as a dress hook glued to the fingernail. Some therapists have also used self-adhesive moleskin or other fabric with a hole for the elastic traction attachment applied to the fingertip. The line is threaded through a pulley at the level of the distal palmar crease and attached at the level of the forearm, generally to the proximal splint strap, around a safety pin. The distal palmar pulley concept is important because it achieves passive DIP flexion. A safety pin in the strap across the palm is a simple method to obtain the distal palmar pulley. Other methods of designing a distal palmar pulley include line guides or D rings embedded in splint material that is brought across the palm.
It is important to assess IP extension on an ongoing basis because of increased potential for PIP and DIP flexion contractures (a result of the increased time in flexion during the day). Most therapists instruct the patient to remove the proximal attachment of the elastic traction at night to allow the fingers to be strapped to the dorsal hood of the splint. The splint is worn full time for the first 4 weeks. It is removed in therapy for skin and splint cleansing and for skin assessment of pressure areas.
Exercises.
Exercises should be performed in therapy and at home, 10 repetitions every hour. Passive flexion of the fingers is performed within the splint. Full passive PIP flexion, DIP flexion, and composite finger flexion are performed passively to the strap across the palm. Full active PIP and DIP extension are performed within the splint, to the dorsal hood of the splint (Fig. 11-12, B). It is important to maintain full IP extension, especially within this protocol, unless a digital nerve repair has been made. Goals in the early phase of the immediate passive-flexion approaches include attaining full passive flexion and active IP extension, tendon gliding as possible within these exercises, edema control, protecting the repaired flexor tendon from rupture with appropriate splinting and patient education, and attaining full UE motion proximal to the wrist.
Phase II (Intermediate)
TIME: 4 to 7 or 8 weeks
GOALS: Attain partial (at least 50%) active flexion of the injured digit, full passive flexion, full active extension, protect repaired tendon from rupture with splinting between exercises and patient education
Exercises.
Exercises should continue as in phase I, and the patient can remove the splint for exercises and bathing. In therapy and at home, active flexion is initiated. Begin with wrist tenodesis exercises and gentle place-active hold in flexion exercises. Advance to active flexion and composite finger extension with the wrist flexed. At 6 weeks, discontinue protective splinting and begin active extension of the fingers with the wrist in neutral.
 If flexor tendon adhesions are noted (passive flexion is better than active flexion), blocking exercises are initiated for PIP and DIP flexion. Goals in the intermediate phase of the immediate passive-flexion programs include attaining at least half range of active flexion of the injured digit, full passive flexion, full active finger extension, and protecting the repaired tendon from rupture with appropriate splinting between exercises and patient education.
Phase III (Late)
TIME: 7 or 8 to 12 weeks
GOALS: Full active and passive flexion and extension, light grip strength, protect repaired tendon from rupture with patient education
Splinting is discontinued and light active use is initiated. If flexor tendon adhesions are present, then advance to light resistive exercises at 8 weeks after surgery.
 If good tendon gliding is evidenced by equal or nearly equal active and passive flexion, then delay resistance until 10 to 12 weeks after surgery and advance gradually. If IP flexion contractures are present, then passive IP extension exercises and dynamic IP extension splinting may be initiated with surgeon approval. Goals in the late phase of the immediate passive-flexion approaches include full active and passive flexion and extension, regaining light grip strength, and protecting the repaired tendon from rupture with patient education. Full grip and pinch strength can be performed as part of a home exercise program 12 weeks after surgery, at which time the repaired flexor tendon is considered to be strong enough to tolerate normal daily activities.
In general, when a digit with a repaired flexor tendon demonstrates good active flexion within the first 5 or 6 weeks after surgery, advancement to resistance is delayed because minimal additional support of adhesions to the repair site exists. When flexor tendon adhesions limit active flexion more than passive flexion, the digit can be advanced through the phases listed previously at the earlier of the times indicated because the tendon has the support of surrounding adhesions and can tolerate the additional tension applied within the advancing phases of treatment with less chance of rupture. The decision to advance a patient with a flexor tendon injury to the next phase of treatment is best done in conjunction with the referring surgeon because advancing the partially healed flexor tendon to active flexion, passive extension, and, most significantly, resistance, creates an increase in tension at the repair site.
Full passive flexion and nearly full extension of the injured finger or fingers should be expected following use of an immediate passive-flexion approach. The amount of active flexion achieved varies, and active DIP flexion is often limited by adhesions. IP extension is occasionally limited by flexion contracture. When composite extension of the wrist and digits is limited in the late phase of tendon healing, a resting pan splint in maximum composite extension, worn at night, will help distal gliding of the tendon to allow composite extension. A finger-length splint may be used if just the IP joints are contracted in flexion. Functional deficits in motion or strength present after 12 weeks can be treated with any traditional therapy approaches, including modalities and dynamic splinting for stiffness or contractures, AROM and PROM, joint mobilization, blocking exercises, and strengthening.
Immediate Active-Flexion Approach
Indications
Development of immediate active-flexion guidelines is the most recent advancement in rehabilitation after flexor tendon repairs. These guidelines have been developed after the onset of surgical advancements of stronger repair techniques described earlier in this chapter. Active-flexion approaches have been developed to minimize flexor tendon adhesions in the early phase of tendon healing and have been very successful in improving outcomes of flexor tendon repairs.8,22,31–33 Immediate active-flexion approaches are reserved for patients who have had a strong enough surgical repair to tolerate the additional stress placed on the tendon by active flexion, as well as those who can be compliant to the splinting and exercise program.  The presence of severe edema, joint stiffness, or health factors that would slow tendon healing would prohibit placement of a patient in an active-flexion approach. It is important to minimize the stress on the tendon, especially in the early phase of tendon healing, to prevent rupture.
Minimizing Tension on a Tendon With Immediate Active-Flexion Approaches
Because active flexion results in an increase in tension within the flexor tendon, it is important to minimize this tension in the early phase of tendon healing to prevent rupture. Edema and stiffness both present increased resistance to active flexion, thereby requiring the flexor muscles to pull harder on the tendon, increasing the work of flexion within an immediate flexion protocol. Work of flexion is a term that describes the amount of tension created within the tendon during active flexion.34 Work of flexion increases with swelling, stiffness, or any internal friction encountered by the tendon caused by bulk of repair, tight pulleys, or swelling of the tendons, in addition to the tension normally developed during active flexion.35 The therapist’s goal is to minimize the work of flexion, thereby minimizing stress on the repaired tendon, when active motion is initiated immediately after repair. The therapist does this by minimizing edema and joint stiffness and using optimal joint positions that minimize the amount of tension developed within the tendon during active flexion.22 Studies have shown that the wrist position that results in the least tension within the flexor tendon during active flexion is partial wrist extension and MP flexion.36
 When the wrist is flexed, an increased amount of work is required by the flexor muscles to flex the fingers, compared with when the wrist is slightly extended. By placing the wrist in slight extension, the extensor tendons are given slack at the wrist, allowing the fingers to relax into partial flexion. It requires only a slight pull by the muscle to further flex the digits actively into a light fist. Thus most immediate active-flexion protocols use a position of wrist neutral to slightly extended during the active-flexion exercises, and avoid active digit flexion with the wrist flexed. Attaining the end ranges of active flexion also significantly increases tension within the flexor tendon, and achieving a light fist with at least 45° of DIP flexion is the main goal in the early phase of tendon healing. More than 45° of DIP flexion is allowed if attained easily by the patient, without excessive effort, when the surgeon has performed a four-strand (or more) repair. Education of the patient placed in this protocol is very important because those patients that attempt to do more than allowed are much more likely to rupture.
Immediate Active-Flexion Guidelines
Phase I (Early)
TIME: 0 to 4 or 5 weeks
GOALS: Attain full passive flexion, ability to actively hold the fingers in a light fist, minimize edema, protect flexor tendon from rupture with splinting and patient education, attain full UE motion proximal to the wrist (Table 11-7)
TABLE 11-7
Flexor Tendon Repair in the Digit (Immediate Active-Flexion Approach)
< ?comst?>
| Rehabilitation Phase | Criteria to Progress to This Phase | Anticipated Impairments and Functional Limitations | Intervention | Goal | Rationale |
| Phase I 0-4 wk |
|
|
< ?comen?>< ?comst1?>
< ?comst1?>
< ?comen1?>
Splinting.
A large variety of splints have been developed to apply when the patient is placed in an immediate active-flexion approach. The splint design was changed to bring the wrist into an optimal position, as described previously, during the exercises that are done at home. The wrist position in the traditional protocols (immobilization and passive-flexion protocols) was that of flexion to place slack in the repaired flexor tendon and prevent tension on the tendon at rest. During active digit flexion, however, the wrist is better placed in a position of slight extension, as described earlier, to prevent excessive tension within the tendon during active flexion. A few of the most commonly used splints will be described; however, additional options are sure to exist because splinting and guidelines are evolving constantly.
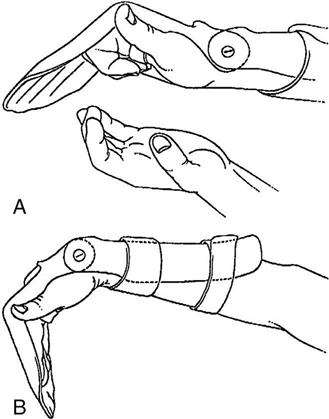
The Indiana protocol uses a wrist hinge splint that allows 30° of wrist extension and full wrist flexion, applied for exercises only (Fig. 11-13, A and B).7,8,20,21 A static dorsal blocking splint with the wrist and MPs flexed is worn at all times between the active exercises in the early phase of tendon healing. This requires that the patient be trusted to change splints at home for exercises without inadvertent stretch applied to the tendon, or use of the hand while the splint is removed. The wrist hinge splint, worn for exercises, maximizes use of the wrist tenodesis exercises and ideal wrist position of partial extension during active flexion of the fingers.
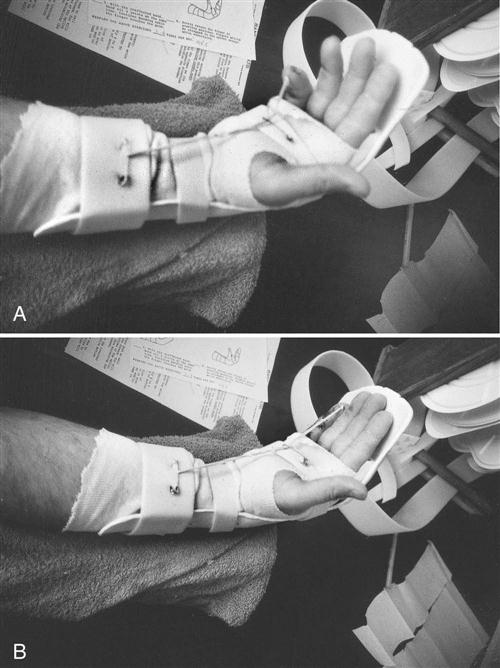
Silfverskiold and May32 use a cast (with the wrist neutral) that is worn at all times, for both exercises and at rest between exercises. Elastic traction is applied to all four fingers regardless of the number of injured fingers, and the elastic traction is removed or loosened for the active-flexion exercises. This concept eliminates the need for the patient to change splints at home, yet achieves the need to bring the wrist out of the flexed position for exercises. This author has used this wrist-neutral concept for both splinting and home exercises.31 The author’s preferred splint is a dorsal blocking splint with the wrist in neutral, MP joints flexed to 50°, and the IP joints allowed full extension unless a digital nerve has been repaired. The use of elastic traction with this splint is optional. If IP flexion contractures begin, the fingers may be strapped to the dorsal hood of the splint between exercises. If elastic traction is used, it is applied to all four fingers (or if the thumb flexor tendon was repaired, then elastic traction is applied to the tip of the thumb only), through a palmar pulley, attached on the proximal strap of the forearm (Fig. 11-14, A). The splint is not allowed to be removed at home by the patient in the early phase of tendon healing, but it is removed in therapy for splint and skin cleansing, assessment of skin for pressure areas, and exercises as follows.
Exercises.
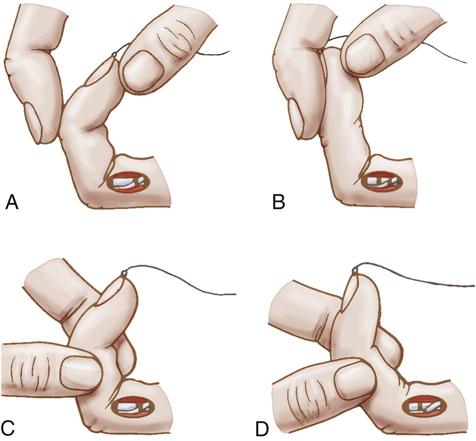
Exercises should be performed in therapy and at home, 10 repetitions every hour. The splint is worn at all times except in therapy. Passive flexion of the digits to the palm is initiated. Active extension of the IP joints is performed fully unless a digital nerve has been repaired (Fig. 11-14, B). The active-flexion portion of the exercises is performed with place-active hold in flexion of the fingers. This is performed by gently, passively flexing the fingers to the palm using the patient’s other hand or the therapist’s hand. After placing the fingers into gentle flexion, the other hand is removed, while the patient actively holds the fingers of the injured hand in a fist (Fig. 11-14, C and D). In therapy, this is done with the wrist extended 30° to decrease tension in the extensor tendons during the place-active hold flexion. It is important to attain DIP flexion during this exercise to ensure FDP gliding.  The patient should not place pressure on the palm or squeeze the palm with any fingertips to avoid increasing tension within the tendon. The place-active hold flexion portion of the exercise is the main difference between the immediate active and immediate passive-flexion guidelines. When the patient is successful in maintaining the actively flexed position of the digits without the repaired digit being trapped or overly supported by the adjacent digit, proximal gliding of the repaired tendon through the pulley system and the area of surgery has been achieved. This place-active hold exercise of the digits is important to obtain within the first 5 days after surgery, or flexor tendon adhesions are much more likely to limit the ability to gain full active flexion at a later time. When active flexion and passive flexion are nearly equal, it indicates good to excellent flexor tendon gliding. If good flexor tendon gliding occurs, the patient is continued in this phase longer than 6 weeks because increased tension within the well-gliding tendon is more likely to cause a rupture than in the adherent tendon (where the tendon is supported by the surrounding scar tissue). If IP flexion contractures develop, passive PIP extension may be performed with the wrist and MP supported in flexion, as described in the previous discussion of passive IP extension exercises.
  Avoid passively extending the DIP joint while performing passive PIP extension in the early phase of tendon healing. Goals in the early phase of an immediate active-flexion rehabilitation program include attaining full passive flexion, ability to actively hold in a light fist including at least 75° of PIP and 45° of DIP flexion, full PIP and DIP extension, edema control, protecting the flexor tendon from rupture with appropriate splinting and patient education, and attaining full UE motion proximal to the wrist.
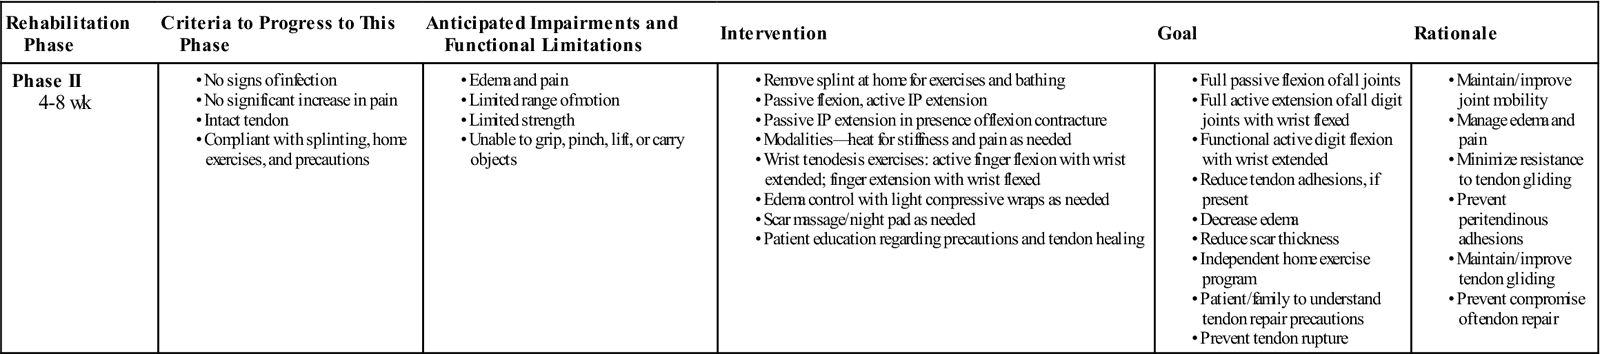
Phase II (Intermediate)
TIME: 4 to 5 weeks to 8 weeks
GOALS: Attain full passive and active flexion and full finger extension, prevent intrinsic tightness, protect the repaired flexor tendon from rupture with splinting between exercises and patient education (Table 11-8)
TABLE 11-8
Flexor Tendon Repair in the Digit (Immediate Active-Flexion Approach)
< ?comst?>
| Rehabilitation Phase | Criteria to Progress to This Phase | Anticipated Impairments and Functional Limitations | Intervention | Goal | Rationale |
| Phase II 4-8 wk |
|
|
< ?comen?>< ?comst1?>
< ?comst1?>
< ?comen1?>
Exercises.
The splint is removed at home for bathing and exercises. If elastic traction was used in the early phase, it is discontinued at this time and the static splint is worn between exercises to protect the patient against inadvertent resistance to the well-gliding tendon. Exercises continue as in the early phase, with the addition of removing the splint to perform active motion with wrist tenodesis as described below. During this phase the patient gradually brings the wrist to neutral with the fingers extended. In therapy, gentle intrinsic stretch is performed by the therapist with the wrist flexed, MPs gently, passively extended while the IPs are held flexed.
 Active finger flexion is added during this phase, but no resistance is allowed. Wrist tenodesis exercises are performed, allowing wrist extension as tolerated with the fingers in flexion and wrist flexion with the fingers extended. Some protocols discontinue the protective splint in the intermediate phase; however, with a well-gliding flexor tendon, it is possible to rupture the repaired tendon when resistance is encountered during normal daily activities. Most patients are not able to predetermine how much resistance each activity they perform with the hand will cause, and this author prefers to
  continue splinting during the intermediate phase unless flexor tendon adhesions are present. If flexor tendon adhesions limit active flexion more than passive flexion, then blocking exercises are initiated. If IP extension is limited, then passive IP extension is performed with the wrist and MPs held in flexion. Goals in the intermediate phase of the immediate active-flexion guideline include full passive and active flexion, full composite finger extension, preventing intrinsic tightness, and protecting the flexor tendon from rupture with appropriate splinting between exercises and patient education.
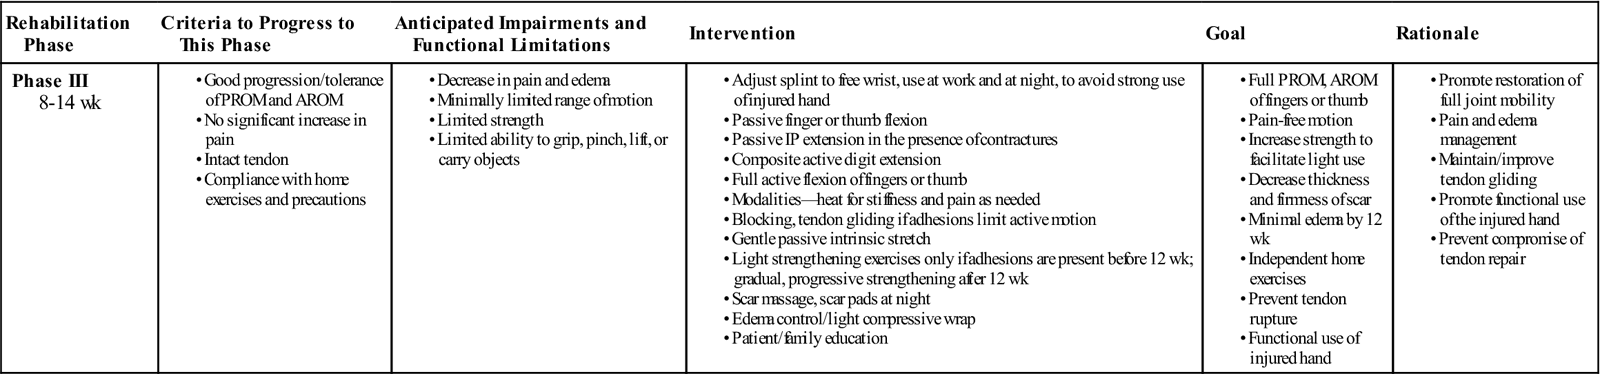
Phase III (Late)
TIME: 8 to 14 weeks
GOALS: Full active flexion and extension of the fingers, prevent or minimize intrinsic tightness, prevent flexor tendon from rupture with splinting during resistive activities and patient education (Table 11-9)
TABLE 11-9
Flexor Tendon Repair in the Digit (Immediate Active-Flexion Approach)
< ?comst?>
| Rehabilitation Phase | Criteria to Progress to This Phase | Anticipated Impairments and Functional Limitations | Intervention | Goal | Rationale |
| Phase III 8-14 wk |
|
< ?comen?>< ?comst1?>
< ?comst1?>
< ?comen1?>
AROM, Active range of motion; IP, interphalangeal; PROM, passive range of motion.
The splint is removed except for activities that require pinching, lifting, or strong grip. Resistance to DIP flexion (e.g., hook grasp with resistance or squeezing with the tips of the fingers) is prohibited until after 12 weeks in the case of a well-gliding flexor tendon that demonstrates flexion in the good to excellent range according to the Strickland-Glogovac formula.27
 A small hand-based dorsal blocking splint is used to prevent the patient from performing this type of activity while at work or during heavier home management tasks. Active and passive flexion and extension of the fingers is performed with the splint off. If flexor tendon adhesions are present (active flexion more limited than passive flexion), blocking exercises continue and resistance may be added, consisting of light gripping. At 12 weeks after surgery, the patient is released to normal activities and instructed to avoid maximal resistive activities for another 2 weeks, gradually increasing tolerance to normal activities. Goals in the late phase of the immediate active motion approach include full active flexion and extension of the fingers, prevention of intrinsic tightness, and light functional use of the hand.
  Prevention of flexor tendon rupture with appropriate splinting during tip pinch, strong grip and hook fist, or lifting activities, as well as patient education, is emphasized. Regaining full grip, pinch, and full UE strength is appropriate after the 12- to 14-week flexor tendon healing process (through traditional strengthening exercises and activities).
Repairs in Zones Proximal to Zone II
The question often arises regarding guidelines for flexor tendon repairs in other zones of the hand and distal forearm. This author uses the same guidelines described previously for all zones. Less complications of flexor tendon adhesions occur when the tendons are repaired in the midpalm, where no tight pulley system and synovial sheath is found in which to become adherent. At the wrist and distal forearm, however, there remains the problem of adhesions to the flexor retinaculum and the carpal tunnel. These areas respond more easily to efforts at regaining tendon gliding in the intermediate and late phases of tendon healing and rehabilitation than does the digit. When the repair is anywhere other than the digit itself, IP flexion contractures are much less common.
Evaluating the Results of A Flexor Tendon Repair
Adding flexion of the IP joints and subtracting any loss of extension is the method used to evaluate the motion of a finger in which a flexor tendon has been repaired in the hand. Although a number of formulas exist, Strickland and Glogovac’s following formula27 is commonly used.
< ?xml:namespace prefix = "mml" />

To clarify the formula, add PIP flexion + DIP flexion (measured in full-fist composite flexion). From this total, subtract any loss of extension of the PIP and DIP joints, measured in full composite extension. Divide the result by 175, and multiply by 100 to determine the percent of normal motion. The normal amount of PIP and DIP flexion is 175°, and zero is the normal loss of extension of the IP joints. Thus if the total active PIP and DIP flexion equals 175° and no loss of extension of the IP joints occurs, then the patient would have 100% of motion after the flexor tendon repair. Classification includes excellent results as 85% to 100%, good as 70% to 84%, fair as 50% to 69%, and poor as less than 50% of normal motion.
An example is a patient whose final composite motion measurements are MP 0° to 85°, PIP 10° loss of extension to 80° of flexion, and DIP 5° loss of extension to 40° of flexion. The formula applied would be as follows:

which is

Sixty percent would be classified as a fair result according to this classification. MP motion is not used in this formula because it is infrequently affected by tendon repairs in zones I or II. Results in the good and excellent categories are considered functional, without need for further intervention. Fair and poor results may need further surgery or therapeutic intervention to regain function of the hand, depending on individual patient needs for ADLs and work.
Summary
The amount of information available regarding flexor tendon rehabilitation is overwhelming, and the task of determining what approach to use for which patient is daunting. Patient and injury variables require the therapist to be aware of immobilization, immediate passive flexion, and immediate active-flexion guidelines for treatment of a flexor tendon repair. Within each hand treatment facility, it is typical to use one approach from the immediate passive-flexion group and one approach from the immediate active-flexion group for most patients. Then, depending on the type of surgical repair, the recommendation of the surgeon and patient compliance, placement of the patient within immediate passive- or immediate active-flexion approach is less complex. It is good, however, to be familiar with other options, because some patients will do better with elastic traction than others. Most of this author’s patients are placed in the immediate active flexion with elastic traction program as described previously, because the referring surgeons are all performing four-strand repairs of the flexor tendon. If IP flexion contractures develop, the program is changed to eliminate the elastic traction or instruct the patient to intermittently strap the IPs in extension to the dorsal hood of the splint (as done at night) during the day.
For those therapists whose patients have traditional two-strand flexor tendon repairs, it is important to choose from the passive-flexion guidelines. If active flexion is performed with these patients in the early phase, then it is done very gently through partial range of flexion (and only under the supervision of the therapist).22
It is important to keep in mind the occasional need to place a patient in an immobilization approach, as well. Individualization of each of the guidelines is necessary. A young child may not advance as quickly as the immobilization guideline described in this chapter indicates. Discussion with the referring surgeon is necessary at each advancement point.
Understanding the concepts of flexor tendon healing in the hand and the tensile strengths of the healing tendon compared with tension demands of motion and use is important. Education of the patient regarding importance of compliance with the instructions within the guidelines and the type of activity that is likely to result in rupture is important. Study of literature and supervised experience in treating patients with this diagnosis is strongly recommended whenever possible.
Clinical Case Review
1A new patient is scheduled for splint fabrication, evaluation, and treatment after repair of flexor tendons. No further information is available on the prescription. What steps should the therapist take before beginning the first session?
The therapist should contact the physician to determine the following:
If the surgeon is not available, the therapist should begin an immediate passive-flexion approach. If passive flexion is limited, then therapy should begin with the elastic traction splint. If passive flexion is 50% or better, then the therapist may consider the static IP positioning splint.
2A new patient is being seen for the first time in therapy after repair of both flexor tendons at the level of the proximal phalanx of a single digit. During the initial visit, the patient begins to sweat, becomes light-headed, and has significant pain with gentle passive flexion. The patient is unable to tolerate more than 30° of passive flexion at each of the IP joints of the injured finger. What can the therapist do to maximize tendon gliding and joint motion within the first week after surgery in the immediate passive- or immediate active-flexion approaches?
This patient is likely to have significant difficulty because of stiffness and adhesions unless he or she becomes more comfortable with passive motion of the digit within a few days. The patient’s understanding of the cause of the pain and what to expect in the next few days is crucial at this point. A reassuring, gentle approach at the first appointment is important. The therapist should emphasize the following points:
 to 2 hours), then the pain usually becomes minimal within a few days.
This patient may be best placed in an elastic traction approach between exercises because the elastic traction will hold the digits in flexion at a tolerable level, gradually increasing flexion as resistance of the tissue decreases. The next session should be scheduled for the next day because the patient is usually feeling better and can tolerate motion and better understand directions. If the pain level continues to significantly limit the initial exercises, then the therapist may perform slow, gentle passive flexion to demonstrate the methods to be used at home. Ongoing frequent therapy visits may be needed in the early phase of tendon healing if improvement is not seen quickly.
3A patient had flexor tendons repaired in a digit 3 weeks ago. During active IP extension exercises, the patient is lacking 30° of PIP extension and 10° of DIP extension. What steps can be taken to improve IP extension?
In therapy, gentle PIP joint mobilization (i.e., accessory glides and gentle passive PIP extension) can be considered with the flexor tendon in the protected position of full wrist and MP flexion. The patient must be relaxed, with no tension in the flexor tendons during the passive flexion, to avoid resisting the repaired flexor tendons.
The therapist should emphasize the IP extension portion of the home exercise program. Full passive MP flexion assists IP extension. The patient should be instructed to passively flex the MP joint of the involved finger fully using the other hand while actively extending the IP joints. A dynamic IP extension splint should not be considered in this early phase of flexor tendon healing.
4A patient had both flexor tendons repaired 5 weeks ago and has been advanced to the intermediate phase of an immediate passive approach, including gentle active motion. At this appointment, the patient shows a sudden decrease in active DIP flexion compared with the previous session, with only trace to no visible active flexion noted by the therapist. What should the therapist consider?
Whenever a sudden complete loss of flexion of the DIP joint occurs, a rupture of the FDP tendon must be considered. The therapist should have the patient make an appointment with the referring surgeon as soon as possible because some surgeons consider immediate repair. Other surgeons wait for maturation of the healing process and consider later tendon grafting if a rupture occurs. The therapist should discuss the patient’s activity level to determine if he or she has used the hand actively, which would place the patient at risk for rupture. The therapist should check tendon integrity by blocking the PIP joint in extension while the patient attempts to actively flex the DIP joint. Any active DIP flexion indicates that the FDP tendon is intact.
5A patient had flexor tendon repair 7 weeks ago. The finger has 30° active DIP flexion when the PIP is blocked in extension by the therapist but no active DIP flexion when all finger joints are flexed into a fist. What does this mean?
The FDP tendon has adhesions. When the finger is held in extension at the MP and PIP joints, it takes only a small amount of glide of the FDP tendon to result in partial DIP joint flexion. However, when the MP and PIP joints are flexed, such as in a composite fist, the FDP tendon must glide much further to pick up the slack created in the tendon by flexion of the first two joints of the finger before it can then flex the DIP joint. Adhesions limit full gliding of the tendon. The therapist should consider increasing the exercises of blocking, gradually increasing the amount of flexion at which the MP and PIP joints are blocked. The surgeon should be contacted to discuss the potential of adding ultrasound or light resistance to minimize adhesions.
6My patient has more than the expected amount of swelling 2 weeks after surgery. Is there anything I can apply at this early stage to decrease swelling in the involved fingers?
Elevation, overhead shoulder pumping, and light edema massage proximal to the splint can be performed early after repair in all cases. In situations where there is excessive swelling, once wounds are healed, the patient can be instructed in the application of a light compressive wrap at night only, with the help of another person. The wrist and distal strap of the splint can be opened, allowing the wrist to flex and the fingers to relax. The assisting individual may then apply the wrap to the swollen fingers lightly, not tight enough to decrease circulation. The wrap is removed during the day to avoid increasing resistance to flexion during exercises.
7My patient has very good ability to place and actively hold the fingers in flexion. Can I advance them to the next phase of rehabilitation and initiate strengthening?
No. When a repaired flexor tendon is gliding without the restriction of adhesions, the tendon repair will be more strained by the resistance than a tendon that has the additional support of adhesions. The better the tendon excursion (better active flexion of the IP joints), the more protective the therapist is regarding advancement to resistance to avoid increasing tension across the repair, which may result in rupture. The patient should continue passive flexion, place-active hold flexion, and advance to active flexion with the splint off at the appropriate times according to the approach used, but avoid resistance until the tendon is fully healed when good active flexion is present. Resistance is used to improve tendon excursion in the presence of restricting adhesions.
8Six weeks after surgical repair of a ring finger FDP, a patient demonstrates active flexion of 80° MP, 80° PIP, and 15° DIP. The uninjured small finger has normal passive flexion; however, active flexion is limited to 90° MP, 80° PIP, and 25° DIP flexion. Why would active flexion of an uninjured finger be limited?
This is a good example of quadriga effect. When the FDP tendon of one finger is not gliding proximally as in this example, the adjacent digit(s) may demonstrate limited active gliding of the FDP as well because of the common muscle belly. When one flexor tendon is tethered by a scar in the finger, the other flexor tendons are unable to be fully pulled proximally by the muscle.