Superior Labral Anterior Posterior Repair
Timothy F. Tyler and Craig Zeman
Introduction
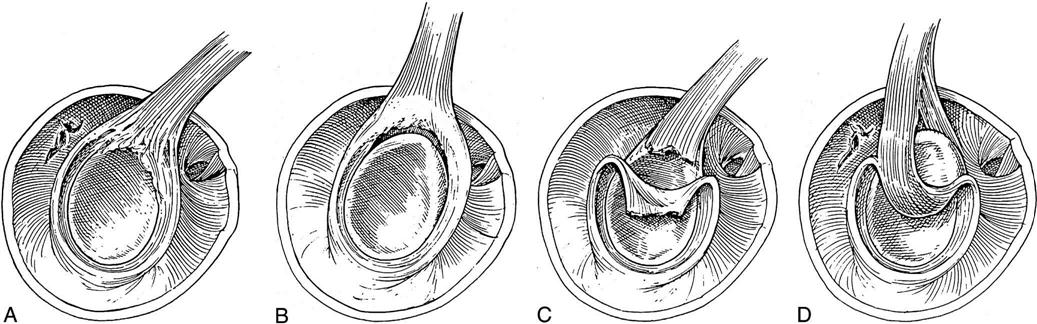
Superior labral anterior posterior (SLAP) lesions were not realized until the advent of shoulder arthroscopy. Andrews, Carson, and McLeod1 were the first to describe labral tears of the biceps anchor, but it was Synder2 who was the first to classify them, outline their treatment, and describe four basic types of lesions: I to IV (Fig. 6-1). Since then, several other variants have been described. So as to not get caught up in the subtleties of the classifications, SLAP lesions can best be understood by how they are treated and by the patient’s concurrent diagnosis. The two major ways that a SLAP lesion can be treated are by débridement and repair. SLAP lesions are seen in patients who either have instability or impingement, and the kind of rehabilitation patients receive is determined by which factors they have.
Overall, nonoperative management has proven unsuccessful for a large number of patients with unstable SLAP lesions,1,3,4 but Edwards feels that a course of nonoperative conservative management of nonsteroidal antiinflammatory drugs (NSAIDs) and physical therapy should be tried. A 50% failure rate was observed in their study.5 In many studies, patients underwent diagnostic arthroscopy at an average of 12 to 30 months from their initial symptoms. In one study, patients had an extended trial of activity modification and rehabilitation exercises.6 Most patients had been treated with rest, physical therapy, steroid injections, and NSAIDs without relief of their symptoms before diagnostic arthroscopy. Arthroscopic tools, anchors, and sutures have continued to advance making the surgical treatment more effective and easier to perform.7–16 Treatment of these lesions is directed according to their type.* In general, type I and III lesions are débrided, whereas type II and many type IV lesions are repaired.4,17–19 After all SLAP repairs, rehabilitation plays an integral part in the patient’s outcome.20
Surgical Indications and Considerations
Cause
The superior labral is part of the attachment of the long head of the biceps.3,9,11,21 The role of the long head of the biceps is to be a humeral head depressor and an anterior stabilizer.7,10 The SLAP area is in continuity with the anterior and posterior labrum. Therefore a tear in the superior labrum can affect the entire labrum, and conversely a tear in the anterior or posterior labrum can disrupt the superior labrum. The classic mechanism to develop a SLAP lesion is force, which either pushes the humeral head over or pulls the humeral head away from the superior labrum.8,22 The humeral head will pull on the superior labrum and the biceps anchor tearing them away from the glenoid.23,24 In addition, a tear of the anterior or posterior labrum from a dislocation can extend into the superior labrum. Repetitive overhead lifting, which can pinch the superior labrum and pull on it in a downward fashion, can also cause degenerative SLAP tears. In the deceleration phase of pitching, the biceps fires to stop the elbow from hyperextending, which causes a force to be placed across the superior labrum. It is this repetitive action that is felt to cause SLAP lesions in pitchers.25
Clinical Evaluation
The therapist should look in the patient’s history for an injury that placed an upward shear force across the shoulder—a fall on an outstretched arm that was overhead or that placed a traction force across the arm, a sudden grab and pull on something, having the arm pulled forcefully (e.g., the shoulder getting pulled on while waterskiing)—as well as mild instability in the shoulder with the repetitive throwing motion.26–28 Some patients can develop SLAP lesions with no apparent cause. In questioning for cause, it is important to ask about repetitive overhead lifting and throwing activities. Patient complaints can range from instability to a vague ache in the shoulder. Many patients can show signs of impingement, and some have symptoms of locking, popping, and catching. No classic symptom pinpoints a SLAP lesion. Many physical examination tests have been described to help diagnose a SLAP lesion.4,17,20,29 The two most common are the Speeds test and O’Brien test, which are modified supraspinatus isolation tests and therefore can be positive if the patient has impingment.30 The problem with diagnosing a SLAP lesion is that it is usually found in combination with either impingement or instability. Overall it appears that the primary authors of these tests report overall good sensitivity and specificity but other authors are unable to repeat their results when tested.31–39 The clinician needs to be aware of other problems that can be associated with SLAP lesions such as ganglion cyst, rotator cuff tears, posterior instability, and acromioclavicular (AC) joint arthritis.40–46
Diagnostic Testing
Plain radiographs are of little use in evaluating a SLAP lesion. Magnetic resonance imaging (MRI) with gadolinium is probably the best way to see a SLAP lesion.47–56 An MRI without gadolinium has been reported to have had some success.57 The problem with an MRI is that it can be too sensitive and tends to “overread” the lesion. A computerized tomography (CT) scan with contrast and three-dimensional (3-D) reconstruction can also be used to see labral tears, but once again it can be too sensitive. A glenolabral cyst can be seen on both MRI and CT scan and can be commonly caused by a SLAP lesion.58
Surgical Procedure
The treatment of SLAP lesions is an arthroscopic procedure. It is very difficult if not impossible to treat a SLAP lesion open. Most SLAP lesions are found on diagnostic arthroscopy; therefore the surgeon must be prepared to treat a SLAP lesion at the time of surgery.
Type I
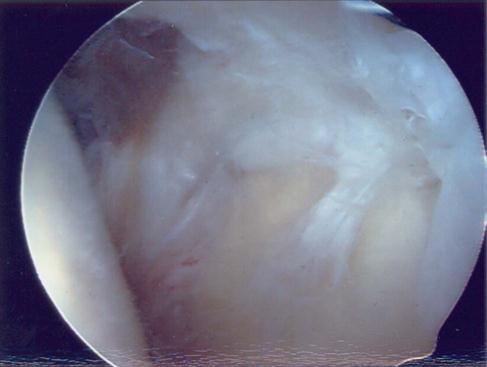
These lesions are simply the fraying of the superior labrum without any significant detachment of the labrum from the superior glenoid (Figs. 6-1, A, and 6-2). The frayed area usually covers a portion of the superior glenoid; however, no gross instability of the labral tissue exists. This lesion is commonly seen in patients with impingement or rotator cuff tears. It is not usually seen in patients with instability and it does not seem to cause capsular laxity. These lesions are simply débrided down to the attached base of the superior labrum with an arthroscopic shaver (Fig. 6-3).59

Type II
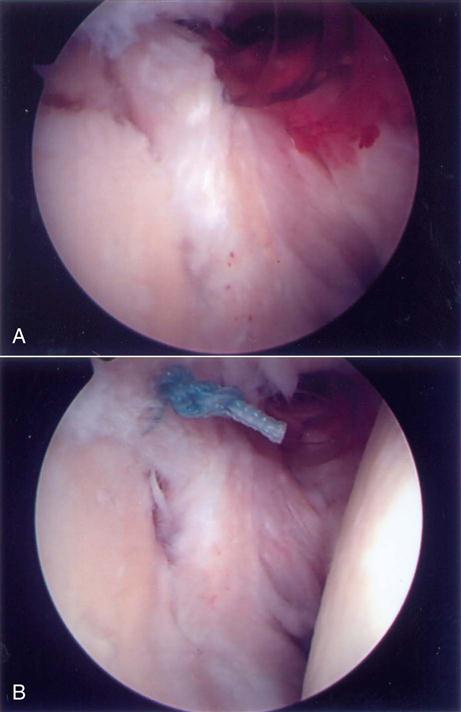
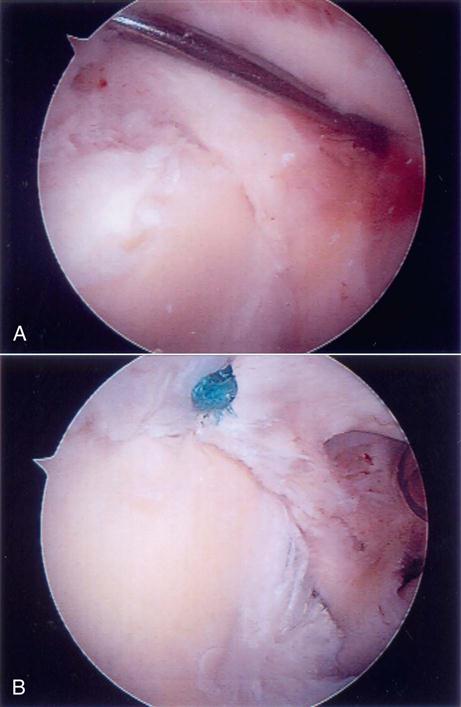
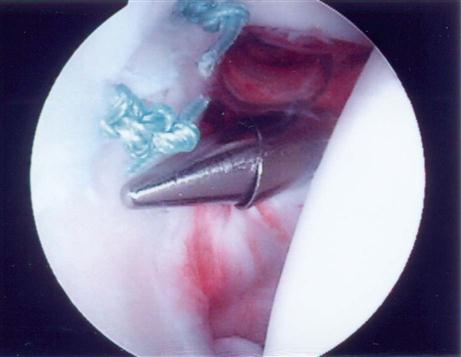
These lesions have an unstable attachment of the superior labrum. The base of the labrum is pulled away from the superior glenoid and is highly mobile (Figs. 6-1, B, and 6-4, A). If the labrum pulls away from the superior glenoid more than 3 to 4 mm when traction is applied to the biceps tendon, the tear is considered unstable.60–63 When the labrum is reduced, one will usually see a reduction in the capsular volume and a change in the position of the anterior and posterior labrum to a more upright position (Fig. 6-4, B). A type II lesion needs to be surgically reduced (Fig. 6-5, A and B). It is done through three portals: one posterior and two anterior. Some type of anchor with suture attached will be used to repair the tear. The detached labrum will be reattached to its anatomic position on the glenoid.
Once the portals have been established, a burr is used to débride the bone of the superior glenoid under the torn labrum. This exposes a bleeding bed of bone that will aid in the healing process. Any loose or frayed ends of the labrum are débrided down to a stable base, and an anchor is placed into the prepared bone through the superior portal. The next task is to pull the two suture ends through the torn labral tissue. This can be done in a multitude of ways; the general concept is as follows: A device with a loop on the end is passed through the torn labral tissue. One end of the suture is then placed into this loop, which is then pulled back through the labral tissue pulling the suture through the labrum. This process is repeated again so that both ends of the suture are passed through the labrum. Using arthroscopic tying techniques, the torn labrum is firmly reattached back down to the bone of the glenoid (Fig. 6-6). Depending on the size of the tear, more anchors may need to be used to get a secure repair.
Type III
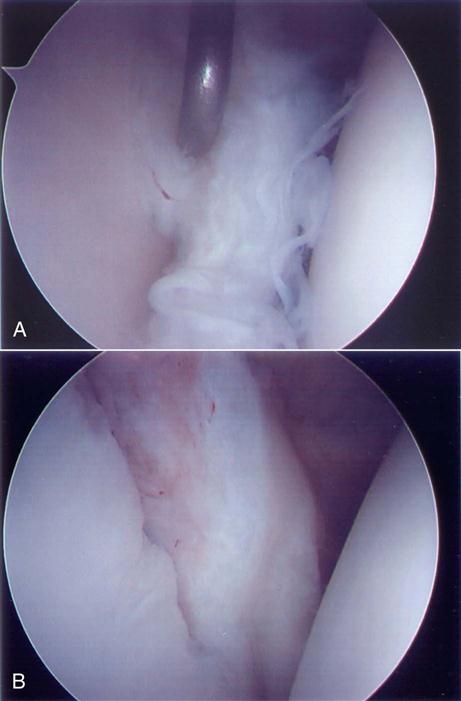
A type III SLAP can be thought of as a bucket handle tear of the labrum (Figs. 6-1, C, and 6-7, A and B). The unstable handle portion floats around inside the glenohumeral (GH) joint, getting caught between the humeral head and the glenoid during shoulder range of motion (ROM). This pulls on the labral and capsular tissue, producing pain in the shoulder. The portion of the labrum not involved in the tear is normally firmly attached to the glenoid; therefore the symptomatic part is the bucket handle tear, which can simply be débrided down to a stable base such as a meniscus tear in the knee.
Type IV
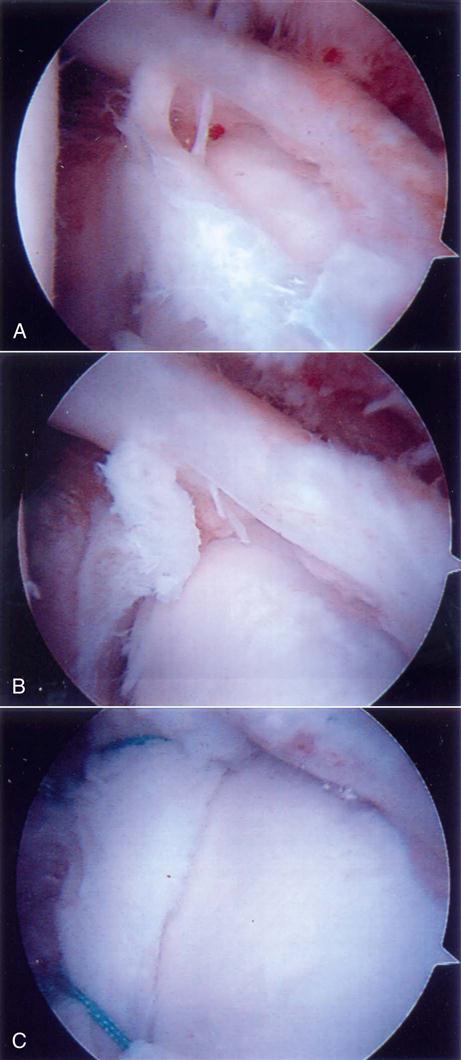
This lesion involves a bucket handle tear of the labrum, which extends into the biceps tendon (Figs 6-1, D, and 6-8, A–C). Treatment of these lesions depends on the extent of the tear and the age and activity level of the patient. If at least 30% of the biceps remains and the remaining portion of the labrum is stable, the torn part can be débrided down to stable tissue. The surgical options are much more complicated if more than 30% of the biceps is torn. In a less active individual, a good option would be to débride the tear and perform a biceps tenodesis. In a throwing athlete, the best option might be to stabilize the labral tear like a type II lesion and repair the tendon of the biceps. A repair would help stabilize an unstable shoulder.
Combined Lesions
SLAP lesions can be seen with anterior and posterior labral tears and with impingement and rotator cuff tears. All other surgical lesions should be treated at the same time as the SLAP repair. More times than not, the therapist will be rehabilitating patients who have undergone multiple procedures. There has been controversy over whether during a rotator cuff repair a SLAP repair should be done. A review of these papers would suggest that in middle-age patients, it is probably best not to repair the SLAP because this can lead to increased stiffness after the surgery.64–66 In contrast, Levy and associates67 demonstrated that predictable short-term surgical results and return to activity can be expected after repair of type II superior labrum anterior posterior lesions in patients younger than 50 years who have a coexistent rotator cuff tear.  It is important to understand every procedure that has been done to the patient so that a proper treatment plan can be designed.
Outcomes
Overall mixed results of operative treatment of SLAP lesions and nonoperative care have been reported.68–71 Short-term improvement can be seen in patients with just simple débridement, but at long-term follow-up, the patients had a high failure rate.72 This failure is probably because the underlying instability was not addressed. Early treatment with staple fixation yields good to excellent results in 80% of the patients.68 The first reports of suture anchor repair had 100% success.29 A review of later reports using various techniques of fixation have seen a success rate of about 85%.17,20,73 Stetson and associates4 reported on patients who had SLAP repairs and no other procedures for whom an 82% success rate was achieved. Recently, better results with longer follow-up have been reported after type II SLAP repair, especially in those athletes with traumatic injury and repair.73,74 Properly performed treatment of SLAP lesions is a reliable procedure.
Therapy Guidelines For Rehabilitation
Postoperatively, the shoulder is placed in a sling without a swathe for 2 to 4 weeks to minimize biceps muscular activity and protect any additional structures addressed during the surgical procedure. The position of the arm is in internal rotation (IR) slightly anterior to the frontal plane. Because the early labral tensile strength is weak, the early rehabilitation program is more conservative than other open-stabilization procedures.29,47,68
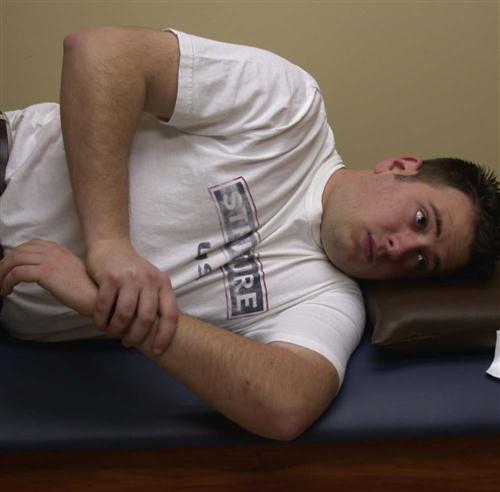
 The main focus of the early protective postoperative period (up to 4 weeks) is to maintain proximal and distal strength and mobility, provide pain relief, and prevent selective hypomobility of sections of the capsule as a result of iatrogenic change from the surgery. During this period, elbow ROM and gripping exercises are encouraged. The authors have found that instructing patients to sleep with a pillow under their elbow to support the shoulder may take stress off the labrum and reduce discomfort. Modalities can be useful tools in providing pain relief. The level of pain, postoperative swelling, and type of SLAP tear that was surgically addressed will determine progression of the patient.48,49 As the treating clinician, good communication with the surgeon is essential to proper care.48 Understanding the specific procedure, concomitant injuries, and tissue quality may also affect the level of progression.
The rehabilitation process will focus on four keys to success:
Phase I (Early Protective Phase)
TIME: Day 1 to 4 weeks after surgery
GOALS: Protect surgical procedure, educate patient on procedure and therapeutic progression, regulate pain and control inflammation, initiate ROM and dynamic stabilization, neuromuscular reeducation of external rotators and scapulothoracic muscles
Initial Postoperative Examination
Outpatient physical therapy can begin as early as 3 days after SLAP repair. At this time the mobility of the sternoclavicular (SC) joint, AC joint, and scapulothoracic joint are addressed and mobilized if indicated. Initial evaluation documentation should include the observation of the portal sites, atrophy, swelling, posture, and functional difficulties. Observation and documentation of ROM and general willingness to move the shoulder and neurovascular measurements should be documented.  Care should be taken to avoid contracting the biceps (active elbow flexion) until week 2. Tests to assess shoulder instability or labral pathology at this point would be inappropriate.
Early Protective Postoperative Rehabilitation
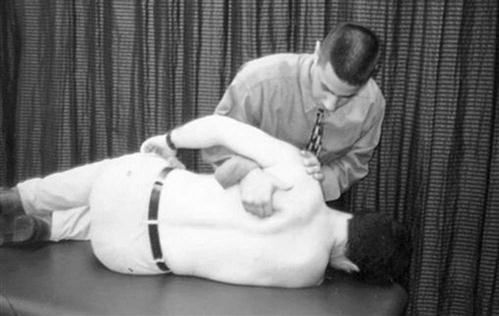
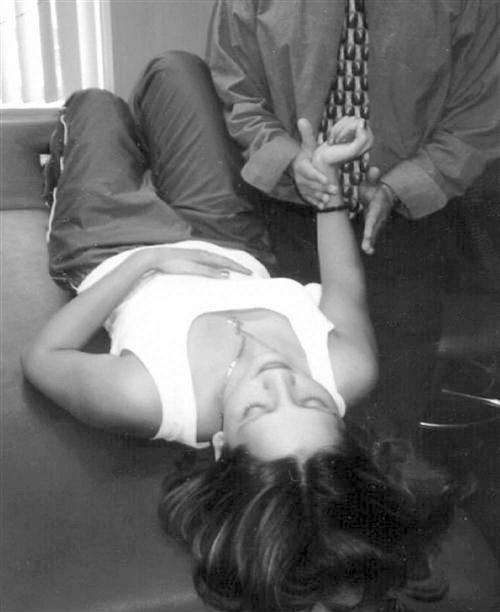
Once the milestone of mobility of the proximal joints is obtained, manual scapular stabilization is initiated. In the side-lying position, manual resistance can be given to the scapula to resist elevation, depression, protraction, and retraction (Fig. 6-9). Pain can be a limiting factor for starting scapular stabilization and rotator cuff isometrics; however, submaximal pain-free alternating isometrics for IR and external rotation (ER) may begin as early as 7 days after surgery (Fig. 6-10). Because the rotator cuff muscles are not violated, this exercise can begin with the arm at the side. Early mobilization exercises such as the pendulums are recommended for pain relief and could prevent adhesions from forming. Pendulums have been shown to produce very little muscular activity and are considered to be a safe exercise during this period for most shoulder surgeries.58
 However, some surgeons feel the arm hanging in a dependent position may put unwanted stress on the repaired labral. Initiation of active assistive range of motion (A/AROM) using a pulley for sagittal plane flexion and scapular plane elevation is advised. In addition, a cane, golf club, or umbrella can be used to assist with regaining flexion, abduction, adduction, and ER at 0° and 30° of abduction (or where the surgeon sets the shoulder during surgery). Gentle mobilization (grades I and II) consisting of posterior glides can be performed at this time for pain relief.
Contraindications
• No ER past the set point for 3 weeks
• No ER in the 90°/90° position for 6 weeks to avoid the peel-back mechanism
Early strengthening of the serratus anterior muscle is also encouraged if it is maintained slightly below 90° of shoulder flexion and is pain free. Subsequent atrophy of the serratus anterior muscle, as a result of immobilization, may allow the scapula to rest in a downwardly rotated position, causing inferior border prominence. Decker and associates75 used EMG to determine which exercises consistently elicited the greatest maximum voluntary contraction (MVC) of the serratus anterior. It was revealed that the serratus anterior punch, scaption, dynamic hug, knee push-up with a plus, and push-up plus exercises consistently elicited more than 20% of MVC. Most importantly, it was determined that the push-up with a plus and the dynamic hug exercises maintained the greatest MVC, as well as maintained the scapula in an upwardly rotated position (Fig. 6-11). Although it would be too early in the rehabilitation process to perform these later exercises, Decker and associates75 highlighted the serratus anterior punch as a valuable exercise. Performed in a controlled, supervised setting, this is an excellent choice to initiate early serratus anterior strengthening. Transition to the more challenging serratus anterior exercises should occur after 8 weeks and be based on logical exercise progression.
 A fine line exists between pushing patients too hard and progressing them as planned. Often patients may feel better than expected during this early protective phase, so therapists must always respect the laws of tissue healing. Three milestones to achieve for progression to the next phase of rehabilitation are (1) to educate the patient on the procedure he or she had and what to expect during the rehabilitation, (2) to provide some pain relief so that the patient is able to tolerate submaximal isometrics of the rotator cuff muscles at 0° abduction, and (3) to attain symmetrical mobility of the SC, AC, and scapulothoracic joints, as well as the ability to protract, retract, elevate, and depress the scapula against submaximal manual resistance. A/AROM goals include achieving flexion to 110° to 130°, abduction to 70°, scapula plane IR to 60°, and scapula plane ER to set point.
Phase II (Intermediate Phase)
TIME: 5 to 8 weeks after surgery
GOALS: Normalize arthrokinematics, gains in neuromuscular control, normalization of posterior shoulder flexibility
During weeks 5 to 8, three visits per week should focus on the return of scapular stability and GH ROM. Later in this period, rotator cuff isotonic strengthening is initiated. During this period, the patient removes the sling, and more aggressive A/AROM exercises are initiated. These exercises may include the use of a pulley or cane to assist in forward elevation in the plane of the scapula and IR. Initially, ER stretching is performed in the guarded neutral position with the arm at the side, and then it is progressed into the scapular plane. While progressing through rehabilitation, the therapist should always consider patients’ morphology, understanding if they are hypermobile by nature and returning motion quickly and easily; if so, they do not need to be pushed.
 Patients with excessive joint laxity or generalized joint hypermobility must be progressed under a watchful eye.76 Excessively stretching ER in the 90°/90° position in these patients too early during their postoperative care may jeopardize the end result. Burkhart and Morgan77 discovered the peel-back mechanism, which can occur during rehabilitation when ER is forced passively in the 90°/90° position before healing has occurred. Kuhn and associates78 demonstrated failure of the biceps superior labral complex in 9 of 10 cadaveric shoulders when the biceps was tensioned in the cocking position. The peel-back phenomenon occurs when the biceps-labral complex is abducted and externally rotated causing a posterior biceps vector, and shearing the biceps anchor repair off its origin.
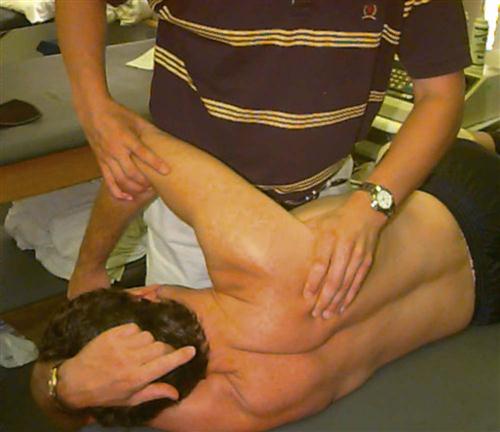
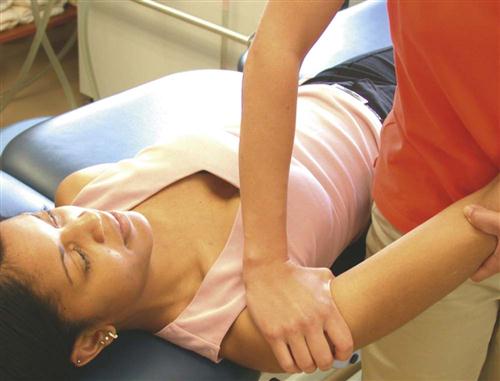
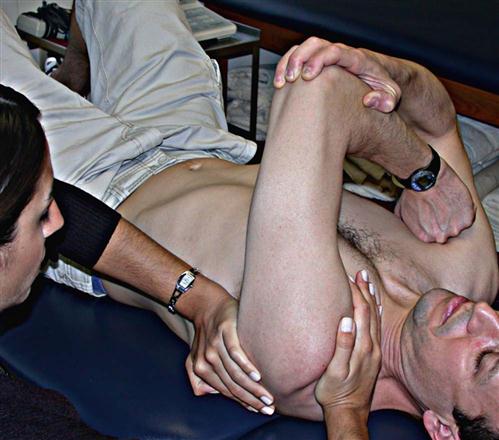
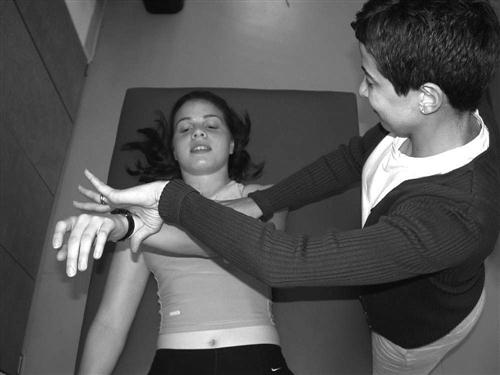
One therapeutic intervention that can assist in decreasing tension in the biceps-labral complex is restoring posterior extensibility. By restoring posterior capsule extensibility, it allows the humeral head to centralize in the glenoid fossa and not be forced anterior. A tight posterior capsule forces the humeral head anterior, creating unwanted tension in the biceps-labral complex as the phenomenon occurs. Stretching and mobilization of the posterior capsule should be emphasized because tightness of the posterior shoulder structures has been linked to a loss of IR ROM.79 Loss of mobility can potentially limit progress, considering a tight posterior capsule is thought to cause anterior-superior migration of the humeral head with forward elevation of the shoulder, possibly contributing to a SLAP tear.80 If posterior shoulder tightness and a decrease in IR ROM are observed, careful assessment must be undertaken. The Tyler test for posterior shoulder tightness can be performed to determine if posterior shoulder tightness is present (Fig. 6-12).79,81 Recently Mullaney and associates82 have made the measurement easier and shown its reproducibility using a digital level. To further determine if the loss of IR is due to capsular contracture, a posterior glide must be performed (Fig. 6-13). An effective method of stretching this area is to stabilize the patient’s scapula at the inferior angle manually while the patient provides a cross-chest adduction force in the supine position (Fig. 6-14). Further stretch may be felt by having the patient add slight pressure into IR by pressing inferiorly on the dorsal aspect of the hand or wrist. This posterior shoulder protocol has been shown to be effective in the correction of posterior shoulder tightness in patients with internal impingement, six of which were more than 6 months after SLAP repair.83
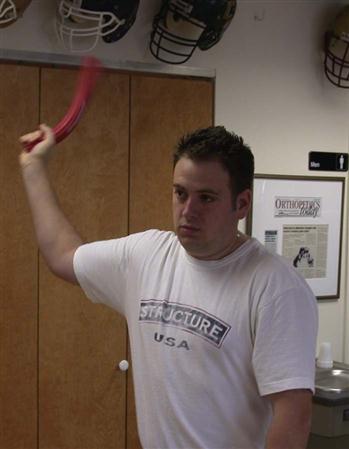
 Passive range of motion (PROM) of ER and abduction should be limited to 65° and 70°, respectively, as to not put stress on the healing biceps-labral complex. Initial ROM goals are to achieve within 10° of full IR and 150° to 165° of passive flexion in the plane of the scapular. The goal is to maintain available mobility and prevent excessive scarring. Similar to Burkhart and Morgan84 and Burkhart, Morgan, and Kibler,85 isotonic strengthening exercises are initiated for abduction, scaption, IR, and ER in the scapular plane.86 In addition, rhythmic stabilization at the end ROM can be performed at this time. To have normal scapulohumeral rhythm, dynamic scapula stability of this joint needs to be restored. Scapula exercises are encouraged in this phase of rehabilitation to counteract scapulohumeral dissociation and provide a stable base of support for active range of motion (AROM) to be performed.87 Recently, the authors of this chapter reported on the importance of scapula stability in generating shoulder rotation torque in microinstability patients. The results of the authors’ study demonstrated patients with microinstability exhibited a significant decrease in peak shoulder ER and IR torque after exercise-induced fatigue of the scapular stabilizer.88 Many authors have examined the EMG activity during scapular strengthening exercises; however, when choosing the appropriate exercise, the clinician must keep the activity pain free and protect the surgical repair.89–92 Three relatively low-level exercises the authors like to use after SLAP repair are (1) elastic resistance rows (not to brake the frontal plane with the involved elbow); (2) standing scapular retraction against elastic resistance with straight arms just below 90° of shoulder flexion; and (3) shoulder oscillation in the plane of the scapula, keeping the wrist, elbow, and shoulder steady (Fig. 6-15). Finally, in the later phases of rehabilitation, the patient can progress to more demanding open and closed kinetic chain scapular strengthening exercises.
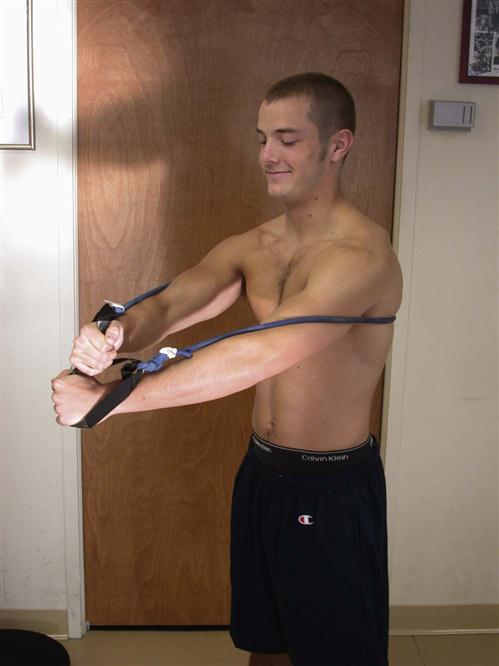
Strengthening exercises should progress to resistance training with elastic bands for IR, ER, abduction, and extension. Maintaining the GH joint in the scapular plane (30° to 45° anterior to the frontal plane) will minimize the tensile stress placed on the labral repair.93
 The authors have found that giving verbal feedback to lift the chest up and pinch the shoulders back can facilitate scapular stabilization while training the external rotators. Hintermeister and associates94 found shoulder elastic resistance training to have a low load on the shoulder and therefore to be safe for postoperative patients.
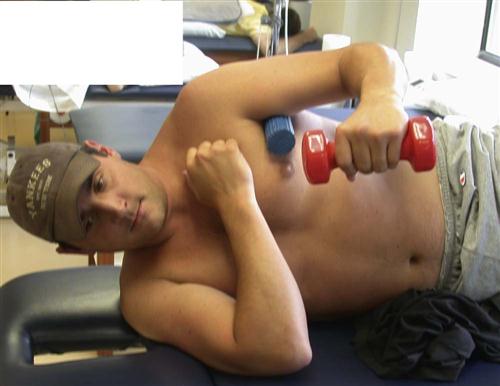
It is our opinion that the use of free weights with the arm in a dependent position should be used accordingly during this period to minimize the potential for detrimental humeral head translation. Side-lying ER is typically initiated during the later portion of this phase (Fig. 6-16). Proper technique, weight, and ROM are important to execute this safely. Stabilizing the humerus to the thorax and not allowing the elbow to drift past the frontal plane of the body will place minimal winding on the labral repair.
 At this phase, minimal weight should be used within the comfortable ROM to prevent ill-advised stress to the healing biceps-labral complex. It may also be recommended that the patient wait until the end of the intermediate postoperative period to initiate jogging or running for this same reason (the humeral head may be forcibly thrusted anteriorly). It is imperative that the therapist maintain supervision of the ROM progression during this period to protect the healing tissue.86 Clinical milestones to progress to the next phase of rehabilitation include (1) achieving 160° of flexion in the scapular plane, (2) scapular plane ER to 65°, (3) ER at 90° abduction to 45°, (4) near full IR in the scapular plane, (5) IR at 90° abduction to 45°, (6) 150° of abduction, (7) symmetrical posterior shoulder flexibility, and (8) improved isotonic internal and external strength in available ROM.
Phase III (Strengthening Postoperative Phase)
TIME: 9 to 14 weeks after surgery
GOALS: Normalize ROM, progression of strength, normalize scapulothoracic motion and strength, overhead activities without pain
During weeks 9 to 14 (usually two to three treatment sessions per week), rehabilitation continues to work toward full GH ROM and dynamic stability of the humeral head in the glenoid fossa. Gaining or maintaining full AROM within 10° of flexion in the sagittal plane and ER are to be achieved later during this time phase. At this time, regaining ER, abduction, and flexion does not seem to be a limiting factor for recovery. Once the patient has achieved the milestone of 70° to 80° ER in the plane of the scapula, he or she will begin to acquire ER ROM at 90° of abduction. Although in the past it has been expected that the patient will have full AROM 8 weeks after SLAP repair, most patients do not achieve this at 8 weeks. In our experience, ER and IR ROM measured in the supine position with the GH joint abducted 90° typically does not achieve full ROM until 10 to 12 weeks or longer, depending upon the patient.
 It is at this point that a sleeper stretch may safely be given to a patient to regain passive IR ROM (Fig. 6-17). This is in agreement with other authors who demonstrated a lack of full return of ROM in patients 12 weeks after SLAP repair.84,85,95,96 In our opinion, the key to a successful rehabilitation of these patients, at this phase, is finding the balance point between stretching ER and letting them naturally regain their ROM.
An arm upper body ergometer (UBE) using light resistance can be beneficial at this time to facilitate ROM and initiate active muscular control of the shoulder.
 The axis of rotation of the UBE should remain below the level of the shoulder joint so as not to force forward flexion above 80°. To avoid stress to the biceps-labral complex, the patient should be positioned at a distance from the axis of rotation that does not allow the elbow to move posterior to the frontal plane when performing ergometer revolutions. This exercise is not initiated earlier because the amount of stress placed on the biceps-labral complex during the use of an UBE is unknown.
When designing the strengthening program, it is important to match patients’ needs with their limitations and goals. A properly designed strengthening program will address their needs by attempting to get the most benefit from each exercise prescription. Previous EMG studies have set forth which shoulder exercises activate particular muscles, and these should be considered as the clinician prescribes a program.58,75,76,90,91 We have combined many of these programs to address generalized specific weaknesses. From these studies, we have developed the “prone program plus” to address scapular stability and generalized weakness. The prone program plus can be started in this phase of the rehabilitation if the exercises are pain free. The prone program plus includes prone GH horizontal abduction with GH IR (thumb down), prone scapula adduction with GH ER (thumb up), prone rows, prone shoulder flexion in the scapular plane, prone 90°/90° ER, push-ups with a plus (therapist initiates exercise in quadruped), and ball press downs. Patients can easily get into poor habits or begin performing these exercises with improper form. It is recommended that clinicians educate their patients on these exercises and allow ample time for them to develop proper form before prescribing these as part of a home program.
Proprioceptive neuromuscular facilitation (PNF) can be described as movements that combine rotation and diagonal components that closely resemble the movement patterns required for sport and work activities. PNF acts to enhance the proprioceptive input and neuromuscular responses while stressing motor relearning in the postoperative phases of rehabilitation. PNF patterns are initiated with the scapula because scapular stability is essential for total function of the shoulder. Scapular patterns are generally performed in the side-lying position, with the head and neck in neutral alignment. The coupled patterns of anterior elevation–posterior depression and anterior depression–posterior elevation are used, respectively. Trunk rotation should eventually be combined with scapular and extremity PNF patterns to maximize combined muscular movement patterns. Techniques such as hold-relax, slow reversals, and contract-relax are used specifically to improve motion, whereas rhythmic stabilization, repeated contractions, and combination isotonics are used to enhance concentric and eccentric muscle action. Specifically, the D2-flexion pattern combines flexion, abduction, and ER, emphasizing the posterior rotator cuff and posterior deltoid (Fig. 6-18). These neuromuscular control exercises strive to reestablish scapular positioning and stability of the humeral head in the glenoid.87
As the patient progresses through the program, periodical reevaluation of the scapular dyskinesis is highly recommended. The authors stress this, especially as the patient gains full ROM and may no longer be inhibited by tight soft tissue structures. The term scapular dyskinesis, although indicating that an alteration exists, is a qualitative collective term that does not differentiate between types of scapular positions or motions.97 Therefore scapular evaluation and categorization is challenging. The most common techniques for objective quantification include visual evaluation, the lateral scapular slide test (LSST), and 3-D techniques. Kibler and associates97 have recently introduced a new visual technique that may help clinicians standardize categorization. This dynamic technique categorizes the dyskinesis in one of four groups:
• Type I—inferior angle prominence (horizontal plane movement)
• Type II—medial border prominence dorsally (frontal plane movement)
• Type III—shoulder shrug motion without winging (sagittal plane movement)
• Type IV—bilaterally symmetrical movement (normal movement)
Like all scapular categorization techniques, the therapist must be concerned with combined movements, a learning curve, and patient experience; however, it does present clinicians with a valuable tool that, with practice, may enhance clinical communication.
The authors also believe that exercises directed toward facilitation of functional muscular firing patterns in both the open and closed chain may provide useful input for return to function after SLAP repair. Lear and Gross93 demonstrated scapular muscle activity increases with a wall push-up progression.  However, the strain on the biceps-labral complex is unknown and may be too great for patients after SLAP repair. This exercise should be gradually built up to and proceeded to with caution. Clinicians should hold this exercise until the advanced strengthening postoperative phase to protect the healing tissue.
Isotonic exercises emphasizing light resistance and increased repetitions are used for isolated and combined movement patterns of the shoulder. The authors use a progression from three sets of 10, to two sets of 15, and on to one set of 30 repetitions. If the patient can perform one set of 30 repetitions with good form and no substitution, he or she can be progressed to 1- to 2-lb weights and back down to three sets of 10 to repeat the cycle. This rationale is based on lending objectivity to the progression and the tonic nature of the rotator cuff muscles and the scapular stabilizers. Isolated exercises are used to enhance or increase the strength of a particular muscle. Combining isotonic exercises in functional-movement patterns are performed with PNF patterns using elastic resistance or the cable column to enhance coordinated movement. In the case of a swimmer, the D1 pattern with elastic resistance will lead to a carryover to his athletic function. Initiation of isokinetic strengthening at this phase may enhance the shoulder’s ability to strengthen in a pain-free ROM. It is encouraged that slower speeds be used when strengthening patients with shoulder instability. Isokinetic principles suggest that faster isokinetic speeds create greater translational forces, whereas slower speeds create stronger compressive forces (which stabilize the shoulder). Milestones that should be met to move to the next rehabilitation phase include (1) within 10° of full AROM in flexion, abduction, IR, and ER in the plane of the scapula; (2) normalized scapulothoracic motion and strength; (3) moderate overhead activities without pain; and (4) isometric internal and external strength should be at least 50% that of the uninjured side.
Phase IV (Advanced Strengthening Phase)
TIME: 15 to 24 weeks after surgery
GOALS: Pain-free full ROM, improve muscular endurance, improve dynamic stability
After 15 weeks the patient is in the final phase of rehabilitation. Full AROM should be attained at this time. The only restriction on ROM is that ER should not be stretched beyond 90°. It may be preferable to allow the athlete to regain additional degrees of ER over time rather than stress the biceps-labral complex, potentially stretching the repair.
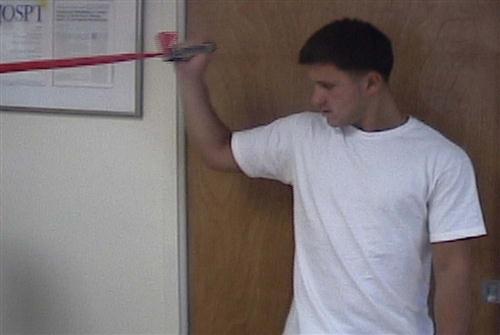
 Posterior capsule stretching is appropriate if full IR has not been obtained yet. Performing the side-lying sleeper stretch encourages ROM for IR (see Fig. 6-17). At the onset of this phase, a thorough strength assessment is needed to evaluate the direction of strengthening needed for the particular patient. This assessment may include manual muscle testing, hand-held dynamometry, and isokinetic strengthening (or a combination of these techniques). Assessment should include the primary shoulder movers, shoulder rotators, and scapula stabilizers. Results of this assessment should be addressed with a well-rounded strengthening program to include isotonic, concentric, and eccentric loading exercises. When designing these programs, consider the everyday demands of each patient. For an overhead-throwing athlete, strengthening in the throwing position is imperative (Fig. 6-19). Once this phase of rehabilitation is reached, treatment should begin to streamline toward the functional demands of the patient.98
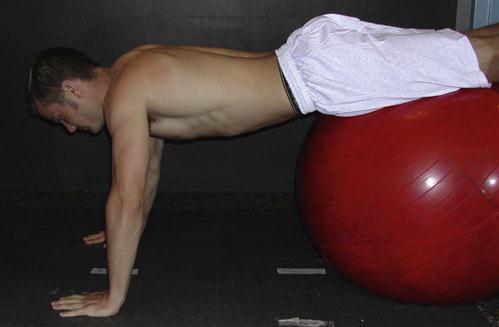
Initiation of a properly designed plyometric training program is often the missing link to discharging a high-level patient. Plyometric training for the upper extremity is used to generate rapid and powerful muscular contractions in response to a dynamic stretch–inducing load to a muscle or group of muscles. It is suggested that plyometrics train the entire neuromuscular system, using the principles of stored elastic energy to use strength as quickly and forcefully as possible. The myotatic stretch reflex develops stored elastic potential. If the exercise movement is slow, such as in weight lifting, the energy is dissipated and nonproductive. However, with rapid movement, this stored elastic energy can be used to generate a force greater than that of the concentric contraction of the muscle alone. Plyometrics use the principles of progressive loading with the ultimate goal of power development. Using a trampoline will increase the EMG activity and elevate the level of eccentric loading of the shoulder rotators.99 Therefore a progression from two-handed, side-to-side throws to overhead throws to one-handed overhead throws is encouraged to maximize the power development of the overhead athlete. A well-rounded program will address both the internal and external rotators of the shoulder, together with the core muscles of the trunk. Externally challenging the patient, by permitting stability from a naturally unstable surface, such as a ball, will challenge the entire kinetic chain. Advanced exercises, such as the Physioball “walk outs,” exemplify this concept (Fig. 6-20). As the patient walks out from the ball with the hands, core stabilizers, as well as GH stabilizers, are challenged. Milestones to progress to the final phase of rehabilitation include (1) pain-free full ROM, (2) less than 20% strength deficits for IR and ER at 90°/second, and (3) 20% strength deficits in all positions.
Phase V (Return-to-Activity-and-Sport Phase)
TIME: 4 to 6 months after surgery
GOALS: Pain-free full ROM, normalized strength, return to sport or activity program
This is the phase of rehabilitation at which very few therapists have the opportunity to discharge patients.
All too often patients lose interest, exhaust insurance coverage, or just neglect the importance of fine-tuning their shoulders before fully returning to their lifestyle. This stage is designed to prepare patients to return, without hesitation, to full participation in all activities. Milestones to successfully complete this phase include (1) total confidence in the shoulder, (2) pain-free full ROM, and (3) an isokinetic or hand-held dynamometry with less than 10% deficit in all positions.100
Exercises in this phase continue to emphasize functional positions, including the plyometric program (isokinetic strengthening at 90° of abduction). A gradual return to sport is permitted once the patient is pain free, has nearly full ROM in all planes, confidence in the shoulder, and 85% to 90% of the strength of the opposite side on isokinetic testing at 90°, 180°, and 300°/second for IR and ER motions.
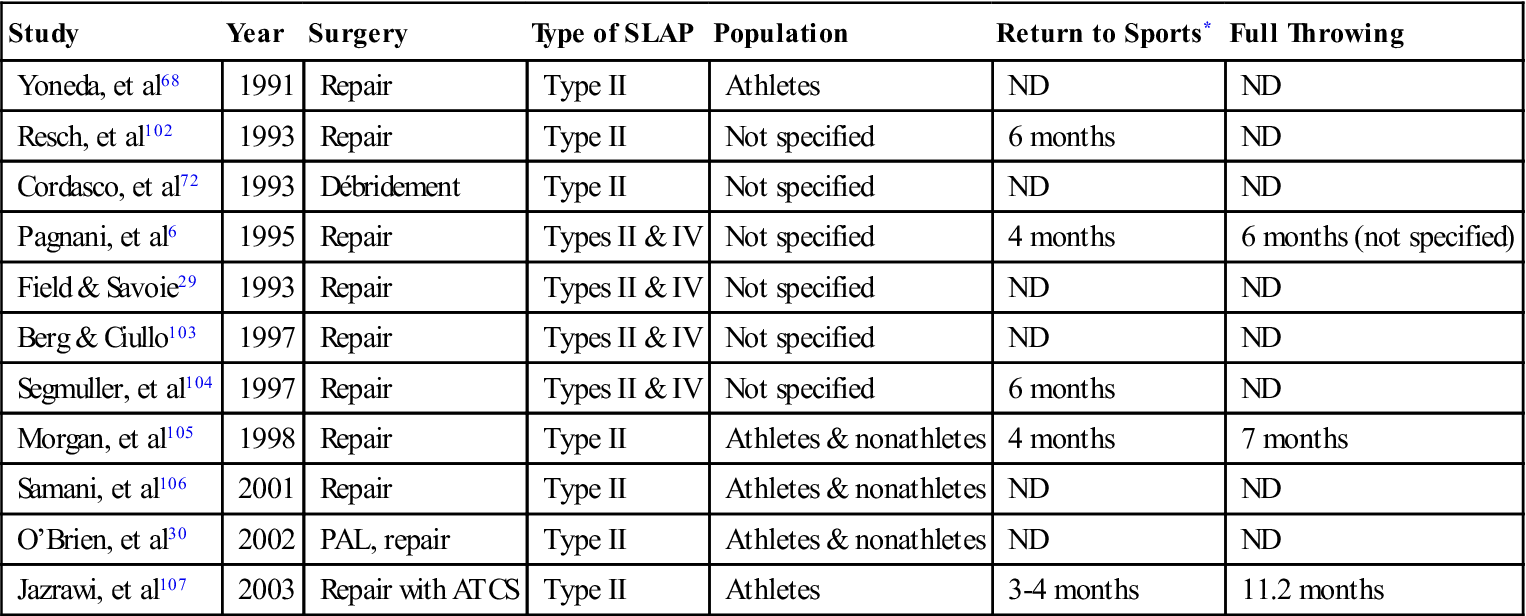
Confidence is achieved with the ability to perform pain-free functional movement in the patient’s sport. Our experience has demonstrated that the throwing athlete requires an additional 1 to 2 months to allow the shoulder to adjust to the motion. Patients also report that it takes up to 1 year before the shoulder feels “normal” after SLAP repair. We currently are using the American Shoulder and Elbow Surgeons Shoulder Evaluation Form to standardize the documentation of pain, motion, strength, stability, and function. Although it remains difficult to gather enough data to determine a criterion score for return to sports, once 6 months have passed and clinical milestones have been met, the athlete is cleared for full throwing. This time frame is in agreement with other authors’ findings101 (Table 6-1).
TABLE 6-1
Time to Return to Sports After SLAP Surgery
< ?comst?>
| Study | Year | Surgery | Type of SLAP | Population | Return to Sports* | Full Throwing |
| Yoneda, et al68 | 1991 | Repair | Type II | Athletes | ND | ND |
| Resch, et al102 | 1993 | Repair | Type II | Not specified | 6 months | ND |
| Cordasco, et al72 | 1993 | Débridement | Type II | Not specified | ND | ND |
| Pagnani, et al6 | 1995 | Repair | Types II & IV | Not specified | 4 months | 6 months (not specified) |
| Field & Savoie29 | 1993 | Repair | Types II & IV | Not specified | ND | ND |
| Berg & Ciullo103 | 1997 | Repair | Types II & IV | Not specified | ND | ND |
| Segmuller, et al104 | 1997 | Repair | Types II & IV | Not specified | 6 months | ND |
| Morgan, et al105 | 1998 | Repair | Type II | Athletes & nonathletes | 4 months | 7 months |
| Samani, et al106 | 2001 | Repair | Type II | Athletes & nonathletes | ND | ND |
| O’Brien, et al30 | 2002 | PAL, repair | Type II | Athletes & nonathletes | ND | ND |
| Jazrawi, et al107 | 2003 | Repair with ATCS | Type II | Athletes | 3-4 months | 11.2 months |
< ?comen?>< ?comst1?>
< ?comst1?>
< ?comen1?>
< ?comst1?>< ?comen1?>*< ?comst1?>< ?comen1?>In most papers, time to return refers to the initial return, not to full return.
Data from O’Brien SJ, et al: The trans-rotator cuff approach to SLAP lesions: Technical aspects for repair and a clinical follow-up of 31 patients at a minimum of 2 years. Arthroscopy 18(4):372-377, 2002.
Summary
Considerations must be given if additional procedures are performed for reattachment of the labrum, ligaments, or the biceps tendon. However, stronger fixation techniques have allowed the rehabilitation to progress more rapidly with these procedures. These guidelines are a continuum of rehabilitation phases based on the effect the surgery has on the tissue and the surrounding structures. Scientific rationale is applied whenever possible; however, as surgical procedures evolve, so must the rehabilitation. These guidelines are by no means set in stone, and all exercises are not distinct to particular phases. The goals and exercises need to be modified based on the performer, the pathology, and the performance demands. Exercise prescriptions should not be viewed as protocol but as guidelines upon which to base rehabilitation. These rehabilitation guidelines are outlined in Box 6-1.
Box 6-1
Rehabilitation Guidelines for SLAP Repair
I Early Protective Phase (0 to 4 Weeks)
A Goals:
B Treatment Plan (0 to 2 Weeks):
C Treatment Plan (2 to 4 Weeks):


D Milestones For Progression:
II Intermediate Phase (5 to 8 Weeks)
A Goals:
B Treatment plan:
 Flexion in the scapula plane passively 150° to 165°
 ER in the scapula plane to 65°
 IR in the scapula plane, full or to within 10°
• Initiate joint mobilizations as necessary
• Initiate posterior capsular stretching
 IR/ER (with GH in the scapula plane) with elastic band

 Scaption full can (no weight if substitution patterns)


C Milestones for progression:
III Strengthening Phase (9 to 14 Weeks)
A Goals:
B Treatment plan:
• ROM progression; stretching ER at 90° of GH abduction
 Within 10° of full AROM in all plans
• Progression of scapular retractors and stabilizers
 Prone program; LT, MT, rhomboid


 Challenging rhythmic stabilization

 Initiate isokinetic IR and ER in scapular plan
 Initiate IR and ER at 90° of GH abduction


C Milestones for progression:
IV Advanced Strengthening Phase (15 to 24 Weeks)
A Goals:
B Treatment plan:


 Advanced closed kinetic chain exercise
 Wall push-ups; with and without ball
 Continue with overhead strengthening
 Continue with isokinetic IR and ER strengthening; 90° of GH abduction
 Advance isotonic strengthening
 Advance rhythmic stabilization training in various ranges and positions


C Milestones for progression:


V Return-to-Activity and Sport Phase (4 to 6 Months)
A Goals:
B Treatment plan:


C Milestones for activity:
A/AROM, active assistive range of motion; AC, acromioclavicular; AROM, active range of motion; ER, external rotation; GH, glenohumeral; IR, internal rotation; LT, lower trapezius; MT, middle trapezius; PROM, Passive range of motion; SC, sternoclavicular; ST, scapulothoracic; UBE, upper body ergometer.
Troubleshooting
Hypomobility and Hypermobility of the Glenohumeral Joint
In the process of rehab after a SLAP repair, it is not uncommon to have difficulty restoring a patient’s normal ROM. With these hypomobile patients, it is necessary to begin early mobilization and stretching to regain normal arthrokinematic and osteokinematic motion. Using grade III and IV mobilizations can help to increase capsular pliability, especially in the posterior and inferior directions.
 The therapist should avoid stretching patients into the apprehension position without applying a posterior “relocation” force because this may cause impingement internally.
After SLAP repair, some patients will experience a hypermobility issue. Often times this is due to generalized ligament laxity that affects all joints. This is tested by thumb-to-forearm, metacarpophalangeal and distal interphalangeal extension, as well as elbow and knee recurvatum. These patients will regain normal ROM on their own as they progress to doing functional movements of the shoulder. Therefore it is necessary for the therapist to mobilize and stretch the GH complex. It is important to progress these patients more slowly and allow them to regain the motion on their own.
Poor Scapular Stabilization
Scapular dyskinesis, or poor scapulohumeral rhythm, is often a problem that patients and therapists face after SLAP repair surgery. Poor scapular stability may have been a precursor that helped lead to the SLAP tear, or it may be a direct result of the disuse after surgery and wearing a sling. In these cases it is necessary to establish a stable base by working the rhomboids, middle and lower trapezius, and the serratus muscles in an endurance fashion. Because normal motion requires these muscles to be tonically active, it is necessary to work them to fatigue. Failing to establish this stable base will lead to the peal-back mechanism occurring when the arm is in the 90°/90° position. Winging of the scapula causes an increased anterior force on the humeral head that will increase the traction force on the long head of the biceps as the arm moves up into the throwing motion. It is important to avoid rotator cuff strengthening in the 90°/90° position until scapulohumeral motion has been normalized.
Posterior Shoulder Extensibility
The throwing athlete has been known to have an increase in ER ROM and a decreased/limited IR ROM. Not maintaining total ROM with a severe loss of IR ROM may lead to a SLAP tear. The cause of the IR ROM loss may be a tight posterior capsule and musculature. If the therapist is lucky enough to see the patient before surgery, this can be addressed. In fact, the surgeon may do a posterior capsule release during the SLAP repair.
 More often the posterior shoulder tightness needs to be treated after the surgery by the physical therapist. Focusing on the posterior shoulder will ensure recovery of total ROM.
Impingement Symptoms During Return-to-Activity Phase
Sometimes after SLAP repair, a patient will report back to the physical therapist with shoulder pain after returning to activity. It is not uncommon for an athlete to forget about the home exercise program or fail to complete rehabilitation. The athlete commonly complains of mechanical shoulder impingement symptoms. If this is the case, it is helpful to closely examine ER strength in the 90°/90° position, posterior shoulder strength, and scapulohumeral rhythm. It is more than likely that one or all of these parameters have not been normalized before the patient returned.
 Suggested Home Maintenance for the Postsurgical Patient
Because the patient spends only an estimated 2 to 3 hours per week with the physical therapist, it is what the patient does on his or her own that influences the eventual outcome. Physical therapists are teachers; they intervene manually when necessary but direct the rehabilitation based on the basic science of healing tissue. Adherence to a home exercise program is crucial for a successful outcome after SLAP repair. The home program for any patient must be individualized based on the patient’s postoperative condition, age, nutritional status, limitations, and individual needs. Frequency, sets, and repetitions are determined based on the therapist’s professional opinion of the expected outcome.
1 Early (0 to 4 Weeks)
2 Intermediate (5 to 8 Weeks)
3 Dynamic Strengthening (9 to 14 Weeks)
4 Return to Sports
ER 90°/90° position with Thera-Band, three sets to fatigue
• Failure to complete full ROM (0° to 90°)
• Upper arm breaking the frontal plane
• Maintain full IR at 90°/90° position
• Rows
• Horizontal ABD, front raises, lateral raises, posterior raises
A/AROM, Active assistive range of motion; ABD, abduction; ER, external rotation; PNF, proprioceptive neuromuscular facilitation; UE, upper extremity.
Clinical Case Review
1Aimee just felt a pop in her shoulder 4 hours ago while throwing a softball from center field to home plate. She has iced her arm and now arrives at your clinic to determine the possible source of pain. What special test might you perform during your physical examination to evaluate for a SLAP tear?
The Speeds test and O’Brien test are commonly used tests.
2Tom is continuing to have pain after his nonoperative rehabilitation of his type I SLAP tear. His MRI is not showing any increased pathology to the biceps complex. What associated injury could be causing pain in his shoulder?
Other problems that can be associated with SLAP lesions include ganglion cysts, rotator cuff tears, posterior instability, and AC joint arthritis.
3Sally is a 42-year-old female who arrives at the clinic 4 days after a SLAP repair. In passing, she tells the therapist that she has not been feeling well since surgery; she reports feeling “rundown” with a low-grade fever and fatigue the last few days. She is also complaining of severe aching around the shoulder joint. She notes her pain as 10 out of 10, and nothing she can do will make it better. “It even hurts when I don’t move, and it often wakes me up.” Upon inspection the therapist notices that the entire area around the shoulder is red, swollen, and has moderate wound seepage. The area surrounding the incision is hot to the touch, and the skin is very firm. What is the most likely cause of the patient’s pain and discomfort?
Sally is exhibiting signs of a postoperative sepsis infection. A feeling of general malaise and low-grade fever are signs of systematic infection. Sally should be referred back to her physician immediately.
4Tom is a 52-year-old male who arrives at the clinic 4 weeks after a SLAP repair. By recommendation of his physician, Tom has worn a sling religiously for the past 4 weeks. Upon the therapist’s initial evaluation, it is noted that Tom has painful and severely restricted motion in all planes. What is the most likely cause of Tom’s ROM deficit, and how would this deficit be treated most successfully?
Tom most likely has some iatrogenic GH adhesive capsulitis (i.e., frozen shoulder). Because he is still in the tissue-healing phase of his rehabilitation, the therapist cannot use grade III or IV mobilizations to normalize arthrokinematic motion because it may disrupt the repair. Tom’s treatment should be with PROM and A/AROM to decrease and prevent further loss of ROM secondary to adhesive capsulitis. He should be encouraged to remove his sling several times a day and perform pendulum exercises to provide distraction and gentle ROM.
5Dwight, who is 6 weeks postoperation for SLAP repair of the right shoulder, presents for his initial evaluation complaining of aching pain on the top of the shoulder laterally and posteriorly, with a feeling of shoulder tightness. You notice that he holds his shoulder in a protective, hiked position. While observing him performing therapeutic exercises, you notice he “shrugs” his shoulders bilaterally with performance of rows and on the right side with scaption AROM. What do you think is the culprit of his complaints, what should be evaluated, and what should your treatment plan consist of?
Based on his subjective complaints, he is likely experiencing upper trapezius muscle tightness with pain being referred to the distal insertion site of the muscle. Based on objective observation, Dwight is overusing the upper trapezius muscle both at rest and with execution of exercises and is using substitution patterns secondary to abnormal scapulohumeral rhythm. Scapulothoracic joint mobility should be assessed, as well as posterior shoulder musculature tightness and posterior capsule mobility.
Treatment should consist of soft tissue mobilization/massage to the upper trapezius muscle, scapulothoracic mobilizations, and joint mobilization to surrounding joints as appropriate, including the GH and sternoclavicular joints. Special attention should be paid to execution of exercises. Because he tends to activate the upper trapezius muscles when performing shoulder movements, visual and tactile cues to keep the shoulders “down and back” should be used, as well as visual or EMG biofeedback for upper trapezius muscle inhibition. Scapular stabilization exercises to strengthen the serratus anterior and other parts of the trapezius should also be added to assist in scapular upward rotation.
6Shannon is a 47-year-old college professor who had a SLAP repair 12 weeks ago on her dominant arm. She is compliant with physical therapy and postsurgical precautions. She comes to the clinic complaining of increased pain and discomfort when writing on the chalkboard and reaching for things. Upon assessment, the therapist finds poor scapulohumeral rhythm, a winging scapular, and the following postmanual muscle testing (MMT) grades: serratus anterior 3/5, rhomboids/midtrapezius 3/5, and lower trapezius 2/5. Based on the clinical findings, what therapeutic exercise should be added to Shannon’s program to resolve her complaints?
The following therapeutic exercises should be added to Shannon’s program: dynamic hugs, push-ups with a plus, serratus punches, scaption, and manual scapula rhythmic stabilization.
7At 12 weeks after SLAP repair, Lily has 45° of GH IR PROM and 40° of AROM. She has been doing the sleeper stretch but has not made any gains in ROM in the last 4 weeks. How does the therapist determine if the limitation in IR ROM is capsular or muscular to ensure that the correct therapeutic exercises are prescribed?
The therapist should perform a Tyler test and a posterior glide looking for side-to-side restriction. If the Tyler test is positive but the posterior glide is negative, the therapist can determine that the lack of IR is caused by muscle tightness and not capsular tightness.
8Demetrius is 20 weeks s/p type II SLAP repair when he begins to get anxious about returning to his recreational baseball team in time for the playoffs, which start in 2 weeks. How should the therapist determine when he is ready to return to sports and at what level of competition?
A patient must first meet the return to activity/sport goals which include pain-free full ROM, normalized strength (i.e., <15% measured contralaterally), and the confidence necessary for the specific sport. Once these goals are met, the patient must then complete a return to activity program (e.g., return to throwing program). The American Shoulder and Elbow Surgeons Shoulder Evaluation Form can be used for documentation and comparison purposes. The literature has generally demonstrated a return to sports between 4 to 6 months for an athlete with a type II SLAP repair.
9Steve is a 22-year-old collegiate baseball pitcher who the therapist has been treating for the last 23 weeks after right-sided SLAP repair (throwing arm). Steve began a throwing program that the therapist designed 3 weeks earlier, and he has been throwing without problems. However, now that the number of pitches has increased in his throwing program, he has been complaining of anterior shoulder pain that bothers him most during the “ball release” and “follow-through” phases of his pitching mechanics. Ruling out a possible compromise of the SLAP repair, what else could possibly be causing Steve’s pain during the late period of his throw?
Because the biceps acts as an elbow flexor and a forearm supinator, its functions in the late phases of throwing are to decelerate the arm and extend the elbow. Overuse of the biceps if it has not been properly strengthened can lead to bicipital tendonitis. The therapist should have Steve back off the throwing program and begin eccentric strengthening of the biceps once the inflammation of the tendonitis has subsided. In addition, Steve’s rotator cuff strength should be checked because the biceps will often be overused as a humeral head depressor if the rotator cuff is weak and not functioning properly.
10Mariano arrives at the clinic after completion of an interval throwing program after 24 weeks of SLAP rehabilitation. He states his shoulder hurts after he is done throwing. After taking a history, the therapist feels that he is having some mechanical impingement. What are three likely causes of this impingement?
Three likely causes of this impingement are (1) poor scapular stability, (2) tight posterior shoulder structure, and (3) weak external rotator.
11Jon is a 16-year-old male, s/p SLAP repair with a small Hill Sachs lesion and is 26 weeks postoperation. His primary complaint is an inability to make the throw from third base to first base, stating he has no velocity. His MMT is 4/5 in all shoulder motions; ER ROM is within normal limits; slight glenohumeral IR deficit of 15°. What should Jon’s continued treatment consist of?
Jon should respond well to continued stretching of his shoulder via sleeper stretch, and posterior shoulder stretches. Included with stretching was continued strengthening with the “Throwers 10” exercises, and continued work with a return to throw interval program.