[level-membership-for-surgery-category]10
Stomach and duodenum
Examination of the stomach and duodenum
Suturing and stapling the stomach and duodenum
Gastrotomy and gastroduodenotomy
Percutaneous endoscopic gastrostomy
Elective surgery for peptic ulcer
Billroth I partial gastrectomy
Revision surgery following peptic ulcer surgery
D2 radical abdominal subtotal gastrectomy
Radical thoracoabdominal total gastrectomy
Palliative operations for gastric carcinoma
Proximal gastrectomy or Merendino Procedure (proximal gastrectomy and jejunal interposition)
Palliative partial gastrectomy
Benign and non-epithelial tumours
ENDOSCOPY
Appraise
1. Consider endoscopy when there is a likelihood that tissue biopsy is required. Radiology contrast studies complement endoscopy.
2. Endoscopy is mandatory in the investigation of gastrointestinal bleeding. It is also extremely useful in delineating anatomy, particularly in cases where there has been previous surgery.
3. Endoscopy is also a useful adjunct intra-operatively. It allows for intra-luminal examination if required when the diagnosis remains unclear.
4. The therapeutic capabilities of an endoscope should not be underestimated. Benign strictures can be dilated (bougie or balloon); malignant strictures cored out using Nd-YAG laser; polyps snared and removed; stones removed from the biliary tree; and stents inserted into the oesophagus, pylorus and biliary tree.
5. Percutaneous endoscopic gastrostomies are commonly performed for patients who are unable to swallow adequate volumes of nutrition. In addition, percutaneous endoscopic jejunostomies and nasojejunal feeding tubes are placed with the aid of endoscopy.
Prepare
1. Familiarize yourself with the endoscopes available in your hospitals. Ensure you are able to set up the scope and the stack independently in case you need to do so out of hours without experienced assistance (Fig. 10.1). Make sure that the instrument, light source, suction apparatus, biopsy forceps and air insufflation pump all work satisfactorily and that the instrument has been sterilized according to the manufacturer’s recommendations. Sterilization of instruments during an endoscopy list demands careful organization to guard against transmission of micro-organisms such as Salmonella spp, Pseudomonas aeruginosa and Mycobacterium as well as hepatitis B virus (HBV) and human immunodeficiency virus (HIV). Thorough cleaning is followed by immersion in 2% alkaline activated glutaraldehyde or 10% succine dialdehyde for a minimum of 4 minutes. Since these substances are toxic, irritant and may cause allergic reactions, the endoscopes must be washed thoroughly afterwards.
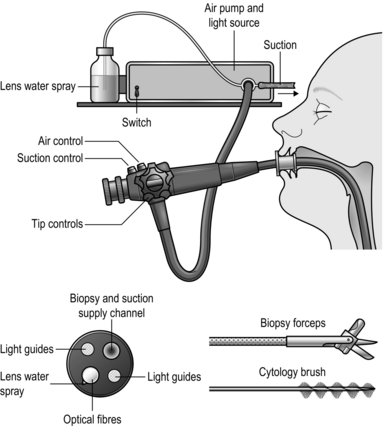
Fig. 10.1 Flexible fibreoptic endoscopy.
2. End-viewing endoscopes are most commonly used and are very versatile but side-viewing scopes are used to cannulate the ampulla of Vater.
3. Obtain written, informed consent from the patient, highlighting the indications for the procedure and the potential complications.
4. The patient takes no food or fluids for 6 hours. In an emergency, attempt endoscopy even if the patient has had a recent meal, but there is a higher risk of aspiration. It is prudent to have an anaesthetist in attendance.
5. Don protective gloves and spectacles before starting the procedure.
6. Try to minimize the use and the dose of sedative (midazolam). For simple diagnostic endoscopy, it is often sufficient to use a local anaesthetic throat spray. Monitor all patients using a pulse oximeter and administer oxygen if necessary. Elderly or infirm patients given analgesics and sedatives are at risk of hypoxia, especially during prolonged procedures.
7. Ensure that the patient has no dentures. Insert a plastic mouthpiece between the patient’s teeth or gums through which the instrument will slide easily. Smear the endoscope shaft with water-soluble lubricant. Secretion and mucus are less likely to adhere to the lens if it is smeared with silicone liquid and lightly polished to leave a thin film.
8. The patient may be laid on the left side, with no pillow but with the head steadied by an assistant who maintains neck flexion, discouraging the patient from extending his neck which tends to make the instrument pass into the larynx. The patient’s pronated left hand lies on the right chest, the right hand grasps the edge of the bed. Both knees and hips are flexed. Alternatively, the patient may lie supine but with the head of the bed raised.
Access
1. Slightly flex the tip of the instrument. Pass it through the mouthpiece, over the tongue, keeping the flexed tip strictly in the midline pointing towards the cricopharyngeal sphincter. As the tip reaches the sphincter there is a hold-up. Ask the patient to swallow. The tip will be slightly extruded, and do not resist this, but suddenly the obstruction disappears as the sphincter relaxes and the instrument can be smoothly passed into the stomach after unflexing the tip.


2. Watch the screen and concentrate on safely passing the instrument through the oesophagus and stomach and into the duodenum, noting incidentally if there is any abnormality. Insufflate the minimum of air to open up the passage. Hold and adjust the tip controls with the left thumb and index finger. Hold the shaft of the endoscope with the right hand close to the patient’s mouth, advancing, withdrawing and rotating it as necessary. When the gastric angulus is passed, flex the tip to identify the pylorus. Advance the tip, keeping the pylorus in the centre of the field until the tip slips through.
3. The side-viewing endoscope has a rounded tip which makes it easier to negotiate the pharynx. If there is any doubt about the free passage, always examine the patient first with an end-viewing endoscope. Become familiar with the tip control and angle of view before passing it. When it has passed into the stomach, rotate it to bring into view the relatively smooth, straight lesser curve which ends at the arch of the angulus, below which can be seen the pylorus in the distance. Angle the instrument up towards the roof of the antrum while advancing the instrument. The view of the pylorus is lost momentarily as the tip slips through into the duodenum. Paradoxically, if the shaft is slightly withdrawn, the instrument is straightened and the tip advances further into the duodenum. Rotate the shaft to bring the medial duodenal wall into view and, as the instrument enters the second part of the duodenum, the ampulla of Vater is usually seen as a nipple, often with a hooded mucosal fold above it.
Assess
1. Withdraw the end-viewing instrument in a spiral fashion to bring into view the whole circumference of the duodenum and stomach. Withdraw the side-viewing endoscope whilst rotating it 180° either side to view the whole circumference. Do not overinflate the stomach and duodenum with air. In the duodenum and distal stomach, keep the endoscope still and watch the peristaltic waves form and pass distally, to estimate the suppleness of the walls and exclude rigidity from infiltration or disease. With the tip of the end-viewing instrument lying in the body of the stomach, flex it fully while gently advancing the shaft to bring the fundus and cardia into view (the ‘J’ manoeuvre). Flex the side-viewing instrument to produce the same view. From just above the cardia the end-viewing instrument displays the pinchcock action of the diaphragmatic crura at each inspiration. If gastric mucosa is seen above this, there is a sliding hiatal hernia. The gastric mucosa is pink and shiny; at the crenated transition to the thinner and more opaque oesophageal squamous mucosa, the colour becomes paler and sometimes slightly bluish. Islands of pink gastric mucosa may be seen above the line of transition.
2. If the view disappears, withdraw the instrument and insufflate a little air. If the lens is obscured, clean it with the water jet or wipe it against the mucosa to free it of adherent mucus.
3. Look out for inflammation in duodenitis, gastritis and oesophagitis. As a rule, the mucosa appears florid and reddened, but endoscopy is uncertain and biopsy specimens should be taken when in doubt. In atrophic gastritis the distal mucosa is thinned and translucent so that submucosal vessels are visible through it. In gastric atrophy, associated with pernicious anaemia, the fundic mucosa is particularly affected, being flat and featureless. Menetrier’s hypertrophic gastritis results in strikingly florid mucosal folds, as may the fundic mucosa in the Zollinger-Ellison syndrome.
4. Peptic ulcers usually display a basal slough, but adherent mucosa may simulate a crater. Healed ulcers typically appear flat and white, with radiating mucosal folds. Diverticula, seen usually high on the gastric lesser curve, have healthy mucosa entering the mouth of the diverticulum. Mallory-Weiss tears show a ragged, often bleeding edge in the mucosa at the cardia.

5. Tumours are typically elevated and malignant ulcers have raised, everted edges. Gastric polyps may be single or multiple, and can be mucosal or submucosal, such as leiomyomas and leiomyosarcomas, which frequently have healthy mucosa overlying them. Lymphomas – sometimes with mucosal hypertrophy, sharply differentiated from normal mucosa – may reveal no histological abnormality on biopsy, since they tend to spread in the submucosa. They may produce multiple shallow ulcers, or ulcers with raised edges. By the time tumours become obvious they are usually well advanced and the best time to recognize them is in the early pre-invasive stage. Any slight irregularity of the mucosa is suspicious, whether it is a localized depression, plateau, cobblestone irregularity or ulcer, especially if this is an unusual site for a peptic ulcer. In cases of reflux, peptic ulcer disease or dyspepsia remove a sample to be tested for Helicobacter Pylori (Clotest).
6. Oesophageal varices, seen in portal venous hypertension, appear as tortuous, sometimes bluish, projections into the lumen of the lower oesophagus and may continue into the gastric fundus or are occasionally visible only in the upper stomach. Do not assume in patients who have gastrointestinal bleeding that visible varices are necessarily the site of bleeding.
7. Pyloric stenosis may prevent the passage of the instrument into the duodenum and it is sometimes impossible to assess whether the obstruction is from benign duodenal ulceration, a mucosal diaphragm in the distal stomach or neoplastic infiltration.
8. Previous gastric surgery distorts the anatomy and preliminary radiological examination is helpful. A stoma or pyloroplasty allows bile to reflux into the stomach. The mucosa around a stoma is often florid. Stomal ulcers usually develop just distal to the anastomosis and the instrument can be passed through it to view them. Recurrent gastric and duodenal ulcers are usually easy to see but remember that carcinoma occurs more frequently following previous gastric surgery for peptic ulceration.
9. Bleeding from the upper gastrointestinal tract can often be localized at endoscopy. If possible use an instrument with a wide-bore channel through which efficient suction can be applied. If necessary, rotate the patient to bring the site of bleeding uppermost, so that it is not hidden at the bottom of a pool of blood and other gastroduodenal contents. If the source of bleeding cannot be found, remember that the examination can be repeated. If an operation is to be performed, repeat endoscopy can be carried out just prior to surgery.
10. Always ensure that endoscopy can be repeated during an operation for upper gastrointestinal bleeding. It is sometimes invaluable in locating the bleeding site while avoiding extensive gastrotomy or gastroduodenotomy.
Action
1. Remove biopsy specimens under vision from any suspicious sites, including tumours, the edges of ulcers, irregularities of the mucosa and suspected inflammation. Take specimens from different places, preferably from each quadrant of the edge of an ulcer and not from the sloughy base. If lymphoma is a possibility, take multiple deep biopsies, since the disease often spreads in the submucosa. Place the specimens in carefully labelled separate pots containing formal saline fixative for histological examination.
2. Polypoid lesions can be caught in a snare for removal and histological examination. If the polyp has a broad base ensure that this is completely caught and, if bleeding is likely, coagulate the base with the diathermy before it is removed.
3. Foreign bodies can be grasped with forceps, snared or caught in a modified Dormia basket for withdrawal. An external tube may be slid over and pushed beyond the endoscope tip, enclosing a sharp foreign body as it is withdrawn to protect the mucosa from damage.
4. Bleeding oesophageal varices can be injected under direct vision using sclerosant solution injected through a long needle passed down the biopsy channel (see Chapter 17). Bleeding ulcers may be coagulated by spraying on thrombogenic substances or using the diathermy point. Argon gas laser or a solid state Nd-YAG laser may be used to coagulate the bleeding vessel by energy release at the point of contact. Since laser light is absorbed by blood clot this must first be gently washed away with a fine water jet. The depth of laser penetration is crucial: too superficial and the effect is lost, too deep and the resulting necrosis penetrates the wall. For this reason, laser coagulation must be performed by a skilled, experienced operator.
5. Endoscopic retrograde cholangiopancreatography (ERCP). A cannula can be passed through a special side-viewing endoscope for insertion in the bile and pancreatic ducts to obtain radiographic pictures following the injection of radio-opaque medium. The ampulla and lower bile duct can be slit with a diathermy wire, and stones can be removed with a modified Dormia basket. A stricture can be dilated from below followed by the insertion of a prosthetic indwelling plastic tube to maintain a passage. These techniques require special training and equipment.
6. Oesophageal dilatation can be carried out with bougies, balloons or by Nd-YAG laser destruction of tissue. The lumen may be held open by inserting a stent (see Chapter 8).
7. Endoscopic ultrasound is a novel diagnostic tool which is most helpful in oesophageal tumour staging but also useful in some gastric pathologies. It also allows for advanced therapeutic manoeuvres such as endoscopic resections of mucosal lesions.
Postoperative
1. Lay a heavily sedated patient in the recovery position (on the left side, slightly face-down), under the care of a trained nurse who will watch him until he recovers fully. If he has any respiratory obstruction this must be overcome; chest physiotherapy will help him to cough up his retained secretions. Do not allow any fluids or foods to be given until the patient is fully recovered and until the effect of pharyngeal anaesthesia has worn off.
PERIOPERATIVE CARE
Preoperative
1. Patients are assessed before an operation and routine check of blood count, blood urea, serum electrolytes and chest X-ray for those who have pre-existing disease, those who smoke or those over 40 years of age is performed. If there is suspicion of cardiac disease, arrange an electrocardiogram (ECG).
2. Explain the intended operation to the patient and obtain informed, signed consent. Detail the risks as well as the benefits.
3. Institute prophylaxis against deep venous thrombosis according to agreed protocol dependent on procedure risk classification.
4. The patient receives no food for 6 hours and water for only 2 hours before operation. If there is evidence of gastric retention, then the stomach should be emptied the day before operation by passing a nasogastric tube for aspiration. Such patients should have an intravenous infusion set up to ensure that they are not dehydrated or electrolytically depleted.
5. Ask the anaesthetist to pass a nasogastric tube as soon as anaesthesia is induced.
6. For straightforward elective operations, some surgeons would not give prophylactic antibiotics, but for emergency surgery such as perforated or bleeding ulcer or surgery for carcinoma or pyloric stenosis give a bactericidal antibiotic, such as a first- or second-generation cephalosporin, before the operation starts and continue it if there is contamination.
Action
1. Although the contents of the healthy stomach are virtually sterile, this is not so in the presence of disease and especially if there is any gastric stasis, as in pyloric stenosis, carcinoma of the stomach and re-operative gastric surgery.
2. Adopt a routine of performing as much dissection as possible before opening the stomach, then isolate the area using added towels of distinctive colour. Keep within the isolated area during the part of the operation that requires the gut to be opened and use a limited number of instruments that are kept separate. Sometimes, in spite of careful preoperative preparation and aspiration of the indwelling nasogastric tube, the stomach is distended with content. In this case, after isolating the area, make an incision into it that will just allow the sucker tube to be inserted and empty it before proceeding; otherwise, the area is likely to be flooded with foul, retained gastric content. Following this, apply non-crushing clamps to occlude the lumen to prevent further efflux. When the stomach or bowel is closed, discard the special towels and the instruments and change into fresh, sterile gloves to continue the operation.
3. The stomach is well supplied with blood and tolerates extensive mobilization without risk to its blood supply. However, this rich blood supply can lead to bleeding from the suture line so consider a haemostatic over-and-over stitch as opposed to a Connell type of stitch, unless the blood vessels are first picked up individually and tied or coagulated.
4. The duodenum is fragile and does not tolerate tension or vigorous mobilization. However, the Kocher manoeuvre often renders it mobile and prevents tension (see Fig. 10.3). Rather than anastomose it under tension, be prepared to close it and perform gastroenterostomy if this is possible.
Aftercare
1. Have the patient’s condition monitored carefully until he recovers from the anaesthetic. In particular, note his colour, respiration, pulse rate and blood pressure. The blood pressure is taken every 15 minutes for the first 3 hours and then half-hourly until it is stable. Have the wound checked regularly to ensure that there is no bleeding.
2. See that the urinary output is checked hourly. Following major operations, an indwelling catheter is necessary so that urinary output can be monitored and when an epidural analgesic has been used. It can be removed as soon as the patient has recovered and is active.
3. Order nasogastric tube drainage to be recorded every hour. It may be gently aspirated every 4 hours if there is a high output. If gastric aspirate is recorded as nil, suspect that the tube is either in the wrong place or blocked. Remove the tube when the amount aspirated is less than the oral intake and the aspirate is clear, provided the patient is comfortable, with a soft abdomen. Try to remove the nasogastric tube early in patients with respiratory problems, if necessary restricting oral fluid intake. It is very difficult to cough with a tube irritating the pharynx.
4. Order intravenous fluids, remembering that sodium retention is frequent following operations and that, provided the patient started in fluid and electrolyte balance, only lost electrolytes need be replaced. Provided also that renal function is good, then, if sufficient fluid is given, small imbalances will be compensated. Since enteral feeding is safer and cheaper than parenteral feeding, consider placing a feeding jejunostomy tube or inserting a fine nasoenteric feeding tube at the time of operation in such patients.
5. On the morning after operation, allow 30 ml of water each hour, increasing incrementally to liberal fluid intake on the third day, after which normal intake can be resumed and intravenous fluid replacement stopped. Following many operations, especially when the stomach and duodenum have not been opened, this regime may be speeded up so that the morning after operation the nasogastric tube can be removed and oral fluid intake allowed in increasing amounts, depending on the patient’s tolerance and general condition. Withhold oral fluids following gastric operations with oesophageal anastomosis but allow the patient to have sips as this is no different to swallowing one’s saliva. It is not possible to prevent a little fluid and saliva from being swallowed, but as a rule wait for 4–5 days after operation. It is reasonable to check the intactness and adequacy of the anastomosis radiologically using a water-soluble contrast medium such as Gastrografin before commencing oral fluids and proceeding gradually to full diet. Others do not rely on this test and will start oral intake as long as there are no clinical markers of a leak, such as fever or rising inflammatory markers.
6. Encourage the patient to sit out of bed the morning following operation and have him walking a little during the next day or two, depending upon his general condition. The help of a cheerful physiotherapist in encouraging the patient to cough up retained sputum and move freely is of enormous value in preventing stasis. The use of epidural anaesthesia greatly facilitates such early mobilization.
ACCESS IN THE UPPER ABDOMEN
GASTRIC CARDIA
1. Tilt the whole patient in a reverse Trendelenberg position (head up).
2. Use an upper midline incision, opening the peritoneum to one or other side of the falciform ligament. Start the incision at or alongside the xiphoid process and carry it vertically down for 20 cm, skirting the umbilicus.
3. Transverse (rooftop) and oblique incisions are also used but may be restricting in patients with a narrow costal margin. They may also be combined with vertical incisions to form a flap. A rooftop (or inverted ‘V’) incision offers good access since the apex of the ‘V’ can be folded down and sutured to the lower abdominal wall.
4. Carefully place retractors and ensure that the operating theatre light is correctly focused and aimed. To gain access under the diaphragm, use a retractor that elevates the lower sternum and costal margin, attached to a frame fixed to the operating table.
5. Mobilize the left lobe of the liver if this interferes with the view. Insert the fully pronated left hand with the index and middle fingers passing on each side of the left triangular ligament to draw down the lobe. Cut the ligament from its free edge towards the right with long-handled scissors, avoiding damage to the subphrenic vessels and left hepatic veins. Fold the lobe to the right, cover it with a gauze pack and have it held out of the way with a large curved retractor. Remember to replace it carefully at the end of the operation.
6. Carry the whole depth of the incision right up to the xiphisternum or into the angle between it and the costal margin. Do not hesitate to excise the xiphisternum using bone-cutting forceps, after dissecting off the two diaphragmatic muscle slips from its under-surface (Fig. 10.2).
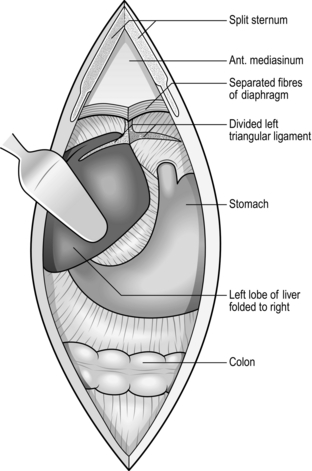
Fig. 10.2 Access in the upper abdomen.
7. If access is still inadequate, particularly for oesophageal anastomosis, consider performing thoracotomy.
8. If using a rooftop incision, make the incision at least an inch below the costal margin to facilitate closure at the end. Make the incision long enough so that you can fold the apex of the V downwards and suture it in the midline below the umbilicus if that helps with exposure.
KOCHER’S DUODENAL MOBILIZATION
Appraise
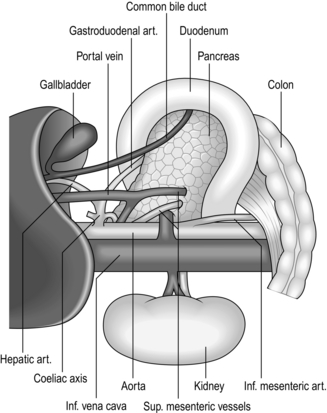
1. This manoeuvre (Fig. 10.3) raises the head of the pancreas contained within the duodenal loop into its embryological midline position, restrained by the structures in the free edge of the lesser omentum above, the superior mesenteric vessels below, and the body and tail of the pancreas to the left.
2. The head and neck of the pancreas can be examined from behind and palpated between fingers and thumb. The lower end of the common bile duct can be palpated and sometimes seen, although it is usually buried within the pancreatic head. The duodenum and especially the ampullary region can be palpated. Duodenotomy allows inspection of the interior of the duodenum. If the incision is placed at the level of the ampulla this can be seen and palpated for tumours or stones. Biopsy, excision of ampullary neoplasms, sphincterotomy, sphincteroplasty, and cannulation or instrumentation of the bile and pancreatic ducts can be carried out under vision.
3. Mobilization is essential for excision of the pancreatic head and duodenal loop in Whipple’s pancreatoduodenectomy.
4. Elevation of the duodenal loop and pancreatic head reveals the inferior vena cava when performing portocaval anastomosis or major hepatic resections.
5. The manoeuvre is particularly valuable in gastroduodenal operations. Pyloroplasty can be performed easily and the extremities of the gastroduodenal incision can be brought together without tension. In gastrectomy, the proximal duodenum is easily dissected and can be closed or united to the stomach with ease. Full mobilization may be a useful step when the stomach is drawn up for gastro-oesophageal or gastropharyngeal anastomosis. However, it is usually the porta hepatis and its connection to the first part of the duodenum that limits further mobilization.
Action
1. If incomplete mobilization is sufficient, as for palpating the lower end of the bile duct or the pancreatic head or for the purpose of carrying out pyloroplasty and gastrectomy by the Polya method, then it may be sufficient to elevate only the superior part of the duodenal loop and pancreatic head. Insinuate a finger into the aditus to the lesser sac and then divide the floor of the foramen downwards, to separate the upper duodenum and pancreas from the inferior vena cava. Extend the mobilization by continuing the division with scissors or diathermy blade, downwards, just outside the convexity of the duodenal loop.
2. For full mobilization, have your assistants draw the hepatic flexure of the colon downwards, the right edge of the wound outwards and the duodenal loop to the left.
3. Incise the peritoneum and underlying fascia of Toldt for 5 cm, placing the incision 1 cm from and parallel to the convex border of the second part of the duodenum.
4. Insinuate your fingers beneath the descending duodenum and pancreatic head. A natural plane of cleavage opens up between the embryological layers which were present when the duodenum was freely suspended in the peritoneal cavity.
5. Having defined the plane, cut the peritoneum and fascia upwards, just outside the duodenal convexity, into the mouth of the aditus to the lesser sac, meanwhile lifting the proximal duodenum forward with a finger, so protecting the inferior vena cava from damage. The dissection is easy and can be carried out by splitting with the finger except in the presence of severe scarring, as from severe duodenal ulceration.
6. Continue the peritoneal and fascial split below, taking care to avoid damaging the right colic vessels, which must be pushed downwards with the hepatic flexure of the colon and mesocolon, to release the junction of the second and third parts of the duodenum.
7. Continue the separation of the pancreas and duodenum across the aorta where it is tethered below by the superior mesenteric artery and its pancreatic branches. The structures in the free edge of the lesser omentum restrain it superiorly.
8. When the appropriate procedure is completed, carefully check the pancreatic head, duodenal loop and the bed from which the structures have been mobilized, before laying them back in place.
EXAMINATION OF THE STOMACH AND DUODENUM
1. Did you make a firm diagnosis before operation? Mucosal lesions within hollow organs are best assessed from within the lumen by radiology and endoscopy, not by examination of the exterior at operation.
2. Look at the exposed stomach. Is it distended as may be seen in pyloric obstruction? Is the musculature hypertrophied as seen in longstanding partial obstruction? The serous surface may be inflamed and oedematous, or scarred and puckered with petechiae overlying an ulcer. It may be covered with miliary tubercles in tuberculous peritonitis, or metastatic deposits of tumour. The thickened rigid appearance of ‘leather-bottle’ stomach may be accompanied by serosal extension, giving an appearance resembling crystallized sugar adherent to the serosa.
3. Feel for the lower oesophagus and diaphragmatic crura. Sometimes there is an obvious invagination of the gastric cardia through the diaphragmatic hiatus. If the normal anatomy can be restored by applying traction to the lesser curve of the stomach, this is a sliding hiatal hernia. If the cardia cannot be drawn down, there is a fixed hiatal hernia which may be primary or may be secondary to disease in the posterior mediastinum. There may be a gap between the crura into which the fingers can be inserted but the stomach remains fixed within the abdomen. Gently grasp the gastric cardia between finger and thumb and see if it can be slid through the hiatus into the chest. Record an asymptomatic hiatal hernia discovered incidentally when carrying out another procedure but do not repair it. Palpate the fundus of the stomach. If it disappears through the hiatus into the posterior mediastinum, this is a rolling hernia which may cause obstructive symptoms. If the patient has complained of this then consider repairing it, depending upon the severity of the symptoms, the extent of herniation, the fitness of the patient and the severity of the proposed operation.
4. Examine the body and lesser curve of the stomach for evidence of ulcers and ulcer scars. Ulcers and healed scars are often palpable and visible, and former ulcers can sometimes be detected by pinching the stomach along the lesser curve. Normal mucosa can be felt to slip away from your fingers but it may be tethered at the site of a healed ulcer. The stomach can be palpated most readily by making holes through avascular parts of the lesser and gastrocolic omenta so that fingers can be passed behind to feel the two layers of gastric wall against the thumb placed anteriorly (Fig. 10.4). The scar of an undetected posterior gastric ulcer may be adherent to the pancreas, but there are normally flimsy adhesions across the lesser sac between the stomach and pancreas. A pre- or intra-operative endoscopy may be very helpful in confirming mucosal pathology site or anatomical abnormalities. If this is not possible, carry out gastrotomy, preferably in the middle of the anterior wall of the stomach at the level of the suspected ulcer or other lesion and evaginate the lesion through the gastrotomy for visual assessment, biopsy or excision. Alternatively, it can be opened along the greater curvature in order to neither compromise any subsequent resection nor endanger the lesser curve’s integrity if you decide to perform ulcer excision. The gastrotomy may then be closed, either because no further action is necessary or prior to carrying out gastrectomy if a hitherto unsuspected chronic gastric ulcer is causing the patient’s symptoms. In poor-risk patients, gastric ulcer may be treated by ulcer excision. Vagotomy is now seldom used when most patients with benign ulcers can be treated successfully with antibiotics and proton-pump inhibitors.
5. Look and feel for neoplasms. These will in nearly all cases have been diagnosed and thoroughly staged by the TNM system before operation. Staging is by computed tomographic (CT) scanning, endoluminal ultrasound and, often, laparoscopy. Carcinoma is most frequently seen, although lymphoma, reticulum-cell sarcoma, leiomyoma, leiomyosarcoma and gastrointestinal stromal tumours (GIST) are not rare, and adenomatous polyps may be felt. Carcinoma may produce a tumour within the stomach or be felt as an ulcer with raised margins. Remember that early gastric cancers may be impalpable.

6. Examine the pyloroduodenal region. The pyloric ring can be picked up between the index finger and thumb of both hands, but the mucosal ring may be smaller than the muscular ring. To check this, invaginate the anterior antral wall through the pylorus on an index finger and invaginate the anterior duodenal wall back into the stomach in a similar manner. If there is obstruction, look again at the stomach. Is it dilated? Is the muscular wall hypertrophied? Look and feel for a duodenal ulcer, remembering that the majority of ulcers lie in the bulb, although they may be in the postbulbar region or further distally, especially in the Zollinger-Ellison syndrome. Sometimes an ulcer crater can be palpated, sometimes there is gross and incontrovertible scarring and narrowing, together with pseudo-diverticulum formation but there may be minimal scarring, a few petechial haemorrhages – which could be iatrogenic – or there may be nothing abnormal to see or feel. Of course the diagnosis should have been made endoscopically before operation, but occasionally endoscopy has failed because the tip of the instrument could not negotiate the narrow or distorted pyloroduodenal canal. If doubt remains, could a small endoscope be passed and the tip guided through manually to allow the interior to be viewed? Alternatively, create a small prepyloric gastrotomy and examine the interior with a finger, or by placing small retractors within the pyloroduodenal canal. A mucosal diaphragm that is soft and easily stretched can be dilated, or conventionally treated by pyloroplasty.
7. Diverticula of the stomach are most frequently found on the upper lesser curve, sometimes produced by traction from a leiomyoma. If no primary lesion is present, leave an asymptomatic diverticulum alone. Pseudodiverticula of the duodenum develop when chronic duodenal ulcer causes distortion. The most frequent duodenal diverticulum is not seen unless it is sought for, since it lies close to the ampulla, protruding into the pancreas, which must be mobilized by Kocher’s manoeuvre to approach from posteriorly. It rarely causes symptoms and should normally be left alone.
SUTURING AND STAPLING THE STOMACH AND DUODENUM
SUTURES
1. There is a wide choice of sutures. As with all sutures, they are severely weakened by crushing, abrasion and rough handling, especially when drawing them through the tissues and tying knots.
2. Innumerable papers have been written about the best ways of suturing stomach and intestine. Should we use interrupted or continuous, one layer or two, simple through-and-through or complex stitches, including or excluding the mucosa, inverted or edge-to-edge? It is obvious from listening to, and reading the papers of, the various advocates that all the methods are successful. There is but a single common factor and that is the care with which sutures are inserted and tied. If you bring together the edges of stomach or bowel that have a good blood supply, are not under tension and are apposed carefully with sutures that do not strangulate the included tissue, they will heal. Many of us continue to use the methods we learned whilst training, because they have demonstrably worked, even though we accept that they may no longer be in vogue. The one layer that must always be included in the stitches, as shown by Halsted, is the submucosa.
LIGATURES
 As with sutures, ligatures are applied using the finest possible materials, although silk and linen are still popular because of their excellent handling properties. Metal clips are convenient to seal blood vessels but they easily catch in swabs and can be dragged off. One instrument applies two clips side by side and cuts between them, for dividing vascular tissue. Unless they offer advantages in saving time, prefer to tie ligatures, which is more versatile.
 Absorbable synthetic clips have also become more commonly used.
STAPLES
 The development of reliable instruments for joining bowel has potentially great value in gastroduodenal surgery. However, they are not as versatile as sutures. If you are a trainee, by all means learn to use stapling instruments but more importantly take every opportunity to master the accurate placement of sutures.

Gastrotomy and gastroduodenotomy
Appraise
1. Gastric, gastroduodenal and duodenal incision allows the interior of the bowel to be examined to confirm, biopsy or treat a suspected lesion such as an ulcer, tumour or source of bleeding.
2. Gastrotomy allows access from below to the lower oesophagus. Strictures are often dilated more safely from below than from above.
Access
1. As a rule, open the stomach on the anterior wall midway between the greater and lesser curves.
2. For the purpose of diagnosis, start with a small incision, 3–4 cm long, the proximal end of which is 5–6 cm from the pylorus. This incision ensures that the intact pylorus or mucosal diaphragm can be examined and it may be unnecessary to destroy the pyloric muscular ring. The incision can be extended proximally or, if it becomes necessary, distally through the pyloric ring onto the anterior wall of the duodenal bulb.
3. To view the interior, first aspirate all the contents. Retractors may be placed to hold open the stomach so that it can be examined by adjusting the theatre light to shine through the opening. The stomach can be manoeuvred manually to bring different parts of the interior into view. Frequently the gastric wall can be evaginated through the incision so that it can be examined and any lesion excised or biopsied. If the pylorus is not too narrow, small retractors may be placed in to allow the duodenal bulb to be viewed, and, if it is wide, an unscarred duodenal bulbar wall may be evaginated through it on a finger. If there is difficulty in viewing the duodenum to exclude or confirm disease, a per-oral endoscope may be introduced through it. Sometimes, when fibreoptic endoscopy is ineffective before operation, perhaps resulting from inability to evacuate the gastric contents, the stomach may be emptied and endoscopy can then be performed. The gastrotomy can be temporarily occluded with a clamp to allow the stomach to be inflated but as a rule the stomach can be held open to allow endoscopy to be accomplished without the need for inflation.
Closure
1. Close a gastrotomy in one or two layers, leaving a longitudinal suture line.
2. It is conventional practice to close a gastroduodenotomy as a Heineke-Mikulicz pyloroplasty. This may be accomplished using a single edge-to-edge row of sutures, a two-layer invaginating suture or with a row of staples. However, this destroys the pyloric metering function and it may be preferable to carefully close the incision to create a longitudinal scar, bringing the edges together without invagination in a single layer, taking care to appose the pyloric edges perfectly. Cover the suture line with a layer of omentum as an extra precaution.
3. Use ingenuity to incorporate the gastrotomy in plans for other procedures. A distal gastrotomy may be incorporated in a gastroenterostomy. The proximal part of a long gastroduodenotomy may be closed longitudinally and the distal part converted into a pyloroplasty if necessary. If gastrectomy is intended, temporarily close the gastrotomy with stitches or staples to keep soiling to a minimum.
PYLOROMYOTOMY
Appraise
1. Pyloromyotomy for infantile pyloric stenosis is described in Chapter 34.
2. Adult hypertrophic pyloric stenosis is rarely discovered as a cause of gastric retention. It is not known whether or not this represents undiagnosed infantile pyloric stenosis.
3. Pyloromyotomy is sometimes carried out following oesophagectomy with oesophagogastric anastomosis, in the hope of preventing gastric retention. Failure of the stomach to empty in the absence of pyloric stenosis results from gastric atony following the inevitable gastric vagotomy. Many surgeons employ a pyloroplasty to compensate for this postvagotomy gastric atony.
Action
1. Grasp the pylorus between finger and thumb of the left hand to steady it (Fig. 10.5).
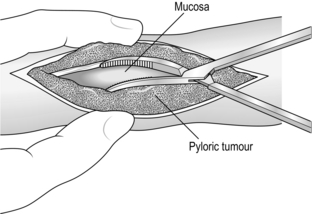
Fig. 10.5 Pyloromyotomy.
2. Incise the seromuscularis along the middle of the anterior antral wall from 1 cm proximal to the thickened segment and carefully extend it distally across the pylorus onto the anterior duodenal wall for 1 cm. The duodenal wall at the fornix is very thin, so take care not to incise into the lumen.
3. Deepen the incision through the thickened muscle of the distal antrum until the mucosa bulges into the split. Make sure all the muscle fibres are divided. The final split may be accomplished by grasping the wall on each side of the split with dry gauze swabs and separating the edges, to allow mucosa to bulge freely along the whole of the incision.
4. Carry the split distally to the pylorus and carefully divide all the circular muscle fibres here, again taking care to expose but not damage the mucosa of the first part of the duodenal bulb. Lift the muscle fibres free of the mucosa with closed fine non-toothed dissecting forceps, allow the forceps blades to open and then cut the fibres between them.
Check
1. Make sure all the fibres have been cut.
2. Gather some gastric air into the segment with the pyloromyotomy, to distend the mucosa so that it bulges into the split. Watch carefully for any leaks. It is no disaster to find a leak and carefully close it with fine stitches: it may be disastrous to miss a leak.
OPERATIVE GASTROSTOMY
Appraise
1. Gastrostomy offers a valuable method of feeding patients who are unable to swallow because of oesophageal obstruction, bulbar palsy and other causes. Patients with mechanical obstruction who will have reconstructive surgery utilizing the stomach as a conduit should not normally have a temporary gastrostomy since this will interfere with subsequent reconstructive surgery. They are better served by a jejunostomy.
2. Gastrostomy offers a means of providing gastric aspiration without nasogastric intubation, valuable in patients who have respiratory difficulties and those who cannot tolerate the presence of the tube in their pharynx, during the postoperative recovery period from gastric operations.
3. As a rule gastrostomy is placed endoscopically (Percutaneous Endoscopic Gastrostomy – PEG) and is intended as a temporary measure. When all else fails, do not hesitate to offer it after discussion with the patient.
4. Operative gastrostomy is often unnecessary following the advent of percutaneous endoscopic gastrostomy. If necessary, a number of operative techniques have been described. Stamm’s gastrostomy (Fig. 10.6) is almost universally used now and is described below. The tube passes through the abdominal wall and enters the stomach through a small stab wound. The hole is prevented from leaking by invaginating it using a series of purse-string sutures so that it resembles a non-spill inkwell. Witzel’s gastrostomy is similar, but leakage is prevented by laying the emerging tube along the stomach wall and covering it by suturing over it ridges of gastric wall so that it lies in a tunnel. The Depage-Janeway gastrostomy employs a flap of stomach formed into a tube which is brought to the skin surface to create a permanent conduit.
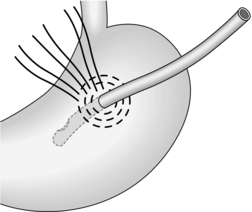
Fig. 10.6 Stamm gastrostomy.
PERCUTANEOUS ENDOSCOPIC GASTROSTOMY
Appraise
1. The commonest application is for intragastric or enteral nutritional support in the presence of, for example, bulbar palsy. Another indication is to enable prolonged gastric aspiration to be performed, especially in those who cannot tolerate nasogastric intubation.
2. Do not attempt this method if the patient has an impassable oesophageal stricture, or previous upper abdominal surgery that produces adhesions preventing expansion of the stomach to contact the anterior abdominal wall, or a partial gastrectomy. Gross ascites or sepsis makes the procedure dangerous so a surgical gastrostomy or jejunostomy is preferred. Portal venous hypertension, coagulopathy/gastric ulcer or tumour at the elective site of gastrostomy is also a contraindication. Gross obesity may make the procedure difficult.
3. There is a choice of methods, and some excellent commercially produced kits are available with tubes 9F or 15F in size. A popular, simple pull-through technique is described below.
Action
1. Pass an end-viewing endoscope into the stomach. In the presence of an oesophageal stricture it may be necessary to dilate it using bougies or a balloon, and then introduce a paediatric endoscope. Pass the tip into the distal stomach.
2. Inspect the stomach and duodenum to exclude any condition that would contraindicate gastrostomy.
3. Gently inflate the stomach to distend it.
4. Have the abdomen exposed and the room lights dimmed.
5. Turn the endoscope tip towards the anterior abdominal wall. The light should be visible through the gastric and abdominal walls.
6. Have the abdominal operator indent the anterior abdominal wall with a finger placed where the endoscope light is seen most brightly. The indentation should be visible from within the stomach.
7. Pass a polypectomy snare through the biopsy channel of the endoscope (Fig. 10.7A).
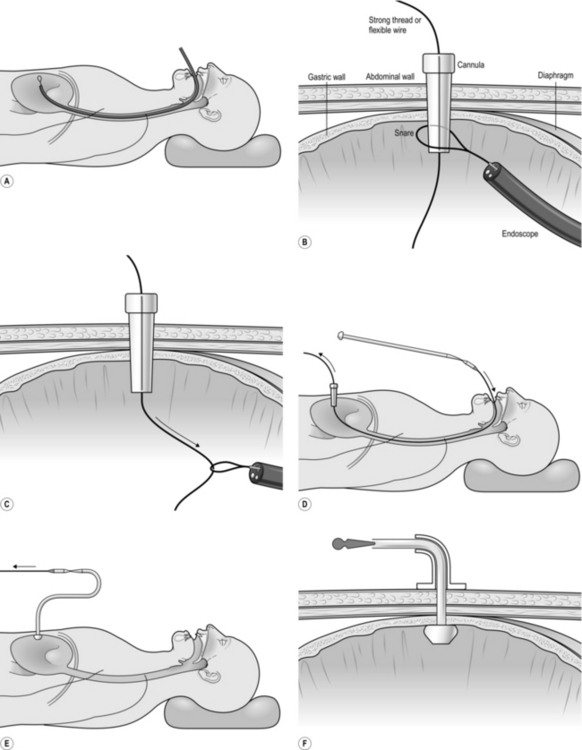
8. If you are the abdominal operator, prepare the skin, infiltrate the chosen puncture spot with local anaesthesia into the skin and abdominal wall (and most often into the gastric lumen under direct vision), then make an incision in the skin sufficiently large to allow the passage of the gastrostomy tube.
9. Pass a needle carrying a smooth, closely fitting plastic cannula through the abdominal wall into the stomach. This catheter is usually in the PEG kit but a standard intravenous catheter may be employed.
10. If you are the endoscopist, manoeuvre the loop of the snare over the cannula (Fig. 10.7B). The needle is withdrawn by the abdominal operator and either a flexible wire or a strong thread is passed through the cannula into the stomach.
11. Withdraw the snare from the end of the cannula under vision, in order to grasp the thread or wire that protrudes from the end of the cannula into the stomach (Fig. 10.7C). While the abdominal operator holds the other end of the thread or wire, withdraw the endoscope, snare and trapped thread or wire out through the mouth.
12. Attach the emerging thread or wire to the tapered end of the gastrostomy tube (Fig. 10.7D). The bulbous or inflatable end of the gastrostomy tube will remain in the stomach, pulling it against the abdominal wall.
13. Apply lubricant to the gastrostomy tube.
14. Draw upon the thread or wire emerging from the abdominal cannula while guiding the tapered tip of the gastrostomy tube through the patient’s mouth and into the oesophagus and stomach. Eventually the tapered tip is drawn against the cannula tip, extruding it. As you continue to pull, the tapered end of the gastrostomy tube will emerge through the gastric and abdominal walls (Fig. 10.7E).
15. Re-pass the endoscope into the stomach and observe the enlarged end (‘bumper’) of the gastrostomy tube as it is drawn up against the gastric wall. In some tubes the end is shaped so that it expands automatically; in others, a balloon is expanded by distending it with air or fluid through a side channel. Make sure that the tension on the gastrostomy tube is not sufficient to cause gastric mucosal blanching.
17. Cut off the tapered end of the gastrostomy tube and ensure that the expanded end is inflated if it is of this type, and seal the side-tube inflation channel.
18. The tube must be fixed to hold the stomach against the abdominal wall. Most kits contain a fixation base that fits over and holds the gastrostomy tube, having an expanded flat surface that lies against the abdominal wall (Fig. 10.7F).
Aftercare
1. Feeding with suitable varied fluids can usually start within 24 hours.
2. Monitor the patient to ensure that there is no chest infection, since reflux and aspiration pneumonia is a well-recognized complication.
3. Check the gastrostomy site since infection is frequent.
4. Leakage around the gastrostomy catheter may develop spontaneously or in the presence of gastric outlet obstruction.
5. Some gastrostomy tubes can be removed by deflating the expanded end and drawing them through the abdominal wall. Others require endoscopic withdrawal.
PERFORATED PEPTIC ULCER
Appraise
1. Record the patient’s age, blood pressure and the presence or absence of serious associated disease such as cardiac, respiratory or renal failure. Fully resuscitate the patient before performing the operation.
2. Perforation of other viscera such as colon or gallbladder may be confused with gastroduodenal perforations. A laparoscopic approach may aid diagnosis and may be adequate for treatment. A CT scan is vital in making a clear diagnosis as long as the patient is stable enough to go through the scanner.
3. Not all patients who have a perforated peptic ulcer should have an operation. Patients seen within 8 hours, in whom a confident diagnosis is made, and who are haemodynamically stable, may be treated conservatively. Ensure that the tip of an 18F nasogastric tube is accurately placed in the most dependent part of the stomach. A disadvantage is that peritoneal toilet cannot be performed. Proceed to operation at once if the patient develops pyrexia, tachycardia, pain, distension or increasing intra-peritoneal gas on X-rays. A few patients develop intra-peritoneal abscesses if there has been significant leakage and soiling. Nasogastric suction, parenteral feeding, systemic antibiotics and chest physiotherapy are instituted, and operation is resorted to only if the patient fails to improve or deteriorates.
4. Perforated gastric ulcer carries a higher mortality than perforated duodenal ulcer, because the patients are, on average, older and generally less ‘fit’. Most gastric ulcer perforations are successfully managed by simple suture after excising a specimen from the edge for histology. Sometimes they are difficult to close and demand gastrectomy. If there is doubt about the nature of the ulcer, treat it as though it is benign, remove a biopsy specimen from the edge and, if malignancy is demonstrated histologically, carry out the appropriate operation later as an elective procedure. If the ulcer cannot be sutured but is of doubtful origin and frozen-section histology is equivocal or cannot be arranged, then carry out gastrectomy as for a benign ulcer and be prepared to re-operate to carry out an elective radical procedure later. The added risks of performing a radical operation are not justified without confirming the diagnosis.


5. Bleeding associated with perforation demands control of both complications. A bleeding perforated gastric ulcer is conventionally controlled by distal gastrectomy, including the ulcer. Bleeding is rarely a complication of anterior perforating duodenal ulcer but if there is a co-existent bleeding posterior duodenal ulcer, the anterior perforation can be incorporated into a gastroduodenotomy. Insert non-absorbable stitches into the base of the posterior ulcer to control the bleeding and then close the gastroduodenotomy as a pyloroplasty. If unable to close the duodenotomy due to friable tissue then perform a distal gastrectomy, close the duodenal stump over a Foley catheter balloon (exteriorized as a controlled fistula) and place a large surgical drain next to the stump. These patients need long-term proton-pump inhibitors.
6. Perforated gastric carcinoma may be amenable to the same operation as would be carried out electively. If not, consider suturing it or plugging the defect with omentum and re-operating electively later after the patient has been brought to the best possible condition. Sometimes inadequate resection is forced upon the surgeon. If so, consider whether this can be corrected later by a more adequate operation.
7. Laparoscopy may be used to confirm the diagnosis, followed by repair using sutures, staples or a plug.
Assess
1. Remove all instruments from the field with the exception of a retractor for your assistant and the sucker tube for yourself.
2. Aspirate any free fluid after collecting a specimen for laboratory examination. Gastric juice is usually bile-stained.
3. Examine the duodenal bulb and the stomach, especially along the lesser curve. If necessary, open the lesser sac of omentum through the lesser or gastrocolic omenta to view the posterior gastric wall.
4. Remember that multiple perforations can occur.
5. Always locally excise or remove a biopsy specimen from the edge of a gastric ulcer.
6. If you cannot find the perforation after a diligent search, explore the whole abdomen, if necessary extending the incision downwards. Examine in particular the gallbladder and sigmoid colon. If you are still puzzled, consider the possibility of Boerhaave’s syndrome (spontaneous rupture of distal spontaneous oesophagus).
7. If you are a surgeon in training and find yourself in difficulty either because of failure to discover the cause, or indecision about the best course of action, or because the required procedure is beyond your capabilities, do not hesitate to contact your chief for advice and assistance.


Simple closure
1. Place two or three parallel sutures of 3/0 synthetic absorbable material through all coats, passing in 1 cm proximal to the ulcer edge and emerging 1 cm distal to the ulcer (Fig. 10.8). Do not pick up the opposite wall as this will obstruct the lumen. When all the sutures are in place, mobilize a tongue of omentum, place it over the perforation and tie the sutures just tightly enough to hold it in place.
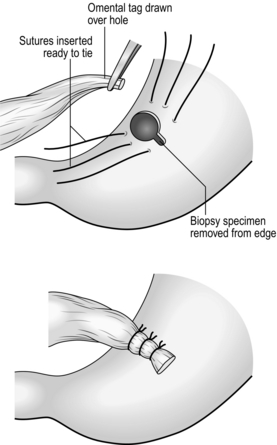
Fig. 10.8 Suture of a perforated peptic ulcer.
2. Insert further sutures to reinforce the obturating action of the omentum and ensure the defect is adequately sealed.
3. Even when closure seems secure, do not hesitate to suture omentum over it.
4. Aspirate any free fluid from above and below the liver, from within the lesser sac, the right paracolic gutter and from the pelvis.
ELECTIVE SURGERY FOR PEPTIC ULCER
Appraise
1. Medical treatment has become the mainstay with potent antacids, atropine-like drugs, liquorice extracts, mucosal-coating substances, histamine H2-receptor-blocking drugs and proton-pump inhibitors. The elimination of Helicobacter pylori, using so-called triple therapy of a proton-pump inhibitor combined with two antibiotics such as clarithromycin and metronidazole, reduces the relapse rate. Most patients can be controlled with these powerful and safe agents and the only people who may require operation are the minority who cannot be controlled medically, who cannot or will not take the required treatment, or who develop complications of the ulcer.
2. The operation in vogue in the 1960s and 1970s was proximal gastric vagotomy, known also as highly selective vagotomy. Some centres report high rates of recurrence after long-term follow-up but variations in recurrence rates probably reflect variations in completeness of parietal cell denervation and are thus dependent on the skill of the surgeon. An adjunctive operation to overcome gastric retention is unnecessary if there is no evidence of impending pyloroduodenal stenosis resulting from the chronic ulcer scarring. If there is, some surgeons dilate the canal through a prepyloric gastrotomy using Hegar-type dilators or a finger, or by invaginating the anterior duodenal and gastric antral walls through the stenosed canal on an index finger tip – a manoeuvre introduced by Jaboulay. If the stenosis is confined to the bulb, a longitudinal incision can be made through it without impinging on the pyloric ring, closing it as a transverse suture line after the manner of a pyloroplasty; hence it is termed a duodenoplasty. A few surgeons still prefer truncal vagotomy combined with pyloroplasty, gastroenterostomy or distal gastrectomy to improve gastric emptying.
3. Gastric ulcer was treated more aggressively by surgeons in the past than was duodenal ulcer. Many surgeons adopt a fixed policy of carrying out endoscopy and biopsy to confirm that the ulcer is benign, then give the patient a 6–8-week course of medical treatment followed by a further check endoscopy. If the ulcer is healed, operation is deferred. If the ulcer is not healed, or if it soon recurs, then surgical treatment is recommended. This more aggressive treatment stems partly from anxiety about the possibility of early malignancy or impending change and partly from the pragmatic knowledge that chronic gastric ulcers are less likely than chronic duodenal ulcers to become quiescent.
4. Postbulbar duodenal ulcers are quite frequently seen in certain countries, especially southern India, but are relatively uncommon in Western countries. They are often severe and stenosing so that operation may be recommended for fear of incipient obstruction. Proximal gastric vagotomy is effective if the lumen is still widely patent; if it is not then add gastroenterostomy, thus retaining the vagal supply to the gallbladder, pancreas and small intestine.
5. Zollinger-Ellison syndrome associated with hypergastrinaemia, usually from G-cell hyperplasia or gastrin-secreting tumour in the pancreas, generally produces peptic ulcers in usual sites. If an ulcer lies in an unusual site, or if there are multiple ulcers and especially if the ulcer is in the upper jejunum, suspect the Zollinger-Ellison syndrome (vide infra).
6. Oesophageal peptic ulceration occurs when gastric acid refluxes into the oesophagus where the squamous mucosa is unresistant to acid attack. This develops most frequently as a result of hiatal hernia but can occur in the absence of herniation of the stomach into the chest. A less frequent cause of peptic ulcer in the oesophagus is the condition of Barrett’s oesophagus. This appears to be acquired, although it used to be called ‘congenitally short oesophagus’. There is intestinal metaplasis in the distal oesophagus and the oesophagogastric mucosal junction moves progressively upwards; an ulcer sometimes develops just above the junction. There is a greatly increased risk of developing adenocarcinoma of the distal oesophagus (see Chapter 9).
VAGOTOMY

TRUNCAL VAGOTOMY
Appraise
1. Per-hiatal truncal vagotomy was formerly indicated for the management of uncomplicated duodenal ulcer when the full range of medical treatment had been tried and failed to control the symptoms. It is normally accompanied by pyloroplasty or gastroenterostomy to improve the rate of gastric emptying, so-called drainage procedures. Pyloroplasty (vide infra) is simple to perform unless the patient is very obese with a deep abdomen and with a fixed, very scarred pylorus. Anterior juxatapyloric gastroenterostomy is convenient if pyloroplasty is difficult to perform, and has the advantage that it is not irrevocable.
2. Truncal vagotomy may be used when controlling gastroduodenal bleeding from peptic ulcer. At such operations the main task is to stop the bleeding, but the secondary task is to prevent bleeding from recurrent or persistent ulcer.
3. In the surgical management of recurrent peptic ulcer truncal vagotomy is best combined with partial gastrectomy.
4. Truncal vagotomy combined with a ‘drainage’ operation is sometimes advocated for the definitive management of a perforated duodenal ulcer. The improvement in medical management of uncomplicated duodenal ulcer has rendered this approach obsolete.
5. Truncal vagotomy and a drainage operation is often effective treatment for chronic gastric ulcer in an unfit patient, but gastrectomy including the ulcer is preferred treatment whenever possible.
Access
1. Use a midline incision 20 cm long, skirting the umbilicus.
2. Mobilize the left lobe of the liver, folding it to the right, to obtain a good view.
3. In an obese patient with a high diaphragm try the effect of tilting the patient 25–30° head-up.
4. Insert a retractor fixed to the table, to elevate the sternum.
Assess
1. Explore the whole abdomen. Remember that patients with proven peptic ulceration may have incidental conditions such as gallstones or colonic carcinoma which might help to explain their symptoms.
2. Examine the stomach and duodenum and note the effects of the ulcer in distorting the duodenum and fixing it, so that you may make a decision about the easiest and safest adjunctive operation.


Action
1. Make sure there is a nasogastric tube in place, as a guide to the line of the gullet at the oesophageal hiatus.
2. While an assistant grasps the lower anterior wall of the stomach and draws it down, identify the hiatus by feeling for the nasogastric tube. Open the peritoneum transversely, avoiding the inferior phrenic vessels. Beneath this is the phreno-oesophageal ligament. Open this and enlarge the incision to 3–4 cm. You can now pass the closed scissors anterior to the gullet into the posterior mediastinum. If you cannot, you have not yet opened the phreno-oesophageal ligament. Thorough mobilization of the distal oesophagus is the key to the achievement of complete vagotomy.
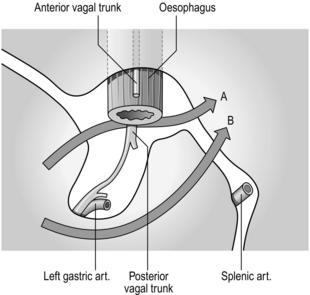
3. Look out for the anterior vagal trunk lying in front of the oesophagus (Fig. 10.9) and separate it upwards for 5 cm and downwards to where it gives off the hepatic and gastric body branches, continuing as the anterior nerve of Latarjet. Transect it where it breaks up below, crushing the distal stump to occlude the small vessels running with it. Place a curved Moynihan clamp across it as high as possible and transect it just below the clamp, then remove the clamp. This is a ‘vagectomy’ and ensures that the whole trunk is removed but does not guarantee that vagotomy is complete, since fine branches may come off higher up and bypass the ‘vagectomy’.
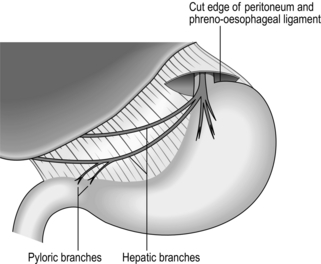
Fig. 10.9 Truncal vagotomy. Exposure of the anterior nerve; the distribution of the nerve is indicated.
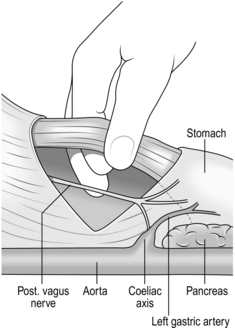
4. Encircle the lower gullet with the right forefinger and thumb. There is a ‘mesentery’ behind the gullet in which lies the posterior vagal trunk (Fig. 10.10). Pass the middle finger to the left of the gullet and push this ‘mesentery’ to the right so that the nerve trunk can be identified. Separate the oesophagus from the vagus and burst through the mesentery behind the vagus. As the trunk is traced down, part of it passes backwards to the coeliac plexus (Fig. 10.11), part continues downwards as the posterior nerve of Latarjet and branches leave to reach the body of the stomach. Crush and cut the nerve below and again as high as possible to remove a segment of nerve to insure against leaving a separate branch intact.
5. Search for missed, separate branches around the whole circumference of the oesophageal wall. They feel like tight threads and should be divided. Make sure that there is no damage to the oesophagus and that all the bleeding is controlled.
6. Repair the horizontal defect in the hiatus using non-absorbable sutures.
7. Carry out the selected adjunctive procedure of pyloroplasty, gastroenterostomy or gastrectomy.
PROXIMAL GASTRIC VAGOTOMY


Action
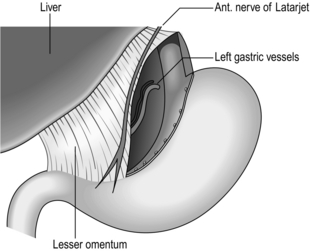
1. Make a hole through an avascular area in the mid-portion of the gastrocolic omentum. While the stomach is lifted forwards, carefully and completely separate the flimsy attachments of the stomach to the pancreas, watching out for, and preserving, the fold of peritoneum that contains the left gastric vessels. Separate the stomach from the posterior wall right up to the roof of the lesser sac. Occasionally you will be surprised to find the scar of an unsuspected posterior gastric ulcer.
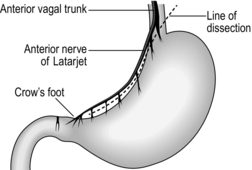
2. Pass the right index finger through the hole in the gastrocolic omentum and grasp the gastric antrum to draw it down, so stretching the lesser curve of the stomach. In all but the most obese patients the taut anterior nerve of Latarjet can be seen running parallel to the lesser curve, separating into branches which form a ‘crow’s foot’ pattern as they cross the curvature at the angulus, accompanied by blood vessels from the descending branch of the left gastric artery (Fig. 10.12). The posterior nerve cannot usually be seen from the front but can be displayed by looking through the hole in the gastrocolic omentum after turning the stomach forwards and upwards.
3. Carefully make a hole through the lesser omentum close to the gastric wall, just to the left of the ‘crow’s foot’ of nerves, while protecting the posterior structures from damage with the right index finger passed through the defect in the gastrocolic omentum. Pass one end of a tape through the hole in the lesser omentum, drawing it out through the hole in the gastrocolic omentum. The tape now encircles the stomach at the level of the angulus, marking the lower limit of dissection. Clip the ends of the tape together so they may be used to exert gentle downward traction on the stomach by an assistant to tauten and define the nerves of Latarjet.
4. Make a second, higher hole in the lesser curve close to the stomach just above the next visible vessels. Double-clamp, divide and ligate the vessels and accompanying nerve filaments.


5. A better method is to pass double ligatures with an aneurysm needle or with Lahey’s fine curved forceps, tie them carefully and divide the tissue between them. It is possible to use haemostatic clips instead of ligatures. One instrument applies two clips side by side and cuts between them: there is not usually sufficient tissue but it may be carefully used where the vessel and nerve length is adequate. If you do use haemostatic clips, take care that you do not inadvertently brush them off, thus tearing the delicate blood vessels.
6. Proceed upwards step by step, dividing the vessels and nerves that cross the lesser curve, carefully preserving the nerves of Latarjet as they are separated from the stomach. Higher up on the stomach, the vessels and nerves do not tend to penetrate at the lesser curve but cross it to enter on the posterior or anterior wall. Take advantage of this extra length by carrying the dissection onto the anterior and posterior walls. The separation of the anterior and posterior nerves of Latarjet from the stomach now proceeds independently onto the anterior and posterior gastric walls.
7. As the anterior and posterior layers of lesser omentum separate, slide non-toothed forceps under avascular sections and cut between the opened blades. Small vessels may be sealed with low-power diathermy applied for the minimum time through fine forceps applied well away from the main nerves and from the gastric musculature.
8. At the level of the main left gastric artery and vein quite large vessels must be ligated and divided on the anterior and posterior walls, together with their accompanying nerve filaments. Above these, the lowest portion of the oesophagus can be separated from the nerves of Latarjet without dividing any large vessels.
9. As the dissection reaches the cardia, the main trunks of the nerve are separated from the gullet, the nerves of Latarjet being the inferior prolongations of them. At this point temporarily stop the dissection.
10. Draw down the gastric fundus while an assistant retracts the left costal margin. Identify the angle of His between the fundus and the left edge of the lower gullet. Carefully incise the peritoneum in the angle, without damaging the stomach or oesophagus. Open up the hole gently with the right index finger and pass the right thumb through the upper part of the defect in the lesser omentum, behind the fundus of the stomach. Thumb and finger are prevented from meeting by the peritoneum of the roof of the lesser sac, which can now be broken through.
11. At the level of the cardia separate, doubly ligate and divide the peritoneum, phreno-oesophageal ligament and nerve fibres across the anterior aspect of the lower oesophagus, leaving the muscle coat denuded but intact.
12. Divide loose tissue and nerve fibres around the posterior aspect of the lower oesophagus, rotating it to improve the view. A troublesome fragile vein is encountered, running posteriorly from the cardia, often in a crescentic peritoneal fold. Tie it, seal it with diathermy current or apply a haemostatic clip. Do not encroach more than 2 cm on the greater curve aspect of the gastric fundus or you will damage the short gastric vessels and the spleen.
13. Clear the whole circumference of the lower 5–7 cm of the oesophagus of nerve fibres. Do not damage the longitudinal muscle coat. Catch any small veins that have retracted into the muscle coat using fine sutures if necessary (Fig. 10.13).
Checklist
1. Examine the lesser omentum, lesser curve of stomach, lower oesophagus and upper lesser sac for signs of damage or bleeding. Have the short gastric vessels or spleen been damaged?
2. Re-examine the lower oesophagus for the presence of persistent vagal fibres and for signs of damage to the muscular coat. Re-examine the incisura angularis, where vagal fibres to the parietal cell mass may also have escaped detection. Finally, look again at the gastric lesser curve to ensure there is no damage. Ensure that 5–6 cm of distal stomach remains innervated.
PYLOROPLASTY
Appraise
1. Re-formation of the pylorus has the effect of increasing the size of the lumen and also destroys the pyloric sphincteric metering function. It can be used to overcome stricture of the pylorus and also to improve gastric emptying following truncal vagotomy. Following proximal gastric vagotomy, the distal stomach or ‘antral mill’ remains innervated so that gastric emptying is not usually prejudiced and pyloroplasty is not required.
2. Pyloroplasty is simple to perform in most circumstances and has enjoyed great popularity as an adjunctive operation with truncal vagotomy for duodenal ulcer. It may be difficult to perform if the duodenum is very scarred and adherent to the pancreas and the structures in the free edge of the lesser omentum if the abdomen is obese and deep.
3. It is probable that many postvagotomy symptoms are attributable to the drainage procedure and not to the vagotomy. Many such patients are improved if the drainage procedure is reversed. Although the pylorus can be anatomically restored to normal, the long-term results are not impressive.
4. Inevitably a number of methods of performing pyloroplasty have been described. The Heineke-Mikulicz method is the simplest, but some surgeons favour the Finney pyloroplasty.
5. The use of pyloroplasty or pyloromyotomy to facilitate gastric emptying following transection of the cardia for oesophagectomy is controversial. Some surgeons perform it only if there is evidence of stenosis (see Chapter 9). In the event of delayed gastric emptying they give metoclopramide 5–10 mg intravenously, and balloon dilatation of the pylorus under radiological control; they reserve re-operation for patients in whom these methods fail. The experience of other surgeons gives less cause for optimism so they routinely perform pyloroplasty or pyloromyotomy to circumvent gastric delay.
HEINEKE-MIKULICZ PYLOROPLASTY
Action
1. Make a longitudinal incision through all coats starting on the anterior wall of the duodenal bulb, carried through the pylorus and on to the anterior gastric antral wall (Fig. 10.14). Centre the incision, 4–5 cm long, on the narrowest part of the pyloroduodenal canal. If there is an active anterior ulcer, encircle it so that a lozenge-shaped segment of anterior pyloroduodenal wall is excised, containing the ulcer. This ‘pylorectomy’ was described by Judd.
2. Aspirate the contents and inspect the interior of the distal stomach and proximal duodenum. Sometimes there is a mucosal diaphragm with no evidence of ulcer in patients with typical features of pyloric stenosis in whom an endoscope would not pass. If a diaphragm is suspected, start the incision on the anterior antral wall 3–4 cm proximal to the pylorus and inspect the interior before cutting through the pyloric ring. Make sure there is not a second narrow duodenal segment distal to the pyloroplasty, as may develop in postbulbar duodenal ulceration.
3. Gently apply tissue forceps to the middle of the upper and lower cut edges and draw them apart, allowing the proximal and distal limits of the incision to come together, transforming the longitudinal cut into a transverse slit.
4. Close the incision, starting from the upper tissue forceps and ending at the lower forceps. Three methods are possible. The traditional technique is to insert an invaginating continuous all-coats layer reinforced with a second seromuscular layer of sutures. However, the invaginated edges may cause a temporary holdup and many surgeons therefore employ a single layer of all-coats sutures placed closely together, uniting the walls edge-to-edge without invagination. In the last few years stapling devices have gained popularity. Place a single straight stapler along the edges as they are held in their new position, with the opposed edges everted. Close and activate the stapler. Cut off the excess tissue with a scalpel blade held in contact with the upper surface of the stapler, which is then removed. Insert a reinforcing layer of seromuscular stitches if desired.
FINNEY PYLOROPLASTY
Action
1. Gently mobilize the duodenal loop by Kocher’s manoeuvre so the descending duodenum can be laid alongside the greater curve part of the gastric antrum.
2. Unite the adjacent gastric and duodenal walls with a seromuscular stitch, from above downwards, closing the angle below the pylorus.
3. Incise the full thickness of the stomach, pylorus and duodenum along an inverted horseshoe-shaped line which runs from the gastric antrum 4–5 cm proximal to the pyloric ring, through the pylorus, curving through the duodenal bulb and down the descending duodenum.
4. Starting at the pylorus, unite with an all-coats stitch the adjacent walls of the stomach and duodenum. Continue the stitches round the lower limits of the incisions to unite the right duodenal cut edge to the left gastric cut edge, using an invaginating stitch.
5. Continue the seromuscular stitch to cover the anterior all-coats suture line.
DUODENOPLASTY
Appraise
1. The advent of proximal gastric vagotomy removed the need to perform an adjunctive drainage operation in the majority of patients with duodenal ulcer since in modern times most patients with incipient pyloric stenosis are operated upon before it becomes severe.
2. Even if pyloroplasty is necessary there are advantages in performing proximal gastric vagotomy. If truncal vagotomy is performed, gallbladder dilatation results and there is an increased risk of gallstones; loss of vagal supply to the pancreas reduces its exocrine secretion and there is a significantly increased risk of severe diarrhoea. In some patients, stenosis is distal to the pylorus and can be overcome without damaging the sphincteric mechanism. This is particularly true when the patient has postbulbar duodenal ulceration. Proximal gastric vagotomy can then be justified.
Action
1. Mobilize the pyloroduodenal region by Kocher’s manoeuvre and confirm that the pyloric ring itself is widely patent by invaginating the anterior antral wall through it on an index finger. The site of stenosis should have been determined before operation but this is not always easy to assess.
2. Make a longitudinal incision through the anterior duodenal wall, stopping short of the pyloric ring (Fig. 10.15). This needs to be only about 1.5–2 cm long. If the ulcer and stenosis are postbulbar remember that the distortion may draw the ampulla out of its normal place, exposing it to inadvertent damage.
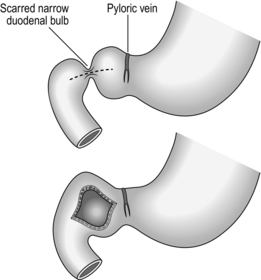
Fig. 10.15 Duodenoplasty.
3. Gently apply tissue forceps to the middle of each cut edge and separate them to produce a transverse slit.
4. Close the slit transversely. Insert a single layer of closely applied stitches, bringing the edges together without inversion.
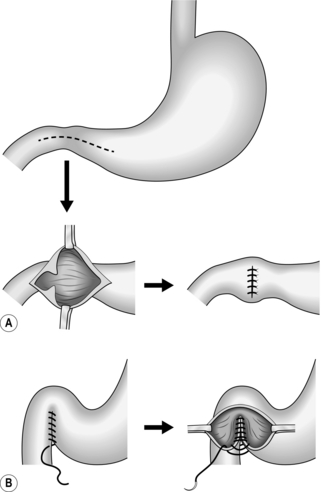
GASTRODUODENOSTOMY


Action
1. Mobilize the descending duodenum by Kocher’s manoeuvre and join the descending duodenum to the anterior wall of the distal stomach with a running seromuscular stitch.
2. Incise the descending duodenum and anterior gastric walls for 5 cm, parallel and close to each side of the seromuscular stitch. Aspirate the contents and inspect the interior (Fig. 10.16).
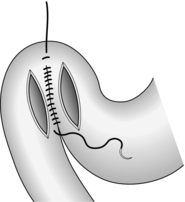
Fig. 10.16 Incisions for gastroduodenostomy.
3. Join the adjacent gastric and duodenal walls with a continuous all-coats stitch, carrying this round on to the anterior walls as an invaginating stitch to encircle the anastomosis.
4. Continue the seromuscular stitch onto the anterior wall to bury the all-coats stitch and complete the two-layer anastomosis.
5. The anastomosis can be accomplished using a stapling device that will insert four linear rows of staples and incise in the same line between the inner rows of staples. Bring the stomach and duodenum together with a posterior seromuscular stitch. Make a stab hole in the stomach and the duodenum at the lower limit of the intended anastomosis. Insert the separated limbs of the stapler, one into each hole, with the points towards the pylorus. Lock the limbs together so they lie just anterior to the seromuscular stitch line with no extraneous tissues intervening. Fire the stapler to insert the rows of staples and cut between the middle rows. Unlock the stapler, withdraw the limbs, inspect the completeness of the union and pick up the extremities of the staple lines through the stab wounds, which are now united, with tissue forceps. Separate the tissue forceps to draw the defect into an everted slit. Close the defect with sutures or a linear stapler. Check the integrity of the anastomosis and if desired continue the seromuscular stitch from the posterior suture line to bury the anterior staple line.
GASTROENTEROSTOMY
Appraise
1. Gastroenterostomy was originally applied to the relief of pyloric obstruction from distal gastric carcinoma. It offers an important method of relief when gastrectomy cannot be carried out because the tumour is locally too extensive or has already metastasized. Always place the gastroenterostomy as high on the stomach as possible to guard against the stoma becoming obstructed by advancing tumour growth. However, always prefer an exclusion gastrectomy if this is possible because high gastroenterostomy often fails to drain the stomach and may provoke bilious vomiting.
2. Gastroenterostomy was used for the relief of benign pyloric stenosis from duodenal ulceration, but in the absence of stenosis it diverts some of the acid away from the ulcer, which usually heals. A proportion of patients eventually develop an ulcer at the stoma, although this may be delayed for many years. An advantage is that if the patient subsequently has postprandial symptoms from the drainage operation, it can be taken down quite simply provided that the pyloroduodenal canal is adequate. Gastroenterostomy for duodenal ulcer is placed as close to the pylorus as possible.
3. Gastroenterostomy may be used as a bypass in the presence of duodenal ileus or fistula. For many years surgeons argued about the merits of different techniques for gastroenterostomy. As a general rule, surgeons now use only anterior juxtapyloric gastroenterostomy for benign disease (Fig. 10.17); this will be described in detail with a note on the previously very popular posterior gastroenterostomy.
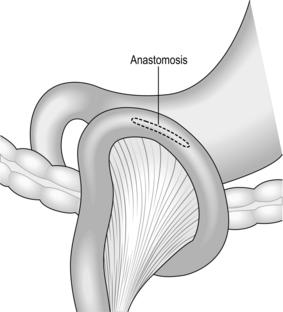
Fig. 10.17 Juxtapyloric anterior gastroenterostomy.
Action
Suture technique
1. Pick up a longitudinal fold of anterior gastric wall and grasp it with one of Lane’s twin clamps. Choose a fold as close to the pylorus as possible if this is for benign pyloric obstruction or accompanies vagotomy for ulcer. Choose a fold as high as possible if this is to bypass an unresectable distal gastric carcinoma.
2. Lift up the greater omentum and transverse colon to identify the duodenojejunal junction. Draw the first loop of jejunum up over the colon and greater omentum to the stomach, with the short but not taut afferent loop against the proximal part of the clamped gastric fold and the efferent loop against the distal end of the fold. Place the second twin clamp along the apposed bowel, avoiding the mesentery, to occlude the lumen but not the blood supply. Lock the clamps together.
3. Unite the adjacent gastric and jejunal walls with a running seromuscular stitch on an eyeless needle. Leave the ends long so that the stitch can be continued to encircle the anastomosis.
4. Open the stomach and jejunum parallel to the seromuscular stitch and 0.5 cm from it on each side, for 4–6 cm if this is for benign disease and for as long as possible if it is to bypass malignant obstruction.
5. Apply fresh drapes to isolate the area and keep separate instruments during the next part of the operation when the potentially infected interior of the bowel will be exposed.
6. Unite the adjacent gastric and jejunal walls with a running all-coats stitch. Carry the stitch round the corner on to the anterior wall to complete the anastomosis. As the anterior gastric and jejunal walls are brought together, invert the edges. A Connell mattress stitch may be used as an alternative to the simple over-and-over stitch but take care that the blood vessels are picked up and tied along the edges since the Connell stitch is not haemostatic.
7. Remove the twin clamps, discard and replace the soiled towels, instruments and gloves.
8. Carry the seromuscular stitch round the end onto the anterior wall and complete it to encircle the anastomosis, burying the all-coats stitch.
Checklist
1. Examine the anastomosis and make sure it is patent.
2. Make sure there is no tension on the loop of jejunum. Draw the transverse colon and greater omentum to the right so there is no weight of bowel to drag on the anastomosis.
Staple technique
1. The anastomosis can be fashioned using a linear-cutter stapling device. Draw the jejunum up to the stomach and attach it along the proposed line of the anastomosis with a seromuscular stitch at each end. Make stab wounds in the stomach and the jejunum close to the stitch uniting the afferent jejunal loop to the proximal stomach.
2. Insert a sucker to empty the gastric and jejunal contents.
3. Separate the two halves of the stapler and insert one blade into each of the stab wounds, pointing towards the distally placed stitch. Lock the blades together, taking care not to include extraneous tissue.
4. Fire the device to insert four parallel rows of staples and cut between the central rows, forming an anastomosis between stomach and jejunum. Unlock the blades and withdraw them.
5. Inspect the anastomosis all round from within and without, inserting sutures to reinforce doubtful areas. Pick up the ends of the staple lines on each side of the defect and draw them apart to create a linear slit. Apply a linear stapling device along the everted edges of the defect to seal the edges. Remove the device and examine the anastomosis to ensure it is perfect, inserting further stitches if necessary. Alternatively, close the defect with sutures.
Technical points
 Suture material and stitches vary from surgeon to surgeon. We have described a sutured anastomosis using two layers of continuous absorbable stitches. A single all-coats stitch is also quite adequate. Many surgeons insert interrupted non-absorbable stitches such as silk on the outer, seromuscular layer. It is not the suture material or method but the care with which they are inserted that determines whether the patient will recover without complications.

POSTERIOR GASTROENTEROSTOMY
1. This method was used with success for many years. From time to time it offers a convenient way of fashioning the anastomosis for benign disease. It cannot be used conveniently for high gastroenterostomy to relieve malignant distal gastric obstruction.
2. Hold up the greater omentum and transverse colon in order to inspect the mesocolon. Identify the middle colic vessels and make a conveniently placed vertical hole through the mesocolon to one or other side of them, 5–7 cm long.
3. Identify the posterior wall of the stomach through the hole and draw it down. Select a dependent and distal part of the stomach.
4. Apply the twin clamps to the protruding part of the stomach and to the first loop of jejunum beyond the ligament of Treitz. Lock the clamps and carry out the anastomosis.
5. Suture the margins of the cut mesocolon to the stomach to prevent small bowel loops from slipping through into the lesser sac and becoming obstructed.
BILLROTH I PARTIAL GASTRECTOMY
Appraise
 Billroth I gastrectomy was first used to resect a distal gastric carcinoma in Frau Heller on 29 January 1881, by Theodore Billroth (1829–1894) of Vienna. The size of the anastomosis between the proximal gastric stump and the duodenum is restricted to the diameter of the duodenal lumen and if the cancer recurs there is a risk of anastomotic obstruction. In Billroth II or polya gastrectomy the whole width of the cut end of the proximal gastric stump can be used for the anastomosis, which is at less risk of obstruction, and this technique has replaced the Billroth I operation.

POLYA PARTIAL GASTRECTOMY
Appraise
 At an emergency operation for bleeding peptic ulcer the most certain procedure is excision of the ulcer-bearing area. If the ulcer is duodenal then polya gastrectomy with closure of the duodenum gives good results if the main end-point is prevention of re-bleeding. However, the operative mortality is twice that following vagotomy with under-running of the bleeding vessel, and the side-effects and late sequelae may be more severe. Consequently, the most frequently performed procedure is vagotomy with pylorotomy following under-running of the ulcer with non-absorbable stitches. Erosive bleeding rarely demands operation but multiple haemorrhages can be dealt with only by excision of the affected gastric wall by gastrectomy. Fortunately such bleeding is usually from the distal stomach.

Assess
1. Explore the whole abdomen. If the operation is for carcinoma, start in the pelvis and lower abdomen, para-aortic region and root of the mesentery, proceeding to the liver before touching the stomach in order to avoid carrying malignant cells around the peritoneal cavity.
2. Carefully examine the stomach and duodenum to confirm the diagnosis and assess the strategy of the operation. If necessary, open the lesser omentum or gastrocolic omentum to examine the posterior wall of the stomach and contents of the lesser sac, including the glands around the coeliac axis and along the superior border of the pancreas.
Resect
Benign disease
1. Make a hole in an avascular area of the gastrocolic omentum to the left of the gastroepiploic vascular arch. Identify the posterior gastric wall and separate it from the pancreas and transverse mesocolon.
2. Clamp in sections, ligate and divide the gastrocolic omentum, extending on the left up to and including the main left gastroepiploic vessels and the first one or two short gastric vessels. Avoid damaging the spleen directly or by exerting heavy traction on the stomach. To the right, divide and ligate the main right gastroepiploic vessels as they lie near the inferior border of the pylorus. The separation of this vascular tissue can be accomplished rapidly using ultrasonic (e.g. Harmonic Scalpel, Ethicon Endosurgery) or tissue response generator (Ligasure, Covidien) dissection.

3. Clamp, divide and ligate the right gastric vessels after identifying and isolating them as they run to the left in the lesser omentum just above the duodenal bulb and pylorus. Divide the lesser omentum proximally, if possible preserving an accessory hepatic artery if one is present.
4. Free the first 1–2 cm of duodenum after applying fine artery forceps on the small vessels posteriorly, dividing and ligating them with fine ligatures. Divide with a linear stapler or Payr’s clamp across the duodenum just beyond the pylorus. Place a second clamp just proximal to this to occlude the stomach. If there is insufficient room for this, apply a non-crushing clamp across the distal stomach. Transect the duodenum just above the distal Payr clamp, ensuring that no gastric mucosa remains attached to the duodenum. Cover the cut distal stomach with a swab.
5. Dissect the duodenum free for 2–3 cm so that it can be safely closed, applying fine forceps and ligatures to the vessels, keeping close to the duodenal wall.


6. Close the duodenal stump, as a rule using a linear stapling device. This places a double row of staples across the duodenum. Apply it just distal to the pylorus in place of the Payr’s crushing clamp and place a proximal clamp across the distal stomach. Activate the stapling device to staple and seal the duodenum and transect this with a scalpel applied closely to the upper edge of the stapler. Alternatively, close the distal stomach and duodenal stump with GIA staplers. It is wise to invaginate and reinforce the everted staple line with a layer of sutures.
7. Alternatively, close the duodenal stump with sutures. First use a running over-and-over spiral stitch that encircles the clamp and the enclosed crushed duodenum. Gently ease out the clamp, tightening the stitches seriatim as it is withdrawn. Tie the stitch. Insert a second invaginating seromuscular suture to cover the first stitch line or insert a purse-string suture and invaginate the first suture line as it is tightened and tied. If possible, insert a third stitch that picks up and draws together the ligated right gastric and right gastroepiploic vessel stumps, the anterior duodenal wall and the peritoneum over the head of the pancreas.
8. Exert a little tension on the left gastric vessels by elevating the pyloric end of the stomach. Identify the artery by feeling for the pulsations. Isolate the vessels from the lesser curve of the stomach, doubly clamp, divide and ligate them.
9. Select the line for the transection of the stomach (Fig. 10.18). When Polya gastrectomy was the standard operation for duodenal ulcer, a two-thirds gastrectomy was usually carried out.
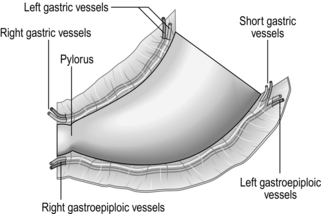
10. Ask the anaesthetist to withdraw the nasogastric tube until the tip lies above the line of transection.
Malignant disease
1. Radical subtotal gastrectomy is described later, but non-radical partial gastrectomy is appropriate in frail patients and in those who have a resectable carcinoma but already have metastatic deposits in the liver or elsewhere which make radical resection impossible.
2. It may not be possible to be sure that the distal resection is clear of tumour but always ensure that the proximal line of resection is well clear of growth. Aim at a minimum of 5 cm apparently tumour-free margin. If the resection line cuts through tumour, the anastomotic line may break down during recovery from the operation. If it does not do so, recurrent tumour at the anastomosis may soon obstruct the lumen.
3. It is useless to carry the line of resection widely beyond the stomach, so adopt the same technique as for resection for benign disease.
4. Plan to provide a full-width gastroenterostomy to guard against recurrent tumour causing obstruction.
Unite
Staples
1. The gastroenterostomy can be accomplished using stapling devices. Place a long straight stapling device across the stomach at the proposed line of section and cut off the distal gastric specimen with a scalpel run along the distal edge of the stapler. Remove the stapler.
2. Bring up a proximal loop of jejunum and suture it to the posterior wall of the stomach 5 cm above the staple line, placing a seromuscular stitch at each end, with the afferent loop to the lesser curve, the efferent loop to the greater curve. Make a stab wound in the greater curve aspect of the posterior wall of the stomach 2 cm proximal to the staple line and a matching stab wound in the jejunum at the origin of the efferent loop.
3. Insert the two limbs of the stapler separately into the holes, with the tips pointing to the lesser curve. Ensure that there is no interposed tissue, lock the two limbs together and fire the instrument. Four lines of staples will have united stomach to jejunum and the knife will have cut a stoma between the centre rows of staples. Unlock and withdraw the stapler.
4. Carefully check that the staple lines are perfect. Place tissue forceps at the ends of the inner and outer staple lines and separate the forceps to create an everted linear defect in the anastomosis. Place a short straight stapler across the everted lips of the defect, tighten and actuate it. Cut off the excess tissue, remove the stapler and check the line of closure carefully, if necessary reinforcing the whole anastomosis all round with sutures.
Sutured
1. Place one of the twin gastroenterostomy clamps across the stomach 2 cm above the proposed line of transection, from greater to lesser curve. Place a long non-crushing clamp across the stomach 3 cm distal to the twin clamp and parallel to it. The stomach will be transected just above this clamp.
2. Fold the distal part of the stomach upwards. Reach down and identify the duodenojejunal junction. Draw up to the stomach the first loop of jejunum, with afferent loop to lesser curve with no slack but not tight. The efferent loop is placed at the greater curve. Place the second of the twin clamps across this loop of bowel, occluding only the lumen and not the mesentery. Marry and lock the clamps together.
3. Run a continuous seromuscular stitch to unite the adjacent gastric and jejunal walls.
4. Incise the full width of the posterior gastric wall 0.5 cm above the clamp, taking care at this time to leave the anterior wall intact. Make a parallel incision in the jejunum, 0.5 cm from the seromuscular suture line. Join the adjacent gastric and jejunal edges with an all-coats stitch.
5. Now cut through the anterior wall of the stomach 1 cm distal to the clamp and remove the specimen of distal stomach. Continue the all-coats stitch round on to the anterior wall and along it to completely encircle the anastomosis.
6. Remove the clamps, discard and replace the towels, gloves and instruments. Complete the seromuscular suture line onto the anterior wall to encircle the anastomosis.
Valved anastomosis
1. When performing gastrectomy for benign disease it is conventional to close the lesser curve half of the stomach and form a small stoma between the greater curve half of the stomach and the jejunum. This is referred to as a valved anastomosis (Fig. 10.19).
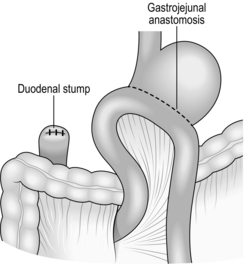
2. A different technique is used after uniting the stomach and jejunum in the twin clamps and with the posterior seromuscular stitch. Have the distal stomach held vertically and place halfway across it from the lesser curve, and 1 cm distal to the twin clamp, a short Payr’s crushing clamp. Cut halfway across the stomach just distal to the Payr clamp, transecting the lesser curve half of the stomach. Oversew the clamp and contained crushed stomach edge with a running loose spiral stitch. Release and gently withdraw the clamp as the sutures are tightened seriatim. This manoeuvre leaves just the greater curve half of the stomach to be united to a matched hole made in the jejunum. The anastomosis is accomplished in a similar manner to the creation of a full-width stoma.
3. After the gloves, towels and instruments have been replaced, continue the posterior seromuscular stitch round and along the anterior wall to encircle the stoma and closed lesser curve.
Technical points
1. The inside of the stomach and bowel are colonized with microorganisms. While fashioning anastomoses, isolate the interior of the bowel from the peritoneal cavity and wound edges by using separate towels, instruments and gloves. When the bowel is repaired, discard and replace them with sterile gloves, towels and instruments.
2. Retrocolic anastomosis may be fashioned following gastrectomy but it does not confer any benefits over the antecolic anastomosis.
3. Some surgeons avoid the use of clamps during the fashioning of gastric anastomoses. There is, however, no evidence that clamps damage the bowel.
Checklist
1. Examine the anastomosis. See that it is perfectly fashioned and intact. If necessary insert extra sutures. Ensure that you can invaginate the gastric and jejunal walls through the stoma.
2. Check each of the main vascular ligatures. Re-tie them if they are insecure.
3. Check the spleen. Aspirate all the blood from under the left cupola of the diaphragm and re-check it just before closing the abdomen to ensure that there has been no further collection of blood.
4. Make sure the duodenal stump is safely closed. Should you leave a drain down to it? If so, does this replace careful technique and should you therefore re-close the duodenum or reinforce the closure?
5. Examine the colon to ensure there is no damage to it, or the mesocolon or middle colic vessels. Draw the greater omentum, transverse colon and mesocolon through to the right so there is no weight of colon resting on the anastomosis.
6. Aspirate any blood from under the right cupola of the diaphragm, from under the liver and in the right prerenal pouch. Finally, aspirate any blood that has collected in the pelvis.
GASTRODUODENAL BLEEDING
Appraise
1. Bleeding is the most life-threatening complication of peptic ulcer. Its management is best carried out by experienced clinicians, endoscopists and surgeons acting as a team. Dedicated units achieve much better survival than those undertaking it as part of a general service.
2. Erosive bleeding sometimes complicates bleeding elsewhere, sepsis, burns, head injury and major trauma. Drugs such as steroids and NSAIDs can cause erosive bleeding or be associated with ulcer bleeding. Alcohol causes acute gastritis with bleeding from this or, following retching, from Mallory-Weiss tears around the cardia. For this reason take a careful history, asking specific questions about drugs.
3. Assess the patient’s general condition so that you can carry out appropriate resuscitation. Check the haemoglobin and haematocrit, and exclude clotting deficiencies if suspected. In appropriate circumstances have blood cross-matched. Routinely give intravenous omeprazole or an equivalent proton-pump inhibitor.
4. Do not make a once-and-for-all assessment but carefully monitor the patient thereafter. Remember that mortality is highest among the over-60s, those with massive haemorrhage and shock, and those with serious associated disease.

5. Carry out endoscopy as soon as possible to determine the cause, site, state and number of lesions. Look for continuing bleeding and the presence of visible vessels which indicate that the bleeding is likely to continue or recur. Even if you cannot identify the source you can usually exonerate particular areas, for example excluding oesophageal varices.
6. If you are expert in their use, have available instruments to control bleeding through the endoscope. These include the Nd-YAG laser, heater probes and diathermy, together with needles for injecting adrenaline (epinephrine), ethanol or polidocanol through the biopsy channel. Other methods that are under trial include application or injection of cryoprecipitate or thrombin to induce clotting, the adhesive trifluoroisopropylcyanoacrylate to seal the vessel, and endoscopic clipping or suturing of vessels. Combinations of these methods are proving effective. Haemostatic substances can be injected in association with local application of heat. They should be the first line of treatment in most patients. They may be repeated if re-bleeding occurs.
7. For this reason, if you are inexperienced or do not have the equipment available, call in an expert or be willing to transfer the patient rather than operate precipitately. Surgery produces its own immediate and long-term complications. Inexpert and ineffective surgery is disastrous.
8. The origin of obscure recurrent upper gastrointestinal bleeding can sometimes be elucidated by injecting radioisotope-labelled red cells into the circulation with gamma-camera monitoring of leakage into the gut. Most surgeons would now opt for angiography carried out during bleeding episodes. In appropriate circumstances the radiologist may be able to embolize the feeding vessel.
9. Relative indications for operation when other methods of control have failed remain:


10. Although exploratory laparotomy allows access to the abdomen, the exterior of the gut is exposed, not the interior where the cause lies. Do not embark on surgery for upper gastrointestinal bleeding alone if there is someone more experienced available. Eschew the temptation to carry out ‘blind’ gastrectomy if you cannot identify the cause of bleeding. This merely confuses the problem while risking the possible complications.
Assess
1. As the abdomen is opened, blood which appears bluish through the bowel wall may be seen in the small or large bowel. Dilated and congested veins on the viscera with a stiff cirrhotic liver make portal venous hypertension obvious. Scarring and oedema of the stomach or duodenum may indicate the site of bleeding.

2. Remember that, in Britain, most upper gastrointestinal bleeds requiring emergency surgery are from peptic ulceration or erosions, but also remember that there are sometimes multiple causes and the detection of a possible site does not exclude the possibility of other causes. Therefore carry out a thorough check of the lower oesophagus, stomach and duodenum, remembering that there may be an unsuspected lesion in the small or large bowel.
3. If no cause is detected and there is no site of active bleeding, do not hesitate to repeat the endoscopy yourself or ask an experienced colleague to do so. It may be valuable first to have a large-bore gastric tube passed so that the stomach can be washed out if it contains blood or retained food.
4. Alternatively, but often less satisfactorily, perform gastrotomy or gastroduodenotomy. Make an incision through the anterior gastric wall midway between the greater and lesser curves in the distal stomach, carrying this through the pylorus into the anterior duodenal wall for 2–3 cm if necessary. Aspirate the gastric contents. Insert large-bladed retractors for your assistants, have the light adjusted to shine into the stomach and carefully examine the interior of the stomach and if necessary the duodenal bulb, seeking the cause of bleeding. Sometimes the gastric wall can be evaginated through the gastric wound to allow close inspection. If the pylorus has not been incised it is often possible to insert thin-bladed retractors through it to view the duodenal bulb, or a flexible cystoscope may be passed, offering excellent views of the bulb.
5. Do not carry out a procedure unless the cause is found. Make a thorough examination of the whole gastrointestinal tract including structures that could produce bleeding into it, such as the biliary tract. If there is no active bleeding and no cause is found, close the abdomen and determine to repeat the endoscopy at the first sign of re-bleeding, followed if necessary by other methods of detection and isolation of bleeding sites.
Action
1. Bleeding duodenal ulcer is preferably treated at present by pyloroplasty or duodenotomy, and suture of the bleeding vessels. Vagotomy is now usually omitted in favour of postoperative medical treatment of the ulcer. Create a gastroduodenotomy of the size that would usually be made for a pyloroplasty. Aspirate blood and clot from the ulcer base and isolate the site of bleeding. This is usually from the gastroduodenal artery. Carefully insert stitches of 2/0 non-absorbable material on a round-bodied small curved needle placed transversely to pick up the artery (Fig. 10.20).
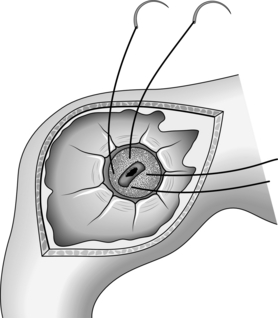
Fig. 10.20 Suture-ligature of gastroduodenal artery in the base of posterior duodenal ulcer, using 2/0 silk.


2. Close the gastroduodenotomy either as a pyloroplasty or longitudinally as it was made.
3. The florid duodenal ulcers that were formerly seen are less common now but occasionally the duodenal ulcer is so large, the walls so thickened and distorted that pyloroplasty will not be successful. One possibility is to close the gastroduodenotomy longitudinally, and if necessary create a gastrojejunostomy. Alternatively, perform Polya gastrectomy, although this should rarely be necessary. The difficulty will be in freeing and closing the duodenum. If the duodenum has already been opened to perform pyloroplasty before the problem is appreciated, first control the bleeding with 2/0 non-absorbable sutures. Now decide whether to dissect the duodenum distal to the ulcer sufficiently to allow it to be closed. This is feasible only if the ulcer is close to the pylorus. If it lies distally, you will endanger the ampullary region. Nissen’s manoeuvre may succeed: suture the anterior cut duodenal edge to the distal ulcer edge and, if there is sufficient free anterior duodenal wall, suture it over the ulcer to the proximal ulcer edge (see Fig. 10.21).
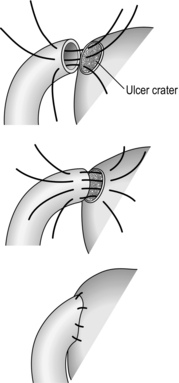
4. If the difficulty of performing pyloroplasty is appreciated early, perform Polya gastrectomy, preserving as much of the anterior duodenal wall as possible, provided the ulcer base can be exposed and the bleeding controlled with sutures. This allows the closure of the duodenum to be carried out securely.
5. Control of the bleeding may be difficult in the presence of a large ulcer and the base may be exposed most easily by ‘pinching off’ the duodenum from the ulcer edge to leave the base free. Control the bleeding. The problem of closing the duodenum can now be tackled calmly, either accomplishing it in the post-ulcer segment, or closing the hole created by the ulcer defect.
6. If all else fails, insert a large catheter into the duodenal defect and close the duodenum around it. Bring the catheter to the surface of the abdomen to create a controlled fistula. This can be removed after 10–14 days and always closes without complication unless there is distal obstruction.
7. The surgical treatment of erosive gastritis is often unsatisfactory and most surgeons are conservative whenever possible. If bleeding is uncontrollably severe, then perform high or even total gastrectomy. Roux-en-Y reconstruction is then usually appropriate.
8. Gastric carcinoma or sarcoma are rare causes of severe gastrointestinal bleeding and should have been diagnosed before surgery was contemplated. Ideally, the operation to be performed is the one that would be selected at an elective operation. However, as a life-saving operation, be prepared to carry out a limited resection. In suitable patients it is reasonable to plan re-operation after 2–3 weeks to carry out radical resection.
RECURRENT PEPTIC ULCER
Appraise
1. The effectiveness of modern drugs has drastically reduced the indications for peptic ulcer surgery and therefore the risk of recurrent ulcer. In consequence, many surgeons are inexperienced in dealing with the challenging problems encountered in this field. Do not hesitate to refer patients with recurrent ulcer to someone who has specialized experience.
2. Test the basal, pentagastrin-stimulated and insulin-stimulated gastric acid secretion. High basal secretion suggests the possibility of a Zollinger-Ellison tumour. In all cases estimate the serum gastrin level and exclude hyperparathyroidism (see Chapter 21). A positive insulin test may suggest incomplete vagotomy if that was the original operation.
3. An episode proton-pump of recurrent ulcer does not necessarily demand re-operation. Try the effect of H2-receptor-blocking drugs in high dosage or proton-pump inhibitors (PPI), or PPI with antibiotics. The ulcer may heal and not recur.
4. If the recurrent ulcer is associated with high basal gastric acid output, carefully explore the pancreas and duodenum to exclude the presence of a Zollinger-Ellison tumour.
5. Recurrent gastric ulcer is rare following Billroth I gastrectomy but, if it does develop, carry out a higher gastrectomy, excising the ulcer. The anastomosis may once again be gastroduodenal, but Polya gastrectomy is highly effective in preventing recurrence. Recurrent ulcer following proximal gastric or truncal vagotomy with excision of the ulcer or a ‘drainage procedure’ is best treated by partial gastrectomy.
6. Recurrent ulcers may develop following conversion surgery to relieve dumping, bile vomiting or diarrhoea. Combine vagotomy and partial gastrectomy.
Action
1. Truncal vagotomy demands expert knowledge of the area. If the trunks were missed previously, search carefully not only around the lower oesophagus but also within the whole of the oesophageal hiatus. The posterior trunk may lie posteriorly on the right crus of the diaphragm. Remember that missed trunks may have been displaced at the first operation.
2. Partial gastrectomy is not necessarily more difficult than at a primary operation but great care is necessary to mobilize the stomach or remnant.
3. Do not leave a complicated anatomical result but prefer to take down anastomoses, leaving the anatomy simple. Blind and redundant loops of bowel endanger the patient’s long-term well-being.
REVISION SURGERY FOLLOWING PEPTIC ULCER SURGERY
Appraise
1. It is surprising how infrequently patients having gastric surgery for cancer develop disabling chronic symptoms compared with those having surgery for peptic ulcer.
2. If you are an inexperienced and occasional gastric surgeon do not embark on revision surgery for the relief of sequelae following operations for peptic ulcer. Resist the desire to ‘do something’. Very few of the many papers written on revision operations are objective or have sufficient numbers, or sufficient follow-up. Many of the patients improve with time following reassurance, and almost all of them can be improved by adherence to simple rules such as avoiding large meals and food that they have learned is likely to be upsetting, by taking small meals separate from fluids and resting after meals, and by avoiding food and drinks containing excessive sugar. In any case, it is wise to wait at least 2 years from the primary operation before contemplating a revision operation.
3. Bilious vomiting following the creation of a gastroenterostomy stoma is most likely to respond to anatomical revision. Indeed, disabling bilious vomiting is the only symptom for which a mechanical conversion can be offered with reasonable confidence. It is thought that the afferent loop is functionally or mechanically obstructed and distends with bile, pancreatic juice and duodenal secretions discharging intermittently into the stomach. The gastric lining is irritated and the patient may vomit or regurgitate some of the bile-stained fluid. At endoscopy, the region of the stoma reveals florid gastritis. If bilious vomiting follows gastroenterostomy plus truncal vagotomy, the anastomosis can often be simply disconnected provided the pyloroduodenal canal has an adequate lumen. If it follows Polya gastrectomy, conversion to a Roux-en-Y anastomosis (see Fig. 10.22) with drainage of the duodenal loop into the efferent limb at least 50 cm from the stomach diverts bile away from the stomach.
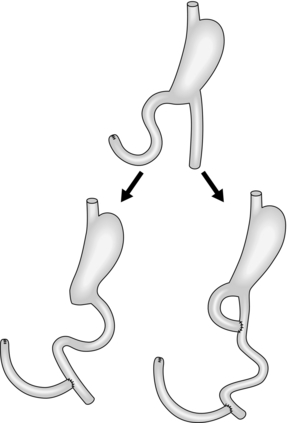
4. An alternative is a Roux-19 conversion in which the afferent loop is divided and the ends are anastomosed into the efferent loop at least 50 cm apart; this procedure can be carried out without mobilizing the stomach. These operations increase the risk of stomal ulceration and, if the original operation was for duodenal ulcer, it is wise to perform truncal vagotomy.
5. Occasionally, bilious vomiting complicates Billroth I gastrectomy. The anastomosis can be disconnected, the duodenum closed and the stomach connected to a Roux-Y loop of jejunum.
6. Dumping syndrome is named from the probability that it develops because of the destruction of pyloric metering of gastric contents into the small bowel. Thus food and fluid may be rapidly deposited into the jejunum, causing overdistension and discomfort, usually within 30 minutes of the meal. This is called ‘early’ dumping. Rapid absorption of fluid may produce circulatory disturbances, while hyperosmolar solutions attract fluid into the lumen, depleting the circulating fluid volume and at the same time overfilling the jejunal lumen. Rapid absorption of sugars may evoke hyperglycaemia stimulating insulin release, followed by rapid fall in blood glucose and the symptoms of hypoglycaemia, usually 2–4 hours after meals. This is called ‘late’ dumping. Proximal gastric vagotomy without drainage for duodenal ulcer greatly reduces the incidence and severity of dumping, since the metering function of the antrum and pylorus is left intact.
7. Following Polya partial gastrectomy, dumping may be diminished by conversion to a Billroth I anastomosis or by conversion to a Roux-en-Y, adding truncal vagotomy if the first operation was for duodenal ulcer, to protect from recurrent ulceration. Neither of these procedures is totally satisfactory in every patient. Elaborations have been recommended, usually in the form of interposed antiperistaltic or isoperistaltic jejunal segments between the gastric remnant and the duodenum or efferent loop of small bowel. As a trainee surgeon, do not attempt to perform these complicated and often ineffective operations.
8. Severe dumping infrequently complicates Billroth I gastrectomy. It is sometimes improved by interposing an isolated isoperistaltic or antiperistaltic loop of jejunum between the gastric remnant and the duodenum.
9. Dumping following vagotomy is usual only when accompanied by an adjunctive procedure to improve gastric emptying. Gastroenterostomy can be taken down if the pyloroduodenal canal is adequate and the results are usually good. Pyloroplasty can be revised so that the pylorus is restored to anatomical normality but reports are varied on the success of the procedure. Probably it does little to improve the patient’s symptoms in the long term.
10. Gastric retention produces a postprandial bloating sensation and regurgitation or vomiting of gastric contents, often with eructation. It was notorious in a proportion of patients treated by truncal vagotomy alone for the cure of duodenal ulcer and was relieved or prevented by the addition of gastrectomy, gastroenterostomy or pyloroplasty. As a rule, improvement occurs with time even when there is no drainage operation. Some patients appear to develop complete gastric atony following vagotomy, including proximal gastric vagotomy, whether or not a drainage operation has been added; this also tends to improve slowly with time. If a drainage operation was not used originally, then perform gastroenterostomy.
11. Occasionally, gastric retention develops from stomal obstruction associated with adhesions trapping the efferent bowel, intussusception of the afferent loop into the stomach or prolapse of hypertrophic gastric mucosal folds into the stoma, and from stenosis following recurrent ulcer. The diagnosis is made by contrast radiography and endoscopy. Treatment is surgical relief of the obstruction, or bypass. In the case of stenosis from recurrent ulcer, truncal vagotomy and gastrectomy are usually necessary.
12. In postgastrectomy patients who swallow indigestible food without first chewing it, the bolus of food may impact in the bowel, usually in the terminal ileum. Surgical relief is necessary: the bolus can usually be broken up without opening the bowel. If it cannot be broken up, ‘milk’ it proximally and open the bowel to extract the bolus. Then repair the incision in the bowel. Subsequently adjure the patient to avoid eating unchewed meat, fruit and other foods.
13. Diarrhoea may complicate peptic ulcer surgery. Make sure that the patient does not have some unrelated cause. An occult tendency to coeliac disease, colitis or irritable bowel disease may become manifest following peptic ulcer surgery. Dumping of food and fluid, especially hyperosmolar fluid, provokes intestinal hurry and diarrhoea as well as dumping syndrome and these symptoms can be controlled with simple dietary advice. Nearly all patients following gastrectomy have a tendency to steatorrhoea, although this may not be clinically evident. In most patients diarrhoea can be controlled using codeine phosphate. A rare cause of diarrhoea is inadvertent gastroileostomy instead of gastrojejunostomy; this requires surgical correction.
14. A few patients have crippling, uncontrollable diarrhoea following truncal vagotomy and drainage for peptic ulcer. Diarrhoea is associated with dumping and can usually be alleviated by controlling the dumping. A 10–12-cm length of jejunum may be taken out of circuit, reversed and inserted 100 cm beyond the ligament of Treitz; alternatively, reverse an 8-cm loop of ileum 40 cm proximal to the ileocaecal valve. The results have been disappointing in the long term.
15. Surgery for peptic ulcer is thought to predispose to gastric carcinoma. The cause is probably excessive bile reflux onto the gastric mucosa following Polya gastrectomy or gastroenterostomy with vagotomy. The detergent bile breaks the protective mucosal barrier, which may provide access to the mucosa for ingested carcinogens. A diet poor in vitamins and antioxidants, together with hypoacidity in the stomach, may be other predisposing factors. Do not assume that all symptoms, especially those developing late or with a changed pattern from previous symptoms, are ‘post peptic ulcer surgery syndrome’. Carry out endoscopy and remove numerous biopsies, especially near the stoma. The reassurance that serious disease has been excluded often leads to an improvement in the symptoms. Successful resection is possible in some patients with stump carcinoma.
GASTRIC CARCINOMA
Appraise
1. At present, the best hope of cure is radical resection. Gastric carcinoma is usually resistant to radiation therapy, but responds to chemotherapy.
2. Unfortunately, most tumours present late. In Japan, a high proportion of early cancers are detected by screening or open-access endoscopy and are successfully treated by surgery. Early gastric cancer is defined as a cancer that is confined to the mucosa or submucosa, with or without spread to the lymph nodes. In the UK, not even those at higher-than-normal risk are routinely and regularly screened. They include those with a family history of the disease, pernicious anaemia and gastric atrophy, hypergammaglobulinaemia, atrophic gastritis, intestinal metaplasia, dysplasia, polyps and previous gastric surgery. Blood group A confers a higher than normal risk. Early gastric cancer is often asymptomatic, yet even patients presenting with dyspepsia are not routinely endoscoped.
3. Lauren of Finland described in 1965 two types of gastric carcinoma. The first is intestinal in type, developing in areas of intestinal metaplasia and tending to be localized. The reduction in gastric cancer that is seen in many Western countries stems from a reduced incidence of this type. The second type is diffuse and tends to spread rapidly within the stomach, often in the submucosa, causing the rigidity that gives it the name ‘linitis plastica’. It also spreads widely outside the stomach and carries a gloomy prognosis. Nevertheless, gastric cancer should be primarily regarded as a locoregional disease which is potentially curable by classical oncological surgery that removes the primary tumour and its draining lymph nodes.
4. Although most gastric carcinomas are sited distally, a tendency for a higher proportion to develop proximally has been noticed in recent years; the reason is unknown.
5. Endoscopy with cytology and biopsy is the best method of screening and diagnosis. It is valuable in detecting early gastric cancer (Fig. 10.23).
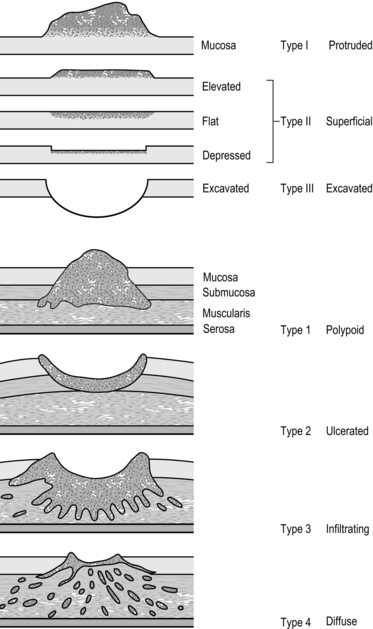
6. Improvements in imaging have facilitated preoperative staging. Barium meal X-ray is often now deprecated if endoscopic diagnosis has been made, but in expert hands it can sometimes give valuable information. For example, gastric rigidity and lack of peristalsis suggest extensive submucosal spread. Chest X-ray may reveal enlarged mediastinal nodes or pulmonary metastases. The preferred imaging modality is CT scanning, which demonstrates spread into adjacent organs, the liver and lymph nodes but does not pick up very early lesions. Endoluminal ultrasound is a valuable means of assessing infiltration and local nodal involvement. Laparoscopy is useful for determining tumour spread in the peritoneal cavity and assessing any fixation of the tumour to surrounding organs.
7. The ability to determine the extent of the tumour before operation saves many patients from fruitless exploratory laparotomy, although the preoperative, perioperative and postoperative staging may prove to be different. The combined TNM (tumour, nodes, metastases) staging of the International Union against (contra) Cancer (IUCC) in 1987 modified the staging to reflect the realization that the depth of invasion is more important than the topographical distribution.
8. Careful studies, carried out mainly in Japan, have demonstrated the sequential spread of cancer from various sites in the stomach to the lymph nodes. Local nodes within 3 cm of the primary tumour are designated N1, the next nodes to be affected are N2, the third tier is N3 and distant spread is N4 (Fig. 10.24, Table 10.1). If the tumour has not spread into unresectable local structures, or been metastasized by the blood stream, curative resection can be attempted. En bloc resection of the tumour with the N1 nodes is designated a D1 resection, with the N1 and N2 nodes a D2 resection. D2 resection is the standard procedure. On occasion a D3 resection may be performed, incorporating the N3 nodes.
Table 10.1
The successive tiers of lymph nodes affected by adenocarcinoma at different sites within the stomach
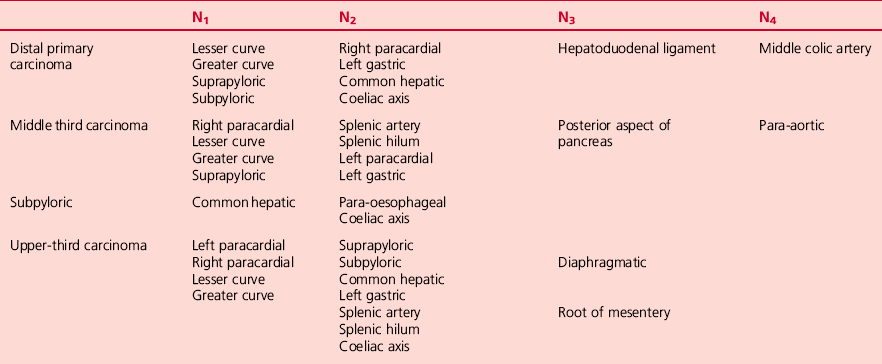
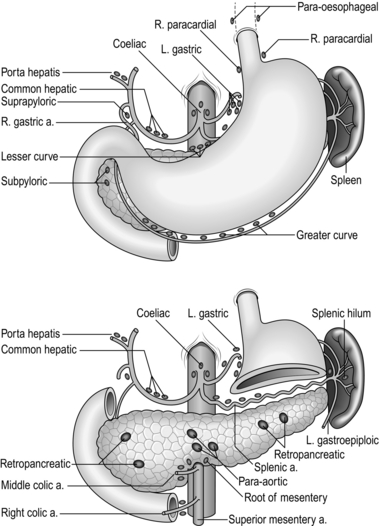
9. Other structures may be removed in continuity with the stomach, including the parietes, the spleen, transverse colon or pancreas. The aim is to achieve circumferential resection margins that are clear of tumour: if you succeed in this endeavour, there is a 20–90% chance of cure, depending on the stage (90% in early gastric cancer, 20% in stage IIIb). Overall, 5-year survival in Britain is now about 40% after potentially curative D2 resection.
10. Radical subtotal gastrectomy carried out through the abdomen is the standard operation for localized distal tumours. For diffuse distal growths and those in the body of the stomach a radical total gastrectomy is required. This is sometimes performed through a left thoracoabdominal incision but can often be performed satisfactorily through the abdomen. For lesions at the gastro-oesophageal junction (Siewert type I and II), a radical oesophagogastrectomy is usually required and this must be performed through a left or right thoracoabdominal approach. However, Siewert type II and III tumours (truly junctional and ones encroaching the proximal 3 cm of stomach, respectively) may be tackled by performing a total or extended gastrectomy. An extended gastrectomy needs a left thoracoabdominal approach.
11. Palliative distal gastrectomy is occasionally helpful if gastric outlet obstruction is not relieved by a stent or a gastroenterostomy.
12. When resection is impracticable, try to relieve existing or impending obstruction. Distal obstruction can usually be bypassed using a proximal gastrojejunostomy. For a proximal obstruction consider dilating a stricture with bougies or inflatable balloons followed by the insertion of a stent. If a large tumour bulges into and blocks the lumen, reduce it using radiotherapy or endoscopically delivered Nd-YAG laser beam vaporization.
D2 RADICAL ABDOMINAL SUBTOTAL GASTRECTOMY
Appraise
 Radical resection for localized carcinoma of the distal stomach will be described. It resembles radical total gastrectomy except that a fringe of proximal stomach is retained; its size is determined by the extent of proximal spread of the tumour since the resection margin should be 5 cm clear of detectable tumour. Preservation of the proximal stomach allows gastrojejunostomy to be accomplished through the abdomen. It is carried out on patients who have no evident involvement of the peritoneum distant from the tumour or of N3 and N4 nodes. Any local invasion of contiguous structures must be resectable with the stomach, such as proximal duodenum, a segment of small bowel, transverse colon, pancreas or spleen.

Assess
1. Do not immediately palpate the stomach. Note any ascites and peritoneal deposits. Start your complete exploration from the pelvis and work towards the stomach in order not to disperse malignant cells. Exclude pelvic deposits and, in the female, ovarian seedlings. Examine the greater omentum for deposits and then raise it to feel the para-aortic nodes and those around the root of the mesentery, and the right colic and middle colic arteries. Examine the full length of the small and then large intestine, seeking peritoneal deposits on the bowel wall, the mesentery and the parietal peritoneum. Look for incidental disease. Throughout the examination confirm pulsation in the arteries, noting atheromatous rigidity, aneurysms and venous or lymphatic obstruction.
2. Now draw the omentum caudally to examine the upper compartment. Feel both lobes of the liver and adjacent diaphragm, gallbladder and free edge of the lesser omentum, the spleen, kidneys and adrenal glands. Starting at the oesophageal hiatus and working distally, look and feel for tumour involvement, fixity, glands and also incidental disease. Systematically move distally, avoiding handling or squeezing the tumour if possible.
3. Palpate the duodenum and feel the head of the pancreas between finger and thumb. Now palpate the body and tail of the pancreas through the lesser omentum and transverse mesocolon, then the region of the coeliac axis just above the neck of the pancreas. This part of the examination cannot be exact and must be repeated as the dissection allows. If you are seriously in doubt whether to proceed, incise the lesser omentum in an avascular area near the liver and examine the coeliac axis and emerging arteries and assess the spread across the lesser sac. If you are doubtful about involvement of the head of the pancreas, perform Kocher’s manoeuvre in order to palpate it adequately. None of these manoeuvres commits you to proceed with radical resection if you discover unsuspected spread.


Resect
1. Lift the great omentum and dissect it from the transverse colon. There is a bloodless plane of fusion between the folded omentum, which was part of the dorsal mesogastrium, and the anterior leaf of mesocolon. Gently peel off the omentum, taking care not to damage the anterior leaf of mesocolon or the middle colic and marginal vessels. Continue on to the pancreas until you reach its upper border. Take care to avoid damaging the pancreas or its blood vessels. It is easy to get lost during this manoeuvre and end up posterior to the pancreas. Therefore, remain vigilant and lift the peritoneum off the anterior surface of the pancreas, which will lead to the coeliac axis and its branches. This manoeuvre is often referred to as a ‘bursectomy’.
2. At the left extremity of the greater omentum the left gastroepiploic vessels pass forwards in the gastrosplenic omentum from the hilum of the spleen. Carefully dissect out the lymph nodes at the origin of the left gastroepiploic artery, then doubly ligate and divide the artery and vein. An ultrasonic dissector is useful for this.
3. At the right extremity of the greater omentum the right gastroepiploic vessels pass forwards from the gastroduodenal vessels. Carefully isolate them and the subpyloric lymph nodes before doubly ligating and dividing them at their origins.
4. Now draw the distal stomach caudally to put on stretch the free edge of the lesser omentum. Carefully make a transverse incision in the anterior leaf above the pylorus to reveal the right gastric vessels and the suprapyloric lymph nodes. Dissect the nodes and doubly ligate and divide the right gastric blood vessels.
5. Gently burst through an avascular area of the lesser omentum close to the liver and extend this towards the cardia, keeping close to the liver. Look for and divide between ligatures the accessory hepatic artery crossing from the left gastric artery.
6. Perform Kocher’s mobilization of the duodenum so that the first part can be dissected from the head of the pancreas. The blood vessels are short and fragile. In order to avoid damaging the pancreas, apply fine haemostasis forceps on the vessels a few millimetres from the duodenal wall, divide the vessels between the tips of the forceps and the duodenal wall, then pick up the short duodenal cut ends to ligate them.
7. Mobilize 5–6 cm of duodenum beyond the pylorus.

8. Use a GIA or similar mechanical stapler to transect the duodenum.
9. From the site of ligature of the right gastric artery, strip the peritoneum, connective tissue and lymph nodes from the hepatic artery, proximally along the upper border of the pancreas, to the coeliac artery en-bloc.
10. Have the distal stomach elevated by an assistant, to tauten the left gastric vessels in their peritoneal fold. In the free edge of the fold lies the left gastric vein; identify, doubly ligate and divide this first. Now extend the dissection of the hepatic artery to the coeliac artery, in order to dissect all the glands from this area, including those around the origin of the splenic artery and look out for the left adrenal gland. Elevate the gland mass into the column of tissue around the now cleaned origin of the left gastric artery. Doubly ligate and divide the left gastric artery. We always place two ties on the proximal cut stump or transfix it with an arterial suture.
11. Have the stomach drawn caudally and to the patient’s left, to place the cardia on stretch. Complete the division of the lesser omentum until the right side of the cardia is reached; now gently clean the upper lesser omentum, connective tissue and right cardiac lymph nodes from the gastric lesser curve down to the selected site of transection. The nerves of Latarjet will be transected during this manoeuvre.
12. Turn the distal stomach cranially again, to examine the upper posterior wall, ensuring that it is free of adhesions; there is often a vein, arching backwards in a peritoneal fold from the posterior gastric fundus, which bleeds annoyingly if it is torn.
13. Transect the stomach with a mechanical stapling device. When the stomach is transected it appears as in Figure 10.25.
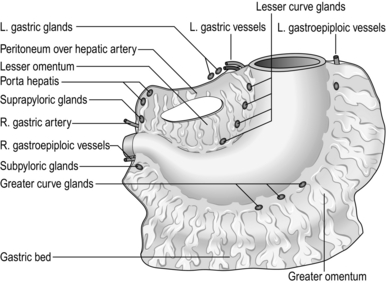
Technical
1. Remember that the more extensive the operation the greater the morbidity and mortality. Do not deprive a fit patient of the chance for cure by being too conservative. However, do not place a patient at risk unnecessarily with a radical resection if the N3 nodes (porta hepatis, root of mesentery, para-oesophageal and retropancreatic) and N4 nodes (middle colic and para-aortic) are already involved. If in doubt, take biopsies of these nodes and obtain frozen-section histology.
2. Remember the two principles of cancer surgery enunciated by the great surgeons, William Halsted and Keiichi Maruyama: whenever possible, dissect the lymph nodes en bloc with the primary tumour so that you do not transect the intervening lymphatics, and obtain clear circumferential resection margins.
3. An argument could be made for less extensive nodal dissection for early gastric cancer. However, in a fit patient, perform D2 resection, because 10–30% of UK patients with early gastric cancer have nodal metastases.
4. The D2 resection may be selectively extended to encompass N3 nodes (a D2/3 resection):
 Tumour cells may travel retrogradely towards the hilum of the liver. Routinely remove these nodes when radically excising distal gastric carcinoma, in continuity with the dissection of the common hepatic artery. Make a careful incision across the upper free edge of the lesser omentum over the hepatic arteries, which can be found by palpation between a finger placed in the upper aditus to the lesser sac, and a thumb placed anteriorly. Carefully strip down the connective tissue and glands from the hilum of the liver to the point of right gastric artery ligation and beyond, along the common hepatic artery to the coeliac axis. Take care not to damage the common bile duct; the portal vein is less at risk since it lies posteriorly.


Unite
1. Fashion a Roux-en-Y loop. Draw up the alimentary limb and ensure it measures at least 50 cm to the jejunojejunal anastomosis to minimize the risk of biliary reflux.
2. The anastomosis can be made using a combined linear stapling and cutting device. In this case transect the stomach with a double line of staples applied with a long linear stapler and transect it below the line of staples. Bring up the selected jejunal end then make stab wounds through the gastric and jejunal walls close to the uniting stitch at the greater curve end of the proposed anastomosis and pass in the separate blades of the combined linear stapler and cutter, one into the stomach, one into the jejunum, lying parallel to each other and pointing to the gastric lesser curve.
3. Lock the two blades together after ensuring that there is no intervening tissue. Actuate the stapler to insert four parallel rows of staples uniting the stomach and jejunum and cutting between the middle rows to form a stoma. Unlock and remove the stapler. Inspect the interior to ensure the anastomosis is perfect.
4. Pick up the incomplete ends of the staple lines with tissue forceps and separate them to leave a longitudinal defect. Close this with an absorbable continuous suture or a short straight stapling device, being careful not to narrow the new anastomosis. Thus you end up with a side stomach to side jejunum anastomosis.
5. Alternatively, draw up a loop of proximal jejunum in exactly the same manner as following Polya gastrectomy for benign disease. The disadvantage of this method is the biliary reflux which can cause discomfort and ulceration at the gastroenterostomy.
ABDOMINAL TOTAL GASTRECTOMY
Resect
1. Complete the gastric mobilization by dividing the lesser omentum right up to the diaphragm and dividing the gastrophrenic ligament close to the diaphragm. Posteriorly, there is a vein arching backwards from the upper stomach that must be ligated or occluded with haemostatic clips and divided. Splenectomy and distal pancreatectomy are not always necessary.
2. The stomach is now attached only to the oesophagus. Gently free this in the hiatus. Transect the anterior and posterior vagal trunks and decide on the level of transection. Divide the oesophagus once you have secured the oesophagus to prevent retraction. Prevent retraction of the oesophagus into the chest by placing a 2/0 PDS suture through the full thickness of the oesophagus about 5 cm proximal to the line of transection or by application of a Satinsky clamp.
3. If a nasojejunal tube is to be used, have it drawn up into the lower oesophagus. It can be pulled down when making a sutured anastomosis when the posterior all-coats suture is in place and pushed on into the jejunum. If a stapled anastomosis is made, have the anaesthetist push it on with a twisting motion when the stapler is withdrawn.
Unite
1. Oesophagojejunostomy is preferably performed using a Roux-en-Y jejunal loop (see Chapter 11). Transect the jejunum close to the ligament of Treitz and divide sufficient primary vascular arcades to allow the distal portion to be taken up to the oesophagus. Transect the bowel beyond the duodenojejunal junction and join the cut proximal end into the side of the Roux loop 50 cm downstream. If a sutured oesophagojejunal anastomosis is used, close the end of the jejunum in two layers, or staple it. The loop should be led up to the oesophagus posterior to the transverse mesocolon. Make sure it lies without tension or twisting. Insert a posterior running suture line of Lembert stitches joining the posterior wall of the oesophagus to the posterior wall of the Roux loop about 5 cm from the closed end. Now transect the oesophagus below the suture line and remove the specimen.
2. Create a hole in the antimesenteric border of the jejunum exactly matching the oesophageal lumen. Insert a stitch through all coats of the oesophagus and jejunum at each end so they can be slightly stretched. Carefully insert a circular all-coats stitch to produce perfect union. Now carry the posterior Lembert stitch onto the anterior wall to encircle the anastomosis, trying to draw up the jejunal wall to cover the inner all-coats stitch.
3. Discard and replace the soiled towels, instruments and gloves.
4. End-to-end Roux loop anastomosis is rarely possible if the oesophagus is sufficiently dilated so that its lumen matches that of the cut end of the jejunum and if the jejunum can be laid straight with not too much tendency to curve at its free end. A two-layer anastomosis is usually fashioned, but one-layer anastomosis is probably equally satisfactory.
5. The oesophagojejunal anastomosis may be accomplished using one of the circular stapling devices. Just after the oesophagus is completely transected, an encircling all-coats purse-string suture is inserted. Introduce a size-testing head so that the correct size of stapler can be used (usually 25 mm). An end-to-side Roux anastomosis does not require a separate stab since the instrument, without the anvil, can be passed in through the cut end of bowel, which will be closed with a linear stapler or in two layers after it is withdrawn. In an end-to-end anastomosis the anvil remains in place but well separated from the staple cartridge, and a purse-string suture is used to draw in the jejunal end over the cartridge.
6. Now feed the anvil head into the cut end of the oesophagus, tighten and tie the purse-string suture and close the anvil head onto the cartridge after ensuring there is no extraneous tissue trapped and that the oesophagus and jejunum lie without tension or twist. Release the safety catch and actuate the gun. Open it, remove it, check the intactness of the anastomosis and of the doughnut-shaped rings on the spindle. Close the portal of entry of the device in two layers.
7. In case of doubt about the integrity of the anastomosis, retain the closed stapler and use it to rotate the anastomosis while inserting reinforcing sutures around the circumference of the stoma. Only now release and remove the stapler.
Check
2. Ensure that the anastomoses are perfect, the bowel is a good colour, untwisted and not stretched and the mesentery lies free.
3. Check all the other structures that have been disturbed. The hiatus does not need to be repaired if total gastrectomy has been carried out. The liver must be replaced if the left lobe was folded to the right. Repair the transverse mesocolon if there is a hole through which small bowel may prolapse.
RADICAL THORACOABDOMINAL TOTAL GASTRECTOMY
Appraise
1. Never embark upon this operation without first obtaining a tissue diagnosis with endoscopic biopsy or cytology or frozen-section histology at operation. Never embark upon it without making every effort by preoperative and operative assessment to exclude metastatic tumour.
2. As a rule, this is a radical operation undertaken for carcinoma of the gastro-oesophageal junction, proximal stomach or cardia with encroachment into the distal oesophagus.
3. Accomplish it through a left thoracoabdominal incision. It can be carried out through an upper midline abdominal incision only if the tumour does not extend proximally beyond the gastro-oesophageal junction and where there is a 5-cm length of intra-abdominal oesophagus.

4. Sarcoma of the stomach is best treated by radical gastrectomy but even if it extends beyond the scope of the operation total gastrectomy may be justified to reduce the bulk of the tumour. Radiotherapy and chemotherapy may then be more effective, with a reduced risk of hollow viscus perforation.
5. Non-radical total gastrectomy through the abdomen was conventionally carried out on patients with Zollinger-Ellison syndrome, whether or not a gastrin-secreting tumour had been totally excised. It is now reserved for the minority of patients whose ulcer cannot be controlled medically or by extirpation of the tumour.
6. This major resection must sometimes be offered to patients who are elderly, have other conditions that prejudice recovery and are also malnourished. Ensure that the nutritional state is restored by oral feeding with high-calorie, high-protein and vitamin-rich diet, nasoenteric feeding or, if necessary, intravenous feeding through a centrally placed venous catheter. Organize preoperative chest physiotherapy and check all other body systems to anticipate and prevent complications. It is recommended that the patient have a double lumen endotracheal tube to allow for deflation of the left lung. Make sure that the patient has an indwelling urinary catheter in place during and after the operation to allow the urinary output to be monitored.
Access
1. The anaesthetized, intubated patient lies on the right side (Fig. 10.26), tilted backwards 30°, right hip and knee flexed, left leg straight and separated from the right leg by a pillow. The pelvis is fixed by a wide strip of adhesive tape to prevent it from rolling backwards; a fixed post, covered with sponge, supports the left scapula posteriorly to maintain its position. The arms are brought in front of the face in the ‘hornpipe’ position.
2. Stand on the patient’s right.
3. Open the abdomen obliquely from the midline to the costal margin in the line of the left seventh or eighth rib.
Assess
1. Note any free fluid. Feel the pelvic peritoneum for deposits, then the para-aortic and middle colic nodes, then the liver.
2. Examine the stomach and its related nodes, in particular the coeliac nodes by making a hole in an avascular part of the lesser omentum near the liver. Note if the tumour is fixed to adjacent structures such as the liver, pancreas, colon or abdominal wall and if partial resection of these allows radical resection to be accomplished. Decide if radical resection is feasible.
Resect
1. Extend the incision along the seventh or eighth rib as far as the lateral border of the sacrospinalis muscle. Open the chest by resecting the costal margin and then incise along the upper border of the rib. Isolate and divide the intercostal nerve posteriorly to prevent postoperative girdle pain.
2. Incise the diaphragm circumferentially about 3 cm from the chest wall to allow easy reconstruction at the end. It may be necessary to resect the crural part en bloc with the growth.
3. Mobilize the spleen forwards (Fig. 10.27) after incising the lienorenal ligament, lifting up the tail and body of the pancreas. When the inferior mesenteric vein is encountered, doubly ligate and divide the splenic vein distal to it and separate the proximal pancreas from the right part of the splenic vein, ligating any small vessels joining the two structures.
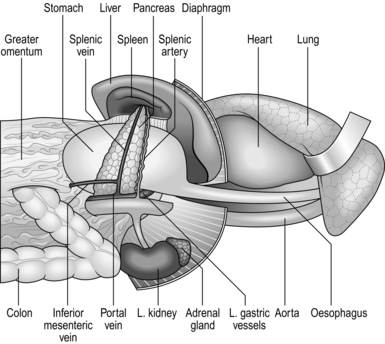
4. Lift up the greater omentum and separate its whole length from the transverse colon in the bloodless plane just above the colon, so that the omentum can be stripped upwards as an intact leaf from the mesocolon. Avoid damaging the mesocolon or its contained blood vessels.
5. Carry out Kocher’s manoeuvre. Carefully identify and dissect out the lymph nodes on the posterior surface of the pancreatic head, para-aortic area, origin of the superior mesenteric artery, and also the origins of the middle colic and right colic arteries. Pot these separately in formalin for histology.
6. Rotate the spleen, tail of pancreas, omentum and greater curve of stomach over to the right. At the pyloric end the right gastroepiploic vessels are taut and at the cardiac end of the stomach the left gastric vessels are tensed. Dissect out the right gastroepiploic vein on the pancreas and doubly clamp, divide and ligate it. Dissect out the origin of the right gastroepiploic artery. Clamp, divide and ligate it, dissecting out the lymph nodes with the vessels. Above the pylorus, identify the right gastric vessels, trace the arteries up to their origin from the hepatic artery and doubly clamp, divide and ligate them, dissecting out the lymph nodes with the vessels. Mobilize the duodenum for at least 5 cm beyond the pylorus. There are small vessels connecting it to the pancreas; clamp these close to the duodenum, divide them between the clamps and the duodenum, pick up the vessels on the duodenal wall and ligate them.
7. Isolate the area with distinctive coloured towels. Transect the duodenum 3–5 cm beyond the pylorus using a linear stapler or between thin crushing clamps such as Lang Stevenson’s. Close the distal cut end with a loose running over-and-over absorbable stitch. Insert a second layer of invaginating stitches to bury the first layer. Alternatively, close the duodenum with a straight stapling device, with or without a row of reinforcing invaginating stitches.
8. Fold the distal stomach to the left. Expose the porta hepatis and incise the peritoneum over the hepatic artery, recognized by palpation. Strip the peritoneum, connective tissue and lymph nodes from the hepatic artery back to the coeliac artery. Continue the peritoneal incision in the porta hepatis to the left, keeping close to the liver, to detach the lesser omentum up to the diaphragm.
9. Have the distal stomach drawn upwards to place the left gastric vessels on stretch within their peritoneal fold. Continue the dissection of peritoneum, connective tissue and nodes along the hepatic artery to clear the coeliac axis and origins of the splenic and left gastric arteries. Dissect in continuity any glands from the aorta above the coeliac axis. Isolate, doubly clamp, divide and ligate the left gastric vein on the posterior abdominal wall. Doubly clamp, divide and ligate the left gastric artery at its origin.
10. If a distal pancreatectomy is required, then just below and to the right of the coeliac axis gently separate the neck of the pancreas from the splenic vein lying behind it and transect the pancreas here, picking up and ligating the small vessels above and below. Identify the main duct and separately ligate it. Close the raw proximal cut end of the pancreas with a running absorbable stitch or with interrupted sutures.
11. The coeliac axis has been cleared of connective tissue and nodes. Now sweep off the tissue on the left-hand side to reveal the cleaned origin of the splenic artery. Doubly clamp, divide and ligate the splenic artery at its origin. Separate the splenic vein from the posterior surface of the pancreas as far as the ligature placed distal to the entrance of the inferior mesenteric vein. The distal splenic artery with its associated glands is now freed, together with the body and tail of the pancreas and spleen.
12. The distal stomach is free. Decide whether or not to excise a cuff of diaphragmatic crura in continuity with the upper stomach and lower oesophagus. In any case, continue up the dissection of the upper stomach and lower oesophagus, keeping well away from them so the loose connective tissue, paracardial glands and lymphatics will be incorporated in the specimen.
13. Have the left lung deflated and retracted or the lower lobe held forwards with a lung retractor. Incise the pleura over the lower oesophagus. Mobilize the oesophagus above the diaphragm and dissect downwards, stripping all the surrounding connective tissue, lymphatics and lymph nodes with it and from the aorta lying posteriorly and the pericardium medially.
14. Extend the radial cut in the diaphragm to the crura. Now, preferably dissect on either side to leave a cuff of crus still attached to the free oesophagus. If the tumour is well away, it is permissible to split through the crus and dissect out all the loose tissue with the oesophagus.
15. The specimen is now attached only by the oesophagus and vagal trunks. Divide the vagi. Decide the level of oesophageal transection to be 5–10 cm clear of detectable tumour. In case of doubt, obtain frozen-section histological confirmation that the resection margin is free from tumour. Reconstruction will be easy if the oesophagus is cut at the level of the lower edge of the left pulmonary vein. Do not stint on the resection, however. It is tragic to succeed in extirpating all the peripheral growth only to have the patient develop recurrence at the stoma. If necessary, the oesophagus can be freed and united on the outside of the arch but this is usually too high for the jejunal limb to reach, or freed up to the neck and united to a conduit there. Transect the oesophagus cleanly (Fig. 10.28). If a nasogastric tube was in place, have it first withdrawn to just above the line of transection.
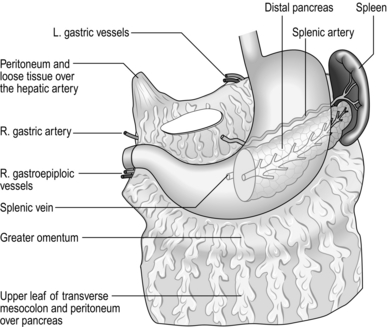
16. Scrupulously ensure total haemostasis now. It will be impossible to examine the area when the reconstructive conduit is in place.
Unite
1. Pick up the proximal jejunum. Carefully examine the vascular pattern. Hold up the loops and view them against a light. Create a Roux loop that will easily reach the retracted oesophagus. Draw the loop through a hole in an avascular portion of the posterior part of the mesocolon, subsequently suturing the margins of the mesocolon carefully to the loop and its mesentery to prevent other loops of bowel from herniating through.
2. The anastomosis may be end-to-end but the jejunum usually sits most comfortably with the oesophagus joined end-to-side. If this is a sutured anastomosis, close the end of the jejunum with a purse-string suture or a linear stapler, reinforced with an invaginating seromuscular stitch. Make a hole in the antimesenteric border of the jejunum to match the lumen of the oesophagus. Place stay sutures through all coats of oesophagus and jejunum at each end and have these drawn apart to slightly stretch the anastomotic lines. Now carefully insert an all-coats stitch uniting the adjacent oesophageal and jejunum walls, placing the sutures 2 mm apart, with 2–3-mm bites. The stitches may be continuous or interrupted, absorbable, braided or monofilament plastic thread. The material and method are less important than the perfection of every stitch (Fig. 10.29).

3. Many surgeons employ a single suture layer. Alternatively, a second layer may be inserted of continuous or interrupted stitches which pick up the muscularis and submucosa of the oesophagus close to the anastomosis and the seromuscularis of the jejunum 5 mm below the anastomosis so that as it is gently tightened it draws a cuff of bowel up and over the all-coats suture line. The anastomosis can be rotated to allow the stitch to be inserted around the whole circumference.
4. Now discard and replace the soiled towels, instruments and gloves.
5. The anastomosis can be fashioned using circular staplers. Choose a suitable cartridge size (usually 25 mm) by inserting a test head into the oesophagus. Do not unite the jejunal end. When turned over the cartridge head with a purse-string suture, it would prove too bulky in conjunction with the thick-walled oesophageal end also drawn into the gap between anvil and cartridge by a purse-string suture.
6. Apply the stapler safety catch and remove the anvil from the spindle. Introduce the spindle and cartridge through the open end of the jejunum, cut down upon the spindle end 5–7 cm from the jejunal end, on the antimesenteric border, and advance the spike through the jejunum. Replace the anvil. Introduce a purse-string suture of monofilament plastic suture around the cut oesophageal end. Introduce the anvil into the oesophagus and tighten the purse-string suture, cutting off the spare thread. Close the anvil onto the cartridge with the intact purse-stringed oesophagus and jejunal wall separating them and with no extraneous tissue caught. Release the safety catch and actuate the stapler. Separate the anvil from the cartridge and gently withdraw the instrument.
7. Confirm that there are two intact toroidal fragments (‘doughnuts’) of oesophagus and jejunum on the spindle. Check the suture line. If necessary, reinforce it partially or completely with sutures.
8. Now close the cut jejunal end using a short straight stapler. If the oesophagus is very thick, dissect back the muscular coat as a cuff which is not included in the stapler. After ‘firing’ and withdrawing the stapler, unite the oesophageal muscle to the jejunum with a continuous ring of sutures. The technique is simplified using the stapling device in which the anvil, together with the spindle, can be separated from the cartridge.
9. Manoeuvre the nasogastric tube through the anastomosis and if possible down to or beyond the duodenojejunal anastomosis if it is intended to use it for feeding.
Technical points
1. Radical and potentially curative resection may be accomplished if the tumour has invaded the diaphragm provided it is possible to excise part of this en bloc with the tumour. If the body or tail of the pancreas is invaded posteriorly, this part of the gland will have been removed as a routine together with the spleen. The transverse colon can be resected en bloc with the stomach. If the tumour spreads distally into the duodenum or into the head of the pancreas then pancreatoduodenectomy would be necessary and this is very rarely feasible.
2. It is important to stretch the anastomosis slightly when uniting it with sutures, since the oesophagus contracts down to a narrow tube and sutures placed close together become widely separated when a bolus of food stretches it, allowing leakage to occur.
3. If the oesophagus retracts under the aortic arch gently free it until it can be brought onto the outside of the arch and complete the anastomosis there. With care this can be accomplished perfectly but occasionally it is worth creating a second, higher thoracotomy. If anastomosis cannot be safely performed, do not persist. Dissect up the oesophagus to the neck and complete it safely there, using a suitable conduit such as a segment of colon.
4. A jejunostomy may be created (see Chapter 11) to allow early feeding if the patient was severely undernourished or if slow recovery is possible. Alternatively, the nasal tube may be passed into the upper jejunum for feeding purposes. In patients who find the tube intolerable, the upper end can be brought out in the neck as a pharyngostomy.
Checklist
1. Check that you have completed the D2 glandular clearance (see Table 10.1).
2. In the chest, make sure the anastomosis is perfectly executed, that it lies without tension and is not twisted. Ensure that the lung is undamaged and that it can be re-expanded by the anaesthetist if he has deliberately collapsed it.
3. Check all the main ligatures. Re-examine the closed neck of pancreas and duodenal stump closure. Check that there is no continuing oozing from the raw surfaces.
4. Check the jejuno-jejunal anastomosis, ensure that the Roux loop passes upwards without twisting, and that its blood supply is not prejudiced. Re-examine the passage of the jejunum through the mesocolon and ensure that the blood supply to the colon is not damaged.
Closure
1. Insert a left basal chest drain and connect it to an underwater seal. Insert an abdominal drain to the distal cut pancreas.
2. Close the cut diaphragm using mattress sutures of non-absorbable material. Even if a cuff of crura has been removed it will close without tension. Do not tighten the new hiatus to constrict the jejunal loop. Do not suture the bowel to the diaphragm but allow it to lie freely.
Postoperative
1. Nurse the patient in a high dependency unit for the first 24 hours.
2. Institute physiotherapy for the chest. Remove the underwater drain after 48 hours if the output is less than 100 ml per day and the drain to the pancreas after 6–10 days. Order daily chest X-rays until the chest is clear. If fluid collects in the base of the left pleural cavity, aspirate it.
3. Give jejunostomy feeds preferably, or parenteral feeds. Some surgeons arrange a contrast swallow after 4–5 days to examine the anastomosis radiologically, but there is little evidence that this changes outcomes: it may be preferable to arrange such studies only if there is a clinical need. Start oral fluid intake at day 3 or 4 and at this stage remove the nasogastric tube if it is not draining much.
PALLIATIVE OPERATIONS FOR GASTRIC CARCINOMA
Appraise
 Palliative resection for carcinoma implies apparently complete removal of the primary tumour where there is metastatic growth outside the scope of a radical resection. If residual tumour remains at the gastric resection margin the anastomosis may not heal, so that the patient develops leakage and peritonitis, or soon develops stomal obstruction from recurrent tumour, or tumour is disseminated widely during the procedure. As cytotoxic chemotherapy improves, palliative resection may be of greater value since some agents are more effective if the tumour bulk is reduced.

PROXIMAL GASTRECTOMY OR MERENDINO PROCEDURE (PROXIMAL GASTRECTOMY AND JEJUNAL INTERPOSITION)
Appraise
 Fit patients with early (T1) cancer of the cardia or upper body of the stomach where a lymphadenectomy is not required are suitable candidates for this procedure.
 Ensure that staging is accurate (including endoscopic ultrasound).
 This is not a lesser procedure for patients thought to be unfit for a total gastrectomy.
Action
1. Access is through an upper midline or a roof top incision.
2. Examine the stomach and its related nodes. If there is a suspicion the tumour stage is greater than T1 or that there is nodal involvement then a D2 total gastrectomy should be performed.
3. After performing a thorough inspection to exclude metastases as with previously described resections, start by mobilizing the proximal stomach. Open a window in the gastrocolic ligament and use a device such an ultrasonic dissector to coagulate and divide the left gastroepiploic and short gastric arteries. You must preserve the right gastroepiploic artery as this will be the main supply to the stomach remnant.
4. Once at the diaphragm, divide the peritoneum over the crura and clear the abdominal part of the oesophagus.
5. Ask your assistant to lift the stomach anteriorly to stretch the left gastric vessels and double ligate then divide these as described previously.
6. Divide the lesser omentum at the edge of the liver from the level of the left gastric vessels to the diaphragm.
7. If performing a proximal gastrectomy (Fig. 10.30), proceed to the oesophago-jejunal anastomosis as described below. (Unite, point 3)
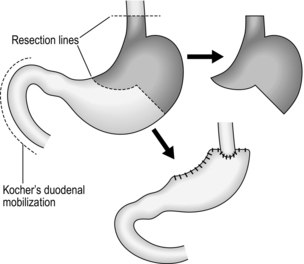
Fig. 10.30 Upper partial gastrectomy.
8. If performing a Merendino Procedure you will need a 15 cm length of jejunum to interpose between the oesophagus and the distal stomach. Divide the jejunum about 20 cm from the DJ flexure and then 15 cm beyond that using a linear stapler, preserving a cone of mesentery with the blood supply to this length. Create a window in the transverse mesocolon to allow the jejunum through.
Unite
1. Once you have satisfied yourself that the jejunal loop will sit comfortably between the oesophagus and distal stomach apply a stay suture through the wall of the oesophagus at least 2 cm from the gastro-oeosphageal junction and then divide the distal oesophagus. Allow at least 2 cm clearance from the tumour in both directions.
2. Using a linear stapler, divide the stomach and remove the specimen.
3. Perform either a handsewn or stapled oesophago-jejunal anastomosis. If stapled, use a circular device as described earlier for total gastrectomy.
4. The jejuno-gastric anastomosis is easily hand sewn using two layers of a continuous absorbable suture.
5. Use a linear stapler to perform the side-to-side jejuno-jejunal anastomosis and close the enterotomy with a continuous absorbable suture.
6. Finally, check the transverse mesocolon and mesenteric windows will not allow any internal herniation and close these if necessary.


PALLIATIVE PARTIAL GASTRECTOMY
Action
1. Perform the gastrectomy in the same manner as for benign disease. Make sure that the line of proximal section is at least 5–7 cm above detectable disease.
2. Close the duodenal stump; bring up a proximal loop of jejunum and create a full-width stoma to guard as far as possible against stomal obstruction if the carcinoma recurs. Alternatively use a Roux-en-Y reconstruction.
GASTROENTEROSTOMY
Appraise


Action
1. The procedure may be performed either laparoscopically or at open surgery.
2. Reach below the transverse mesocolon and draw up the proximal jejunum, selecting the first loop that will reach easily to the upper stomach.
3. If a laparoscopic approach is used, select a long laparoscopic linear stapler. Put a stay suture through the jejunal loop and ask an assistant to hold the suture. This will aid you, once you have made the enterotomy and gastrotomy, to place the ends of the stapler into each opening. Close the remaining defect either with another linear stapler or using an absorbable suture.
4. The same principle applies to the open approach. Create a high, wide stoma between the upper anterior gastric wall and the jejunum. Use twin gastroenterostomy clamps only if they facilitate the procedure.
CARDIAC OBSTRUCTION
Appraise
1. An inoperable proximal carcinoma that obstructs the cardia offers a challenge. If nothing is done the patient will starve to death.
2. An oesophagus narrowed by a tumour can be opened using laser, gently dilated and a stent placed either endoscopically or under radiological control.
3. Occasionally, it is valuable to insinuate a nasogastric tube through into the stomach for feeding purposes before trying the effect of radiation therapy. In some patients this may result in dramatic shrinkage of the tumour and relief of the obstruction.
4. Many surgeons deprecate the use of a feeding gastrostomy in patients with terminal disease.
GASTRIC LYMPHOMA
 Most lymphomas are generalized nodal disease, affecting the stomach secondarily. Primary gastric lymphoma is a non-Hodgkin’s B-cell lymphoma characterized by the absence of peripheral node enlargement, mediastinal gland enlargement on chest X-ray, or liver and spleen enlargement. In addition, there is no bone marrow evidence of leukaemia. Some tumours that appear to be neoplastic run a benign course and are labelled pseudolymphomas. They may represent reactive hyperplasia.

 Staging is by clinical, endoscopic, ultrasound and CT scanning.
 The best method of treatment is a combination of chemotherapy and radiotherapy.
BENIGN AND NON-EPITHELIAL TUMOURS


GASTROINTESTINAL STROMAL TUMOURS
 These are tumours of mesenchymal origin and are recognized by the presence of proteins expressed in gastrointestinal stromal tumours (GISTs) called DOG-1 (discovered on GIST-1) and CD117.
 Histopathological diagnosis often needs EUS directed biopsy as the tumour is submucosal.

 Tyrosine kinase inhibitors play a role in the management of large and metastatic GISTs.

ZOLLINGER-ELLISON SYNDROME
Appraise
1. The classic syndrome consists of severe and sometimes intractable peptic ulcer developing as a rule in expected sites but sometimes distally in the duodenum and proximal jejunum, associated with gastric acid hypersecretion of marked degree.
2. Exclude it in all patients developing recurrence following surgical treatment of duodenal ulcer. The ulcers may be multiple. There may be diarrhoea, usually attributed to irritability of the bowel from contact with its high acid content. The syndrome is caused by a gastrin-secreting tumour of the pancreatic islets which may be benign or malignant, or there may be hyperplasia without tumour formation (see Chapter 16). The serum gastrin is raised and appears to act as a trophic hormone acting on gastric parietal cells which undergo hyperplasia. The gastric fundic mucosa appears hypertrophied and extends almost to the pylorus, hypersecreting acid in response to the hypergastrinaemia at basal rates approaching maximal acid output. Zollinger-Ellison syndrome is part of a multiple endocrine neoplastic (MEN) syndrome in a quarter of cases, the parathyroid glands being particularly frequently involved. The features of hypergastrinaemia are reproduced in the absence of a pancreatic tumour when the antrum is congenitally duplicated and when it is sequestered in an alkaline medium.
3. Suspect the diagnosis when duodenal ulcer does not respond as expected to medical treatment; or is multiple; or ulcers occur in the stomach, distal duodenum and upper jejunum or in unexpected areas of the stomach such as the greater curvature. The suspicion is confirmed when very high basal levels of acid output are measured and maximal pentagastrin stimulation has little or no added effect. Serum gastrin is raised. In case of doubt, carry out calcium stimulation test (5 mg/kg/hour infused for 3 hours) or a secretin challenge (4 units/kg intravenously). These cause a sharp release of gastrin from tumours. Search for other endocrine abnormalities, particularly of the parathyroid glands.
4. Total gastrectomy was previously advocated but should now be reserved only for those who fail to respond to adequate treatment with H2-receptor-blocking drugs, omeprazole or somatostatin analogues.
5. After employing scanning techniques to exclude metastases, and angiography to try to localize the tumour, plan to explore the abdomen and carefully examine the pancreas, duodenum, stomach, liver and remainder of the abdomen, searching for single or multiple tumours and metastasis. Debulking of metastases is worthwhile. If a solitary tumour is found in the head of the pancreas in the absence of metastases, enucleate it. If a tumour is found in the body or tail of the pancreas, excise the body and tail. If no tumour is found in the pancreas, duodenum or elsewhere, excise the body and tail of the pancreas for histological exclusion of hyperplasia.
Akiyama, H. Thoracoabdominal approach for carcinoma of the cardia of the stomach. Am J Surg. 1979; 137:345–349.
Allum, W.H., Griffin, S.M., Watson, A., et althe Association of Upper Gastrointestinal Surgeons of Great Britain and Ireland, the British Society of Gastroenterology, and the British Association of Surgical Oncology. Guidelines for the management of oesophageal and gastric cancer. Gut. 2002; 50(Suppl V):v1–v23.
Barkun, A. Helicobacter pylori eradication prevents ulcer recurrence after simple closure of duodenal ulcer perforation. Evidence-Based Gastroenterology. 2001; 2:6–8.
Bell, G.D., McCloy, R.F., Charlton, J.E., et al. Recommendations for standards of sedation and patient monitoring during gastrointestinal endoscopy. Gut. 1991; 32:823–827.
Higham, J., Kang, J.-Y., Majeed, A. Recent trends in admissions and mortality due to peptic ulcer in England: increasing frequency of haemorrhage among older subjects. Gut. 2002; 50:460–464.
Imamura, H., Kurokawa, Y., Kawada, J., et al. Influence of bursectomy on operative morbidity and mortality after radical gastrectomy for gastric cancer: results of a randomized controlled trial. World J Surg. 2011; 35(3):625–630.
Kodera, Y., Fujiwara, M., Ohashi, N., et al. Laparoscopic surgery for gastric cancer: a collective review with meta-analysis of randomized trials. J Am Coll Surg. 2010; 211(5):677–686.
McCulloch, P. The role of surgery in patients with advanced gastric cancer. Best Pract Res Clin Gastroenterology. 2006; 20(4):767–787.
Rabine, J.C., Barnett, J.L. Management of the patient with gastroparesis. J Clin Gastroenterol. 2001; 32:11–18.
Sasako, M. Principles of treatment of curable gastric cancer. J Clin Oncol. 2003; 21(Suppl. 23):2745–2755.
So, J.B.Y., Yam, A., Cheah, W.K., et al. Risk factors related to operative mortality and morbidity in patients undergoing emergency gastrectomy. Br J Surg. 2000; 87:1702–1707.
Thorban, S., Bottcher, K., Etter, M., et al. Prognostic factors in stump carcinoma. Ann Surg. 2000; 231:188–194.
[/level-membership-for-surgery-category][not-level-membership-for-surgery-category]10
Stomach and duodenum
Examination of the stomach and duodenum
Suturing and stapling the stomach and duodenum
Gastrotomy and gastroduodenotomy
Percutaneous endoscopic gastrostomy
Elective surgery for peptic ulcer
Billroth I partial gastrectomy
Revision surgery following peptic ulcer surgery
D2 radical abdominal subtotal gastrectomy
Radical thoracoabdominal total gastrectomy
Palliative operations for gastric carcinoma
Proximal gastrectomy or Merendino Procedure (proximal gastrectomy and jejunal interposition)
Palliative partial gastrectomy
Benign and non-epithelial tumours
ENDOSCOPY
Appraise
1. Consider endoscopy when there is a likelihood that tissue biopsy is required. Radiology contrast studies complement endoscopy.
2. Endoscopy is mandatory in the investigation of gastrointestinal bleeding. It is also extremely useful in delineating anatomy, particularly in cases where there has been previous surgery.
3. Endoscopy is also a useful adjunct intra-operatively. It allows for intra-luminal examination if required when the diagnosis remains unclear.
4. The therapeutic capabilities of an endoscope should not be underestimated. Benign strictures can be dilated (bougie or balloon); malignant strictures cored out using Nd-YAG laser; polyps snared and removed; stones removed from the biliary tree; and stents inserted into the oesophagus, pylorus and biliary tree.
5. Percutaneous endoscopic gastrostomies are commonly performed for patients who are unable to swallow adequate volumes of nutrition. In addition, percutaneous endoscopic jejunostomies and nasojejunal feeding tubes are placed with the aid of endoscopy.
Prepare
1. Familiarize yourself with the endoscopes available in your hospitals. Ensure you are able to set up the scope and the stack independently in case you need to do so out of hours without experienced assistance (Fig. 10.1). Make sure that the instrument, light source, suction apparatus, biopsy forceps and air insufflation pump all work satisfactorily and that the instrument has been sterilized according to the manufacturer’s recommendations. Sterilization of instruments during an endoscopy list demands careful organization to guard against transmission of micro-organisms such as Salmonella spp, Pseudomonas aeruginosa and Mycobacterium as well as hepatitis B virus (HBV) and human immunodeficiency virus (HIV). Thorough cleaning is followed by immersion in 2% alkaline activated glutaraldehyde or 10% succine dialdehyde for a minimum of 4 minutes. Since these substances are toxic, irritant and may cause allergic reactions, the endoscopes must be washed thoroughly afterwards.
Fig. 10.1 Flexible fibreoptic endoscopy.
2. End-viewing endoscopes are most commonly used and are very versatile but side-viewing scopes are used to cannulate the ampulla of Vater.
3. Obtain written, informed consent from the patient, highlighting the indications for the procedure and the potential complications.
4. The patient takes no food or fluids for 6 hours. In an emergency, attempt endoscopy even if the patient has had a recent meal, but there is a higher risk of aspiration. It is prudent to have an anaesthetist in attendance.
5. Don protective gloves and spectacles before starting the procedure.
6. Try to minimize the use and the dose of sedative (midazolam). For simple diagnostic endoscopy, it is often sufficient to use a local anaesthetic throat spray. Monitor all patients using a pulse oximeter and administer oxygen if necessary. Elderly or infirm patients given analgesics and sedatives are at risk of hypoxia, especially during prolonged procedures.
7. Ensure that the patient has no dentures. Insert a plastic mouthpiece between the patient’s teeth or gums through which the instrument will slide easily. Smear the endoscope shaft with water-soluble lubricant. Secretion and mucus are less likely to adhere to the lens if it is smeared with silicone liquid and lightly polished to leave a thin film.
8. The patient may be laid on the left side, with no pillow but with the head steadied by an assistant who maintains neck flexion, discouraging the patient from extending his neck which tends to make the instrument pass into the larynx. The patient’s pronated left hand lies on the right chest, the right hand grasps the edge of the bed. Both knees and hips are flexed. Alternatively, the patient may lie supine but with the head of the bed raised.
Access
1. Slightly flex the tip of the instrument. Pass it through the mouthpiece, over the tongue, keeping the flexed tip strictly in the midline pointing towards the cricopharyngeal sphincter. As the tip reaches the sphincter there is a hold-up. Ask the patient to swallow. The tip will be slightly extruded, and do not resist this, but suddenly the obstruction disappears as the sphincter relaxes and the instrument can be smoothly passed into the stomach after unflexing the tip.
2. Watch the screen and concentrate on safely passing the instrument through the oesophagus and stomach and into the duodenum, noting incidentally if there is any abnormality. Insufflate the minimum of air to open up the passage. Hold and adjust the tip controls with the left thumb and index finger. Hold the shaft of the endoscope with the right hand close to the patient’s mouth, advancing, withdrawing and rotating it as necessary. When the gastric angulus is passed, flex the tip to identify the pylorus. Advance the tip, keeping the pylorus in the centre of the field until the tip slips through.
3. The side-viewing endoscope has a rounded tip which makes it easier to negotiate the pharynx. If there is any doubt about the free passage, always examine the patient first with an end-viewing endoscope. Become familiar with the tip control and angle of view before passing it. When it has passed into the stomach, rotate it to bring into view the relatively smooth, straight lesser curve which ends at the arch of the angulus, below which can be seen the pylorus in the distance. Angle the instrument up towards the roof of the antrum while advancing the instrument. The view of the pylorus is lost momentarily as the tip slips through into the duodenum. Paradoxically, if the shaft is slightly withdrawn, the instrument is straightened and the tip advances further into the duodenum. Rotate the shaft to bring the medial duodenal wall into view and, as the instrument enters the second part of the duodenum, the ampulla of Vater is usually seen as a nipple, often with a hooded mucosal fold above it.
Assess
1. Withdraw the end-viewing instrument in a spiral fashion to bring into view the whole circumference of the duodenum and stomach. Withdraw the side-viewing endoscope whilst rotating it 180° either side to view the whole circumference. Do not overinflate the stomach and duodenum with air. In the duodenum and distal stomach, keep the endoscope still and watch the peristaltic waves form and pass distally, to estimate the suppleness of the walls and exclude rigidity from infiltration or disease. With the tip of the end-viewing instrument lying in the body of the stomach, flex it fully while gently advancing the shaft to bring the fundus and cardia into view (the ‘J’ manoeuvre). Flex the side-viewing instrument to produce the same view. From just above the cardia the end-viewing instrument displays the pinchcock action of the diaphragmatic crura at each inspiration. If gastric mucosa is seen above this, there is a sliding hiatal hernia. The gastric mucosa is pink and shiny; at the crenated transition to the thinner and more opaque oesophageal squamous mucosa, the colour becomes paler and sometimes slightly bluish. Islands of pink gastric mucosa may be seen above the line of transition.
2. If the view disappears, withdraw the instrument and insufflate a little air. If the lens is obscured, clean it with the water jet or wipe it against the mucosa to free it of adherent mucus.
3. Look out for inflammation in duodenitis, gastritis and oesophagitis. As a rule, the mucosa appears florid and reddened, but endoscopy is uncertain and biopsy specimens should be taken when in doubt. In atrophic gastritis the distal mucosa is thinned and translucent so that submucosal vessels are visible through it. In gastric atrophy, associated with pernicious anaemia, the fundic mucosa is particularly affected, being flat and featureless. Menetrier’s hypertrophic gastritis results in strikingly florid mucosal folds, as may the fundic mucosa in the Zollinger-Ellison syndrome.
4. Peptic ulcers usually display a basal slough, but adherent mucosa may simulate a crater. Healed ulcers typically appear flat and white, with radiating mucosal folds. Diverticula, seen usually high on the gastric lesser curve, have healthy mucosa entering the mouth of the diverticulum. Mallory-Weiss tears show a ragged, often bleeding edge in the mucosa at the cardia.
5. Tumours are typically elevated and malignant ulcers have raised, everted edges. Gastric polyps may be single or multiple, and can be mucosal or submucosal, such as leiomyomas and leiomyosarcomas, which frequently have healthy mucosa overlying them. Lymphomas – sometimes with mucosal hypertrophy, sharply differentiated from normal mucosa – may reveal no histological abnormality on biopsy, since they tend to spread in the submucosa. They may produce multiple shallow ulcers, or ulcers with raised edges. By the time tumours become obvious they are usually well advanced and the best time to recognize them is in the early pre-invasive stage. Any slight irregularity of the mucosa is suspicious, whether it is a localized depression, plateau, cobblestone irregularity or ulcer, especially if this is an unusual site for a peptic ulcer. In cases of reflux, peptic ulcer disease or dyspepsia remove a sample to be tested for Helicobacter Pylori (Clotest).
6. Oesophageal varices, seen in portal venous hypertension, appear as tortuous, sometimes bluish, projections into the lumen of the lower oesophagus and may continue into the gastric fundus or are occasionally visible only in the upper stomach. Do not assume in patients who have gastrointestinal bleeding that visible varices are necessarily the site of bleeding.
7. Pyloric stenosis may prevent the passage of the instrument into the duodenum and it is sometimes impossible to assess whether the obstruction is from benign duodenal ulceration, a mucosal diaphragm in the distal stomach or neoplastic infiltration.
8. Previous gastric surgery distorts the anatomy and preliminary radiological examination is helpful. A stoma or pyloroplasty allows bile to reflux into the stomach. The mucosa around a stoma is often florid. Stomal ulcers usually develop just distal to the anastomosis and the instrument can be passed through it to view them. Recurrent gastric and duodenal ulcers are usually easy to see but remember that carcinoma occurs more frequently following previous gastric surgery for peptic ulceration.
9. Bleeding from the upper gastrointestinal tract can often be localized at endoscopy. If possible use an instrument with a wide-bore channel through which efficient suction can be applied. If necessary, rotate the patient to bring the site of bleeding uppermost, so that it is not hidden at the bottom of a pool of blood and other gastroduodenal contents. If the source of bleeding cannot be found, remember that the examination can be repeated. If an operation is to be performed, repeat endoscopy can be carried out just prior to surgery.
10. Always ensure that endoscopy can be repeated during an operation for upper gastrointestinal bleeding. It is sometimes invaluable in locating the bleeding site while avoiding extensive gastrotomy or gastroduodenotomy.
Action
1. Remove biopsy specimens under vision from any suspicious sites, including tumours, the edges of ulcers, irregularities of the mucosa and suspected inflammation. Take specimens from different places, preferably from each quadrant of the edge of an ulcer and not from the sloughy base. If lymphoma is a possibility, take multiple deep biopsies, since the disease often spreads in the submucosa. Place the specimens in carefully labelled separate pots containing formal saline fixative for histological examination.
2. Polypoid lesions can be caught in a snare for removal and histological examination. If the polyp has a broad base ensure that this is completely caught and, if bleeding is likely, coagulate the base with the diathermy before it is removed.
3. Foreign bodies can be grasped with forceps, snared or caught in a modified Dormia basket for withdrawal. An external tube may be slid over and pushed beyond the endoscope tip, enclosing a sharp foreign body as it is withdrawn to protect the mucosa from damage.
4. Bleeding oesophageal varices can be injected under direct vision using sclerosant solution injected through a long needle passed down the biopsy channel (see Chapter 17). Bleeding ulcers may be coagulated by spraying on thrombogenic substances or using the diathermy point. Argon gas laser or a solid state Nd-YAG laser may be used to coagulate the bleeding vessel by energy release at the point of contact. Since laser light is absorbed by blood clot this must first be gently washed away with a fine water jet. The depth of laser penetration is crucial: too superficial and the effect is lost, too deep and the resulting necrosis penetrates the wall. For this reason, laser coagulation must be performed by a skilled, experienced operator.
5. Endoscopic retrograde cholangiopancreatography (ERCP). A cannula can be passed through a special side-viewing endoscope for insertion in the bile and pancreatic ducts to obtain radiographic pictures following the injection of radio-opaque medium. The ampulla and lower bile duct can be slit with a diathermy wire, and stones can be removed with a modified Dormia basket. A stricture can be dilated from below followed by the insertion of a prosthetic indwelling plastic tube to maintain a passage. These techniques require special training and equipment.
6. Oesophageal dilatation can be carried out with bougies, balloons or by Nd-YAG laser destruction of tissue. The lumen may be held open by inserting a stent (see Chapter 8).
7. Endoscopic ultrasound is a novel diagnostic tool which is most helpful in oesophageal tumour staging but also useful in some gastric pathologies. It also allows for advanced therapeutic manoeuvres such as endoscopic resections of mucosal lesions.
Postoperative
1. Lay a heavily sedated patient in the recovery position (on the left side, slightly face-down), under the care of a trained nurse who will watch him until he recovers fully. If he has any respiratory obstruction this must be overcome; chest physiotherapy will help him to cough up his retained secretions. Do not allow any fluids or foods to be given until the patient is fully recovered and until the effect of pharyngeal anaesthesia has worn off.
PERIOPERATIVE CARE
Preoperative
1. Patients are assessed before an operation and routine check of blood count, blood urea, serum electrolytes and chest X-ray for those who have pre-existing disease, those who smoke or those over 40 years of age is performed. If there is suspicion of cardiac disease, arrange an electrocardiogram (ECG).
2. Explain the intended operation to the patient and obtain informed, signed consent. Detail the risks as well as the benefits.
3. Institute prophylaxis against deep venous thrombosis according to agreed protocol dependent on procedure risk classification.
4. The patient receives no food for 6 hours and water for only 2 hours before operation. If there is evidence of gastric retention, then the stomach should be emptied the day before operation by passing a nasogastric tube for aspiration. Such patients should have an intravenous infusion set up to ensure that they are not dehydrated or electrolytically depleted.
5. Ask the anaesthetist to pass a nasogastric tube as soon as anaesthesia is induced.
6. For straightforward elective operations, some surgeons would not give prophylactic antibiotics, but for emergency surgery such as perforated or bleeding ulcer or surgery for carcinoma or pyloric stenosis give a bactericidal antibiotic, such as a first- or second-generation cephalosporin, before the operation starts and continue it if there is contamination.
Action
1. Although the contents of the healthy stomach are virtually sterile, this is not so in the presence of disease and especially if there is any gastric stasis, as in pyloric stenosis, carcinoma of the stomach and re-operative gastric surgery.
2. Adopt a routine of performing as much dissection as possible before opening the stomach, then isolate the area using added towels of distinctive colour. Keep within the isolated area during the part of the operation that requires the gut to be opened and use a limited number of instruments that are kept separate. Sometimes, in spite of careful preoperative preparation and aspiration of the indwelling nasogastric tube, the stomach is distended with content. In this case, after isolating the area, make an incision into it that will just allow the sucker tube to be inserted and empty it before proceeding; otherwise, the area is likely to be flooded with foul, retained gastric content. Following this, apply non-crushing clamps to occlude the lumen to prevent further efflux. When the stomach or bowel is closed, discard the special towels and the instruments and change into fresh, sterile gloves to continue the operation.
3. The stomach is well supplied with blood and tolerates extensive mobilization without risk to its blood supply. However, this rich blood supply can lead to bleeding from the suture line so consider a haemostatic over-and-over stitch as opposed to a Connell type of stitch, unless the blood vessels are first picked up individually and tied or coagulated.
4. The duodenum is fragile and does not tolerate tension or vigorous mobilization. However, the Kocher manoeuvre often renders it mobile and prevents tension (see Fig. 10.3). Rather than anastomose it under tension, be prepared to close it and perform gastroenterostomy if this is possible.
Aftercare
1. Have the patient’s condition monitored carefully until he recovers from the anaesthetic. In particular, note his colour, respiration, pulse rate and blood pressure. The blood pressure is taken every 15 minutes for the first 3 hours and then half-hourly until it is stable. Have the wound checked regularly to ensure that there is no bleeding.
2. See that the urinary output is checked hourly. Following major operations, an indwelling catheter is necessary so that urinary output can be monitored and when an epidural analgesic has been used. It can be removed as soon as the patient has recovered and is active.
3. Order nasogastric tube drainage to be recorded every hour. It may be gently aspirated every 4 hours if there is a high output. If gastric aspirate is recorded as nil, suspect that the tube is either in the wrong place or blocked. Remove the tube when the amount aspirated is less than the oral intake and the aspirate is clear, provided the patient is comfortable, with a soft abdomen. Try to remove the nasogastric tube early in patients with respiratory problems, if necessary restricting oral fluid intake. It is very difficult to cough with a tube irritating the pharynx.
4. Order intravenous fluids, remembering that sodium retention is frequent following operations and that, provided the patient started in fluid and electrolyte balance, only lost electrolytes need be replaced. Provided also that renal function is good, then, if sufficient fluid is given, small imbalances will be compensated. Since enteral feeding is safer and cheaper than parenteral feeding, consider placing a feeding jejunostomy tube or inserting a fine nasoenteric feeding tube at the time of operation in such patients.
5. On the morning after operation, allow 30 ml of water each hour, increasing incrementally to liberal fluid intake on the third day, after which normal intake can be resumed and intravenous fluid replacement stopped. Following many operations, especially when the stomach and duodenum have not been opened, this regime may be speeded up so that the morning after operation the nasogastric tube can be removed and oral fluid intake allowed in increasing amounts, depending on the patient’s tolerance and general condition. Withhold oral fluids following gastric operations with oesophageal anastomosis but allow the patient to have sips as this is no different to swallowing one’s saliva. It is not possible to prevent a little fluid and saliva from being swallowed, but as a rule wait for 4–5 days after operation. It is reasonable to check the intactness and adequacy of the anastomosis radiologically using a water-soluble contrast medium such as Gastrografin before commencing oral fluids and proceeding gradually to full diet. Others do not rely on this test and will start oral intake as long as there are no clinical markers of a leak, such as fever or rising inflammatory markers.
6. Encourage the patient to sit out of bed the morning following operation and have him walking a little during the next day or two, depending upon his general condition. The help of a cheerful physiotherapist in encouraging the patient to cough up retained sputum and move freely is of enormous value in preventing stasis. The use of epidural anaesthesia greatly facilitates such early mobilization.
ACCESS IN THE UPPER ABDOMEN
GASTRIC CARDIA
1. Tilt the whole patient in a reverse Trendelenberg position (head up).
2. Use an upper midline incision, opening the peritoneum to one or other side of the falciform ligament. Start the incision at or alongside the xiphoid process and carry it vertically down for 20 cm, skirting the umbilicus.
3. Transverse (rooftop) and oblique incisions are also used but may be restricting in patients with a narrow costal margin. They may also be combined with vertical incisions to form a flap. A rooftop (or inverted ‘V’) incision offers good access since the apex of the ‘V’ can be folded down and sutured to the lower abdominal wall.
4. Carefully place retractors and ensure that the operating theatre light is correctly focused and aimed. To gain access under the diaphragm, use a retractor that elevates the lower sternum and costal margin, attached to a frame fixed to the operating table.
5. Mobilize the left lobe of the liver if this interferes with the view. Insert the fully pronated left hand with the index and middle fingers passing on each side of the left triangular ligament to draw down the lobe. Cut the ligament from its free edge towards the right with long-handled scissors, avoiding damage to the subphrenic vessels and left hepatic veins. Fold the lobe to the right, cover it with a gauze pack and have it held out of the way with a large curved retractor. Remember to replace it carefully at the end of the operation.
6. Carry the whole depth of the incision right up to the xiphisternum or into the angle between it and the costal margin. Do not hesitate to excise the xiphisternum using bone-cutting forceps, after dissecting off the two diaphragmatic muscle slips from its under-surface (Fig. 10.2).
Fig. 10.2 Access in the upper abdomen.
7. If access is still inadequate, particularly for oesophageal anastomosis, consider performing thoracotomy.
8. If using a rooftop incision, make the incision at least an inch below the costal margin to facilitate closure at the end. Make the incision long enough so that you can fold the apex of the V downwards and suture it in the midline below the umbilicus if that helps with exposure.
KOCHER’S DUODENAL MOBILIZATION
Appraise
1. This manoeuvre (Fig. 10.3) raises the head of the pancreas contained within the duodenal loop into its embryological midline position, restrained by the structures in the free edge of the lesser omentum above, the superior mesenteric vessels below, and the body and tail of the pancreas to the left.
2. The head and neck of the pancreas can be examined from behind and palpated between fingers and thumb. The lower end of the common bile duct can be palpated and sometimes seen, although it is usually buried within the pancreatic head. The duodenum and especially the ampullary region can be palpated. Duodenotomy allows inspection of the interior of the duodenum. If the incision is placed at the level of the ampulla this can be seen and palpated for tumours or stones. Biopsy, excision of ampullary neoplasms, sphincterotomy, sphincteroplasty, and cannulation or instrumentation of the bile and pancreatic ducts can be carried out under vision.
3. Mobilization is essential for excision of the pancreatic head and duodenal loop in Whipple’s pancreatoduodenectomy.
4. Elevation of the duodenal loop and pancreatic head reveals the inferior vena cava when performing portocaval anastomosis or major hepatic resections.
5. The manoeuvre is particularly valuable in gastroduodenal operations. Pyloroplasty can be performed easily and the extremities of the gastroduodenal incision can be brought together without tension. In gastrectomy, the proximal duodenum is easily dissected and can be closed or united to the stomach with ease. Full mobilization may be a useful step when the stomach is drawn up for gastro-oesophageal or gastropharyngeal anastomosis. However, it is usually the porta hepatis and its connection to the first part of the duodenum that limits further mobilization.
Action
1. If incomplete mobilization is sufficient, as for palpating the lower end of the bile duct or the pancreatic head or for the purpose of carrying out pyloroplasty and gastrectomy by the Polya method, then it may be sufficient to elevate only the superior part of the duodenal loop and pancreatic head. Insinuate a finger into the aditus to the lesser sac and then divide the floor of the foramen downwards, to separate the upper duodenum and pancreas from the inferior vena cava. Extend the mobilization by continuing the division with scissors or diathermy blade, downwards, just outside the convexity of the duodenal loop.
2. For full mobilization, have your assistants draw the hepatic flexure of the colon downwards, the right edge of the wound outwards and the duodenal loop to the left.
3. Incise the peritoneum and underlying fascia of Toldt for 5 cm, placing the incision 1 cm from and parallel to the convex border of the second part of the duodenum.
4. Insinuate your fingers beneath the descending duodenum and pancreatic head. A natural plane of cleavage opens up between the embryological layers which were present when the duodenum was freely suspended in the peritoneal cavity.
5. Having defined the plane, cut the peritoneum and fascia upwards, just outside the duodenal convexity, into the mouth of the aditus to the lesser sac, meanwhile lifting the proximal duodenum forward with a finger, so protecting the inferior vena cava from damage. The dissection is easy and can be carried out by splitting with the finger except in the presence of severe scarring, as from severe duodenal ulceration.
6. Continue the peritoneal and fascial split below, taking care to avoid damaging the right colic vessels, which must be pushed downwards with the hepatic flexure of the colon and mesocolon, to release the junction of the second and third parts of the duodenum.
7. Continue the separation of the pancreas and duodenum across the aorta where it is tethered below by the superior mesenteric artery and its pancreatic branches. The structures in the free edge of the lesser omentum restrain it superiorly.
8. When the appropriate procedure is completed, carefully check the pancreatic head, duodenal loop and the bed from which the structures have been mobilized, before laying them back in place.
EXAMINATION OF THE STOMACH AND DUODENUM
1. Did you make a firm diagnosis before operation? Mucosal lesions within hollow organs are best assessed from within the lumen by radiology and endoscopy, not by examination of the exterior at operation.
2. Look at the exposed stomach. Is it distended as may be seen in pyloric obstruction? Is the musculature hypertrophied as seen in longstanding partial obstruction? The serous surface may be inflamed and oedematous, or scarred and puckered with petechiae overlying an ulcer. It may be covered with miliary tubercles in tuberculous peritonitis, or metastatic deposits of tumour. The thickened rigid appearance of ‘leather-bottle’ stomach may be accompanied by serosal extension, giving an appearance resembling crystallized sugar adherent to the serosa.
3. Feel for the lower oesophagus and diaphragmatic crura. Sometimes there is an obvious invagination of the gastric cardia through the diaphragmatic hiatus. If the normal anatomy can be restored by applying traction to the lesser curve of the stomach, this is a sliding hiatal hernia. If the cardia cannot be drawn down, there is a fixed hiatal hernia which may be primary or may be secondary to disease in the posterior mediastinum. There may be a gap between the crura into which the fingers can be inserted but the stomach remains fixed within the abdomen. Gently grasp the gastric cardia between finger and thumb and see if it can be slid through the hiatus into the chest. Record an asymptomatic hiatal hernia discovered incidentally when carrying out another procedure but do not repair it. Palpate the fundus of the stomach. If it disappears through the hiatus into the posterior mediastinum, this is a rolling hernia which may cause obstructive symptoms. If the patient has complained of this then consider repairing it, depending upon the severity of the symptoms, the extent of herniation, the fitness of the patient and the severity of the proposed operation.
4. Examine the body and lesser curve of the stomach for evidence of ulcers and ulcer scars. Ulcers and healed scars are often palpable and visible, and former ulcers can sometimes be detected by pinching the stomach along the lesser curve. Normal mucosa can be felt to slip away from your fingers but it may be tethered at the site of a healed ulcer. The stomach can be palpated most readily by making holes through avascular parts of the lesser and gastrocolic omenta so that fingers can be passed behind to feel the two layers of gastric wall against the thumb placed anteriorly (Fig. 10.4). The scar of an undetected posterior gastric ulcer may be adherent to the pancreas, but there are normally flimsy adhesions across the lesser sac between the stomach and pancreas. A pre- or intra-operative endoscopy may be very helpful in confirming mucosal pathology site or anatomical abnormalities. If this is not possible, carry out gastrotomy, preferably in the middle of the anterior wall of the stomach at the level of the suspected ulcer or other lesion and evaginate the lesion through the gastrotomy for visual assessment, biopsy or excision. Alternatively, it can be opened along the greater curvature in order to neither compromise any subsequent resection nor endanger the lesser curve’s integrity if you decide to perform ulcer excision. The gastrotomy may then be closed, either because no further action is necessary or prior to carrying out gastrectomy if a hitherto unsuspected chronic gastric ulcer is causing the patient’s symptoms. In poor-risk patients, gastric ulcer may be treated by ulcer excision. Vagotomy is now seldom used when most patients with benign ulcers can be treated successfully with antibiotics and proton-pump inhibitors.
5. Look and feel for neoplasms. These will in nearly all cases have been diagnosed and thoroughly staged by the TNM system before operation. Staging is by computed tomographic (CT) scanning, endoluminal ultrasound and, often, laparoscopy. Carcinoma is most frequently seen, although lymphoma, reticulum-cell sarcoma, leiomyoma, leiomyosarcoma and gastrointestinal stromal tumours (GIST) are not rare, and adenomatous polyps may be felt. Carcinoma may produce a tumour within the stomach or be felt as an ulcer with raised margins. Remember that early gastric cancers may be impalpable.
6. Examine the pyloroduodenal region. The pyloric ring can be picked up between the index finger and thumb of both hands, but the mucosal ring may be smaller than the muscular ring. To check this, invaginate the anterior antral wall through the pylorus on an index finger and invaginate the anterior duodenal wall back into the stomach in a similar manner. If there is obstruction, look again at the stomach. Is it dilated? Is the muscular wall hypertrophied? Look and feel for a duodenal ulcer, remembering that the majority of ulcers lie in the bulb, although they may be in the postbulbar region or further distally, especially in the Zollinger-Ellison syndrome. Sometimes an ulcer crater can be palpated, sometimes there is gross and incontrovertible scarring and narrowing, together with pseudo-diverticulum formation but there may be minimal scarring, a few petechial haemorrhages – which could be iatrogenic – or there may be nothing abnormal to see or feel. Of course the diagnosis should have been made endoscopically before operation, but occasionally endoscopy has failed because the tip of the instrument could not negotiate the narrow or distorted pyloroduodenal canal. If doubt remains, could a small endoscope be passed and the tip guided through manually to allow the interior to be viewed? Alternatively, create a small prepyloric gastrotomy and examine the interior with a finger, or by placing small retractors within the pyloroduodenal canal. A mucosal diaphragm that is soft and easily stretched can be dilated, or conventionally treated by pyloroplasty.
7. Diverticula of the stomach are most frequently found on the upper lesser curve, sometimes produced by traction from a leiomyoma. If no primary lesion is present, leave an asymptomatic diverticulum alone. Pseudodiverticula of the duodenum develop when chronic duodenal ulcer causes distortion. The most frequent duodenal diverticulum is not seen unless it is sought for, since it lies close to the ampulla, protruding into the pancreas, which must be mobilized by Kocher’s manoeuvre to approach from posteriorly. It rarely causes symptoms and should normally be left alone.
SUTURING AND STAPLING THE STOMACH AND DUODENUM
SUTURES
1. There is a wide choice of sutures. As with all sutures, they are severely weakened by crushing, abrasion and rough handling, especially when drawing them through the tissues and tying knots.
2. Innumerable papers have been written about the best ways of suturing stomach and intestine. Should we use interrupted or continuous, one layer or two, simple through-and-through or complex stitches, including or excluding the mucosa, inverted or edge-to-edge? It is obvious from listening to, and reading the papers of, the various advocates that all the methods are successful. There is but a single common factor and that is the care with which sutures are inserted and tied. If you bring together the edges of stomach or bowel that have a good blood supply, are not under tension and are apposed carefully with sutures that do not strangulate the included tissue, they will heal. Many of us continue to use the methods we learned whilst training, because they have demonstrably worked, even though we accept that they may no longer be in vogue. The one layer that must always be included in the stitches, as shown by Halsted, is the submucosa.
LIGATURES
As with sutures, ligatures are applied using the finest possible materials, although silk and linen are still popular because of their excellent handling properties. Metal clips are convenient to seal blood vessels but they easily catch in swabs and can be dragged off. One instrument applies two clips side by side and cuts between them, for dividing vascular tissue. Unless they offer advantages in saving time, prefer to tie ligatures, which is more versatile.
Absorbable synthetic clips have also become more commonly used.
STAPLES
The development of reliable instruments for joining bowel has potentially great value in gastroduodenal surgery. However, they are not as versatile as sutures. If you are a trainee, by all means learn to use stapling instruments but more importantly take every opportunity to master the accurate placement of sutures.
Gastrotomy and gastroduodenotomy
Appraise
1. Gastric, gastroduodenal and duodenal incision allows the interior of the bowel to be examined to confirm, biopsy or treat a suspected lesion such as an ulcer, tumour or source of bleeding.
2. Gastrotomy allows access from below to the lower oesophagus. Strictures are often dilated more safely from below than from above.
Access
1. As a rule, open the stomach on the anterior wall midway between the greater and lesser curves.
2. For the purpose of diagnosis, start with a small incision, 3–4 cm long, the proximal end of which is 5–6 cm from the pylorus. This incision ensures that the intact pylorus or mucosal diaphragm can be examined and it may be unnecessary to destroy the pyloric muscular ring. The incision can be extended proximally or, if it becomes necessary, distally through the pyloric ring onto the anterior wall of the duodenal bulb.
3. To view the interior, first aspirate all the contents. Retractors may be placed to hold open the stomach so that it can be examined by adjusting the theatre light to shine through the opening. The stomach can be manoeuvred manually to bring different parts of the interior into view. Frequently the gastric wall can be evaginated through the incision so that it can be examined and any lesion excised or biopsied. If the pylorus is not too narrow, small retractors may be placed in to allow the duodenal bulb to be viewed, and, if it is wide, an unscarred duodenal bulbar wall may be evaginated through it on a finger. If there is difficulty in viewing the duodenum to exclude or confirm disease, a per-oral endoscope may be introduced through it. Sometimes, when fibreoptic endoscopy is ineffective before operation, perhaps resulting from inability to evacuate the gastric contents, the stomach may be emptied and endoscopy can then be performed. The gastrotomy can be temporarily occluded with a clamp to allow the stomach to be inflated but as a rule the stomach can be held open to allow endoscopy to be accomplished without the need for inflation.
Closure
1. Close a gastrotomy in one or two layers, leaving a longitudinal suture line.
2. It is conventional practice to close a gastroduodenotomy as a Heineke-Mikulicz pyloroplasty. This may be accomplished using a single edge-to-edge row of sutures, a two-layer invaginating suture or with a row of staples. However, this destroys the pyloric metering function and it may be preferable to carefully close the incision to create a longitudinal scar, bringing the edges together without invagination in a single layer, taking care to appose the pyloric edges perfectly. Cover the suture line with a layer of omentum as an extra precaution.
3. Use ingenuity to incorporate the gastrotomy in plans for other procedures. A distal gastrotomy may be incorporated in a gastroenterostomy. The proximal part of a long gastroduodenotomy may be closed longitudinally and the distal part converted into a pyloroplasty if necessary. If gastrectomy is intended, temporarily close the gastrotomy with stitches or staples to keep soiling to a minimum.
PYLOROMYOTOMY
Appraise
1. Pyloromyotomy for infantile pyloric stenosis is described in Chapter 34.
2. Adult hypertrophic pyloric stenosis is rarely discovered as a cause of gastric retention. It is not known whether or not this represents undiagnosed infantile pyloric stenosis.
3. Pyloromyotomy is sometimes carried out following oesophagectomy with oesophagogastric anastomosis, in the hope of preventing gastric retention. Failure of the stomach to empty in the absence of pyloric stenosis results from gastric atony following the inevitable gastric vagotomy. Many surgeons employ a pyloroplasty to compensate for this postvagotomy gastric atony.
Action
1. Grasp the pylorus between finger and thumb of the left hand to steady it (Fig. 10.5).
Fig. 10.5 Pyloromyotomy.
2. Incise the seromuscularis along the middle of the anterior antral wall from 1 cm proximal to the thickened segment and carefully extend it distally across the pylorus onto the anterior duodenal wall for 1 cm. The duodenal wall at the fornix is very thin, so take care not to incise into the lumen.
3. Deepen the incision through the thickened muscle of the distal antrum until the mucosa bulges into the split. Make sure all the muscle fibres are divided. The final split may be accomplished by grasping the wall on each side of the split with dry gauze swabs and separating the edges, to allow mucosa to bulge freely along the whole of the incision.
4. Carry the split distally to the pylorus and carefully divide all the circular muscle fibres here, again taking care to expose but not damage the mucosa of the first part of the duodenal bulb. Lift the muscle fibres free of the mucosa with closed fine non-toothed dissecting forceps, allow the forceps blades to open and then cut the fibres between them.
Check
1. Make sure all the fibres have been cut.
2. Gather some gastric air into the segment with the pyloromyotomy, to distend the mucosa so that it bulges into the split. Watch carefully for any leaks. It is no disaster to find a leak and carefully close it with fine stitches: it may be disastrous to miss a leak.
OPERATIVE GASTROSTOMY
Appraise
1. Gastrostomy offers a valuable method of feeding patients who are unable to swallow because of oesophageal obstruction, bulbar palsy and other causes. Patients with mechanical obstruction who will have reconstructive surgery utilizing the stomach as a conduit should not normally have a temporary gastrostomy since this will interfere with subsequent reconstructive surgery. They are better served by a jejunostomy.
2. Gastrostomy offers a means of providing gastric aspiration without nasogastric intubation, valuable in patients who have respiratory difficulties and those who cannot tolerate the presence of the tube in their pharynx, during the postoperative recovery period from gastric operations.
3. As a rule gastrostomy is placed endoscopically (Percutaneous Endoscopic Gastrostomy – PEG) and is intended as a temporary measure. When all else fails, do not hesitate to offer it after discussion with the patient.
4. Operative gastrostomy is often unnecessary following the advent of percutaneous endoscopic gastrostomy. If necessary, a number of operative techniques have been described. Stamm’s gastrostomy (Fig. 10.6) is almost universally used now and is described below. The tube passes through the abdominal wall and enters the stomach through a small stab wound. The hole is prevented from leaking by invaginating it using a series of purse-string sutures so that it resembles a non-spill inkwell. Witzel’s gastrostomy is similar, but leakage is prevented by laying the emerging tube along the stomach wall and covering it by suturing over it ridges of gastric wall so that it lies in a tunnel. The Depage-Janeway gastrostomy employs a flap of stomach formed into a tube which is brought to the skin surface to create a permanent conduit.
Fig. 10.6 Stamm gastrostomy.
PERCUTANEOUS ENDOSCOPIC GASTROSTOMY
Appraise
1. The commonest application is for intragastric or enteral nutritional support in the presence of, for example, bulbar palsy. Another indication is to enable prolonged gastric aspiration to be performed, especially in those who cannot tolerate nasogastric intubation.
2. Do not attempt this method if the patient has an impassable oesophageal stricture, or previous upper abdominal surgery that produces adhesions preventing expansion of the stomach to contact the anterior abdominal wall, or a partial gastrectomy. Gross ascites or sepsis makes the procedure dangerous so a surgical gastrostomy or jejunostomy is preferred. Portal venous hypertension, coagulopathy/gastric ulcer or tumour at the elective site of gastrostomy is also a contraindication. Gross obesity may make the procedure difficult.
3. There is a choice of methods, and some excellent commercially produced kits are available with tubes 9F or 15F in size. A popular, simple pull-through technique is described below.
Action
1. Pass an end-viewing endoscope into the stomach. In the presence of an oesophageal stricture it may be necessary to dilate it using bougies or a balloon, and then introduce a paediatric endoscope. Pass the tip into the distal stomach.
2. Inspect the stomach and duodenum to exclude any condition that would contraindicate gastrostomy.
3. Gently inflate the stomach to distend it.
4. Have the abdomen exposed and the room lights dimmed.
5. Turn the endoscope tip towards the anterior abdominal wall. The light should be visible through the gastric and abdominal walls.
6. Have the abdominal operator indent the anterior abdominal wall with a finger placed where the endoscope light is seen most brightly. The indentation should be visible from within the stomach.
7. Pass a polypectomy snare through the biopsy channel of the endoscope (Fig. 10.7A).
8. If you are the abdominal operator, prepare the skin, infiltrate the chosen puncture spot with local anaesthesia into the skin and abdominal wall (and most often into the gastric lumen under direct vision), then make an incision in the skin sufficiently large to allow the passage of the gastrostomy tube.
9. Pass a needle carrying a smooth, closely fitting plastic cannula through the abdominal wall into the stomach. This catheter is usually in the PEG kit but a standard intravenous catheter may be employed.
10. If you are the endoscopist, manoeuvre the loop of the snare over the cannula (Fig. 10.7B). The needle is withdrawn by the abdominal operator and either a flexible wire or a strong thread is passed through the cannula into the stomach.
11. Withdraw the snare from the end of the cannula under vision, in order to grasp the thread or wire that protrudes from the end of the cannula into the stomach (Fig. 10.7C). While the abdominal operator holds the other end of the thread or wire, withdraw the endoscope, snare and trapped thread or wire out through the mouth.
12. Attach the emerging thread or wire to the tapered end of the gastrostomy tube (Fig. 10.7D). The bulbous or inflatable end of the gastrostomy tube will remain in the stomach, pulling it against the abdominal wall.
13. Apply lubricant to the gastrostomy tube.
14. Draw upon the thread or wire emerging from the abdominal cannula while guiding the tapered tip of the gastrostomy tube through the patient’s mouth and into the oesophagus and stomach. Eventually the tapered tip is drawn against the cannula tip, extruding it. As you continue to pull, the tapered end of the gastrostomy tube will emerge through the gastric and abdominal walls (Fig. 10.7E).
15. Re-pass the endoscope into the stomach and observe the enlarged end (‘bumper’) of the gastrostomy tube as it is drawn up against the gastric wall. In some tubes the end is shaped so that it expands automatically; in others, a balloon is expanded by distending it with air or fluid through a side channel. Make sure that the tension on the gastrostomy tube is not sufficient to cause gastric mucosal blanching.
17. Cut off the tapered end of the gastrostomy tube and ensure that the expanded end is inflated if it is of this type, and seal the side-tube inflation channel.
18. The tube must be fixed to hold the stomach against the abdominal wall. Most kits contain a fixation base that fits over and holds the gastrostomy tube, having an expanded flat surface that lies against the abdominal wall (Fig. 10.7F).
Aftercare
1. Feeding with suitable varied fluids can usually start within 24 hours.
2. Monitor the patient to ensure that there is no chest infection, since reflux and aspiration pneumonia is a well-recognized complication.
3. Check the gastrostomy site since infection is frequent.
4. Leakage around the gastrostomy catheter may develop spontaneously or in the presence of gastric outlet obstruction.
5. Some gastrostomy tubes can be removed by deflating the expanded end and drawing them through the abdominal wall. Others require endoscopic withdrawal.
PERFORATED PEPTIC ULCER
Appraise
1. Record the patient’s age, blood pressure and the presence or absence of serious associated disease such as cardiac, respiratory or renal failure. Fully resuscitate the patient before performing the operation.
2. Perforation of other viscera such as colon or gallbladder may be confused with gastroduodenal perforations. A laparoscopic approach may aid diagnosis and may be adequate for treatment. A CT scan is vital in making a clear diagnosis as long as the patient is stable enough to go through the scanner.
3. Not all patients who have a perforated peptic ulcer should have an operation. Patients seen within 8 hours, in whom a confident diagnosis is made, and who are haemodynamically stable, may be treated conservatively. Ensure that the tip of an 18F nasogastric tube is accurately placed in the most dependent part of the stomach. A disadvantage is that peritoneal toilet cannot be performed. Proceed to operation at once if the patient develops pyrexia, tachycardia, pain, distension or increasing intra-peritoneal gas on X-rays. A few patients develop intra-peritoneal abscesses if there has been significant leakage and soiling. Nasogastric suction, parenteral feeding, systemic antibiotics and chest physiotherapy are instituted, and operation is resorted to only if the patient fails to improve or deteriorates.
4. Perforated gastric ulcer carries a higher mortality than perforated duodenal ulcer, because the patients are, on average, older and generally less ‘fit’. Most gastric ulcer perforations are successfully managed by simple suture after excising a specimen from the edge for histology. Sometimes they are difficult to close and demand gastrectomy. If there is doubt about the nature of the ulcer, treat it as though it is benign, remove a biopsy specimen from the edge and, if malignancy is demonstrated histologically, carry out the appropriate operation later as an elective procedure. If the ulcer cannot be sutured but is of doubtful origin and frozen-section histology is equivocal or cannot be arranged, then carry out gastrectomy as for a benign ulcer and be prepared to re-operate to carry out an elective radical procedure later. The added risks of performing a radical operation are not justified without confirming the diagnosis.
5. Bleeding associated with perforation demands control of both complications. A bleeding perforated gastric ulcer is conventionally controlled by distal gastrectomy, including the ulcer. Bleeding is rarely a complication of anterior perforating duodenal ulcer but if there is a co-existent bleeding posterior duodenal ulcer, the anterior perforation can be incorporated into a gastroduodenotomy. Insert non-absorbable stitches into the base of the posterior ulcer to control the bleeding and then close the gastroduodenotomy as a pyloroplasty. If unable to close the duodenotomy due to friable tissue then perform a distal gastrectomy, close the duodenal stump over a Foley catheter balloon (exteriorized as a controlled fistula) and place a large surgical drain next to the stump. These patients need long-term proton-pump inhibitors.
6. Perforated gastric carcinoma may be amenable to the same operation as would be carried out electively. If not, consider suturing it or plugging the defect with omentum and re-operating electively later after the patient has been brought to the best possible condition. Sometimes inadequate resection is forced upon the surgeon. If so, consider whether this can be corrected later by a more adequate operation.
7. Laparoscopy may be used to confirm the diagnosis, followed by repair using sutures, staples or a plug.
Assess
1. Remove all instruments from the field with the exception of a retractor for your assistant and the sucker tube for yourself.
2. Aspirate any free fluid after collecting a specimen for laboratory examination. Gastric juice is usually bile-stained.
3. Examine the duodenal bulb and the stomach, especially along the lesser curve. If necessary, open the lesser sac of omentum through the lesser or gastrocolic omenta to view the posterior gastric wall.
4. Remember that multiple perforations can occur.
5. Always locally excise or remove a biopsy specimen from the edge of a gastric ulcer.
6. If you cannot find the perforation after a diligent search, explore the whole abdomen, if necessary extending the incision downwards. Examine in particular the gallbladder and sigmoid colon. If you are still puzzled, consider the possibility of Boerhaave’s syndrome (spontaneous rupture of distal spontaneous oesophagus).
7. If you are a surgeon in training and find yourself in difficulty either because of failure to discover the cause, or indecision about the best course of action, or because the required procedure is beyond your capabilities, do not hesitate to contact your chief for advice and assistance.
Simple closure
1. Place two or three parallel sutures of 3/0 synthetic absorbable material through all coats, passing in 1 cm proximal to the ulcer edge and emerging 1 cm distal to the ulcer (Fig. 10.8). Do not pick up the opposite wall as this will obstruct the lumen. When all the sutures are in place, mobilize a tongue of omentum, place it over the perforation and tie the sutures just tightly enough to hold it in place.
Fig. 10.8 Suture of a perforated peptic ulcer.
2. Insert further sutures to reinforce the obturating action of the omentum and ensure the defect is adequately sealed.
3. Even when closure seems secure, do not hesitate to suture omentum over it.
4. Aspirate any free fluid from above and below the liver, from within the lesser sac, the right paracolic gutter and from the pelvis.
ELECTIVE SURGERY FOR PEPTIC ULCER
Appraise
1. Medical treatment has become the mainstay with potent antacids, atropine-like drugs, liquorice extracts, mucosal-coating substances, histamine H2-receptor-blocking drugs and proton-pump inhibitors. The elimination of Helicobacter pylori, using so-called triple therapy of a proton-pump inhibitor combined with two antibiotics such as clarithromycin and metronidazole, reduces the relapse rate. Most patients can be controlled with these powerful and safe agents and the only people who may require operation are the minority who cannot be controlled medically, who cannot or will not take the required treatment, or who develop complications of the ulcer.
2. The operation in vogue in the 1960s and 1970s was proximal gastric vagotomy, known also as highly selective vagotomy. Some centres report high rates of recurrence after long-term follow-up but variations in recurrence rates probably reflect variations in completeness of parietal cell denervation and are thus dependent on the skill of the surgeon. An adjunctive operation to overcome gastric retention is unnecessary if there is no evidence of impending pyloroduodenal stenosis resulting from the chronic ulcer scarring. If there is, some surgeons dilate the canal through a prepyloric gastrotomy using Hegar-type dilators or a finger, or by invaginating the anterior duodenal and gastric antral walls through the stenosed canal on an index finger tip – a manoeuvre introduced by Jaboulay. If the stenosis is confined to the bulb, a longitudinal incision can be made through it without impinging on the pyloric ring, closing it as a transverse suture line after the manner of a pyloroplasty; hence it is termed a duodenoplasty. A few surgeons still prefer truncal vagotomy combined with pyloroplasty, gastroenterostomy or distal gastrectomy to improve gastric emptying.
3. Gastric ulcer was treated more aggressively by surgeons in the past than was duodenal ulcer. Many surgeons adopt a fixed policy of carrying out endoscopy and biopsy to confirm that the ulcer is benign, then give the patient a 6–8-week course of medical treatment followed by a further check endoscopy. If the ulcer is healed, operation is deferred. If the ulcer is not healed, or if it soon recurs, then surgical treatment is recommended. This more aggressive treatment stems partly from anxiety about the possibility of early malignancy or impending change and partly from the pragmatic knowledge that chronic gastric ulcers are less likely than chronic duodenal ulcers to become quiescent.
4. Postbulbar duodenal ulcers are quite frequently seen in certain countries, especially southern India, but are relatively uncommon in Western countries. They are often severe and stenosing so that operation may be recommended for fear of incipient obstruction. Proximal gastric vagotomy is effective if the lumen is still widely patent; if it is not then add gastroenterostomy, thus retaining the vagal supply to the gallbladder, pancreas and small intestine.
5. Zollinger-Ellison syndrome associated with hypergastrinaemia, usually from G-cell hyperplasia or gastrin-secreting tumour in the pancreas, generally produces peptic ulcers in usual sites. If an ulcer lies in an unusual site, or if there are multiple ulcers and especially if the ulcer is in the upper jejunum, suspect the Zollinger-Ellison syndrome (vide infra).
6. Oesophageal peptic ulceration occurs when gastric acid refluxes into the oesophagus where the squamous mucosa is unresistant to acid attack. This develops most frequently as a result of hiatal hernia but can occur in the absence of herniation of the stomach into the chest. A less frequent cause of peptic ulcer in the oesophagus is the condition of Barrett’s oesophagus. This appears to be acquired, although it used to be called ‘congenitally short oesophagus’. There is intestinal metaplasis in the distal oesophagus and the oesophagogastric mucosal junction moves progressively upwards; an ulcer sometimes develops just above the junction. There is a greatly increased risk of developing adenocarcinoma of the distal oesophagus (see Chapter 9).
