[level-membership-for-orthopaedics-category]11
Splinting and casting
Pearls of splinting and casting
 The stockinette should fit the extremity without being too loose or tight.
 Cast/undercast padding should be appropriate to the diameter and length of the extremity.

 An elastic bandage or wrap should be appropriate to the diameter and length of the extremity.


 When rolling the cast/undercast padding:
• Pull just enough tension on the wrap so that it is taut but not so much that the material tears away.
• The padding should be predominantly rolled from distal toward proximal.
• Commonly, roll just enough padding to eliminate any residual shadow-effect (i.e., the padding should be relatively opaque versus the layers below, typically three layers thick)
 When ready to apply the splint:
• Thoroughly wet the selected material with clean room-temperature water and squeeze out the excess water. A dry towel may be used to help absorb or damp dry the material as needed.
• The warmer the water, the quicker the set time of the material; however, the heat released by the material also increases and this can be sufficient to cause skin burns or irritation.
• If using plaster, keep in mind while measuring to fit the splint that plastic will shrink a bit when wet.
• For the typical adult, a plaster splint will need to be between 10 and 15 layers thick for adequate stability.

• Thoroughly wet the selected cast tape with clean room-temperature water and leave the material wet or lightly wring depending on time likely required for end application.
• It is best to leave the material a bit saturated because any wringing will only quicken the set time of the material and care must be taken so that the material does not cure before the cast has finished being rolled in its entirety.
• The warmer the water, the quicker the set time of the material as well, so follow the same guidelines.
• Pay great care not to pull significant tension on the tape when wrapping the cast; simply unroll it onto the extremity to avoid compromising circulation.
Splints
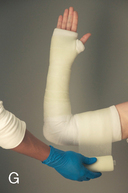
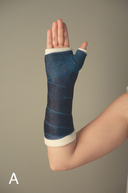
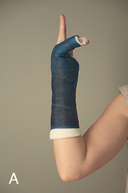
Upper extremity sugar tong (reverse) splint: Figure 11-1, A
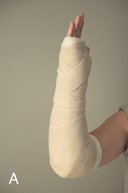


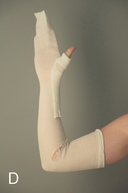
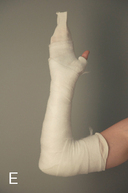
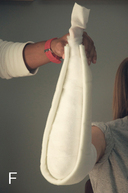
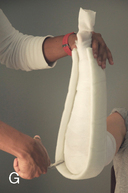

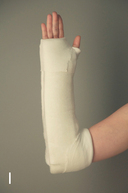
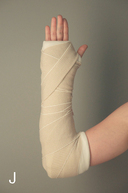
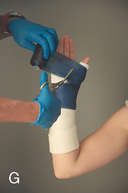
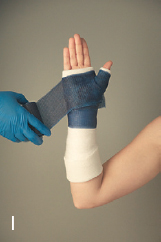
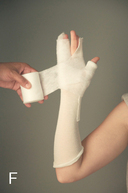
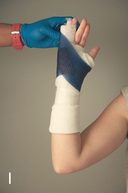
Figure 11-1. A, Upper extremity sugar tong (reverse) splint. B, Apply stockinette. C, Cut the stockinette and overlap at the antecubital fossa. D, Create a protective sleeve of padding over the thumb with the stockinette and fold over on itself. E, Apply casting padding. F, Apply splint and trim to fit. G, Cut slits in the splint at the elbow to create wings that overlap. H, Mold the wings around the elbow. I, Fold the ends of the stockinette back over the splint. J, Wrap elastic bandage over splint to secure in place.


Application
1) With the patient’s arm flexed to approximately 90 degrees and their wrist at neutral, fit the 2-inch stockinette in length from just beyond the fingertips up to midway of the humerus. Cut a hole in the stockinette to adequately accommodate the thumb (Fig. 11-1, B).
 The 1-inch width stockinette may be used specifically for the thumb to create a protective sleeve of padding by folding suitable length over on itself three times.
2) At the antecubital fossa, cut a slit in the stockinette (epicondyle to epicondyle), and pull the proximal portion of the stockinette to overlap the distal portion (or vice versa) (Figs. 11-1, C and 11-1, D).
3) Begin wrapping the padding at the metacarpal heads (MCHs) and proceed proximally with a 50% overlay. Figure-of-eight wrap around the elbow and apply ample padding around the bony prominences of the epicondyles. Continue wrap up to the midhumerus, but keep about 2 fingerbreadths distal to the stockinette edge (Fig. 11-1, E).
 The 3-inch width padding works for wrapping the hand, wrist, and forearm, whereas the 4-inch width is suitable for wrapping from the forearm, elbow, and arm.
4) Measure so that the selected splint material fits as a “U” around the elbow and along the dorsal and volar sides of the arm all the way to the MCHs, respectively (Fig. 11-1, F).
5) Apply the splint material beginning on the volar side at the palmar crease of the hand, proximally toward the elbow, around the elbow, and back to just distal to the MCHs on the dorsal side of the hand. Any excess material can be trimmed away or folded back on itself.
 Pay particular care to any material obstructing the thumb.
 At the elbow, you may cut slits (ulnar toward radial) partway through the splint on both the volar and dorsal aspects, and overlap the wings of the splint material on itself to allow for a better mold around the elbow (Figs. 11-1, G and 11-1, H).
6) Pull the underlying stockinette and padding back over the splint at the distal and proximal ends, respectively (Fig. 11-1, I). This will protect and pad the patient from the edge of the splint at those areas.
7) Wrap the elastic bandage over the wet splint to just secure it in place. Wrap distal toward proximal; use a figure-of-eight wrap to cover around the elbow (Fig. 11-1, J).
8) The splint should be molded to maintain given reduction or with the wrist at neutral (functional) unless otherwise indicated.
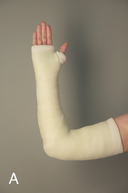
Upper extremity long arm posterior splint: Figure 11-2, A
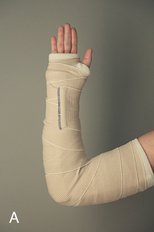
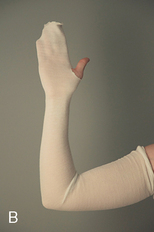
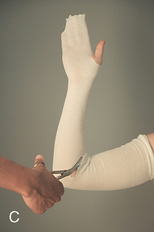

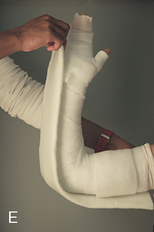
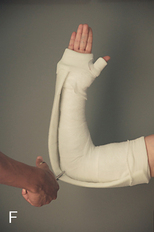
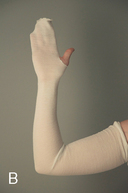
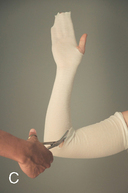
Figure 11-2. A, Upper extremity long arm posterior splint. B, Apply stockinette. C, Cut the stockinette and overlap at the antecubital fossa. D, Apply casting padding. E, Apply splint and trim to fit. F, Fold the ends of the stockinette back over the splint. Cut slits in the splint at the elbow to create wings that overlap to mold around the elbow.


Application
1) With the patient’s arm flexed to approximately 90 degrees and their wrist at neutral, fit the 2-inch stockinette in length from just beyond the fingertips up to (and with some gather at) the axilla. Cut a hole in the stockinette to adequately accommodate the thumb (Fig. 11-2, B).
 The 1-inch width stockinette may be used specifically for the thumb to create a protective sleeve of padding by folding suitable length over on itself three times.
2) At the antecubital fossa, cut a slit in the stockinette (epicondyle to epicondyle) and pull the proximal portion of the stockinette to overlap the distal portion (or vice versa) (Fig. 11-2, C).
3) Begin wrapping the padding at the MCHs and proceed proximally with a 50% overlay. Figure-of-eight wrap at the elbow, and apply ample padding around the bony prominences of the epicondyles. Continue wrapping up to the axilla (Fig. 11-2, D).
 The 3-inch width padding works for wrapping the hand, wrist, and forearm, whereas the 4-inch width is suitable for wrapping from the forearm, elbow, and arm.
4) Measure so that the selected splint material fits from the fifth MCH to the axilla.
5) Apply the splint material beginning on the ulnar side at the palmar crease along the fifth metacarpal of the hand, along the ulna, posteriorly along the elbow up just distal to the axilla. Any excess material can be trimmed away or folded back on itself (Fig. 11-2, E).
 Pay particular care to any material obstructing the axilla.
 At the elbow, you may cut partway through the splint on both the volar and dorsal aspects, and then overlap the wings of the splint material on itself to allow for a better mold around the elbow (Fig. 11-2, F).
6) Pull the underlying stockinette and padding back over the splint at the distal and proximal ends, respectively. This will protect and pad the patient from the edge of the splint at those areas.
7) Wrap the elastic bandage over the wet splint to just secure it in place. Wrap distal toward proximal; use a figure-of-eight wrap to cover around the elbow.
8) The splint should be molded to maintain given reduction and with the wrist in a functional position unless otherwise indicated.
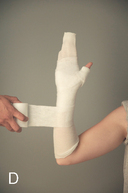
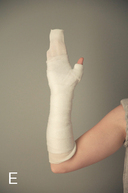
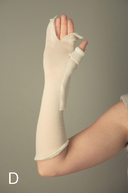
Upper extremity volar short arm splint: Figure 11-3, A
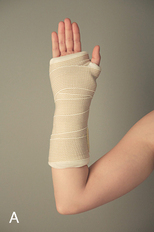


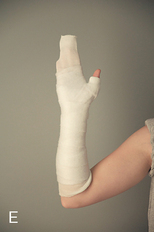
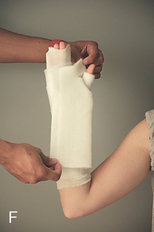
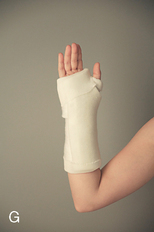
Figure 11-3. A, Upper extremity volar short arm splint. B, Apply stockinette. C, Create a protective sleeve of padding over the thumb with the stockinette and fold over on itself. D, Apply casting padding. E, Apply casting padding. F, Apply splint and trim to fit. G, Fold the ends of the stockinette back over the splint.


Application
1) With the patient’s wrist at neutral, fit the 2-inch stockinette in length from just beyond the fingertips up to the antecubital fossa. Cut a hole in the stockinette to adequately accommodate the thumb (Fig. 11-3, B).
 If enclosing the fingers in the splint, place padding between each finger, respectively, to protect against skin maceration.
 The 1-inch width stockinette may be used specifically for the thumb to create a protective sleeve of padding by folding suitable length over on itself three times (Fig. 11-3, C).
2) Begin wrapping the padding at the MCHs and proceed proximally with a 50% overlay. Continue wrapping up to the antecubital fossa (Figs. 11-3, D and 11-3, E).
 If enclosing the fingers in the splint, alternatively begin wrapping the padding at the distal phalanges.
3) Measure so that the selected splint material fits in length from the MCHs to within about two to three fingerbreadths (about 2 inches) of the antecubital fossa.

4) Apply the splint material beginning on the volar side at the palmar crease of the hand, proximally toward the antecubital fossa. Any excess material can be trimmed away or folded back on itself (Fig. 11-3, F).

5) Pull the underlying stockinette and padding back over the splint at the distal and proximal ends, respectively. This will protect and pad the patient from the edge of the splint at those areas (Fig. 11-3,G).
6) Wrap the elastic bandage over the wet splint to secure it in place. Wrap distal toward proximal.
7) The splint should be molded as to counter the given injury or with the wrist at neutral unless otherwise indicated.
Upper extremity thumb spica splint: Figure 11-4, A
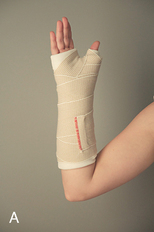


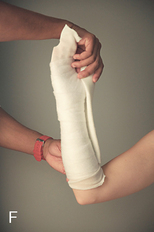
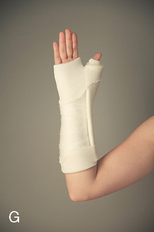
Figure 11-4. A, Upper extremity thumb spica splint. B, Apply stockinette. C, Create a protective sleeve of padding over the thumb with the stockinette and fold over on itself. D, Apply casting padding. E, Apply casting padding. F, Apply splint and trim to fit. G, Fold the ends of the stockinette back over the splint.


Application
1) With the patient’s wrist at neutral, fit the 2-inch stockinette in length from just beyond the fingertips up to the antecubital fossa. Cut a hole in the stockinette to adequately accommodate the thumb (Fig. 11-4, B).
 The 1-inch width stockinette may be used specifically for the thumb to create a protective sleeve of padding by folding suitable length over on itself three times (Fig. 11-4, C):
• Interphalangeal joint (IP) free = If leaving the distal phalanx free, the collar should be just proximal to the distal interphalangeal joint (DIP).
• IP joint included = If enclosing the distal phalanx, the collar should approach the thumb tip.

2) Begin wrapping the padding at the MCHs and proceed proximally with a 50% overlay. Continue wrapping up to just distal to the antecubital fossa (Figs. 11-4, D and 11-4, E).
3) Measure so that the selected splint material fits in length from the MCHs to within about two to three fingerbreadths (about 2 inches) of the antecubital fossa.
4) Apply the splint material centered over the radial border of the thumb and forearm, beginning just proximal to the padded edge of stockinette (or cast/undercast padding) protecting the thumb proximally toward the antecubital fossa. Any excess material can be trimmed away or folded back on itself (Fig. 11-4, F).
 Pay particular care to any material that would otherwise make the splint circumferential about the thumb.
5) Pull the underlying stockinette back just over the padding at the distal and proximal ends, respectively. This will protect and pad the patient from the edge of the cast at those areas (Fig. 11-4, G).
6) Wrap the elastic bandage over the wet splint to secure it in place. Wrap distal toward proximal.
Upper extremity ulnar gutter splint: Figure 11-5, A


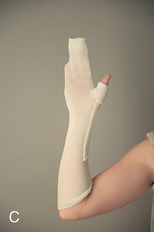
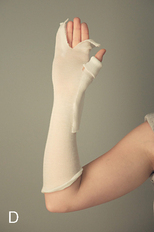


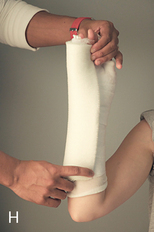
Figure 11-5. A, Upper extremity ulnar gutter splint. B, Apply stockinette. C, Create a protective sleeve of padding over the thumb with the stockinette and fold over on itself. D, Cut a slit in the stockinette between the long and ring fingers. E, Place some cast padding between the fingers to prevent skin maceration. F, Apply cast padding starting around the wrist and fingers. G, Continue cast padding proximally. H, Apply splint and trim to fit.


Application
1) With the patient’s wrist at neutral, fit the 2-inch stockinette in length from about 1 inch beyond the fingertips up to the antecubital fossa. Cut a hole in the stockinette to adequately accommodate the thumb (Fig. 11-5, B).
 The 1-inch width stockinette may be used specifically for the thumb to create a protective sleeve of padding by folding suitable length over on itself three times (Fig. 11-5, C).

2) At the distal end of the stockinette, cut a slit in the stockinette longitudinally toward the web space between the long and ring fingers (Fig. 11-5, D).
3) Trim or fold a few layers of cast/undercast padding to place between the length of the ring and small fingers to prevent skin maceration (Fig. 11-5, E).
4) Begin wrapping the padding just at the tips of the ring and small fingers and proceed proximally with a 50% overlay. Continue wrapping up to just distal to the antecubital fossa (Figs. 11-5, F and 11-5, G).
5) Measure so that the selected splint material fits from the tip of the ring finger to the antecubital fossa.
6) Apply the splint material beginning on the ulnar side of the small finger (distally equal to the ring ginger) forming a “gutter” along the fifth metacarpal and the ulna proceeding toward the antecubital fossa. Any excess material can be trimmed away or folded back on itself (Fig 11-5, H).

7) Pull the underlying stockinette and padding back over the splint at the distal and proximal ends, respectively. This will protect and pad the patient from the edge of the splint at those areas.
8) Wrap the elastic bandage over the wet splint to just secure it in place. Wrap distal toward proximal.
9) The splint should be molded at the fingers, hand, and wrist to maintain a given reduction or counter the given injury as indicated.

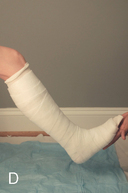
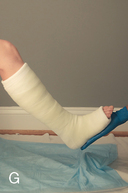
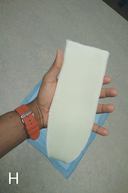
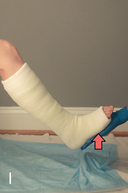
Lower extremity sugar tong (ankle-stirrup/u) splint: Figure 11-6, A
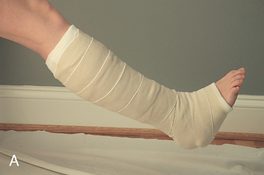

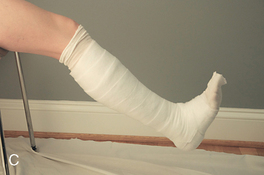
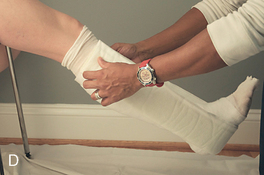

Figure 11-6. A, Lower extremity sugar tong (ankle stirrup/U) splint. B, Apply stockinette and create a fold over the anterior ankle. C, Apply cast padding. D, Apply splint and trim to fit. E, Center the splint on the lateral and medial sides of the leg and care not to overlap the proximal ends.


Application
1) With the patient’s ankle at neutral (ankle dorsiflexed to approximately 90 degrees), fit the 3-inch stockinette in length distally from the MTHs up to the patella and popliteal fossa.
2) At the ankle joint, cut a slit in the stockinette (malleolus to malleolus) and pull the proximal portion of the stockinette to overlap the distal portion (or vice versa) (Fig. 11-6, B).
3) Begin wrapping the padding just proximal to the MTHs and proceed proximally with a 50% overlay. Figure-of-eight wrap at the ankle/heel and apply ample padding around the bony prominences of the malleoli. Continue wrapping up to the tibial tuberosity (Fig. 11-6, C).
 The 4-inch width padding works for wrapping the midfoot and ankle, whereas the 6-inch width is suitable for wrapping from the ankle up to the tibial tuberosity.
4) Measure so that the selected splint material fits as a “U” under the heel of the foot and up the ankle along the lateral and medial sides of the leg all the way to even with the level of the fibular head (Fig. 11-6, D).
5) Apply the splint material in the same manner used to measure above. Any excess material can be trimmed away or folded back on itself.
 Pay particular care to any material obstructing the motion of the knee.
 Center the splint on the lateral and medial sides of the leg and take care not to overlap the proximal ends (Fig. 11-6, E).
6) Pull the underlying stockinette and padding back over the splint at the distal and proximal ends, respectively. This will protect and pad the patient from the edge of the splint at those areas.
7) Wrap the elastic bandage over the wet splint to just secure it in place. Wrap distal toward proximal; use a figure-of-eight wrap to cover around the ankle and heel.
8) The splint should be molded with the ankle at neutral unless otherwise indicated.
Lower extremity posterior leg splint: Figure 11-7, A
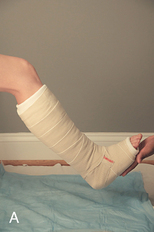

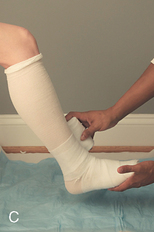

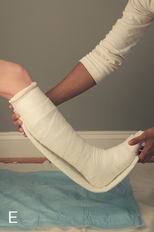
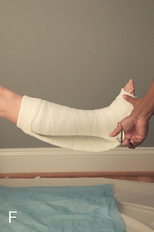
Figure 11-7. A, Lower extremity posterior leg splint. B, Apply stockinette and create a fold over the anterior ankle. C, Apply cast padding. D, Apply cast padding with ankle in neutral. E, Apply splint and trim to fit. F, Fold the ends of the stockinette back over the splint and cut splint to create wings that mold around the ankle.


Application
1) With the patient’s ankle at neutral (ankle dorsiflexed  90 degrees), fit the 3-inch stockinette in length about 1 inch distal to the hallux up to the patella and popliteal fossa.
 In the case of an Achilles tendon injury, particularly, the foot should be kept in slight equinus (plantar flexion).
2) At the ankle joint, cut a slit in the stockinette (malleolus to malleolus) and pull the proximal portion of the stockinette to overlap the distal portion (or vice versa) (Fig. 11-7, B).
3) Begin wrapping the padding just distal to the MTHs and proceed proximally with a 50% overlay. Figure-of-eight wrap at the ankle and heel and apply ample padding around the bony prominences of the malleoli. Continue wrapping up to the tibial tuberosity (Figs. 11-7, C and 11-7, D).
 The 4-inch width padding works for wrapping the foot and ankle, whereas the 6-inch width is suitable for wrapping the leg.
4) Measure so that the selected splint material fits in length posteriorly from the MTHs to the popliteal fossa.
5) Apply the splint material in the same manner used to measure above. Any excess material can be trimmed away or folded back on itself (Fig. 11-7, E).
 Pay particular care to any material obstructing the motion of the knee or intruding the popliteal fossa.
 At the heel, you may cut partway through the splint on both the lateral and medial aspects and then overlap the wings of the splint material on itself to allow for a better mold around calcaneus (Fig. 11-7, F).
6) Pull the underlying stockinette and padding back over the splint at the distal and proximal ends, respectively. This will protect and pad the patient from the edge of the splint at those areas.
7) Wrap the elastic bandage over the wet splint to just secure it in place. Wrap distal toward proximal; use a figure-of-eight wrap to cover around the ankle and heel.
8) The splint should be molded to maintain the patient’s ankle at neutral unless otherwise indicated.
Lower extremity long leg splint: Figure 11-8, A
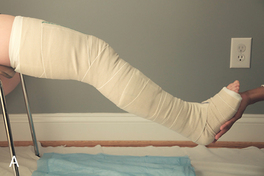
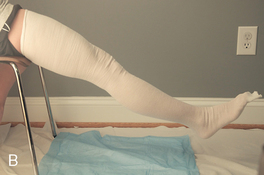
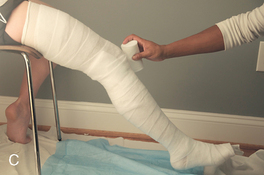
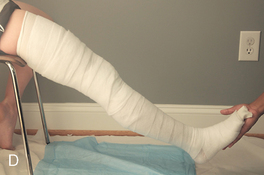
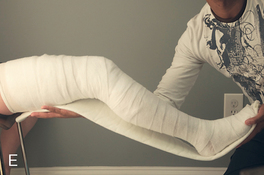
Figure 11-8. A, Lower extremity long leg splint. B, Apply stockinette. C, Apply cast padding. D, Apply cast padding with ankle in neutral. E, Apply splint and trim to fit.


Application
1) With the patient’s ankle at neutral (ankle dorsiflexed  90 degrees) and the knee just slightly flexed (
 15 degrees), fit the 4-inch stockinette in length about 1 inch distal to the hallux up to (and with some gather at) the groin (Fig. 11-8, B).
2) At the ankle joint, cut a slit in the stockinette (malleolus to malleolus) and pull the proximal portion of the stockinette to overlap the distal portion (or vice versa).
3) Begin wrapping the padding just distal to the MTHs and proceed proximally with a 50% overlay. Figure-of-eight wrap about the ankle and heel and apply ample padding around the bony prominences of the malleoli. Likewise, use ample padding on the bony prominences of the knee. Continue wrapping up to the groin (Figs. 11-8, C and 11-8, D).

4) Measure so that the selected splint material fits in length posteriorly from the MTHs to the gluteal sulcus.
5) Apply the splint material in the same manner used to measure above. Any excess material can be trimmed away or folded back on itself (Fig. 11-8, E).
 Pay particular care to any material obstructing the motion of the leg or intruding the groin or buttock.

6) Pull the underlying stockinette and padding back over the splint at the distal and proximal ends, respectively. This will protect and pad the patient from the edge of the splint at those areas.
7) Wrap the elastic bandage over the wet splint to just secure it in place. Wrap distal toward proximal; use a figure-of-eight wrap to cover around the ankle and heel.
8) The splint should be molded to maintain the patient’s ankle at neutral and knee slightly bent unless otherwise indicated.
Casts
Short arm cast: Figure 11-9, A
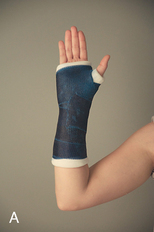
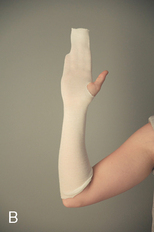

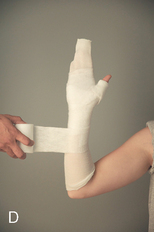

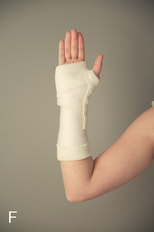
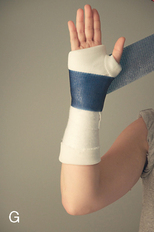
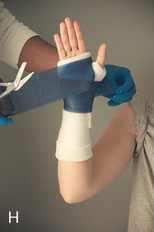
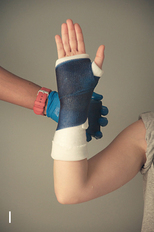
Figure 11-9. A, Short arm cast. B, Apply stockinette. C, Create a protective sleeve of padding over the thumb with the stockinette and fold over on itself. D, Apply cast padding. E, Apply cast padding. F, Fold the ends of the stockinette back over the cast padding. G, Begin wrapping the cast tape at the wrist. H, Partially cut the cast tape from proximal to distal and place between the first web space and repeat two additional times. I, Continue wrapping cast tape proximally.


Application
1) With the patient’s wrist at neutral, fit the 2-inch stockinette in length from just beyond the fingertips up to the antecubital fossa. Cut a hole in the stockinette to adequately accommodate the thumb (Fig. 11-9, B).
 The 1-inch width stockinette may be used specifically for the thumb to create a protective sleeve of padding by folding suitable length over on itself three times (Fig. 11-9, C).
2) Begin wrapping the padding at the MCHs and proceed proximally with a 50% overlay. Continue wrapping up to just distal to the antecubital fossa (Figs. 11-9, D and 11-9, E).
3) Pull the underlying stockinette back just over the padding at the distal and proximal ends, respectively. This will protect and pad the patient from the edge of the cast at those areas (Fig. 11-9, F).
4) Begin wrapping the cast tape at the wrist joint (Fig. 11-9, G). One wrap circumferentially around to anchor is suitable before proceeding distally to fit the tape proper about the hand/palm. At the first web space, cut proportionately through the width of the tape proximal toward distal, laying the remaining width through web space and the newly cut ends dorsal and volar about the base of the thumb, respectively (Fig. 11-9, H). Roll the tape circumferentially en route just proximal to the base of the thumb to overlay both of the cut ends. Fit the tape through the web space in this manner two additional times (for three layers total).
 Keep the tape proximal to the padded edge of stockinette (i.e., proximal to the distal palmar crease and proximal to the MCHs dorsally).
5) Continue wrap proceeding proximally with a 50% overlay up toward the antecubital fossa, but keep about one fingerbreadth distal to the padded edge of stockinette (Fig. 11-9, I).
6) Roll the tape three times around the proximal end before proceeding back distally with a 50% overlay toward the wrist.
 Roll the tape to its completion or cut the roll free when enough tape has been applied to eliminate any shadow effect or noticeable weak points (typically three layers of tape is ideal)
7) The cast should be molded to counter the given injury or with the wrist at neutral unless otherwise indicated.


Long arm cast: Figure 11-10, A


Application
1) With the patient’s elbow flexed to approximately 90 degrees and his or her wrist at neutral, fit the 2-inch stockinette in length from just beyond the fingertips up to (and with some gather at) the axilla. Cut a hole in the stockinette to adequately accommodate the thumb (Fig. 11-10, B).
 The 1-inch width stockinette may be used specifically for the thumb to create a protective sleeve of padding by folding suitable length over on itself three times.
2) At the antecubital fossa, cut a slit in the stockinette (epicondyle to epicondyle) and pull the proximal portion of the stockinette to overlap the distal portion (or vice versa) (Fig. 11-10, C).
3) Begin wrapping the padding at the MCHs and proceed proximally with a 50% overlay. Figure-of-eight wrap at the elbow, and apply ample padding around the bony prominences of the epicondyles. Continue wrapping up to the axilla (Fig. 11-10, D).
 The 3-inch width padding works for wrapping the hand, wrist, and forearm, whereas the 4-inch width is suitable for wrapping from the forearm, elbow, and arm.
4) Pull the underlying stockinette back just over the padding at the distal and proximal ends, respectively. This will protect and pad the patient from the edge of the cast at those areas (Fig. 11-10, E).
5) Begin wrapping the 3-inch width cast tape at the wrist joint. One wrap circumferentially around to anchor is suitable before proceeding distally to fit the tape properly about the hand and palm. At the first web space, cut proportionately through the width of the tape proximal toward distal, laying the remaining width through web space and the newly cut ends dorsal and volar about the base of the thumb, respectively. Roll the tape circumferentially en route just proximal to the base of the thumb to overlay both of the cut ends. Fit the tape through the web space in this manner two additional times (for three layers total).
 Keep the tape proximal to the padded edge of stockinette (i.e., proximal to the distal palmar crease and proximal to the MCH dorsally)
6) Continue wrap proceeding proximally with a 50% overlay up toward the antecubital fossa, but keep about one fingerbreadth distal to the antecubital fossa.
7) Roll the tape three layers thick around the proximal forearm before proceeding back distally with a 50% overlay toward the wrist (Fig. 11-10, F).
 Roll the tape to its completion or cut the roll free when enough tape has been applied to eliminate any shadow effect or noticeable weak points (typically ≥ three layers of coverage ideal).

8) Begin wrapping the 4-inch width cast tape about two fingerbreadths distal to the padded edge of stockinette at the axilla. Roll circumferentially three layers thick around before proceeding distally with a 50% overlay toward the elbow.
9) Figure-of-eight wrap the elbow three times, and overlap at least half width the still wet end of the cast at the proximal forearm (Fig. 11-10, G). Ensure adequate coverage at the elbow (three or more layers) before proceeding proximally with a 50% overlay toward the axilla.
 Roll the tape to its completion or cut the roll free when enough tape has been applied to eliminate any shadow effect or noticeable weak points (typically three or more layers of coverage is ideal).
10) To further unify the distal and proximal portions of the cast, wrap another 3-inch width cast tape beginning at the distal end capturing the hand (one layer as earlier) before proceeding proximally with a 50% overlay to the proximal end at the axilla (one layer).
 Cut the roll free or optionally roll the tape to its completion with a 50% overlay proceeding distally again toward the hand and wrist.
11) The cast should be molded to counter the given injury or with the wrist at neutral unless otherwise indicated.


Thumb spica cast: Figure 11-11, A


Application
1) With the patient’s wrist at neutral, fit the 2-inch stockinette in length from just beyond the fingertips up to the antecubital fossa. Cut a hole in the stockinette to adequately accommodate the thumb (Fig. 11-11, B).
 The 1-inch width stockinette may be used specifically for the thumb to create a protective sleeve of padding by folding suitable length over on itself three times (Fig. 11-11, C):

2) Begin wrapping the padding at the MCHs and proceed proximally with a 50% overlay. Continue wrapping up to just distal to the antecubital fossa (Figs. 11-11, D and 11-11, E).
3) Pull the underlying stockinette back just over the padding at the distal and proximal ends, respectively. This will protect and pad the patient from the edge of the cast at those areas (Fig. 11-11, F).
4) Begin wrapping the 3-inch width cast tape at the wrist joint. One wrap circumferentially around to anchor is suitable before proceeding distally to fit the tape proper about the thumb, hand, and palm.
5) To fit the tape around the thumb, roll the tape to the dorsal-radial border of the thumb and approaching the first web space, cut partially through the width (proximal toward distal) to just fit the tape around the proximal phalanx segment of the thumb (or distal phalanx segment additionally if IP joint is included). Continue through and around the respective phalanx segment(s) circumferentially back to the dorsal-radial border of the thumb again. Fit the tape around the thumb in this manner two additional times (for three layers total) (Figs. 11-11, G and 11-11, H).
 Keep the tape just proximal to the padded edge of stockinette (or cast/undercast padding) protecting the thumb.
6) To fit the tape about the hand and palm, from the thumb roll toward the first web space, cut proportionately through the width of the tape proximal toward distal, laying the remaining width through the web space and the newly cut ends dorsal and volar about the base of the thumb, respectively (Fig. 11-11, I). Roll the tape circumferentially en route just proximal to the base of the thumb to overlay both of the cut ends. Fit the tape through the web space in this manner two additional times (for three layers total).
 Keep the tape proximal to the padded edge of the stockinette (i.e., proximal to the distal palmar crease and proximal to the MCH dorsally).

7) Continue wrap proceeding proximally with a 50% overlay up toward the antecubital fossa, but keep about one fingerbreadth distal to the padded edge of the stockinette.
8) Roll the tape three times around the proximal end before proceeding back distally with a 50% overlay toward the wrist.
 Roll the tape to its completion or cut the roll free when enough tape has been applied to eliminate any shadow effect or noticeable weak points (typically three layers of tape is ideal).
9) The cast should be molded to counter the given injury or with the wrist and thumb at neutral unless otherwise indicated.


Outrigger (routinely ulnar gutter) cast: Figure 11-12, A


Application
1) With the patient’s wrist at neutral, fit the 2-inch stockinette in length from about 1 inch beyond the fingertips up to the antecubital fossa. Cut a hole in the stockinette to adequately accommodate the thumb (Fig. 11-12, B).
 The 1-inch width stockinette may be used specifically for the thumb to create a protective sleeve of padding by folding suitable length over on itself three times (Fig. 11-12, C).
2) At the distal end of the stockinette, cut a slit in the stockinette longitudinally toward the web space between the long and ring fingers (Fig. 11-12, D).
3) Trim and fold a few layers of cast/undercast padding to place between the length of the ring and small fingers to prevent skin maceration (Fig. 11-12, E).
 These fingers can (optionally) be secured to one another via buddy-tape to further stabilize the injury.
4) Begin wrapping the padding just at the tips of the ring and small fingers and proceed proximally with a 50% overlay (Figs. 11-12, F and 11-12, G). Continue wrapping up to just distal to the antecubital fossa.
5) Pull the underlying stockinette back just over the padding at the distal and proximal ends, respectively. This will protect and pad the patient from the edge of the cast at those areas (Fig. 11-12, H).
6) Begin wrapping the 3-inch width cast tape at the wrist joint (preferably starting on the volar surface rolling radial toward ulnar). One wrap circumferentially around to anchor is suitable before proceeding distally.
7) To fit the tape about the respective phalanges, angle and roll the tape to the dorsal aspect of the phalanges, even with the radial border of the ring finger cut at a slight angle partially through the width (proximal toward distal) to just fit the tape through the long and ring finger web space and around the ring and small finger phalanx segment(s) (Fig. 11-12, I). Continue through and around the respective phalanx segment(s) circumferentially back to the dorsal-radial border of the ring finger again. Fit the tape around the phalanges in this manner two additional times (for three layers total).
 Keep the tape just proximal to the padded edge of stockinette (or cast/undercast padding), protecting the phalanges.

8) To fit the tape about the hand, from the phalanges roll toward the first web space, cut proportionately through the width of the tape proximal toward distal, laying the remaining width through web space and the newly cut ends dorsal and volar about the base of the thumb, respectively. Roll the tape circumferentially en route just proximal to the base of the thumb to overlay both of the cut ends. Fit the tape through the web space in this manner two additional times (for three layers total).
9) Continue wrap proceeding proximally with a 50% overlay up toward the antecubital fossa, but keep about one fingerbreadth distal to the padded edge of stockinette.
10) Roll the tape three times around proximal end before proceeding back distally with a 50% overlay toward the wrist.
 Roll the tape to its completion or cut the roll free when enough tape has been applied to eliminate any shadow effect or noticeable weak points (typically three layers of tape is ideal).
11) The cast should be molded to counter the given injury, commonly with the wrist in moderate extension and the ring and small fingers molded fully extended in the intrinsic plus position (metacarpal phalangeal joints in about 70 degrees of flexion) unless otherwise indicated.


Muenster cast: Figure 11-13, A
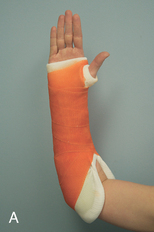
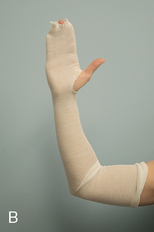
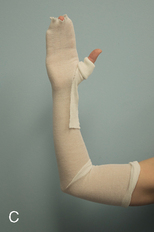
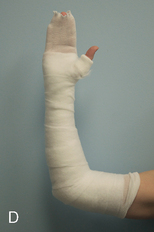
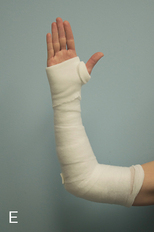
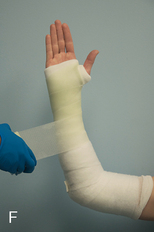
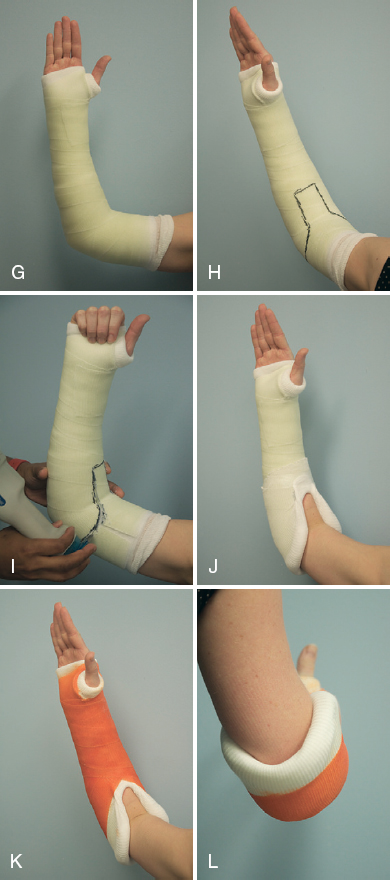
Figure 11-13. A, Muenster cast. B, Apply stockinette. C, Create a protective sleeve of padding over the thumb with the stockinette and fold over on itself. D, Apply cast padding. E, Fold the ends of the stockinette back over the cast padding. F, Apply cast tape from distal to proximal. Partially cut the cast tape from proximal to distal and place between the first web space and repeat two additional times. G, Continue wrapping the cast tape proximally up the arm and use a figure-of-eight around the elbow. Allow to set with the elbow in the desired position. H, Draw lines around the elbow to guide cutting. I, Cut the splint using an oscillating cast saw. J, Fold the ends of the stockinette back over the cut end of the cast. K, Apply another layer of cast tape from distal to proximal and lay over the ends of the stockinette. L, Posterior view of completed cast.


Application
1) With the patient’s elbow flexed to approximately 90 degrees and his or her wrist at neutral, fit the 2-inch stockinette in length from just beyond the fingertips up to midway of the humerus. Cut a hole in the stockinette to adequately accommodate the thumb (Fig. 11-13, B).
 The 1-inch width stockinette may be used specifically for the thumb to create a protective sleeve of padding by folding suitable length over on itself three times (Fig. 11-13, C).
2) At the antecubital fossa, pull the proximal portion of the stockinette to overlap the distal portion to create a measurable fold (tongue) to be used subsequently.
 The tongue should resemble a crescent that extends from epicondyle to epicondyle (as shown in preceding figure).
3) Begin wrapping the padding at MCHs and proceed proximally with a 50% overlay. Figure-of-eight wrap at the elbow and apply ample padding around the bony prominences of the epicondyles. Continue wrapping up to the midhumerus, but keep about two fingerbreadths distal to the stockinette edge (Fig. 11-13, D).
 The 3-inch width padding works for wrapping the hand, wrist, and forearm, whereas the 4-inch width is suitable for wrapping from the forearm, elbow, and arm.
4) Pull the underlying stockinette back just over the padding at the distal end. This will protect and pad the patient from the edge of the cast at that area (Fig. 11-13, E).
 The underlying stockinette at the proximal end will be pulled back over for padding at that end subsequently.
5) Begin wrapping the 3-inch width cast tape at the wrist joint. One wrap circumferentially around to anchor is suitable before proceeding distally to fit the tape proper about the hand. At the first web space, cut proportionately through the width of the tape proximal toward distal, laying the remaining width through the web space and the newly cut ends dorsal and volar about the base of the thumb, respectively. Roll the tape circumferentially en route just proximal to the base of the thumb to overlay both of the cut ends. Fit the tape through the web space in this manner two additional times (for three layers total) (Fig. 11-13, F).
 Keep the tape proximal to the padded edge of the stockinette (i.e., proximal to the distal palmar crease and proximal to the MCHs dorsally).
6) Continue wrapping, proceeding proximally with a 50% overlay up toward the antecubital fossa but keeping about one fingerbreadth distal to the antecubital fossa.
7) Roll the tape three layers thick around the proximal forearm before proceeding back distally with a 50% overlay toward the wrist.
 Roll the tape to its completion or cut the roll free when enough tape has been applied to eliminate any shadow effect or noticeable weak points (typically ≥ 3 layers of coverage ideal)

8) Begin wrapping the 4-inch width cast tape just distal to the cast/undercast padding at the midhumerus. Roll circumferentially three layers total around before proceeding distally with a 50% overlay toward the elbow.
9) Figure-of-eight wrap about the elbow three times, and overlap at least one-half width (2 inches) the still wet end of the cast at the proximal forearm. Ensure adequate coverage about the elbow (three or more layers) before proceeding proximally with a 50% overlay toward the midhumerus (Fig. 11-13, G).
 Roll the tape to its completion or cut the roll free when enough tape has been applied to eliminate any shadow effect or noticeable weak points (typically three or more layers of coverage is ideal).
 The cast should resemble a shortened long arm cast at this point.
10) The cast should be molded to counter the given injury or with the wrist at neutral unless otherwise indicated.
 Continually rub the cast with open hands to help laminate and smooth the layers until the cast has set firm, taking care to not create any undue indentations or pressure points.

11) Once the cast has set firm, tailor the proximal portion using an oscillating cast saw (Figs. 11-13, H and 11-13, I). Remove the areas otherwise obstructing the extension and flexion of the elbow while still leaving the portions that reduce the pronation and supination of the wrist.
 Ergo, the cast should ultimately curve around two to three fingerbreadths proximal to the lateral and medial epicondyles, respectively, scoop down (distal) just proximal to the olecranon posteriorly, with an appropriate two to three fingerbreadths’ notch extending along the length of the proximal radius anteriorly.

12) Cut a slit through the middle of the anterior cast/undercast padding proximal to distal extending to the notch at the proximal forearm. Fold the padding proximal to distal to rim the proximal margins of the cast, and pull the underlying stockinette taut back over the padding and the cast at the proximal end. This will protect and pad the patient from the edge of the cast at those areas (Fig. 11-13, J).
 The tongue of stockinette (created in Step 2 earlier) can be accessed once the cast/undercast padding has been slit and the proximal stockinette pulled back over the cast as described. Use this tongue to further tailor the stockinette/padding about the notch by pulling it taut distally, the ends of which will be fixed in place subsequently when overlaid by cast tape.
13) To complete the cast, wet another 3-inch width of cast tape and begin wrap at the distal end capturing the hand (one layer thick as earlier) before proceeding proximally with a 50% overlay to the proximal end to just capture the unsecured stockinette (one layer thick) (Figs. 11-13, K and 11-13, L).
 Cut the roll free or optionally roll the tape to its completion with a 50% overlay proceeding distally again toward the wrist and hand.
14) Continually rub the cast with open hands to help laminate and smooth the layers until they have set firm.
Short leg non–weight-bearing cast: Figure 11-14, A


Application
1) With the patient’s ankle at neutral (ankle dorsiflexed to approximately 90 degrees) fit the 3-inch stockinette in length about 1 inch distal to the hallux up to the patella and popliteal fossa.
 In the case of an Achilles tendon injury, particularly, the foot should be kept in moderate equinus (plantar flexion).
2) At the ankle joint, cut a slit in the stockinette (malleolus to malleolus) and pull the proximal portion of the stockinette to overlap the distal portion (or vice versa) (Fig. 11-14, B).
3) Begin wrapping the padding just distal to the MTHs and proceed proximally with a 50% overlay. Use a figure-of-eight wrap about the ankle and heel and apply ample padding around the bony prominences of the malleoli. Continue wrapping up to the tibial tuberosity (Figs. 11-14, C and 11-14, D).
4) Fit and apply the self-adhering orthopaedic foam (or cast/undercast padding) to extend anteriorly from just distal to the MTHs up to the tibial tuberosity (centered directly over the foot/shin). Additionally, apply a section of foam just even with the tibial tuberosity yet extending laterally from fibular head to proximal-medial tibia. Lastly, apply a section of foam posteriorly at the heel with length and width adequate to protect the Achilles tendon insertion.
5) Pull the underlying stockinette back just over the padding at the distal and proximal ends, respectively. This will protect and pad the patient from the edge of the cast at those areas (Fig. 11-14, E).
6) Begin wrapping the 4-inch width cast tape just proximal to the ankle joint. One wrap circumferentially around to anchor is suitable before proceeding distally to fit the tape properly around the foot and ankle. Figure-of-eight wrap the ankle three times, and ensure adequate coverage around the heel (three or more layers) before proceeding distally with a 50% overlay toward the MTHs (Fig. 11-14, F).
7) Roll the tape three layers thick around the MTHs before proceeding back proximally with a 50% overlay toward and/or beyond the ankle joint. Roll the tape to its completion.
8) Begin wrapping another 4-inch width cast tape about two fingerbreadths distal to the padded edge of stockinette at the tibial tuberosity/popliteal fossa. Roll circumferentially three layers total around before proceeding distally with a 50% overlay toward the ankle.
9) Figure-of-eight wrap the ankle and further overlap at least the midfoot. Ensure adequate overlay around the heel and ankle before proceeding proximally with a 50% overlay back toward the tibial tuberosity and popliteal fossa.
 Roll the tape to its completion or cut the roll free when enough tape has been applied to eliminate any shadow effect or noticeable weak points (typically three or more layers of coverage is ideal).
10) The cast should be molded to maintain the patient’s ankle at neutral unless otherwise indicated.
 Continually rub the cast with open hands to help laminate and smooth the layers until the cast has just set firm, taking care to not create any undue indentations or pressure points.
 Shape and mold to accommodate the malleoli and Achilles tendon insertion.
11) To further unify the distal and proximal portions of the cast, wrap another 4-inch width of cast tape (or 3-inch width, alternatively) beginning at the distal end (one layer) before proceeding proximally with a 50% overlay to the proximal end at the tibial tuberosity and popliteal fossa (one layer).
 Cut the roll free or optionally roll the tape to its completion with a 50% overlay proceeding distally again toward the foot and ankle.
12) Continually rub the cast with open hands to help laminate and smooth the layers until the cast has set firm.
Short leg walking cast: Figure 11-15, A


Recommended materials


Application
1) With the patient’s ankle at neutral (ankle dorsiflexed  90 degrees), fit the 3-inch stockinette in length about 1 inch distal to the hallux up to the patella and popliteal fossa.
 Casting the ankle at neutral (even minute dorsal flexion) is essential for the walking cast to allow proper balance and toe-off.
2) At the ankle joint, cut a slit in the stockinette (malleolus to malleolus) and pull the proximal portion of the stockinette to overlap the distal portion (or vice versa) (Fig. 11-15, B).
3) Begin wrapping the padding just distal to the MTHs and proceed proximally with a 50% overlay. Figure-of-eight wrap the ankle and heel and apply ample padding around the bony prominences of the malleoli. Continue wrapping up to the tibial tuberosity (Figs. 11-15, C and 11-15, D).
4) Fit and apply the self-adhering orthopaedic foam (or cast/undercast padding) to extend anteriorly from just distal to the MTHs up to the tibial tuberosity (centered directly over the foot and anterior tibia). Additionally, apply a section of foam just even with the tibial tuberosity yet extending laterally from fibular head to proximal-medial tibia. Lastly, apply a section of foam posteriorly at the heel with length and width adequate to protect the Achilles tendon insertion.
5) Pull the underlying stockinette back just over the padding at the distal and proximal ends, respectively. This will protect and pad the patient from the edge of the cast at those areas (Fig. 11-15, E).
6) Begin wrapping the 4-inch width cast tape just proximal to the ankle joint. One wrap circumferentially around to anchor is suitable before proceeding distally to fit the tape properly around the foot/ankle. Figure-of-eight wrap the ankle three times, and ensure adequate coverage about the heel (three or more layers) before proceeding distally with a 50% overlay toward the MTHs (Fig. 11-15, F).
7) Roll the tape three layers thick around the MTHs before proceeding back proximally with a 50% overlay toward and/or beyond the ankle joint. Roll the tape to its completion.
8) Begin wrapping another 4-inch width cast tape about two fingerbreadths distal to the padded edge of stockinette at the tibial tuberosity and popliteal fossa. Roll circumferentially three layers total around before proceeding distally with a 50% overlay toward the ankle.
9) Figure-of-eight wrap the ankle and further overlap at least the midfoot. Ensure adequate overlay around the heel and ankle before proceeding proximally with a 50% overlay back toward the tibial tuberosity and popliteal fossa.
 Roll the tape to its completion or cut the roll free when enough tape has been applied to eliminate any shadow effect or noticeable weak points (typically three or more layers of coverage is ideal.)
10) The cast should be molded to maintain the patient’s ankle at neutral as indicated (Fig. 11-15, G).
 Continually rub the cast with open hands to help laminate and smooth the layers until the cast has set firm, taking care to not create any undue indentations or pressure points.
11) Measure so that the selected splint material fits double the length of the patient’s foot from the MTHs to the heel. Remove the splint material from any protective sleeve it may be contained in, fold the splint over on itself, and subsequently trim it to roughly proportion the sole of the patient’s foot. Hold this in place (Fig. 11-15, H).
12) To further unify the distal and proximal portions of the cast and to tie in the newly made cast sole, wrap another 4-inch width of cast tape (or 3-inch width alternatively) beginning at the distal end (one layer) before proceeding proximally with a 50% overlay to the proximal end at the tibial tuberosity and popliteal fossa (one layer) (Fig. 11-15, I).
 Cut the roll free or optionally roll the tape to its completion with a 50% overlay proceeding distally again toward the foot/ankle.
13) Continually rub the cast with open hands to help laminate and smooth the layers until the cast has set firm.
Long leg cast: Figure 11-16, A
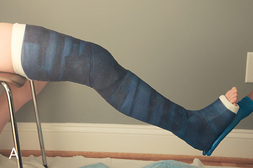


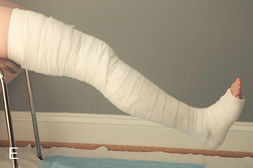

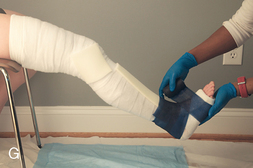
Figure 11-16. A, Long leg cast. B, Apply stockinette. C, Apply cast padding. D, Keep the ankle in neutral. E, Fold the ends of the stockinette back over the cast padding. F, Apply self-adhering orthopaedic foam padding to the anterior foot, ankle, and tibia, bilateral knee condyles, and the posterior heel. G, Apply cast tape from distal to proximal and use a figure-of-eight around the ankle.

Recommended materials


Application
1) With the patient’s ankle at neutral (ankle dorsiflexed to approximately 90 degrees) and the knee just slightly flexed (≈15 degrees), fit the 4-inch stockinette in length about 1 inch distal to the hallux up to (and with some gather at) the groin (Fig. 11-16, B).
2) At the ankle joint, cut a slit in the stockinette (malleolus to malleolus) and pull the proximal portion of the stockinette to overlap the distal portion (or vice versa).
3) Begin wrapping the padding just distal to the MTHs and proceed proximally with a 50% overlay. Figure-of-eight wrap the ankle and heel and apply ample padding around the bony prominences of the malleoli. Likewise, amply pad the bony prominences of the knee. Continue wrapping up to the groin (Figs. 11-16, C and 11-16, D).
4) Pull the underlying stockinette back just over the padding at the distal and proximal ends, respectively. This will protect and pad the patient from the edge of the cast at those areas (Fig. 11-16, E).
5) Fit and apply the self-adhering orthopaedic foam (or cast/undercast padding) to extend anteriorly from just distal to the MTHs up to the tibial tuberosity (centered directly overtop the foot and anterior tibia). Additionally, apply a square section of foam over each condyle. Lastly, apply a section of foam posteriorly at the heel with length and width adequate to protect the Achilles tendon insertion (Fig. 11-16, F).
6) Begin wrapping the 4-inch width cast tape just proximal to the ankle joint. One wrap circumferentially around to anchor is suitable before proceeding distally to fit the tape properly around the foot and ankle. Figure-of-eight wrap the ankle three times, and ensure adequate coverage around the heel (three or more layers) before proceeding distally with a 50% overlay toward the MTHs (Fig. 11-16, G).
7) Roll the tape three layers thick around the MTHs before proceeding back proximally with a 50% overlay toward and/or beyond the ankle joint. Roll the tape to its completion.
8) Begin wrapping another 4-inch width cast tape about two to three fingerbreadths distal to the padded edge of stockinette at the groin and gluteal sulcus. Roll circumferentially three layers thick around before proceeding distally with a 50% overlay toward the knee.
9) Figure-of-eight wrap the knee three times and ensure adequate overlay around the knee and popliteal fossa before proceeding proximally with a 50% overlay back toward the groin and gluteal sulcus. Roll the tape to its completion.
10) Begin wrapping another 4-inch width cast tape to quickly capture the ankle joint before proceeding proximally with a 50% overlay capture the knee.
 Roll the tape to its completion or cut the roll free when enough tape has been applied to eliminate any shadow effect or noticeable weak points along the length of the entire cast (typically three or more layers of coverage is ideal).
11) The cast should be molded to maintain the patient’s ankle at neutral and knee slightly bent unless otherwise indicated.
 Continually rub the cast with open hands to help laminate and smooth the layers until the cast has just set firm, taking care to not create any undue indentations or pressure points.
12) To further unify the distal and proximal portions of the cast, wrap another 4-inch width of cast tape (or 3-inch width alternatively) beginning at the distal end (one layer) before proceeding proximally with a 50% overlay to the proximal end at the groin and gluteal sulcus (one layer). Use a subsequent roll if necessary.
 Cut the roll free or optionally roll the tape to its completion with a 50% overlay proceeding distally again toward the foot and ankle.
13) Continually rub the cast with open hands to help laminate and smooth the layers until the cast has set firm.
Crux of splinting and casting
 Keep the splint or cast and the skin around the edges clean and dry:
• When showering or bathing: Roll up a small towel and wrap it around your arm or leg, just about the splint or cast (do not tuck the towel into the splint or cast) and tape the towel into place. Place an arm or leg into a bag. Tape the bag into place.
• Protect the splint or cast from getting wet during rain.
• A wet splint or cast must be changed within 24 hours to prevent skin breakdown.
 Do not put anything down inside of your splint or cast:
• No powder, spray, lotion, water or liquids, or foreign objects to scratch under the splint or cast

 Do not remove the splint or cast.
 Regular activities should include upper/lower extremity range of motion and edema control:
• Move all joints/appendages not immobilized by the splint/cast.
• Massage fingers/toes from the tips toward extremity several times daily as needed.
• Elevate the extremity above the level of your heart (20 to 30 minutes, several times daily), especially whenever any of the following symptoms occur:


[/level-membership-for-orthopaedics-category][not-level-membership-for-orthopaedics-category]11
Splinting and casting
Pearls of splinting and casting
The stockinette should fit the extremity without being too loose or tight.
Cast/undercast padding should be appropriate to the diameter and length of the extremity.
An elastic bandage or wrap should be appropriate to the diameter and length of the extremity.
When rolling the cast/undercast padding:
• Pull just enough tension on the wrap so that it is taut but not so much that the material tears away.
• The padding should be predominantly rolled from distal toward proximal.
• Commonly, roll just enough padding to eliminate any residual shadow-effect (i.e., the padding should be relatively opaque versus the layers below, typically three layers thick)
When ready to apply the splint:
• Thoroughly wet the selected material with clean room-temperature water and squeeze out the excess water. A dry towel may be used to help absorb or damp dry the material as needed.
• The warmer the water, the quicker the set time of the material; however, the heat released by the material also increases and this can be sufficient to cause skin burns or irritation.
• If using plaster, keep in mind while measuring to fit the splint that plastic will shrink a bit when wet.
• For the typical adult, a plaster splint will need to be between 10 and 15 layers thick for adequate stability.
• Thoroughly wet the selected cast tape with clean room-temperature water and leave the material wet or lightly wring depending on time likely required for end application.
• It is best to leave the material a bit saturated because any wringing will only quicken the set time of the material and care must be taken so that the material does not cure before the cast has finished being rolled in its entirety.
• The warmer the water, the quicker the set time of the material as well, so follow the same guidelines.
• Pay great care not to pull significant tension on the tape when wrapping the cast; simply unroll it onto the extremity to avoid compromising circulation.
Splints
Upper extremity sugar tong (reverse) splint: Figure 11-1, A
Figure 11-1. A, Upper extremity sugar tong (reverse) splint. B, Apply stockinette. C, Cut the stockinette and overlap at the antecubital fossa. D, Create a protective sleeve of padding over the thumb with the stockinette and fold over on itself. E, Apply casting padding. F, Apply splint and trim to fit. G, Cut slits in the splint at the elbow to create wings that overlap. H, Mold the wings around the elbow. I, Fold the ends of the stockinette back over the splint. J, Wrap elastic bandage over splint to secure in place.
Application
1) With the patient’s arm flexed to approximately 90 degrees and their wrist at neutral, fit the 2-inch stockinette in length from just beyond the fingertips up to midway of the humerus. Cut a hole in the stockinette to adequately accommodate the thumb (Fig. 11-1, B).
The 1-inch width stockinette may be used specifically for the thumb to create a protective sleeve of padding by folding suitable length over on itself three times.
2) At the antecubital fossa, cut a slit in the stockinette (epicondyle to epicondyle), and pull the proximal portion of the stockinette to overlap the distal portion (or vice versa) (Figs. 11-1, C and 11-1, D).
3) Begin wrapping the padding at the metacarpal heads (MCHs) and proceed proximally with a 50% overlay. Figure-of-eight wrap around the elbow and apply ample padding around the bony prominences of the epicondyles. Continue wrap up to the midhumerus, but keep about 2 fingerbreadths distal to the stockinette edge (Fig. 11-1, E).
The 3-inch width padding works for wrapping the hand, wrist, and forearm, whereas the 4-inch width is suitable for wrapping from the forearm, elbow, and arm.
4) Measure so that the selected splint material fits as a “U” around the elbow and along the dorsal and volar sides of the arm all the way to the MCHs, respectively (Fig. 11-1, F).
5) Apply the splint material beginning on the volar side at the palmar crease of the hand, proximally toward the elbow, around the elbow, and back to just distal to the MCHs on the dorsal side of the hand. Any excess material can be trimmed away or folded back on itself.
Pay particular care to any material obstructing the thumb.
At the elbow, you may cut slits (ulnar toward radial) partway through the splint on both the volar and dorsal aspects, and overlap the wings of the splint material on itself to allow for a better mold around the elbow (Figs. 11-1, G and 11-1, H).
6) Pull the underlying stockinette and padding back over the splint at the distal and proximal ends, respectively (Fig. 11-1, I). This will protect and pad the patient from the edge of the splint at those areas.
7) Wrap the elastic bandage over the wet splint to just secure it in place. Wrap distal toward proximal; use a figure-of-eight wrap to cover around the elbow (Fig. 11-1, J).
8) The splint should be molded to maintain given reduction or with the wrist at neutral (functional) unless otherwise indicated.
Upper extremity long arm posterior splint: Figure 11-2, A
Figure 11-2. A, Upper extremity long arm posterior splint. B, Apply stockinette. C, Cut the stockinette and overlap at the antecubital fossa. D, Apply casting padding. E, Apply splint and trim to fit. F, Fold the ends of the stockinette back over the splint. Cut slits in the splint at the elbow to create wings that overlap to mold around the elbow.
Application
1) With the patient’s arm flexed to approximately 90 degrees and their wrist at neutral, fit the 2-inch stockinette in length from just beyond the fingertips up to (and with some gather at) the axilla. Cut a hole in the stockinette to adequately accommodate the thumb (Fig. 11-2, B).
The 1-inch width stockinette may be used specifically for the thumb to create a protective sleeve of padding by folding suitable length over on itself three times.
2) At the antecubital fossa, cut a slit in the stockinette (epicondyle to epicondyle) and pull the proximal portion of the stockinette to overlap the distal portion (or vice versa) (Fig. 11-2, C).
3) Begin wrapping the padding at the MCHs and proceed proximally with a 50% overlay. Figure-of-eight wrap at the elbow, and apply ample padding around the bony prominences of the epicondyles. Continue wrapping up to the axilla (Fig. 11-2, D).
The 3-inch width padding works for wrapping the hand, wrist, and forearm, whereas the 4-inch width is suitable for wrapping from the forearm, elbow, and arm.
4) Measure so that the selected splint material fits from the fifth MCH to the axilla.
5) Apply the splint material beginning on the ulnar side at the palmar crease along the fifth metacarpal of the hand, along the ulna, posteriorly along the elbow up just distal to the axilla. Any excess material can be trimmed away or folded back on itself (Fig. 11-2, E).
Pay particular care to any material obstructing the axilla.
At the elbow, you may cut partway through the splint on both the volar and dorsal aspects, and then overlap the wings of the splint material on itself to allow for a better mold around the elbow (Fig. 11-2, F).
6) Pull the underlying stockinette and padding back over the splint at the distal and proximal ends, respectively. This will protect and pad the patient from the edge of the splint at those areas.
7) Wrap the elastic bandage over the wet splint to just secure it in place. Wrap distal toward proximal; use a figure-of-eight wrap to cover around the elbow.
8) The splint should be molded to maintain given reduction and with the wrist in a functional position unless otherwise indicated.
Upper extremity volar short arm splint: Figure 11-3, A
Figure 11-3. A, Upper extremity volar short arm splint. B, Apply stockinette. C, Create a protective sleeve of padding over the thumb with the stockinette and fold over on itself. D, Apply casting padding. E, Apply casting padding. F, Apply splint and trim to fit. G, Fold the ends of the stockinette back over the splint.
Application
1) With the patient’s wrist at neutral, fit the 2-inch stockinette in length from just beyond the fingertips up to the antecubital fossa. Cut a hole in the stockinette to adequately accommodate the thumb (Fig. 11-3, B).
If enclosing the fingers in the splint, place padding between each finger, respectively, to protect against skin maceration.
The 1-inch width stockinette may be used specifically for the thumb to create a protective sleeve of padding by folding suitable length over on itself three times (Fig. 11-3, C).
2) Begin wrapping the padding at the MCHs and proceed proximally with a 50% overlay. Continue wrapping up to the antecubital fossa (Figs. 11-3, D and 11-3, E).
If enclosing the fingers in the splint, alternatively begin wrapping the padding at the distal phalanges.
3) Measure so that the selected splint material fits in length from the MCHs to within about two to three fingerbreadths (about 2 inches) of the antecubital fossa.
4) Apply the splint material beginning on the volar side at the palmar crease of the hand, proximally toward the antecubital fossa. Any excess material can be trimmed away or folded back on itself (Fig. 11-3, F).
5) Pull the underlying stockinette and padding back over the splint at the distal and proximal ends, respectively. This will protect and pad the patient from the edge of the splint at those areas (Fig. 11-3,G).
6) Wrap the elastic bandage over the wet splint to secure it in place. Wrap distal toward proximal.
7) The splint should be molded as to counter the given injury or with the wrist at neutral unless otherwise indicated.
Upper extremity thumb spica splint: Figure 11-4, A
Figure 11-4. A, Upper extremity thumb spica splint. B, Apply stockinette. C, Create a protective sleeve of padding over the thumb with the stockinette and fold over on itself. D, Apply casting padding. E, Apply casting padding. F, Apply splint and trim to fit. G, Fold the ends of the stockinette back over the splint.
Application
1) With the patient’s wrist at neutral, fit the 2-inch stockinette in length from just beyond the fingertips up to the antecubital fossa. Cut a hole in the stockinette to adequately accommodate the thumb (Fig. 11-4, B).
The 1-inch width stockinette may be used specifically for the thumb to create a protective sleeve of padding by folding suitable length over on itself three times (Fig. 11-4, C):
• Interphalangeal joint (IP) free = If leaving the distal phalanx free, the collar should be just proximal to the distal interphalangeal joint (DIP).
• IP joint included = If enclosing the distal phalanx, the collar should approach the thumb tip.
2) Begin wrapping the padding at the MCHs and proceed proximally with a 50% overlay. Continue wrapping up to just distal to the antecubital fossa (Figs. 11-4, D and 11-4, E).
3) Measure so that the selected splint material fits in length from the MCHs to within about two to three fingerbreadths (about 2 inches) of the antecubital fossa.
4) Apply the splint material centered over the radial border of the thumb and forearm, beginning just proximal to the padded edge of stockinette (or cast/undercast padding) protecting the thumb proximally toward the antecubital fossa. Any excess material can be trimmed away or folded back on itself (Fig. 11-4, F).
Pay particular care to any material that would otherwise make the splint circumferential about the thumb.
5) Pull the underlying stockinette back just over the padding at the distal and proximal ends, respectively. This will protect and pad the patient from the edge of the cast at those areas (Fig. 11-4, G).
6) Wrap the elastic bandage over the wet splint to secure it in place. Wrap distal toward proximal.
Upper extremity ulnar gutter splint: Figure 11-5, A
Figure 11-5. A, Upper extremity ulnar gutter splint. B, Apply stockinette. C, Create a protective sleeve of padding over the thumb with the stockinette and fold over on itself. D, Cut a slit in the stockinette between the long and ring fingers. E, Place some cast padding between the fingers to prevent skin maceration. F, Apply cast padding starting around the wrist and fingers. G, Continue cast padding proximally. H, Apply splint and trim to fit.
Application
1) With the patient’s wrist at neutral, fit the 2-inch stockinette in length from about 1 inch beyond the fingertips up to the antecubital fossa. Cut a hole in the stockinette to adequately accommodate the thumb (Fig. 11-5, B).
The 1-inch width stockinette may be used specifically for the thumb to create a protective sleeve of padding by folding suitable length over on itself three times (Fig. 11-5, C).
2) At the distal end of the stockinette, cut a slit in the stockinette longitudinally toward the web space between the long and ring fingers (Fig. 11-5, D).
3) Trim or fold a few layers of cast/undercast padding to place between the length of the ring and small fingers to prevent skin maceration (Fig. 11-5, E).
4) Begin wrapping the padding just at the tips of the ring and small fingers and proceed proximally with a 50% overlay. Continue wrapping up to just distal to the antecubital fossa (Figs. 11-5, F and 11-5, G).
5) Measure so that the selected splint material fits from the tip of the ring finger to the antecubital fossa.
6) Apply the splint material beginning on the ulnar side of the small finger (distally equal to the ring ginger) forming a “gutter” along the fifth metacarpal and the ulna proceeding toward the antecubital fossa. Any excess material can be trimmed away or folded back on itself (Fig 11-5, H).
7) Pull the underlying stockinette and padding back over the splint at the distal and proximal ends, respectively. This will protect and pad the patient from the edge of the splint at those areas.
8) Wrap the elastic bandage over the wet splint to just secure it in place. Wrap distal toward proximal.
9) The splint should be molded at the fingers, hand, and wrist to maintain a given reduction or counter the given injury as indicated.
Lower extremity sugar tong (ankle-stirrup/u) splint: Figure 11-6, A
Figure 11-6. A, Lower extremity sugar tong (ankle stirrup/U) splint. B, Apply stockinette and create a fold over the anterior ankle. C, Apply cast padding. D, Apply splint and trim to fit. E, Center the splint on the lateral and medial sides of the leg and care not to overlap the proximal ends.
Application
1) With the patient’s ankle at neutral (ankle dorsiflexed to approximately 90 degrees), fit the 3-inch stockinette in length distally from the MTHs up to the patella and popliteal fossa.
2) At the ankle joint, cut a slit in the stockinette (malleolus to malleolus) and pull the proximal portion of the stockinette to overlap the distal portion (or vice versa) (Fig. 11-6, B).
3) Begin wrapping the padding just proximal to the MTHs and proceed proximally with a 50% overlay. Figure-of-eight wrap at the ankle/heel and apply ample padding around the bony prominences of the malleoli. Continue wrapping up to the tibial tuberosity (Fig. 11-6, C).
The 4-inch width padding works for wrapping the midfoot and ankle, whereas the 6-inch width is suitable for wrapping from the ankle up to the tibial tuberosity.
4) Measure so that the selected splint material fits as a “U” under the heel of the foot and up the ankle along the lateral and medial sides of the leg all the way to even with the level of the fibular head (Fig. 11-6, D).
5) Apply the splint material in the same manner used to measure above. Any excess material can be trimmed away or folded back on itself.
Pay particular care to any material obstructing the motion of the knee.
Center the splint on the lateral and medial sides of the leg and take care not to overlap the proximal ends (Fig. 11-6, E).
6) Pull the underlying stockinette and padding back over the splint at the distal and proximal ends, respectively. This will protect and pad the patient from the edge of the splint at those areas.
7) Wrap the elastic bandage over the wet splint to just secure it in place. Wrap distal toward proximal; use a figure-of-eight wrap to cover around the ankle and heel.
8) The splint should be molded with the ankle at neutral unless otherwise indicated.
Lower extremity posterior leg splint: Figure 11-7, A
Figure 11-7. A, Lower extremity posterior leg splint. B, Apply stockinette and create a fold over the anterior ankle. C, Apply cast padding. D, Apply cast padding with ankle in neutral. E, Apply splint and trim to fit. F,
[/not-level-membership-for-orthopaedics-category]
