[level-membership-for-surgery-category]Chapter 17
Splenectomy
Surgical Principles
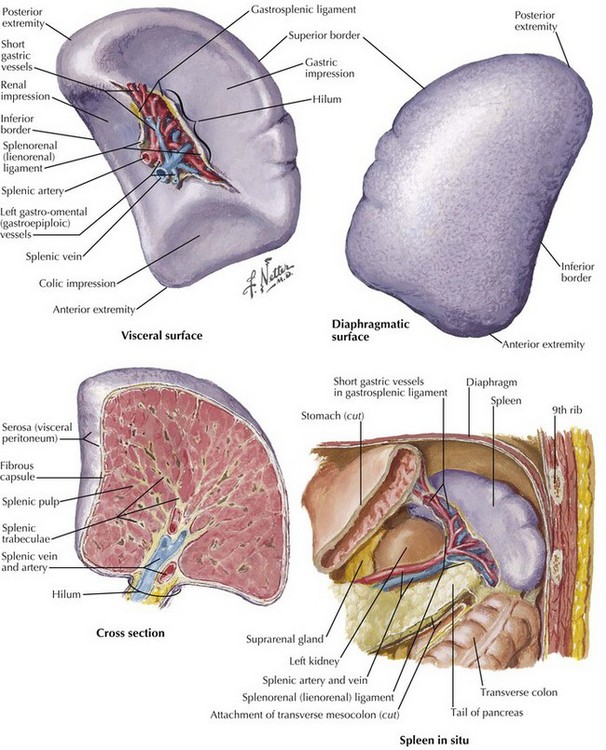
The key to safe splenectomy is understanding the anatomy surrounding the spleen (Fig. 17-1). The spleen must be safely mobilized from all the surrounding structures to prevent common perioperative complications related to the splenic anatomy, including gastric injury or leak during division of short gastric vessels; pancreatitis or pancreatic fistula from the pancreatic tail during mobilization of the splenic hilum; colon injury during division splenic flexure; left pleural effusion or left pulmonary atelectasis from excessive diaphragm manipulation; and bleeding from short gastric vessels, splenic artery, or splenic vein.
During the postoperative period, splenic vein thrombosis can lead to inferior mesenteric vein or portal vein thrombosis, with serious consequences (Fig. 17-2, A). The most serious long-term complication of splenectomy is sepsis, which can be decreased with preoperative immunization for the common encapsulated organisms, including meningococcal, pneumococcal, and Haemophilus influenzae type B infections, either 2 weeks before or on the last day of admission after surgery.
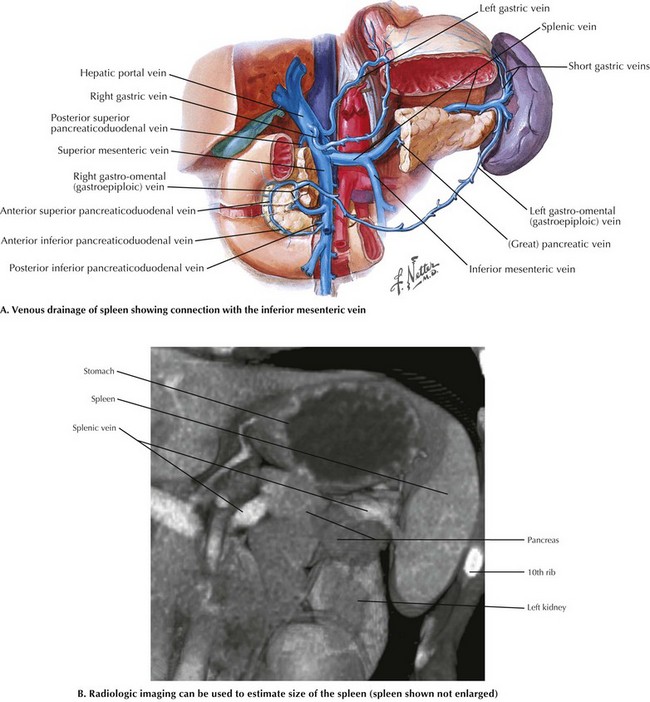
FIGURE 17–2 Venous anatomy and the resection bed in splenectomy. (B from Weber EC, Vilensky JA, Carmichael JW. Netter’s radiologic anatomy. Philadelphia: Elsevier; 2008.)
In the preoperative period, radiologic imaging can be obtained in patients with an enlarged spleen to assist in surgical planning (Fig. 17-2, B). The surgical approach to splenectomy often depends on the size of the spleen. Clinical data for elective splenectomies support a purely laparoscopic approach for spleens less than 20 cm in size and a hand-assisted or open approach for larger spleens.
Laparoscopic Surgical Technique
Initially and throughout each stage of the procedure, accessory spleens are searched for and removed if identified. Dissection is done with an ultrasonic energy source beginning at the lower pole of the spleen, mobilizing the splenic flexure by dividing the lienocolic ligament. The goal of the mobilization is to be able to place a vascular stapler safely across the hilum of the splenic structures, as shown in Figure 17-1. The gastrosplenic ligament and the short gastric vessels are divided. The posterior and lateral splenophrenic attachments are also divided. These are usually avascular unless the patient has portal hypertension.
Bulus, H, Mahmoud, H, Altun, H, et al. Outcomes of laparoscopic versus open splenectomy. J Korean Surg Soc. 2013;84(1):38–42.
Fraser, SA, Bergman, S, Garzon, J. Laparoscopic splenectomy: learning curve comparison between benign and malignant disease. Surg Innov. 2012;19(1):27–32.
Habermalz, B, Sauerland, S, Decker, G, et al. Laparoscopic splenectomy: the clinical practice guidelines of the European Association for Endoscopic Surgery (EAES). Surg Endosc. 2008;22(4):821–848.
Katkhouda, N, Manhas, S, Umbach, TW, Kaiser, AM. Laparoscopic splenectomy. J Laparoendosc Adv Surg Tech A. 2001;11(6):383–390.
[/level-membership-for-surgery-category][not-level-membership-for-surgery-category]Chapter 17
Splenectomy
Surgical Principles
The key to safe splenectomy is understanding the anatomy surrounding the spleen (Fig. 17-1). The spleen must be safely mobilized from all the surrounding structures to prevent common perioperative complications related to the splenic anatomy, including gastric injury or leak during division of short gastric vessels; pancreatitis or pancreatic fistula from the pancreatic tail during mobilization of the splenic hilum; colon injury during division splenic flexure; left pleural effusion or left pulmonary atelectasis from excessive diaphragm manipulation; and bleeding from short gastric vessels, splenic artery, or splenic vein.
During the postoperative period, splenic vein thrombosis can lead to inferior mesenteric vein or portal vein thrombosis, with serious consequences (Fig. 17-2, A). The most serious long-term complication of splenectomy is sepsis,
[/not-level-membership-for-surgery-category]
