CHAPTER 14 Sleeve Lobectomy
Right Middle Lobe Superior Segment – Video 14
Approach to Video-Assisted Sleeve Lobectomy of the Right Middle Lobe Superior Segment
 Video-Assisted Sleeve Lobectomy of the Right Middle Lobe Superior Segment
Step 1. Right Middle Lobe Vein
♦ The thoracoscope is aimed anteriorly with the 30-degree lens pointed posteriorly toward the hilum.
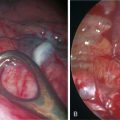
♦ Dissect between the inferior and superior pulmonary veins to define the inferior border of the RML vein and to determine whether there is drainage from the middle lobe to the inferior pulmonary vein (Figure 14-2).
♦ With the vascular endoscopic stapler introduced from the utility incision or the auscultatory incision, transect the RML vein.
Step 2. Middle Lobe Artery
Step 3. Minor Fissure
♦ Pull the middle lobe and upper lobe inferiorly to line up the minor fissure with incision 1 or incision 3.
♦ Pass the stapler (with a blue or green load cartridge) through either incision toward the lung. Carefully point the anvil of the stapler toward the space between the middle lobe and upper lobe veins. If the stapler is pointed more obliquely, it can tear into the lung parenchyma. Fire the stapler.
Step 4. Major Fissure between the Middle Lobe and the Lower Lobe
♦ Exposure: Retract the right lower lobe (RLL) posteriorly and slightly inferiorly, and retract the RML inferiorly and anteriorly to line up the major fissure with the stapler.
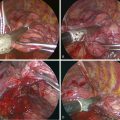
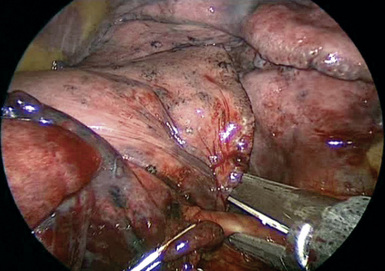
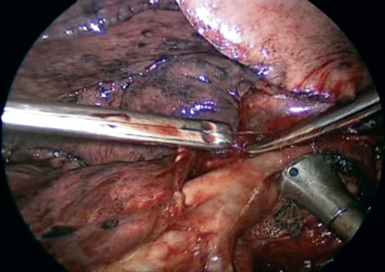
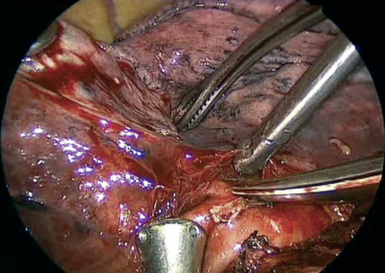
♦ For most patients who have a parenchymal bridge of tissue that extends for the entire length of the major fissure, pass the stapler through incision 1, and point it directly up the major fissure. The first firing of the stapler is safe because the device cannot reach the artery in the fissure (Figure 14-8).
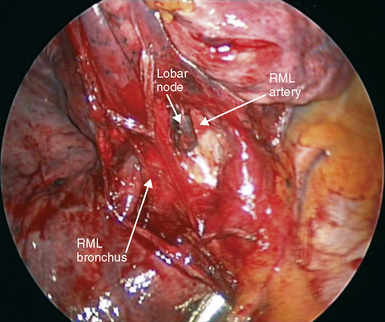
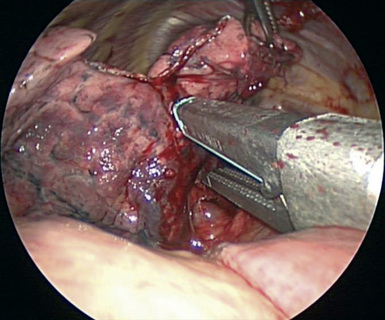
♦ Lift the parenchyma in the fissure with a ring forceps. The artery and the bronchus run parallel to each other (Figure 14-9). Remove the lobar node between the RLL and RML bronchus to better define the artery. Spread the Metzenbaum scissors on the surface of the artery to create a tunnel.
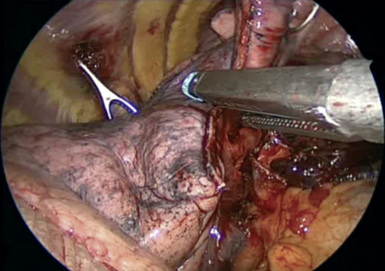
♦ Place the anvil of the stapler on the artery in the tunnel. Pull lung parenchyma into the stapler to complete the major fissure between the RML and the RLL (Figure 14-10).
♦ If the connection between the RML and the RLL in the major fissure does not extend to the inferior aspect of the major fissure, completion of this part of the fissure begins with lifting the parenchyma of the fissure to find the artery.
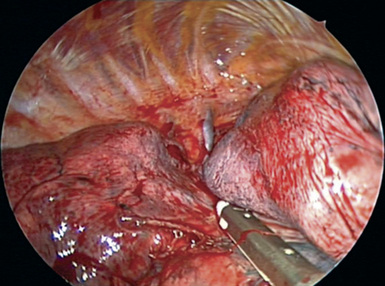
Figure 14-8 The stapler completes the fissure between the right middle lobe and the right lower lobe.

Step 5. Separating the Superior Segment from the Basilar Segments
♦ Exposure: Retract the RLL posteriorly and slightly inferiorly, and retract the RML inferiorly and slightly medially.
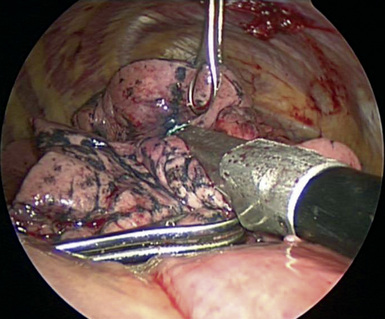
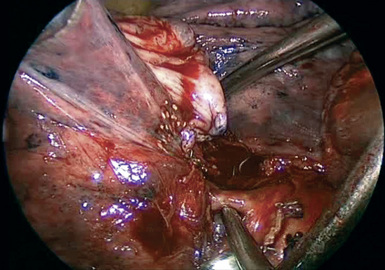
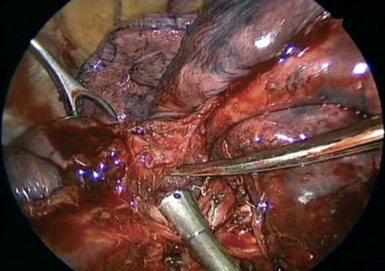
♦ The dissection along the artery to complete the major fissure between the RML and the RLL exposes the RLL artery and the superior segmental artery. That landmark separates the superior segment from the basilar segments. There is often at least a small suggestion of a fissure at the inferolateral border of the superior segment.
♦ Direct the anvil of the stapler between the inferior border of the superior segmental artery and the RLL artery, and align the staple cartridge with the superior segmental fissure (Figure 14-11). Pull the lung parenchyma into the stapler. It usually needs to be fired three or four times to separate the superior segment (Figure 14-12).

Step 6. Superior Segmental Artery
♦ With the superior segment separated, the superior segmental artery is seen, and the superior segmental bronchus is posterior to the bronchus.
Step 7. Completing the Major Fissure between the Superior Segment and the Posterior Segment of the Right Upper Lobe
♦ At this point in the operation, the superior segment and the middle lobe are attached, and they surround the artery. Transect the lung parenchyma as far from the tumor as possible.
♦ If the tumor is by the middle lobe bronchus and does not involve the major fissure, complete the entire major fissure by continuing to dissect along the surface of the artery to create a tunnel for the stapler.
♦ If the tumor is by the superior segmental bronchus and does come close to or involve the major fissure, transect the RML bronchus with a stapler.
♦ Complete the major fissure between the RLL superior segment and the right upper lobe (RUL) posterior segment (Figure 14-15). Complete the minor fissure to expose the artery in the fissure. With the Metzenbaum scissors, dissect transversely between the posterior ascending artery and the artery for the superior segment.
Step 8. Transecting the Intermediate Bronchus and the Bronchus for the Basilar Segments
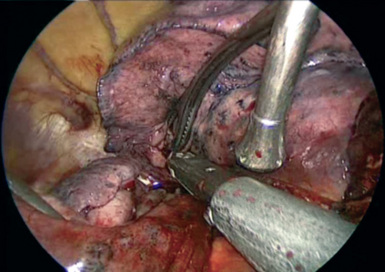
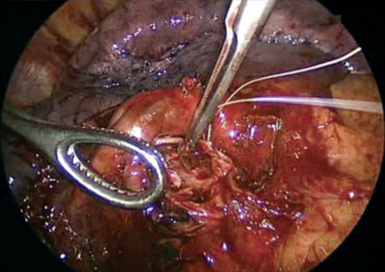
♦ The bronchus lies posterior and medial to the artery. With sharp and blunt dissection, separate the two structures (Figure 14-16).
♦ Retract the artery anteriorly to expose and transect the basilar segmental bronchus at the inferior margin of the superior segmental bronchus. With a scalpel, cut the mainstem and intermediate bronchi. It may be safer to cut the bronchi from anterior to posterior so that the cut is made away from the artery (Figure 14-17).
♦ Place a stay suture on the basilar segmental bronchus before it is completely transected, because it retracts into the lung tissue.

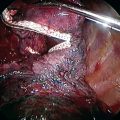
Step 9. Posterior Bronchial Anastomosis
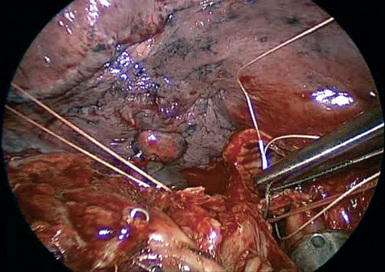
♦ Place a stay suture posteriorly on the intermediate bronchus to help approximate the intermediate and the mainstem bronchi (Figure 14-18).
♦ Take down the inferior pulmonary ligament to take tension off the anastomosis for a sleeve resection.
♦ Using a standard needle holder through the utility incision (4), place the interrupted sutures from posterior to anterior along the membranous portion on the bronchus (Figure 14-19).
♦ Tie the knots inside or outside the lumen. It is better to tie the knots as the sutures are placed, because placing the sutures first and tying the knots later requires keeping the sutures in order and preventing them from becoming crossed as the sutures are placed.
Step 10. Completion of the Bronchial Anastomosis
♦ Place the sutures for the remainder of the anastomosis, and tie the knots on the outside of the bronchial wall (Figure 14-20).
♦ Tie the knots extracorporeally, and push the knots with a finger through the utility incision. Rarely, a knot pusher is needed.
♦ Fill the chest with water (not saline), because the red blood cells explode in the water. That allows better visualization through the water to examine the anastomosis for possible bleeding or an air leak.