24 Simple practical procedures
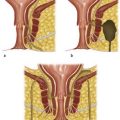
Urinary catheterisation (male)
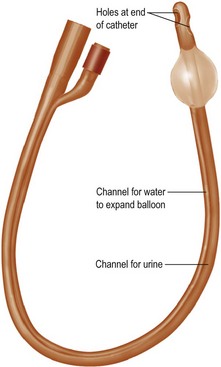
Urinary catheters are made of latex or silicone rubber. A Foley catheter is shown in Figure 24.1. Common sizes for adults are 12–14F and for children 8–10F. The smallest feasible size should be used. You will need:
Procedure
• Wash hands and put on gloves
• Arrange everything needed on a sterile tray
• Drape the sterile towels to expose the penis
• Grasp penis with left hand with sterile swab
• Retract the foreskin (if present) and clean glans and urethral opening
• Squeeze lidocaine gel into urethra
• Open catheter, place kidney dish beneath urethral orifice
• Insert catheter with right hand (holding penis with left)
• Peel off plastic wrapping as you go
• Pulling the penis up and then down (Fig. 24.2) will help to traverse the prostatic urethra
• Insert catheter fully to ensure the balloon is in the bladder
• Check capacity of balloon and after urine is seen inflate 5–10 mL
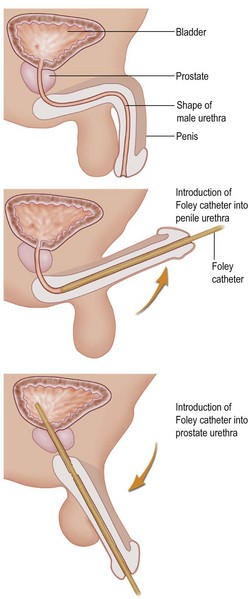
Further details of technique may be found in Henry and Thomson, Clinical Surgery, 2005, Chapter 11.
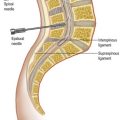
Central venous line insertion – internal jugular vein
Many patients needing a central venous line insertion are quite unwell and unable to tolerate lying flat. Get everything ready before you put them into this position. The bed must be at 15° head-down tilt at the point of insertion of the needle. There are two methods for the internal jugular vein – high and low. The high method is shown in Figure 24.3. This procedure can result in serious complications (pneumothorax, carotid artery damage, haematoma) and should be done by, or under supervision of, an experienced doctor. It is common to utilise ultrasound to aid placement, as recommended in NICE guidelines, 2002.

Procedure
• If the patient is conscious, infiltrate the skin and proposed route of insertion with local anaesthetic at the level of the thyroid cartilage lateral to the carotid artery
• Open the CVP pack and flush all parts with heparinised saline
• Check the guidewire and practise advancing this
• Flush the needle and syringe to be used for cannulation with heparinised saline
• Make a small incision at the entry site
• Insert the needle and when deep to skin aspirate as you advance until venous blood is seen in the syringe
• Detach syringe and insert wire and introducer into end of needle
• When wire is halfway inserted withdraw needle
• Dilate the track with dilator
• Remove dilator and insert central line over the wire, remove wire
• The tip should lie in the superior vena cava
Details of the procedure can be found in Chapter 11 of Henry and Thomson, Clinical Surgery, 2005.
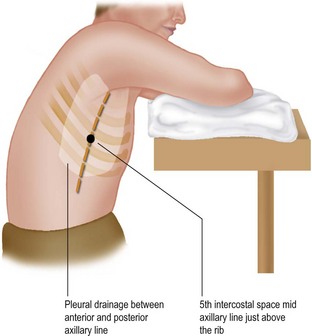
Insertion of a chest drain
• between a 22F and 32F chest drain without the trocar
• underwater seal apparatus and bottle
• small and large artery forceps
Procedure
• Position patient as shown in Figure 24.4
• Check physical signs, correct side and CXR
• Mark site of insertion (it is surprisingly easy to lose your bearings once the drapes are on). This will also ensure that you insert the drain at the same site you anaesthetised: the patient will appreciate this
• Anaesthetise skin and proposed track down to rib
• Make a 2–3 cm incision at marked site
• Bluntly dissect down to superior border of rib with artery forceps
• Continue to parietal pleura (more local anaesthetic may be needed)
• Puncture pleura, insert finger and sweep any adhesion within pleural space
• Guide drain down track with forceps and finger to pleural cavity
• Advance drain gently into cavity over your finger using Spencer Wells forceps to grasp the tip on the drain (DO NOT USE THE TROCAR THAT COMES WITH THE DRAIN), then attach underwater drainage apparatus
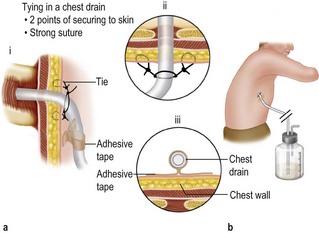
• Close incision and tie to chest drain (Fig. 24.5)
• Secure connection between drain and underwater drainage apparatus
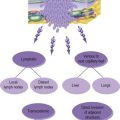
Venous access
Choosing the site
Common sites for cannulation in the body are shown in Figure 24.6. Avoid arteriovenous fistulas, poor venous or lymphatic drainage (see Box 24.1). Avoid the foot if possible. Types of venous cannula are shown in Table 24.1.

Box 24.1 Aids to location of a vein
Use a sphygmomanometer and inflate it to below diastolic pressure to allow arterial inflow but not venous escape of blood
Hang the patient’s arm over the edge of the bed or couch and tap (not slap) the back of the hand to cause venodilatation
Immerse the forearm in a bowl of warm water for 2 minutes and place the tourniquet before removing the hand from the bowl
| Size | Colour | Use |
|---|---|---|
| 22G | Blue | Children, small fragile veins |
| 20G | Pink | Low-flow intravenous infusions such as analgesia, sedation |
| 18G | Green | Intravenous fluids and drugs |
| 16G | Yellow | Blood transfusions |
| 14G | Grey | Rapid fluid administration – shock, major trauma and GI bleeding |
| 12G | Brown | Rapid fluid administration – shock, major trauma and GI bleeding |
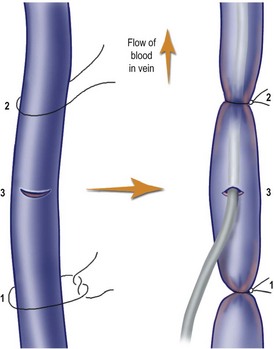
Venous cut-down
This method should only be used if it is not possible to obtain venous access elsewhere (Fig. 24.7).
• Prepare skin and drape (e.g. long saphenous vein)
• Infiltrate the area with lidocaine 0.5%
• Make a transverse incision (2.5 cm)
• Bluntly dissect vein from all other structures and free for 2 cm
• Ligate distal end of vein, sling proximal end
• Make a small transverse incision in vein
Blood gas sampling
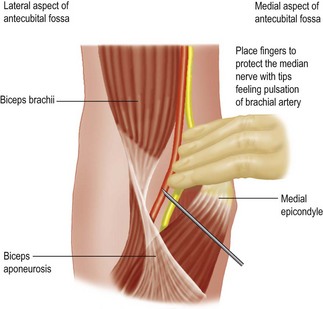
The vessels of choice are the radial, femoral and brachial in that order. The sites for puncture of the femoral and brachial arteries are shown in Figures 24.8 and 24.9. For radial artery cannulation always check the patency of the ulnar artery first (Allen test).

Procedure
• Draw up 0.5 mL heparin to lubricate whole syringe (prefilled syringes are commonly available)
• Hold syringe 60–90° to skin, advancing slowly with slight negative pressure
• If syringe fills spontaneously, artery has been entered
• If no filling, artery may have transfixed; withdraw slowly and you may get lucky!
• Obtain 2 mL and cap immediately
• Remove syringe and compress puncture site for 3 minutes (longer if patient anti-coagulated)
• Empty syringe of all bubbles and take immediately for analysis. (Place on ice if not immediately possible.)
Insertion of a nasogastric tube
Procedure
• Sit patient upright with chin on chest
• Lubricate tube (preferably cold) and insert into one nostril gently
• Aim backward towards the occiput and advance tube
• Ask patient to swallow when patient feels tube is at back of pharynx
• Give sips of water to aid the above
• If coughing or cyanosis develops, withdraw tube to hypopharynx
• After insertion, check tube is not coiled in back of mouth
• Auscultate below left costal margin and quickly inject air into tube – a loud borborygmus confirms position
• Test aspirate with litmus paper for acidity